
Lighting Equipment
- FirstStudio BackDrop Support Kit
- MultiDisc 32 inch
- QuikDisc®: 12 inch white balancing tool
- RockSteady Bag
- StarLite® OctoDome® nxt: extra small deluxe kit
A frequent assignment for a portrait photographer is the headshot, or head-and-shoulders shot, for a model or a businessperson's portfolio. This lesson illustrates a few tips about lighting for this particular situation with a compact main light setup and a reflector fill.
Topics Covered:
- The Background
- A Simple, Multi-Light Setup
- Finding The Flattering Light
- Increasing Contrast
- Adding A Hairlight
- A Switch To More Traditional Lighting
- The Dramatic Portrait Study
Recommended Reading:
- Portrait Photographer's Handbook
- 500 Poses for Photographing Women
- 500 Poses for Photographing Men
- Posing for Portrait Photography: A Head-to-Toe Guide for Digital Photographers
- Doug Box's Guide to Posing for Portrait Photographers
- Master Lighting Guide for Portrait Photographers
- Light It, Shoot It, Retouch It: Learn Step by Step How to Go from Empty Studio to Finished Image
The Background
Before our subject arrived for this photo shoot, we prepared the studio with the lighting we planned to use. We set up a simple grey background with the FirstStudio™ BackDrop Support Kit, pulling it slightly to one side to give the background some dimension with an angled drape effect. [figure 1]

Figure 1
Since our subject was a young man needing some headshots for his portfolio and a shot for the fitness club where he works, we wanted the lighting to be a little more dramatic.
A Simple, Multi-Light Setup
We set up two StarLites with 500-watt bulbs and the OctoDome® nxts. We wanted to use one for a hair light, so we experimented with the new LiteDisc Holder: Compact, setting it up as a mini-boom. We didn't fully extend the arm, as this would have created too much sag, or bend, in the Holder.
Our mini boom configuration required a counterbalance, so we used the RockSteady weight bag. With lighter weight setups like this, the LiteDisc® Holder works well as a mini boom for when you are on location and can't bring your heavy equipment.
The RockSteady weight bag is designed with double-zippered pouches so that it can hold sand, lead shot, or whatever you can find to give ballast. Here, we used small water bottles, which were quick and easy. [figure 2]

Figure 2
To keep the hair light from spilling onto the background where we didn't want it, we attached an accessory Grid to the OctoDome. [figure 3]
The next step was to set the white balance in the camera to match our 500-watt Starlite bulbs in the OctoDomes. We could have just set the camera to the Tungsten preset, but we wanted it to be more precise, so we opted for the Custom White Balance option.
To assist in this process, we used the QuikDisc, which folds up small enough to fit in one's pants pocket and pops open to a flat 12 inches in diameter. It's an 18% gray balance disc with a target in the center, so you don't have to take your camera off of Auto-focus when performing a custom White Balance. [figure 4]

Figure 3

Figure 4
Finding The Flattering Light
When our subject arrived, we started with one light. We wanted to know what main light position would best flatter our subject, so before we began shooting, we moved the light into a variety of positions to see which lighting angle worked best for our subject.
Since he had deep-set eyes, we wanted the light a little lower than what is used for most subjects to keep his eyes well illuminated. Since he had a well-sculpted face, we could get away with lighting him this way. With a rounder face, placing the light a little higher would render a better light for narrowing the face with more of a shadow at the cheekbone.
We also noticed that by placing the light on the right side, it gave the appearance of a straighter nose. If you look at the ridge of the nose, many people will appear to have a crooked nose when the light comes from one side, and the ridge line looks straight when illuminated from the other. In this case, our subject had a straight nose when the light came from the right and a crooked nose when it came from the left. So we chose the right side, with the light just high enough to still put a shadow under the chin, yet nicely fill the eyes.
When doing a facial analysis like this, try to concentrate on what flaws the lighting brings out. Tell your subject that you're looking for their "best light". Sometimes the lighting will exaggerate a scar or pimple, so some analysis before the shoot can pay off.
In our first setup, we aimed the light just a little in front of the subject to bounce the light off a 32" MultiDisc Kit. This Kit consists of a 32 inch MultiDisc, the new LiteDisc Holder: Compact, and a medium LiteStand. [figures 5-7]

Figure 5

Figure 6

Figure 7
Increasing Contrast
To get a darker background and put less light on the ear closest to the main light, we put a grid on our main light. This also caused less light to hit the reflector, giving the subject more contrast for a more dramatic look. [figures 8 and 9]

Figure 8

Figure 9
Adding A Hairlight
Next, we used the new LiteDisc Holder: Compact as a mini boom. By not fully extending it, we gave it added support. Then with our RockSteady weight bag, we counterbalanced it. The setup shot shows the first position we tried (not using the Grid) in order to also illuminate our background. [figure 10]

Figure 10
Our test shots had too bright of a background, so we attached a Grid to the OctoDome nxt that was on the mini boom. The result of that change is shown below. [figure 11]

Figure 11
A Switch To More Traditional Lighting
Next, we had a wardrobe change to give our subject a photo to use for his job at a local fitness center, which needed to be a more traditional head-and-shoulder shot.
We wanted a natural looking wrap-around light, so we decided to dramatically cut down the hair light. The glossy nature of his hairstyle created intense specular highlights when illuminated by the soft box on the boom. We liked the dramatic highlight for the portfolio shots, but wanted to soften the effect for his business portrait.
We put our fill light on the same side of the camera as the main light, to create the effect of a larger natural light source.
We positioned the gold side of a MultiDisc: 32-inch on the opposite side of our subject, raising it above and a little behind him, so the reflected light would gently rim his shoulder and hair. As you can see, the gold color looks nice on darker hair. For a more subtle effect, the soft gold would be a good choice. We used the LiteDisc Holder: compact to position the disc just right to bounce back light from the two OctoDomes. [figure 12 and 13]

Figure 12

Figure 13
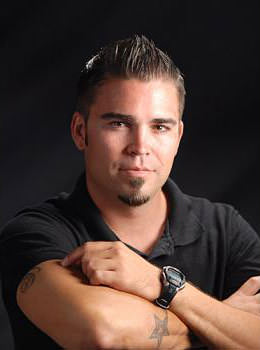
Here's our result. [figure 14]

Figure 14
From the headshot look, it's easy to move the camera away or zoom out for a seated portrait with no light adjustment. [figure 15]

Figure 15
The Dramatic Portrait Study
Next, we decided to do a more dramatic portrait study. We positioned the OctoDome nxt with a Grid above and behind our subject. Then we positioned the soft gold side of our MultiDisc on the opposite side, in front of our model, in order to bounce a little light back on our model, just enough to give separation from the background. [figures 16 and 17]

Figure 16

Figure 17
We further refined the shot by knocking down some of the intensity of the light on our subject's arms and hands. To accomplish this, we used a common technique in portraiture whereby you introduce an object between the light source and the subject to block some of the light from the area you want less illuminated. This device is often called a Gobo or Flag.
The QuikDisc is opaque and neutral in color, so it was the perfect choice for this application. We placed it fairly close to the light, so the fall off of light would be very gradual. (The closer to the subject you bring it, the more defined your introduced shadow will appear.) The LiteDisc Holder: Compact was the perfect tool for positioning it. [figures 18 and 19]

Figure 18

Figure 19
As you can see from these results, it's easy to modify the look of your shots with some basic lighting gear and a little know-how.
Remember to experiment with your lighting, and above all, have fun in the process!
Lighting Equipment
- FirstStudio BackDrop Support Kit
- MultiDisc 32 inch
- QuikDisc®: 12 inch white balancing tool
- RockSteady Bag
- StarLite® OctoDome® nxt: extra small deluxe kit
-
Also Read: 23 THINGS YOU MUST KNOW TO BE SUCCESSFUL IN PHOTOGRAPHY
Recommended Reading:
- 2013 Photographer's Market: The Most Trusted Guide to Selling Your Photography
- Best Business Practices for Photographers
- The Fast Track Photographer Business Plan: Build a Successful Photography Venture from the Ground Up
- Group Portrait Photography Handbook
- 500 Poses for Photographing Women
- The Best of Family Portrait Photography: Professional Techniques and Images
- 500 Poses for Photographing Group Portraits
- Selling Your Photography: How to Make Money in New and Traditional Markets
- Starting Your Career as a Freelance Photographer
- Photographer's Survival Manual: A Legal Guide for Artists in the Digital Age
- Legal Handbook for Photographers: The Rights and Liabilities of Making Images
- Taking Stock: Make money in microstock creating photos that sell
- Going Pro: How to Make the Leap from Aspiring to Professional Photographer