
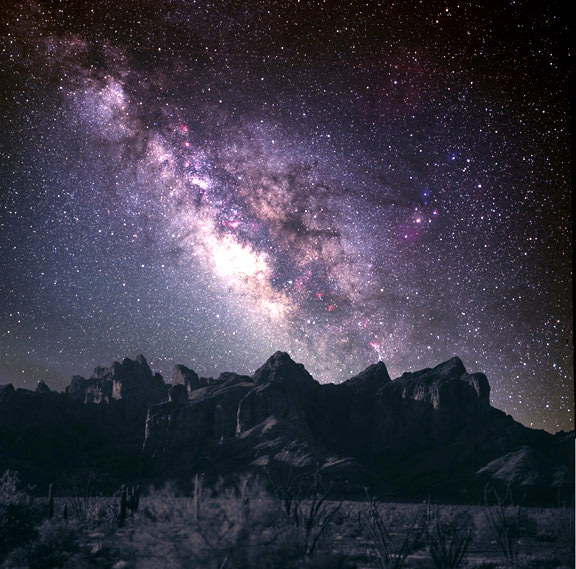
 Humans have always been fascinated by the night sky, so when photography was invented, and then evolved into digital photography, it’s no wonder cameras have been pointed skyward to record the cosmos. One of the most amazing and spectacular astronomical photos is a view of the Milky Way Galaxy, our home, from Earth. As any amateur stargazer knows, you must be at the right place at the right time to see the Milky Way. To photograph it requires even more knowledge and preparation, but the five tips in this two-part PhotographyTalk.com article will help you capture this band of stars in images that will fascinate your family members and friends.
Make It as Easy as Possible.
The most serious wide-field astrophotographers (those that shoot the Milky Way instead of single objects or small groups of objects) take pictures of the Milky Way with a rather complex system. It requires shooting multiple exposures of the sky, often with a tracking mount on a tripod, and then combining the images for the final composition. This is beyond the skill level of the average photographer and the money he or she is willing to spend for specialized equipment for what may be a one-time-only opportunity.
Recommended Cameras:
Nikon D500 | Nikon D3300 | Canon EOS Rebel T5 | Sony A7RII | Canon 7D Mark II
Fortunately, excellent images of the Milky Way are possible with just a single exposure, although a DSLR camera is required, and the best possible. If you do decide to tackle this digital photography challenge, then it may be just the kind of situation to rent a top DSLR, so you have the full array of features and capabilities. To optimize your results, you’ll need the DSLR and the following five components: accurate shutter speed; a fast, wide lens; the high end of the ISO range; manual focus; and no light pollution.
Accurate Shutter Speed.
Your goal with a Milky Way photo is to render the stars as sharp points of light without any motion blur. That requires a shutter speed of enough time to capture these points of light, but not too much time that would result in a loss of sharpness. The focal length of the lens you are using with your DSLR is a primary factor in selecting an accurate shutter speed for this kind of photo.
A Lens, Fast and Wide.
To determine the right shutter speed for a balance of light, you need a wide and fast lens, a 14–24mm f2.8 lens, for example. The wide angle reveals more of the Milky Way and the speed of the lens permits the longer shutter speed to capture sufficient starlight without trails. The short focal length also causes the points of starlight to be registered as smaller objects on the camera’s sensor, which also reduces any blur from a long exposure. The reverse is obviously true: Shoot the Milky Way with a lens of a longer, or even telephoto, focal length and the points of starlight will be bigger on the sensor, making any blurring much more noticeable. Even though 14mm is an excellent focal length, the maximum exposure time to avoid motion blur is approximately 30 seconds, which only further supports the need for a wide, fast lens.
Push the ISO Setting.
To complement a relatively fast shutter speed (30 seconds or less is considered fast for a long exposure) and a fast lens, the ISO must also be accurately set, so all the scant light entering the lens will help to register the image in as much detail as possible on the sensor. It’s true that for most standard types of digital photos you want to use a low ISO setting, but photographing the Milky Way is anything but a standard shot. Having an excellent range of ISO settings, including extremely high choices, is another reason an above average to top-of-the-line DSLR is needed. This is also a technique that may require some testing or trial-and-error because the higher the ISO the more detail of the sky you’ll record. Don’t hesitate to push the ISO beyond everything you’ve learned or experienced in the past. You’ll be surprised how far you must go before losing significant image quality.
Read Part 2 of this PhotographyTalk.com article for more tips about capturing the unbelievable beauty of the Milky Way.
Recommended Reading:
- How to Photograph the Moon and Planets with Your Digital Camera
- Night and Low-Light Photography Photo Workshop
- Night Photography: Finding your way in the dark
- The 100 Best Astrophotography Targets