
Photography Tip—Bring Your Eye Into Focus with the Diopter Adjustment
- Follow these steps to learn how to use the diopter adjustment on your camera.
- Place your camera on a solid surface or mount it on a tripod.
- Place a flat card or other item in front of the camera. The side toward the camera should be textured, so your camera’s auto-focus will work.
- Press your shutter release halfway to activate the auto-focus function.
- Keeping your camera perfectly still, move the diopter adjustment until your digital photo appears to be in focus, according to your eyesight.
- Once you’ve confirmed its sharpness, release the shutter fully.
- Photojojo!: Insanely Great Photo Projects and DIY Ideas
- The Complete Photo Manual: 300+ Skills and Tips for Making Great Pictures
- 50 Photo Projects - Ideas to Kickstart Your Photography
- 50 Fast Digital Camera Techniques
- Digital Camera Tricks and Special Effects 101: Creative Techniques for Shooting and Image Editing
- The Complete Photo Manual: 300+ Skills and Tips for Making Great Pictures
- BetterPhoto Basics: The Absolute Beginner's Guide to Taking Photos Like a Pro
 Many digital cameras include an auto-focus function, so the image imparted to the sensor is recorded in sharp focus. It’s a major feature of your camera that helps you take better digital photos. Occasionally, you’ll have a reason to focus your camera manually; and, if you must wear glasses, then it can be difficult to compose your digital photos, because your glasses hinder your eyesight when looking through the viewfinder.
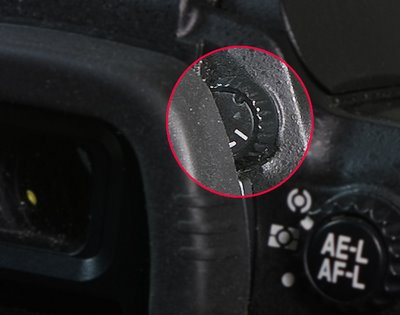
That’s when you want to use the diopter adjustment, which is found on most brands of DSLR cameras. Many of these PhotographyTalk.com articles recommend that you read your camera manual first, and refer to it often. If you have, then you should know where the diopter adjustment is located on your camera. For those of you who are behind on your manual reading, the diopter adjustment is typically to the right of the eyepiece.
Recommended Cameras:
Nikon D500 | Nikon D3300 | Canon EOS Rebel T5 | Sony A7RII | Canon 7D Mark II
Think of one of the pieces of equipment your eye doctor uses to examine your eyes. It looks like a huge pair of glasses. It has a series of concave and convex lenses that the doctor can adjust to various combinations to test you for nearsightedness or farsightedness. The diopter adjustment does much the same: it adjusts the focus of what you see to accommodate for your less than 20/20 vision, or if you’re wearing glasses. Look for a small scale on the diopter adjustment, with 0 representing approximately 20/20 vision, and then settings between –3 and +3. The diopter adjustment doesn’t influence the function of the auto-focus, as the two features are independent of each other.
Not only does the diopter adjustment help you take sharper digital photos, but also it helps you to feel less vain about your less-than-perfect eyesight!
Recommended Reading: