
If you have recently bought a DSLR or mirrorless camera, or are thinking of doing so in the near future, you are probably interested in doing more than just pointing and shooting with it on Automatic mode. You want to learn how to use it properly, right?
Knowing what aperture, shutter speed and ISO are and what they do is a good start, but understanding how they work together is the key to you becoming a better photographer.
I know this often sounds daunting to a beginner. It certainly did to me, until I was taught how simple it is. Trust me. You just need to use the right settings.
For me, ‘the right settings’ means Aperture (A or Av) mode and a manually set ISO. Aperture mode is a semi-automatic setting where you change the size of the hole in the lens diaphragm, i.e. the aperture, and the camera changes the shutter speed to suit.
Let’s have a look.
Aperture
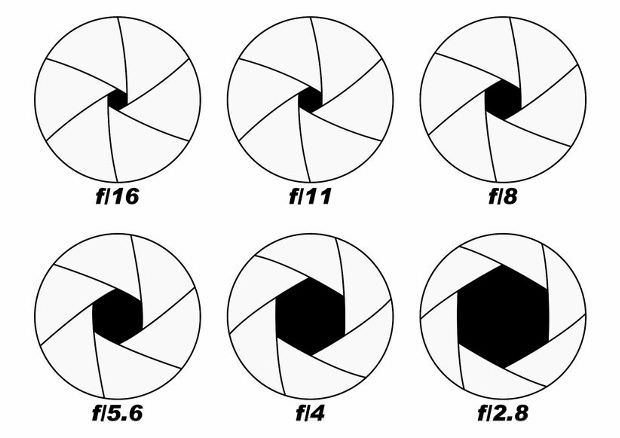
Aperture controls how much light is allowed through the lens by increasing and decreasing the size of the hole in the lens diaphragm, with the lower values denoting a bigger opening. Lower aperture values also give shallower depths of field.
The range of full f-stops (your lens will probably have half or third stops too) on a common zoom lens goes from wide open to closed down in this sequence:
(f3.5) f4 – f5.6 – f8 – f11 – f16 – f22 – f32
If this list of full f-stops seems like a randomly increasing set of figures, try looking at every other one and seeing how they alternately double as they increase.

Shutter Speed
Shutter speed determines how long the lens curtain is open for, varying the amount of time the light has to enter the lens.
The range of shutter speeds a lens is capable of shooting at might look something like this:
30” (seconds) – 15” – 8” – 4” – 2” – 1” – 1/2 (of a second) – 1/4 – 1/8 – 1/15 – 1/30 – 1/60 – 1/125 – 1/250 – 1/500 – 1/1000 – 1/2000 – 1/4000 – 1/8000
Most people can comfortably take a sharp photograph at 1/60.
Again, notice how the values halve/double as the speed increases.
ISO
ISO controls the camera sensor’s sensitivity to light. A lower value (like ISO 100) means more light is needed to take a well exposed shot. On a sunny day in the park, use ISO 100. On cloudy days, indoors, or at night, you will need to choose a higher ISO. Using higher ISO values mean lower image quality, which is why we set our ISO to the lowest value possible that still allows us to achieve the desired shutter speed. Only if you can’t reach the shutter speed you want should you raise the ISO value.
A typical range of ISO values available on a camera might look like this:
ISO 100 – 200 – 400 – 800 – 1600 – 3200 – 6400 – 12800
Notice how once again the values double as they increase.
How to Use the Settings
A quick recap of the important points:
-
Set your camera to A or Av mode
-
The ISO should be set to the lowest value possible that still allows you to reach the desired shutter speed
-
All values rise and fall by doubling or halving
Although we have the three values, I want you to mentally separate ISO from aperture and shutter speed. Imagine ISO acting alone, with aperture and shutter speed working together.
ISO is the foundation setting and doesn’t change from shot to shot. If the light doesn’t change, neither do you change the ISO value. If you are shooting in bright sunshine all day, the ISO can be left at 100 all day. The reason we set ISO manually is so we know that it won’t change unless we change it. It has to remain constant for us to have full control over aperture and shutter speed. Here’s another important statement:
At a given ISO value, your camera sensor always needs the same amount of light to get a well exposed shot.
Aperture and shutter speed are variable from shot to shot, and work together to ensure your sensor is getting the right amount of light for the ISO you have set.
Remember, with a fixed ISO value, as you open or close the aperture on A or Av mode, your camera will change the shutter speed to suit. Closing the aperture means less light coming in, which in turn means the lens being kept open for longer to maintain a good exposure.
In real terms, outside on a sunny day, our settings might look like this:
ISO 100
Aperture f8
Shutter speed 1/250 (of a second)
(Success Tip:The easiest way to learn photography when you have little time to spare)
The size of the hole in our diaphragm at f8 may mean a shutter speed of 1/250 gives us a well exposed shot. So if we were to close our aperture by one f-stop and make the hole smaller, the shutter speed will increase to allow the light longer to enter the smaller hole and into the lens. Our new values would look like this:
ISO 100
Aperture f11
Shutter speed 1/125 (of a second)
Using This in the Real World (not the studio)
Remember how, in our lists of f-stop, shutter speed and ISO values, everything increased or decreased by doubling or halving? Look again to our example of a camera setting above. As we closed our aperture one stop, from f8 to f11, our speed doubled to compensate. This is a rule of photography. As one value increases by one stop, the other moves one stop to compensate. Open up the aperture and the shutter speed will increase accordingly, by the same number of stops. It’s predictable, and it works.
The aperture and shutter speed values you need depend on the picture you are taking and in what light. With the appropriate ISO and a little practice though, you can easily control both of them for all your photos without leaving Aperture mode.