Day 18 Lesson: Use Shallow Depth of Field
Using shallow depth of field is a great way to help draw the viewer’s eye to the primary subject of your photograph. While your subject will remain in sharp focus, the background will be blurred, and oftentimes results in a soft, beautiful backgrounds, and sometimes even nice bokeh effects.
Your challenge today is to snap images using a shallow depth of field. Let’s learn just how to do that!
Open the Aperture
Cbuckley at the English language Wikipedia [GFDL (http://www.gnu.org/copyleft/fdl.html) or CC-BY-SA-3.0 (http://creativecommons.org/licenses/by-sa/3.0/)], via Wikimedia Commons
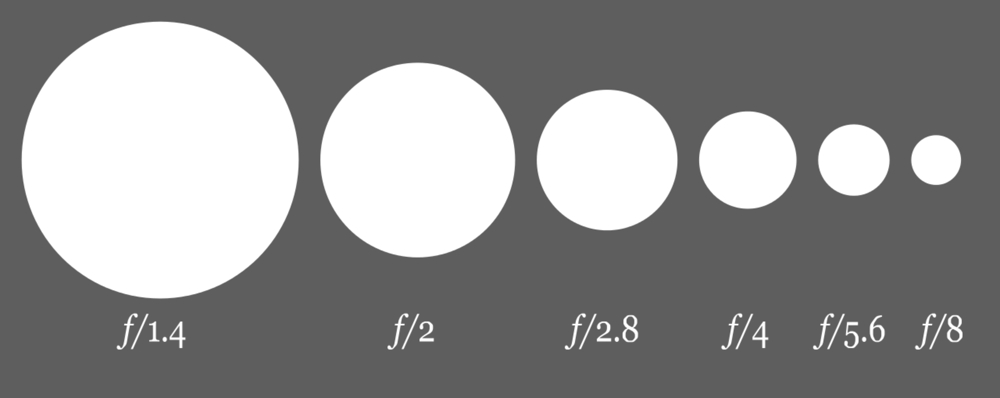
Shallow depth of field is achieved by opening up your camera’s aperture. Remember that the aperture number is inversely related to its size – the smaller the number, the larger the aperture.
Not all lenses are created equal in this department. Kit lenses usually only open up to about f/5.6, while some higher end lenses go to f/1.4. Although the difference between these numbers may not seem like a lot, the difference in the amount of light that’s allowed in is quite significant. So, whatever your lens’ maximum aperture is, try opening it to that point to ensure you’ve got the shallowest depth of field possible.
Give the Background Some Space

When taking shots outdoors, an easy way to help get a soft background is to put some distance between your subject and the background, as was done in the example image above. Maintaining some distance from the background will allow you to narrow the aperture if need be, such as if there is a lot of sunlight that would cause the image to be overexposed at the maximum aperture. As you can see, the result is a nice, soft background that keeps the focus on the man’s face.
Select Your Focus Point Carefully

With such a shallow depth of field, you will need to be mindful of where your focus point will be. If there are multiple people in the frame, for example, only one of them will be in sharp focus, as seen in the image above. Notice how narrow the range of focus is in this shot – both the foreground and the background are blurred. In this image, a good focal point would be on the bridge of the woman’s nose, which would ensure that her entire face is in focus.
To get the focus right, try using a single point AF. All camera models are slightly different in terms of how to do this, so if you aren’t sure, check your camera owner’s manual for instructions on how to manually select the focus point. Doing so will help you get the person or object you want to highlight in sharp focus, which can otherwise be difficult to do when there is such a shallow depth of field.
Try Creative Use of Depth of Field

With your aperture wide open, you have a world of possibilities for interesting shallow depth of field shots. You can bring attention to a specific part of the body, for example, as was done in the image above. Notice how the depth is so shallow that only the woman’s thumb is in sharp focus.

You can also use shallow depth of field to highlight objects, like the tennis ball and racket in the image above. This image is a great example of how the focal plane can be expanded. Note that the ball and the middle part of the tennis racket are both in focus, while the tip of the racket and everything in the background are blurred. If you’ve got several objects (or people) you want in focus, make sure they fall within the focal plane. If you find the focal plane is to narrow, simply reduce your aperture to expand the depth of field, remembering that you may need to make adjustments to shutter speed to maintain good exposure.
Practice and Participate!
Now that you’re armed with some ideas for using shallow depth of field, get out there and practice! Remember that putting some distance between your subject and the background will help get those soft, dreamy backdrops that look so good behind a subject that’s in sharp focus. Selecting your AF point will also help ensure that what you want in focus will be in focus. Also try your hand at some creative compositions, using the narrow focal plane to highlight specific objects or areas of the scene.
Once you’ve got your images processed, select your best work and upload it to the forum for today’s challenge. Let others see the hard work you’ve done, and be sure to check out how other Photography Talk members tackled the challenge!