Aurora HDR 2019 Review

Aurora HDR
In Aurora HDR 2019, Skylum has set out to give photographers a powerful, yet easy-to-use program for creating vivid, eye-catching, and dynamic images.
Past versions of Aurora HDR were met with wide acclaim and won many industry awards. In fact, Apple selected Aurora HDR 2018 as the Best Mac App of 2017.
The question is, does this version live up to its predecessors?
In this Aurora HDR 2019 review, take a tour of some of its new tools and best features to see if Skylum has indeed improved upon an already excellent product.
Aurora HDR 2019 is Still a Master With Bracketed Exposures

One thing that past versions of Aurora HDR were known for is that they were a rockstar when it came to merging bracketed exposures.
The latest version of the software only builds on that reputation.
New for Aurora HDR 2019 is tone-mapping technology for both bracketed and single images.
Using a Quantum HDR EngineTM, and AI-powered tone mapping technology, Aurora HDR 2019 meticulously analyzes your photos and merges them intelligently.

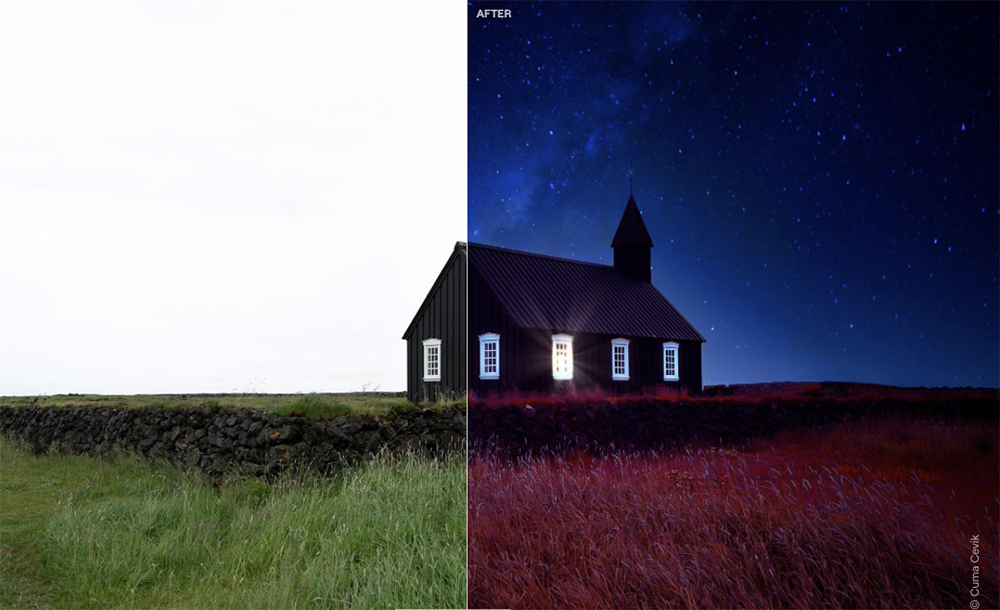
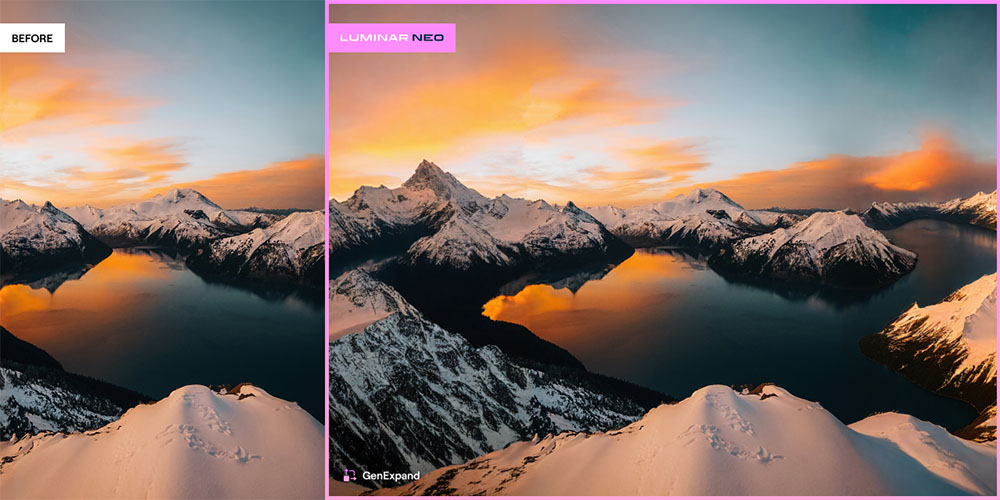
 Before and after images by Iurie Belegurschi
The results, as you can see in the before and after comparison above, are breathtaking. The Quantum HDR EngineTM has improved the saturation of the colors in the image, opened up the dark areas of the shot, and controlled for noise.
On the tone-mapping front, detail has been brought out in the shadowed areas of the photo while details have been automatically recovered in the highlighted areas.
That’s a significant change because in the past tone-mapping was done manually, so it was hugely time-consuming.
Now, though, Aurora HDR 2019 makes the process fast, simple, and highly effective.
Aurora HDR 2019 Artificial Intelligence
AI plays a very important role in Aurora HDR. It powers the aforementioned Quantum HDR engine and makes getting gorgeous HDR images a quick and easy process.
But don’t think that because it’s “quick and easy” that the results are somehow less than ideal.

Thanks to the advanced nature of Aurora HDR’s artificial intelligence, the images you create will have no halos, no chromatic aberration, and no artifacts.

In fact, as Trey notes in his video, the results you get with a single RAW file are so similar to those you get with bracketed exposures that it’s hard to tell which is which when all is said and done.
In other words, you get outstanding results in less time - the before and after photos above are proof positive of that!
Aurora HDR 2019 Looks

No one wants to spend hours and hours editing photos. But you don’t need hours and hours if you use Aurora HDR 2019.
There are more than 80 different presets (called Looks) that enhance the original RAW file and take it from so-so to spectacular in a matter of seconds. You can see above how these Looks are organized and easy to access for fast edits.
There’s landscape Looks, architecture Looks, and dramatic Looks, which result in a creative, stylized photo instantaneously with one click of a button.

There are even Signature Pro Looks made just for Aurora HDR 2019 by some of the world’s best photographers, including Trey Ratcliff, Serge Ramelli, and Randy Van Duinen.
As you can see above, each Look has a small preview so you can see how it will affect your image before selecting it. Each one is made up of all the adjustments applied for each filter, including LUTs, Blending Mode, Masks, and Opacity changes.
Again, the point here is that this software takes the guesswork out of crafting gorgeous HDR photos by giving you incredibly powerful tools that are simple to use, but have profound, positive effects on how your HDR photos look.
 Photo by Iurie Belegurschi
Quick Tip: Aurora HDR 2019 offers special Adjustment Layers that allow you to add new Filters or Looks to an existing edit. Build the perfect edit using multiple layers, which you can control precisely by masking certain layers.
To do so, just add an adjustment layer, select the desired Filter or Look, and paint the areas you want to be affected by the Filter or Look.
Aurora HDR 2019 Tools

As noted above, Aurora HDR’s AI is super powerful and helps you create gorgeous HDR photos.
But things aren’t left totally up to AI - you have the final say over how your photo looks thanks to a variety of tools that make fine adjustments a breeze.
That includes a host of filters like HDR Denoise, which automatically recognizes noise in the shot and eliminates it, leaving beautiful details behind.

You can also use the HDR Smart Structure tool to enhance the depth and detail of the image.
HDR Smart Structure does this by giving you precise control over details, structure, and sharpness in your photos, all without creating excess artifacts that can make the image look overprocessed.
Specifically, this filter helps reveal the structure and texture of surfaces in the shot that adds an extra layer of realism to the image. This is especially handy when shooting real estate.
As you can see above, the interior shot by Randy Van Duinen benefits from a moderate level of HDR Smart Structure (the slider is set to 48 out of 100).
Another filter Randy used in the photo above is HDR Clarity, which gives you the power to boost the clarity in the image only where it’s needed. That means that you don’t have to retouch the whole photo, and can simply add localized contrast.

In addition to the HDR Clarity tool, Aurora HDR 2019 has a handy HDR Details Boost adjustment that allows you to increase sharpness without increasing noise or introducing ghosting or halos.
The result is a clearer, sharper photo (or, conversely, you can create a softer photo if you like) by simply adjusting a set of sliders.
As shown above, the HDR Details Boost filter gives you independent control over small, medium and large details. There’s also sliders that enable you to mask certain areas or protect other areas for the cleanest, detail-rich images possible.

I’d be remiss if I didn’t mention the new LUT Mapping filter as well.
This filter is used to add creative color toning to an image, including black and white conversions and digital film looks, in a matter of seconds.
Also new is a LUT mapping integration with instant preview, that way you can have a peek at what the image looks like as you make changes to it. It makes styling your photos a quicker process, especially since you can use any one of eleven LUTs that are pre-loaded in Aurora HDR 2019.
Better still, you can import your own LUTs or download LUTs right from the Skylum website.

Though not a new feature, the Adjustable Gradient tool in Aurora HDR 2019 has been improved to give you fine control in the upper and lower areas of your photos.
Adding a gradient in this manner simulates using a graduated neutral density filter, that way you can control for bright skies and darker landscapes.
As shown above, there are separate adjustments for highlights, shadows, contrast, vibrance, and exposure so you can perfect the look you’re going for and get a more even exposure throughout the image.
Best of all, Aurora HDR 2019 lets you do this without having to create layers or masks - just position the transition point in the image, select how gradual the transition of the gradient is, and align it just so in your photo for a beautiful final result.
Aurora HDR 2019 Gives You Flexibility

Something else that’s impressed me about Aurora HDR 2019 is that it can be used as a standalone program or as a plug-in.
That means that you can purchase the program (currently $99.00) and make it your primary editing tool for HDR photos, or you can add it to Photoshop, Lightroom, or Apple Photos as an integrated component of your existing workflow.
Either way, as Serge Ramelli discusses in his walkthrough of Aurora HDR 2019, you can take advantage of features like batch processing, layers, masking, LUT mapping, and RAW support (among many others) to enhance your photos to your heart’s content.
That makes Aurora HDR 2019 ideal for photographers of all kinds, from those at the start of their photographic journey to those that have been at it for years.