

There’s something primal and captivating about watching a storm roll across the landscape. The towering clouds, crackling lightning, and dramatic interplay of light and shadow create some of nature’s most spectacular displays. For landscape photographers, storm photography represents the ultimate challenge—capturing the raw power and fleeting beauty while respecting the forces that could easily overwhelm both the photographer and equipment.
Storm photography isn’t just about pointing your camera at dark clouds and hoping for the best. It requires careful planning, proper equipment, advanced techniques, and above all, an unwavering commitment to safety. The rewards, however, are immense. A single successful storm photography session can yield images that showcase nature’s incredible drama in ways that few other subjects can match.
This comprehensive guide will walk you through everything you need to know to begin your storm photography journey safely and successfully. From essential safety protocols to camera techniques, equipment recommendations to post-processing tips, you’ll discover how to capture nature’s most dramatic moments while keeping yourself and your gear protected. Remember, the most important aspect of storm photography isn’t the perfect shot—it’s returning home safely with your images and stories to share.
Table of Contents
Safety First: Essential Storm Photography Precautions

Photo by Liza Kras via Shutterstock
Before discussing cameras and techniques, we must address the elephant in the room: storm photography can be dangerous. Lightning strikes, flash floods, high winds, and rapidly changing conditions pose real threats that no photograph is worth risking your life over. Understanding and respecting these dangers is the foundation of successful storm photography.
Proper preparation begins long before you step outside. Weather monitoring is crucial—use apps like RadarScope, Weather Underground, or the National Weather Service radar to track storm movement, intensity, and timing. Study storm patterns in your area and identify safe shooting locations with multiple escape routes. Always inform someone of your plans, including your intended locations and expected return time.
When you’re in the field, maintain safe distances from active lightning. The general rule is if you can hear thunder, you’re close enough to be struck. Your vehicle serves as an excellent mobile shelter—modern cars with metal frames act as Faraday cages, protecting occupants from lightning strikes. However, avoid parking under power lines, near large trees, or in flood-prone areas.
Safety Rule: If conditions become unsafe, abandon the shoot immediately. No photograph is worth risking your life. Trust your instincts—if something feels dangerous, it probably is.
Storm Photography Equipment Essentials

Photo by Alexander Jung via Shutterstock
Successful storm photography doesn’t require the most expensive gear, but it does demand reliable equipment that can withstand challenging conditions. Your camera choice—whether DSLR or mirrorless—matters less than having weather sealing and good low-light performance. Full-frame cameras typically excel in storm photography due to their superior high-ISO capabilities, but crop sensors can produce excellent results too.
Lens selection significantly impacts your storm photography results. Wide-angle lenses (14-35mm) capture expansive sky drama and provide environmental context, while telephoto lenses (70-200mm) allow you to photograph distant storms from safer positions. A sturdy tripod is absolutely essential—winds during storms can easily topple lightweight supports, potentially damaging your equipment.

Photo by Byz via Shutterstock
Consider buying used gear to maximize your storm photography budget, too. Platforms like MPB offer an excellent selection of pre-owned camera equipment, with each item professionally inspected and graded so you know exactly what to expect. Their six-month warranty on most items and seven-day return policy provide peace of mind, while their constantly changing inventory means you can find virtually any camera and lens for storm photography at significant savings compared to buying new.
Weather protection accessories are non-negotiable for storm photography as well. Rain covers, lens hoods, microfiber cloths, and extra batteries (cold weather drains power quickly) should always be in your kit. A headlamp with red filter preserves night vision while allowing you to adjust settings, and a remote shutter release or intervalometer enables hands-free operation during long exposures.
Camera Settings and Techniques for Storm Photography

Photo by TempleNick via Shutterstock
Manual mode provides the consistency essential for storm photography, where lighting conditions change rapidly and unpredictably. Start with ISO settings between 100-800, depending on available light and your camera’s noise performance. Lower ISOs produce cleaner images but require longer exposures, while higher ISOs allow faster shutter speeds but introduce more noise.
Aperture selection for storm photography typically falls between f/8-f/11, providing optimal lens sharpness while maintaining sufficient depth of field for both foreground and sky elements. This sweet spot also allows reasonable shutter speeds without pushing ISO too high. Shutter speed varies dramatically based on your subject—use fast speeds (1/125s or faster) to freeze lightning branches, or longer exposures (30 seconds or more) to capture multiple lightning strikes in a single frame.

Photo by Lukas Jonaitis via Shutterstock
Lightning photography presents unique technical challenges. For nighttime lightning, use long exposures with your camera on a tripod, allowing multiple strikes to accumulate in one frame. Daytime lightning requires different approaches—either extremely fast reflexes with shorter exposures or specialized lightning triggers. Focus manually on a distant object, as autofocus struggles in low-light storm conditions.
Composition in storm photography follows traditional landscape rules but with dramatic flair. Position horizons according to the rule of thirds, but don’t hesitate to break this rule when massive storm systems dominate the frame. Include foreground elements like trees, buildings, or roads to provide scale and context for the storm’s immense size. Leading lines from roads or shorelines draw viewers into the dramatic scene.
Types of Storm Photography Opportunities

Photo by Pictureguy via Shutterstock
Approaching storms offer some of the most photographically rewarding opportunities in storm photography. The advancing wall of clouds, dramatic lighting contrasts, and sense of impending power create compelling images. Shelf clouds, mammatus clouds, and supercell structures provide unique photographic subjects that showcase nature’s incredible atmospheric architecture.
Active lightning photography represents the holy grail of storm photography for many enthusiasts. Nighttime lightning photography is generally easier, as long exposures can capture multiple strikes against dark skies. Daytime lightning requires more advanced techniques, including lightning triggers or incredible timing. The key is patience—lightning rarely strikes exactly where and when you expect.
Don’t overlook storm aftermath opportunities in your storm photography planning. As storms dissipate, dramatic clearing skies, sunbeams piercing clouds, and rainbow formations provide spectacular photographic subjects. These moments often produce the most colorful and emotionally impactful storm photographs, as the contrast between storm drama and emerging calm creates powerful visual narratives.

Photo by JORGE CORCUERA via Shutterstock
Seasonal considerations greatly influence storm photography opportunities. Summer thunderstorms provide classic lightning and dramatic cloud formations, while winter storms offer different but equally compelling subjects like snow squalls and ice formations. Coastal areas present unique storm photography challenges and opportunities, from hurricane preparations to dramatic sea conditions.
Post-Processing Your Storm Photography

Storm photography often pushes the limits of camera dynamic range, making post-processing crucial for realizing your creative vision. Start with basic adjustments—recover blown highlights in bright lightning or sunlit cloud edges, and lift shadows to reveal foreground details without making images look unnatural. The goal is enhancing the drama that was already present, not creating it artificially.
Contrast enhancement can significantly improve storm photography impact, but restraint is key. Increase overall contrast gradually, using graduated filters to balance bright skies with darker foregrounds. Vibrance adjustments often work better than saturation increases, as they protect skin tones and prevent color oversaturation in already dramatic scenes.
Advanced techniques like HDR (High Dynamic Range) processing can help manage extreme lighting conditions common in storm photography. However, avoid the over-processed HDR look that can make storm images appear unnatural. Focus stacking may be necessary when using wide apertures for faster shutter speeds, ensuring both foreground and background elements remain sharp. Get insights into color recovery in dark storm photos in the video above by Christian Möhrle – The Phlog Photography.
Maintain realism in your storm photography post-processing. While creative interpretation has its place, storm photographs should represent the incredible natural drama you witnessed. Viewers should feel the power and beauty of the storm, not be distracted by obvious digital manipulation. The goal is showcasing nature’s inherent drama, not creating artificial spectacle.
Location Planning and Storm Timing

Photo by LensFocusArt via Shutterstock
Successful storm photography requires more than just showing up when storms arrive. Research potential locations during calm weather, identifying safe shooting positions with unobstructed views and multiple escape routes. Consider foreground elements that could enhance your compositions—isolated trees, interesting buildings, or water features that reflect lightning.
Understanding local weather patterns dramatically improves your storm photography success rate. Learn when your area typically experiences storms—afternoon thunderstorms in summer, winter storm systems, or seasonal severe weather periods. Study topographic maps to understand how terrain affects storm movement and intensity in your region.
Timing is everything in storm photography. The “golden hour” before sunset often produces the most dramatic storm lighting, as warm sunlight contrasts with dark storm clouds. However, don’t limit yourself to these obvious times—storms at any hour can produce spectacular results with proper technique and preparation.
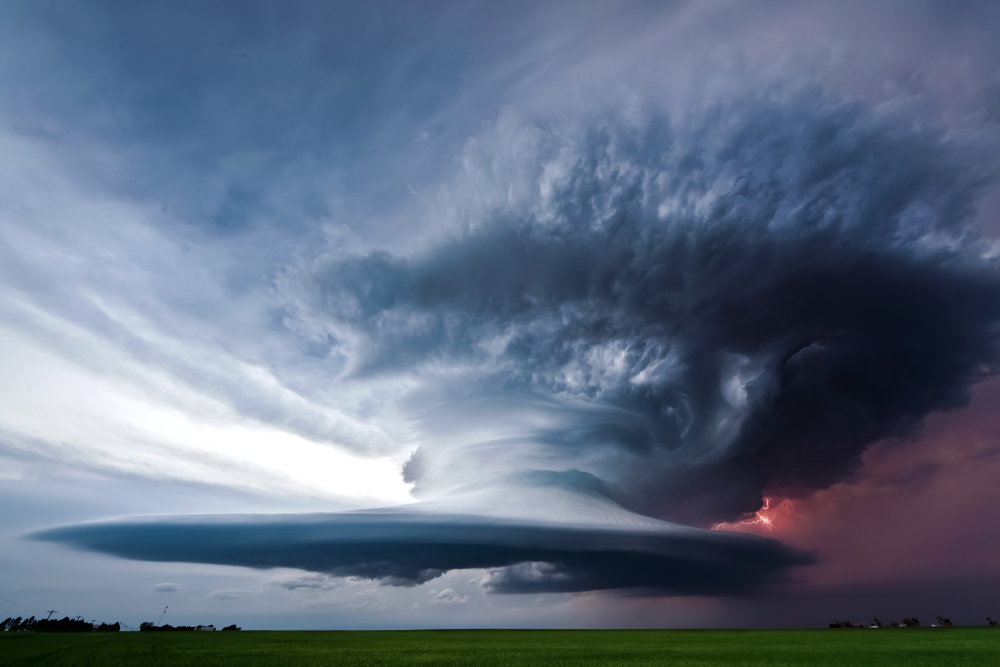
Photo by Minerva Studio via Shutterstock
Building a personal storm photography calendar helps you anticipate the best opportunities. Track local weather patterns, note successful shooting locations, and record technical data from your best shots. This historical data becomes invaluable for predicting future opportunities and improving your storm photography success rate over time.
Storm photography combines technical skill, artistic vision, and calculated risk-taking in ways few other photographic genres can match. By prioritizing safety, using appropriate equipment, mastering essential techniques, and exercising patience, you can capture nature’s most dramatic displays while respecting the forces that create them.
Remember that storm photography is a marathon, not a sprint—the most spectacular opportunities often come to those who are prepared, patient, and persistent. Start with smaller, safer storms to build your skills and confidence, gradually working up to more dramatic conditions as your experience grows. Most importantly, never let the pursuit of the perfect shot compromise your safety or the safety of others.
Heads up: Clicking on our affiliate links and exploring our sponsored content helps us at no extra cost to you, and we only recommend gear we’re absolutely crazy about!
Learn More:
- 5 Keys for More Impactful Photos of Landscapes
- Here’s the Key to Better Landscape Photos With One Simple Trick
Hero photo by Lukas Jonaitis via Shutterstock