
Automobile Photo Tips with Bryan Peterson
Last week I was in Nashville for a day, taping a show called Power Block which airs on this fall on Spike TV, Saturday October 8th @ 12:30PM and Sunday, October 9th @ 12PM. Power Block is all about cars so you might be wondering how this involves me. It came about through a friend and former student at PPSOP.com, Alex Schult who is the President of PhotographyTalk.com. And simply enough, Alex has connections and Alex asked if I would be a guest and speak about photographing cars and that’s what I did. Beyond the simple do’s and dont’s for car portraits, we also spoke a bit about the art of car photography too e.g. panning and motion opportunities plus the fine art to be found in the details. Time did not allow me to cover all of these topics on Spike TV but there is no reason I can’t do that here since no one has me on a clock and there is no worry of “going to commercial.”
So, let’s begin with a closer look at the wonderful world of CARS!
Our journey through the land of creative shutter speeds must include a visit with a most “frustrating, yet really rewarding” technique called panning. (A quote from many, many students in my on-line school and from my on-location workshops.)
When you pann any subject you will almost always be shooting from a point of view that is directly parallel to your subject and when your moving subject enters the frame from the left or right, you move and simply follow it with the camera in that same direction of the subject while depressing the shutter release button. This ensures that your moving subject remains relatively stationary in ‘that’ same spot in your viewfinder and in fairly sharp focus, while all of the stationary objects that surround the subject record as either horizontal OR vertical streaks. (Normally when one comes across a panning composition in a book, magazine, calendar or at the local art fair, the subjects are always moving right to left, or left to right i.e. kid on a bicycle or a jogger, but expand your horizons and consider panning the ‘vertical’ motion filled world too i.e. a kid on a pogo stick, a kid going up and down on a teeter-totter, the up and down ‘free-fall’ rides at the amusement park etc.) 
To pann effectively, you will want to use shutter speeds between of at least a 1/30 second but again I’m all about experimentation and if you are shooting digitally, (no film costs), consider panning at even slower shutter speeds, such as a 1/15, 1/8 or even a 1/4 of a second. When you pann ANY subject, keep in mind that you MUST HAVE AN APPROPRIATE BACKGROUND in order to be successful. And what is meant by an appropriate background? Because backgrounds, when panned, are rendered as blurred streaks of color and tone, you will find that the more busy and colorful the background, the better the panned subject will look in front of it. If you were to paint colored horizontal streaks onto a canvas, a single color would look like nothing more then a solid color with no evidence of streaking. But if were to use several colors, you would be able to distinguish the streaks.
Panning is a challenging exercise in “getting it right” and needless to say, a lot of shots are wasted until you get “that” one but like most things that DON’T come easy, it’s that ONE shot that makes it all worthwhile!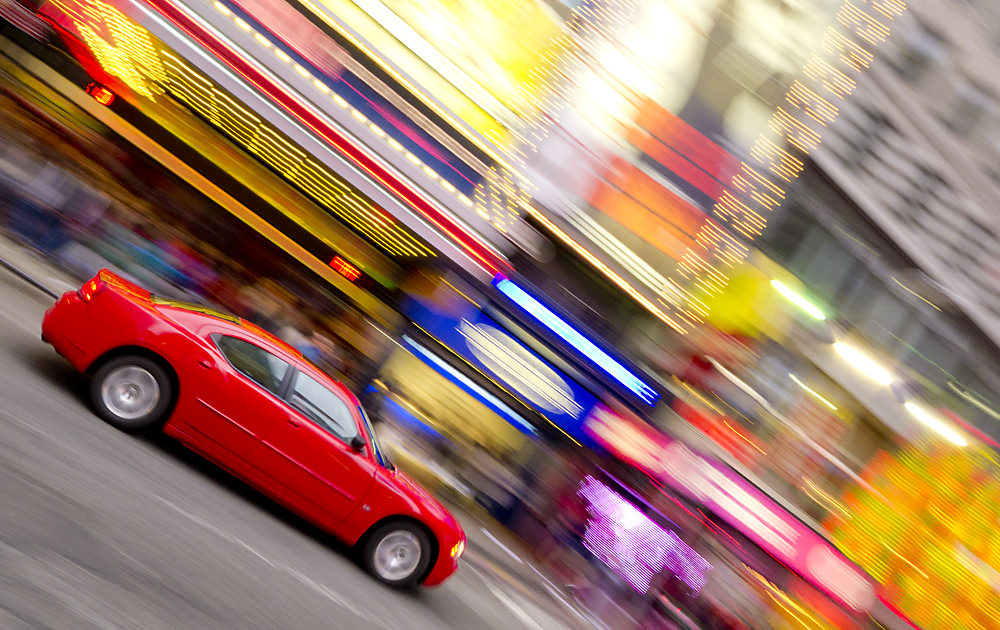
PHOTO#1-Opportunties to pann really are everywhere, but when it comes to an abundance of panning opportunities, the city is King. From New York to San Francisco, London to Rome, Tokyo to Singapore, cities are on the move, by day or by night.
Times Square, New York City is one of the richer locations for creating successful panning shots due to the non-stop hustle and bustle of traffic in the street and pedestrians on the sidewalks. Additionally there are no shortage of backgrounds thanks to the numerous billboards that are seen suspended above the numerous shops and restaurants. Handholding my camera and 17-55mm lens, with an ISO of 100 and an exposure of f/8 for a 1/30 second, I simply moved left to right and at a diagonal. Because I was focusing soley on this red Dodge Charger and following it as moved along Broadway, plus shooting at a the slow shutter speed of a 1/30 second, I recorded a relatively sharp car against some very colorful blurrry/streaky signage in the background. A truly high-energy image was the result, which no doubt conveys the sights and sounds of Times Square.
My reasoning for shooting on the diagonal was really quite simple. The diagonal line imparts a sense of movement and speed, even when a diagonal line is standing still e.g. a diagonal leaning ladder up against a house. And since I was panning in this case, I felt it would be an even bigger ‘rush’, a greater sense of movement and speed when shot as a diagonal composition.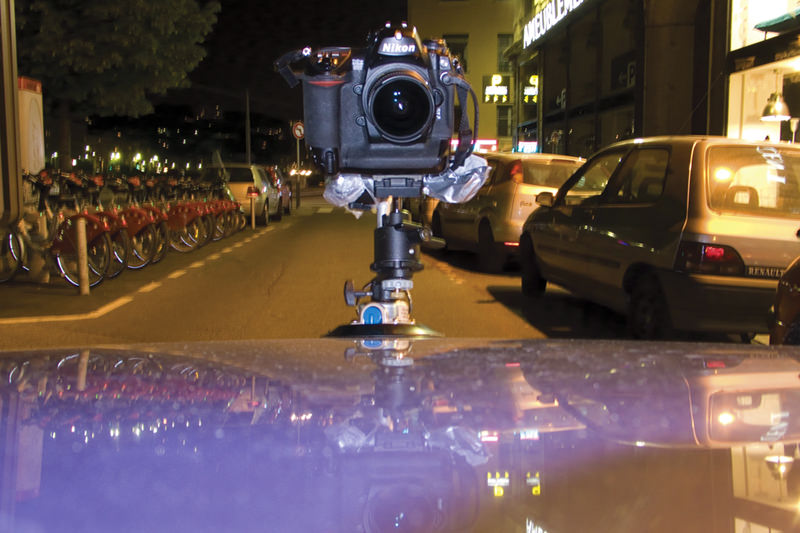

PHOTO#2-#3-Its been years since I saw the movie Jacoobs Ladder which starred Tim Robbins as a Vietnam Vet who was ‘caught’ between life and death. I really enojoyed that movie and it was also during that movie that I an idea came to me, which, more then ten years later, I finally found the time and the tools to to create. If you saw the movie then you no doubt recall the somewhat ‘ghoulish’ looking characters that would show their faces on subways and cars as they sped away from an anxious and confused Tim Robbins.
I wanted to recreate this same idea while driving a car through a tunnel. With the aid of a Bogen Super Suction Cup, (and boy do I ever mean ‘Super Suction’) I was able to mount my camera and fish eye lens on the hood of my friend Phillipe’s car intent of firing off a number of exposures as we drove through several long tunnels. I’m the passenger and Phillipe is driving.
Of course I wanted to record a sense of motion which meant I would need a ‘slow’ shuter speed of at least 1/2 if not once second. And in order to determine what aperture I would need to use at these speeds I needed to take a meter reading under a lighting condition that would be siimmilar ot the light we would find in inside the tunnel. Getting that meter reading actually proved rather easy, as I suggested that we first dricve through the tunnel, without the camera mounted on the car, but rather with the sunroof open, which then allowed me to shoot down onto the hood of the car and take my meter reading. Once we were inside the tunnel I stood up, and with my 17-55mm lens and camera set to 100 ISO, I simply pointed it at the hood of the car in Aperture Priority and found that when I chose f/8 I had a correct exposure indication of 1/2 second and of course at f/11 the correct exposure was now indicating1 second. After this first trip through the tunnel, we exited and pulled off to the side of the road and with the bright interior dome light on inside the car, I took another reading of Phillpe’s face and discovered that also at f/11, I could get a correct exposure at one second. I had the ‘numbers’ and now we were all set. I chose to leave the camera in Aperture Priority Mode, rather than manual, knowing that if I set the aperture to f/11 the camera would record a correct exposure somewhere in the neighborhood of one second, depending on the varying degrees of brightness as we drove through the tunnel. So, with the camera in Aperture Priority Mode, the lens set to f/11 and pointed at ‘us’, and with the Nikon Remote Recevier mounted to the camera, we were ready to begin our journey through several long tunnels, but NOT before donning our ghoulish masks. I wanted this to be a ‘ghoulish dream’ kind of photo. As we drove through the tunnels, I would simply fire the camera from inside the car with the Nikon remote sending unit. After making several trips through the tunnels, we pulled over and I began a quick review of the images we had made so far and two things were immediately apparent. Most of the exposures were spot on, BUT Phillipe and I were seen in most of the exposures as a bit too blurry. It was clear that Phillpe and I needed to settle down and temper our excitement and sit as still as possible. So off we drove once more, into the long tunnel, donning our masks once more and this time I was sure we had the shot and I was proven right once I looked at the monitor.
(In so far as the exposure you see here, Phillipe’s car is actually light blue and once inside the tunnel, it recorded an odd bronze cast that no amount of PhotoShop could repair. But it was also while trying to recover the light blue color in PhotoShop, that I came upon this ‘wild’ purple color and the more I viewed it the more I liked it so a purple car it is! This color was the result of ‘playing’ with both the Color Balance and Hue/Satruation controls in PhotoShop.)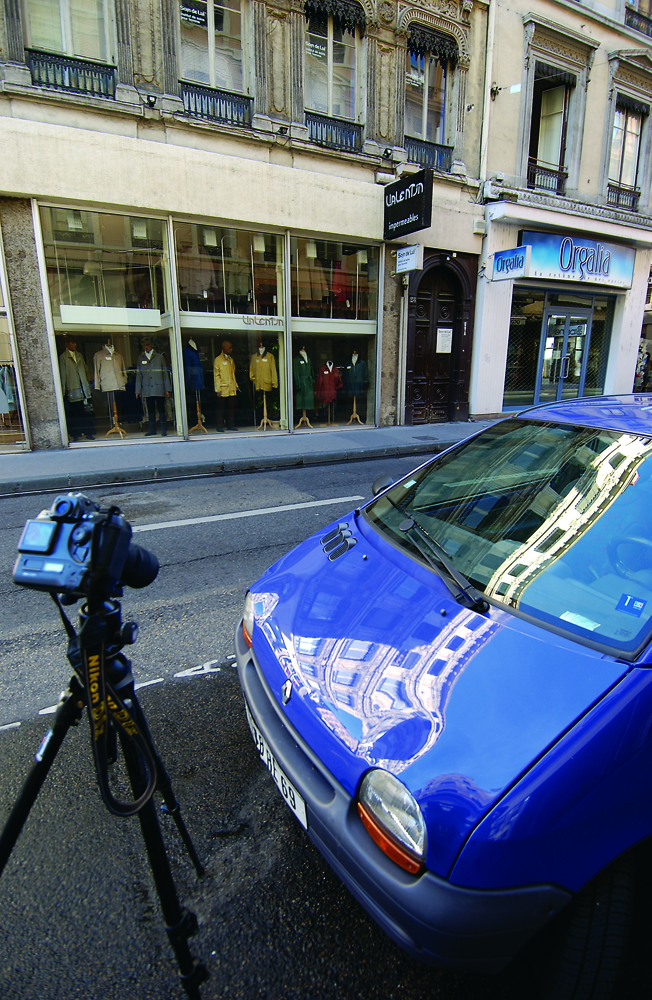

PHOTO#4-#5-As you may have already discovered, your telephoto zoom with macro is not really a true macro, but that certainly doesn’t mean that you can’t shoot some close-ups with it. In fact, your telephoto zoom with macro does allow you to focus closer than a telephoto zoom without macro and the ‘trick’ is to find subjects that are large enough to fill the frame, since with most macro compositions, filling the frame is paramount.
An early Sunday morning found me out and about the quiet streets of Lyon, France and it wasn’t too long into my morning journey that I came upon one of many telephoto ‘macro’ opportunities that morning. With my camera and Nikkor 75-300mm Macro zoom, I was able to focus within three feet of the reflection that was found on the hood of this small car. To achieve maximum impact, I moved a bit right, left, up and down, until I this reflection was filling my frame in the most pleasing way. Not a true macro shot, but certainly an eye-catching close-up! With my aperture set to f/22, to assure top to bottom sharpness, I simply adjusted the shutter speed until a 1/8 second indicated a correct exposure and than fired off several frames, tripping the camera’s shutter with my the self-timer to eliminate any possible vibrations to the camera that could have resulted from my pressing the shutter release with my finger.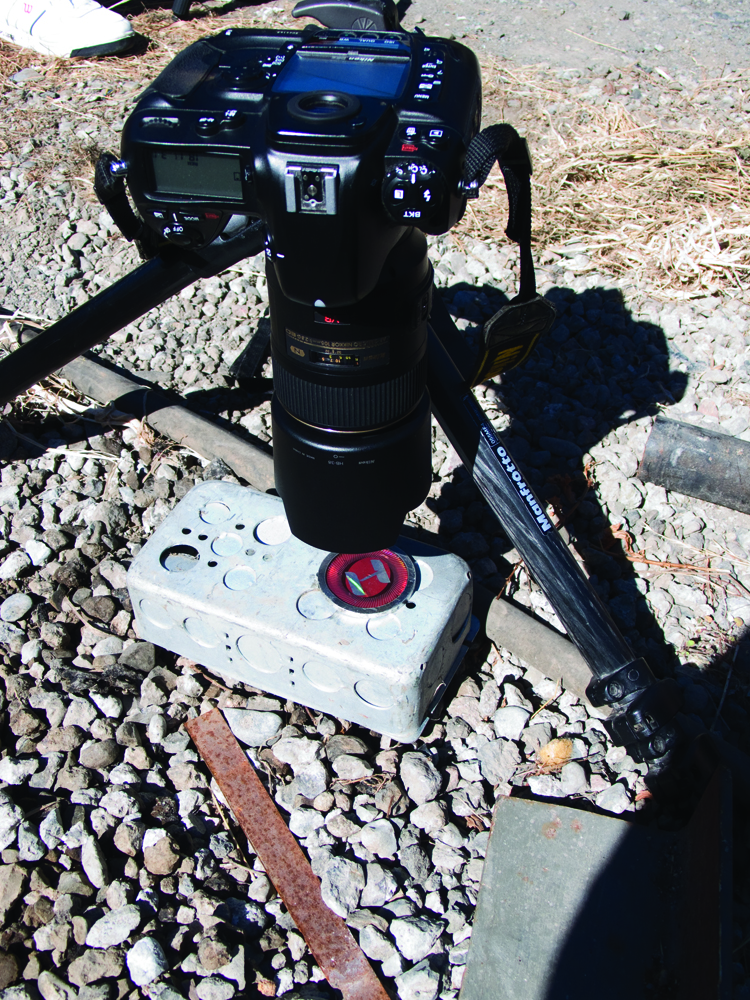
PHOTO#5-#6- Years ago, I was involved in one of those really minor fender benders in a Mall parking lot, and as luck would have it, my camera and 55mm Micro-Nikkor were in the trunk of the car. I say luck for the best reasons of all: the accident was not my fault, and I wanted to be sure and take a picture of the small but still noticeable damage to my right front fender of my bright red VW Jetta.
I had intended to only take one shot, but I was soon immersed in the “beauty” of the damage, small as it was. Not only was their some new texture revealed, (the shiny metal now exposed by the paint that had been scraped off, but also there was some nice added color, a deep yellow color from the other car, which had left its mark atop what red paint remained in the area of the damaged fender). Later that evening, I began to think more about other macro possibilities beyond the natural world and within a few days I paid what would become a number of visits to local junkyards and wrecking yards and thus began my constant journey of always placing these locations on my annual list of places to shoot. Several years ago, a handful of students and came across a wrecking yard in Petaluma, California. After seeking permission to enter, which was given by the owner, all of us were soon immersed in the joy of shooting ‘industrial abstracts’.
I came upon an emblem, a hologram in fact, for a Honda. Soon I was over the top of it, with my camera and 105mm Micro Nikkor lens focusing as close as necessary to record the letter H. Because I was parallel to the emblem, I had no depth of field concerns so I chose the ‘critical aperture’ of f/11 and simply adjusted my shutter speed until a correct exposure of a 1/160 second was indicated and than fired off several frames. What happened next is vitally important so please pay attention. I knew when photographing the letter H, I had yet to focus as close as my lens allowed. I knew I could still focus even closer and perhaps record another close-up image, one that would result in being far more abstract than the letter H. I mention this for one good reason. Most amateur and even professional shooters get so excited when they get their first macro lens, that they fail to fully realize its close focusing potential. On countless workshops I have been invited by a student to check out their close-up image in their viewfinders. More often than not I like what they have done, but when asked if they have considered looking at that subject even closer, they remark, “How can I do that?” and I simply reply, “Keep focusing until you can focus no more.” To their surprise, they discover just how close, “really close” they can focus and thus opens up the real world of macro.
In my second shot, I simply focused as close as I could get, which in turn rendered a much more abstract image of this Honda emblem. Because my point of view was still parallel to the emblem, I still chose to use the aperture of f/11, but now my light meter was indicating the need to change my shutter speed from a 1/160 second to a 1/100 second to maintain a correct exposure. The reason for this is simple: the lens was now extended further and as such the light that would be traveling down the lens and onto the film or CCD took longer to arrive, so a slower shutter speed was in order.
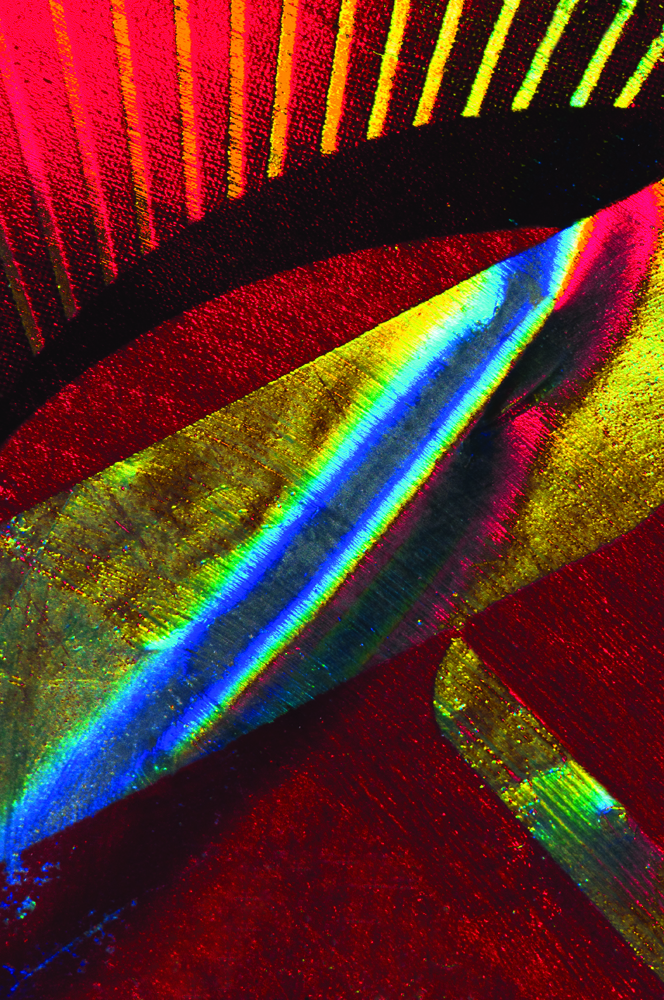
Photo#7-#8-Of the six elements of design—line, shape, form, texture, pattern, and color—which is the strongest? Line! Without line there can be no shape, without shape there can no form, without shape and form there can be no texture. And, without line or shape, there can be no pattern.
A line can be long or short, thick or thin. It can lead you away or move you forward. It can be felt as restful, rigid, active, soothing, or threatening. The emotional meanings of line cannot be overlooked. Some of us experience a thin line as sickly or unstable, and yet others see it as sexy, cute, and vulnerable. A thick line for some may feel stable and reliable, but for others unhealthy and stern.
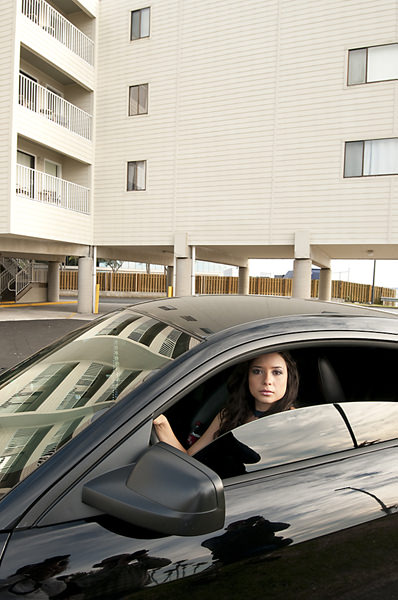
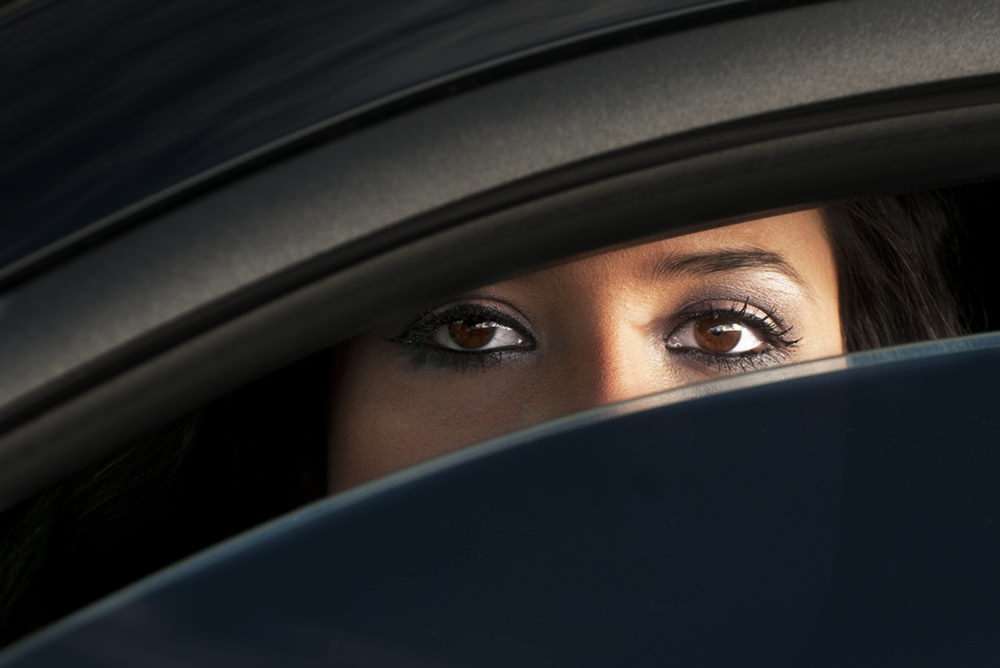
In nature, curvilinear lines dominate. They are the wind, the rivers, the surf, the dunes, and the hills. Curvilinear lines are experienced by most as soft, gentle, sexy, restful, and relaxing. Perhaps the curvilinear line explains our love affairs with the car!
Clearly the curvilinear line of the window and roof of this 2009 Mustang make for a striking photograph of the young woman seated inside.