Do You Have Color Under Control?

If you've been pursuing photography on any level for a reasonable length of time, the term “color management” won't be a new one to you. Even the rawest novice will understand that colors can shift in the process of creating images, and that there can be several factors that may cause those shifts. Even many experienced photographers, however, don't always grasp what's involved in complete color management. Let's take a look at what needs to be considered if you really want to get photo colors under control from start to finish.
There are three basic stages in creating a photograph with a digital camera:
- The capture: recording a scene on the camera sensor, using available and/or supplemental lighting.
- The edit: Almost all digital images will require editing.
- The display: There are two basic options here: electronic display and printing. Each has its own specific requirements.
Along with the other aspects of an image, color information can be affected by the methods the photographer uses. Furthermore, each stage in the process depends on the previous stage for maintaining true colors. Developing the best practices for each stage is critical if you want to render colors faithfully in your final images, or exercise precise control over their manipulation.

Given those points, it's easy to see that complete color management is also a 3-step process. In other words, you need to take the proper steps before and during the capture stage, followed by editing correctly, then outputting the image to your display medium. Those steps may include calibration, compensation for existing conditions, and using the right devices to establish control parameters.
Over the course of the next few articles, we'll discuss the color management steps required for each stage of the creation process. We'll include standard and optional steps as well as recommended for procedures, software and hardware.

As you work your way through this series, you'll find many references to the color management solutions from Datacolor. Their line of comprehensive, intuitive color tools includes all the components needed for quality color management and control, from start to finish. They've developed hardware and software packages specifically engineered for each stage of color management, as well as a complete studio that includes everything needed to manage your entire color management workflow and achieve professional, repeatable results.
Color management is the key to consistent quality in your images and taking control of color is surprisingly easy with the right methods and the right tools. The next few articles will introduce you to both.
We Recommend
Getting Color Under Control - Stage 1: The Capture
The introductory article for this series explained that there are 3 stages to complete color management: the capture, processing and display. In this installment, we'll look at the first stage, in which you capture your image and what's required to maintain accurate colors in this step.
Camera Calibration
Every DSLR sensor, from manufacturer to manufacturer and camera to camera will exhibit differences in color rendition. That's why camera calibration is extremely important if you want accurate colors in your images. Obviously, adjusting your sensor isn't practical and your camera doesn't provide a means to make adjustments, with the exception of white balance adjustment, which won't address individual colors.
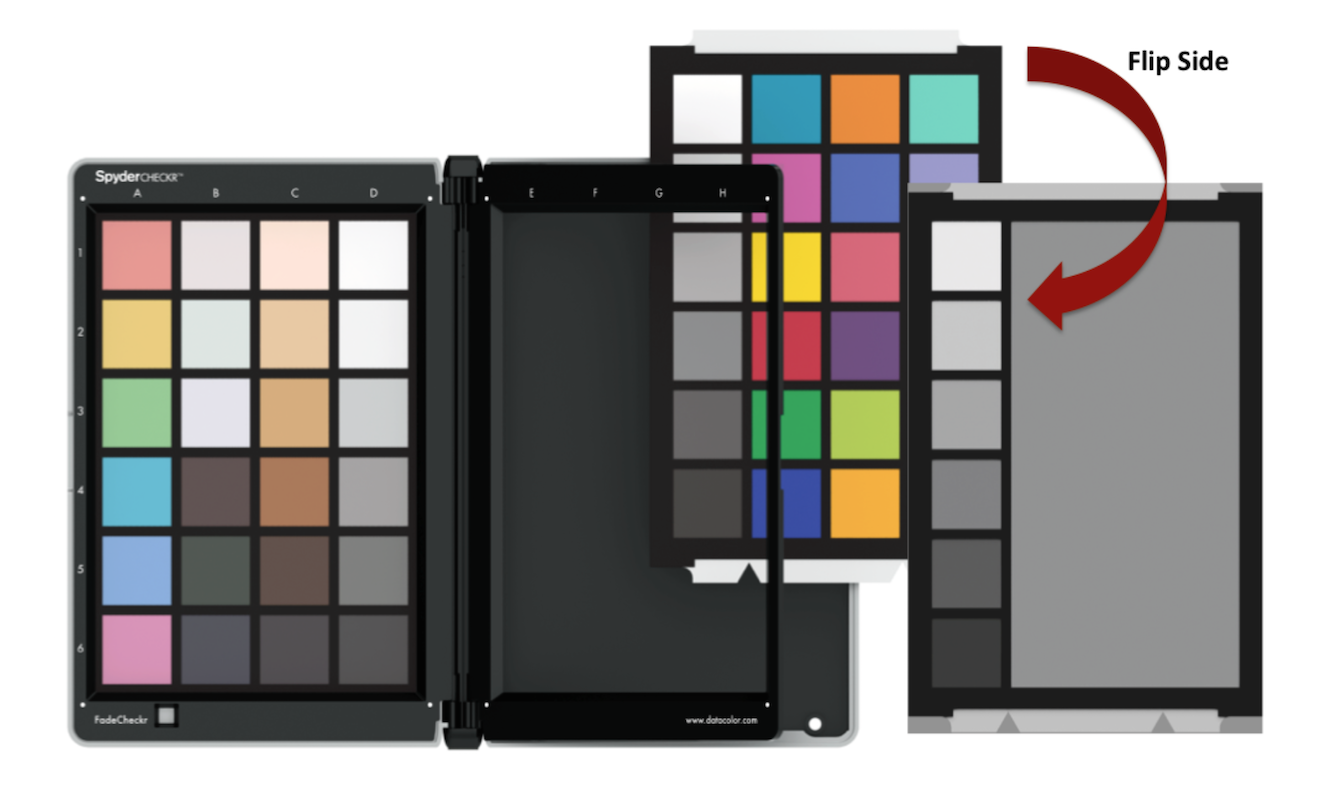
The solution is to create a camera profile that automatically corrects the color in your images. This profile becomes an integral part of your processing workflow, but it has to start in the capture stage, with the creation of the color profile. The process is simple with Datacolor's SpyderCHECKR, which includes a double-sided reference card and the software to create that camera color profile with a few simple steps.
I'd like to encourage you to take the time to watch the recorded webinar presentation below, which delivers a comprehensive look at calibration in the capture stage, including both color and focus calibration:
Balancing Light

Because exposure value affects how your colors will appear, accurate color rendition is highly dependent on overall exposure. As most photographers know, however, differences in light and shadow throughout an image can make it difficult to find the right balance in the studio or field. What's more, if you shoot in RAW mode, which we always recommend, you're going to need to balance the light in each of your images during Stage 2. So, after camera calibration, how do you make sure your colors stay consistent?
The answer comes down to another important step in this first stage: having and using a reference for adjusting light values. While an 18% gray card has been and still is the standard reference, having a way to evaluate white balance and black level settings in addition to middle gray makes the process much easier and allows you to create a preset in your RAW file processing software that lets you apply the correct settings to each image taken under the same lighting conditions.
Datacolor's SpyderCube is the best tool we've found for this step. You simply take one reference shot that includes the cube for each lighting situation. That's all that's required in this stage to allow you to balance the light correctly in all of your RAW files shot under those same conditions.
Here's another pre-recorded webinar that's worth taking the time to watch, demonstrating the uses of SpyderCube:
Armed with this information and the tools we've mentioned above, you're ready to tackle Stage 1 of the color management process quickly, easily and accurately.
We Recommend
Getting Color Under Control – Stage 2: The Edit

After capturing the colors in your images correctly, the second stage of color management begins. The editing stage is the point where you'll make sure that the images you've captured are rendered accurately when they are displayed and printed.
Monitor Calibration
While you might think this step is more closely related to the display stage of color management, the fact is that if you're going to render colors accurately, you need to first see them correctly. Different monitors display colors differently, even if they're identical products. Colors in a display will shift as a monitor ages. The lighting in your room will also affect how you see colors. Without calibration, there's no way to know whether your display is showing you the true colors captured by your camera. The errors will carry over into your final digital images and prints.
Display calibration, therefore, is a critical step before you start editing and on an ongoing basis. Fortunately, it's not a difficult one with the right tool. Our favorite tool is the Spyder5 from Datacolor. It provides easy, reliable calibration for all your monitors, with 5-minute periodic checkups. Watch the webinar below to see exactly how it works.
Creating Color Profiles
Now that your monitor is calibrated, so you know you're seeing the truest possible colors, it's time to use the target, or test shots that you took with SpyderCHECKR in Stage 1. Here's a short video that shows you how:
You'll now have an accurate color correction reference to use in all your editing, to easily maintain the accuracy of the colors in your images.
Adjusting for Lighting Conditions
As you edit your images, you'll use the test shots you took at the beginning of your sessions with SpyderCUBE to adjust the black and white levels, then apply those adjustments to all the photos taken under those same lighting conditions, using batch processing. This is one of the greatest time savers you'll ever add to your workflow. Watch the how-to videos below to learn how to calibrate your RAW files using Adobe Camera RAW and Lightroom:
Finalizing your Edits
With your monitor calibrated and your images adjusted for lighting, you're now free to edit your images according to your needs. Your colors are true-to-life, and you can add whatever tweaks you like to the final product. Cropping, rotation, resizing, etc. can all be performed confidently, knowing that the vivid colors you see are exactly what you'll get. If you're sending them out for printing, you'll need to check with the printer you choose for the color space to use. If you're printing them yourself, you'll want to make sure your printer is reproducing the colors in your images accurately, too. We'll cover that subject in the next article, on Stage 3: the display.
We Recommend
Top 10 Gifts for Photographers Under $150

Believe it or not, the Holdays are almost upon us! Since it's never too early to start shopping for your favorite photographer-type people, we're helping get you off to an early start. As always, we've listend to our members and followed the buying trends to bring you our lists of gifts sure to please any photography or cinematography buffs on your list. Here's the first for this year, with ten great gift ideas under $150.00. Happy shopping!
1. Syrp Variable ND Filter

A Neutral Density (ND) filter is one of the most creative tools you can give a photographer or cinematographer. It enables creative effects by allowing wider apertures and/or slower shutter speeds in bright lighting conditions. The most well-known examples are probably those dreamy, foggy effects created by moving water in stills and elimination of “roll” in videos. This rugged, variable version eliminates the need to carry several ND filters by allowing from 1 to 8.5 stops of exposure reduction with one filter!
2. Datacolor® Spyder®LENSCAL

SpyderLENSCAL provides a fast, reliable method of measuring the focus performance on your camera and lens combinations. It allows photographers to obtain razor-sharp focusing or check to see that their lenses are working at their peak performance.
3. WoodSnap

Imagine your favorite photographer's work printed directly on wood! Give him or her a vibrant, 16” x 20” wood print, complete with mounting slots and ready to grace his, her (or your) wall! Each genuine wood print is completely unique. Upload a photo from Facebook, Instagram or your computer, or email it in to get started.
4. Spider Holster

Conventional camera straps are clumsy, hard on your neck and shoulders and not the fastest way to access your DSLR. The Single Camera System from Spider Pro transfers the weight to your hips and allows an incredibly quick draw of a full-size DSLR with lens when that killer shot comes up. It's revolutionary, rugged and perfect for active photographers.
5. Perfectly Clear

Perfectly Clear Complete for Photoshop and Lightroom offers incredibly effective, one-click enhancement of images. You can use the 40 built-in presets or easily create your own with precise control. With this bundle, you'll get complete control over exposure, contrast, noise reduction, and color. Portrait photographers can also quickly enhance the eyes, skin, face, teeth and much more in one easy-to-use package.
6.Wolverine F2D Mighty

Most photograhers have stacks of negatives and slides just begging to be converted to digital images, and who doesn't have a bunch of old home movies to digitize? The Wolverine Digital Converter makes it easy to create high-resoultion (up to 20MP) digital files from film and positive transparencies. Give the gift of preserved memories.
7. Promaster Multi-Function IR Timer Remote/Intervalometer

Time-lapse sequences are among the most fun and rewarding things you can do with your DSLR. With this intervalometer, you can control your sequences remotely on most brand-name DSLRs and for those that don't have IR sensors, you can add an optional cable to use it wired. Of course, it also works as a standard remote shutter release with a little extra control, like controlling the number of exposures in continuous mode, all from up to 30 feet away.
8. Sirui T-004X Aluminum Tripod with C-10S Ball Head

This aluminum travel tripod from Sirui is compact and weighs in at just 2 pounds. Its legs reverse fold, so its closed size is just 15.7 inches. The adjustable center column can be replaced with the short center column for low angle shooting and three leg angle settings let you keep shooting on uneven terrain. Despite its small size, it can support up to 13.2 pounds and has a maximum height of 58 inches. The tripod even comes with a ball head with safety-lock Arca-type compatible clamp with quick release plate.
Learn more about the Sirui T-004X Aluminum Tripod with C-10S Ball Head.
9. Aquapac SLR Camera Case with Hard Lens

How awesome would it be to shoot underwater with your DSLR? The Aquapac can make that happen! Not only is it guaranteed to let you shoot under up to 15 feet of water, it will float if you drop your camera overboard, and doubles as a protective “rain suit” to keep out moisture, sand and other contaminants. It also comes with an adjustable neck cord and moisture-detecting desiccant packets. Open up a whole world of new possibilities with this gift.
Glide Gear DEV 235 Camera Track Slider 23.5"

One of the coolest things you can do with videos and time-lapse sequences is to add smooth, controlled camera motion. This simple slider enables that without a lot of expense, but without sacrificing quality. It mounts to a tripod or can be set up on almost any surface with the adjustable legs and rubber ball feet. It accepts almost any digital camera, camcorder or video camera, so there's no need to worry about what your favorite photographer shoots with!
We Recommend
Top 10 Gifts for Photographers Under $250

It's almost that time again, folks. The Holidays. Yep, it's later than you think, and before long you're going to wish you'd started shopping for your favorite photography buff. Unless, of course, that is, you're one of those smart readers that follows our Holiday Gift Guides here at PhotographyTalk. We've done the shopping for you – all you need to do is pick one of the great gifts we recommend. If you've got a photographer (even if it's you) to buy for and have a budget of $150 to $249.99, you're in the right place!
1. Syrp Genie Mini Panning Motion Control System

Consistent, smooth panning can add impact to both time-lapse sequences and video. That's exactly what Genie provides, with a simple device that you can carry in your pocket! It works with your smartphone, GoPro, mirror-less camera or DSLR. You program it wirelessly through an included app, and factory presets make it easy to use, even for those with no experience.
2. Datacolor® Spyder®5PRO

Here's an advanced color accuracy solution, with room lighting settings for optimal monitor brightness, to help you get true colors on screen and in print. Advance-featured, interactive calibration for laptop and desktop displays.
3. MyStudio MS20 Professional Table Top Photo Studio

Having professional looking photos of your products is so important, especially in any kind of eCommerce, but it can be a very time-consuming, challenging and often expensive process for people without much (or any) photographic experience. The MyStudio® MS20 Table Top Photo Studio is a superior, all-in-one table top photo studio system that will help you take amazing product photos even if you don’t have a lot of photography experience. It is a very affordable yet versatile photo studio kit that provides everything you need to take professional quality photos of your products. Featuring a unique 20”x20”x12” seamless “cyclorama” background and soft, wrap-around 5000K “daylight” lighting, the MS20 will help you take your product photos to the next level.
4. Plustek ePhoto Z300 Photo Scanner

If you’ve got piles of printed photos laying around and want to digitize them, there’s no need to send them off to a third party when you can do it yourself with the Plustek ePhoto Z300 Photo Scanner. This scanner is designed specifically to gently handle prints to avoid damaging delicate surfaces. With a 300 dpi CCD scanner, the unit will create high-quality digital reproductions of prints ranging in size from 1x1” up to 8.5x11.7”. If time is of the essence, don’t worry - the Z300 takes just two seconds to fully digitize a 4x6” photo and can handle a printing load of up to 500 sheets per day. It comes bundled with software that auto-deskews and adjusts your photos, allows for easy editing, and has a one-touch social media share button. It will be a great addition to your collection of gear and makes an ideal gift for other photographers in your life as well. If you’re after a film to digital scanner, then another option worth considering is the Plustek Optic Film 8100.
5. HoldFast Gear MoneyMaker Multi-Camera Harness

If your photographer shoots with more than one camera – or wants to, here's a gift that will make that happen in style. This beautiful, high-grade leather harness is designed to hold two cameras near your hips, and allows them to slide up in an instant for that quick shot. All sorts of accessories can be added, including an option to carry a third camera!
6. Singh-RayLighter, Brighter” LB Warming Polarizer

There is no substitute for a polarizing filter when you need one. Not only does it make pale blue skies more brilliant, it's most important function is removing glare from your images, allowing you to do things like photograph what's under the surface of a body of water. It also restores color and details on reflective surfaces. This filter adds a subtle warming effect, adding a little more “punch” to your images.
7. Sirui Urbanite BP Camera Backpack

For photographers on the move, having a handy way to store, transport, and protect their gear is of the utmost importance. Why not give them something stylish too? The Sirui Urbanite BP offers plenty of space for a DSLR camera, up to 4 lenses, camera accessories like spare batteries and memory cards, and room for a 15” laptop and 10” tablet! For added security, all camera gear is organized in a padded, zippered compartment that’s accessed from the rear. On top is a zippered compartment for things like a phone, car keys, and other belongings that you might need quick access to. The unique internal flow-through design lets you safely store a long telephoto lens or compact travel tripod out of sight. Carry all you need in a great looking backpack that doesn’t scream “photo gear inside!”
Learn more about the Sirui Urbanite BP Camera Backpack..
8. MyStudio® MS20J Table Top Photo Studio w/ Jewelry Kit + Tripod

Jewelry photography can be a real challenge. Even if you don’t have a lot of photography experience, this all-inclusive jewelry photography kit from MyStudio® provides everything you need to start taking professional looking photos of your jewelry. Featuring the best-selling MS20 Table Top Photo Studio with a seamless cyclorama background and 5000K “daylight” lighting, and combining it with the MyStudio® 12pc jewelry photography prop and tool kit and a bonus tripod, you will have all the tools needed to make your photos stand out. The included DVD is packed with demos and tutorials that will help you take your jewelry photography to the next level.
9. SlickforceSystem Trilogy - Mastering Lighting, Retouching & Compositing

This incredible bundle from Slickforce will take you step-by-step through the process of becoming an expert at lighting, retouching, and compositing your images. Your favorite photographer is sure to love the way that master photographers deconstruct their methods and make ground-breaking photography processes accessible and easy to understand. Whether it’s lighting your subject like a pro, learning advanced retouching techniques, or building the skills needed to create stunning composites, the SlickforceSystem Trilogy has the photographer in your life covered from A-Z!
Learn more about the SlickforceSystem Trilogy.
Marumi 77mm EXUS Circular Polarizer Filter

If you don't need the added warming of the polarizing filter above, here's an extremely high-quality one that retains the cooler colors. The thin filter ring design is ideally suited for use with wide-angle lenses and features multiple light-blocking ridges, a satin finish, and a black ink coating to provide a surface reflectivity of less than 0.6% to reduce the likelihood of lens flare and ghosting. Additionally, the male threads of the filter ring are coated with Teflon to help eliminate filter jamming and promote easier installation and removal from lenses.