- Forum
- Photography and Camera Forum
- Taking the Photo | Editing | The art of Photography!
- Beginner Photography Forum
- How to AVOID getting this ? help Please
How to AVOID getting this ? help Please
-
 Topic Author
- LovePhotography
- Photography Hooked
-
- Canon XSi & Nikon D3100
- Followers: 120
- Posts: 548
-
Points:
0
Post #166632
KCook wrote: Changing contrast may, or may not, change color tones. Depends on the situation. In any event this would best be done in PP (Post Processing), not in the camera.
For any shot with a quiet body of water (not a babbling brook), that water is automatically our eye's guide to whether the shot is level or not. Some of the newest cameras do have a leveling gauge shown in the viewfinder! Wish my old 50D had that feature. Shots that are slightly off level can be adjusted in PP. I do that all the time.
PP is simply what you do with a photo editor. Not a camera adjustment. Many novices think camera control is the entire story. Perfect camera settings results in perfect picture with no need for editing. Pros (mostly) know better. Your editor is your friend.
Kelly
Oh see I always thought that with Change the contrast you were changing the color - I was also told a while back - that you don't really want to change a picture - but I will look into that with what I have and see if I can change the contrast a bit.
I had NO idea that such a thing was out there - I will check out my camera's to see - I will try to be more level when it comes to water - Guess I was Not even thinking of that - My main goal was to get the house in and the trees and the water & sky - Not thinking about anything being level or not.
what PP do you use??
I know that a camera can do some pretty amazing things BUT I know that it cannot do too much...
Thanks KELLY - I always lilke hearing what you have to tell me - ....
Post #166656
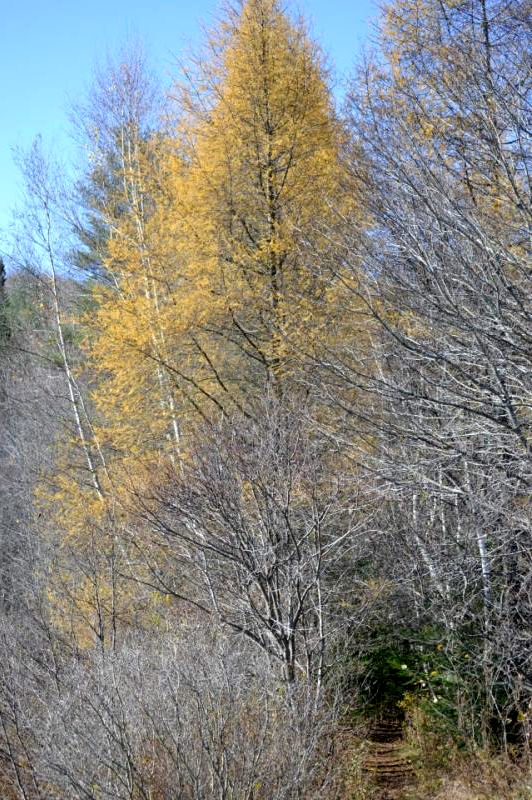
For the first one, I shifted the blacks by about 15% and the whites 5 - 10%. Then I changed the sky color a tad. The main kick was the Levels/contrast, which, as you can see, added definition to the trees.
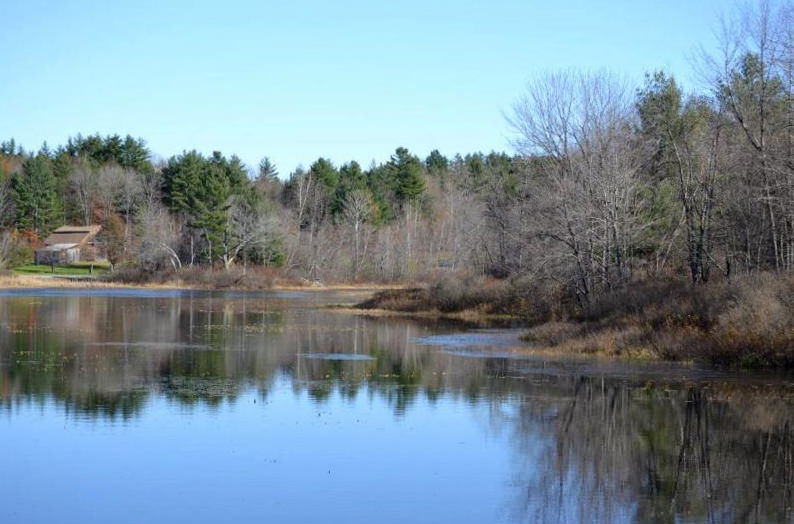
The second one required about a 10% adjustment of the blacks, 0.6° tilt correction and I cleared out that annoying little branch at the bottom.
Not sure who said you should not alter photos. Most every photo is an "altered" photo, and it's been that way since photography's beginning. The trick is to not let your viewer know it's been edited.
Every moment of light and dark is a miracle. - Walt Whitman
-

- KCook
- Photo Elder
-
- Canon EOS 50D and Olympus E-P5
- Followers: 1325
- Posts: 5410
-
Points:
32913
Post #166659
That is one philosophy / belief / ethic / zen whatever. In my view that thinking is a hangover from the days of film. Digital images are a whole different game. More thoughts on choices for editors -I was also told a while back - that you don't really want to change a picture
www.photographytalk.com/forum/editing-an...iting-toolset#151828
Kelly
-
 Topic Author
- LovePhotography
- Photography Hooked
-
- Canon XSi & Nikon D3100
- Followers: 120
- Posts: 548
-
Points:
0
Post #166667
VT Hiker wrote: I took the liberty to adjust these two. The main thing was adjusting the Levels. Kelley said something about that being a tricky adjustment, which it would be if you did a simple contrast tweak, but doing Levels you can alter the blacks and whites independently.
For the first one, I shifted the blacks by about 15% and the whites 5 - 10%. Then I changed the sky color a tad. The main kick was the Levels/contrast, which, as you can see, added definition to the trees.
The second one required about a 10% adjustment of the blacks, 0.6° tilt correction and I cleared out that annoying little branch at the bottom.
Not sure who said you should not alter photos. Most every photo is an "altered" photo, and it's been that way since photography's beginning. The trick is to not let your viewer know it's been edited.
WOW !! Those look so much better - I really LOVE them now -
Yes a while back someone said not to alter your photo's - what you see if what you get -
if I can ask what soft ware or how did you fix them?? I always thought that doing anything would mess them up - other than cropping & adding borders were really the ONLY good thing to -
WOW !! THANK YOU.... I guess working with them Really is a good thing to do - Makes them POP so much more...
-
 Topic Author
- LovePhotography
- Photography Hooked
-
- Canon XSi & Nikon D3100
- Followers: 120
- Posts: 548
-
Points:
0
Post #166669
KCook wrote:
That is one philosophy / belief / ethic / zen whatever. In my view that thinking is a hangover from the days of film. Digital images are a whole different game. More thoughts on choices for editors -I was also told a while back - that you don't really want to change a picture
www.photographytalk.com/forum/editing-an...iting-toolset#151828
Kelly
I can see where is HELPS out a lot with a picture -
WOW !!! I had no idea - I was really under the thought Not to mess with them - Learned something New today Kelly - THANK YOU !!!
Post #166673
The first one might be better cropping the left side to get rid of the deadwood so to speak. That might make the yellow tree and the path stand out more. I didn't even notice the path at first, I mostly saw all the gray branches and the yellow.
There's always some processing and adjusting, whether it's film running thru a machine or the camera and/or the photographer making adjustments. As others said the processing shouldn't be noticeable. And there's probably a fine line between post-processing and altering the photo too much (to the point it's not even the same picture anymore).
Sharon
-
 Topic Author
- LovePhotography
- Photography Hooked
-
- Canon XSi & Nikon D3100
- Followers: 120
- Posts: 548
-
Points:
0
Post #166679
icepics wrote: The second one is a nice photo once it's straightened; it seems a liitle 'soft' meaning it's not quite sharp enough. There's an interesting little building way back on the left but I didn't even notice it at first, when the picture is too soft in its focus things don't seem to stand out.
The first one might be better cropping the left side to get rid of the deadwood so to speak. That might make the yellow tree and the path stand out more. I didn't even notice the path at first, I mostly saw all the gray branches and the yellow.
There's always some processing and adjusting, whether it's film running thru a machine or the camera and/or the photographer making adjustments. As others said the processing shouldn't be noticeable. And there's probably a fine line between post-processing and altering the photo too much (to the point it's not even the same picture anymore).
I guess that every photo needs work - or has work done to it.
see I STILL LIke it - the way that it is in BOTH pictures - I guess I like dead stuff -
Oh I wanted to get all that stuff in the picture - the dead trees, the yellow trees and the trail - But having it be touched up is better..
The other one I like the way it is too..
MAYBE I will NEVER get the "EYE" for it - I mean I liked both of them before - the re-touch does make them better but I still like them -
Post #166685
I like the silvery gray branches but you can have too much of a good thing, I saw mostly that and didn't even notice at first that path, when I looked again I realized why you took the picture the way you did, but I didn't even see it at first because there was so much of the gray...
Sometimes it can work to shoot straight on which it looks like you did here, but you can also take the picture from a little to the left or to the right, or from a different angle, to give you a different perspective. That can sometimes make a photo more interesting.
I think you're often 'seeing' it, but the challenge is to capture it so viewers see what you saw.
Sharon
Post #166691
Frankly, you should not listen to that person because they're clueless.LovePhotography wrote: Yes a while back someone said not to alter your photo's - what you see if what you get -
Do a search on surrealist photography. People have been doing funky things with photographs for well over 100 years, so it's not limited to digital or to Photoshop, despite "photoshopping" being the common term today. For example, search Man Ray's rayographs and Jerry Uelsmann's combination prints.
Really, when you think about it, every choice a photographer makes is "altering" a photograph. Choice of shutter speed, aperture and ISO (among others) are altering the photo before it's even shot! No photo is perfectly representing reality, which is kind of the point, so you may as well have fun with it.
I have a version of Photoshop, but the corrections I did can be found in any decent editor. Also, I kept the edits simple so you could pick them up easily, despite not knowing much about editing.if I can ask what soft ware or how did you fix them?? I always thought that doing anything would mess them up - other than cropping & adding borders were really the ONLY good thing to -
I enjoy a good vignette, and borders can be neat sometimes, but generally I think they are best left out of a photo. Certainly, you don't want to do them on too many photos because then the impact is weakened.
Every moment of light and dark is a miracle. - Walt Whitman
-
 Topic Author
- LovePhotography
- Photography Hooked
-
- Canon XSi & Nikon D3100
- Followers: 120
- Posts: 548
-
Points:
0
Post #166692
icepics wrote: Maybe you see something in your photos because you know it's there; someone else looking at your picture may not notice the same things unless they stand out in the photo.
I like the silvery gray branches but you can have too much of a good thing, I saw mostly that and didn't even notice at first that path, when I looked again I realized why you took the picture the way you did, but I didn't even see it at first because there was so much of the gray...
Sometimes it can work to shoot straight on which it looks like you did here, but you can also take the picture from a little to the left or to the right, or from a different angle, to give you a different perspective. That can sometimes make a photo more interesting.
I think you're often 'seeing' it, but the challenge is to capture it so viewers see what you saw.
Now i get it - I should Remove some of the brahces on the left side of the picture - get it..
I do that - I take a lot of different angles I think that is why I take so many of them - take it standing straight - kneeling down, lying down on the ground - lots of tilts and stuff - SO I try to make it interesting BUT I guess they did not come out like I thought ( THINK ) that they did..
I KNOW HOW does one work on that - if you see the picture - HOW can one get it across - when you see it and think that it looks good & you are told DULL, Flat and other things...
I GUESS I don't know how to get things across to others -
Post #166696
I think a good challenge for you would be to limit yourself to ONE, and only one, composition per scene. You can take as much time as you want to frame it in your viewfinder, and you can go horizontally, vertically, lying on the ground or hanging upside down if you want... but you can take only the one composition per scene. That may help you learn faster what works and what doesn't.LovePhotography wrote: I do that - I take a lot of different angles I think that is why I take so many of them - take it standing straight - kneeling down, lying down on the ground - lots of tilts and stuff
Every moment of light and dark is a miracle. - Walt Whitman
-
 Topic Author
- LovePhotography
- Photography Hooked
-
- Canon XSi & Nikon D3100
- Followers: 120
- Posts: 548
-
Points:
0
Post #166707
VT Hiker wrote:
I think a good challenge for you would be to limit yourself to ONE, and only one, composition per scene. You can take as much time as you want to frame it in your viewfinder, and you can go horizontally, vertically, lying on the ground or hanging upside down if you want... but you can take only the one composition per scene. That may help you learn faster what works and what doesn't.LovePhotography wrote: I do that - I take a lot of different angles I think that is why I take so many of them - take it standing straight - kneeling down, lying down on the ground - lots of tilts and stuff
I Don't know if I could do it - really!! I am SO excited about a photo and think as I looking at WOW - I wonder what it would look like this way or this way - etc.. I feel like a kid jumping up and down in my SKIN... I LOVE It..
But I will try what you suggest - MAYBE Not on Sunday but I will try it.. maybe the following weekend as I have nothing going on - yet... This is a project for me - And I will shoot in Manual..
THANK YOU!!
- Forum
- Photography and Camera Forum
- Taking the Photo | Editing | The art of Photography!
- Beginner Photography Forum
- How to AVOID getting this ? help Please
Latest Reviews
The Canon EOS R100 is an entry-level mirrorless camera introduced in 2023. But just because it’s an entry-level camera doesn’t mean it’s a bare-bones camera. Find out why in this review!
Nikon’s retro-looking Nikon Zfc is anything but retro. Under its classic body is a host of features and amenities that make it a worthwhile compact mirrorless camera for 2024.
The Canon EOS R50 is one of the newest R-system cameras from Canon. Is it worth your money? Find out all the details you need to know in this comprehensive review.
The Sony FE 70-200mm f/2.8 GM OSS II is Sony’s flagship mirrorless zoom lens. As such, it’s loaded with features and has a top-shelf build quality that makes it a top pick!
Forum Top Posters
-
1Travis Brunson 1 post
-
2Razky 1 post
-
3Esseff 1 post
-
4ShutterPal 1 post
-
5CaptNemo 1 post
-
6db3348 1 post
-
7Garbo 1 post
-
8Foggy 1 post
Latest Articles
Creating impactful photos of landscapes depends on many factors, not the least of which is your talent behind the lens. This guide explores other elements required for the best product.
The Canon EOS R100 is an entry-level mirrorless camera introduced in 2023. But just because it’s an entry-level camera doesn’t mean it’s a bare-bones camera. Find out why in this review!
Are you ready to upgrade your camera? Before buying new, you might consider the value of purchasing used gear to save money.
The Olympus OM-D E-M10 Mark IV is a micro four thirds camera released in 2020. It’s an entry-level system along with the OM-D E-M5 Mark III. Use this guide to determine which one is best for you!
Blue hour photography might not be as well known as golden hour photography, but it is every bit as good a time to create epic images of landscapes. Learn how in this quick tutorial!
Nikon’s retro-looking Nikon Zfc is anything but retro. Under its classic body is a host of features and amenities that make it a worthwhile compact mirrorless camera for 2024.
Moving from taking snapshots of your dog to creating beautiful images doesn’t have to be that difficult! Use the tips outlined in this dog photography guide, and you’ll get better results in no time.
Acrylic print photos are a beautiful way to display your favorite images. But they don’t come without some questions. Get all the answers you need about this medium in this guide!


