- Forum
- Photography and Camera Forum
- Taking the Photo | Editing | The art of Photography!
- Photoshop Saving Methods
Photoshop Saving Methods
-
 Topic Author
- JeremyS
- Photography Hooked
-
- Nikon D3200 & Nikon D800
- Followers: 31
- Posts: 506
-
Points:
291
Post #403091
-

- garyrhook
- Oh Wise One
-
- Nikon D850, Nikon D750, Panasonic G7K
- Followers: 912
- Posts: 11103
-
Points:
67681
Post #403099
TIFF files can be compressed (lossless, but compressed). RAW files are not because compression takes processing cycles and time; who's got time for that when shooting?
What happens when you use PSD files?
By what criteria have you determined that you're losing quality? File size is kinda irrelevant. Format is what matters.
-
 Topic Author
- JeremyS
- Photography Hooked
-
- Nikon D3200 & Nikon D800
- Followers: 31
- Posts: 506
-
Points:
291
Post #403115
garyrhook wrote: RAW files contain additional information that may not translate to any other format. It may (probably will) be dispensed with.
TIFF files can be compressed (lossless, but compressed). RAW files are not because compression takes processing cycles and time; who's got time for that when shooting?
What happens when you use PSD files?
By what criteria have you determined that you're losing quality? File size is kinda irrelevant. Format is what matters.
I can tell I'm losing quality because if I repeat this process a couple times, going back into lightroom then further editing etc. the file eventually has obvious banding. EX: that photo of the osprey you edited up and showed us how you edited it. I tried a few different ways before and I'd change it afterwards. I ended up with a banded sky and awful quality. That is my basis of determining that I'm losing quality.
-

- Shadowfixer1
- Photo Elder
-
- Olympus OMD E-M1 MKII
- Followers: 1349
- Posts: 5551
-
Points:
73230
Post #403138
-
 Topic Author
- JeremyS
- Photography Hooked
-
- Nikon D3200 & Nikon D800
- Followers: 31
- Posts: 506
-
Points:
291
Post #403145
Shadowfixer1 wrote: Are you working in 8 bit or 16 bit. Pushing pixels around too much in 8 bit will produce banding much quicker than 16 bit. I don't think the file type is your problem. I think your adjustments are too extreme for the file you're working with.
My edit's consist mainly of stitching two exposures together, or dodging and burning. Nothing extreme and no major changes. Portraits will usually have some minor touchups done but that shouldn't cause that.
The reason why I'm bringing this up now is because I brought this image into photoshop for some sharpening and slight dodge/burn. The image which typically would be 6-12MB ended up as 1.2MB. That doesn't make sense to me if my typical JPGs are 6-12MB with a 95% image quality on Lightroom, and when they go into Photoshop they turn into 1.2MB JPGs.
-

- Shadowfixer1
- Photo Elder
-
- Olympus OMD E-M1 MKII
- Followers: 1349
- Posts: 5551
-
Points:
73230
Post #403146
-
 Topic Author
- JeremyS
- Photography Hooked
-
- Nikon D3200 & Nikon D800
- Followers: 31
- Posts: 506
-
Points:
291
Post #403147
Shadowfixer1 wrote: How many pixels are in each image. Look at that information and tell us if they are different.
There is fewer pixels in the edited image because it has been cropped. That still doesn't account for 10MB of Data dissappearing. I can understand the size going from 12-16MB down to like 6-8MB but not 1/10th. And this is just that example.
I can take other examples where I've done some dodging and burning and no cropping and the same thing happens. The File size is by far smaller than what the original JPG looks like.
Basically what I'd like to know is, where is the menu to set your save settings in Photoshop?
-

- Shadowfixer1
- Photo Elder
-
- Olympus OMD E-M1 MKII
- Followers: 1349
- Posts: 5551
-
Points:
73230
Post #403150
-
 Topic Author
- JeremyS
- Photography Hooked
-
- Nikon D3200 & Nikon D800
- Followers: 31
- Posts: 506
-
Points:
291
-

- Shadowfixer1
- Photo Elder
-
- Olympus OMD E-M1 MKII
- Followers: 1349
- Posts: 5551
-
Points:
73230
Post #403152
-

- Shadowfixer1
- Photo Elder
-
- Olympus OMD E-M1 MKII
- Followers: 1349
- Posts: 5551
-
Points:
73230
Post #403155
PS. Go to "preferences" in Lightroom under the Edit header and check your settings. More specifically, check "External Editing" settings.
-
 Topic Author
- JeremyS
- Photography Hooked
-
- Nikon D3200 & Nikon D800
- Followers: 31
- Posts: 506
-
Points:
291
Post #403158
Shadowfixer1 wrote: Forget about the end file size when you look at it in explorer. It doesn't really matter. Look at the number of pixels and where that changes so drastically and you will pin point the problem and the solution.
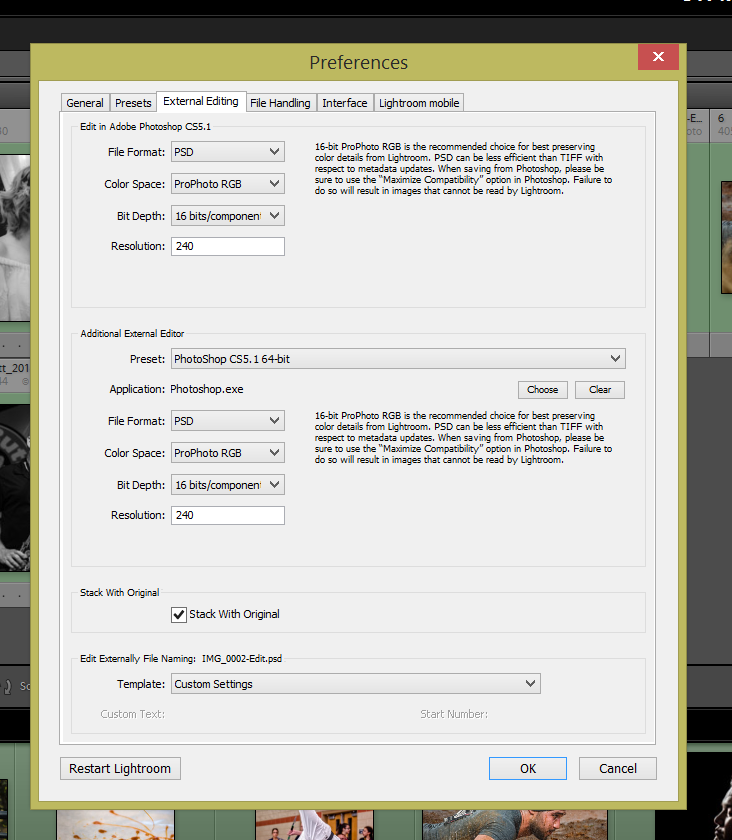
PS. Go to "preferences" in Lightroom under the Edit header and check your settings. More specifically, check "External Editing" settings.
This is what my external editing settings looks like. I'm thinking I should bump my resolution to 300ppi.
-

- Shadowfixer1
- Photo Elder
-
- Olympus OMD E-M1 MKII
- Followers: 1349
- Posts: 5551
-
Points:
73230
Post #403171
-
 Topic Author
- JeremyS
- Photography Hooked
-
- Nikon D3200 & Nikon D800
- Followers: 31
- Posts: 506
-
Points:
291
Post #403174
Shadowfixer1 wrote: Those settings are fine. The problem is not there. It must be in Photoshop somewhere. How much are you cropping?
In that example of a photo roughly 80%. Which is probably the most extreme crop ive ever done. It still wont explain other situations where the same thing happens.
-

- garyrhook
- Oh Wise One
-
- Nikon D850, Nikon D750, Panasonic G7K
- Followers: 912
- Posts: 11103
-
Points:
67681
Post #403178
A) Use PSD.
2) Don't crop in PS. There's no need.
C) Don't save/export in PS. There's no need.
Here are my settings:
Note that use of 16 bit mode and ProPhotoRGB. That will preserve as much info as possible. I also use the 64-bit version for more data space in memory.
I can't imagine why anyone with LR + PS would do anyting except:
- Edit in LR, doing absolutely everything you can there. If you are planning on stitching, make your adjustments and copy them to the other pieces. Then apply the healing brush, etc. Do not crop. Do not apply post-crop vignetting.
- Export all of the images to PS, as layers.
- In PS align them and let PS figure out how big the image needs to be. Do your PS work, such as color blending, cloning, applying other plugins (to layers, right?), etc.
- Save and go back to LR.
- Cropping
- Post-crop vignette
- Re-adjust highlights/shadows as needed (use the 'j' key to turn on clipping indication).
When I started out, I tried bouncing back and forth because I didn't really understand the rendering of the intervening images, and it just caused me trouble. I think this approach results in far fewer headaches. At least, fewer headaches for me.
I'd love to demonstrate with a couple of your to-be-stitched images. I'm willing to bet what you want to do is possible.
- Forum
- Photography and Camera Forum
- Taking the Photo | Editing | The art of Photography!
- Photoshop Saving Methods
Latest Reviews
Nikon’s retro-looking Nikon Zfc is anything but retro. Under its classic body is a host of features and amenities that make it a worthwhile compact mirrorless camera for 2024.
The Canon EOS R50 is one of the newest R-system cameras from Canon. Is it worth your money? Find out all the details you need to know in this comprehensive review.
The Sony FE 70-200mm f/2.8 GM OSS II is Sony’s flagship mirrorless zoom lens. As such, it’s loaded with features and has a top-shelf build quality that makes it a top pick!
The Leica SL2-S is an attractive, premium mirrorless camera with photo and video specs that are sure to impress. And with the legendary Leica name, you know this camera exudes quality!
Forum Top Posters
-
1alexcray 6 posts
-
2Esseff 2 posts
-
3db3348 2 posts
-
4Colorado Mike 1 post
-
5Travis Brunson 1 post
-
6nijolcreat... 1 post
-
7Razky 1 post
-
8ShutterPal 1 post
-
9CaptNemo 1 post
-
10Garbo 1 post
Latest Articles
The Olympus OM-D E-M10 Mark IV is a micro four thirds camera released in 2020. It’s an entry-level system along with the OM-D E-M5 Mark III. Use this guide to determine which one is best for you!
Blue hour photography might not be as well known as golden hour photography, but it is every bit as good a time to create epic images of landscapes. Learn how in this quick tutorial!
Nikon’s retro-looking Nikon Zfc is anything but retro. Under its classic body is a host of features and amenities that make it a worthwhile compact mirrorless camera for 2024.
Moving from taking snapshots of your dog to creating beautiful images doesn’t have to be that difficult! Use the tips outlined in this dog photography guide, and you’ll get better results in no time.
Acrylic print photos are a beautiful way to display your favorite images. But they don’t come without some questions. Get all the answers you need about this medium in this guide!
Where do you get your landscape photography inspiration? Is it from masters like Ansel Adams? Or perhaps viewing art from other genres? We’ve got these and a few other sources for you to check out!
The Canon EOS R50 is one of the newest R-system cameras from Canon. Is it worth your money? Find out all the details you need to know in this comprehensive review.
Too often, affordable online printing companies don’t meet your expectations of what a print should look like. But there are some choices that combine affordability with superb quality!


