A Worthy Lightroom Alternative?
photo byMaksym Azovtsev via iStock
Lightroom Alternative
For quite some time, Adobe has pretty much had the market cornered when it comes to post-processing software. Heck, I learned how to edit photos in Photoshop in the late 1990s, so that should give you a little perspective on their track record of success.
But in recent years, many different post-processing options have emerged. What’s more, since Adobe moved to its subscription-based model a few years back, the popularity of Lightroom and Photoshop alternatives has only increased.
And while some Lightroom alternatives are little more than ripoffs or just plain terrible free software with little functionality, there have been some excellent programs developed to help you edit your photos.
One of those programs is Exposure.
Exposure in a Nutshell
Exposure X4 is an award-winning, non-destructive RAW editor with advanced tools and features that help photographers like you and me streamline our post-processing workflow to efficiently create drop-dead gorgeous images.
Not only is it chock-full of tools for helping you edit your images, but it’s also loaded for bear with features that help you keep all your images neatly organized.
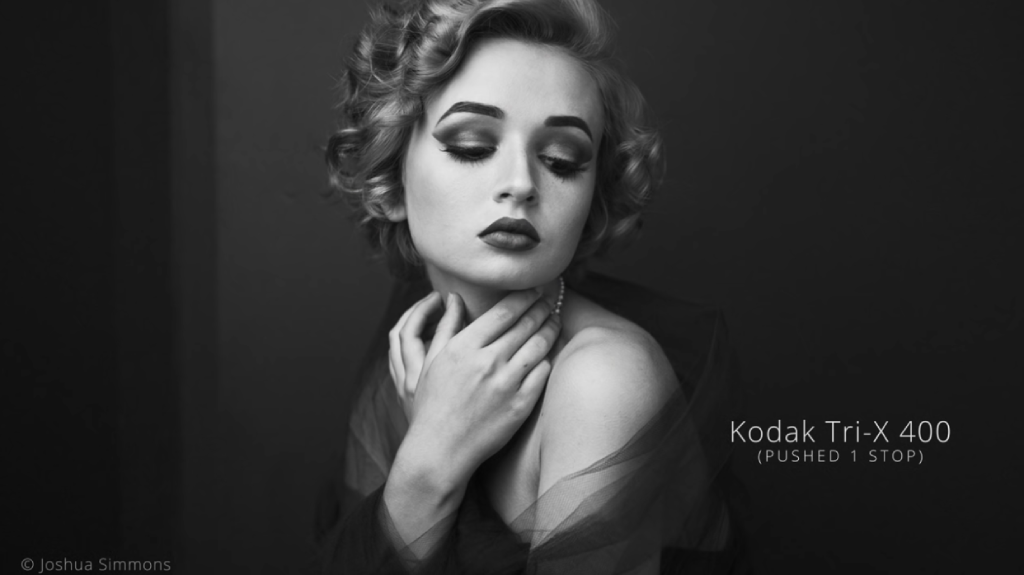
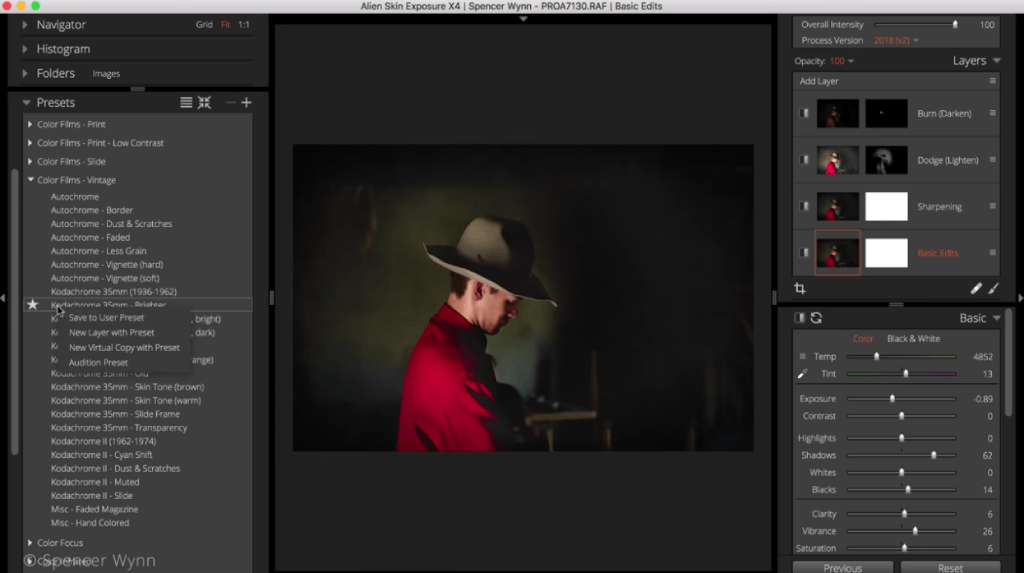
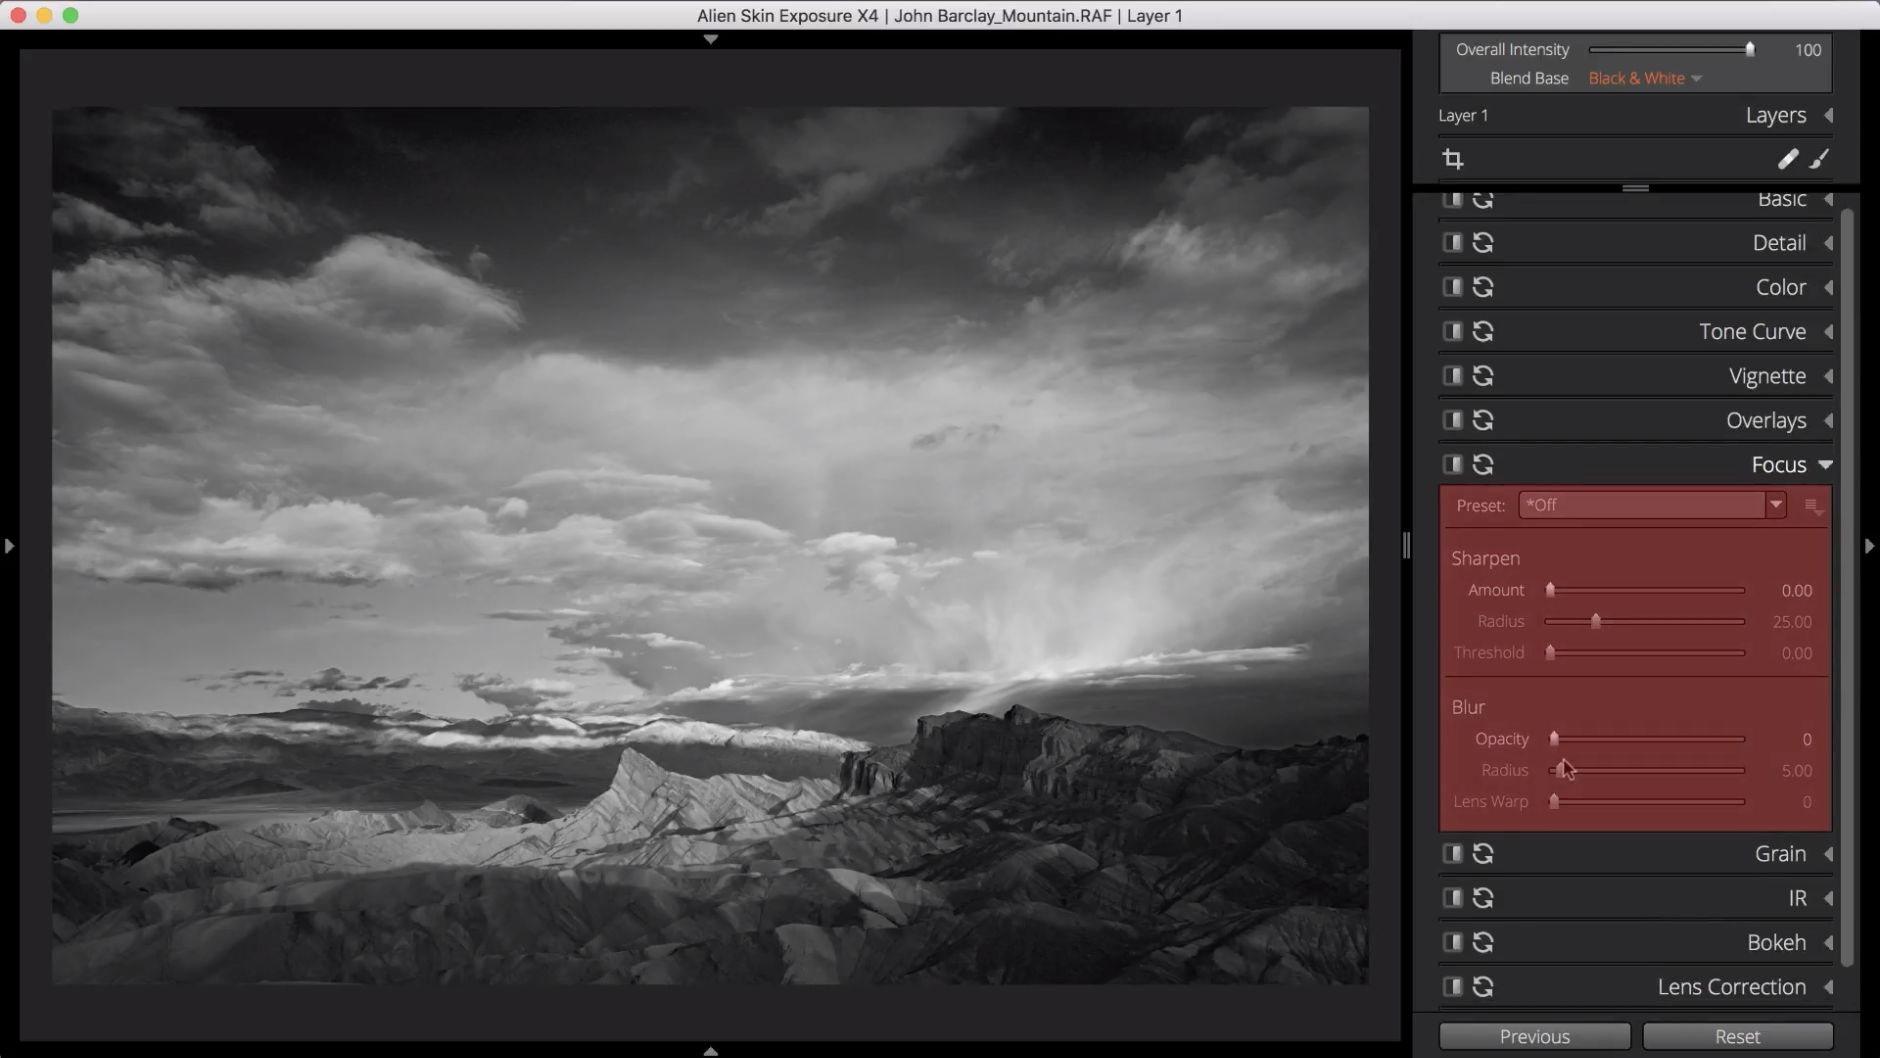
We’re talking fast retouching tools, easy-to-use layering tools, and even special effects (including classic black and white presets, as shown above) that make the process of editing your photos both fruitful and fast.
Heck, there’s even hundreds of presets you can apply to your images with a single click. You can even customize the presets or make your own to further the speed with which you can edit your photos.
But if you ask me, what’s most impressive about Exposure are the organizational tools under the hood.
In addition to having instant access to images for editing purposes (there’s no waiting for slow imports to finish), you can also copy images from your memory card and organize the images therein using keywords or collections in a single step. Nice!
With keywords, collections, smart collections, ratings, and tags at your fingertips, you’ll never have to hunt and peck for that one photo you want to edit. With so much metadata available to you, you can categorize your images at any level you like.
And since Exposure uses the same folder structure as your computer (no complicated catalogs...yes!!) there’s no learning curve for file organization. Instead, you’ll be immediately familiar with Exposure’s structure, and that means less time messing around with file organization and more time actually editing your photos.
It’s seriously a breath of fresh air to use this software!
Is Exposure a Worthy Lightroom Alternative?
I think it’s obvious at this point that I think Exposure is a more than worthy Lightroom alternative.
But if you’ve never seen Exposure in action, you might still be on the fence about it.
In the video above, Alien Skin gives us a quick introductory tour of Exposure X4, the latest version of this incredible software.
As the video explains, Exposure is the only photo editor that combines the two worlds of creative editing tools and a powerful organizational structure within the context of a fast, intuitive workspace.
That means that it’s feature-rich and you can learn how to use it in a snap - that’s not something that other software can claim.
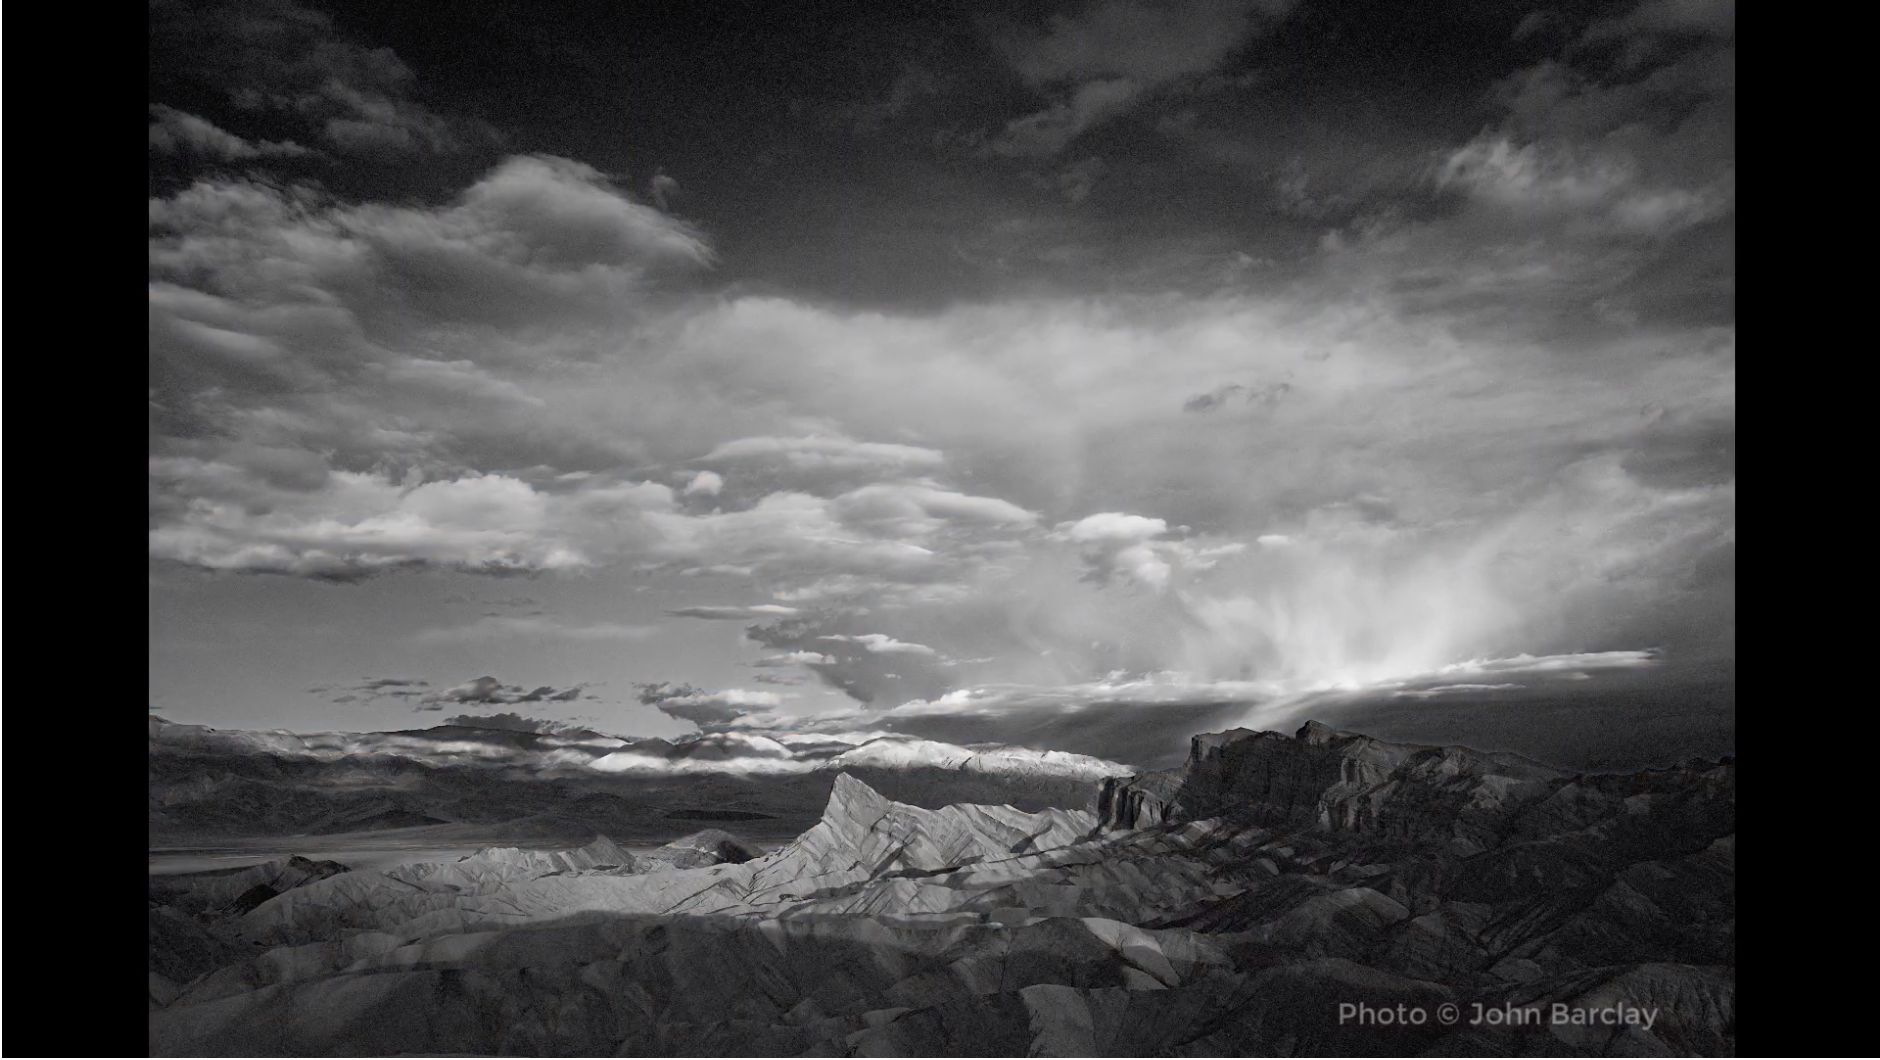
One look at the before and after image above, and you can see just how powerful Exposure is. With image processing quality that is unparalleled, you can extract every last detail out of your RAW files to create a final product that absolutely wows all who view it.
With features like skin softening, dodging and burning, vignetting, spot healing, moveable light effects, and dozens more, there is no end to the creative possibilities before you.

Whether you’re a landscape photographer, a portrait photographer, a wildlife photographer, or something in between, Exposure has everything you need to create the best versions of your images. And I literally mean everything - just check out this list of Exposure’s features.
Still not convinced? No problem! You can try Exposure X4 free for a whole month and give it a thorough test drive.
Trust me, once you experience the Exposure difference, you’ll be firmly in the camp that it is indeed a worthy Lightroom Alternative!
We Recommend
Alien Skin Software Pivots, Changes Its Name to Exposure Software

It’s been nearly three decades that Alien Skin Software has been in the business of making tools for photographers and other creative professionals that help them fulfill their creative vision.
And throughout the years, Alien Skin Software has won wide acclaim from creatives for their innovative and easy-to-use tools.
If you’ve never used Exposure before, it specializes in special effects, creative looks, and film simulations, and uses advanced math and cutting-edge research that assist photographers in developing bespoke creative looks for images of all kinds. It can be used as a standalone application or as a plugin to Lightroom or Photoshop.
But every company needs a refresh from time to time, and now it’s Alien Skin’s turn.
Today, the company announced a full rebrand, with a new logo, a new website, and perhaps most importantly, a new name - Exposure Software.
The new company name is indicative of its popular and award-winning photo-editing platform, file organizer, and RAW processor Exposure X4, which is currently in release. You can watch an introduction to Exposure X4 in the video above.
Exposure fans will be excited to know that Exposure X5 is due this fall. Check out some of its features below:
As Finley Lee, Exposure Software’s CEO noted in the company’s press release on the subject, “More than just a name change, the new branding initiative reflects the importance of, and commitment to, making Exposure the best photo editor for creative photographers.”
Exposure Software isn’t just a one-trick pony, either.
In fact, the company sells Blow Up, a photo-enlargement software, Snap Art, which transforms photographs into “works of art,” and Eye Candy, which adds realistic effects to images.
For more details about Exposure Software and their suite of products, visit their new website, https://exposure.software.
We Recommend
Easy Portrait Photography Tips for Beginners

photo byalvarez via iStock
The great thing about portrait photography tips for beginners is that there are SO many of them.
What’s more, many of them are just plain easy to implement - it just requires a bit of practice.
Best of all, these tips can be used on their own or together, so you can pick, choose, and combine your way to better portraits.
With all that said, let’s get started!
Table of Contents
- Get on Their Level
- Use a Polarizer for Portraits
- Focus on the Eyes
- Build Rapport With the Model
- Seek Good Light
- Make the Portrait Shine With the Right Editing Techniques
Get on Their Level

photo by RichLegg via iStock
One mistake a lot of portrait photographers make is not getting down on someone’s level.
When you take a portrait looking down on someone it can often give the feeling of them being small or powerless.

photo by via XiXinXing iStock
Conversely, taking photographs from a low angle, looking up at someone will give feelings of power and looking down at you. (also it gives you a good look up their nose.)
While being above or below your subject can help convey different emotions, as a beginning photographer try to think of the lens of your camera as your own eye. If you create portraits of subjects looking eye to eye with them you will me more pleased with the results.
Use a Polarizer for Portraits

I never realized how valuable a polarizing filter is in portrait photography until I accidentally left mine on from a landscape shoot.
It was years ago and I’d only just discovered the value of a polarizer for landscapes, so imagine my surprise when it helped me take better portraits!
While it’s true that polarizing filters are usually associated with big, wide open spaces, they lend an incredible hand to the portrait photographer. Using a polarizing filter for portraits opens you up to new, more vibrant colors in your portraits.
Also, if you’re shooting with children (or teens) polarizing filters are a huge help because they reduce the amount of oils you can see on someone’s face.

photo by Saadetalkan via iStock
If you’re dealing with a teenager that is already camera shy because they are self conscious about their skin, just about the worst thing you could do is present them with a final photo that has lots of glare off their oily forehead.
Polarizing filters also make all of the colors in your portraits more vibrant, which looks phenomenal when you’re doing outdoor shoots.
Take the above-photo as an example. The matte finish on this young woman’s face can be achieved with make up, but it can also be aided by the use of a polarizing filter like this one.
Editor's Tip: Get Kenko’s latest updates and access to promos for discounted gear. Click here to sign up.
I always use Kenko filters because you’re not going to get a better polarizing filter for the price. It’s extremely thin, which is a must if you’re buying a polarizing filter for portraits because it keeps your photos from darkening at the edges.
Then, once you’ve purchased your polarizer for portraits, you can read all about how to use a circular polarizer for portraits and some common issues you may run into when first starting out.
Learn More:
- 3 Tips on How to Use a Circular Polarizer
- Beginner Photography Mistakes and Tricks for Avoiding Them
Focus on the Eyes

photo by Peter Vahlersvik via iStock
Sony cameras have this thing called Eye AF, which allows you to autofocus on a subject’s eyes with ease (and track their eyes if the subject is moving, too). The reason Sony has this is because the eyes in portrait photography are the single most important point you need to be focusing on.
Your photo could be beautifully lit, with sharp features and gorgeous composition, but if your model’s eyes aren’t absolutely sharp, then you’ve lost the essence of the portrait.
Watch the video above by Light Club for more information about how to use catchlights in your portrait photography to convey different emotions.
Build Rapport with the Model

photo by FG Trade via iStock
You’ll probably be taking someone’s portrait for one of two reasons: they’re paying you to do it or they’re a model and someone else is paying you both to do it.
In both of these situations, the model might have a creative vision that they would like you to carry out, and portrait photography tips leave this out far too often.
Before the photoshoot, ask your subject if there is a particular color they would like to wear or a particular theme they want to convey. Ask about emotions they want to highlight in their photos, locations they especially want to feature, and so forth.
The point is that you likely have all kinds of ideas of what you want to accomplish in the photoshoot, but the model might have just as many ideas - and excellent ones too! Work together to get a better final result.

photo by Georgijevic via iStock
Then, throughout the shoot, make sure you’re taking the time to stop and show them the photos you’ve captured so far. Just a peek here and there will suffice; no need to spend all your time looking at photos instead of taking them!
Photographers often times get caught up in their own heads and forget to work both for and with the other people in the room, so the more collaborative spirit you have, the better things will go.
Seek Good Light

Photo by Trevor Cole on Unsplash
Portrait photography tips are really almost all “find good light.”
This obviously applies to the general lighting in the shot, like the dramatic sidelighting used in the image above to create such beautiful depth and contrast.
Creating catchlights in your model’s eyes is another way you can use light to create an image with more impact. You can do this in either a studio or a natural setting

photo by CoffeeAndMilk via iStock
As shown above, the studio lights are reflected in the model’s eyes, giving them a piercing look that immediately draws your attention.
If you’re shooting outside, you’ll need a backup plan in case the lighting isn’t ideal. What happens if your model is late for an evening shoot and you’ve missed the best light of the day?
Essentially, always go to the worst case scenario for your lighting and have Plans B, C, and D set up just in case.
Sean Tucker is one of my favorite “light” gurus in photography. In the above series, he walks you through how to find good lighting in a natural environment.
Learn More:
Make the Portrait Shine With the Right Editing Techniques
A proper portrait photography editing workflow is needed if you're going to create images that are as stunning as possible.
In the video above, you can learn about a sample workflow that can do just that.
Using Exposure by Alien Skin Software, you can see how making changes to the white balance, improving sharpness, making tonal adjustments, and addressing touch-ups like blemish removal can do wonders for the quality of your portraits.
And the best part is that these changes can be made quickly and easily in Exposure - it's a streamlined process that focuses on helping you meet your creative goals without bogging you down in a complicated workspace.
If you've never used Exposure before, you can try it free to test it out. If you're like me, you'll be hooked!
With that, you have a variety of portrait photography tips that will help you elevate the quality of your photos.
As I mentioned before, you can use these tips on their own or together. Whatever your approach, following basic rules of photography like these will set you on a path to better portraits.
We Recommend
Five Post-Processing Tips
photo byRawpixel via iStock
More than ever before, photographers today have all kinds of tools at their disposal for getting the most out of their images.
Indeed, post-processing is a crucial component of photography, but with so many different programs with so many different tools available, it’s easy to understand why so many photographers find post-processing a little overwhelming and confusing.
This post seeks to help clarify a few things.
Using Exposure X4 by Alien Skin as an example, we’ll explore five post-processing tips that will improve your workflow, help you save time, and facilitate the creation of more impactful photos.
Let’s get to it!
Post-Processing Tip #1: Make It Easy to Find Photos Later
One of the biggest difficulties of post-processing is simply making sense of all the photos you’ve taken.
If you’re like me, keywording your photos after the fact is not a strong suit, so why not keyword them while adding photos to your image library? Doing so kills two birds with one stone, that way you don’t have to worry about keywording later.
For landscapes, you can use the location of the shot as the keyword. For portraits or wedding photos, use the name of your client. You can alternatively use the subject matter or the date, heck, even colors can be used as keywords. Whatever works best for your particular workflow!
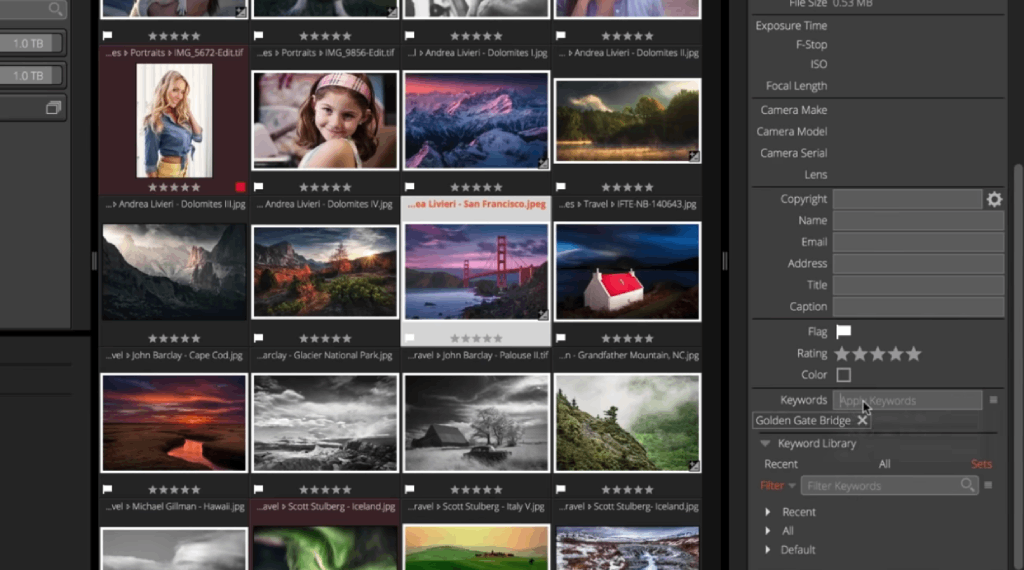
Adding keywords is easily accomplished using Exposure’s “Copy From Card” dialog.
In fact, Exposure’s Copy From Card dialog allows you to do much more than apply keywords. As the video above explains, you can also preview images, make image selections, edit metadata, apply creative presets, and more.
Quick Tip: Keywording isn’t the only tool at your disposal for organizing your images in Exposure. You can create smart collections of images, apply ratings, and add tags to photos to drill down and organize your photos in a highly customized manner.
Post-Processing Tip #2: Pick the Photos You Want to Edit (and Hide the Ones You Don’t)
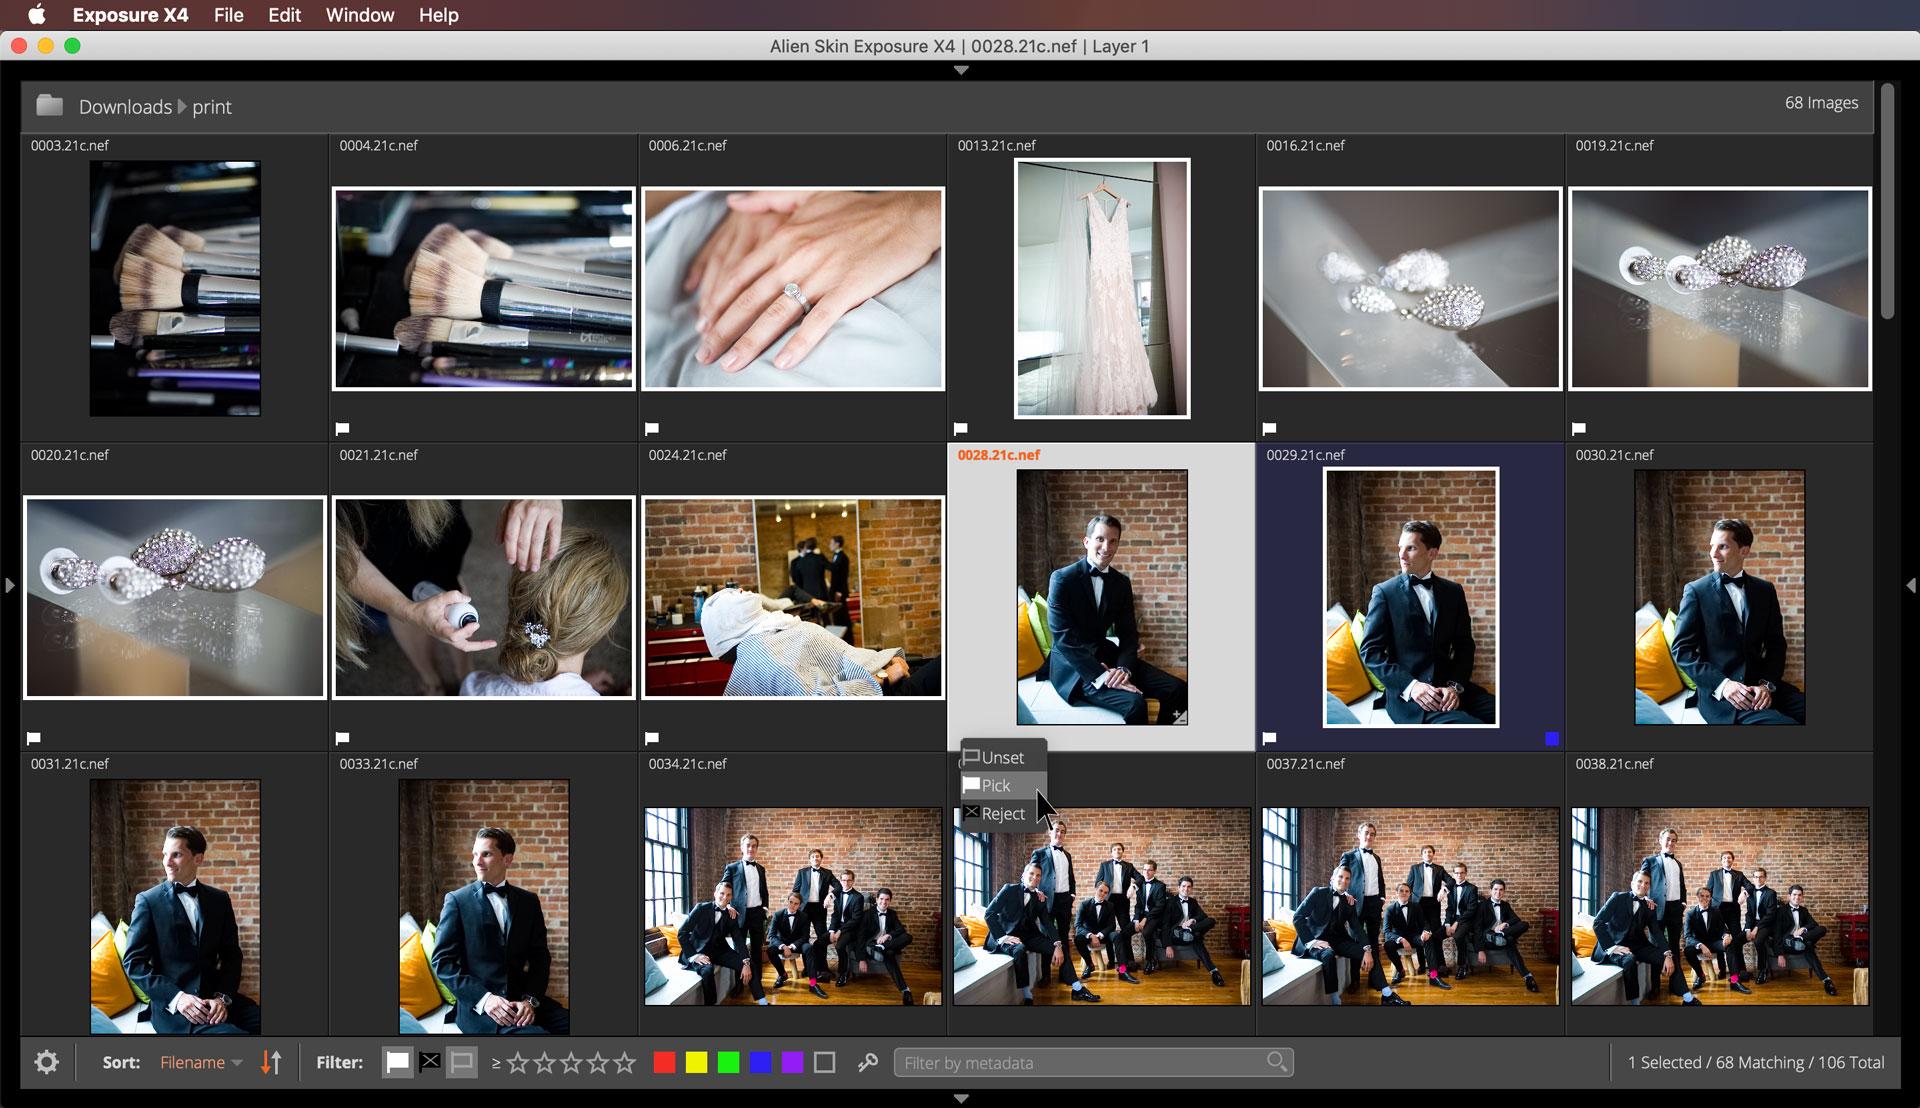
Personally, I prefer to flag the photos I want to edit from the outset, that way I know exactly what photos need attention later on.
In Exposure, you can do this by adding “pick flags” to the photos you wish to work on and “reject flags” to those you want to skip. To set a pick flag, simply press the + key to mark an image as picked and the - to set the image as rejected.
Then, all you have to do is set a filter which hides the images flagged as rejects, that way you don’t have to look at them as you edit. It’s a quick, simple, and easy way to improve your post-processing workflow.
Post-Processing Tip #3: Batch Edit Photos Taken in the Same Conditions
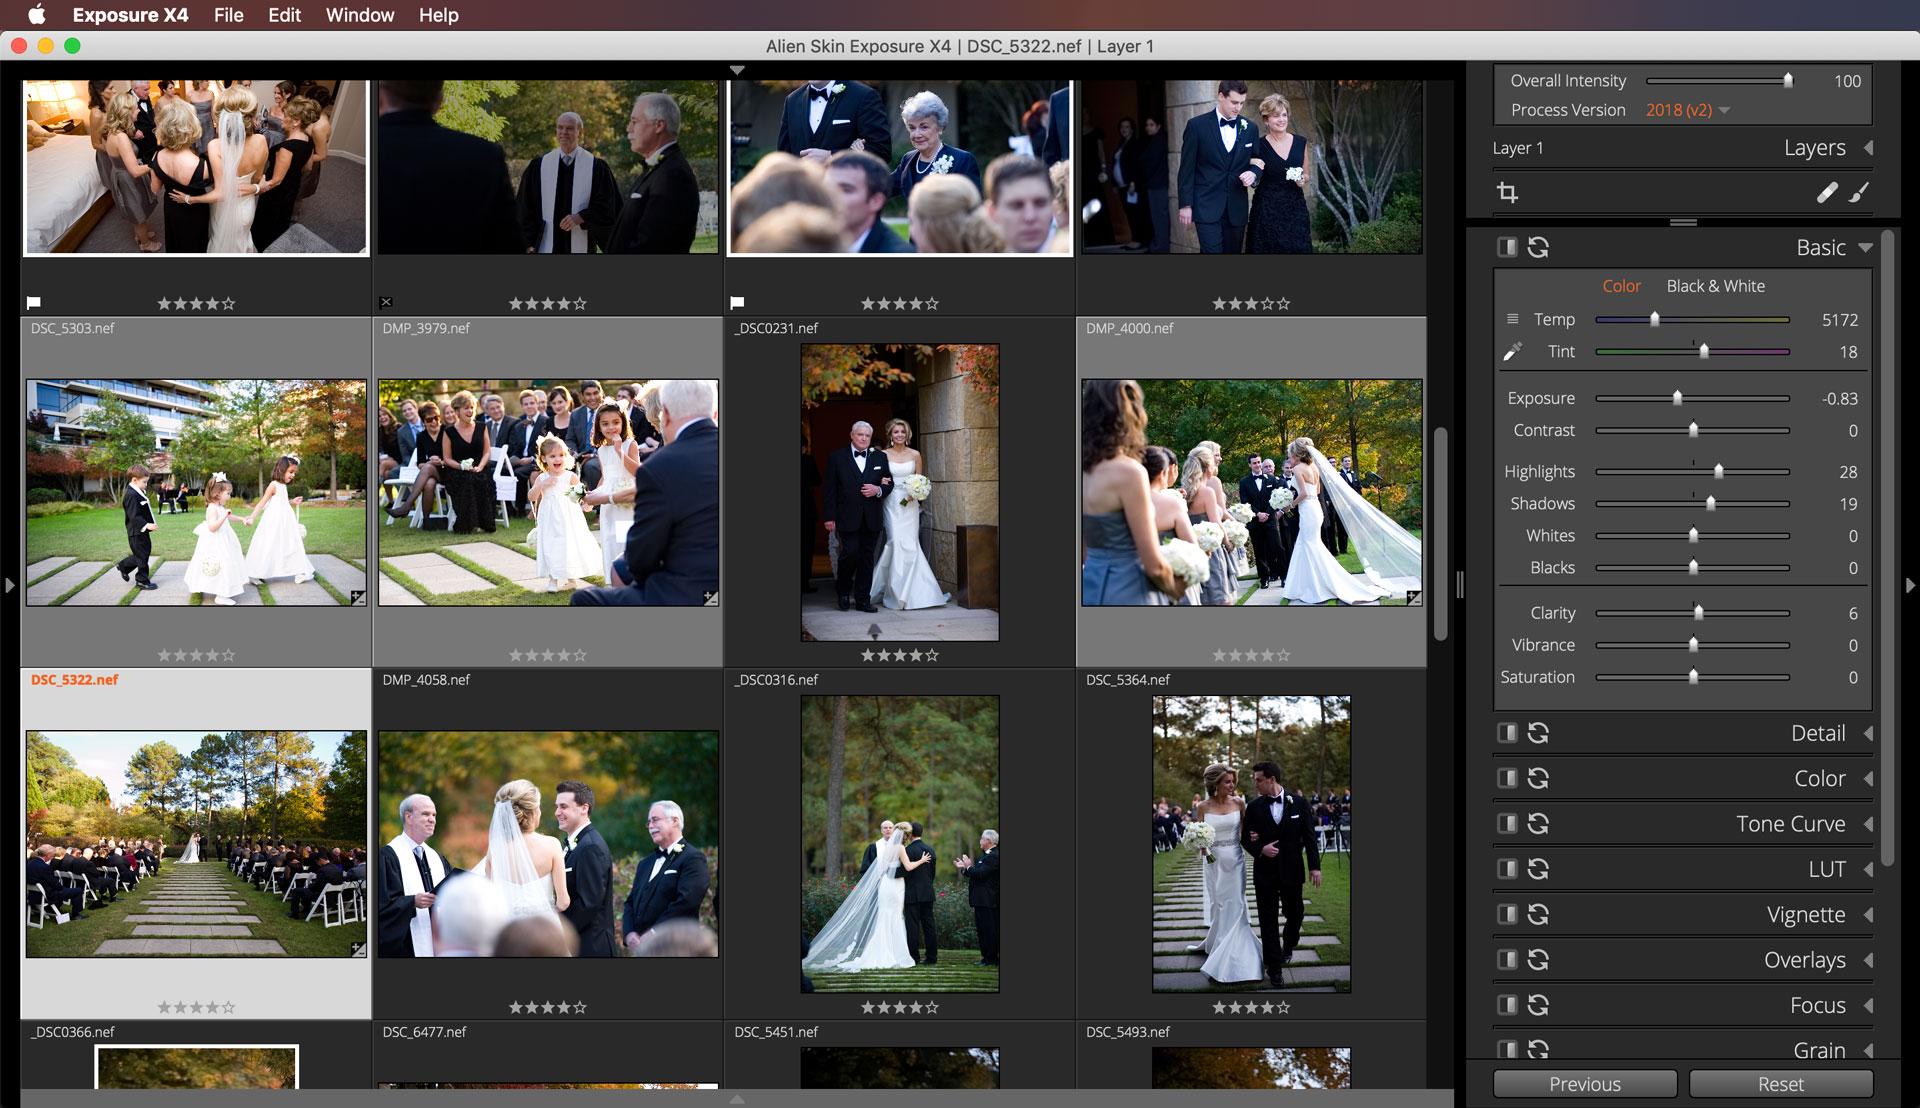
One of the biggest consumers of time when you’re post-processing is meticulously editing individual images. You can speed up that process, though, by using the batch edit function.
If you have a set of photos that were taken under the same conditions - say, the say lighting - a variety of edits can be done to the entire set of photos simultaneously.
Quick Tip: In Exposure, just select the photos you wish to batch edit, and you can apply basic edits, apply presets, adjust the white balance, and even recompose the images using the crop tool all in one fell swoop. When it comes to digital photo processing, this is one of the biggest time-savers you can implement.
Get a free trial of Exposure and start improving your post-processing skills today.
Post-Processing Tip #4: Ramp Up Your Sharpening Efforts
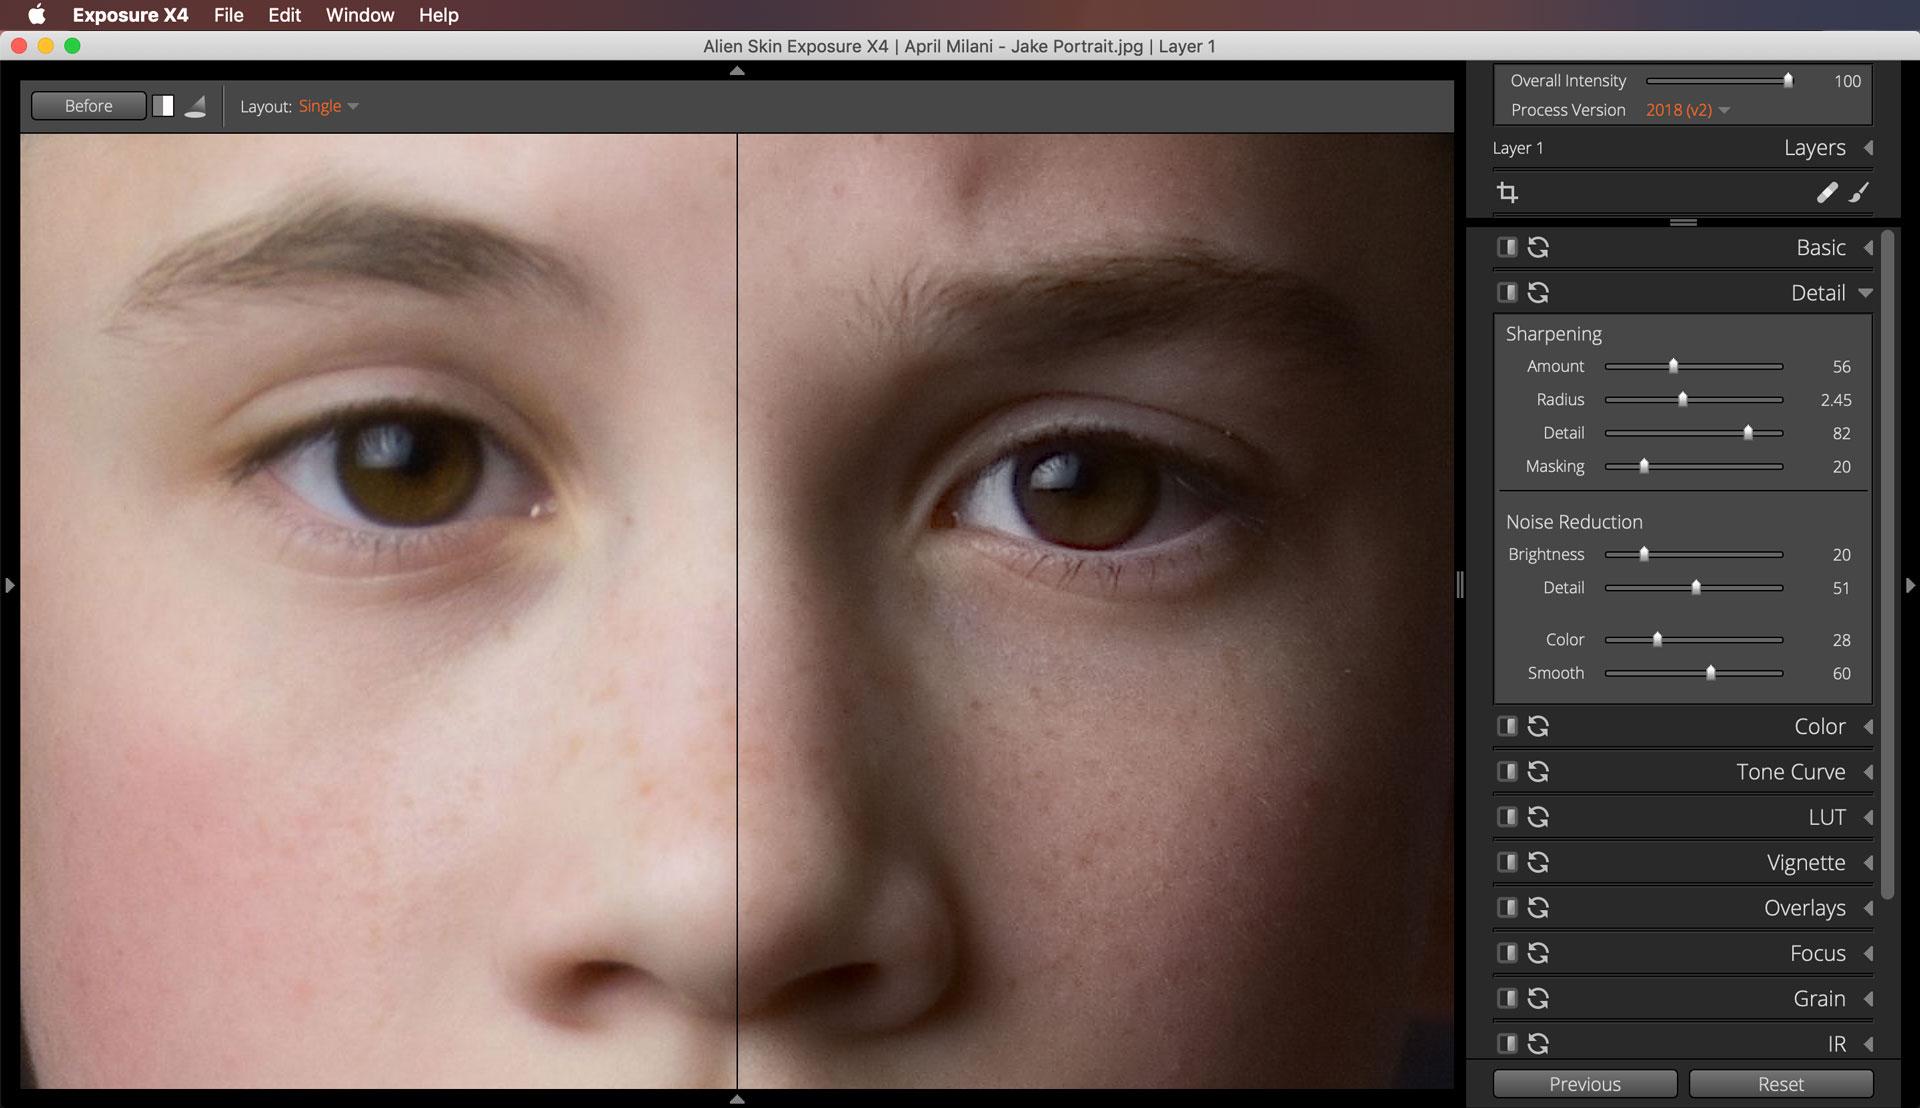
The RAW processing engine of Exposure offers you a wide range of tools that help you make exceptional photos. In addition to highlight and shadow recovery, noise reduction, color toning, and other crucial tools, Exposure also has highly effective sharpening tools.
The best way to make use of Exposure’s sharpening features is to zoom in to 1:1 and temporarily adjust the sharpening amount to the maximum.
Then, adjust other sharpening aspects like radius, detail, and masking while holding down the option key. Doing so gives you a visualization of the areas that will be sharpened.
As a final step, reduce the sharpening amount to an appropriate level. The end result will be a tack-sharp photo that gives viewers a clean, crisp view of the subject.
Post-Processing Tip #5: Consider Presets
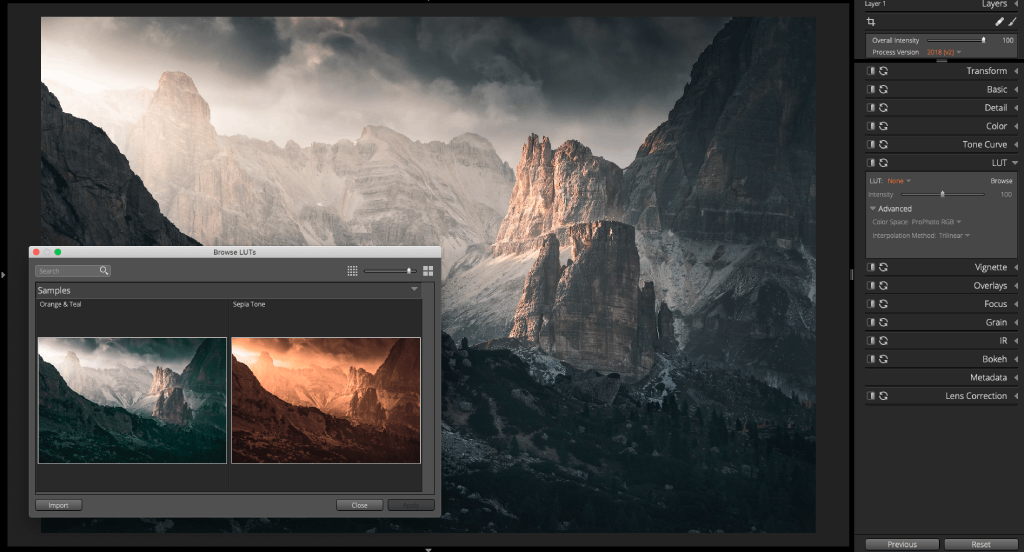
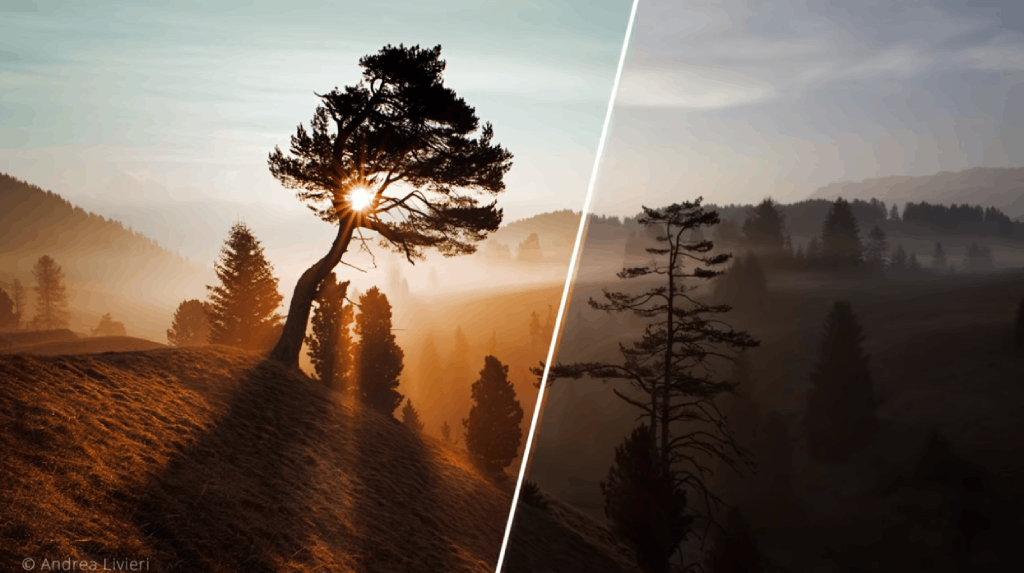
Photo © Andrea Livieri. This screenshot shows the new LUT support in Exposure X4.5. Two striking new looks are shown in the Browse LUTs dialog, each dramatically transforming the original image. LUTs can be imported into Exposure for an endless variety of new styles.
I don’t know about you, but the most difficult part of post-processing for me is simply figuring out which preset looks the best. I can spend 10, 15, and even 20 minutes or more poring over presets trying to find the right one.
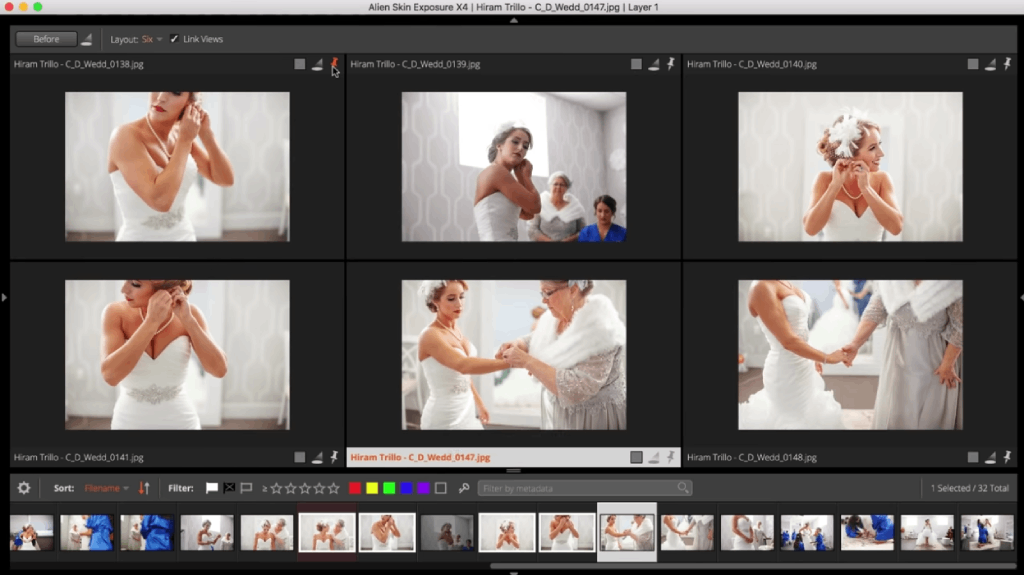
In Exposure, this process is made easier because you can view different options on the screen at once. This makes selecting which preset works the best a much, much easier process.
I just pick my top several presets (out of the several hundred available), use Exposure’s comparison view to see them on-screen at the same time, and go from there. It truly makes a tedious process a breeze!
Quick Tip: You can make your own presets, apply them in a single click, and use Exposure’s layering and advanced brush tools to blend them together for a completely custom look.
Bonus Post-Processing Tip: Export Accurately
How you export your images depends on their end-use.
For example, if you’re exporting an image to post on Instagram, its size, compression, file type, bit depth, and more will be different for a photo of a client that you’re sending to print.
Fortunately, Exposure has a way to streamline this process as well, thanks to its Quick Export functionality.
Quick Export enables you to easily set up customizable file handling recipes to simplify and speed up the production of images. So, no matter the situation or the end-use of the photo, Exposure can help you export it in a manner that works best.
Easy, right?! With these tips and the intuitive tools and ease of use of Exposure, you’ll be able to make quick work of post-processing without sacrificing image quality. What’s not to like about that?
Get a free trial of Exposure and start improving your post-processing skills today.
We Recommend
How to Convert an Image to Black and White
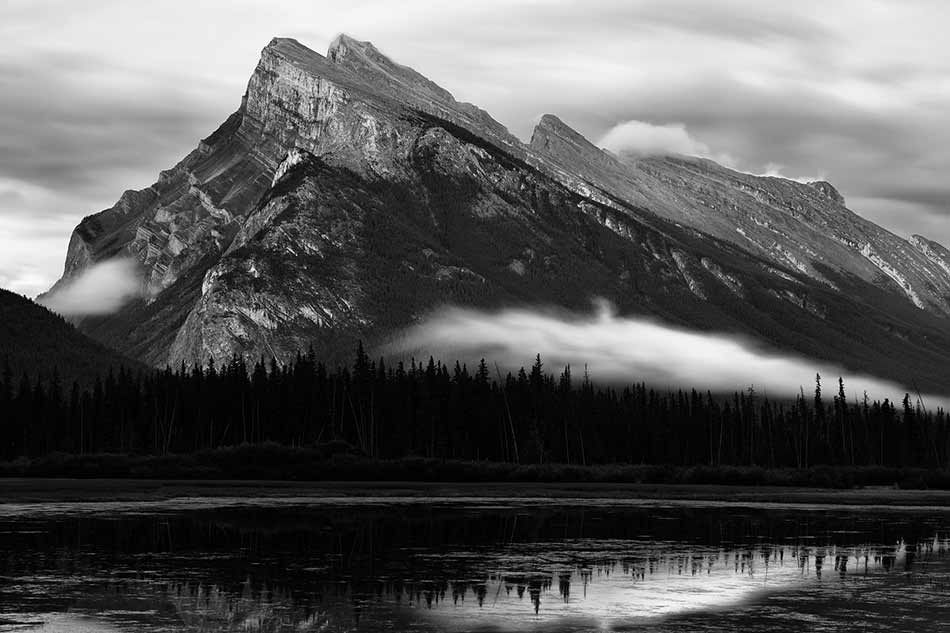
photo byIanChrisGraham via iStock
Sometimes the photos you take simply have more impact as a black and white photo.
Perhaps the photograph is rich with contrast. Maybe there’s lots of textures or patterns. Or there might be interesting lines or shapes in the shot that could be accentuated in a black and white photo.
There are many different ways in which you can convert a color image to a black and white one. But in this tutorial, we’ll explore how to convert an image to black and white using Exposure by Alien Skin Software.
The video above provides a quick step-by-step process for creating black and white images.
Below I’ve outlined each step for easy reference.
Let’s get started!
Convert an Image to Black and White Step 1: Prepare the Color Image
YouTube Screenshot/Alien Skin Software
The first step in learning how to make a black and white photo is to prepare the original color photo for conversion.
This preparation process should involve basic edits like correcting color casts, getting the exposure just right, and boosting contrast, as that will enhance the appeal of the black and white shot. These tools can be accessed in the Basic tool panel, as shown above.
Likewise, it’s important to reduce any noise that’s present in the color photo, unless you want that grainy look for the black and white image you’ll create.
Naturally, doing these kinds of edits to a color photo is best accomplished if you shoot in RAW format.
RAW files retain all the unprocessed data collected by the camera’s sensor, so there is far more data with which to work in post-processing than you get with a JPEG.
Additionally, RAW files allow you to process images without changing the source file and without losing image quality, neither of which is true for JPEGs. So, if you want the best results, shoot in RAW!
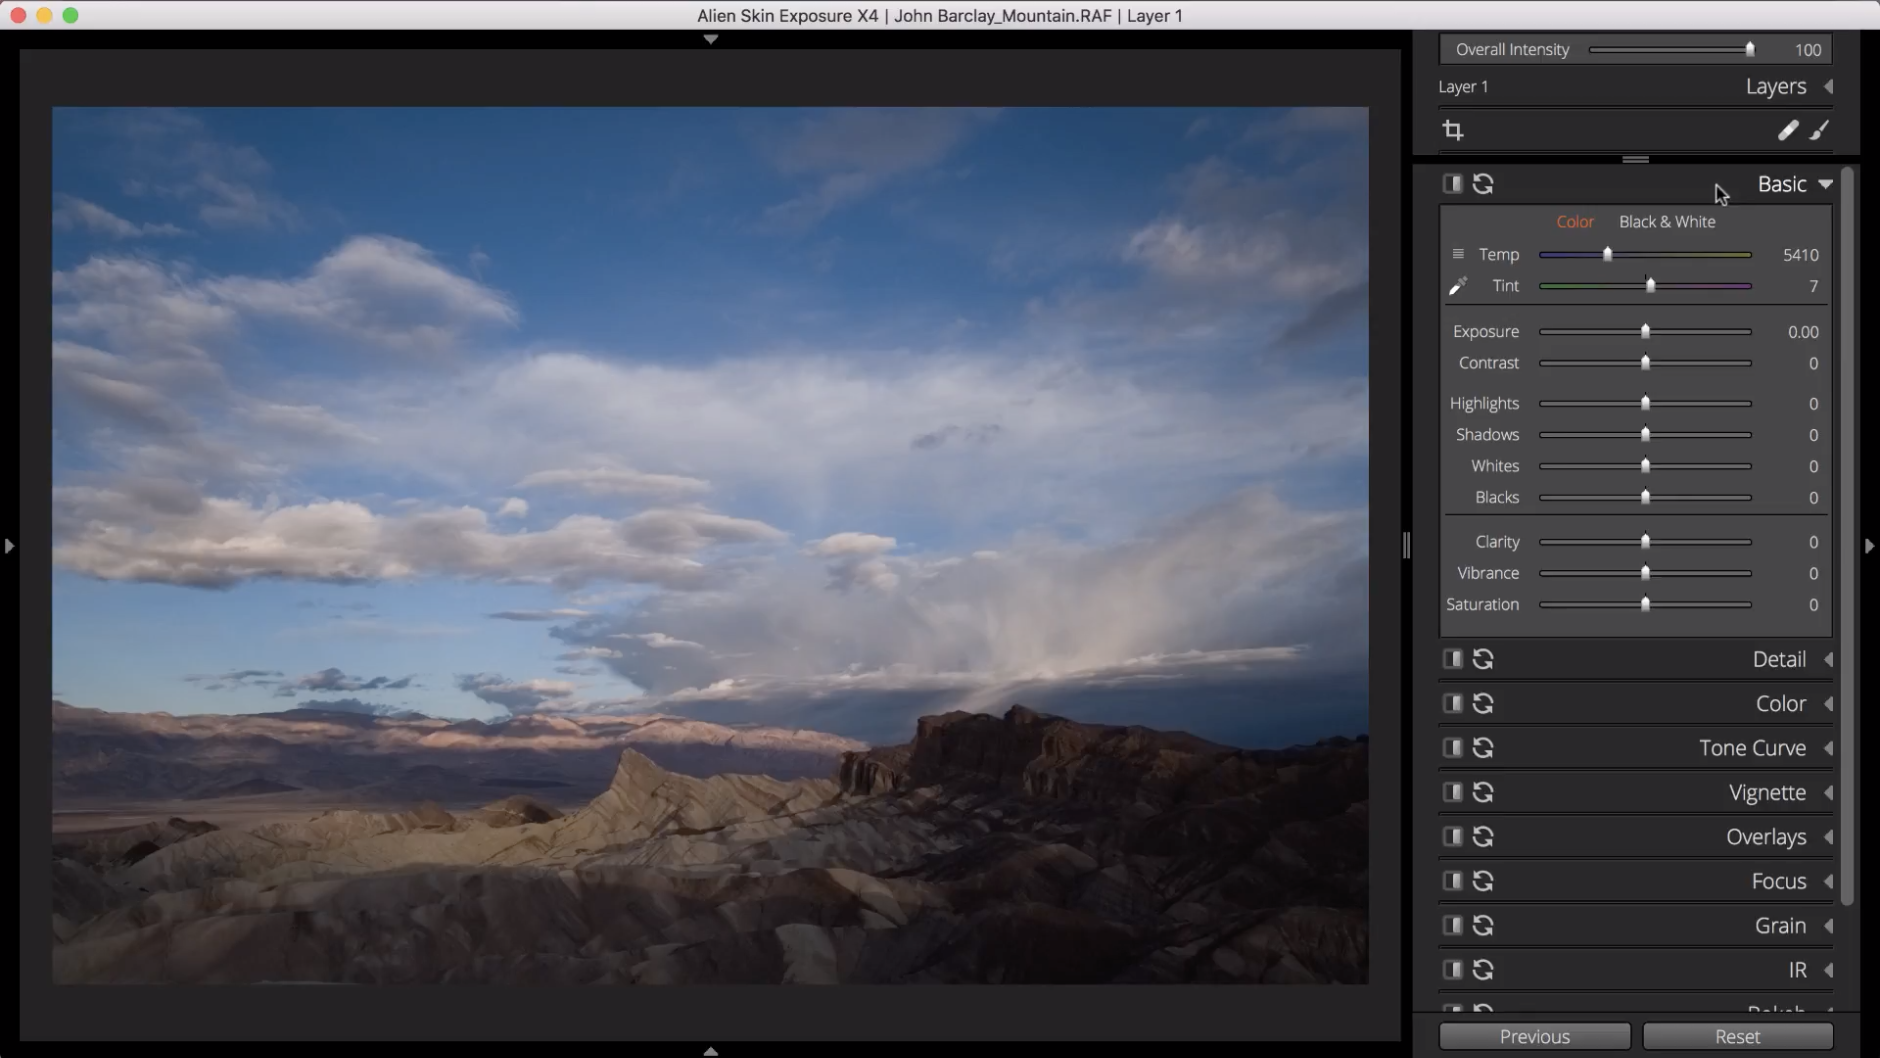
YouTube Screenshot/Alien Skin Software
When working on the original color photo, be sure to consult the histogram in Exposure (shown above), that way you can see if the adjustments you’re making are clipping the highlights or shadows.
In this sample, the image could use a little more brightness.
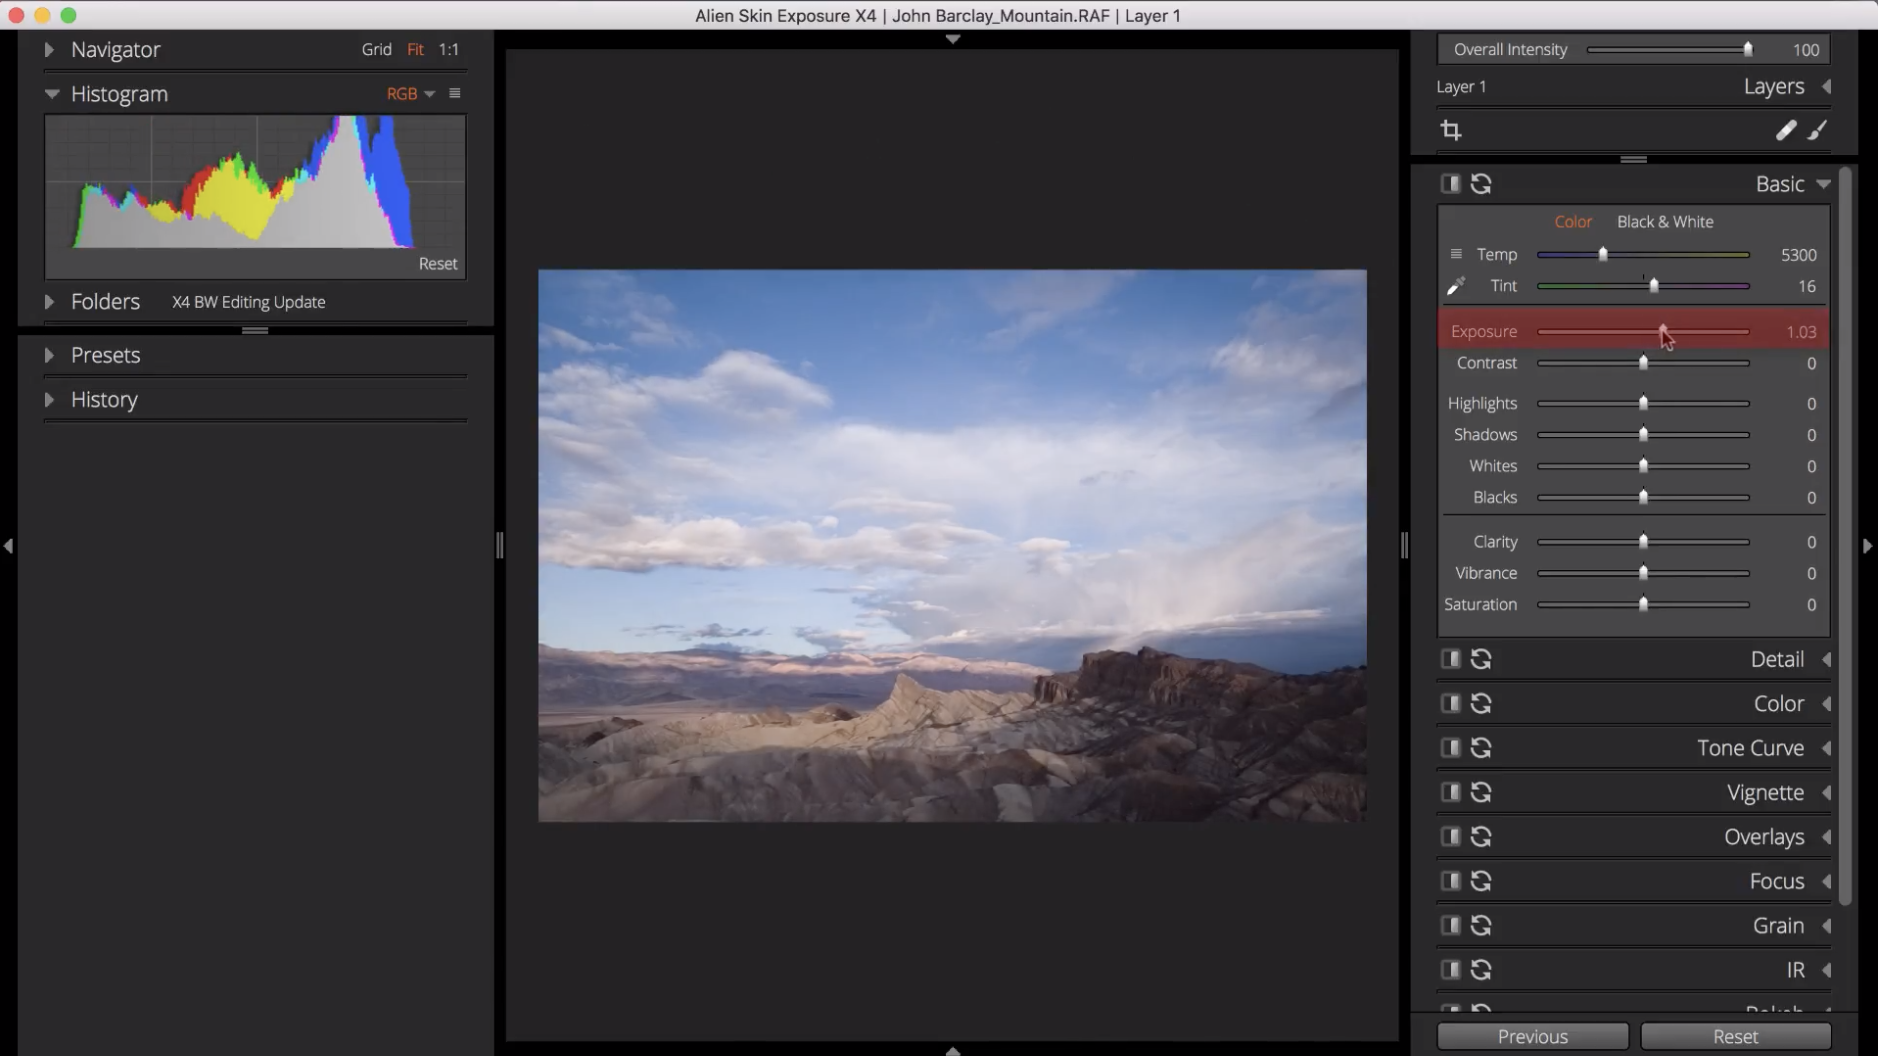
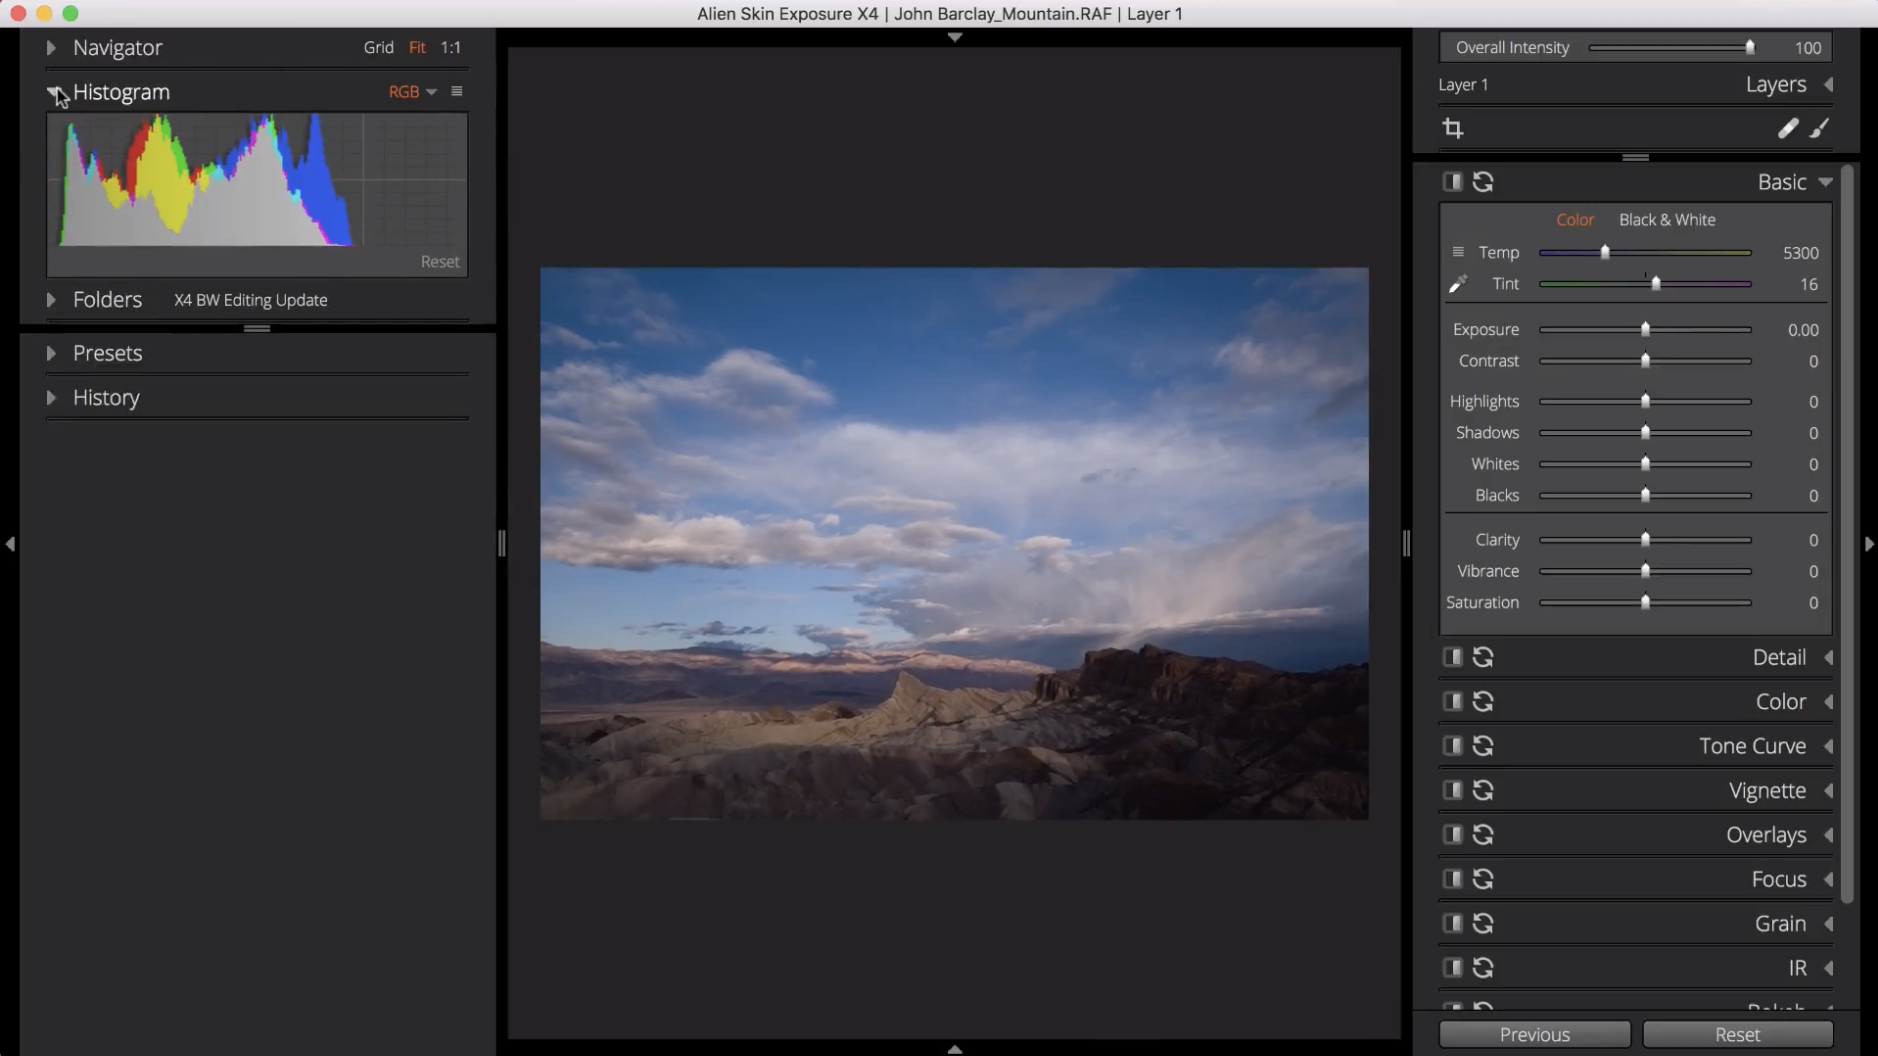
YouTube Screenshot/Alien Skin Software
As you can see above, dragging the Exposure slider to the right brightens the shot. Adding a little contrast further helps prepare this image for conversion to black and white.
Learn More:
Convert an Image to Black and White Step 2: The Black and White Conversion

YouTube Screenshot/Alien Skin Software
The second step in the process is to initiate the black and white conversion.
As you can see above, this is a simple task of selecting the Black & White option in the Basic panel. Once you do so, Exposure converts the image for you.

YouTube Screenshot/Alien Skin Software
The Black & White setting applies the default color settings to the shot, the result of which is an image with a good base that’s ideal for black and white conversion.
From here, it’s a matter of fine-tuning the image.
Quick Tip: Exposure also has a number of black and white presets you can use to make even faster black and white conversions. Learn more about these presets here.
Convert an Image to Black and White Step 3: Make Fine Adjustments to Colors

YouTube Screenshot/Alien Skin Software
In this sample, the Clarity tool helps bring out the details in the shot, particularly in the rocky areas in the foreground.

YouTube Screenshot/Alien Skin Software
As mentioned before, the default color settings are applied to the black and white image. You can access these settings in the Color Panel, where you can adjust the brightness of each color to improve the contrast of the shot.
Alternatively, you can use the color presets in Exposure to change the look of the shot depending on which color preset you use - red, blue, green, and so on.
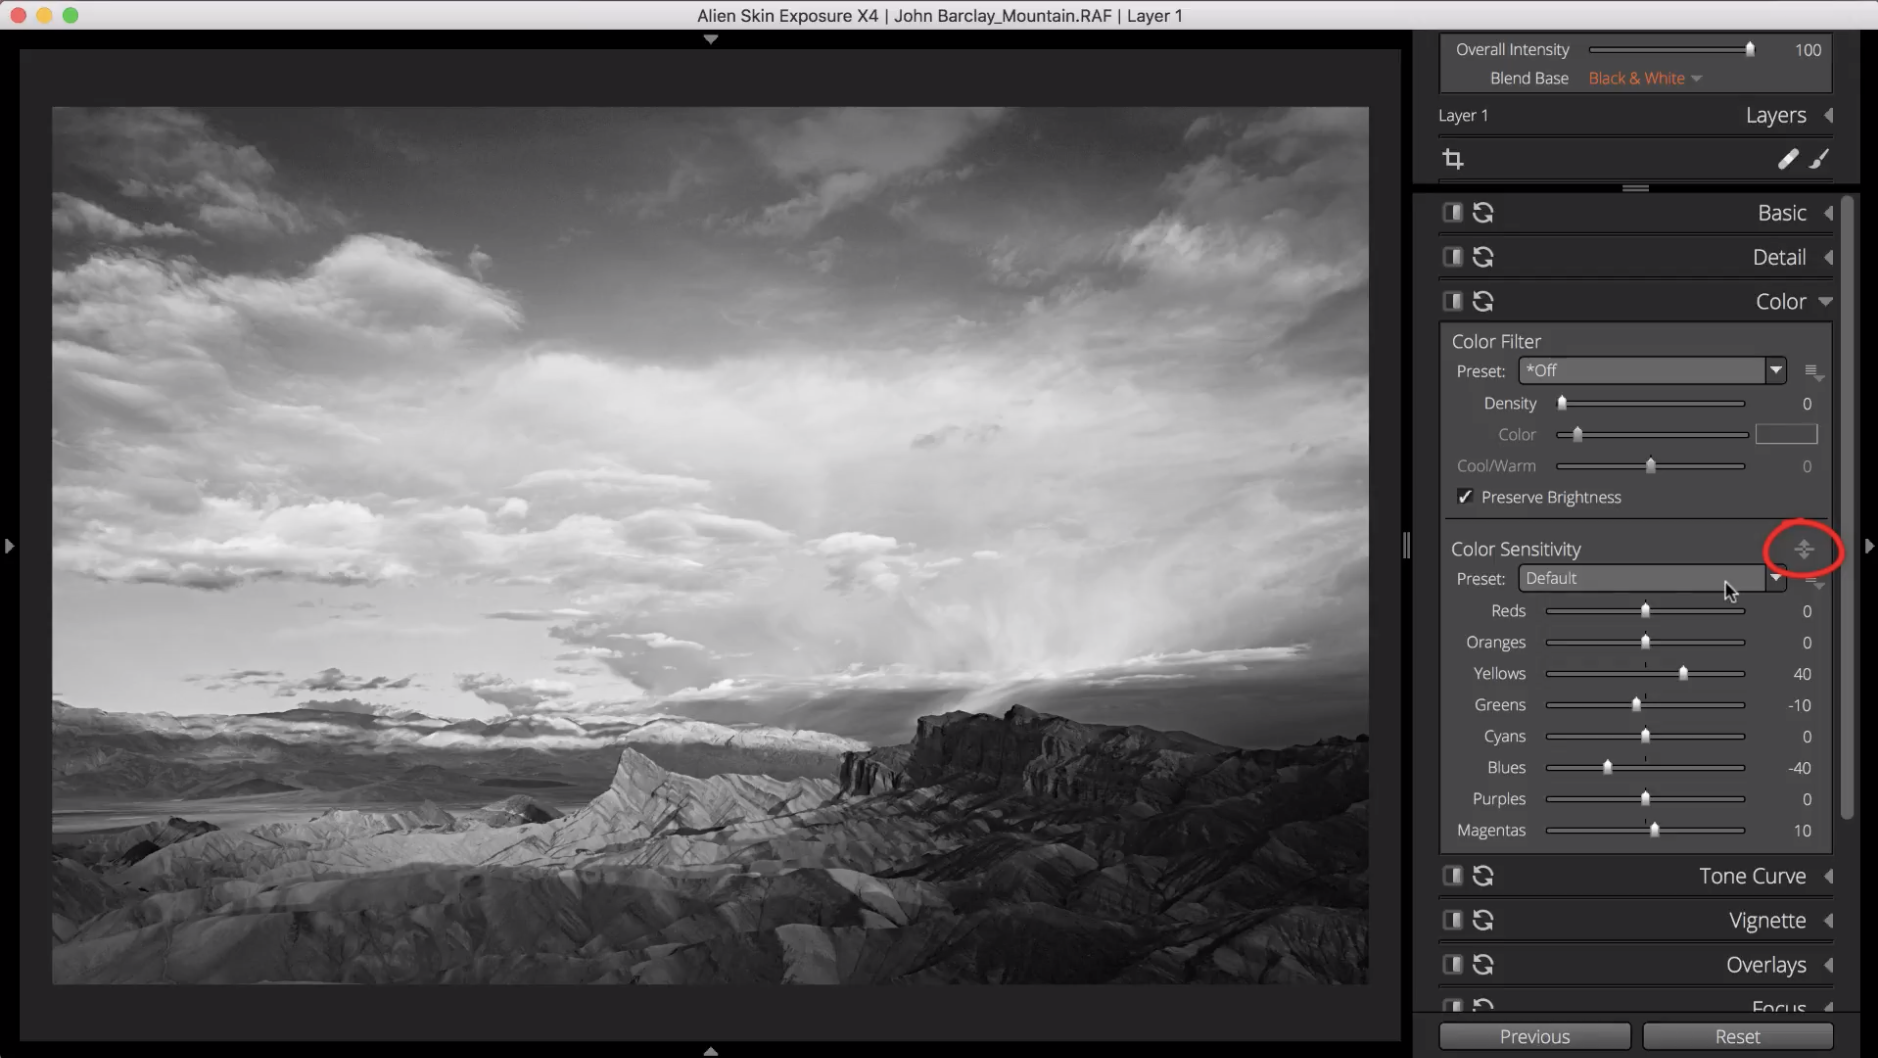
YouTube Screenshot/Alien Skin Software
It’s also beneficial to use the Targeted Adjustment Tool (highlighted above) to brighten or darken specific colors in the shot.
You simply click on an area of the image to select a color, and then drag the mouse up to brighten that color throughout the shot or drag the mouse down to darken it.
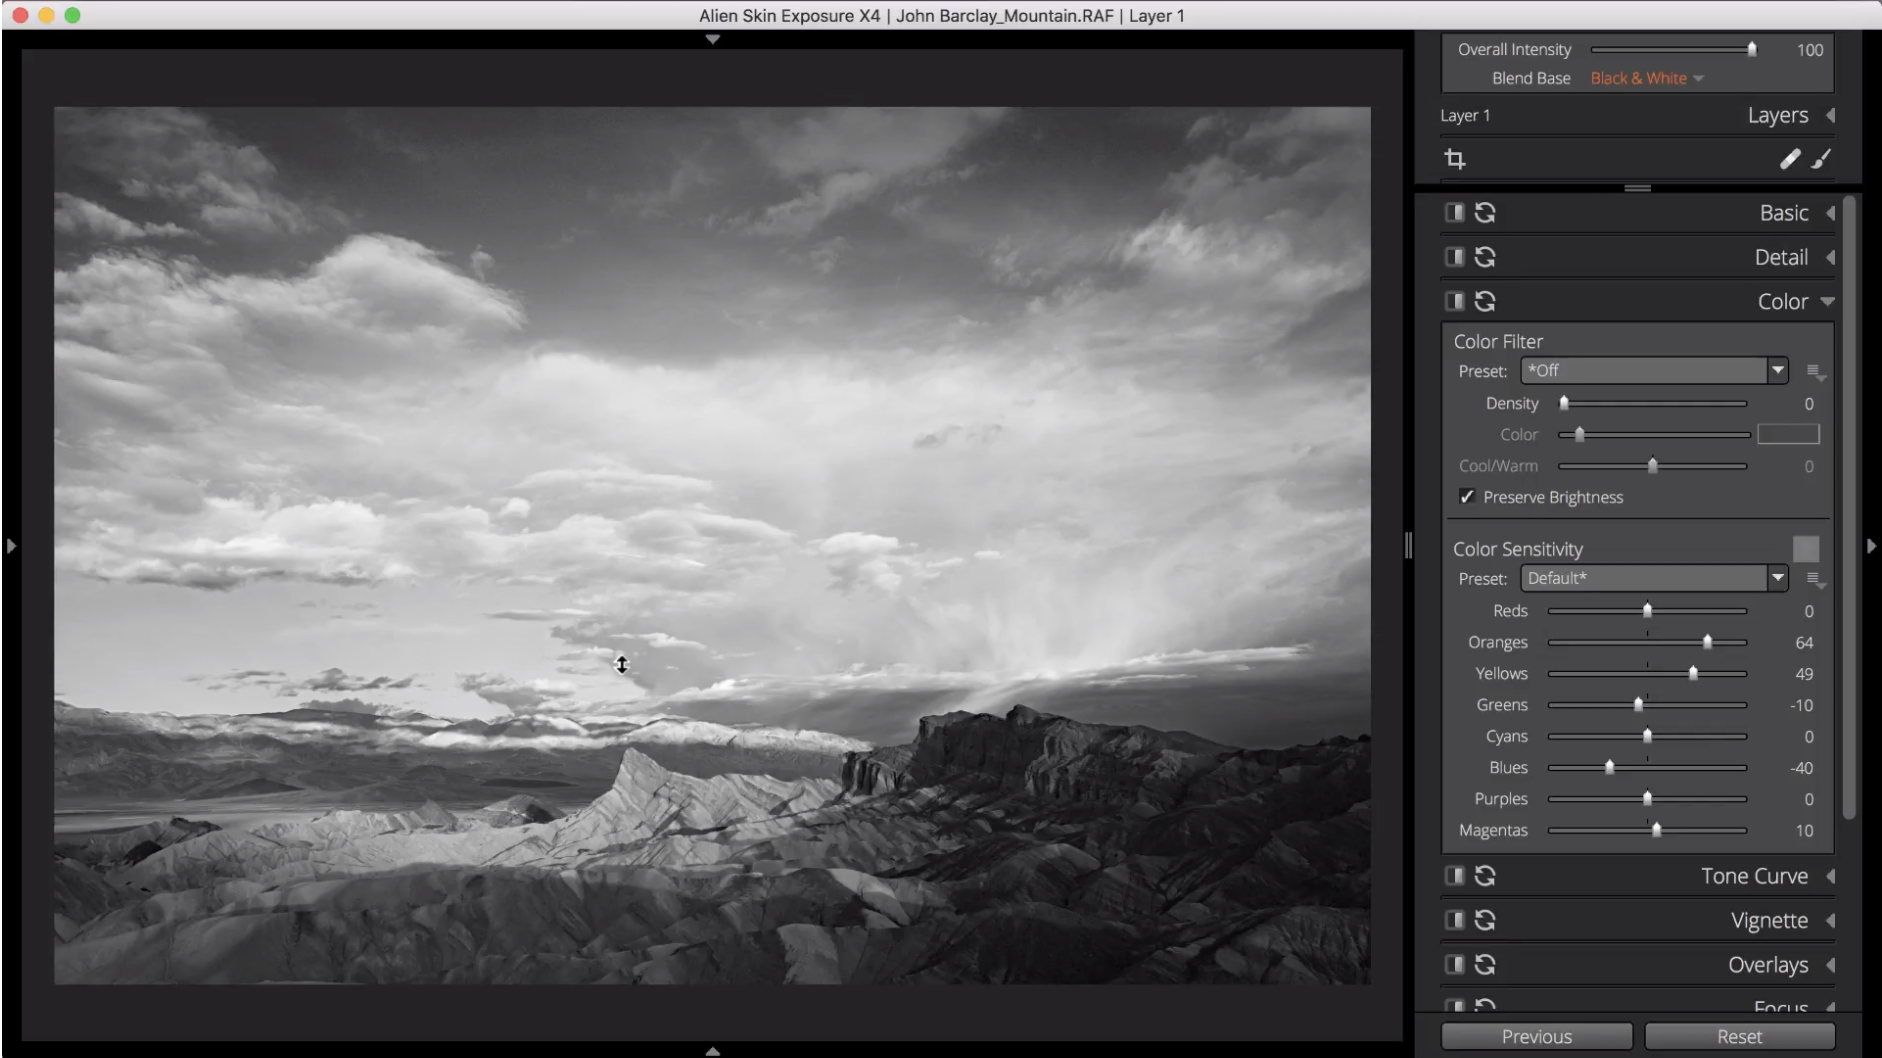
YouTube Screenshot/Alien Skin Software
In this example, the mountaintop, which has strong orange and yellow tones, was selected.
By dragging the mouse upward, these two colors are boosted throughout the shot. Notice the difference in positioning on the orange and yellow color sliders in the image above from the image previous to that.
Learn More:
Convert an Image to Black and White Step 4: Make Tone Adjustments, Add a Vignette, and Sharpen
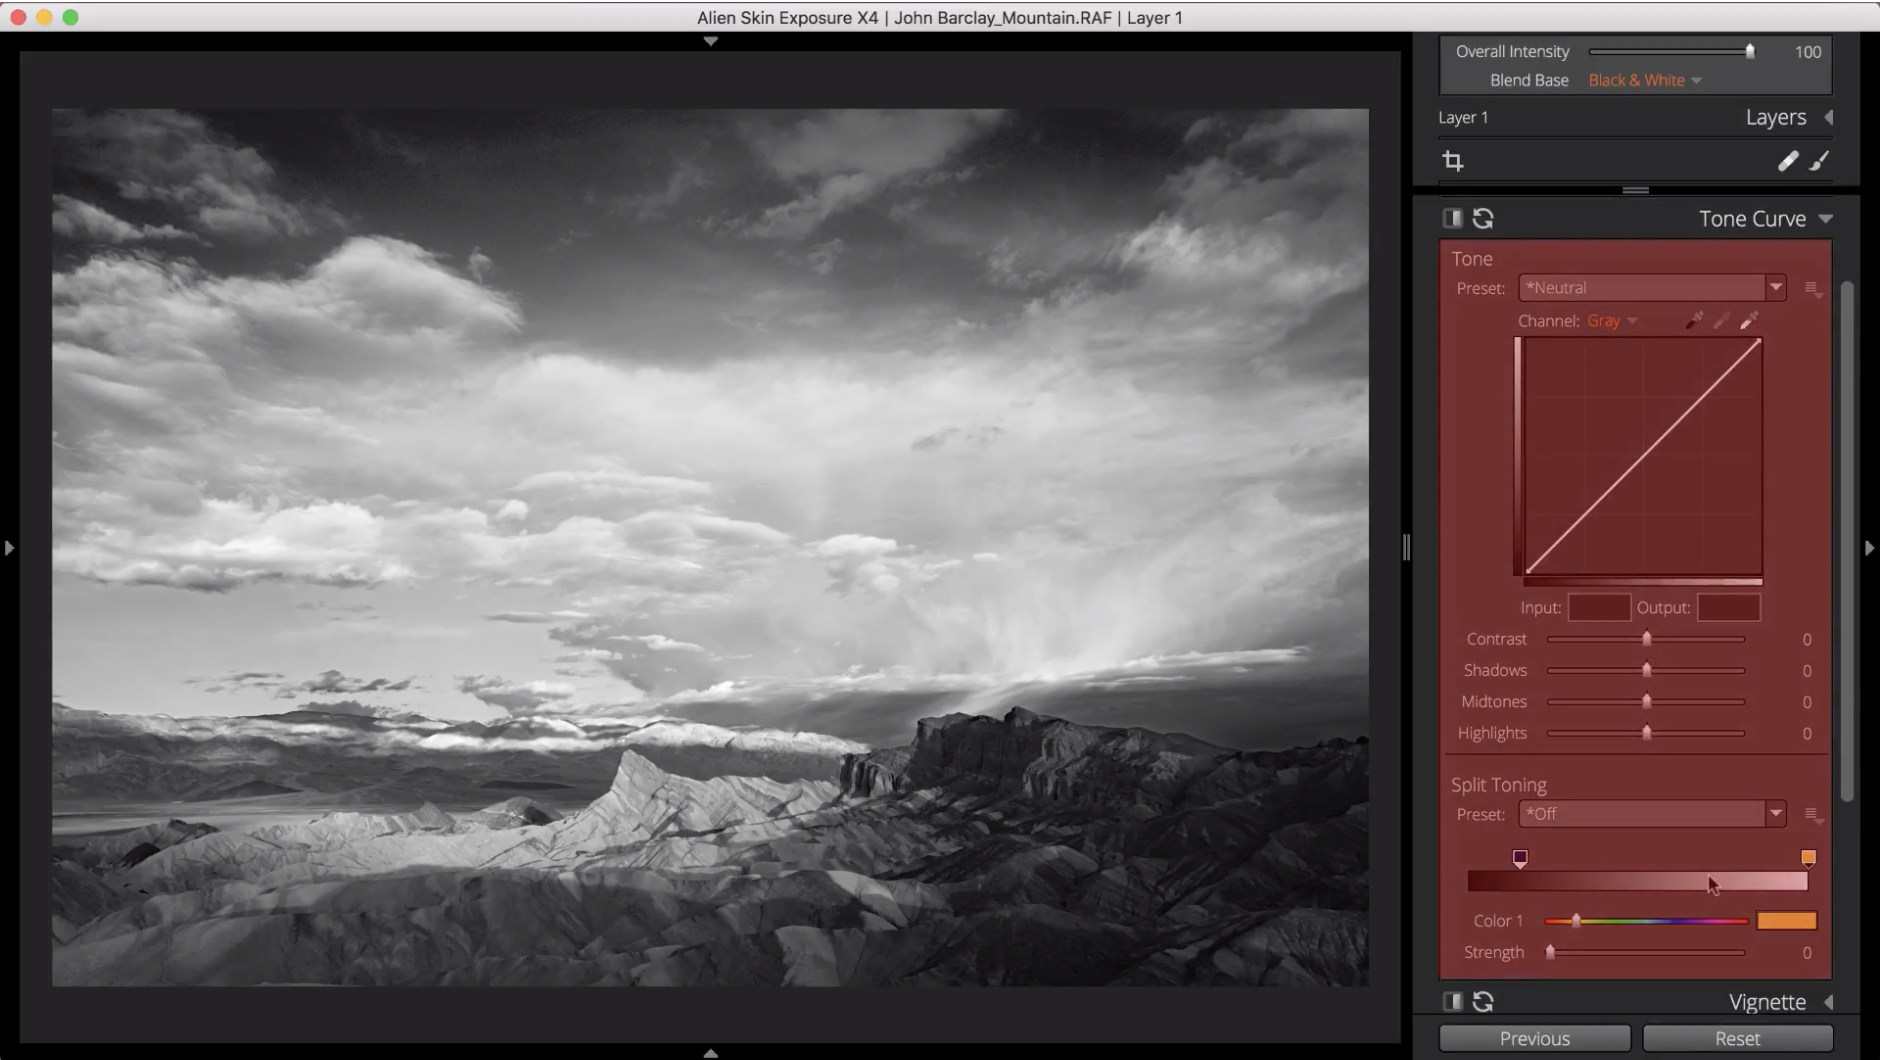
YouTube Screenshot/Alien Skin Software
Using the Tone Curve Panel (shown above), you can make pinpoint changes to the shadows, midtones, highlights, and overall contrast of the image.
By increasing the shadows, for example, and decreasing the midtones, you can enhance contrast that will make the image a more appealing black and white photo.
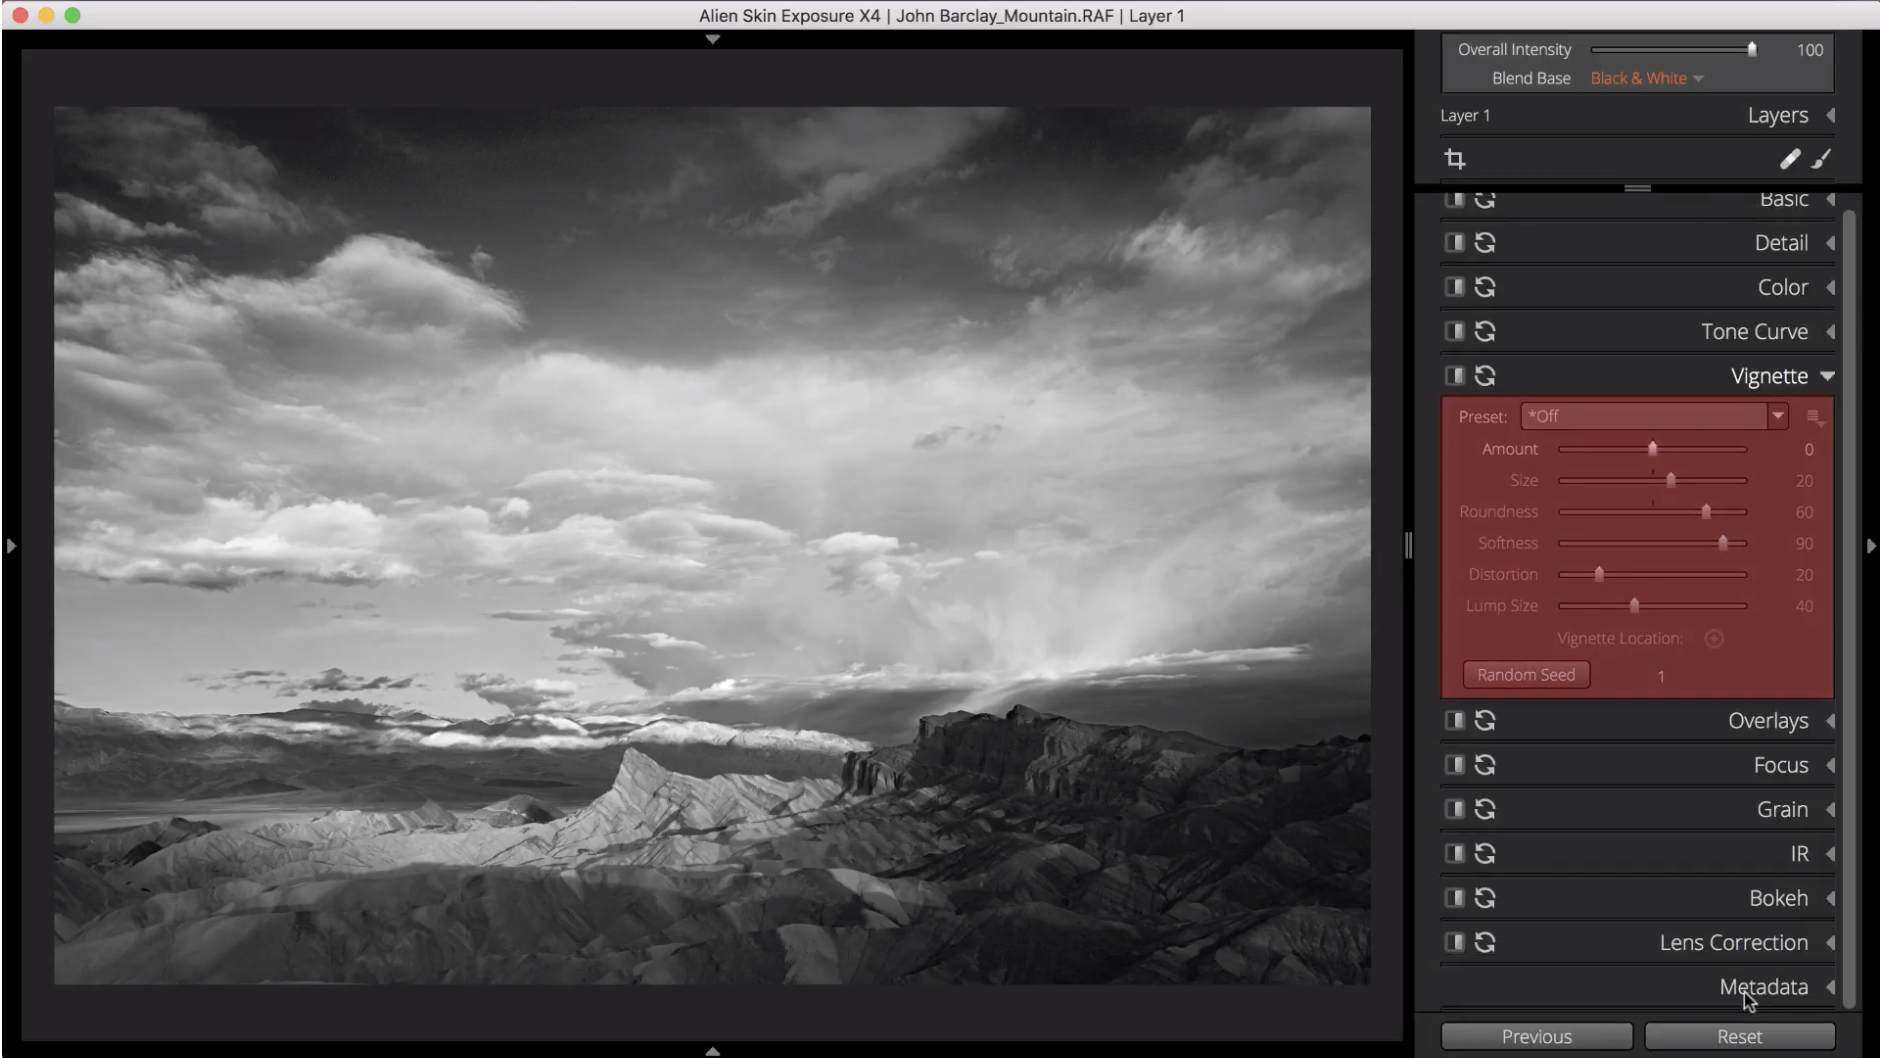
YouTube Screenshot/Alien Skin Software
You can also add a vignette - a slightly darkened area around the perimeter of the shot - to increase tonal differences and help draw the viewer’s eyes toward the center of the photo.
Lastly, you can sharpen the photo to make sure the image is as crisp as possible.
In the Focus Panel (shown above), apply the Low Radius preset to add a moderate amount of sharpening.
It’s important to not go overboard with sharpening - less really is more, otherwise the image will look harsh and overedited.
YouTube Screenshot/Alien Skin Software
And that’s it! This basic workflow for how to make a black and white photo will get you positive results each time.
And, as the video at the beginning of this article demonstrates, it doesn’t take but a few minutes to work through the conversion process in this manner.
Effective and fast - what more can you ask for?!
If you haven’t tried Exposure yet, pick up a free 30-Day trial to give it a test drive and see how it can help you improve your post-processing workflow.
We Recommend
How to Fix Color Casts

Photo by Atikh Bana on Unsplash
Learning how to fix color casts is a simple process. This is fortunate because color casts are extremely common, so correcting them takes just a few moments.
Before we explore how to fix color casts, it’s necessary to understand what color casts are and why they occur.
What is a Color Cast?
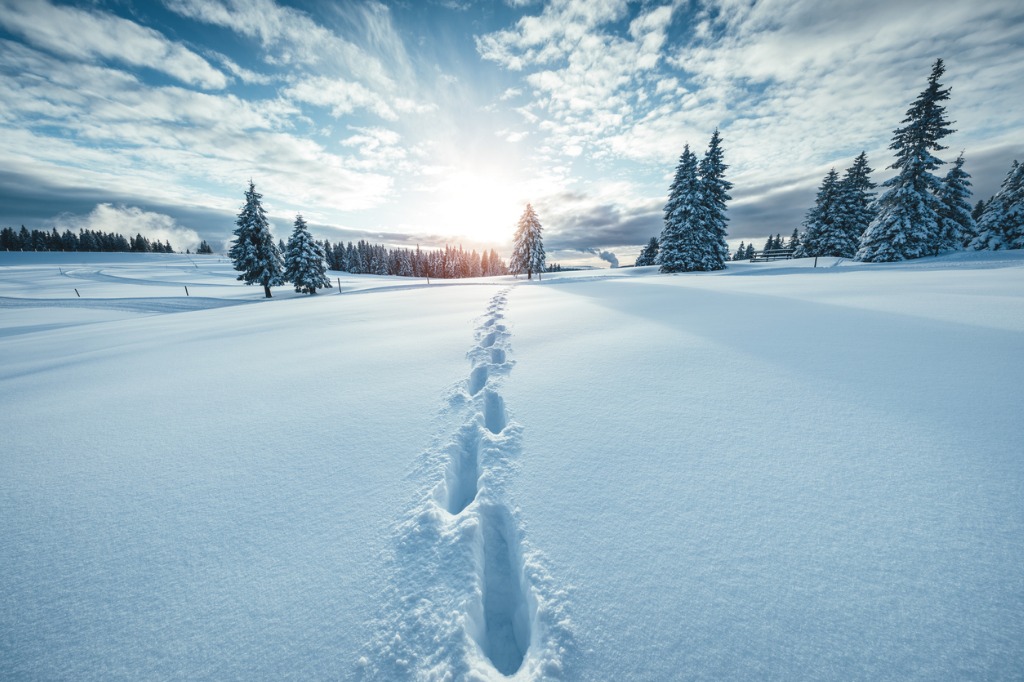
photo by borchee via iStock
The simplest color cast definition is this: a color tint that results from incorrect white balance or contaminated light. In the image above, the snow is blue, not white as it should be. This is a color cast.
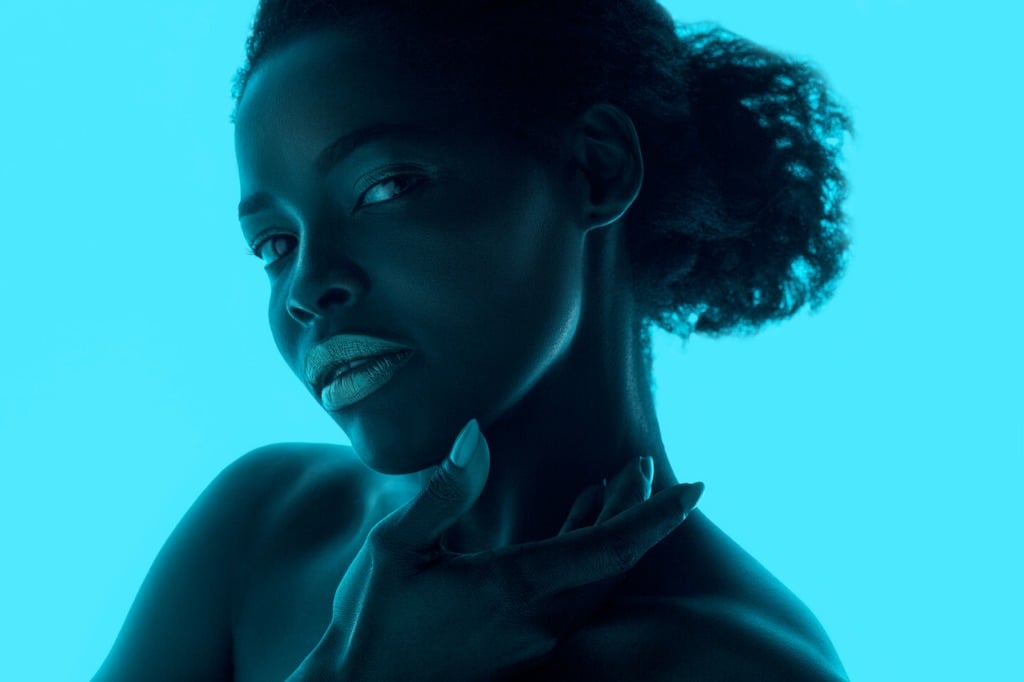
photo by anton5146 via iStock
As another example, color casts can result from colored light (like the blue light in the image above) or neutral light that bounces off a colored surface, like a yellow color cast that results from light bouncing off a yellow wall.
Color casts often appear throughout an image, though they are much easier to identify in lighter areas.
To determine whether a color cast exists, examine an area of the shot that should be white or gray (like the whites of the model’s eyes in the image above). If that area is not white or gray as it should be, you’ve got a color cast problem.

Photo by Jonatan Pie on Unsplash
Of course, color casts can be used as a creative tool for impact.
While accidental color casts are unwanted, purposeful color casts can add a lot of drama to a photo, as shown above.
In this case, the greenish-blue tint of the image adds a surreal and mysterious vibe to the photograph.
Learn More:
Mitigate Color Casts by Shooting in RAW
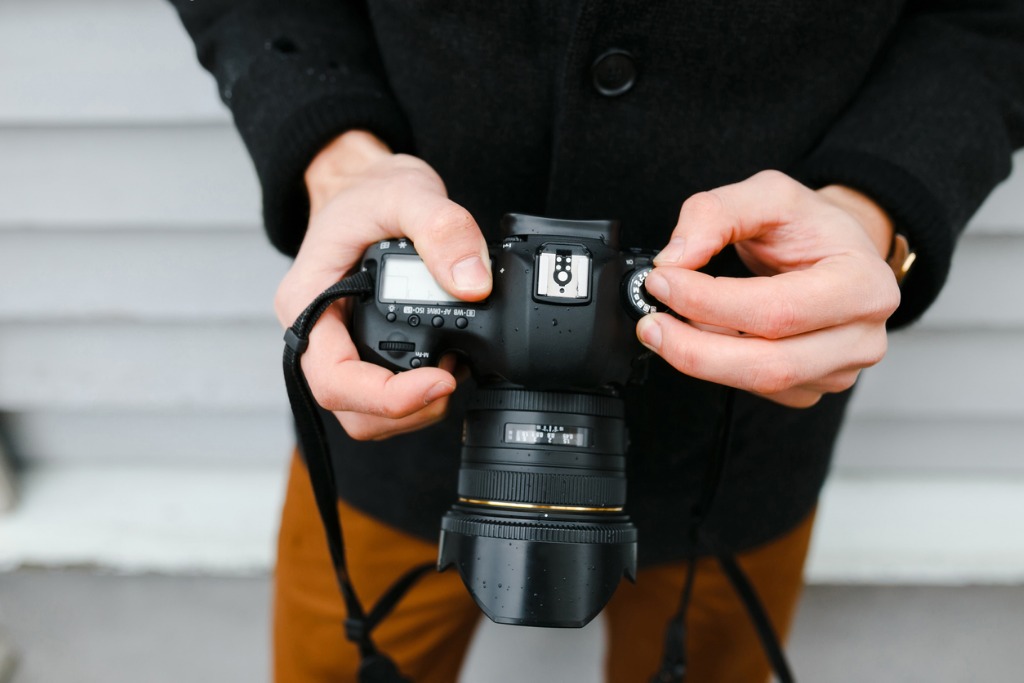
photo by IlyaOreshkov via iStock
Fixing color casts begins by selecting the appropriate file type.
By shooting in RAW rather than JPEG, you empower yourself to have more leeway when editing your photos.
Because RAW files retain far more data than JPEGs, you have more information with which to work in post. This includes white balance details about the image, which are rendered as metadata in a RAW file as opposed to it being applied to the pixels in the shot, as is the case with a JPEG.

photo by HRAUN via iStock
As a result, you can make pinpoint adjustments to the white balance of your images and do so without impacting the original pixels when you shoot in RAW. This means that RAW files are the best of both worlds - you can easily correct color casts due to white balance issues, and you can do so without degrading the quality of the image file.
Quick Tip: Another advantage of shooting and editing RAW files is that the corrections you make are much more precise. That is, the adjustments are not made to the image you see on your computer screen. Instead, a new image file is created based on the settings you select. When making similar adjustments to JPEGs, the effect is much more diminished and is also not as accurate.
How to Fix Color Casts
Fortunately, fixing color casts is a simple, straightforward procedure in post-processing.
To demonstrate how to fix color casts, let’s use Exposure by Alien Skin Software.
In Exposure, you can utilize just one tool - the white balance adjustment - to correct color casts and make neutral tones appear normal once again.
As demonstrated in the video above, this tool is ideal for use in images in which there is just one type of light illuminating the scene.
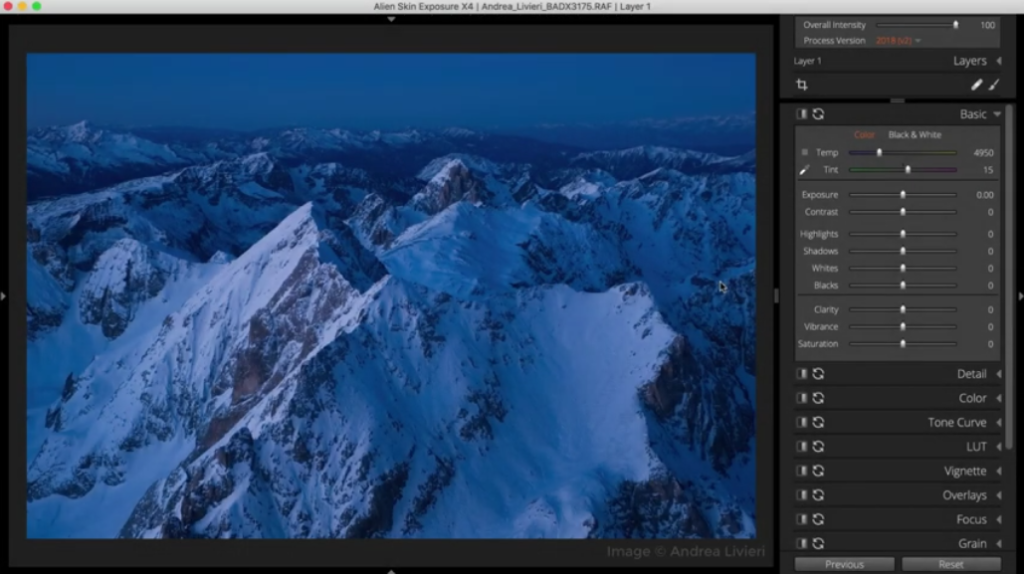
YouTube Screenshot/Alien Skin Software
As shown above, the landscape is illuminated with blue hour light, which has resulted in a strong blue color cast in the image.
YouTube Screenshot/Alien Skin Software
To correct this, you simply select the adjustment tool from the tool panel and click on an area of the image that should appear as a neutral color. In this case, clicking on any of the snow-covered areas will work, as shown above.
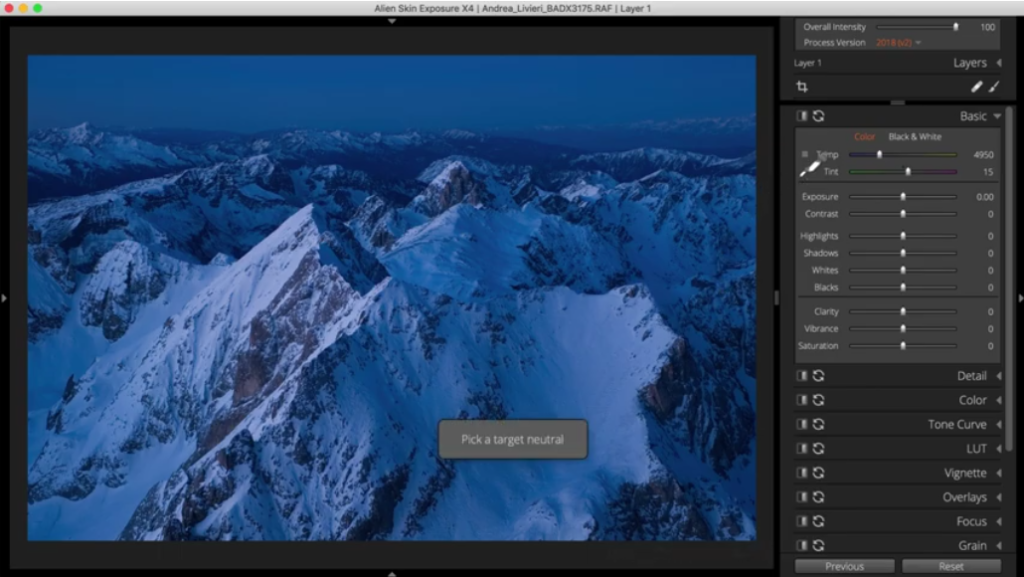
YouTube Screenshot/Alien Skin Software
Clicking on an area that should have a neutral color automatically corrects the color cast and sets the values for the color temperature and tint sliders on the right side of the screen, as shown above.
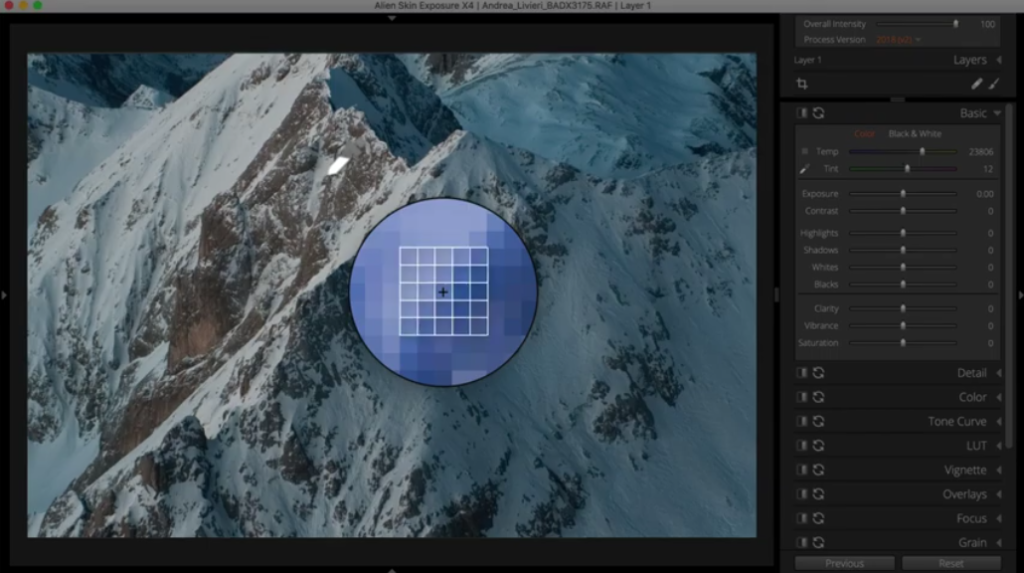
YouTube Screenshot/Alien Skin Software
What’s interesting about Exposure is that it’s color balance tool uses a 5x5 pixel grid to sample for white balance. This is advantageous because smaller sampling areas will include other colors, which can skew the results.

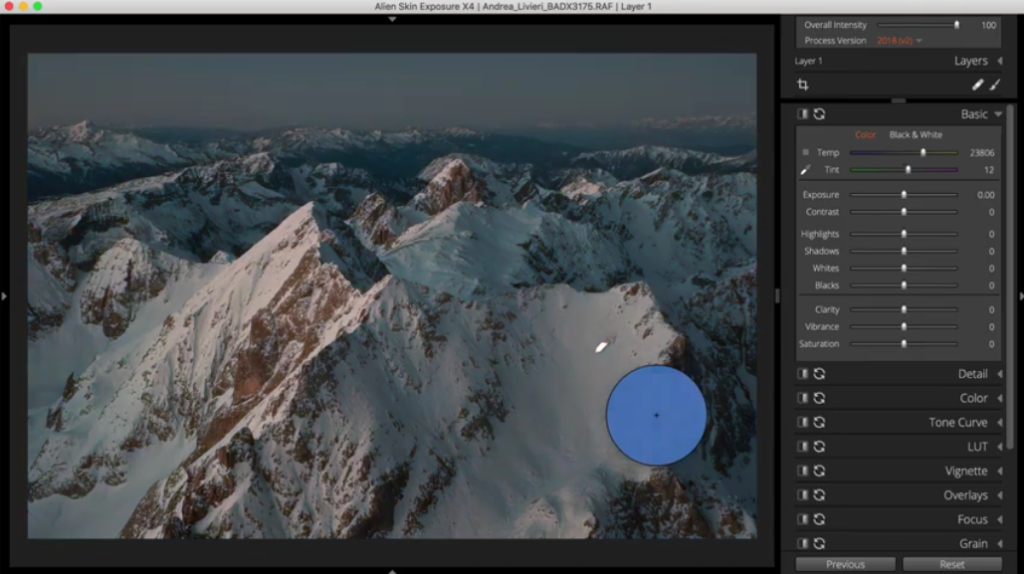
YouTube Screenshot/Alien Skin Software
The best practice for fixing color casts is to take white balance samples from several areas in the shot. Doing so allows you to find the most balanced sampling area, which will get you the most accurate correction for the color cast.
In the screenshot above, you can see that the sample in the middle provides the “cleanest” source area with a relatively consistent color throughout the grid.
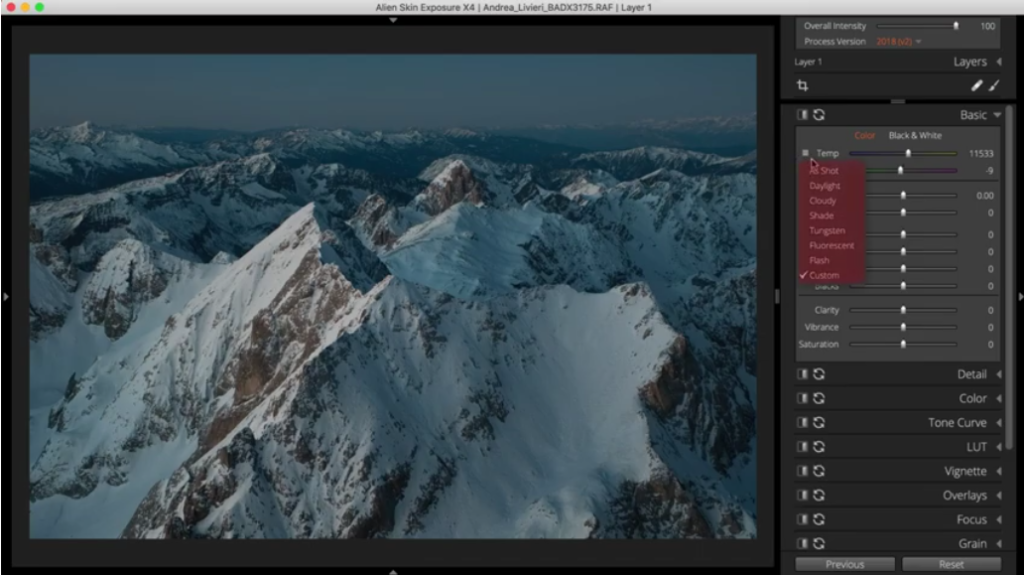
YouTube Screenshot/Alien Skin Software
Exposure also has various white balance presets you can use to correct common white balance issues quickly.
These sliders - which include Daylight, Cloudy, Shade, Tungsten, Fluorescent, and Flash - automatically adjust the sliders for temperature and tint when they are selected. Additionally, you can create a custom white balance preset should you desire.
Whether you use one of these presets or choose to utilize the adjustment tool, making corrections to color casts takes just a few moments to get spectacular results.
If you aren’t familiar with Exposure, or if you don’t have much experience in correcting color casts, you can download a free 30-day trial of the software to try these color cast fixes for yourself!
Learn More:
We Recommend
How to Fix Underexposed Photos

photo bykurmyshov via iStock
We’ve all been there…
The light might’ve been a little challenging or your camera settings might have been off (or maybe both!), and the result is an image that is just too dark.
While underexposing an image on purpose can help boost color saturation in a sunset photo or aid in creating a dramatic and moody shot, if the level of underexposure goes too far, you’ll notice a loss of detail in the image. Learn more about photoshoot poses for men on our website PhotographyTalk.com.
In particular, the shadowed areas of the shot will appear to be nothing but black blobs of space, so not exactly a good look!
In this quick tutorial, you’ll learn how to fix underexposed photos fast using Exposure by Alien Skin Software.
Table of Contents
- First Things First: Why Underexposure is Not a Good Thing
- How to Fix Underexposed Photos Fast
- Edit Underexposed Photos With the Help of a Histogram
- Fixing Dark Photos: Watch the Colors
First Things First: Why Underexposure is Not a Good Thing
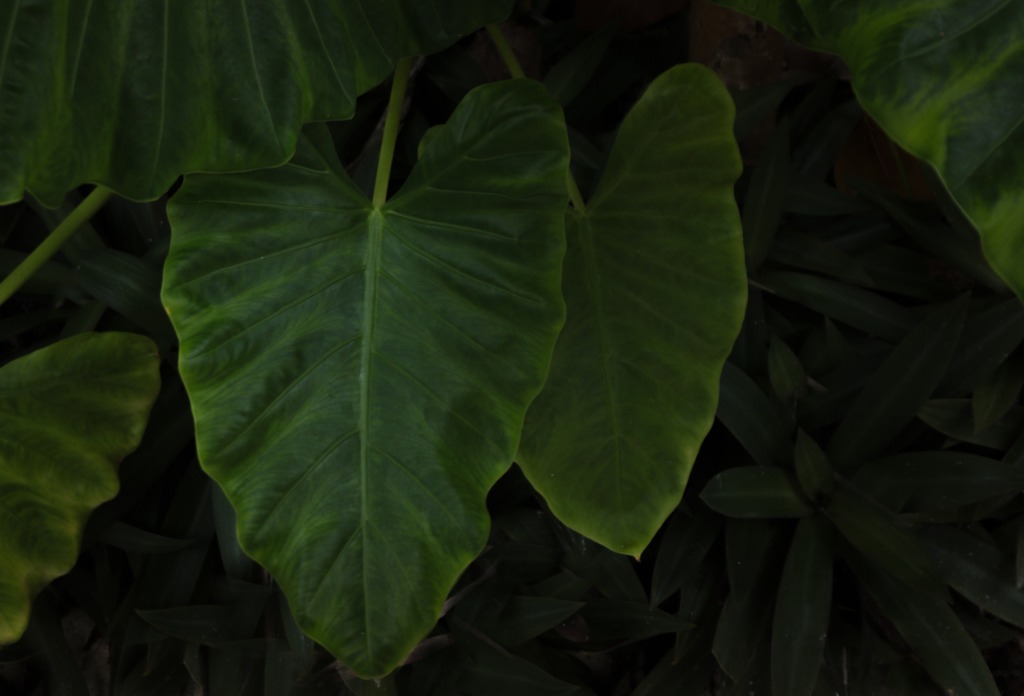
photo by MelanieMaya via iStock
As noted above, underexposed photos lose detail in shadowed areas. But why is this not a good thing?
Primarily, the issue with having a lack of detail in shadowed areas is that the image becomes a little flat and “muddy,” like the one shown above. Note how you can’t really distinguish any details in the background due to the darkness of the shot, and as a result, the image just looks flat.
In other words, there is a lack of depth because areas of an underexposed shot that should have a range of dark tones really have just one dark tone. So, instead of offering a variety of gray and black tones that give this photo dimension and help separate the leaf from the background, all you really see is one black blob.
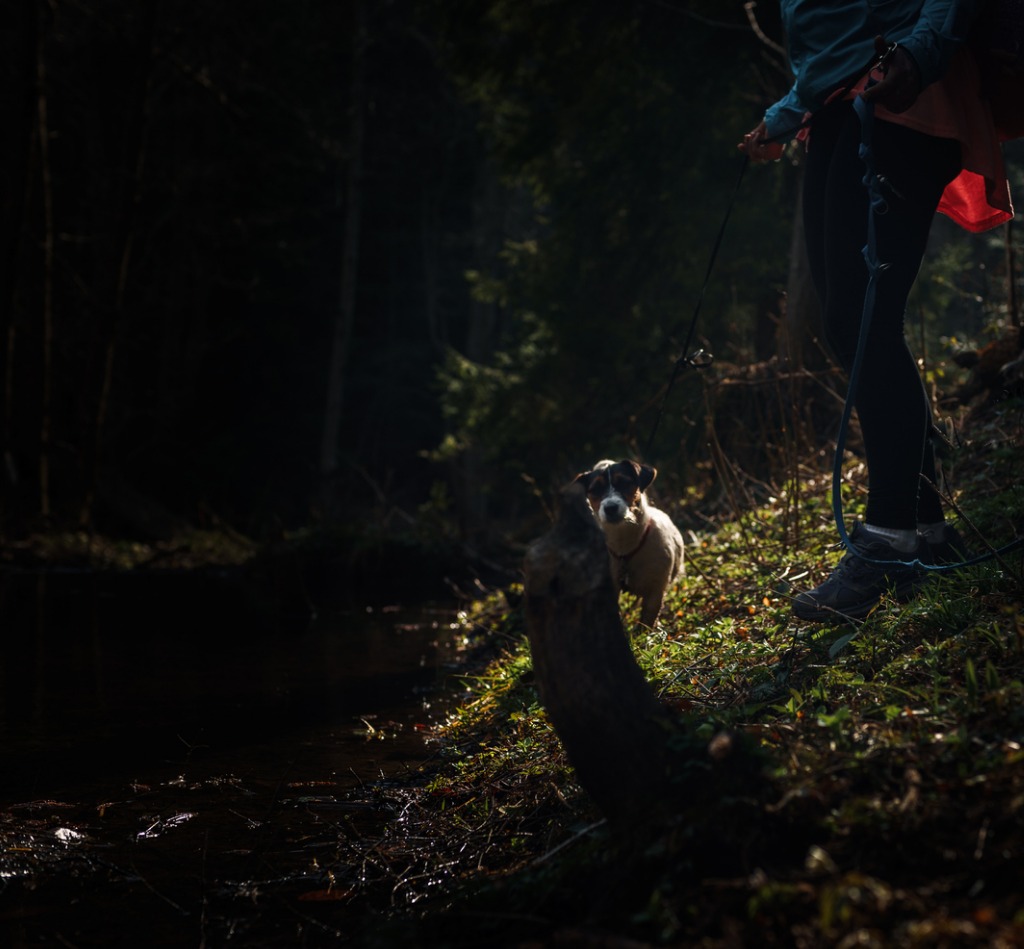
photo by ucho103 via iStock
Secondly, underexposure makes it more difficult for the viewer to distinguish the subject from its surroundings.
In the example above, you can tell that there’s a dog and a person in the photo, but where they begin and end is a little murky.
And yet, as bad as these examples are, there is hope to retrieve the details that have been lost to underexposure. This is particularly true if you shoot your photos in RAW (which you absolutely should be doing!)because RAW files retain virtually all the image data collected by your camera’s sensor. You can also check another post about men picture poses.
That means that when you open your photos in software like Exposure, there is a vast amount of information you can work with to make corrections and adjustments to the image.
How to Fix Underexposed Photos Fast
In the video above, Alien Skin Software walks us through a quick and simple process on how to edit underexposed photos.
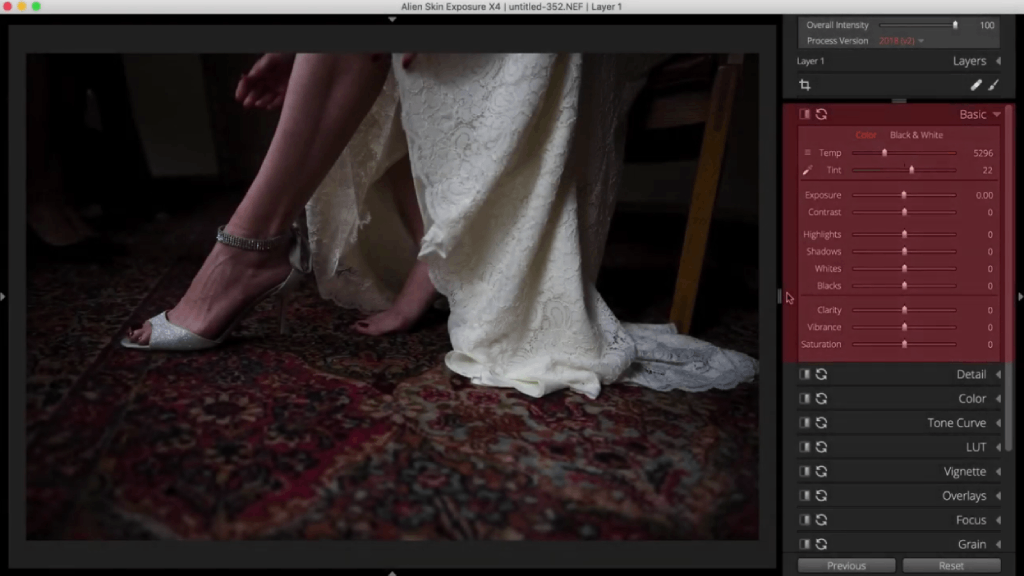
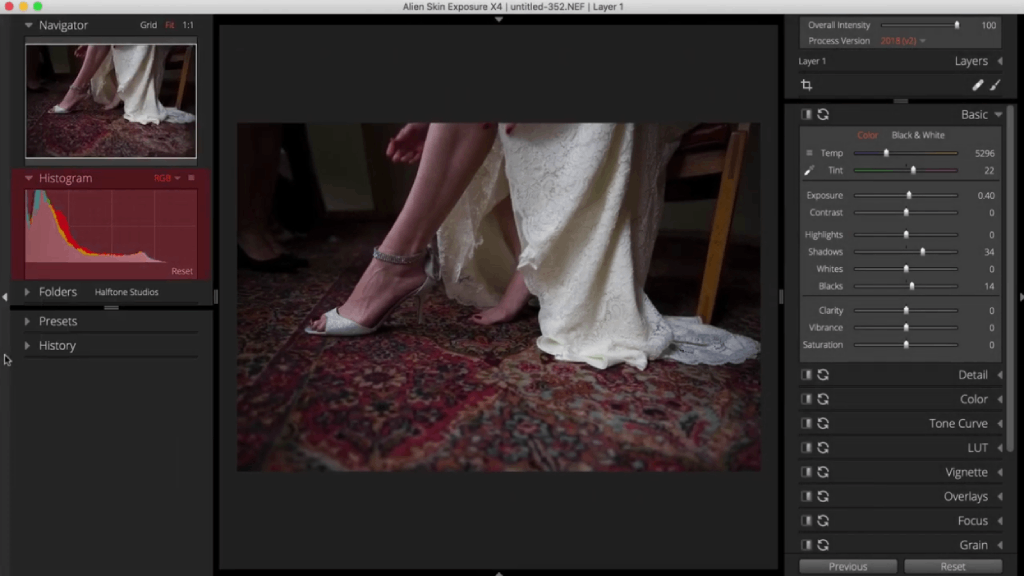
YouTube Screenshot/Alien Skin Software
The process of working on an underexposed image starts in the Basic Panel (highlighted above), where you’ll find the Exposure Slider.
This slider adjusts the brightness of the entire photo, so it’s the first place you should start with editing underexposed photos.
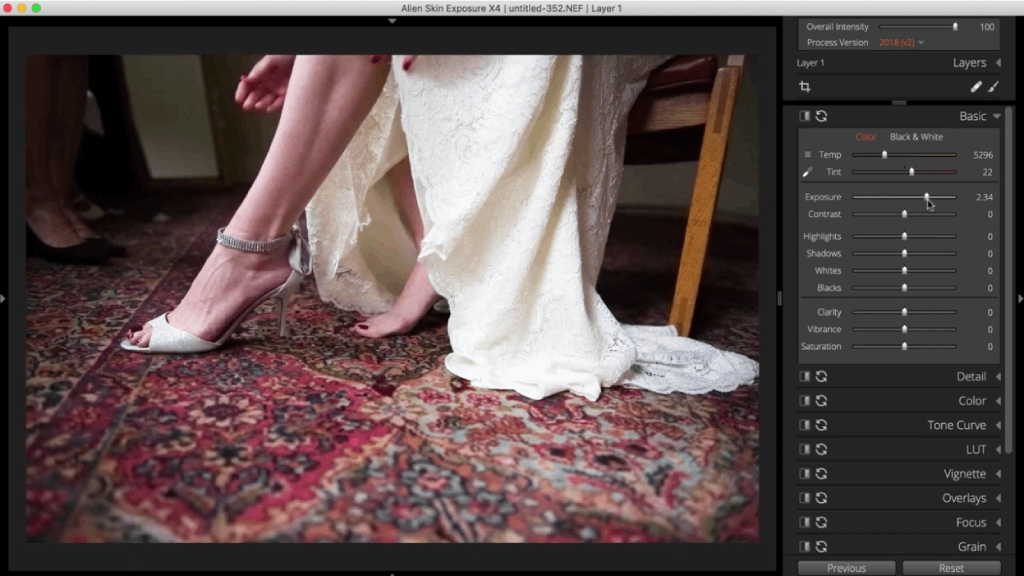
YouTube Screenshot/Alien Skin Software
While it will bring out more detail in the shadowed areas of the photograph, it will also brighten the
highlights in the shot. When making adjustments to the Exposure Slider, just keep an eye on the highlighted areas to ensure you’re not losing detail.
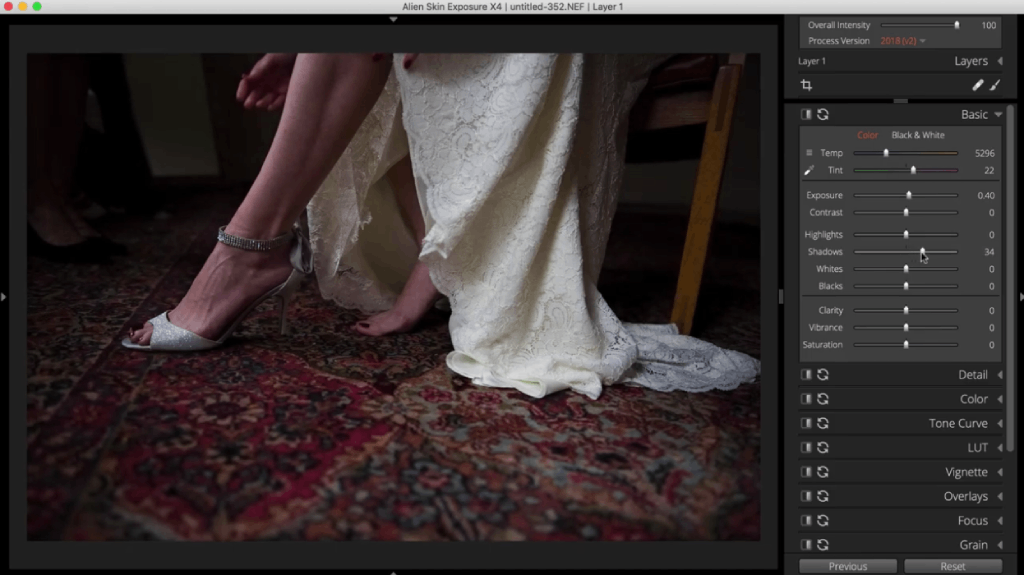
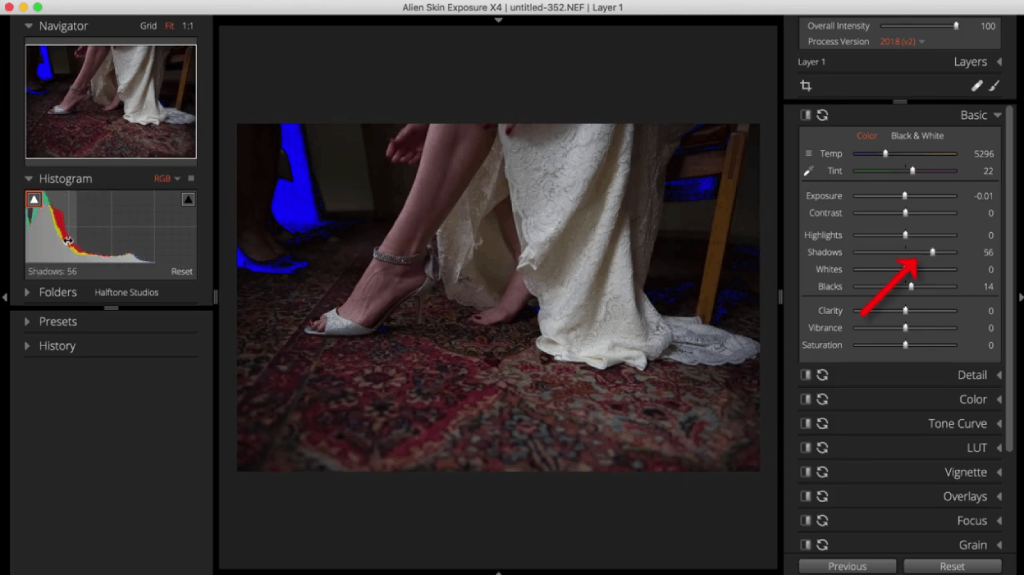
YouTube Screenshot/Alien Skin Software
Next, work on the shadowed areas of the image by using the Shadows Slider. Moving it to the right will brighten the darker areas of the image, revealing details that were previously unrecognizable.
Editor’s Tip:If you don’t have Exposure and you want to give it a test drive, you can DOWNLOAD A FREE 30-DAY TRIAL HERE.
As with the Exposure Slider, a little can go a long way with the Shadows adjustment. You want to increase it slowly, ensuring that you’re paying close attention to how the details are being revealed as the slider moves to the right.
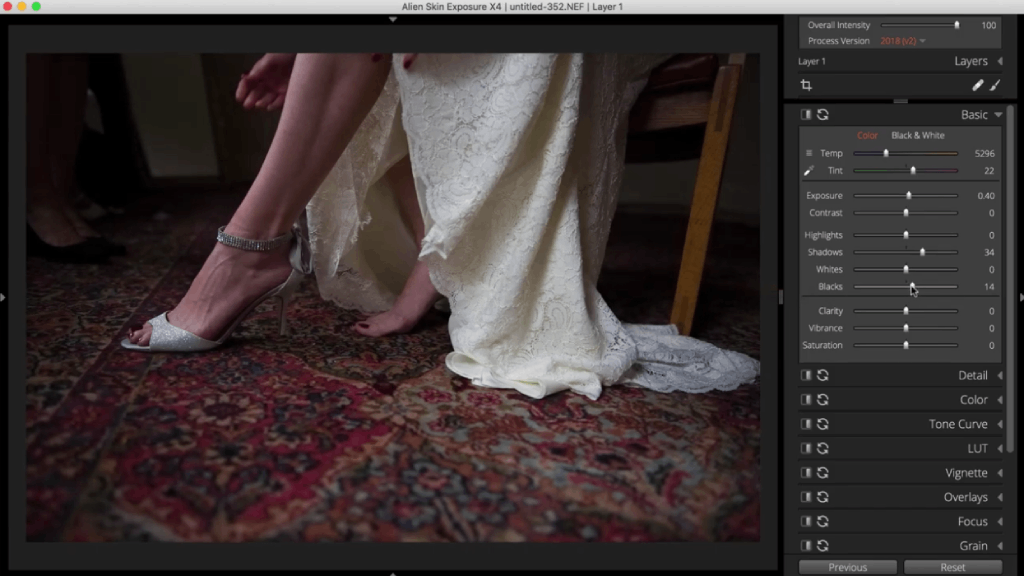
YouTube Screenshot/Alien Skin Software
Lastly, the Blacks Slider can be used to retrieve detail in the darkest areas of the photo. Simply drag it to the right to lighten black tones, again, being careful not to bring it so far up that details are lost.
And with these three simple steps, you can fix dark photos, recover lost details, and create a much more compelling image. Nice!
Edit Underexposed Photos With the Help of a Histogram
YouTube Screenshot/Alien Skin Software
Post-processing software like Exposure gives you another tool that will help you dial in the exposure settings to get a well-exposed image. That tool is the histogram.
This histogram is a graphical representation of the tones in the image. Dark tones are represented on the left side of the graph, light tones on the right, and midtones in the center.
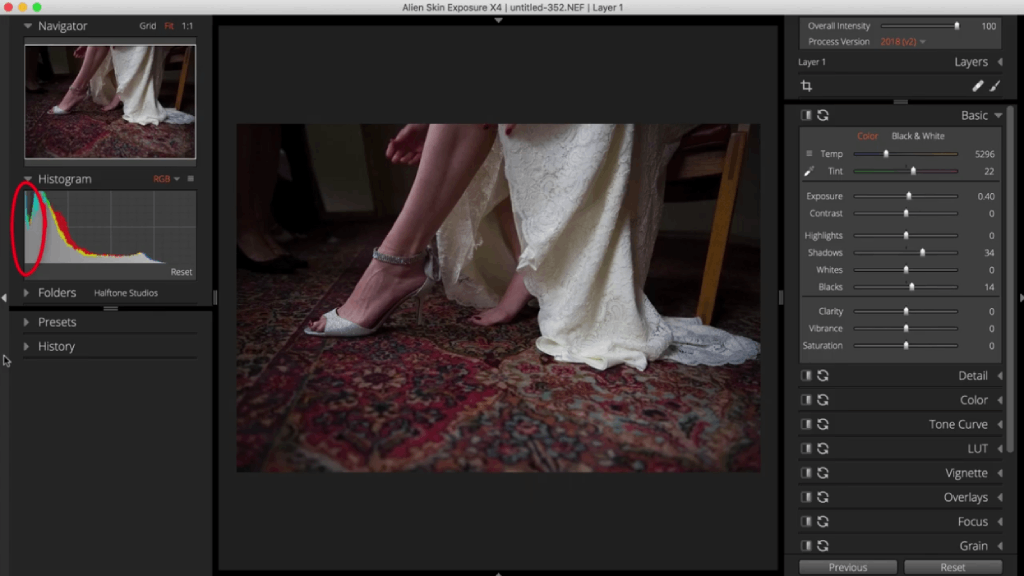
YouTube Screenshot/Alien Skin Software
If the graph is skewed to the left, as shown above, this indicates that the image is too dark, and that the details in the darker areas of the photo have been clipped.

YouTube Screenshot/Alien Skin Software
What makes this tool so easy to use to correct underexposure is twofold. First, you can enable a clipping warning (by clicking the left arrow on the histogram), which adds a blue warning overlay to indicate the tones that have been clipped. Second, the clipping warning is dynamic, meaning, as you make adjustments to the image, it will automatically update so you can track how you’re doing with regard to rescuing clipped details.
YouTube Screenshot/Alien Skin Software
Furthermore, you can click and drag on specific tones on the histogram to change them. When you do so, you’ll see the corresponding changes to the positioning of the sliders in the Basic Panel.
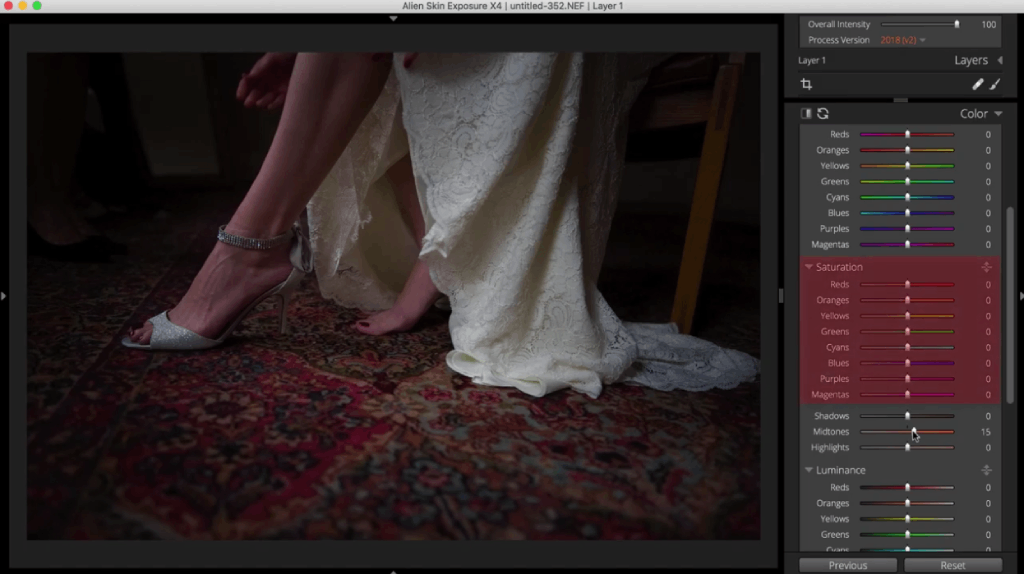
Fixing Dark Photos: Watch the Colors
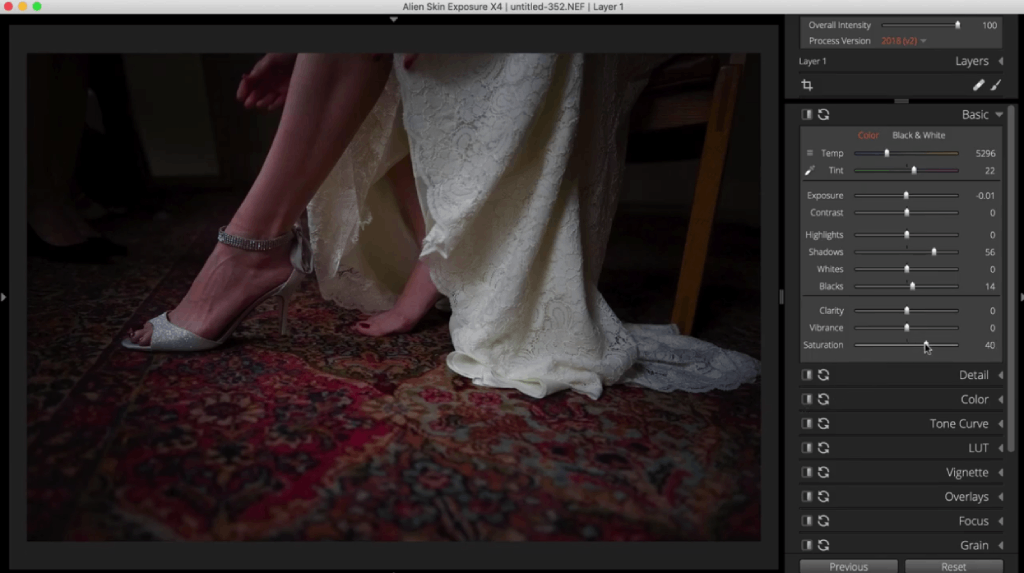
YouTube Screenshot/Alien Skin Software
When utilizing these tools to improve the details in dark areas of the photo, you might notice that colors in these areas become a little washed out and less dynamic.
Once you have the exposure problems corrected in the image, take a look at the dark and midtone areas and inspect the colors. If they seem a bit dull, simply increase the saturation in the image to bring that color back.
As noted above, a little goes a long way, so be careful to make fine adjustments to the Saturation Slider to protect against oversaturating the colors in your photo.

YouTube Screenshot/Alien Skin Software
For even more control over the representation of colors in the image, you can utilize the sliders in the Color Panel, which include sliders to adjust the colors individually for highlights, midtones, and shadows. You can even adjust the saturation level of specific colors in the image, as shown below.
YouTube Screenshot/Alien Skin Software
With that, you have a quick tutorial on how to fix underexposed photos.
Making these corrections is simple and easy, and takes just a few moments, but the results can be spectacular.
Learn more about Exposure, and to try it out free for 30 days, click here.
We Recommend
How to Use Layers to Enhance an Image
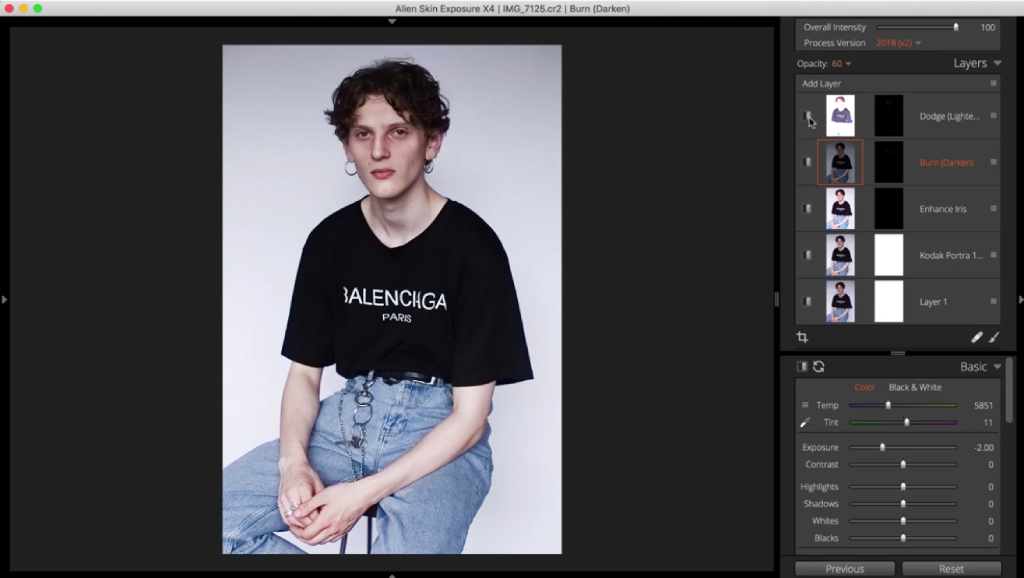
YouTube Screenshot/Alien Skin Software
Using layers as part of your editing workflow is an excellent way to get creative with your images without impacting the original image itself.
That is, each layer is added to the file - think of it like a stack of pancakes - each of which contains a different edit.
One layer might brighten the image while another might enhance the vibrancy. You can adjust the opacity of each layer, use masks, and perform a variety of other tasks with layers to get a custom look.
In this tutorial, you’ll learn how to use layers to fulfill your creative vision. To illustrate this process, we’ll look at layering in Exposure by Alien Skin Software.
The video above offers a detailed demonstration of the process. Below, I’ve outlined that process step by step.
Table of Contents
- What are Layers and How are They Used?
- How to Create Layers in Photos
- How to Manage Layers in Photo Editing
What are Layers and How are They Used?
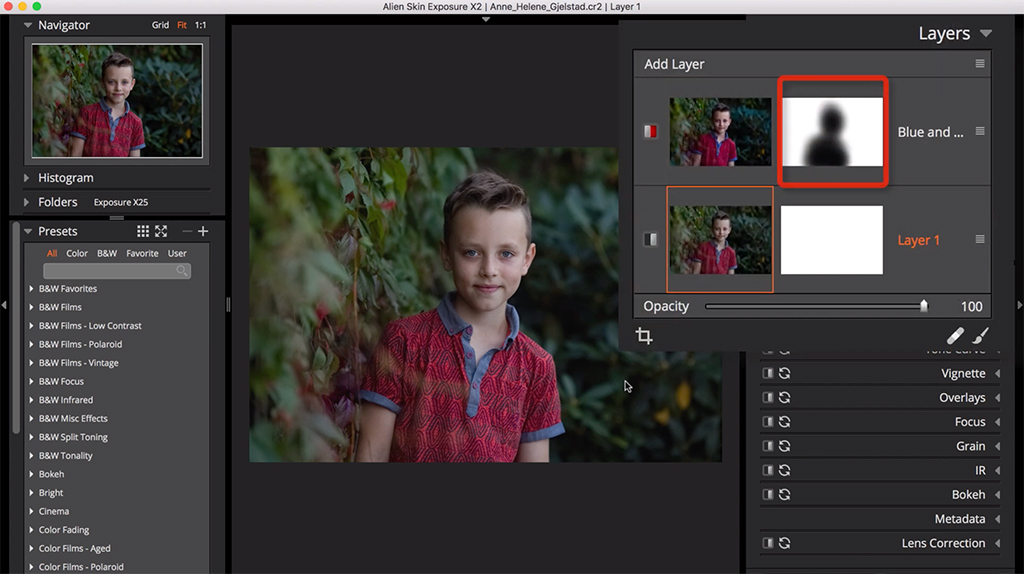
YouTube Screenshot/Alien Skin Software
As noted above, layers are used to add adjustments to an image without impacting the original image itself.
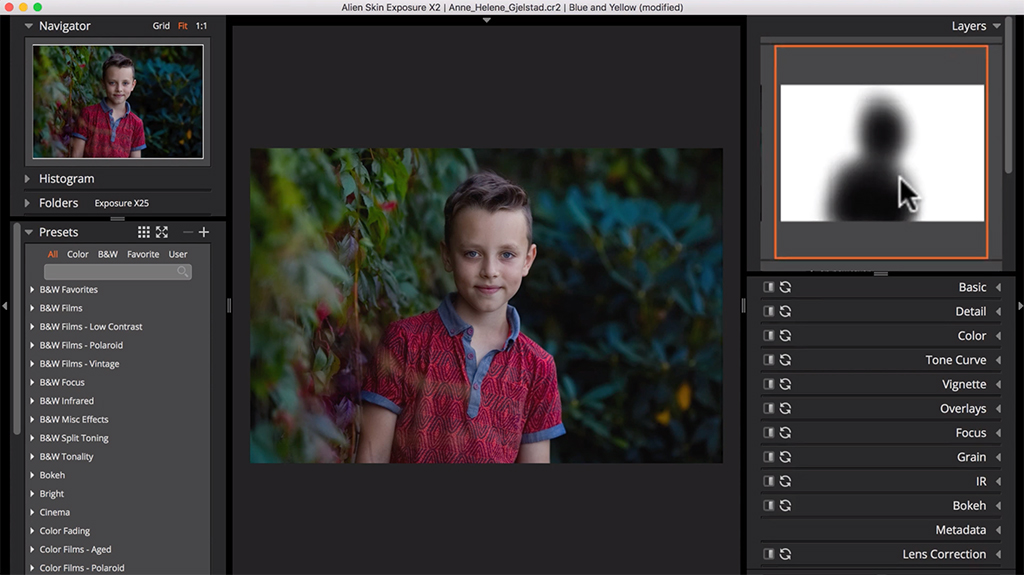
In Exposure, each layer includes two elements, as shown above - the adjustments you make (on the left) as well as a mask (on the right).
Regarding adjustments, they can be made in one of two ways. First, you can use Exposure’s editing panels to select the appropriate adjustment. Second, you can apply a preset to the layer. Presets are available in Exposure’s Presets panel, as shown below.
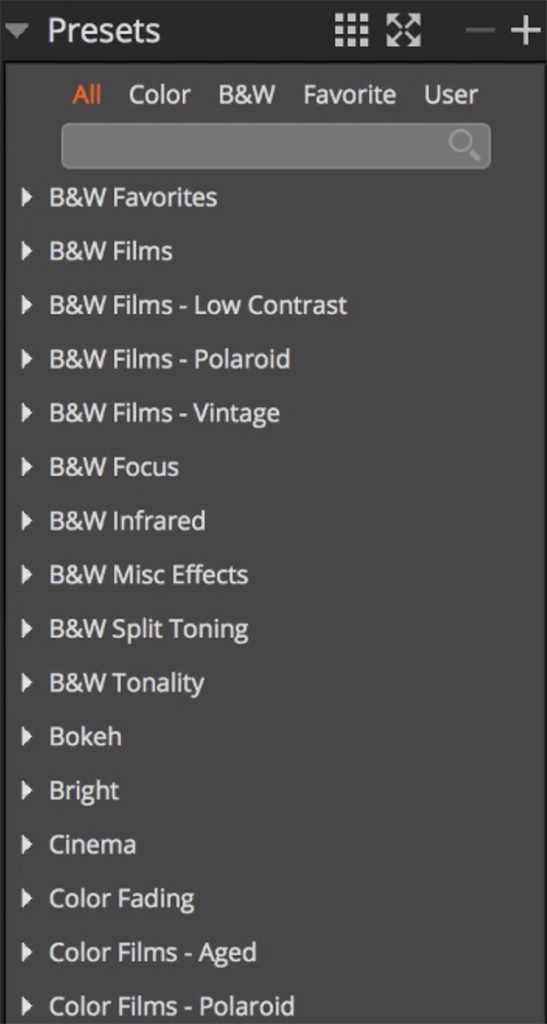
YouTube Screenshot/Alien Skin Software
Part of the beauty of using layers is that they can be applied to the entire image (i.e., by adding a preset to a layer) or they can be applied to just a portion of the image that you select.
The process of applying a layer’s adjustment to a part of an image is straightforward.
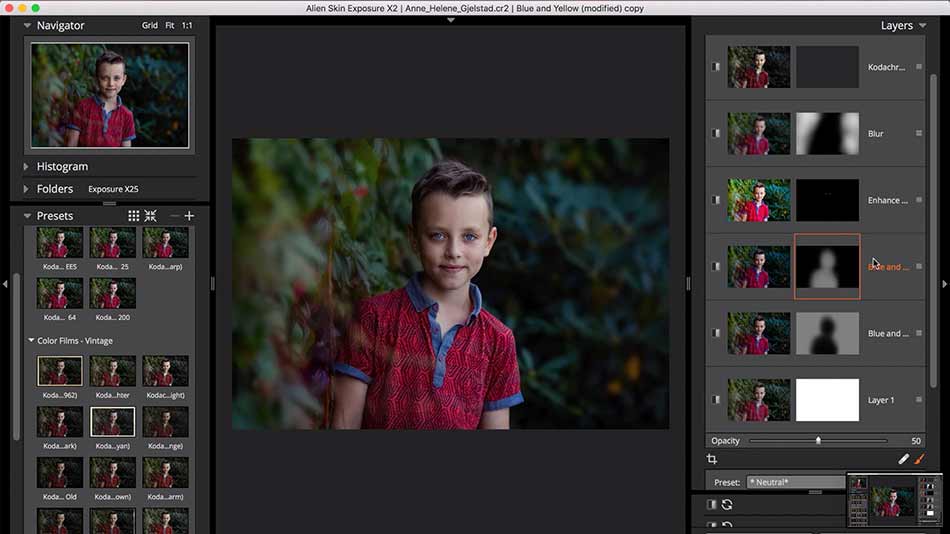
YouTube Screenshot/Alien Skin Software
In the screenshot above, you can see how a Blue and Yellow preset has been applied to this photo by Norwegian photographer Anne Helene Gjelstad. Notice how the preset has been brushed on the leaves in the background and does not influence the appearance of the boy in the center of the frame.
This is because the mask determines which areas of the layer will display the selected adjustment.
If you look at the thumbnail of the mask, you can see which areas of the photo have been affected by the mask. The light areas represent the portion of the photo to which the adjustment has been applied. The dark areas are unaffected.
Think of the function of the mask as controlling the brightness of the layer’s effect - if the mask is bright, the adjustment will appear more strongly. If the mask is dark, not as much (if any) of the adjustment will come through.
YouTube Screenshot/Alien Skin Software
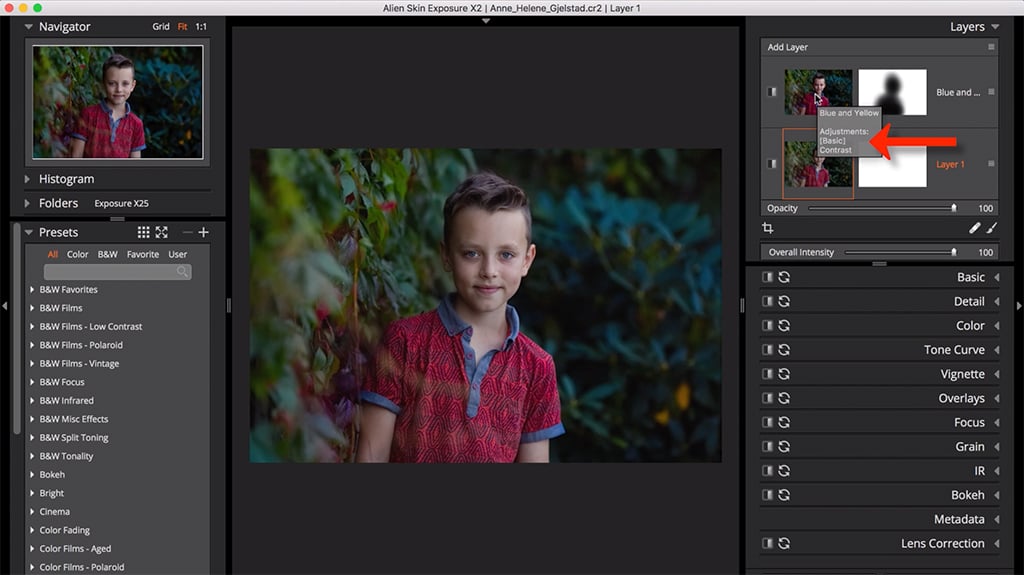
While the mask shows you where the adjustment has been applied, the thumbnail preview of the image gives you details about the image at the present stage of editing. If you click on it as shown above, you can see a list of the adjustments that have been made thus far.
Furthermore, you can use the Opacity Sliders on each layer to determine how robust the layer’s effect is on the image.
Dragging the Opacity Slider to the left decreases the effect while dragging it to the right increases the layer’s effect.
Quick Tip: Not all adjustments can be added to a layer. For example, you can’t crop or rotate an image in a layer, nor can you perform lens corrections or spot healing. These adjustments must be made before adding layers to the image.
Learn More:
How to Create Layers in Photos
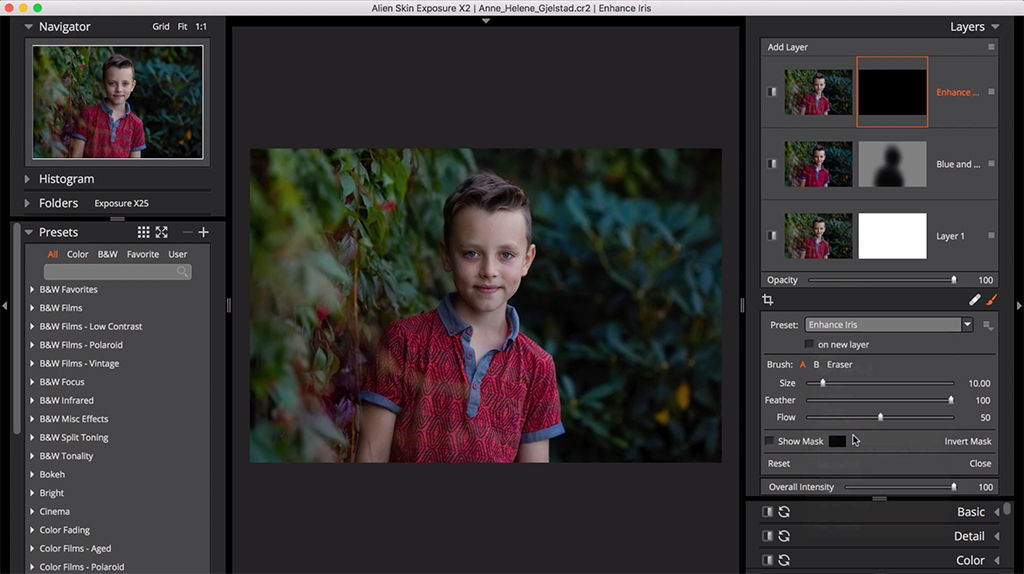
YouTube Screenshot/Alien Skin Software
Adding layers is a simple matter of clicking the Add Layer button. With an infinite number of layering possibilities, there is no end to the creative output you can create by adding them to an image.
Once the layer is created, you’ll want to click on the mask thumbnail, which opens the Brushing Panel. Using a brush allows you to select which areas of the image will be impacted by the layer’s effect.
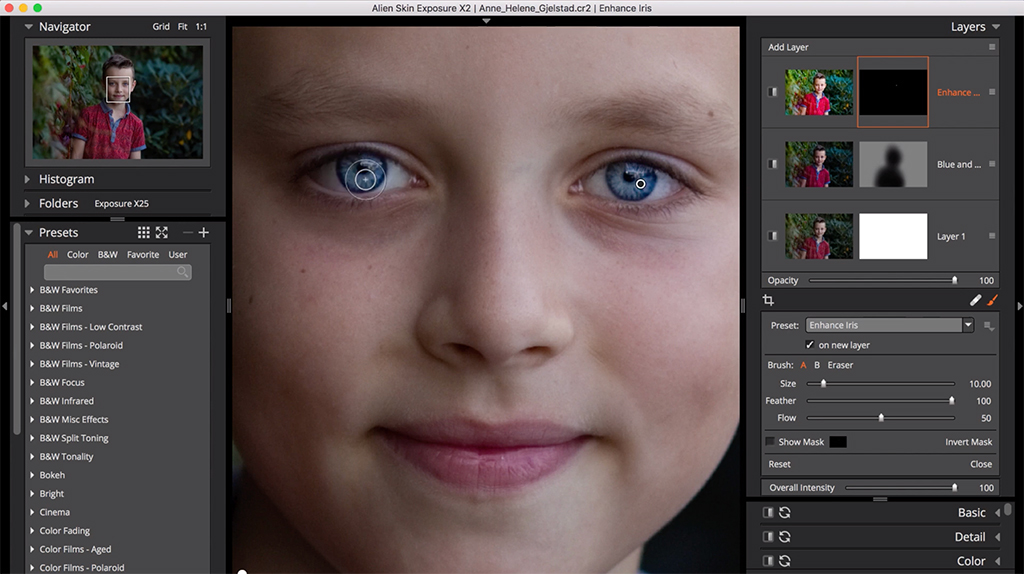
In this case, the Enhance Iris tool is selected and the flow is set at 50 percent, as you can see on the right side of the screenshot above.
At this point, you just brush the effect onto the image. If the effect needs to be changed, you can do so by reducing the opacity of the layer as described earlier.
YouTube Screenshot/Alien Skin Software
To apply a preset to the entire image, you simply click Add Layer again, select the desired preset, and it will be applied. In this instance, the Kodachrome preset was selected.
Remember, this preset has been applied to the entire image. This is because the layer mask thumbnail was not selected beforehand.
Quick Tip: When adding layers to a photo, it’s best to make basic adjustments first (i.e., exposure, saturation, contrast, etc.), then add a preset, then make brushing adjustments, and finally adding details like grain or light leaks at the end. This is important because each layer influences the layer below it.
How to Manage Layers in Photo Editing
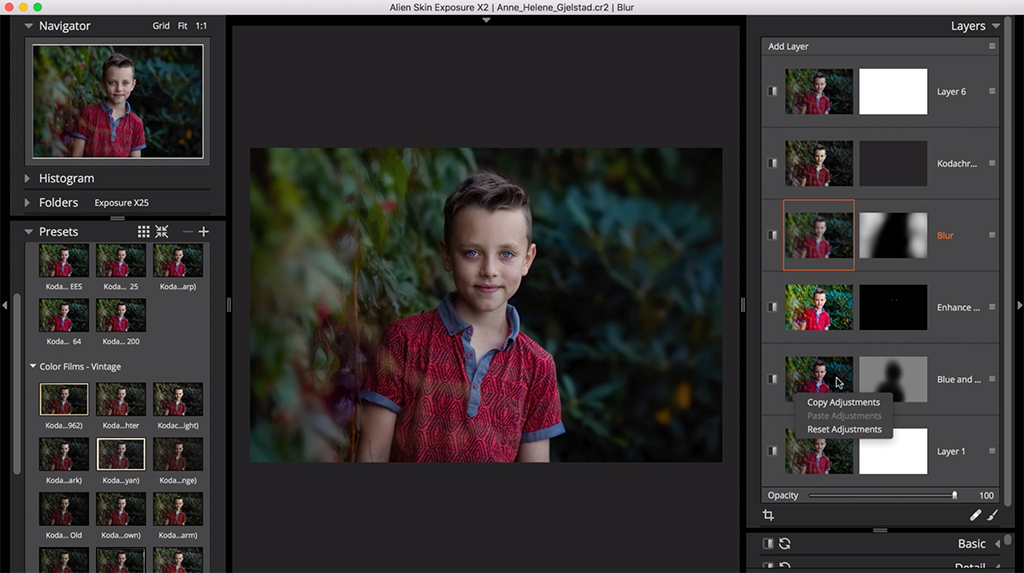
YouTube Screenshot/Alien Skin Software
Layers don’t just give you flexibility in terms of the adjustments you can make to the image. They also offer various controls for enhancing their effects.
For example, as shown above, if you right-click on a layer, you’re presented with various options, like layer, adjustments, or mask, and from there you can choose to further manipulate the selection.
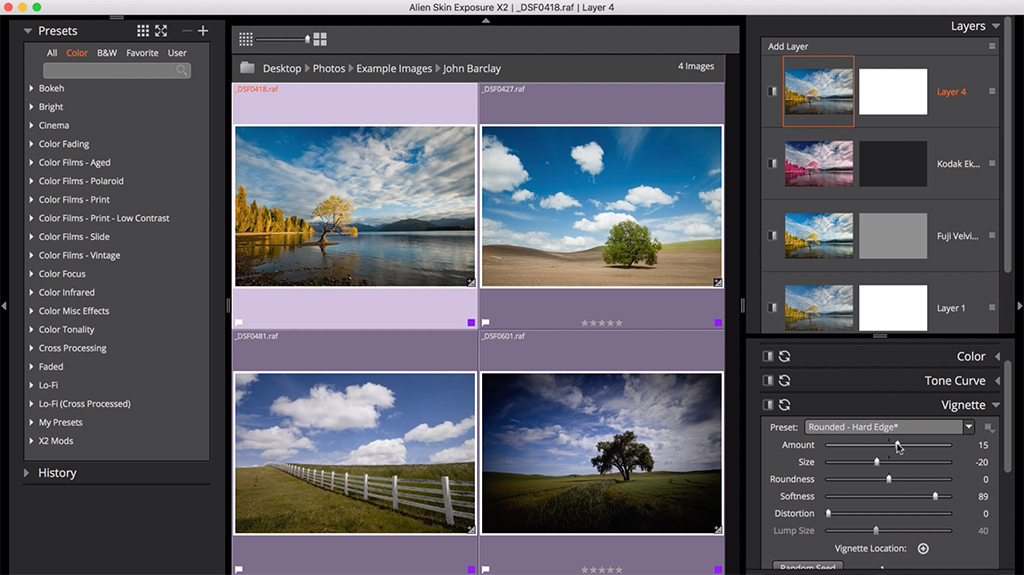
YouTube Screenshot/Alien Skin Software
So, if you want to duplicate a layer, you can do so. You can also toggle layers on and off. As shown above, Exposure even allows you to make adjustments to layers on more than one image. This is handy if you need to apply the same kind of layer to more than one photo.
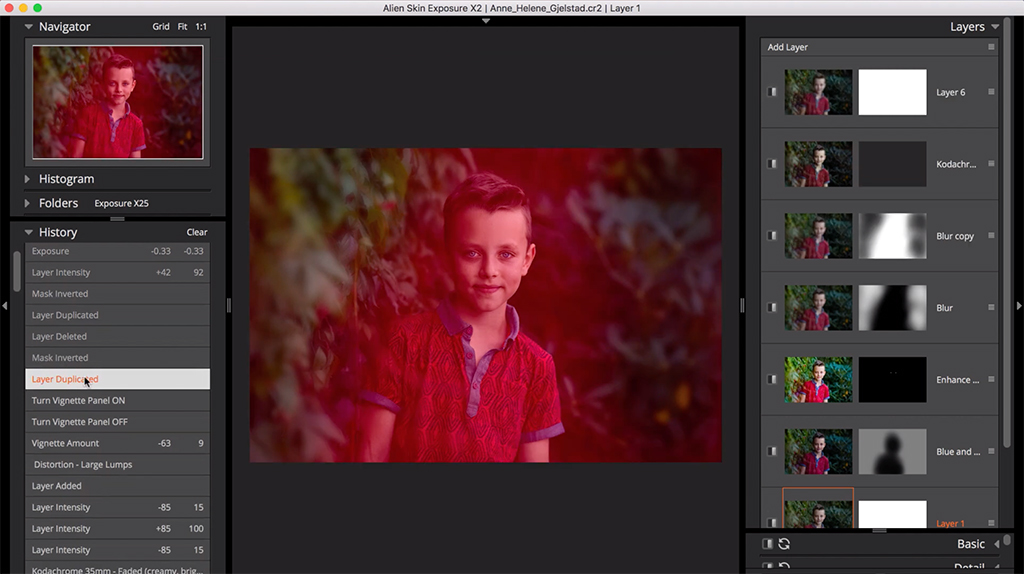
YouTube Screenshot/Alien Skin Software
If you get confused as to what layers you’ve added, Exposure’s History Panel gives you an overview of each change you’ve made. What’s more, you can revert the image back to any point in the history if need be.
Quick Tip: You can save layers as a custom preset, that way you can apply those specific changes to images in the future. Programs like Exposure allow you to select which adjustments are saved, that way more unique adjustments that might not be applicable to other images can be left out.
So, as you can see, adding and managing layers to an image is a quick and simple process, yet it can have a profound impact on the images you create!
Better still, you can learn how to use layers and experiment with Exposure all at the same time. Head over to their website to get a 30-day free trial and get your creative groove on!
Learn More: