5 Photography Tips That Will Make You a Better Photographer

photo by Lyndon Stratford via iStock
Let’s face it…
The road to mastering photography is a long one. In fact, it’s a journey that never ends! There is always something new to learn and existing skills that can be improved.
If you ask me, the most difficult part of learning photography isn’t getting started, but transitioning from being a beginner to a more advanced photographer.
The tips I’ve outlined below address this very period in your development and will help you get over the hump to become more skilled.
Let’s begin!
Table of Contents
- Get Out of Full Auto
- Learn to Use the Camera’s Histogram
- Learn How to Use Artificial Light
- Streamline Your Post-Processing Workflow
- Use a Circular Polarizer
Get Out of Full Auto

photo by Photographer and videographer via iStock
I’ve said before that using full auto mode when you’re a beginner can actually be a good thing. After all, without having to worry about exposure settings, you can concentrate more fully on things like composition and framing.
But now that you’re ready to become more of an enthusiast photographer, it’s time to leave full auto behind.
I think everyone should learn manual mode, but you don’t have to jump right to the big, scary M on your camera’s dial just yet.

photo by eROMAZe via iStock
A great way to exert more control over the camera settings is to shoot in aperture priority, shutter priority, or program mode:
- Aperture priority mode (A or Av on the camera dial, shown above) gives you control over the aperture and ISO while the camera controls shutter speed. This is a great mode to shoot in for things like portraiture or other scenes in which you want to control depth of field.
- Shutter priority mode(S or Tv on the camera dial) gives you control over the shutter speed and ISO while the camera controls the aperture. Use this setting if you want to control how motion appears in the shot.
- Program mode (P on the camera dial) allows you to set the ISO and the camera sets the aperture and shutter speed for you. This is advantageous in challenging light conditions in which you want a high ISO (in low light) or a low ISO (in bright light).
Getting familiar with these semi-automatic modes is a great way to take baby steps away from full auto without being overwhelmed by having to control all the exposure settings yourself.
Learn to Use the Camera’s Histogram

When I was a beginner photographer, I relied on the camera’s LCD to determine if the shot I just took was well-exposed.
The problem with doing that is that the LCD is not at all an accurate representation of the lightness or darkness of the photos you take.
Instead, if you want to become a better photographer with images that are better-exposed, you need to learn how to use the camera’s histogram.
Looking at the graph above, you can see why the histogram is so beneficial - it gives you a graphical representation of how many pixels are shadows, midtones, and highlights.
If the histogram is skewed to the left, you know that the image is too dark and that you need to brighten it up. If it’s skewed to the right, the opposite problem is at hand - the image is too bright and it needs to be darkened.
Take a deep-dive into how to read a histogram to get all the details on this very handy tool.
Learn How to Use Artificial Light

There are tons of natural light photographers out there that make masterful images. But there are also quite a few photographers that only use natural light because they don’t know how to harness the power of artificial lights.
Light is obviously the most critical aspect of photography, so understanding how to manipulate light is a critical skill you need to learn if you’re going to become a better photographer.
Unfortunately, when many beginners think of artificial light, they think of the pop-up flash on their camera.
The problem with the light emitted from pop-up flashes is that it’s intensely bright, which creates harsh shadows behind a very bright subject. That’s just not a flattering look.

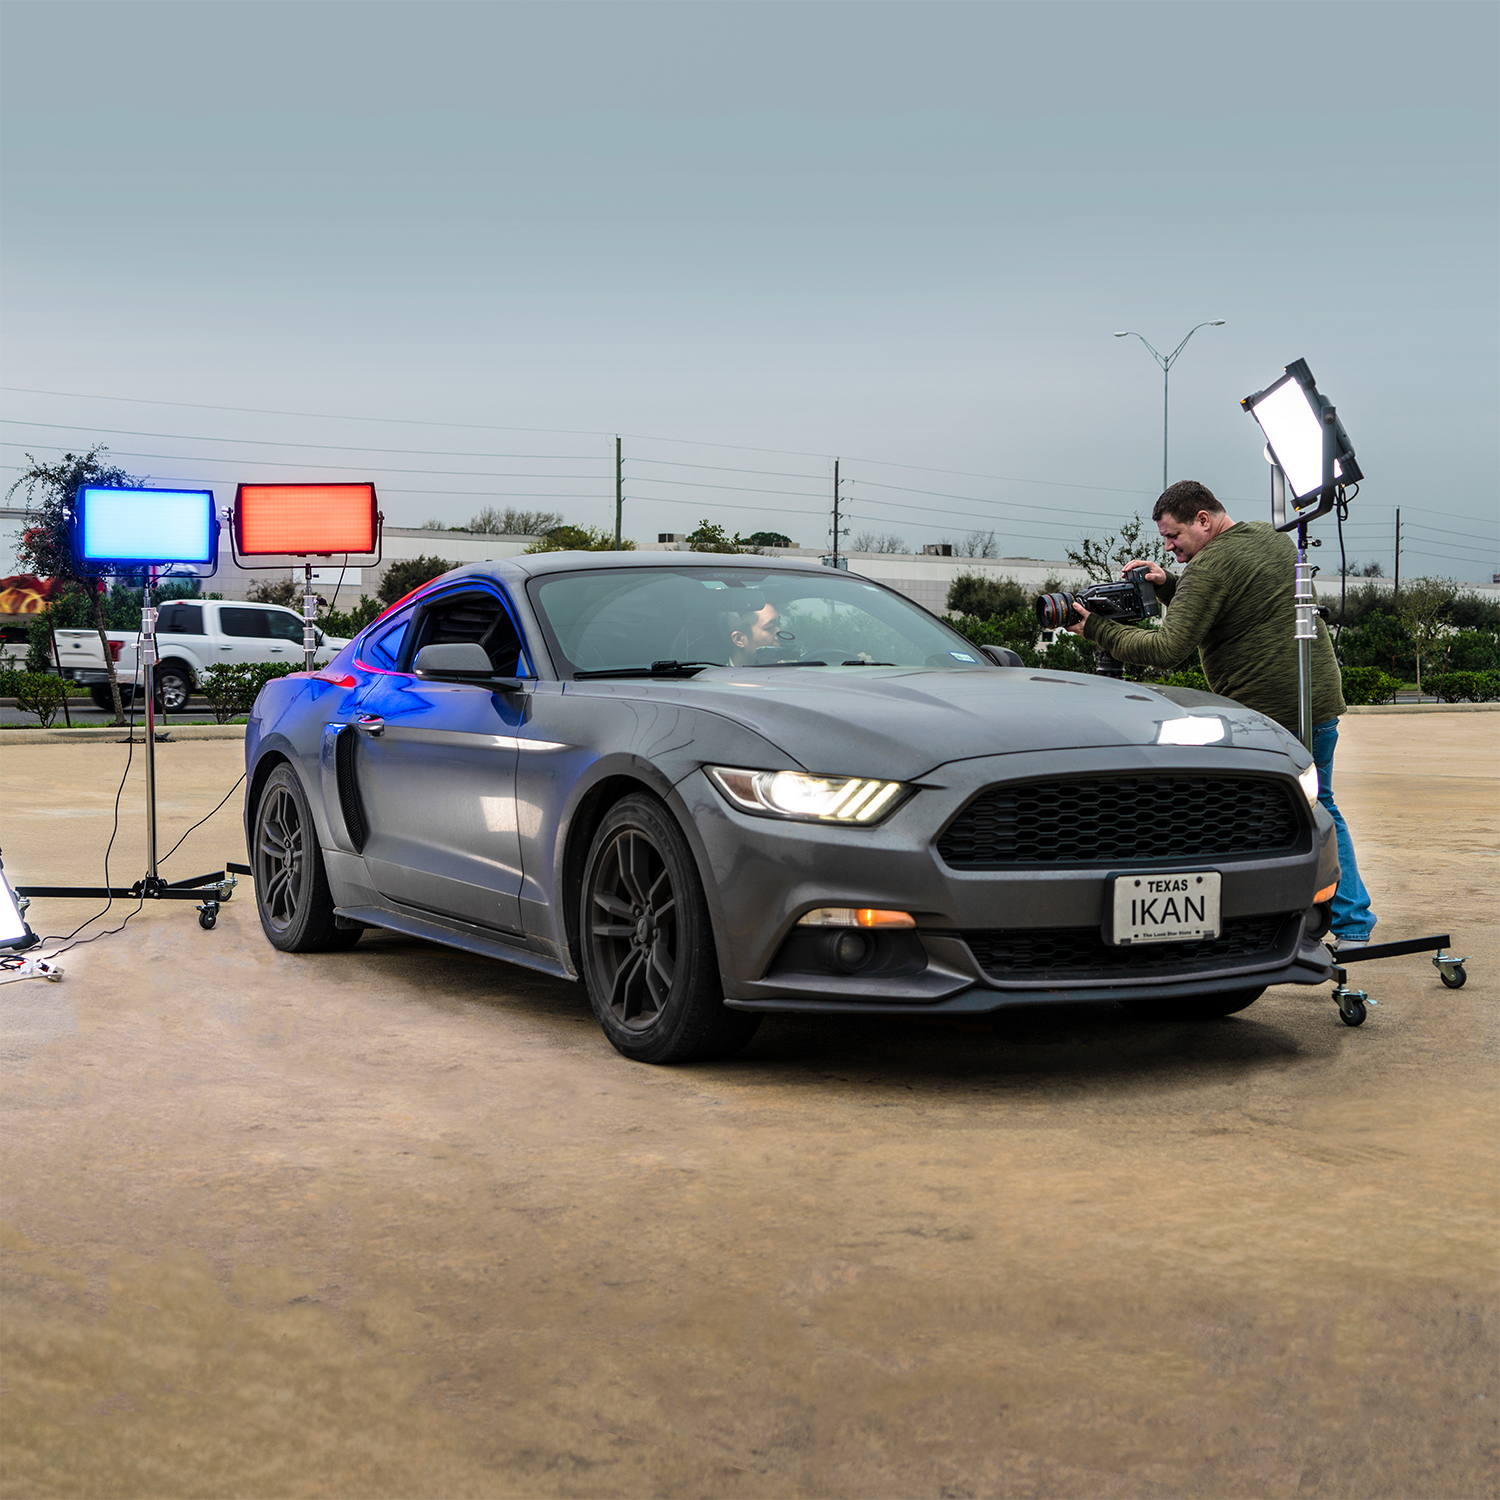
A better option is to use an off-camera light to shape the light in a way that adds interest to the shot. You can see this concept in action in the image above.
The different colors of light add visual punch to the photo while also helping separate the subject from his surroundings.
And you don’t have to invest in expensive speedlights, light stands, and modifiers to do it, either.
A perfect light for photographers that wish to advance their skills is the little guy shown below, the Hakutatz Pocket Size RGB+AW LED Light.

Editor's Note: The Hakutatz Kickstarter campaign was a huge success! Their Amazon store will be open and ready for orders in early December.
Being such a small light, it’s easily portable and maneuverable, so you can experiment with light placement to get different effects in your photos.
What’s more, this light offers RGB light, which allows you to produce all the colors of the spectrum. There are also separate LEDs that produce white light and amber light, which can help you achieve the precise white balance you want in your images.

As shown above, you can manipulate the color emitted by the light using the companion smartphone app. How easy is that?!
Another aspect of mastering artificial light is learning how to use multiple lights at the same time.
Hakutatz makes this task super easy because you can use two, three, or more of these lights together to combine different kinds of light and different effects, allowing you to create an intricate lighting scheme without all the fuss.
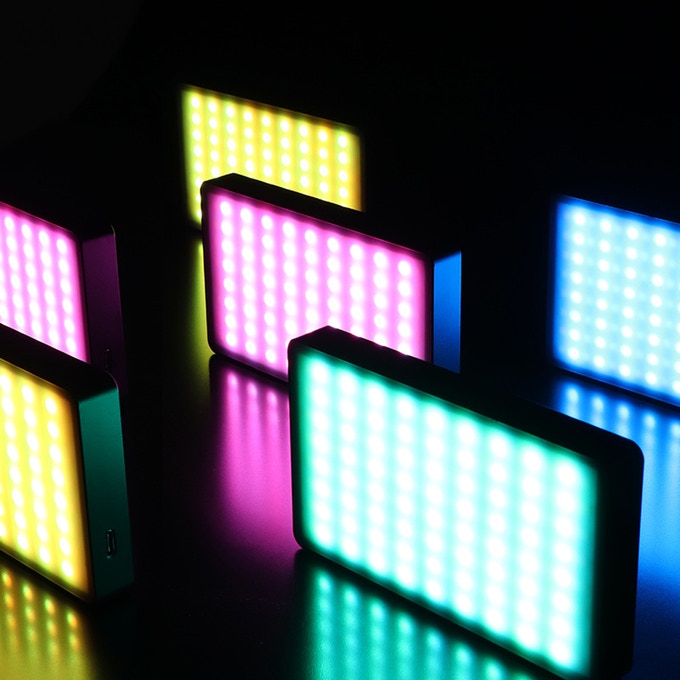
Best of all, since this light has adjustable brightness, saturation, and color temperature, you don’t need light modifiers like softboxes or diffusers. Instead, you have all the tools you need wrapped up in this one awesome little light.
Learn more about the Hakutatz Pocket Size RGB+AW LED Light and see how it can help you elevate the quality of your photos.
Streamline Your Post-Processing Workflow

photo by photoguns via iStock
When I look back on how I edited photos when I was a beginner, I can’t help but shutter. It was bad. Really bad.
But back in the day, processing images was a much more complex and laborious task than it is today. There are all kinds of tools that help you tap into your creativity while at the same time making it an easier, less time-consuming task.
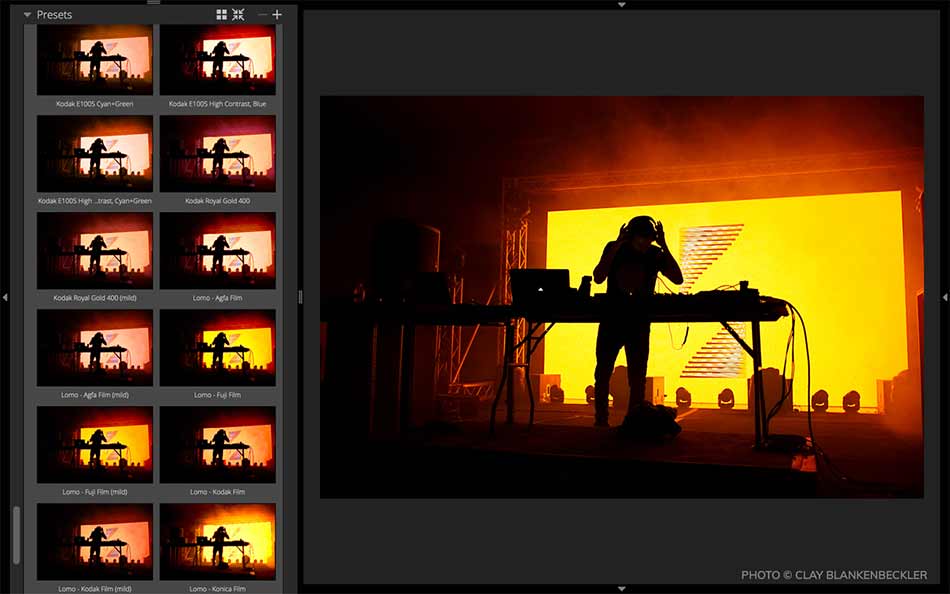
One of the best ways to make photo editing an easier process is to use presets that allow you to change the look and feel of your photos with a click of your mouse.

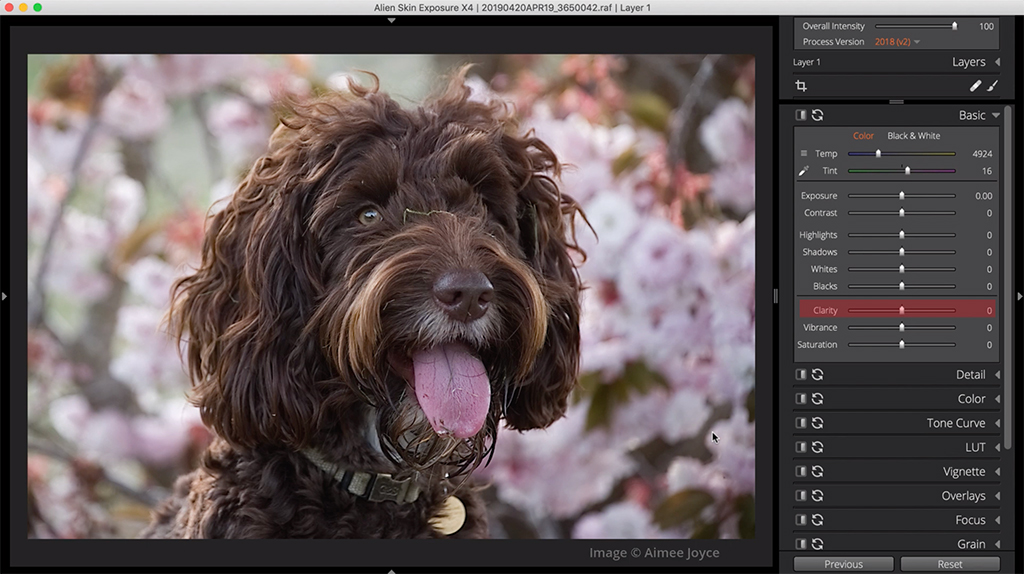
In Exposure, for example, there are over 500 presets from which to choose, including beautiful film presets that harken back to the days of film photography.
But these presets aren’t just applied in one way - you can customize how each one looks and save it for use on future images for a consistent look.

Another way to make editing your photos easier is to use non-destructive layers.
What this means is that you add effects and make adjustments to layers on top of the original image, so the original is left unchanged.
You can add presets, make adjustments to color and saturation, manipulate the exposure, and make many other changes quickly and easily to get the precise look you want in the photo.
And if you’re a bit of a disorganized mess like I am, you’ll appreciate editing programs that also offer tools for organizing your photos.
As shown in the video above, Exposure ticks that box as well, with the ability to create smart collections of photos based on specific criteria like image ratings, flags, or color labels. You can also organize images based on the camera use, when the photo was taken, when it was edited, and even the camera settings that were used.
Learning how to edit your photos and do so in a way that enhances their beauty is a crucial part of advancing from being a beginner to an enthusiast photographer. And with editing programs like Exposure, you can do that in a much more efficient manner.
See Exposure in action in the video above. To get your free trial, click here.
Use a Circular Polarizer
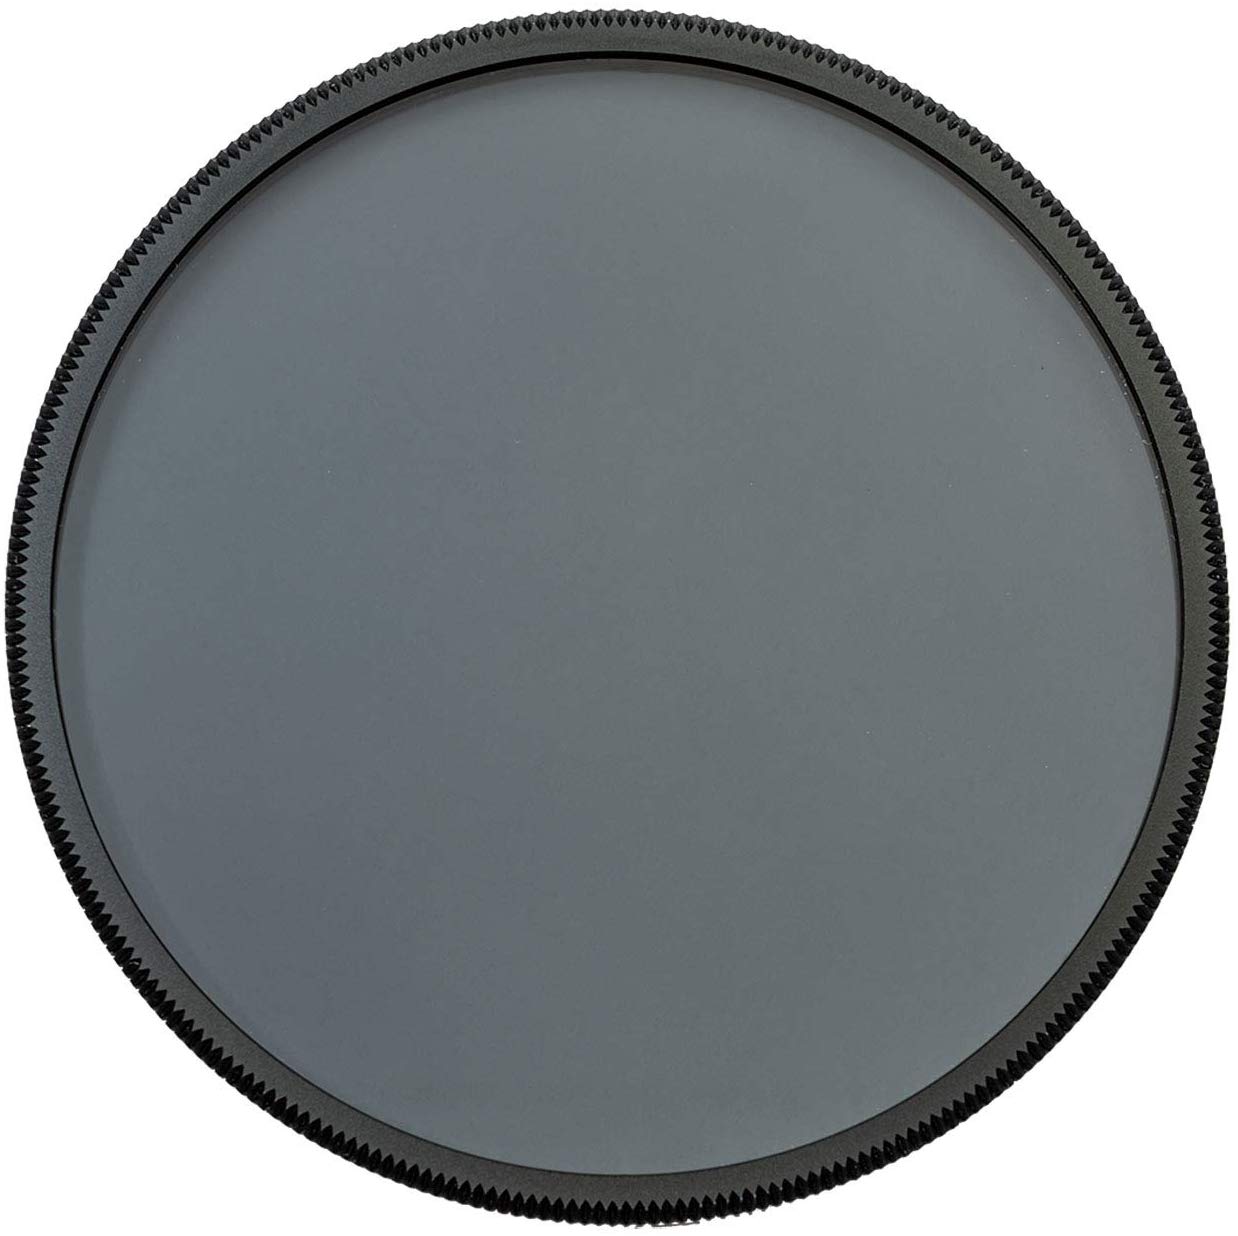
One of the best - and easiest - things you can do to improve your photos is to start using a circular polarizing filter.
These filters offer too many benefits to not have one in your camera bag. Take a look at what a polarizer can do:
- It reduces glare off non-metallic surfaces like water, wet plants and rocks, and even skin.
- It boosts contrast and saturation in the sky, making the blue atmosphere deeper and richer and the clouds a brighter white.
- It minimizes atmospheric haze, so distant features appear crisper.
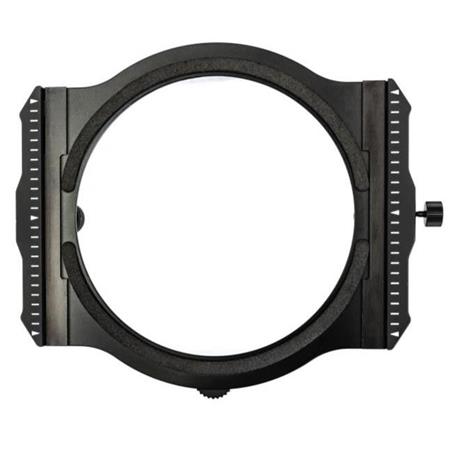
And the best part is that Marumi makes a magnetic filter system that makes using filters a veritable breeze.
Just attach the M100 filter holder (shown above) to your lens, pop the circular polarizer in place, and you're ready to rock!
And since the system is magnetic, it makes it super quick and easy to swap out filters when needed.
Part of becoming a better photographer is knowing what gear to use and when, and having a circular polarizer in your kit is certainly a piece of gear you should have if landscape photography is your vibe!
We Recommend
Alien Skin Software Pivots, Changes Its Name to Exposure Software

It’s been nearly three decades that Alien Skin Software has been in the business of making tools for photographers and other creative professionals that help them fulfill their creative vision.
And throughout the years, Alien Skin Software has won wide acclaim from creatives for their innovative and easy-to-use tools.
If you’ve never used Exposure before, it specializes in special effects, creative looks, and film simulations, and uses advanced math and cutting-edge research that assist photographers in developing bespoke creative looks for images of all kinds. It can be used as a standalone application or as a plugin to Lightroom or Photoshop.
But every company needs a refresh from time to time, and now it’s Alien Skin’s turn.
Today, the company announced a full rebrand, with a new logo, a new website, and perhaps most importantly, a new name - Exposure Software.
The new company name is indicative of its popular and award-winning photo-editing platform, file organizer, and RAW processor Exposure X4, which is currently in release. You can watch an introduction to Exposure X4 in the video above.
Exposure fans will be excited to know that Exposure X5 is due this fall. Check out some of its features below:
As Finley Lee, Exposure Software’s CEO noted in the company’s press release on the subject, “More than just a name change, the new branding initiative reflects the importance of, and commitment to, making Exposure the best photo editor for creative photographers.”
Exposure Software isn’t just a one-trick pony, either.
In fact, the company sells Blow Up, a photo-enlargement software, Snap Art, which transforms photographs into “works of art,” and Eye Candy, which adds realistic effects to images.
For more details about Exposure Software and their suite of products, visit their new website, https://exposure.software.
We Recommend
An Easy Way to Correct Lens Distortion and Vignetting

photo by AndreyPopov via iStock
Lens Distortion and Vignetting
All lenses - even professional ones that cost thousands of dollars - can create defects in photos that diminish their overall quality and visual appeal.
This includes distortion, in which lines that are straight appear to have a curve to them, and vignetting, in which the corners of the image appear to be darkened.
In this quick tutorial, you’ll learn how to correct lens distortion and vignetting quick and easily.
For demonstration purposes, Exposure X5 is used to show how to make these corrections in post-processing.
If you don’t already have Exposure, you can download a free 30-day trial.
Let’s get started!
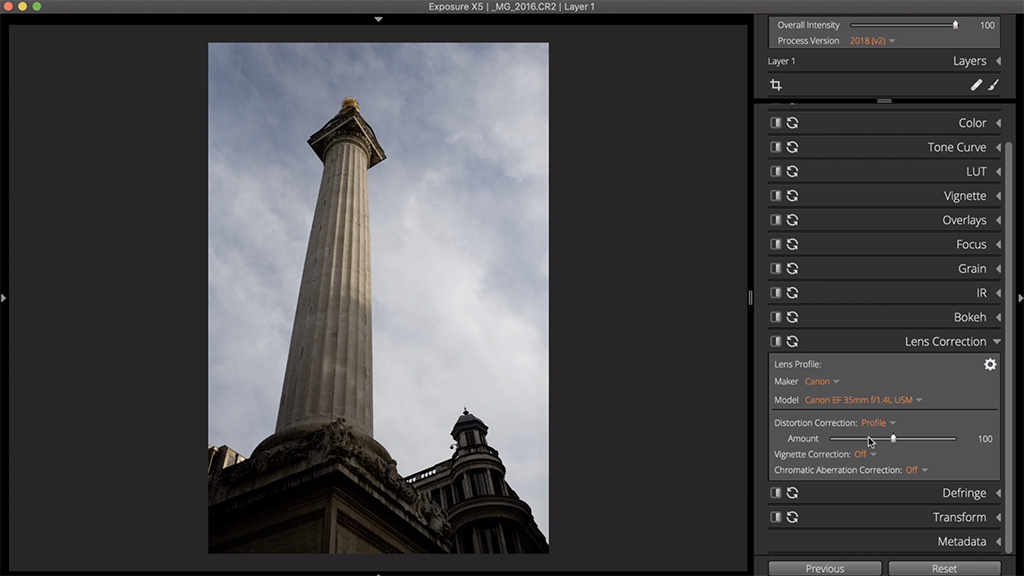
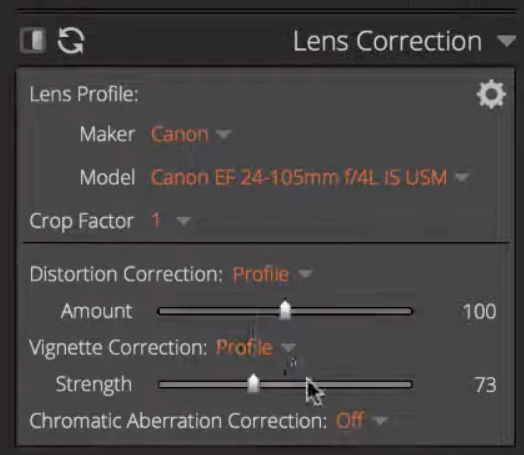
How to Correct Lens Distortion

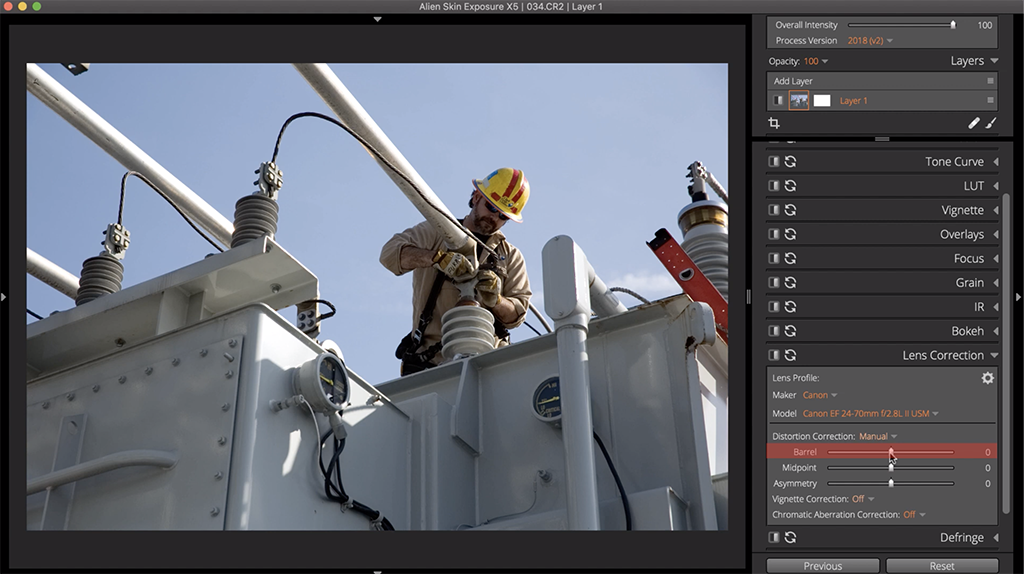
YouTube Screenshot/Exposure Software
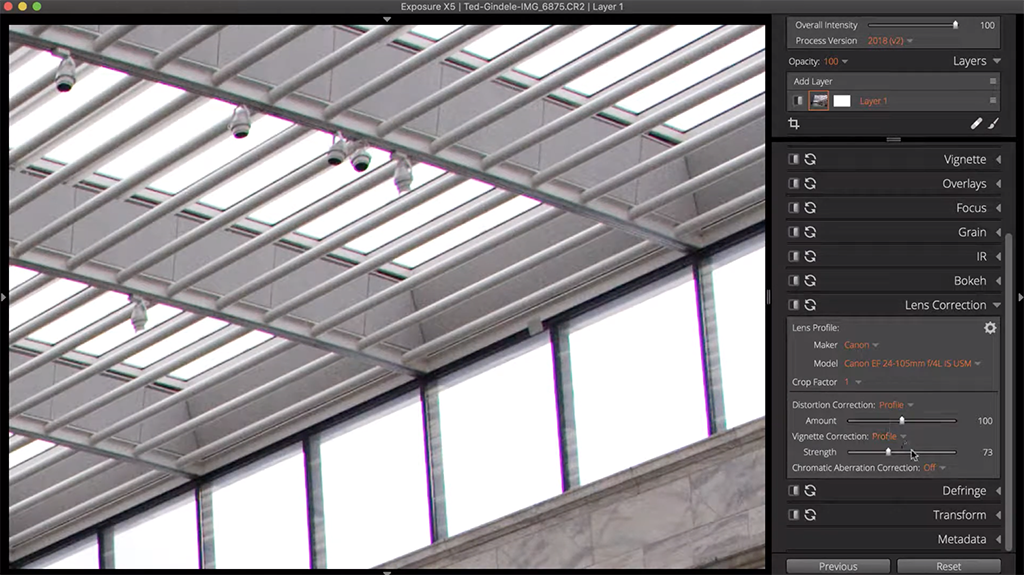
What makes the process of correcting lens distortion so easy with Exposure is that it has a vast library of lens profiles specifically designed to remove any distortion in the image.
Using the Amount slider, you can adjust how much or how little the profile for your image influences how the image looks.

YouTube Screenshot/Exposure Software
To get the most control, adjust the Amount manually, that way you can keep an eye on lines in the image (like those highlighted in red above) and make the fine adjustments to make them appear exactly straight.
However, in most situations, the Barrel Slider is the only tool you need to use.
YouTube Screenshot/Exposure Software
The Barrel Slider (highlighted in red above) adjusts for pincushion distortion, which results in straight lines bending inward, or barrel distortion, in which lines bend outward.
This single slider can correct either of these issues in a matter of seconds.
You can also use the Midpoint Slider to change the shape of the correction. That is, it controls how much of the effect is added to the middle of the shot versus the corners of the shot.

YouTube Screenshot/Exposure Software
Just be aware that using this slider at extreme levels can cause wrapping effects to occur, so using it judiciously is recommended.
Lastly, you can make adjustments to the Asymmetry slider to gain finer control over distortion in the corners of the photo.
Note in the screenshot above how the Barrel, Midpoint, and Asymmetry sliders have been adjusted very little, yet the difference in this shot and the first one in this section is quite extreme. A little goes a long way!
Learn More:
How to Correct Vignetting
YouTube Screenshot/Exposure Software
Though vignetting can sometimes be used to add artistic flair to a photograph, vignetting is typically an unwanted consequence of the lens used to take the photo.
Using Exposure, you can quickly remove vignetting for a cleaner shot.
The Vignette Correction balances out the darkening in the corners by using the Lens Profile of the lens that was used.
Then, simply adjust the Strength Slider as needed for each image in which vignetting appears.

YouTube Screenshot/Exposure Software
Again, using Manual controls gives you an added layer of precision when removing vignetting. As you can see above, manipulating the manual controls has significantly brightened the edges of this shot.
Once you’ve made the needed corrections, you might need to adjust the image exposure to ensure the photo is well-exposed.

YouTube Screenshot/Exposure Software
A handy feature of Exposure is that you can turn a vignette correction for a specific lens into a custom preset.
This enables you to apply the same corrections to any images taken with that lens, thereby speeding up the process of removing vignetting even further.
Just click the gear icon at the top of the editing panel (shown above) to create a custom preset. You can also create a custom preset for distortion adjustments and for chromatic aberration adjustments too.
With that, you have a quick and easy way of removing lens distortion and vignetting.
Check out the video above by Exposure to review the process, and be sure to get your 30-day free trial if you don’t already have Exposure!
Learn More:
We Recommend
Awesome Camera Accessories for On-the-Go Photographers
photo bybortnikau via iStock
Camera Accessories
Whether you’re on the road because you love to travel or you’re doing it out of necessity for work, you want to have camera accessories that can come along with you without being a burden.
Fortunately, recent years have seen awesome camera accessories made available that are small and portable, yet still pack a mighty punch.
Below, I’ve outlined a few of my favorite on-the-go camera accessories that will make your photography trips much easier.
Table of Contents
- LitraTorch 2.0
- E-Image EK610 Professional Compact Tripod
- Haida NanoPro Circular Polarizing Filter
- HEX Ranger Sling Bag
- Exposure X5
The LitraTorch 2.0 is a Must-Have for Travel Photographers

If you’ve spent any amount of time learning about photography, you know that good light is the key to getting a good photograph.
And while it’s perfectly fine to label oneself as a “natural light photographer,” there are times when natural light just won’t cut it.
But if you need to be highly mobile, the last thing you want to do is carry around light stands, softboxes, diffusers, and all sorts of lighting gear.
Instead, stay mobile and use the LitraTorch 2.0, an absolutely incredible light that will shock you with its power and quality of illumination.

I have this little guy (that’s it in the photo above, just above the lens) and it has been a Godsend as I get more and more into on-location work.
It has 16 LEDs that put out 800 lumens of light. Considering it’s just 1.5 inches square, that’s an incredible amount of light!
Since it weighs just three ounces, it’s not like you’ll be bogged down with heavy gear, either.
In fact, you can pick up a handful of these things, throw them in your camera bag, and not notice a difference in the weight you’re carrying.

Better still, the LitraTorch 2.0 is adjustable, so you can set it at 100 lumens, 450 lumens, or 800 lumens to suit the situation.
No matter the light output, this thing has beautiful, crisp, flicker-free light at a color temperature of 5700K.
With a CRI of 90+ and TLCI of 92, you begin to get a picture of just how superb this little light really is!
Add in durable construction, waterproofness to 60 feet, a magnet for mounting it to metallic surfaces, and two ¼-20 mounts, and you have the makings of the perfect little light.
Learn more about the LitraTorch 2.0
Learn More:
Save Space With the E-Image MA600 Monopod

A means of stabilizing the camera is a must for every photographer, but what you don’t want is a big, bulky, heavy tripod that you have to carry around from one shoot location to the next.
The E-Image MA600 Monopod is a great solution for on-the-go photographers that simply don’t have room for a traditional tripod.
At just 3.1 pounds, this monopod is lightweight, and with just a single leg, it’s form factor is much smaller than a tripod, thereby giving you more room in your camera bag for other gear.
This monopod can support an astonishing 44 pounds of gear, so whether you have a DSLR, mirrorless camera, or a large video camera, you’ll get all the support you need.
Made of aluminum, the MA600 monopod is strong and durable, yet more budget-friendly than carbon fiber options.
The flip-lock design of the leg locks makes setup a breeze and quick adjustments easy as well.
There’s a soft foam grip and a strap at the top of the monopod to give you multiple points of securing it while shooting.
It can extend to nearly 75-inches yet folds down to little more than 25-inches for easy transport. And with a base that spreads 16-inches, this monopod offers superb stability, even if you’re panning to track a subject.
Learn more about the E-Image MA600 Monopod
Learn More:
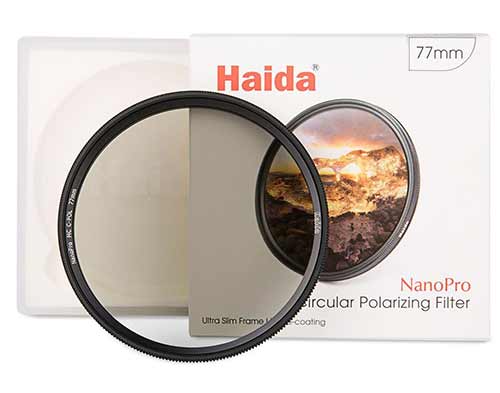
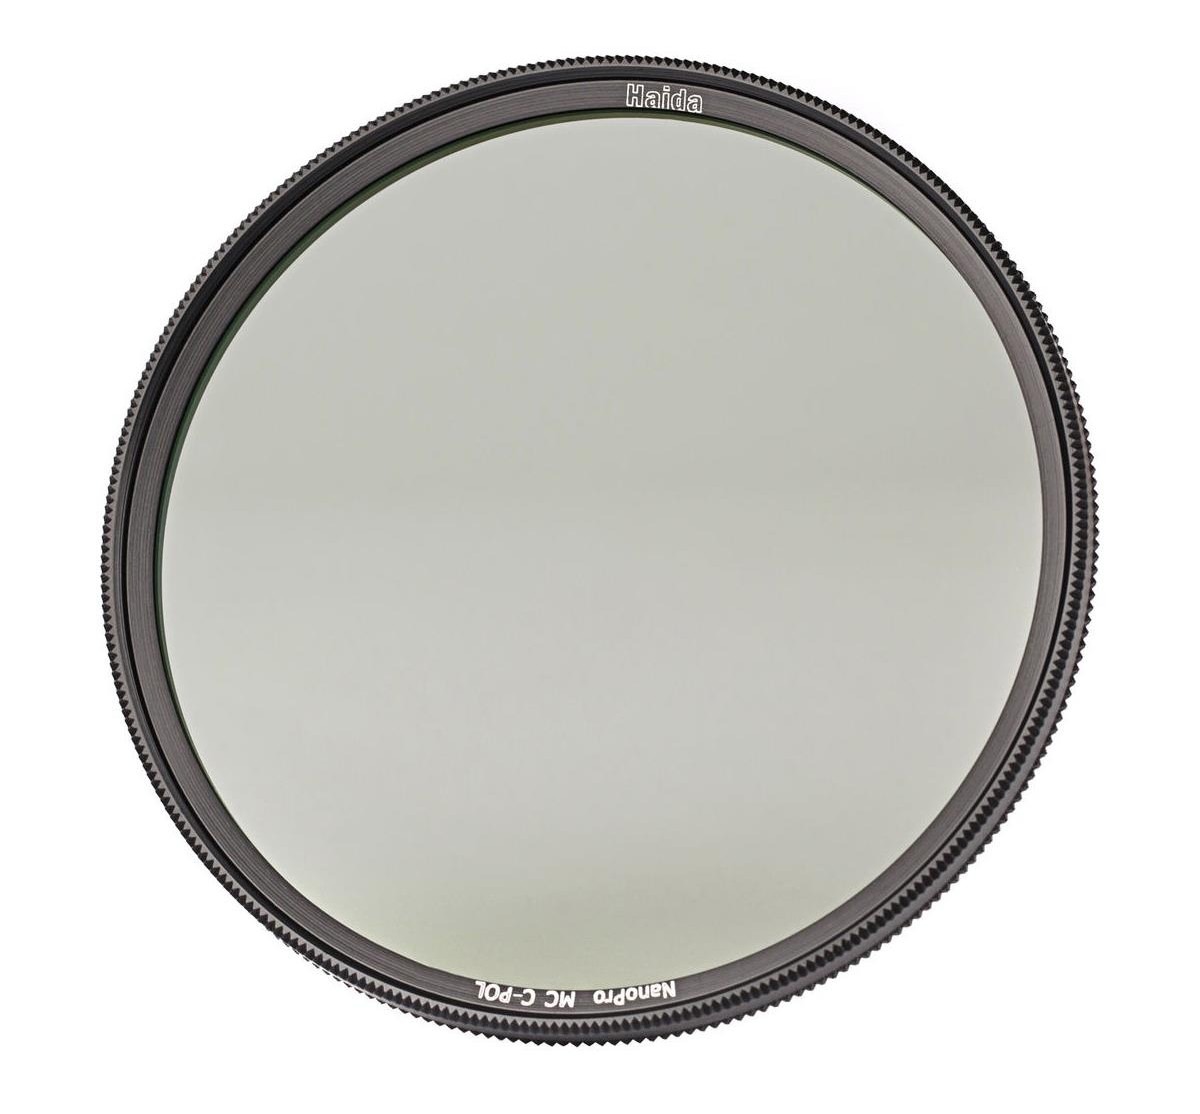
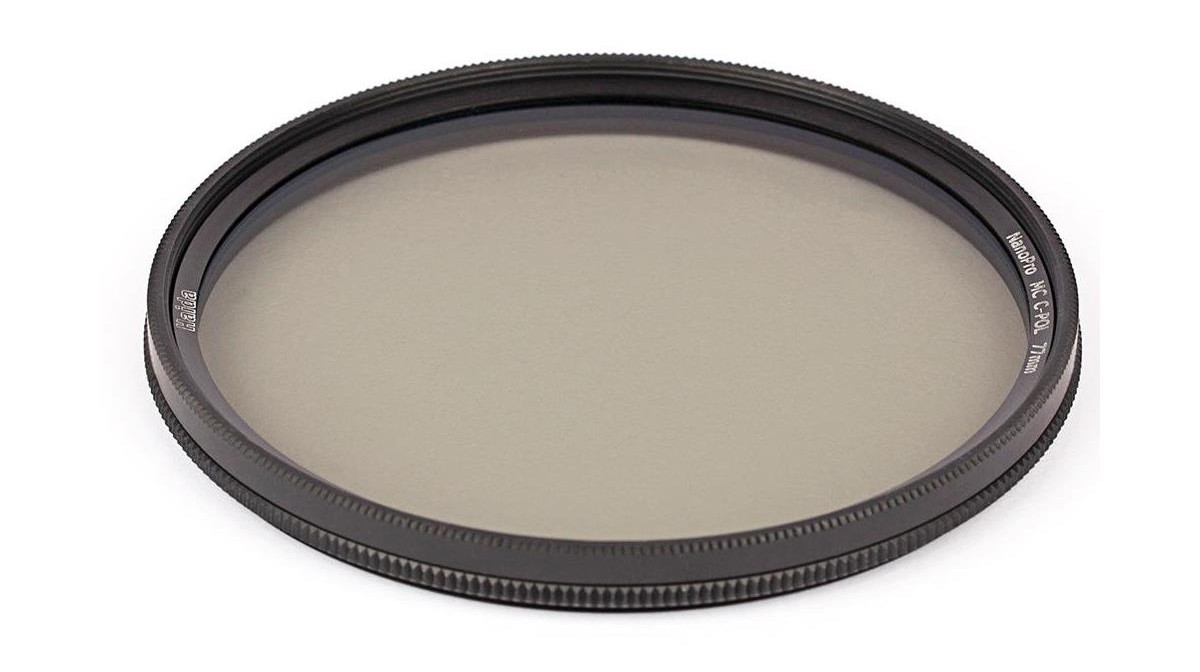
Step Up Your Photography Game With a Haida NanoPro Circular Polarizing Filter

When you’re on the move, it’s important to shed weight when you can.
One of the ways I’ve done that as of late is to ditch my giant filter kit and roll with just one filter - my Haida NanoPro Circular Polarizer.
Of all my filters, this one is the most invaluable simply because of the many benefits I gain from using it.
photo by DieterMeyrl via iStock
As all polarizers do, this thing boosts contrast in the sky, minimizes glare off of water and other non-metallic surfaces, and reduces atmospheric haze.
In all these cases, my landscape photos benefit from stronger colors, improved clarity, and gorgeous contrast.
But not all polarizers are made alike, so it’s important to invest in one that offers the highest-quality results. Haida does just that.
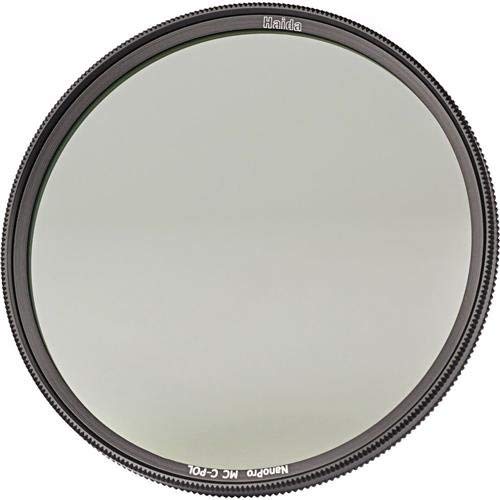
The NanoPro coating on this filter offers a number of benefits, including making cleaning an easier task. That’s because dust, dirt, smudges, and moisture are repelled thanks to ten (yes...ten!) layers of coatings.
What’s more, the NanoPro coating has anti-reflective properties to ensure your photos are as clean and crisp as possible.
With high-quality optical glass, a lightweight 5mm aluminum mount, and side knurling that allows for easier and more precise adjustments, this polarizer is definitely a camera accessory that takes up very little space in your bag, but is worth its weight in gold.
Learn more about the Haida NanoPro Circular Polarizing Filter
Learn More:
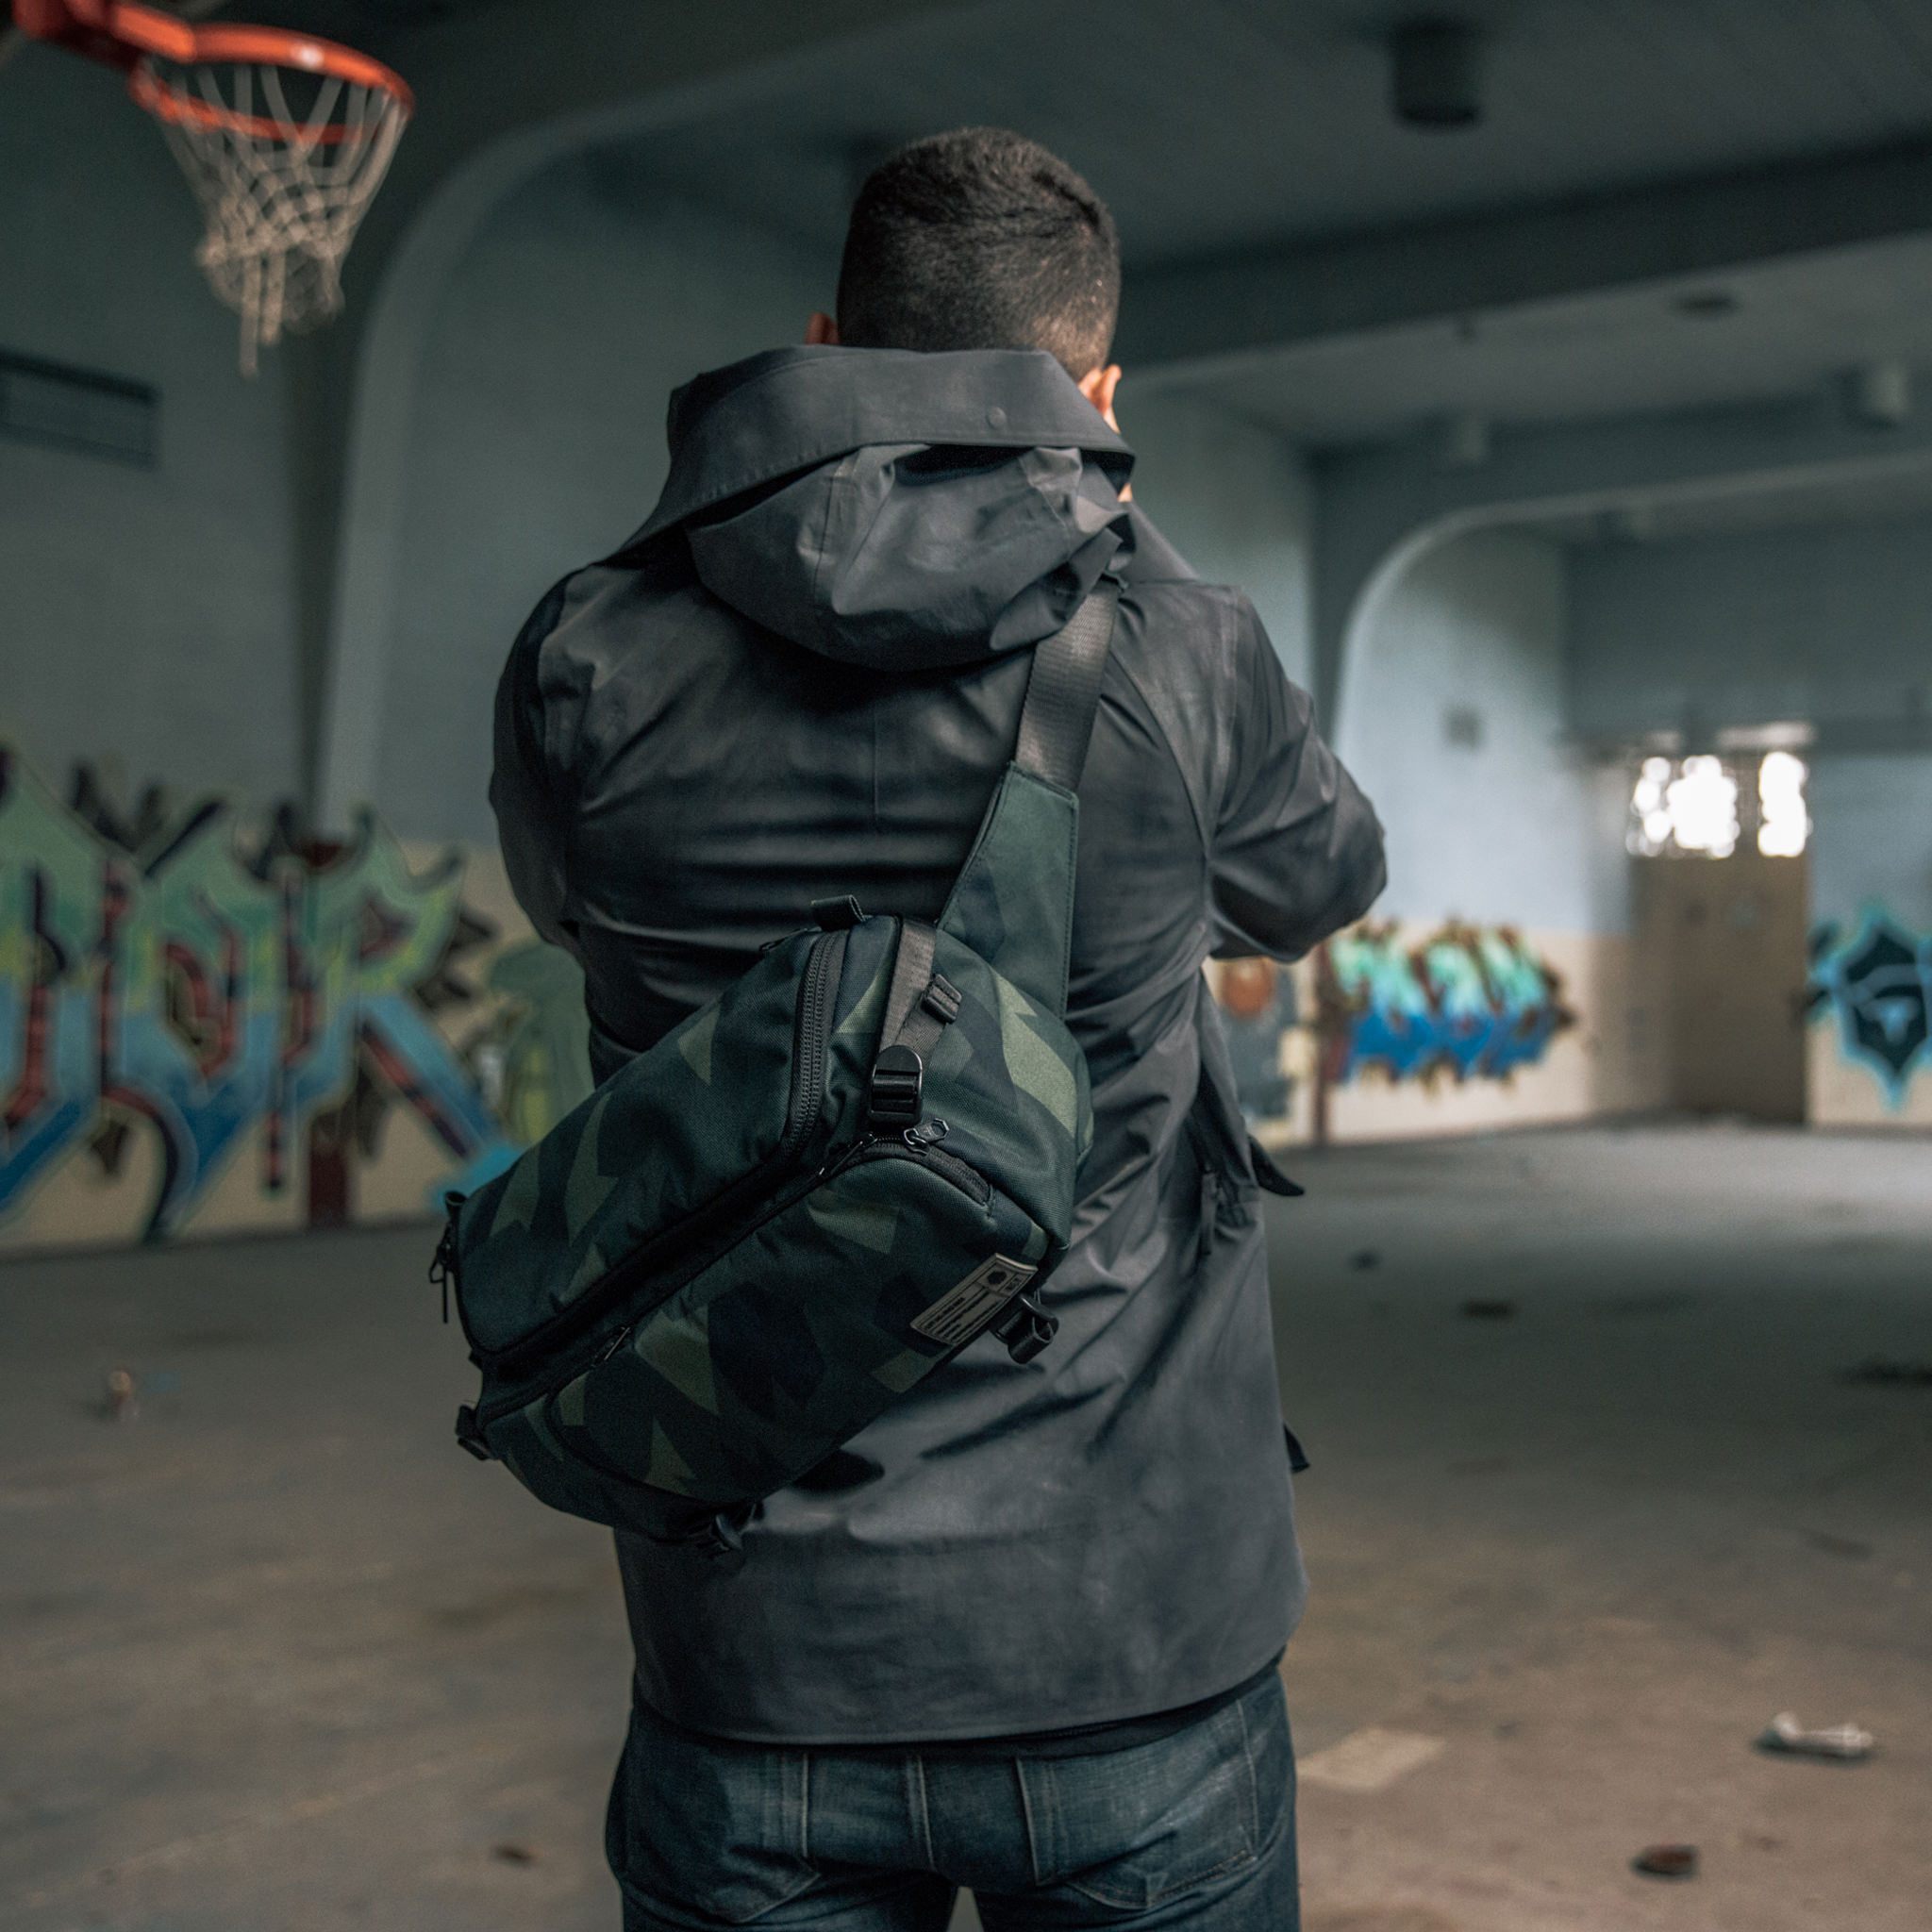
Carry Tons of Gear Without Feeling Weighed Down With the HEX Ranger Sling Bag
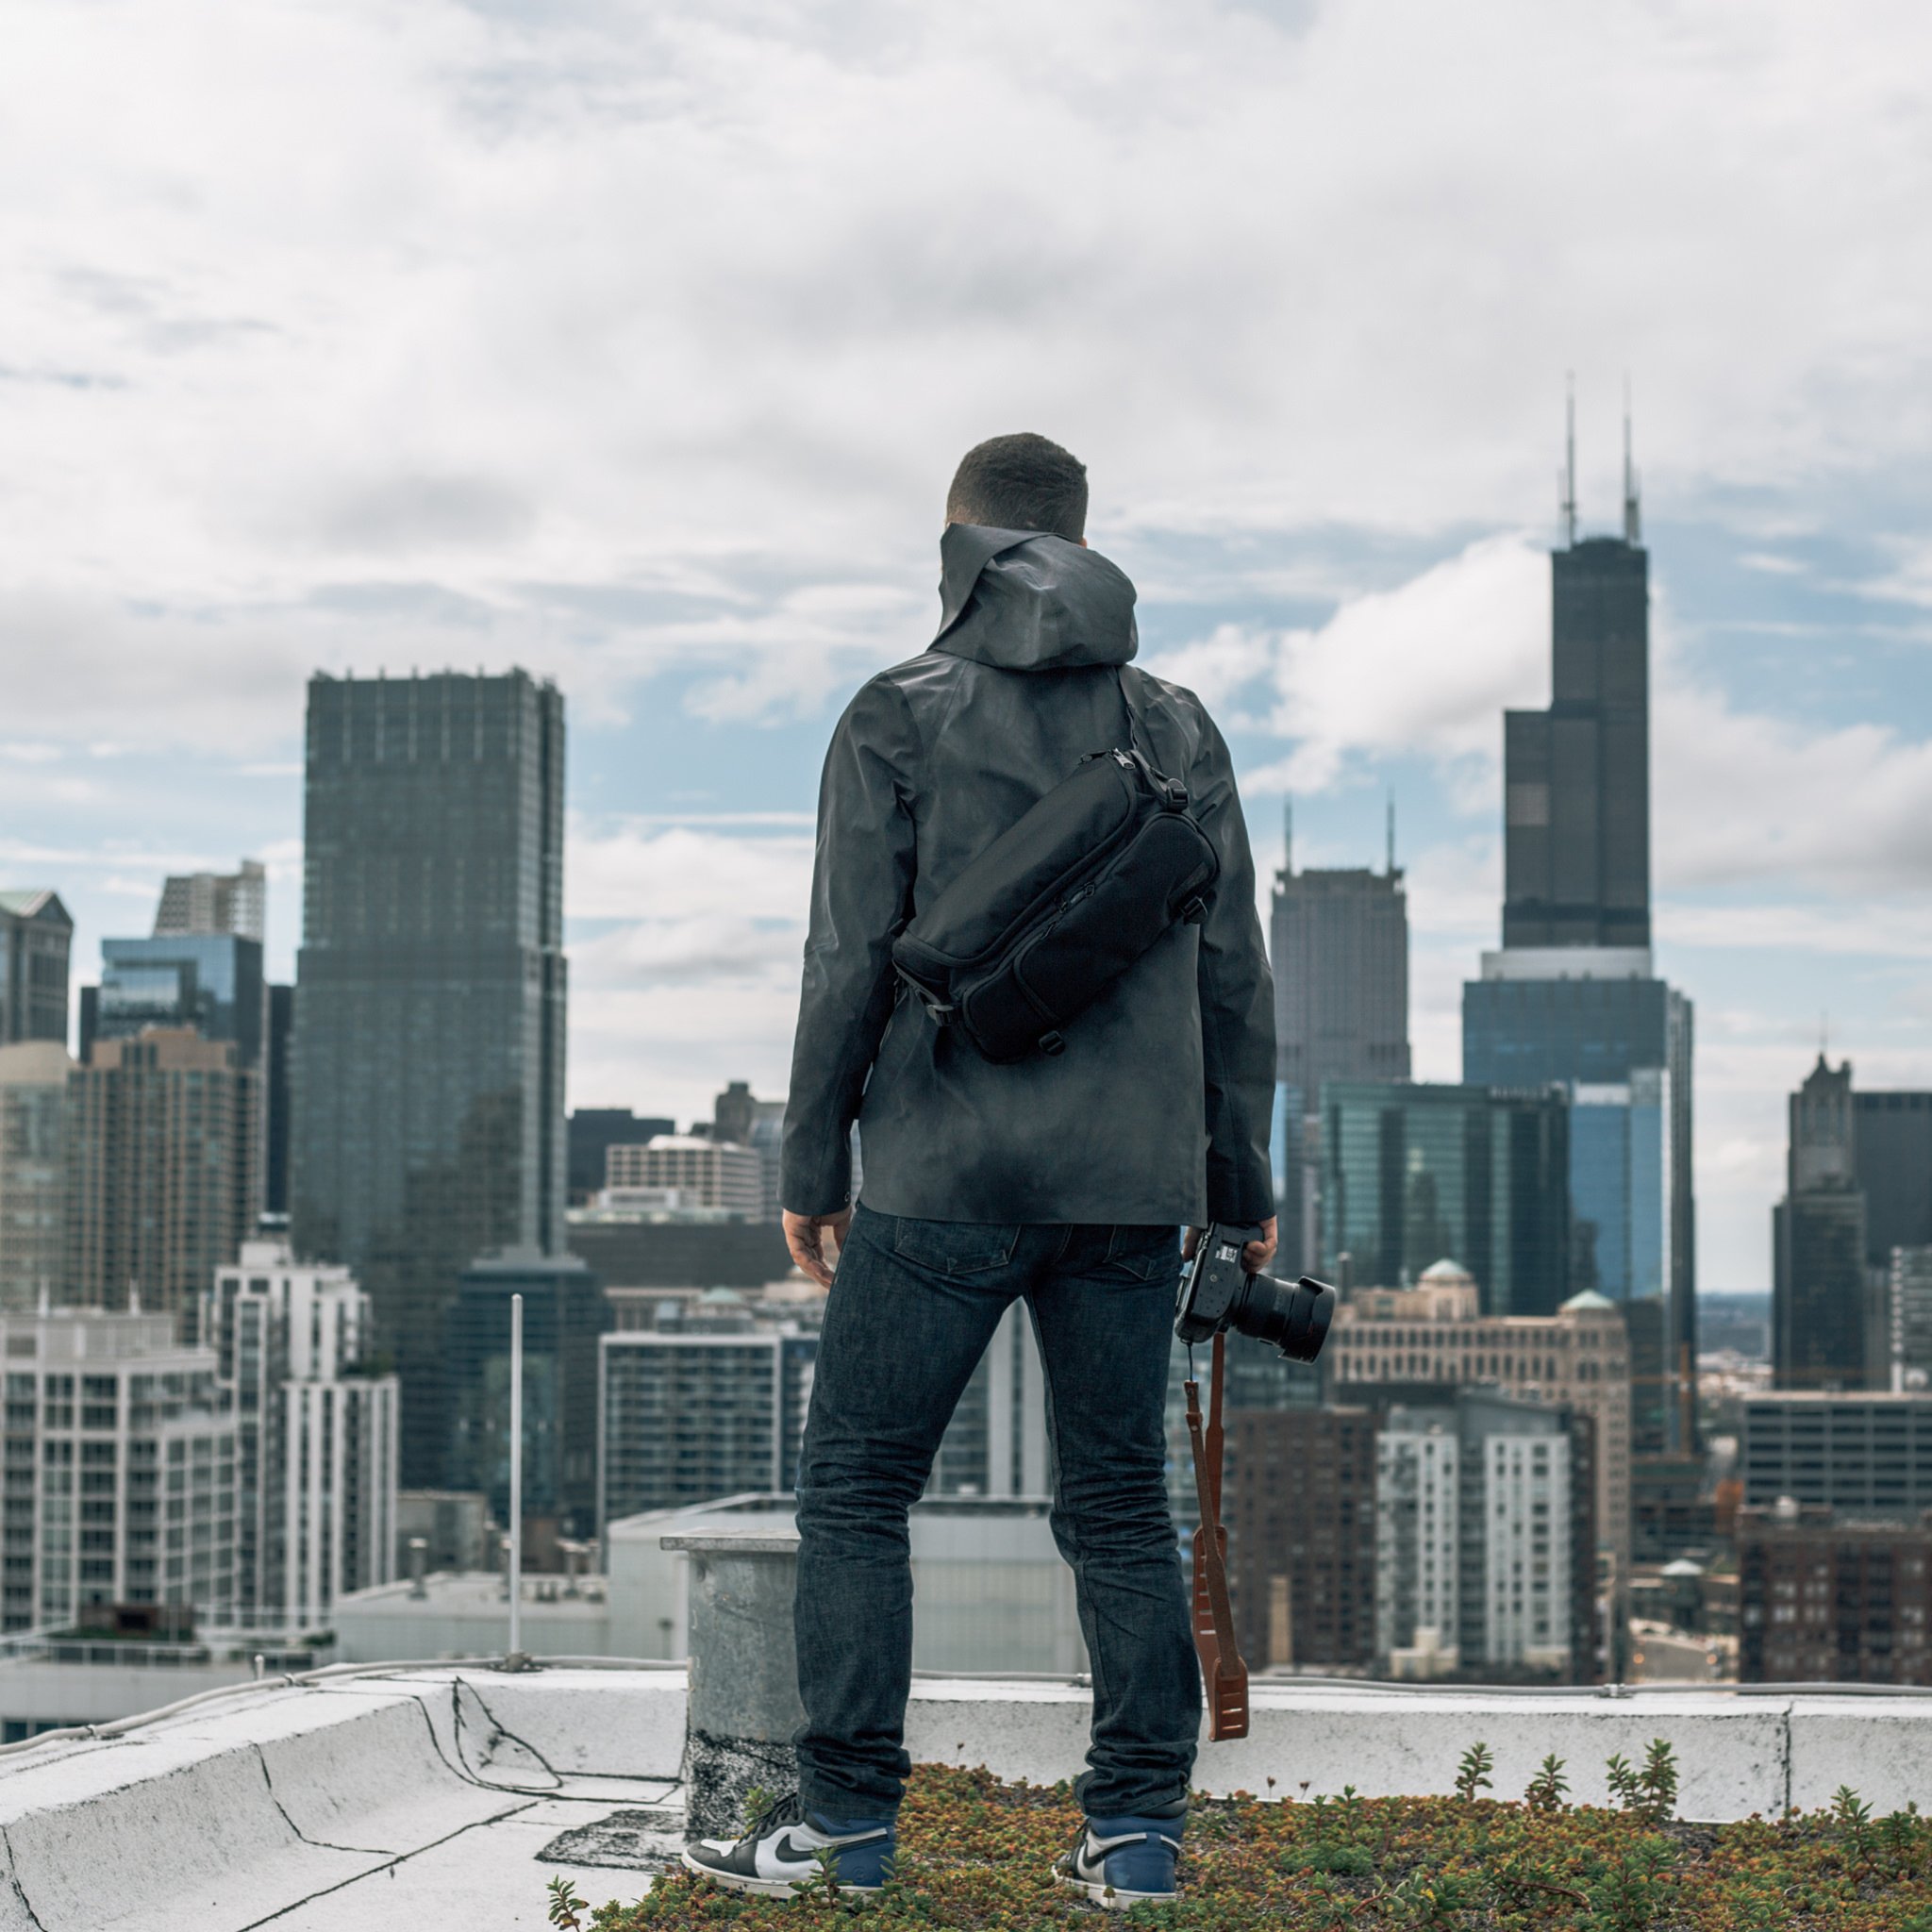
When you’re ready to head to points unknown, you need a camera bag that can fit loads of gear, but that isn’t big and bulky and difficult to carry.
Enter the HEX Ranger DSLR Sling Bag…
I have to say that I was completely blown away by this bag the first time I laid eyes on it when I met the folks behind HEX at their Los Angeles offices.
I’ve been a Peak Design guy for a long time, and if you know Peak Design, you know the quality that they put out.
But, man, HEX has taken it to another level!
For starters, it’s a compact bag at just 1.3 pounds and 14.5"L x 7.25"W x 4.75"H, yet I can fit everything from my 10 liter Peak Design Sling Bag into this 8 liter Ranger bag.
Why?
It’s simple - HEX has eliminated all the unused space from this bag, which gives you tons of carrying capacity without the bulk.
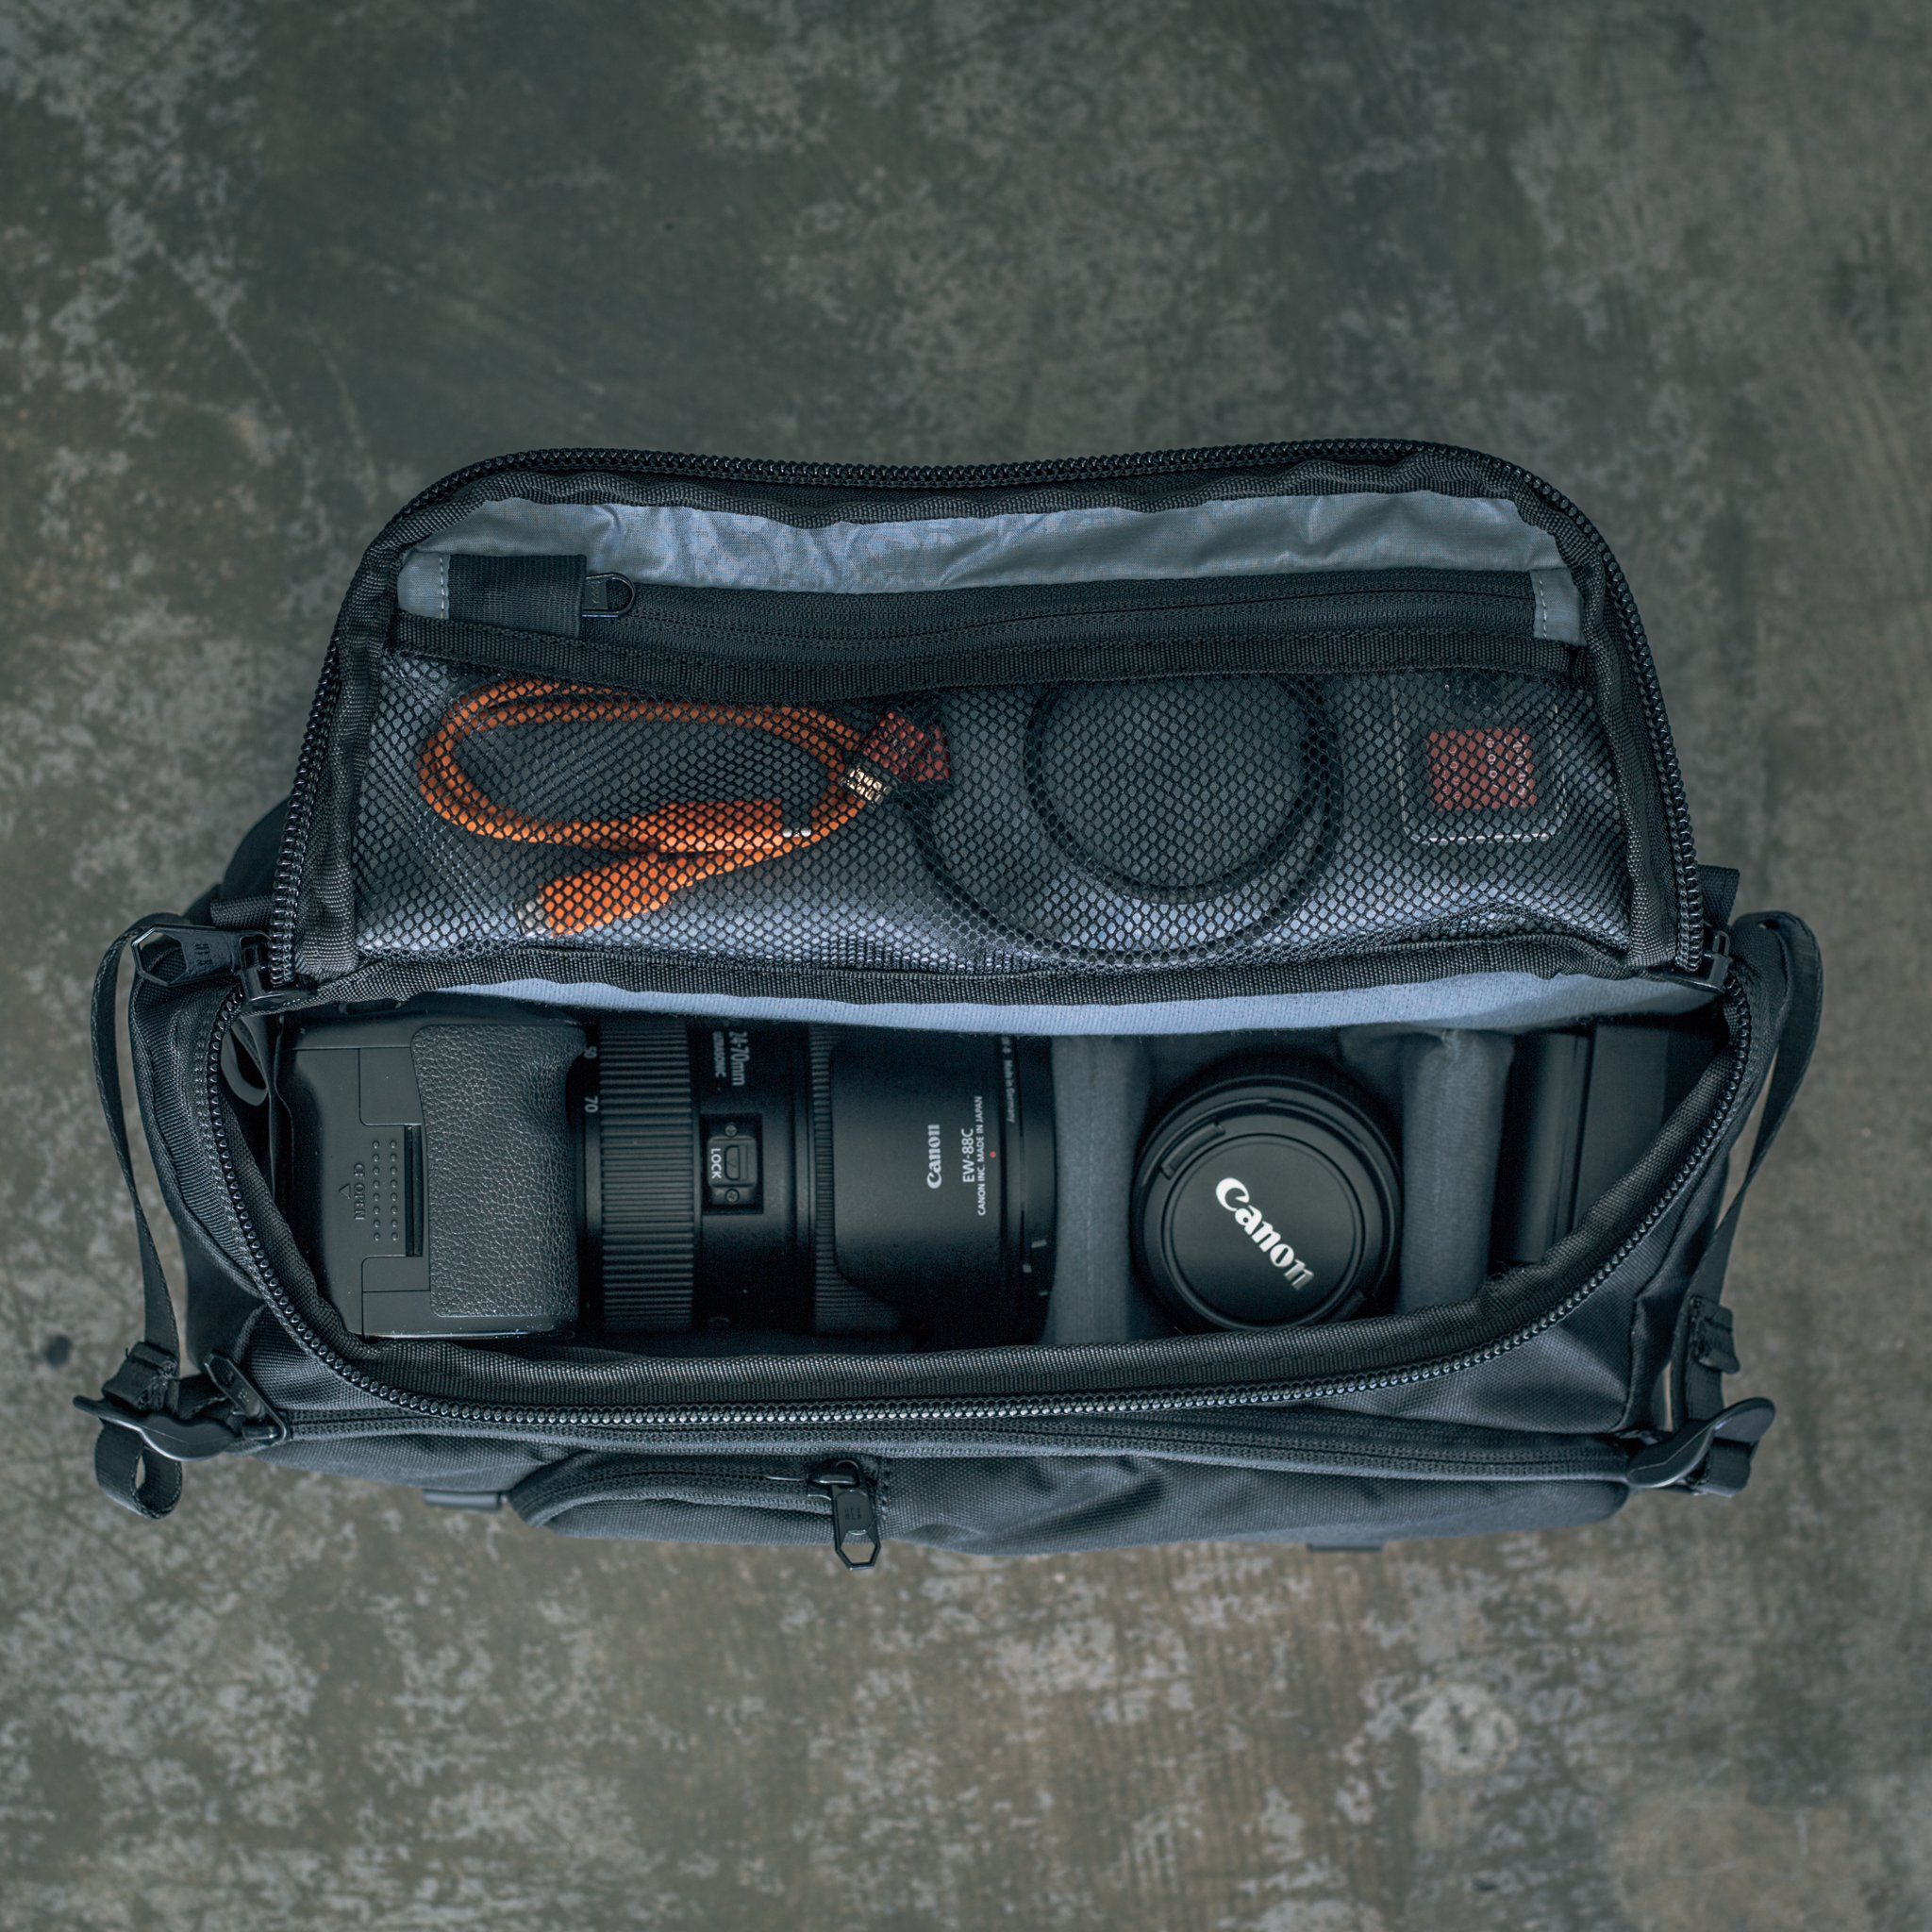
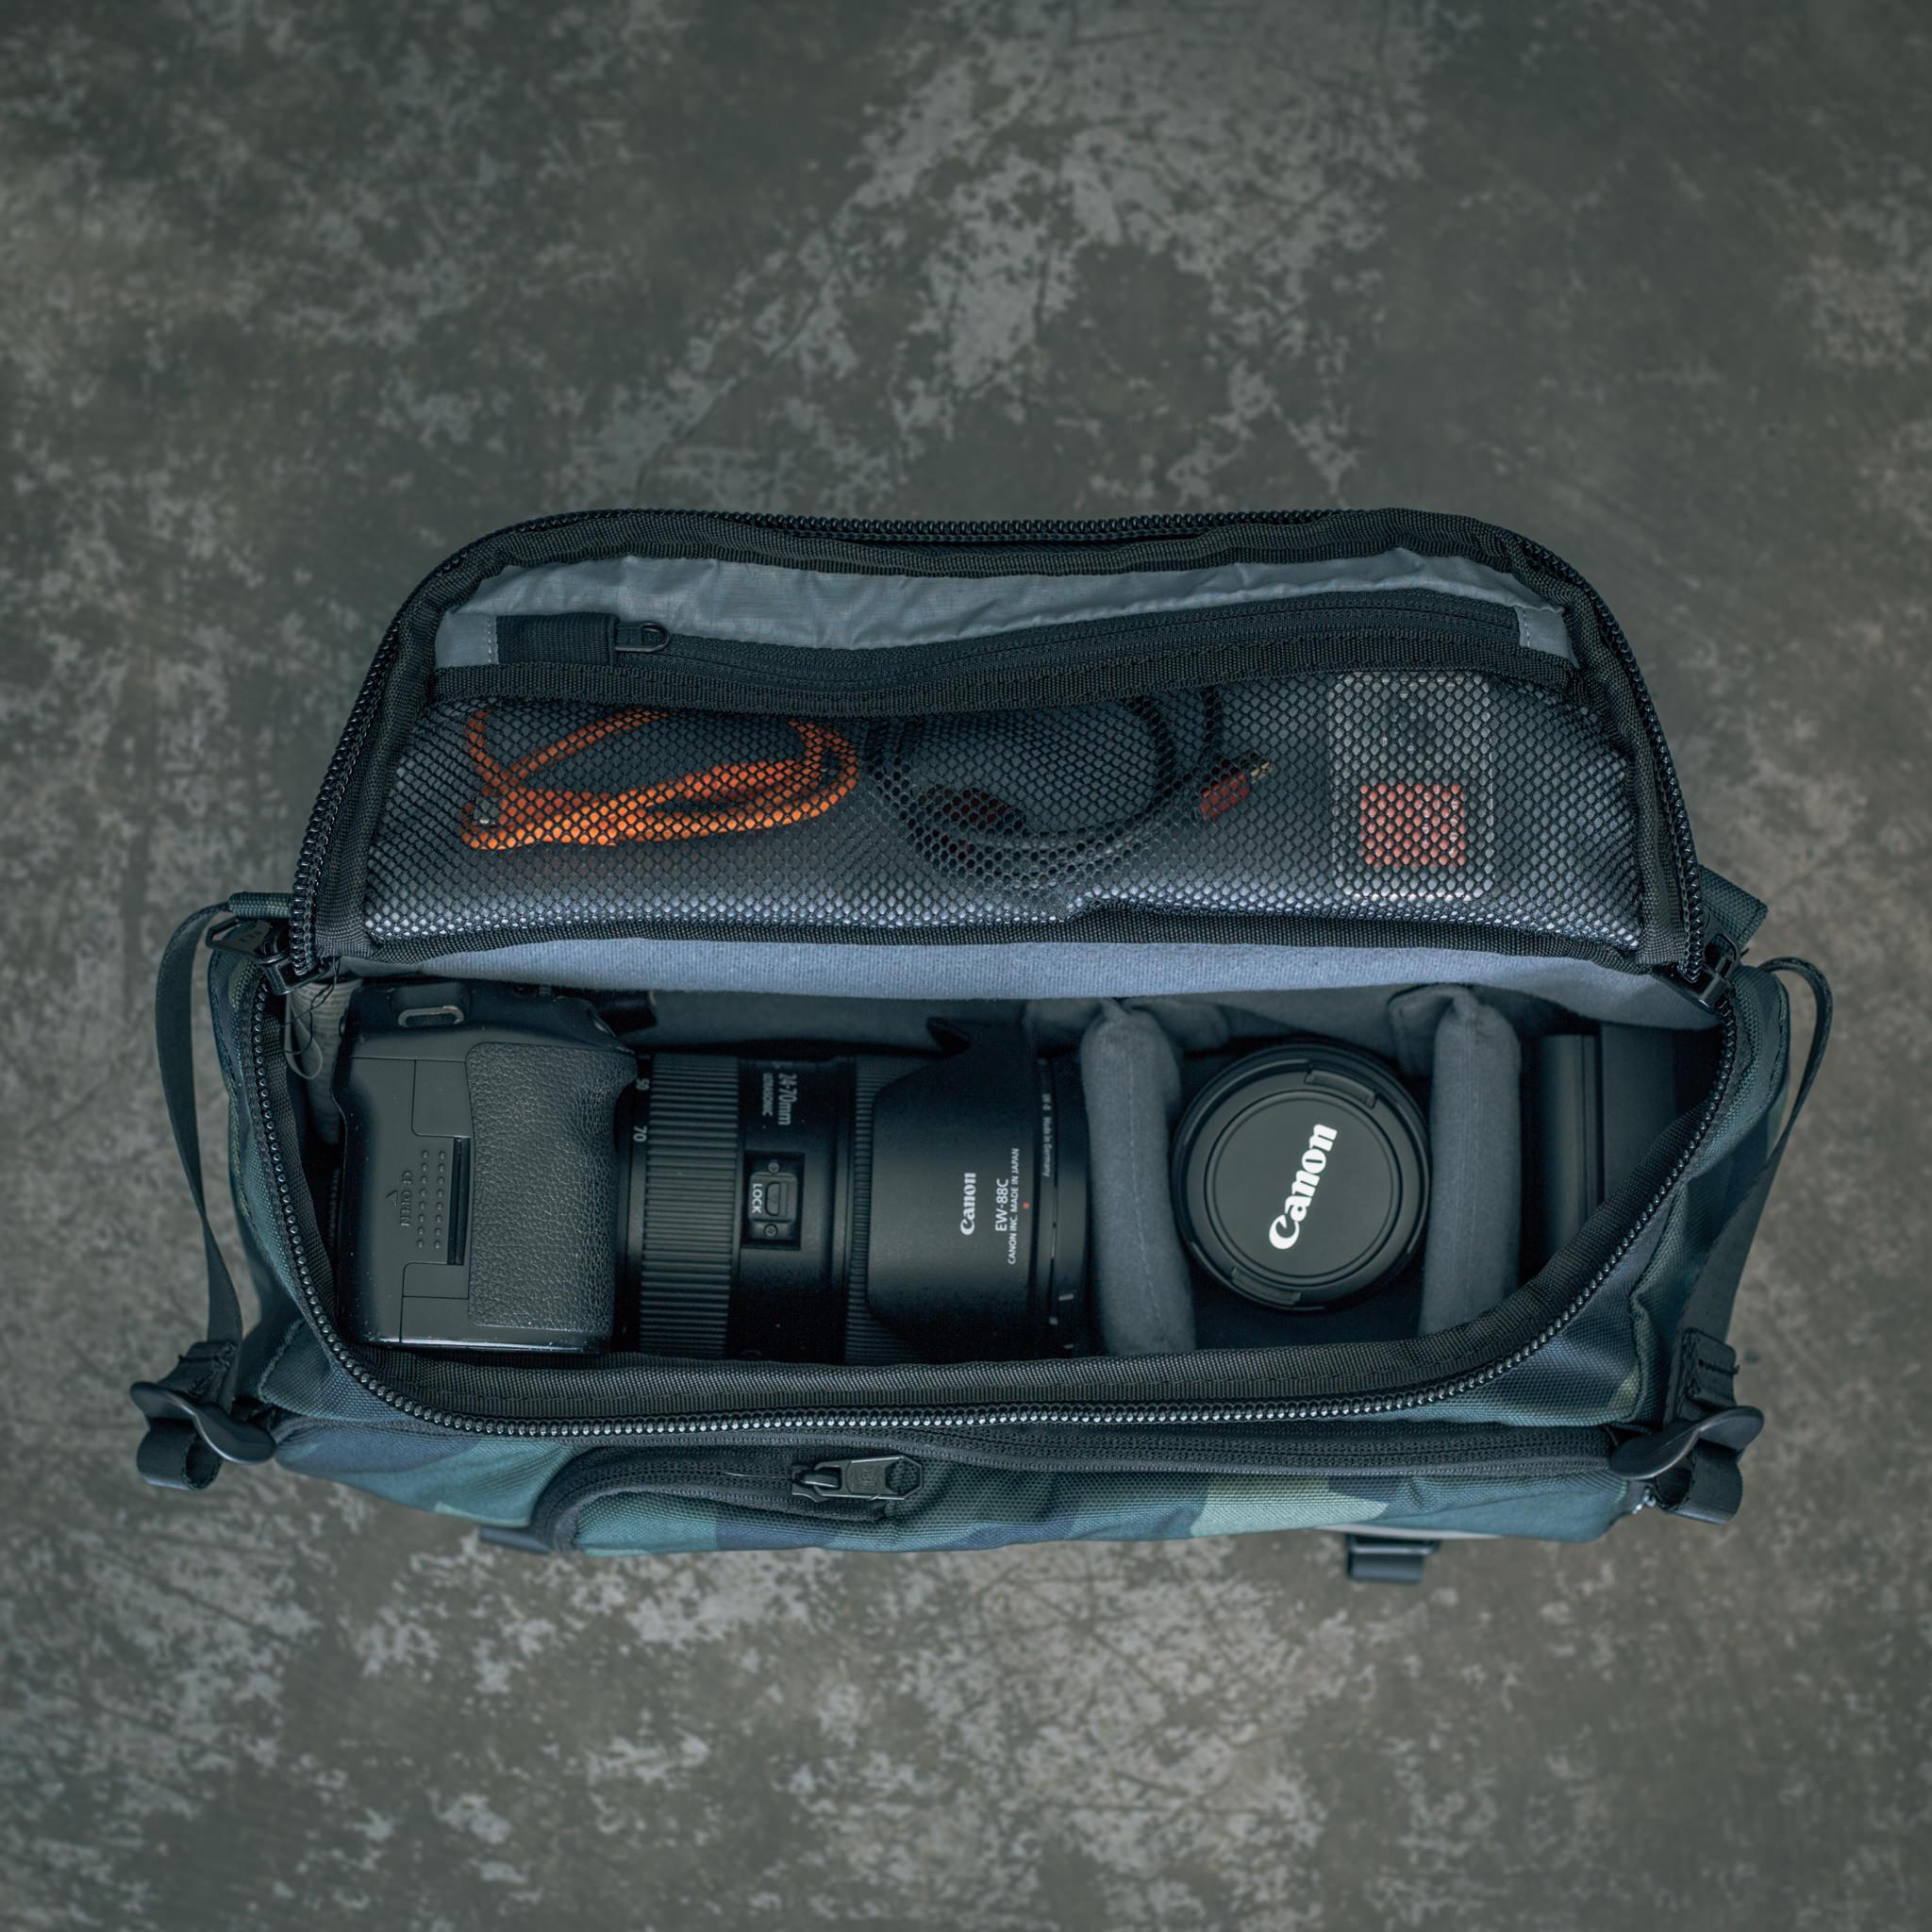
But don’t think that because it’s slim and trim that it isn’t loaded with features.
This bag has collapsible interior dividers that allows you to customize what gear you carry. The dividers can fold up or be removed completely, which allows the bag to lay completely flat. That’ll come in handy on your travels, for sure!
There are pockets galore, too, including a front-access organizer for the small things you need, a faux fur-lined sleeve for your tablet, and tons of velcro stash pockets. There’s even side adjustable load straps and an adjustable bottom carry strap to bring along more gear when you need it!

Perhaps the best thing about this bag is how it fits.
It’s snug to your body, so it doesn’t knock around as you walk, nor does it pose a threat to slide off and hit someone as you pass by.
It’s super easy to adjust and grab your gear thanks to the YKK zippers with metal pulls. The genuine Cordura material is great looking and durable too.
HEX simply impressed the heck out of me with this bag, which is why it’s my go-to travel bag now!
Learn more about the Hex Ranger DSLR Sling Bag
Learn More:
Save Time Editing With Exposure X5
 photo by lechatnoir via iStock
I enjoy editing my photos as much as the next guy, but when I'm on the go, I don't want to be in the hotel room slumped over my computer editing photos for hours on end. Instead, I want to be out exploring and shooting!
Exposure X5 lets me do that thanks to its ability to streamline my workflow when it comes to organizing and editing my photos.
In particular, there are three features (there are many, many more features, by the way) I especially like that make this some of my favorite photography software...
First, I appreciate the fact that Exposure includes hundreds of presets (like the one shown below). This enables me to add looks to my photos with just one click. In many situations, the presets are just what the doctor ordered, but if I need to tweak them, I can do so quickly and easily.
I can also save the presets that I customize and reuse them again in the future. How cool is that?!
Second, Exposure is just dead-easy to use with an intuitive layout that makes editing images a breeze.
If need be, you can customize the workspace to better suit your needs, too. On top of that Photoshop and Lightroom plug-in support is included so you can more seamlessly migrate your images into Exposure.
The third feature I really love about Exposure X5 is that it allows you to quickly transition from editing images to organizing images without having to switch modules.
Speaking of organizing, you can create smart collections of images based on criteria you specify and use keywords for further organization. You can even choose to retain or remove keywords during image export and import keyword sets directly from Lightroom.
In other words, Exposure X5 is simply a well-designed, beautifully thought-out photo editor and management system all bundled into one easy-to-use workspace.
When you're on the go and time is of the essence, you can't ask for more from your imaging software!
Get a free 30-day trial of Exposure X5 to see just how awesome it is.
We Recommend
Exposure X5 is Here; New Tools Make Photo Editing Easier Than Ever

If you’ve been following our articles the last few months, you know that we’ve been testing Exposure to see how it stacks up against the likes of Lightroom and Photoshop.
Exposure X4 was certainly up to the task, and now that Exposure X5 is here, we’re excited to see just how good it is.
Spoiler alert - it’s really good!
Exposure X5 Features
Exposure X5 was released last week, and in that time span, we’ve had time to explore its new features.
One of the most exciting new features in Exposure X5 is 3D color masking (there’s a tutorial on how to use this tool later in this article).
Essentially, 3D color masking gives you ultra-precise control over where an adjustment is applied to an image. That fine level of control is thanks to definitions that allow the adjustment areas to be defined by specific color characteristics, like luminance, saturation, and hue.
This allows you to target things like skin tones, the sky, and other specific color ranges with just a few clicks.
Exposure X5 also has advanced chromatic aberration correction, which allows you to remove those unwanted artifacts lens profiles or by manual adjustments, if so desired. Paired with a new fringe removal tool, chromatic aberration is easier than ever to remove.
There’s also a new vignette correction tool that combats darkened areas around the edges of your photos. It can be applied via a lens profile or through manual controls, just like the chromatic aberration correction.
Furthermore, Exposure X5 has custom camera profiles that enable you to control how color is interpreted from RAW files. These camera profiles (created by X-Rite or other software) can be applied automatically by matching a camera model or serial number, and it can also be used to match to a specific lens or ISO range.
On top of all that, the folks at Exposure have included the following in Exposure X5:
- New complementary color presets
- New light and airy presets
- New season-inspired looks
- More black & white film options
- Support for grayscale TIFF and JPEG images
- New image flip options
- Multiple user interface language options, including English, French, and German
If you’ve never tried Exposure, now’s the time. You can download a free trial version to test out for 30 days to see if it’s the right editing program for you.
Learn More:
How to Fix Color Casts
YouTube Screenshot/Exposure Software
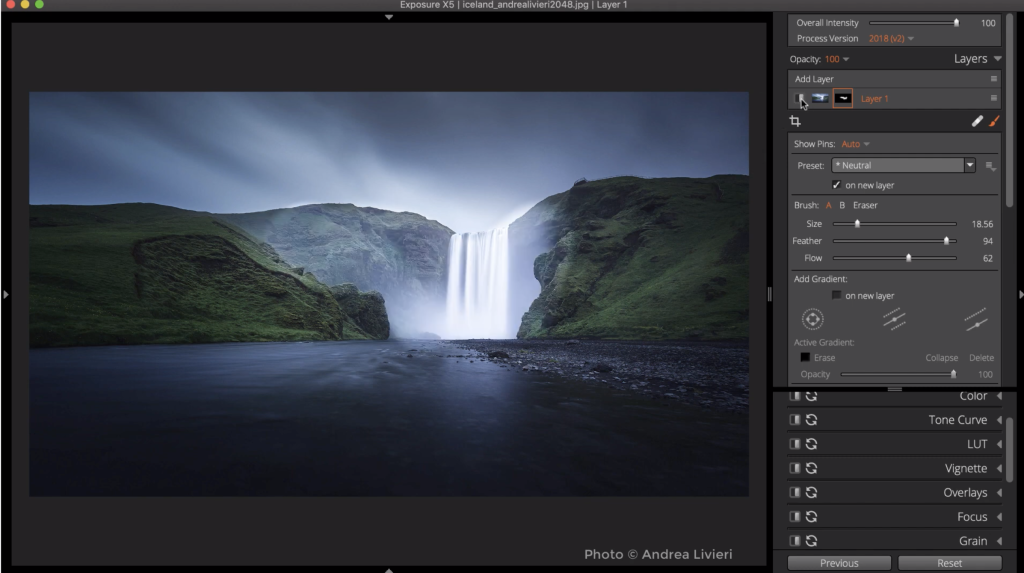
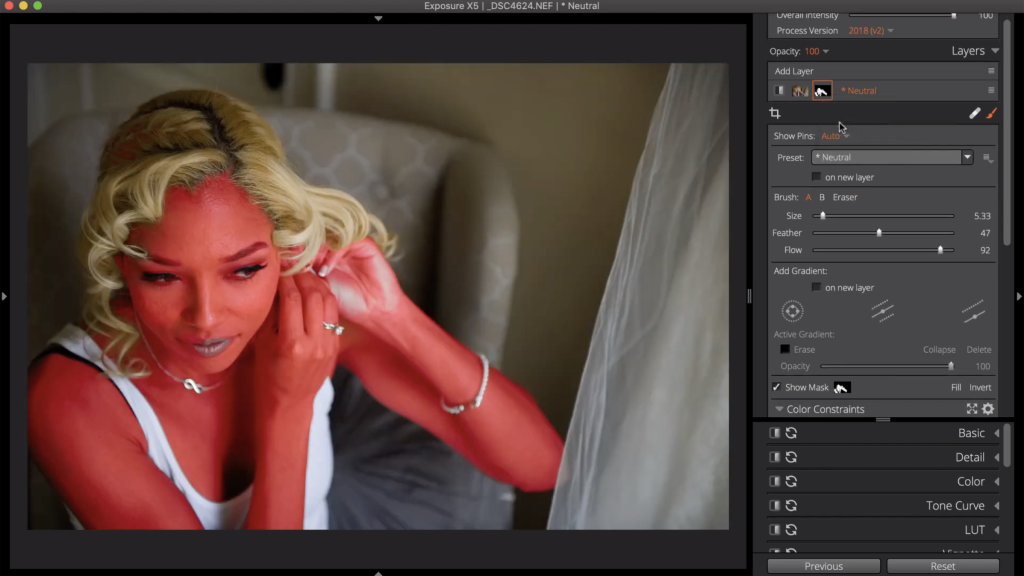
As I mentioned above, 3D color masking is a new and exciting feature in Exposure X5. This quick tutorial will show you how this tool works.
The control you get for applying effects to images with the 3D color masking feature is simply outstanding. We’re talking absolute pin-point application of the desired effect based on color properties like hue, saturation, and luminance.
You can apply masks in a variety of ways.
As shown above, you can use the brush tool to apply the mask to larger areas. While this works fine in many situations, it isn’t all that precise. If you look closely, the masked area extends into the clouds above the waterfall. It also misses some of the cliff face on to the left and right of the waterfall.
YouTube Screenshot/Exposure Software
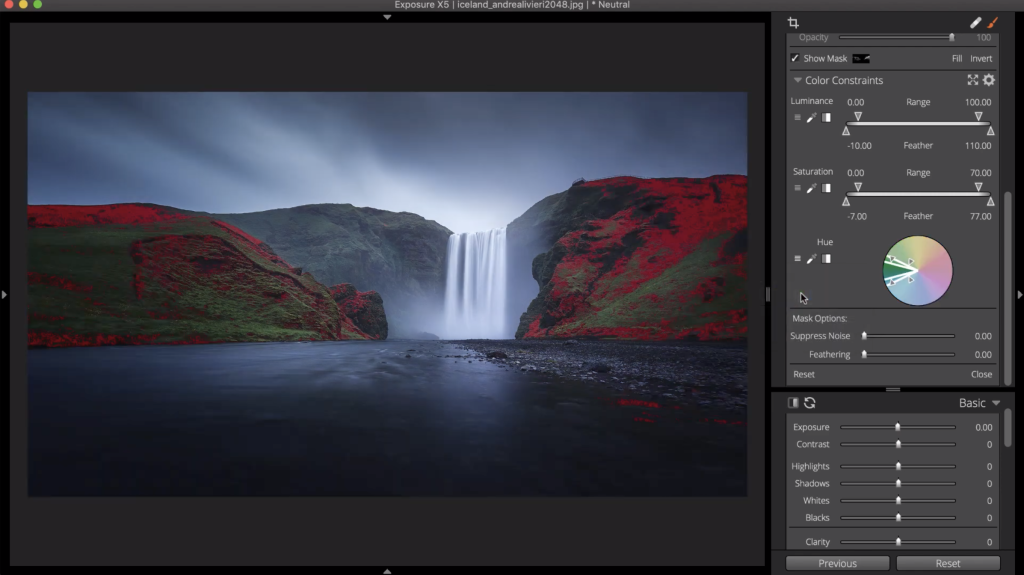
A much more precise way of applying masks is with Exposure X5’s 3D color masking tool.
Setting the color mask is a straightforward process.
For example, you can use the hue range presets to select a specific range of colors in the image to which the mask will apply. As shown above, the 3D color mask has been applied to dark green hues.
To change the hue range of the mask, you simply rotate the color wheel.

YouTube Screenshot/Exposure Software
You can refine the control over the range of hues easily as well.
Just grab the arrows on either side of the hue range and extend it to include more tones in the mask or to feather the mask across a broader range of hues.
As you can see above, the mask now covers a much broader range of green hues than in the previous screenshot.
In either case, this method of defining the area to which an effect is applied is far more precise and will get you much better final results.
3D Color Masks are Reusable
YouTube Screenshot/Exposure Software
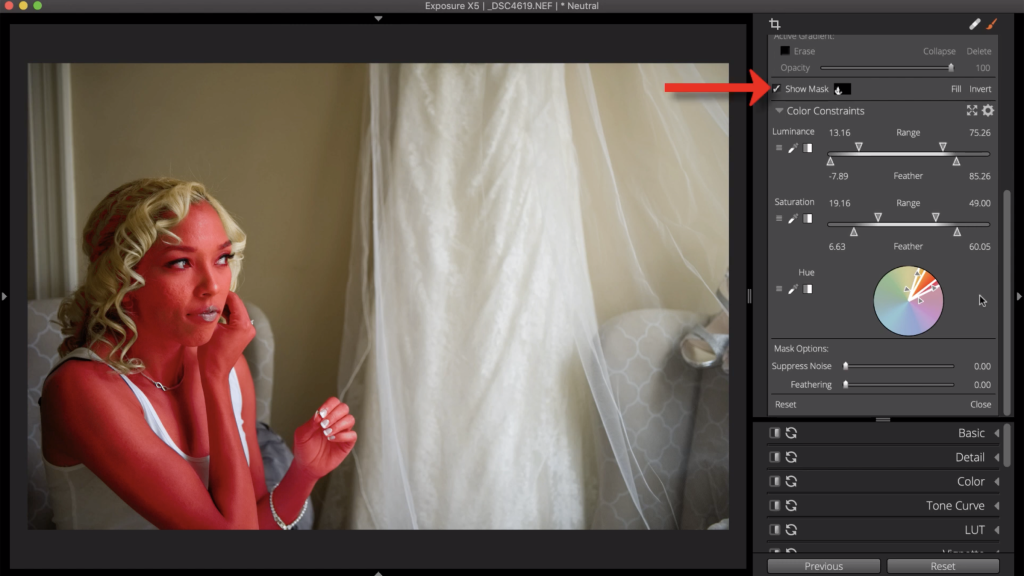
Another excellent feature of 3D color masks is that you can save them and reuse them on other images.
After the mask is defined, ensure the “show mask” option is turned on (indicated by the red arrow above). This will display the areas in the shot that are selected.
In this case, the mask can be copied from this portrait to another portrait, and Exposure X5 will automatically recalculate the boundaries of the mask to adhere to the content in the new image.
YouTube Screenshot/Exposure Software
So, if you’re shooting a series of portraits and the subject moves to a new position, the same mask can be applied to each image, even though you only tuned the mask to the first image in the sequence.
This works even if the images weren’t taken in sequence or even in the same environment!
The results you get are quite good, and in many cases fine-tuning is not needed. However, if you do need to refine the mask after you’ve pasted it into a new image, you can easily do so with the brush tool.
One of our most time-consuming tasks as photographers is editing our images, so any tools that come along to make that process smoother and more efficient are welcomed with open arms.
3D color masks are one such tool. You can streamline your workflow without losing any control over how your images look. Not only that, it’s an incredibly easy tool to use!
Get Exposure X5 and test out the 3D color mask on your own images. If you’re like me, you’ll be beyond impressed!
See the full 3D color mask tutorial in the video above.
Learn More:
We Recommend
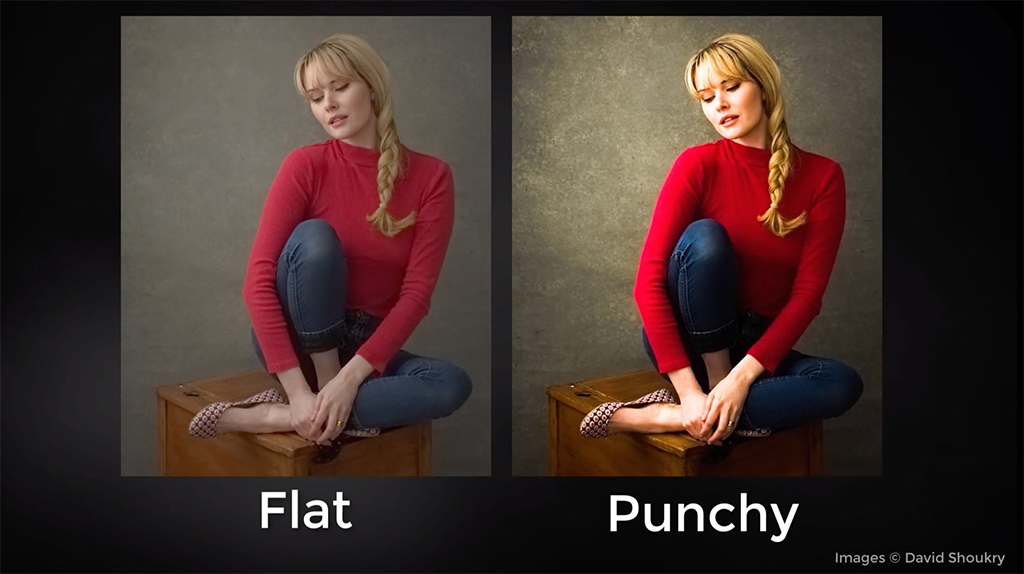
How to Add Life to a Flat Photo

Photo by Josefa nDiaz on Unsplash
If you shoot in RAW (which you should), you know that the image files are quite flat, with little in the way of color and contrast.
This means that before you publish, print, or share images, you need to do some work to add life to the shot.
The question is, how do you add punch to a flat photo?
In this tutorial, you’ll learn simple tricks for how to edit a flat photo using Exposure.
What is a Flat Photo?
YouTube Screenshot Exposure Software
To begin, let’s answer the question, “What is a flat photo?”
Essentially, a flat photo is one with very little in the way of contrast. This is advantageous because flat photos retain the details in both the shadows and the highlights.
The flatness of the image can be easily corrected in post-processing, as we will soon see. So, there’s a double benefit - there’s more details in the shadows and highlights and it’s easy to add visual punch to a shot. It’s the best of both worlds!
How to Edit a Flat Photo: Work on Contrast
YouTube Screenshot Exposure Software
The first step needed to add life to a flat photo is to increase the contrast in the shot.
Contrast is the overall difference between light and dark tones in a photograph. As noted above, flat images have reduced contrast, so using a program like Exposure to boost contrast will immediately give the photo greater visual appeal.
With greater contrast comes greater dynamic range. The greater the dynamic range, the wider the histogram for the shot will be (conversely, a flat image’s histogram has a peak in the middle with very little values on either end).
YouTube Screenshot Exposure Software
When adjusting the contrast of an image, you want to do it in a way that makes the dynamic range extend the width of the histogram, as shown above. Doing so ensures you have deep shadows, bright highlights, and plenty of pixels in between.
The primary question you should ask yourself when working on the contrast is how much to add.
On the one hand, if you don’t add enough contrast, the photograph will still appear flat. On the other hand, if you add too much contrast, the details in the shadows and highlights could be lost.
As a result, it’s necessary to experiment with the level of contrast and fine-tune it such that you get the visual punch you’re after without going overboard.
Learn More:
How to Edit a Flat Photo: Give Clarity a Boost
YouTube Screenshot Exposure Software
In programs like Exposure, you’ll find a Clarity adjustment tool that is also beneficial for giving your photos added visual appeal.
Specifically, the clarity slider makes adjustments to the edge contrast of midtones in the image.
In addition to this, clarity gives photos a sharper appearance and also enhances textures and other small details. In particular, clarity is an excellent tool for giving more life to a black and white photo.

YouTube Screenshot Exposure Software
More generally, clarity is a great option if the photo is of a landscape, cityscape, or animal. This is because clarity brings out the textures of landscapes, enhances the linear lines of buildings, and emphasizes wrinkles and other skin textures.
Again, working with something like the clarity tool requires some experimentation to determine the level at which you get the best results. Too much clarity results in an overprocessed look that is not pleasing at all (as shown above) while not enough clarity can leave an image looking too smooth and soft.
How to Edit a Flat Photo: Use Vibrance, Not Saturation
YouTube Screenshot Exposure Software
A third option to add punch to a flat photo is to manipulate the vibrance of the photo.
Vibrance is like saturation, in that it makes colors appear richer. However, vibrance, only works on pixels that have a lower saturation. The result of this is the ability to deepen the colors of the shot without making colors that are already saturated look overprocessed and fake.
This is a particularly good tool to use when working on a portrait - vibrance protects skin tones, so you can improve color saturation in other areas of the shot without making people’s skin look unnatural.
YouTube Screenshot Exposure Software
Just be aware that pushing vibrance too far can result in colors that look unrealistic, blotchy, and lose detail, thus appearing as a solid color block.
While having a flat image isn’t usually desirable, neither is having an image that looks overprocessed! As with all things in photography, practice makes perfect, so experimenting with these three tools will help you step up your post-processing game and create engaging, beautiful photos with tons of life.
In the video above by Exposure Software, you can see each of these steps to add life to a flat photo in action.
Remember, the tutorial explains these steps using Exposure, but these instructions can be used to work on images in other programs as well.
If you don’t have Exposure, you can download a full trial version to test out.
We Recommend
How to Correct Chromatic Aberration Quickly and Easily

photo byaluxum via iStock
The manner in which lenses are constructed can cause colored fringes to appear in the image along hard edges.
These artifacts are known as chromatic aberration, which occurs when a lens refracts wavelengths of light onto different planes.
This short tutorial explains how to correct chromatic aberrations. We’ll be demonstrating the process using Exposure Software.
If you don’t own Exposure, you can download a free 30-day trial to give it a spin!
Step 1: Find a High-Contrast Edge
YouTube Screenshot/Exposure Software
Chromatic aberrations appear in high-contrast areas along edges, so that’s where you need to look to find the offending color fringing.
The first step in how to fix chromatic aberrations is to zoom in to 100 percent (or more) in Exposure on an area with high contrast so you can easily see where the color fringing has occurred.
Learn More:
Step 2: Select Your Lens’s Profile
YouTube Screenshot/Exposure Software
The next step in how to correct chromatic aberrations is to use your lens’s specific chromatic aberration profile.
These profiles are designed to correct the chromatic aberrations that each supported lens creates.
The profiles make corrections automatically, however, there are manual controls you can utilize to dial in a more specific level of correction.
Step 3: Reduce Color Fringing
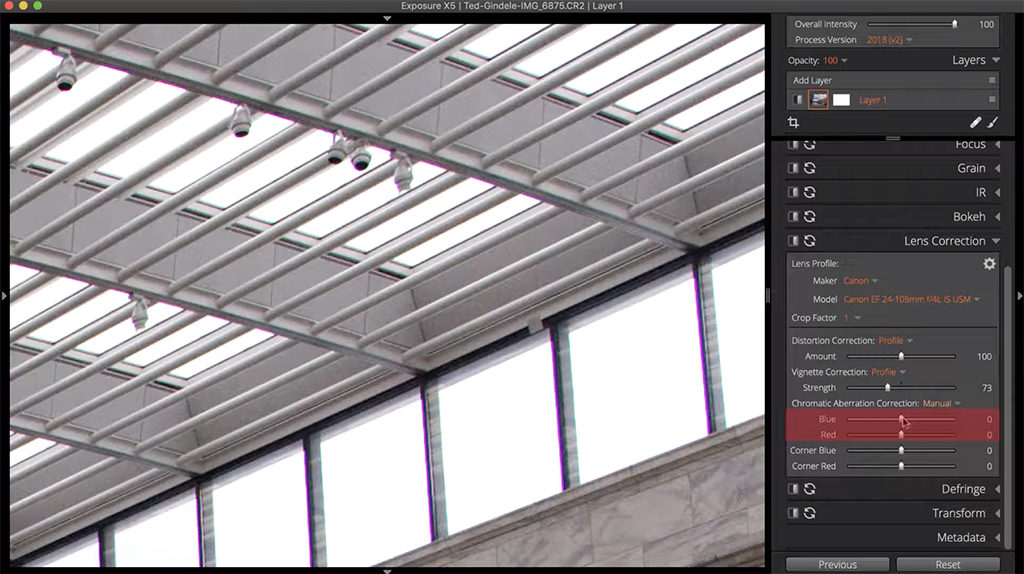
YouTube Screenshot/Exposure Software
The Blue and Red sliders should be used to reduce color fringing if the lens profile didn’t take care of it on its own.
If green or purple fringing is evident, make an adjustment to the Blue slider. When cyan or red fringing has occurred, adjust the Red slider.
In most cases, only these sliders will be needed to eliminate fringing. But, if additional adjustments are needed, you can use the Corner Color sliders to enhance or diminish the strength of corrections made in each corner.
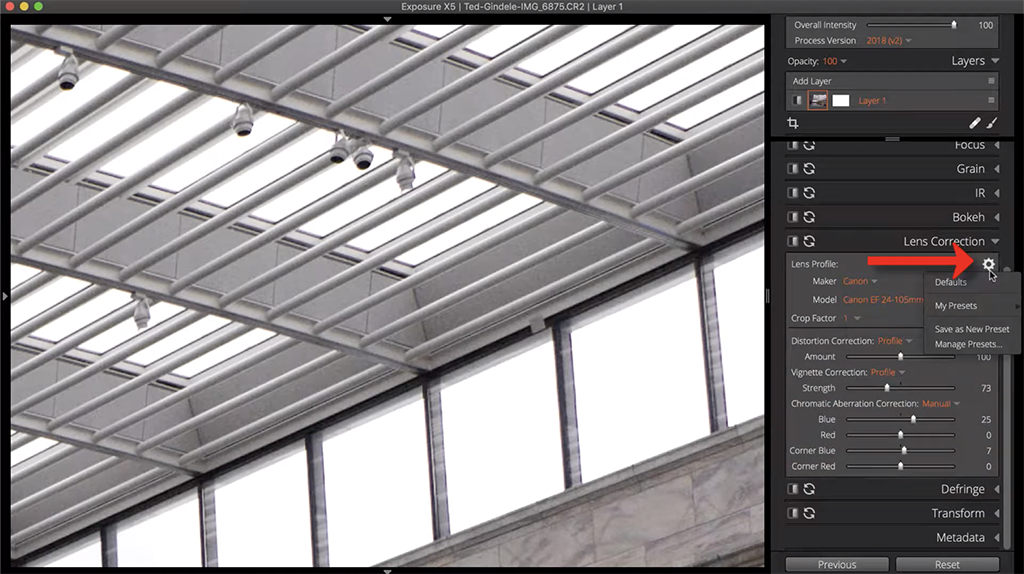
YouTube Screenshot/Exposure Software
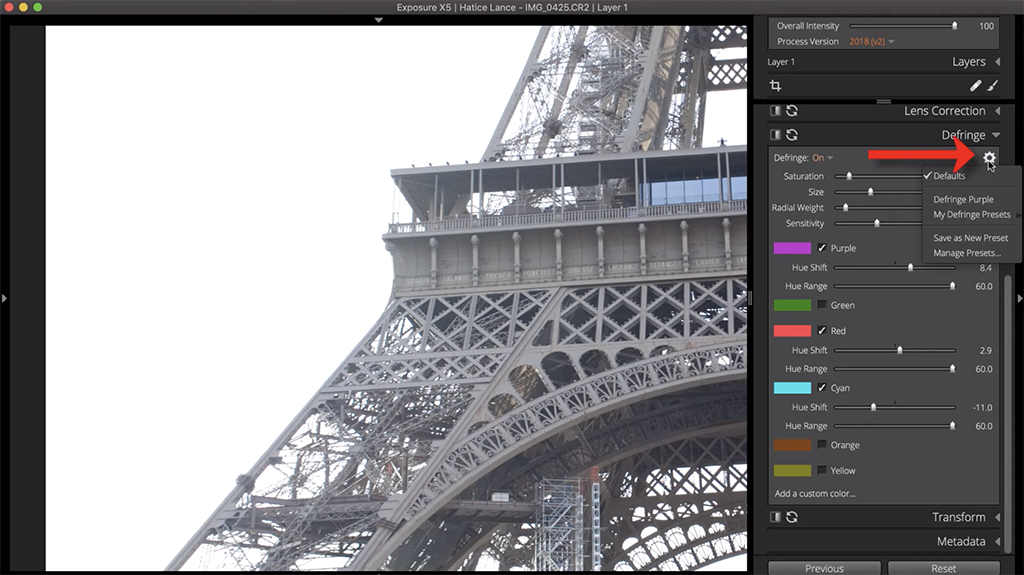
Quick Tip: Exposure allows you to save lens correction settings as a preset, that way you can speed up the process and have a quick chromatic aberration fix. Select the gear icon at the top of the Lens Correction Panel to access the preset creation menu. Once saved, your lens preset will include all the settings in the panel, including chromatic aberration correction, vignette, and distortion.
Learn More
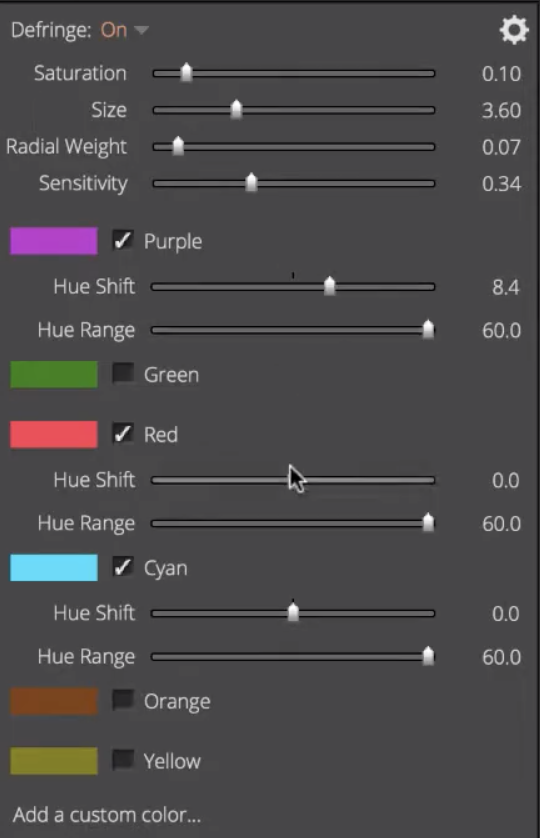
Step 4: Advanced Color Fringe Removal
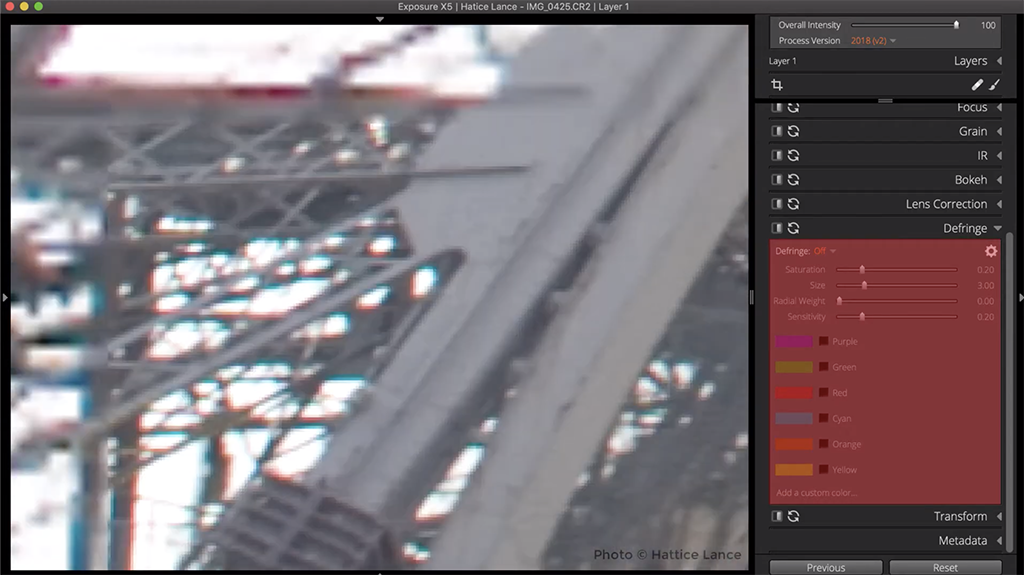
YouTube Screenshot/Exposure Software
In most cases, the first three steps in this process are enough to correct chromatic aberration.
However, sometimes fringing needs more attention to effectively remove it. That’s where Exposure’s Defringe Panel comes in.
The Defringing tool corrects colors that remain after chromatic aberration correction has been utilized.
YouTube Screenshot/Exposure Software
Exposure makes this process easy because color fringes can be removed from all the edges in the photos (and for all colors) simultaneously. If you want more control, however, you can select each hue individually and correct each color on its own.
Just like in the Lens Correction Panel, you can create presets in the Defringe Panel to speed up the process of removing fringing for your particular lenses.
YouTube Screenshot/Exposure Software
Quick Tip: If Exposure does not have a chromatic aberration correction lens profile for your particular lens, you can use the Defringe Panel to remove chromatic aberration. Just set the defringe settings to match the colors of the fringing in the photo and the Defringe tool will remove them.
Removing chromatic aberrations really has never been so simple. With just a few clicks, you can easily take care of color fringing, and best of all, you can save your settings as a preset and automatically take care of these common issues when editing future images taken with the same lens.
If you need a refresher of these steps, check out the video above by Exposure Software.
Ready to try Exposure for yourself? Learn more about Exposure and download your free trial!
We Recommend
How to Recapture Details in Blown-Out Highlights
photo byjacoblund via iStock
Blown-out highlights are just part of photography, right?
Wrong!
There are measures you can take to protect against blown-out highlights. When shooting landscapes, you can expose for the highlights in the first place, shoot in HDR, or use a graduated neutral density filter.
When taking portraits, you can use a fill flash or reflector to reduce the dynamic range in the scene. You can also shoot in the shade or on an overcast day to help minimize the chances that blown-out highlights will occur.
But sometimes, despite your best efforts, you end up with a photo with blown-out highlights. Then what?
In this short tutorial, I’ll explain how you can recapture details in blown-out highlights using Exposure X5. If you don’t already own Exposure, you can test it out for free by downloading the trial version here.
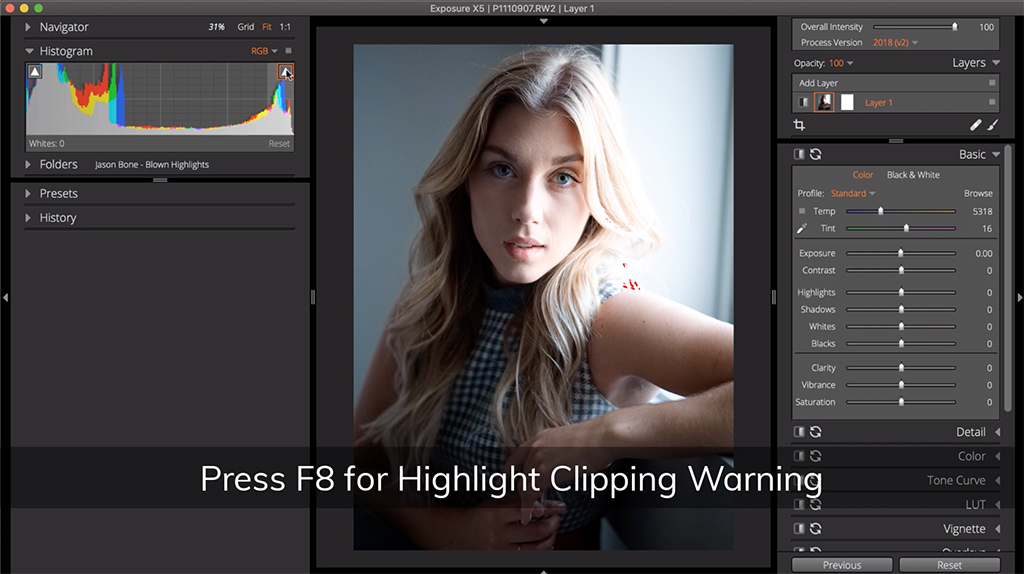
Step 1: Identify the Blown-Out Highlights
YouTube Screenshot/Exposure Software
The first step in reducing blown-out highlights is simply identifying where they’ve occurred in the image.
Exposure has a clipping warnings tool that highlight the areas of the shot that have lost detail due to overexposure. Just toggle the clipping warnings on by pressing F8 or by clicking the highlights arrow in Exposure’s histogram, as shown above.
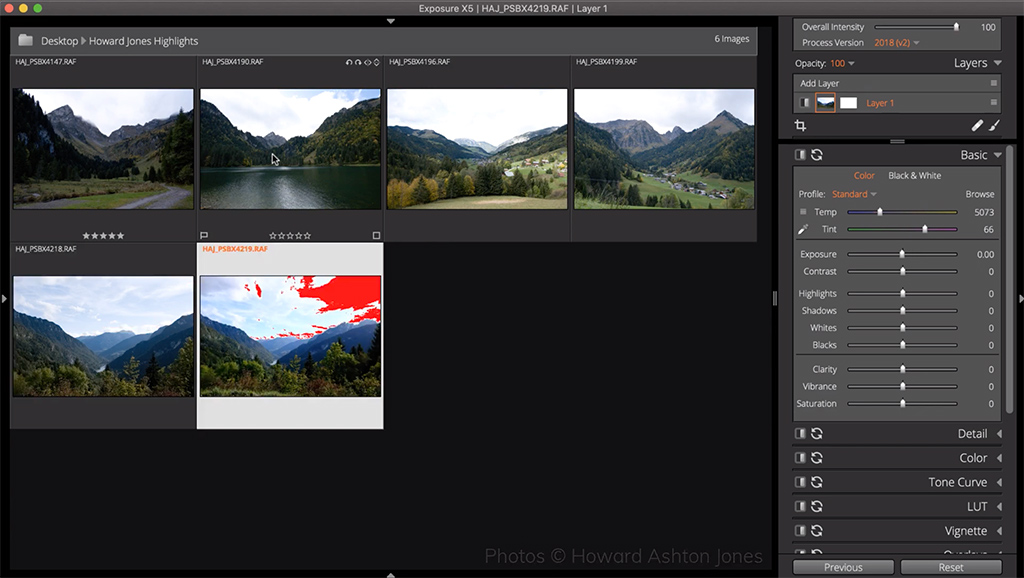
YouTube Screenshot/Exposure Software
When this feature is enabled, the blown-out areas are highlighted in red. The redder an area is, the less likely you will be able to recover all of the missing information in that area.
However, if an area is sporadically highlighted in red, there is a lot of information that you can recover in Exposure.
Learn More:
Step 2: Reduce Blown-Out Highlights

YouTube Screenshot/Exposure Software
Learning how to reduce blown-out highlights is simpler than you might think.
Using Exposure X5, just manipulate the appropriate sliders in the Basic Panel.
When making adjustments to these sliders, it’s important to begin at the top of the panel and work your way down. This is because the order in which you make changes can influence how other controls work.
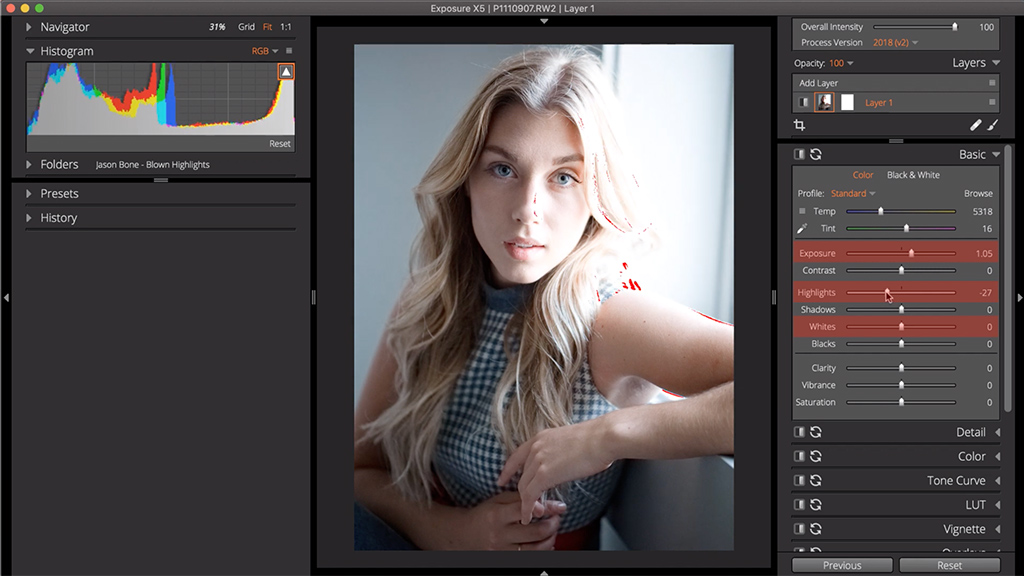
YouTube Screenshot/Exposure Software
As an example, manipulating the Exposure slider will affect the whites in the shot as well as the highlights. So, if you were to adjust the highlights and whites using their independent sliders, and then adjusted the Exposure slider, you’d have to go back and adjust the highlights and whites again.
YouTube Screenshot/Exposure Software
Speaking of the Exposure slider, it controls the tones that appear in the middle of the histogram, highlighted in red above. So, as you move the slider left or right, you will see a change in the levels of the highlights and whites in the middle of the histogram.
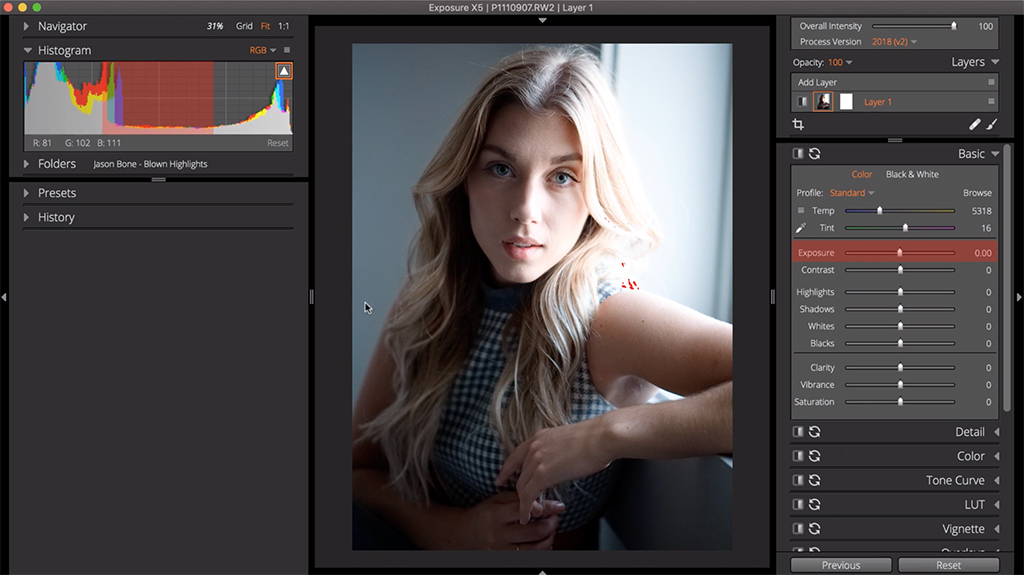
YouTube Screenshot/Exposure Software
The independent sliders for highlights and whites work on the areas on the right side of the histogram. You use the Whites slider to determine what is considered true white in the photo. The Highlights slider, meanwhile, is what you use to diminish blown-out highlights. Simply move the highlights slider left or right as necessary until you recover as much detail as possible in blown-out areas.
This method of recovering blown-out highlights requires some finesse - small and incremental adjustments to the Exposure, Highlights, and Whites sliders will get you the best results. Just remember to work your way down from the top of the Basic Panel.
Step 3: Balance Detail Recovery
It is possible to get overzealous and reduce the highlights and whites in an image too much, so, again, take care to make precise adjustments without making the image look flat.
In the video above by Exposure Software, you can see how to avoid going overboard with detail recovery. The previous steps in the process of recapturing blown-out highlights are also reviewed.
The whole process of recovering blown-out highlights using Exposure X5 takes just a few minutes, but its impact can be profound. Use these steps to reduce blown-out highlights in your images for photos that have much more visual appeal.
Learn More:
We Recommend
Learn How to Make More Money With These Photography Business Tips
photo byRawpixel via iStock
The first 3 years I ran my photography business I spent more money on it than I made, and I was only able to do that because I ran it part-time after my full-time day job was over.
I spent endless hours emailing photographers I looked up to asking for photography business tips, or asking how to make more money.
Many times, I got an unsatisfactory answer because I wanted to suffer for my art. In other words, I was told I wasn’t running my photography business like a business. I wasn’t worried about my bottom line because I was too focused on photography income tips, and nothing else about running a business.
But, after years of scraping by in photography, I think I finally have some useful tips for other photographers I want to share.
Table of Contents
- Charge More Money
- Streamline Your Workflow
- Be a Professional
- Invest in Yourself
- Be Available (Within Reason)<
- Build Relationships
Charge More Money
Chelsea Nicole PhotographyChelsea Nicole Photography really says it best with her diagram in the video above.
Most photographers are stuck in the lower-tier of photography. They charge less, but this isn’t really the problem. The problem is that clients at this lower-tier of pricing can be more difficult to deal with.
While it’s always necessary to begin at this crowded portion of the photography business spectrum, you need to quickly move beyond this pricing if you’re going to make it in this business.

photo by jeffbergen via iStock
A good way to introduce yourself to the idea of charging more is to up your pricing structure. This doesn’t mean you should double your rates overnight, but gradually increasing them over time can soften the blow to customers who remember what you used to charge.
Out of all my photography business tips, this one will help you learn most people are not turned off by photographers asking for what they are worth. If you’re good at what you do, you deserve to be paid for it, and that’s the view of many clients.
Besides, in the end, you’ll never find the answer to how to make more money in photography without charging more!
Streamline Your Workflow
 photo by Anchiy via iStock
As the old saying goes, "time is money," so that means you need to streamline your workflow in every way possible, that way there isn't a moment wasted over the course of the workday.
No one I know wants to work more than they already do, and part of what I do to work smarter, not harder, is to utilize tools that make my daily tasks less time-consuming.
For example, I use Exposure X5 to edit my photos and make use of its many built-in time-saving features to make editing a breeze.
Exposure X5 has a huge selection of Looks that put tons of beautiful film presets at my fingertips.
You can apply a look with just a single click while also having the option of customizing the look and saving it for use later on. This helps me create a consistent look and feel across a range of images but without having to repeat long, drawn-out edits over and over again. Nice!

Aside from having handy features like Looks, the workflow of Exposure is simply fantastic.
Its layout is intuitive, which leads to efficient use of the software to get the job done. What's more, Exposure allows you to customize your preferences for a bespoke editing experience.
With a seamless transition between organizing your images and editing them, you save even more time - time you can then use to go shoot more photos!
Try Exposure X5 free for 30 days to see what I mean about it being a fantastic time-saver!
Be a Professional

photo by jacoblund via iStock
This one goes without saying: if you’re charging professional money then you need to act professionally.
Communicate when something goes wrong. Keep your anger and frustration to yourself.
Set expectations for yourself and for your clients.
Meet deadlines. Do what you say you’re going to do.

photo by gorodenkoff via iStock
There are a ton of great photographers out there, and you’re in competition with many of them.
A great way to set yourself apart from the crowd is to really develop a strong customer service game. After all, if someone calls you to do their family portraits or to shoot their wedding, chances are good that they already like the work that you do.
You can get more clients and make more money by going above and beyond, and building on the good reputation you have for your photography skills by wowing clients with your service before, during, and after their shoot.
Learn More:
Invest in Yourself

photo by fizkes via iStock
It’s important to know that as you move along in your photography business, you need to continually invest in yourself (and your business, for that matter) if you’re going to maximize your profits.
Investing in yourself means taking the time to develop new skills and hone existing ones.
In particular, learning the business of photography is critical - if you’re already a professional photographer, you should have a wealth of photography knowledge and skills.
But many of us don’t have the business or marketing savvy needed to help our businesses take flight, so that’s a good area to spend some time and money in learning new things.

photo by LPETTET via iStock
The other huge part of learning how to make money from photography is ensuring you are taking care of yourself as your own employee.
I recommend Catch for freelancers, which is a one-stop shop for personal benefits. You enter what percentage of each check you need for taxes, health care, retirement, and time off. You then connect it to your bank and it basically does the rest.
Photography business tips rarely touch on making sure you get time away from the studio, or making sure you’re saving for retirement you will greatly deserve in a few years time.
Plus, you can’t shoot if you’re ill. So, make sure you show up for your annual physical, if only for your photography business!
Be Available (Within Reason)
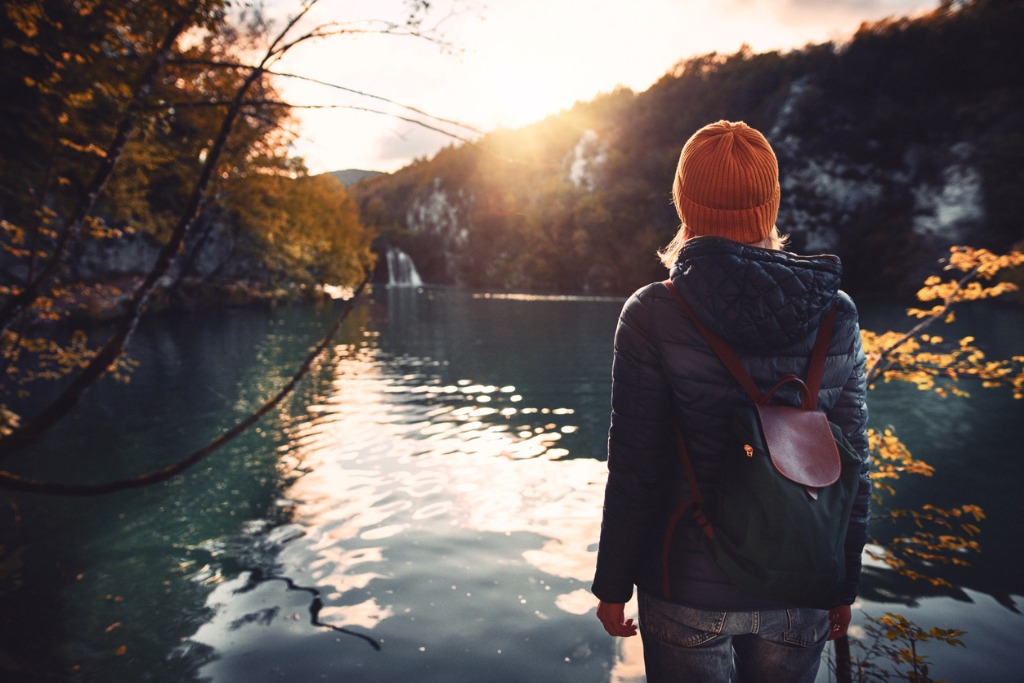
photo byda-kuk via iStock
Many photographers allow their pursuit of income to block their judgement about how much they work.
Of course, you want to put your client first, but there needs to be some boundaries, otherwise you’ll find yourself working all the time and neglecting the time you need to rest and unwind.
It’s one thing to occasionally oblige a client that needs your services after hours, but be reasonable about how often you do so. I don’t know many people that enjoy working all day and all night, and you shouldn’t have to do so either.
The same goes for when you are on vacation. Set up an “out-of-office” email and don’t worry about how to make more money until you’re home.
P.S. if you need a little extra help learning how to set boundaries with your clients, and really how to grow a photography business, this article from Small Business Boss is extremely helpful.
Build Relationships

photo by mediaphotos via iStock
The best advice I ever received about how to grow a photography business is to invest in your relationships.
These relationships extend from clients to other photographers to your suppliers.
And the best way to build relationships in the photography business is to communicate honestly.

One of my favorite suppliers, CanvasHQ continues to receive my business because they are forthright with what should be expected of them.
They offer a guarantee on their products, so if something isn’t right, you can send it back and they’ll reprint it for free.
What’s more, they’re very open about their process of creating the prints and the materials they use, so I know exactly what to expect. And what to expect is top-quality work with archival canvas, professional inks, and hand-crafted frames.

Plus, they deliver that quality on time every time!
It doesn’t hurt matters that every time I sell one of my clients on a canvas print, they absolutely love it and often come back for more or refer me to their friends.
Using quality suppliers only helps further your photography connections, and it can also help you bring in more money. It’s a win-win!
Learn More:
We Recommend
Mirrorless Camera Accessories You Need Right Now
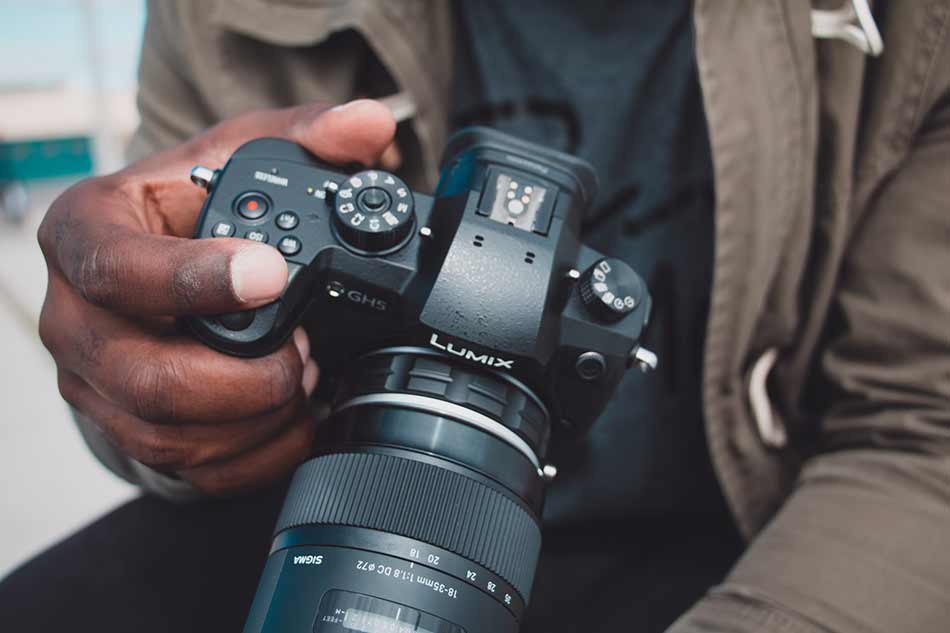
Photo by Jeff David King on Unsplash
I don’t want to say that the days of the DSLR are done, but I can’t help but wonder how many more years that the likes of Canon, Nikon, Sony, and other major companies will continue to make them.
With so many mirrorless cameras now available, and with Canon and Nikon jumping into the mirrorless deep end as of late, more and more photographers are bound to make the switch to mirrorless.
The question is, once you go mirrorless, what accessories do you need to complete your kit?
Here’s a few recommendations that I’ve enjoyed using with my Nikon Z7, Panasonic GH5, and Sony a6400 as of late.
Top Mirrorless Camera Accessories: Haida 77mm NanoPro Multi-coated Circular Polarizer Filter
I picked up a Zeiss Batis 18mm f/2.8 lens a few months ago for my Sony a6400, and I enjoy using that combination of camera and lens for shooting landscapes.
On the a6400, which is a crop sensor camera, this lens has an effective focal length of 27mm, which isn’t as wide as I’d like for some landscapes, yet it still provides a pleasing view of the subject matter.
More to the point, this lens is ludicrously sharp, so elements from near to far are rendered in gorgeous detail.
Helping matters is my Haida 77mm NanoPro circular polarizing filter.
At just $80, it won’t break the bank, which is a good thing since that Zeiss lens isn’t exactly cheap.
But just because it’s an affordable filter doesn’t mean that it skimps on performance…
Like any quality circular polarizer, this filter helps reduce reflections and glare off of water and non-metallic surfaces while also minimizing atmospheric haze.
On top of that, the filter boosts the contrast in the sky, making the white clouds brighter and the blue atmosphere deeper and more saturated.
And since this filter is made of optical glass, I get excellent clarity, contrast, and color fidelity.
Additionally, Haida has incorporated 10 layers of multi-coatings to minimize reflections, protect the filter, and reduce the need for cleaning because oils and water bead off the surface of the filter.
I appreciate the thin mount on this filter, too - just 5mm thick, it doesn’t cause vignetting when used with a wide-angle lens.
This is just a well constructed and well-designed filter that will help you achieve improved photos with your mirrorless camera.
Learn more about the Haida 77mm NanoPro circular polarizing filter
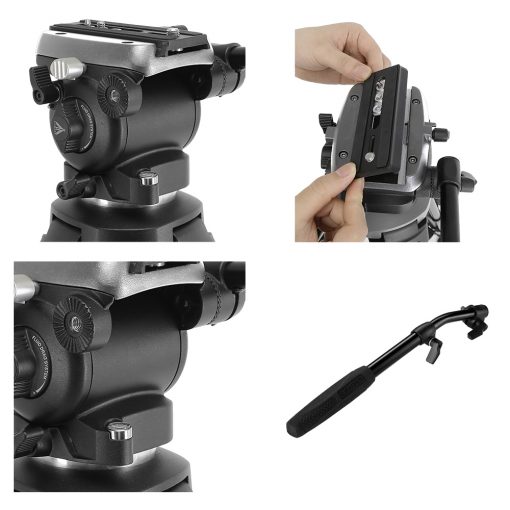
Top Mirrorless Camera Accessories: E-Image EK650 Professional Video Tripod
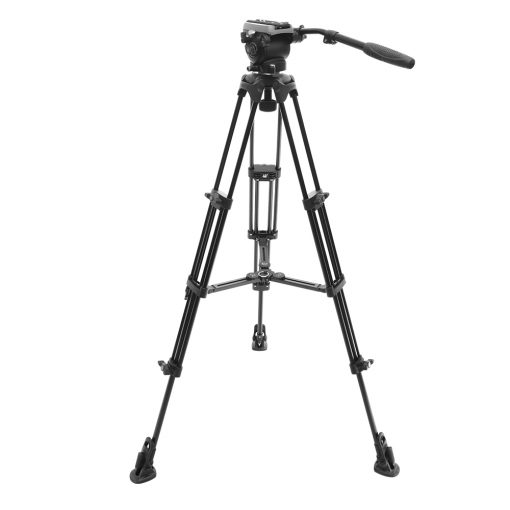
When I’m out shooting videos with my Panasonic GH5, I need a good, solid tripod to support the camera, and for that, the E-Image EK650 is a great choice.
Not only does this tripod support up to 11 pounds of gear, but it also offers a nice height range of 30.5-66” so I can vary the eye level of the footage I’m shooting.
The fluid head that comes with the tripod has a 75mm bowl and a fixed counterbalance that allows it to support the weight of your gear. There are also independent pan and tilt locks, a quick-release plate, and a removable right-sided pan bar.
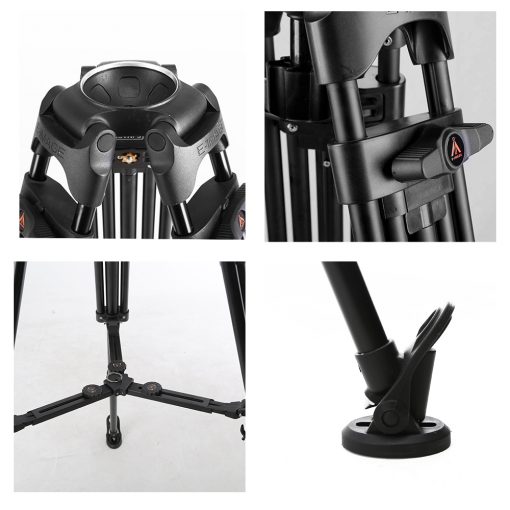
The tripod has twist leg locks that make for easy setup and help prevent accidental disengagement of the lock, as sometimes occurs with flip-lock mechanisms.
To give the tripod more support, there’s a removable mid-level spreader that improves stability as well as removable rubber feet with spikes underneath, which are perfect for uneven or slippery terrain.
At around nine pounds, this tripod is lightweight enough to easily carry from one location to the next, too.
This tripod has been a durable, reliable rig addition to my kit and has proven its worth whether I’m filming in the studio, in the city, in the country, and points in between. And at $200, it’s well-priced!
Learn more about the E-Image EK650 Professional Video Tripod
Top Mirrorless Camera Accessories: HEX Ranger Sling Bag

Okay, okay, the HEX Ranger Sling Bag is marketed as a DSLR bag, but this thing is so versatile and so well put together that it can certainly be used to carry mirrorless gear like my Nikon Z7.
What makes this a great mirrorless bag is that it is designed with the utmost attention to detail and use of space.
Where other sling bags are on the bulky side and often don’t fit you all that well, the HEX Ranger fits snugly (but not too snugly!) and stays in place on your bag as you maneuver around.
Shooting with a mirrorless camera is all about taking advantage of its small form factor and light weight, and this bag mirrors that.
It weighs just 1.3 pounds and measures 14.5"L x 7.25"W x 4.75"H. As you can see above, it hugs your body and is totally unobtrusive, yet easily accessible to get your gear.
Speaking of access, this bag has a large top opening to access your gear and tons of pockets for storing your phone, glasses, keys, tablet, memory cards and other items.
This bag is made of premium, water-resistant Cordura and has genuine YKK zippers with custom metal pulls that offer superior durability and performance.
Inside, the fold-out bottom panel allows the bag to be folded flat for packing while the fleece-lined main compartment offers configurable and removable partitions to keep your gear safe and sound.
HEX simply thought of everything when they designed this bag. And since it can hold eight liters of gear, you can bring your mirrorless camera, a couple of lenses, a tablet, and other accessories, no problem!
Learn more about the HEX Ranger Sling Bag
Top Mirrorless Camera Accessories: Camera Canopy

Try as you might to predict the weather and rely on the weather forecast, at some point you’re going to be out shooting and find yourself in a rain storm that wasn’t expected.
More to the point, there are many occasions when you might want to go out shooting, only to find that the weather is rainy and dreary. That shouldn’t stop you from going out to take photos, though.
A while back, I picked up a Camera Canopy for my Nikon Z7, and it has been a great addition to my kit for those days when the rain just won’t go away.
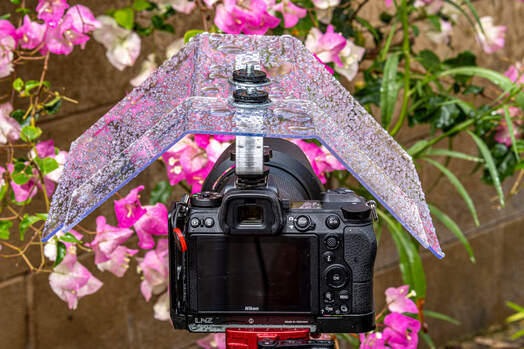
What’s so clever about the Camera Canopy is that it attaches to the hot-shoe mount of the camera and covers both the camera body and lens from above.
That means that you have unencumbered access to the camera’s buttons and LCD, which is certainly not the case when you use a typical bag-like rain cover.
What’s more, since the Camera Canopy extends beyond the end of the lens, it protects the lens glass from moisture so you can shoot during a downpour without worrying that water droplets are going to interfere with the shot.
If you’re a landscape photographer with a mirrorless camera, Camera Canopy is a must-have for your kit!
Learn more about the Camera Canopy for Mirrorless Cameras
Top Mirrorless Camera Accessories: Litra Torch LitraPro
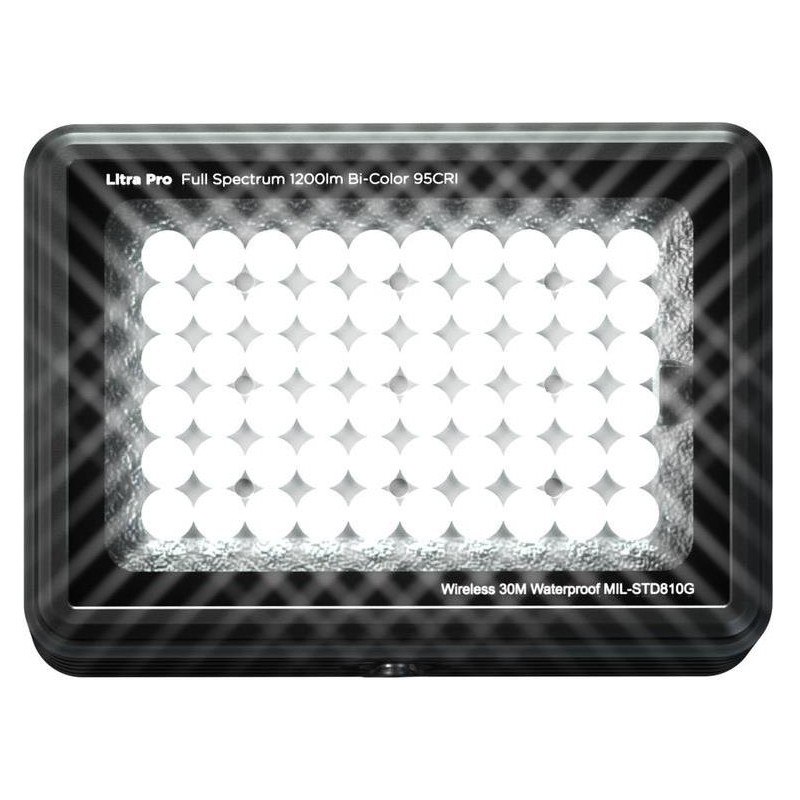
No matter if you’re taking still photos, videos, working in the studio, or working in the field, having a solid light source is a must.
But what you don’t want is to lug around big, heavy lighting gear, which is why the Litra Torch LitraPro is my go-to light.
Measuring just 2.8 x 2 x 1.2" and weighing 6 ounces, this little light is ultra-portable and won’t take up hardly any space in your camera bag (that’s it on top of my Sony a6400 below).
But don’t think that because it fits in the palm of your hand that it doesn’t pack a mighty punch…
With 60 LEDs that can pump out 1200 lumens of brightness, this little light punches above its weight class.
Not only that, but the LitraPro is a full-spectrum bi-color light so you can adjust the color temperature (from 3000-6000K) to suit the specific shooting situation.
It puts out good quality light, too, with a CRI of 95.
On top of all that, this light has a 10-hour rechargeable battery, multiple mounting points, Bluetooth, and is waterproof up to 90 feet.
In other words, it’s a go-anywhere, do-anything light!
Learn more about the Litra Torch LitraPro
Top Mirrorless Camera Accessories: Batteries and Battery Chargers
Mirrorless cameras don’t offer the same battery performance as their DSLR cousins, so it’s important to have extra juice on your outings.
For all three of my mirrorless cameras, I have three spare batteries, all of which are fully charged the night before a shoot.
Likewise, a dual battery charger enables faster charging, that way they’re ready to roll for the next day.
Though batteries and chargers aren’t as sexy as the items outlined earlier, they’re still a necessity!
We Recommend
Simple Landscape Photography Tips With Tons of Impact

Photo by Ken Cheung on Unsplash
I’m always adding bullet points to my landscape photography tips list because it’s one of the most beautiful forms of photography, and there’s always so much to learn.
I learned how to photograph landscapes for the first time from my grandfather, and I’ve found that landscape photography is often a generational photography niche.
In an attempt to continue this trend, here are five easy landscape photography tips that will help you elevate the quality of your photos.
Table of Contents
- Try Aerial Photography
- Don’t Be Afraid of the Stars
- Take Your Photo Editing to the Next Level
- Snap Incredible Dusk Pictures Right After Golden Hour
- Get Away From Eye Level Shots
- Golden Hour is Never Overrated
Try Aerial Photography

Photo by Andreas Gücklhorn on Unsplash
I understand this is one of the less simple landscape photography tips, because it requires you to buy a drone (which can get expensive) or rent a plane or helicopter or find someone willing to take you up in one.
But, I’ve found that the further into remote territory you travel, the more likely it is that the locals own their own planes because they need them to get supplies from neighboring towns. I’ve found that locals are often more than happy to take you on their supplies runs.
So, if you’re already going to be traveling to find some landscape shots, think about traveling to remote areas in Canada, Alaska, or islands in the North Atlantic, like the Faroe Islands.
Then, once you’re up in that plane, remember to shoot with faster shutter speeds so the landscape isn’t blurred as you whiz by in the plane.

photo by adamkaz via iStock
It’s also important to use a polarizer.
Polarizers for landscape photography are essential when shooting aerial shots. They help to cut glare from lakes and streams, which will definitely be in abundance if you’re shooting somewhere really remote like northern Canada or Alaska.

Additionally, polarizing filters help reduce atmospheric haze, so when you take shots out toward the horizon, distant features like mountains will look cleaner and crisper without that blue haze obscuring the view.
Polarizers also boost the contrast in the sky, with whiter clouds and a bluer atmosphere that gives your landscape photos a ton of visual appeal.

I recommend Kenko’s Puro Slim Circular Polarizer because Kenko is the number one polarizer filter maker in Japan for the quality of the build and how high-end the technology behind the polarizer is.
Editor's Tip: Get Kenko’s latest updates and access to promos for discounted gear. CLICK HERE TO SIGN UP.
That technology includes a 16-layer multi-coating that helps maintain optical quality. These layers help repel dust and water, and they make the filter super easy to clean too.
Plus, this one is only $66 and it will last a lifetime.

Photo by Izuddin Helmi Adnan on Unsplash
When I was trying to figure out how to improve landscape photos, especially aerially, I played around with as many wide-angle lenses as I could get my hands on.
While you can take more traditional landscape shots with a wide angle lens, you can also shoot ones like the one above, which is more abstract and artistic.
If you ask me, aerial photography is one of the easiest ways to inspire your audience with your landscape photography. The perspective from above it all is unique and it helps people see landscapes in an entirely new way.
Learn More:
Don’t Be Afraid of the Stars

Photo by kazuend on Unsplash
I can’t tell you how many times I’ve met someone who loves landscape photography, but absolutely refuses to shoot landscapes at night because it’s so difficult to shoot stars when you’re a beginner.
And while this list is supposed to be comprised of easy landscape photography tips, something as technical as shooting stars is less about ease and more about practice, so it’s not that it’s overly hard, it just takes time.

Photo by Jesse Sewell on Unsplash
Don’t forget your tripod (it’s essential). Shoot with a high ISO (as high as you can without making your photos noisy), which for many cameras is in the 800-3200 range. Finally, keep your F-stop wide, but try to avoid the widest aperture as it will not garner you the sharpest results. Step it down by a stop or two instead.
Then, set your lens to manual focus and focus at infinity to ensure the night sky is in sharp focus.
I tend to attack astrophotography in a very methodical way. I will begin the evening with a really slow shutter speed, around 8 seconds, and slowly bump my shutter speed up all the way to 30 seconds. You’ll probably find you get the best shots between 20 seconds and 30 seconds (if you want star trails, anyway), but this is a good way to train yourself.
Editor's Tip: One of the best ways to highlight the foreground of a landscape photo taken at sunrise or sunset is to use a light to illuminate it. I carry the Litra Pro for this purpose because it's compact and easy to transport, yet has 60 LEDs that put out 1200 lumens of light. This bi-color light has an adjustable color temperature, a 10-hour battery life, and is waterproof and rugged to stand up to the most challenging landscape photography conditions. Grab one today, and see how easy it is to create more dynamic landscape photos!
Take Your Photo Editing to the Next Level
 photo by Rawpixel via iStock
I've been a photographer for a long time, so long, in fact, that I remember learning how to edit photos using the original version of Photoshop.
But things have changed, to say the least, when it comes to the editing tools we now have at our disposal.
One such tool, Exposure X5, is my go-to editing program these days because it's lightweight, powerful, and super easy to use. See what I mean in the video below:
Since it's an advanced non-destructive RAW editor, I can play around with my images to my heart's content knowing that the original file is unaltered.
I can add presets and adjustments by using the layers feature, use the brush tool to enhance specific areas of my shots, and with the new 3D Color Mask, I can specify areas of the shot that where color adjustments are made.
Exposure X5 has all the typical tools a landscape photographer might want to use, too - sharpening, noise reduction, black and white editing, white balance, transform tools...you name it.
But it also has handy features like over 500 Presets that allow you to add a custom look to your images with a single click. Above, you can see how a film preset was used to punch up this architectural shot. The same can be done easily for landscapes.
On top of that, Exposure X5 has LUT support for streamlining your workflow even further.
Perhaps the best part is that Exposure X5 isn't just a photo editor, but a complete image management system too.
You can automatically populate collections based on criteria you specify, easily migrate images from Lightroom to Exposure, apply keywords, make virtual copies, and search and filter photos. And that's just the start!
You can try Exposure X5 for 30 days for free to see what I mean when I say it's a feature-rich, intuitive photo editor and management system. Give it a try...what have you got to lose?!
Snap Incredible Dusk Pictures Right After Golden Hour

photo by greenleaf123 via iStock
If I’m on a photography trip, you know I’m shooting for 14 hours a day. And a lot of my landscapes are really far north, where the days can be as short as a couple of hours.
So, I’ve gotten really good at working with the amount of light I’ve been gifted.
Which is why it irks me so much when someone complains about not getting good shots after sunset.
The best advice I can give on how to improve landscape photos is by adding your own light. Bring headlamps, extremely bright flashlights, or some tiny but powerful portable lights like this.

Photo by Yann Allegre on Unsplash
One of my favorite landscape shots is the one above: where the photographer adds a light inside of their tent to examine the incredible place they call an office.
Creating a scene like this gives the shot instant drama between the burst of light and the illuminated shape of the tent.
Sometimes, even the prettiest of scenes can be made more dramatic by simply adding an interesting shape like a tent and illuminating it from inside.
Get Away of Eye Level Shots

photo by Shaiith via iStock
Landscape shots can be boring if taken from a traditional eye level. You have the entire world to explore. Climb mountains; lay on the forest floor. Do what landscape photographers do best and show your audience a view they will never see again.

photo by 1111IESPDJ via iStock
You’ll see way more landscape shots taken from a bird’s eye view, photos like shots of Yosemite or glaciers in Iceland. Try to break these norms and experiment with looking up at your landscapes instead.
Quick Tip: Get out into a boat on that gorgeous lake everybody else is capturing from the surrounding mountains. Put your camera as close to the surface of the lake as possible and take a shot with the lake’s waters serving as the foreground.
Golden Hour is Never Overrated

photo by serts via iStock
Golden hour is never overrated, and neither is talking about it.
I honestly don’t think there is anything prettier the fading light of the day illuminating a snowy landscape like the one above.
I also think shooting during golden hour is one of the best landscape photography tips out there because it’s a great exercise for photographers.
You have gorgeous light, so that’s a bonus, but the light is fleeting, so you have to learn how to work quickly and efficiently to get the shots you want.

Photo by Saad Chaudhry on Unsplash
Golden hour creates dramatic landscapes, deeper contrast, brighter colors and is simply mesmerizing.
And when paired with other landscape photography tips like altering your perspective or shooting with a drone or from an airplane, the results can be breathtaking!
Learn More:
We Recommend
The Best of 2019
 Photo by Lyndon Stratford via iStock
As we near the end of 2019 (and the decade!), it's a prime time to look back on the year in photography.
It's been a crazy year with so many incredible innovations happening. I say that every year, but every year it's the truth!
When I think about the best photography gear, gadgets, products, and services, I think about things that are functional, easy to use, and innovative.
The list I've compiled below is full of products that tick these boxes...
Each item I've included on my Best of 2019 list is something that I have at the very least thoroughly tested or that I own.
With that said, here's a few items that blew me away in 2019.
Argraph Marumi M100 Filter System

One of the hallmarks of the companies featured on this list is that they have all innovated the photography industry in some way.
For Marumi, their claim to fame isn’t just crafting some of the best filter systems available today, but creating filter systems that streamline your workflow in the field.
Marumi’s Magnetic M100 Filter Holder and their line of magnetic filters are just what the doctor ordered for photographers that are sick of sliding filters in and out of their holders.
The M100 filter holder sports a slim 10mm design with strong magnetic attachments that hold the filter in place. The foam gaskets on the filter holder ensure that there are no light leaks to ruin your photos.

If using a circular polarizer, it rotates independently in the filter holder and features water and oil-repellent coatings on both sides that minimizes clean up.
The filter also has anti-static-anti-scratch, and anti-reflection properties that ensure you have the ideal shooting experience.

The other magnetic filters in Marumi’s lineup have the same features, including their graduated ND filters and solid ND Filters.
The graduated ND filters include hard-edge, soft-edge (as shown above), and reverse grads for photographing landscapes with a definite horizon, a variable horizon, and at sunrise and sunset, respectively.

Of course, there are also many different solid ND filters available from 2-stops all the way up to 15-stops.
Like the other Marumi filters mentioned above, these ND filters are made of durable Schott 5270 glass that offers high-definition results.
When photographing landscapes, the quality of light can change from one second to the next. That’s why this magnetic system is so compelling - by reducing the time spent swapping out filters, you can spend more time photographing the beauty before you!
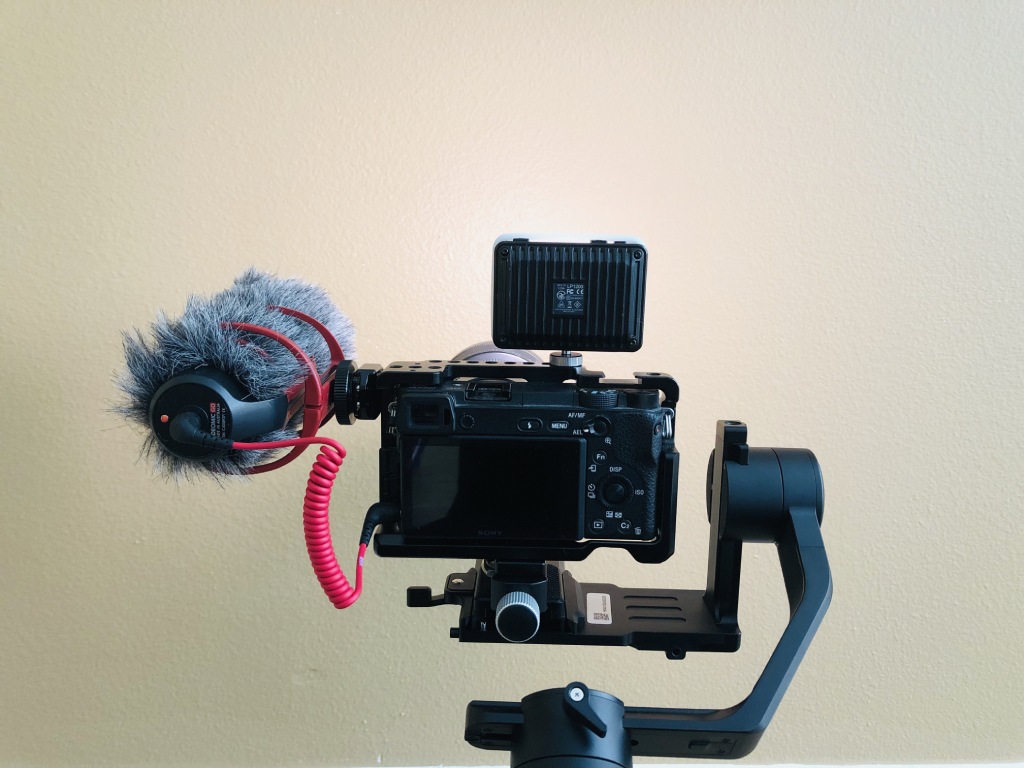
Ikan E-Image Horizon One 3-Axis Gimbal

One of the most pleasant surprises for me this year was just how good the Ikan E-Image Horizon One 3-Axis Gimbal really is.
I use this rig with my Nikon Z7, and it absolutely rocks it in terms of helping me get ultra-smooth, cinematic-looking video.
This gimbal is extremely well built and feels solid and supremely sturdy in your hand.
Granted, my setup doesn't come close to meeting this gimbal's eight-pound load capacity, but I'm sure it could perform just as well if I used a heavier camera and lens package.
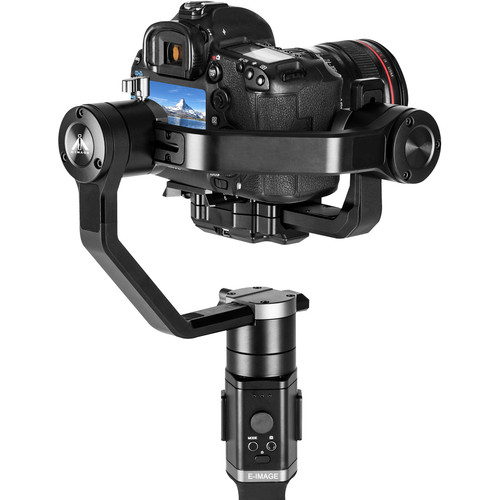
The Horizon One has brushless motors that give you ultra-precise stabilization, and with the 12-hour runtime, you can shoot all day long without stopping to recharge the gimbal.
Built into the unit are five operational modes, including my personal favorite, "Dream Follow," which gives you 360-degree spin on the roll axis.
I can't even tell you how many gimbals I've tested and owned over the years - maybe more than a dozen!
And this rig is by far one of the very best.
It's impeccably built, full of features, and easy to use. If that doesn't say "Best of 2019," I don't know what does.
Ikan Onyx Digital Color LED Panel Light
I know what you're thinking...
How can a light be part of the Best of 2019?
Well, as you know, photography is all about great light, and the Ikan Onyx Digital Color Light definitely delivers on that front.
What I've found so impressive with this light is that it has RGB, white, and amber LEDs. And with five color modes, you can use this thing for just about any kind of photo shoot or video shoot.
In fact, in RGB mode, this light gives you independent control over the red, green, and blue LEDs, which means you can literally create millions of different colors to suit your needs and tastes.
Meanwhile, the amber and white LEDs give photographers the option of recreating daylight or tungsten light with incredible accuracy.
This light even has a CCT mode that offers an adjustable color temperature from 2800K up to 10,000K. You simply don't find that kind of range in most lights!
On top of that, the Onyx has a Hue Shift feature of green and magenta lights, giving you yet another option for exerting pinpoint control over the kind of light you have available to you.
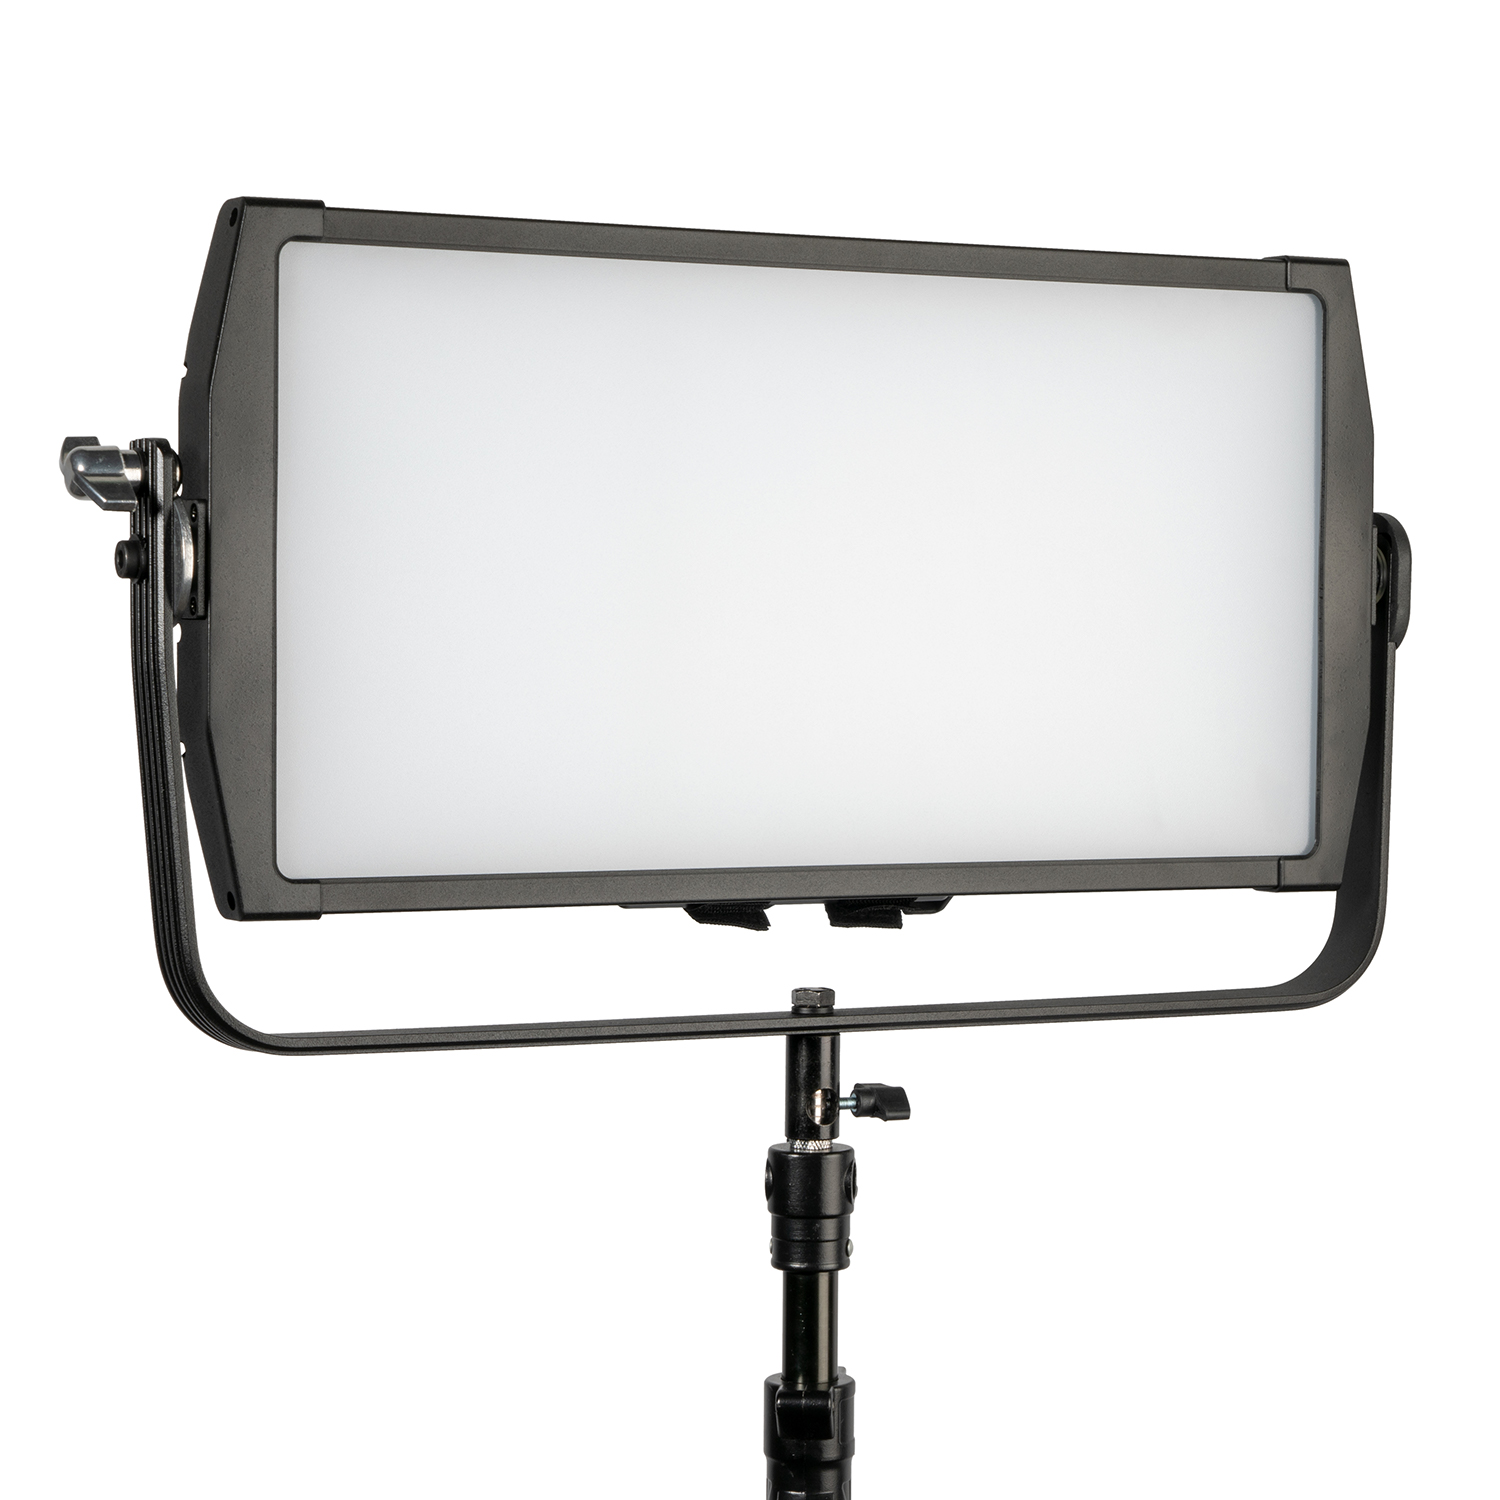
Ikan also stuffed the Onyx with eight special effects - like police lights and candle flames - as well as 33 different gels to give you even further light customization possibilities.
Heck, there's even a built-in 1/2-stop diffuser!
This is one of the best lights I've used this year, and the data backs it up - it has a CRI-TLCI rating of 95, so you know that the light it emits is clean and beautiful.
In my opinion, you just won't find a better light, which is why I've included it in my Best of 2019 list.
Exposure Software
I've been a fan of Exposure Software for a long time, and it just keeps getting better and better with more and more tools available that make editing photos a simpler, more streamlined process.
The latest version of Exposure - Exposure X5 - is brimming with innovative and easy-to-use features.
There's a huge collection of "Looks," which give you the power to change the appearance of the image with a simple click.
You can make selective presets too, that way the edits you want to apply only apply to specific areas of the image.
Exposure has all the basic editing tools you could want as well, including nondestructive layers, linear and radial gradients, a brush tool, overlays, creative focus, and more.
In addition to all that, Exposure is also a complete photo manager.
You can apply camera profiles and presets, migrate collections over from Lightroom, use keywords to manage and organize your images, and review images side-by-side for easy comparison.
Exposure also enables you to create smart collections of photos - just add specific criteria you want for the collection (i.e., rating, color label, flag, camera data, f-stop, and so forth) and Exposure will populate the collection for you.
Nice, right?!
One of my favorite features, though, is the 3D color masking tool in Exposure.
Basically, this tool gives you precise control over where an adjustment is applied in the shot. This is thanks to the range of definitions that Exposure uses to define adjustment areas, such as saturation, hue, and luminance.
Because you can target colors of a specific hue, for example, you can apply adjustments to specific areas of the shot, like the sky or to skin tones. You can do all this with just a few clicks, too!
From the intuitive user interface to the powerful editing tools to the suite of support features that help make your workflow smoother, Exposure has everything you need to create your best images. They even offer a free trial to give it a test drive!
Syrp

It's been a great year for Syrp...
They unveiled the Syrp Genie Mini II Linear this time last year to much fanfare.
If you're unfamiliar with this thing, the Genie Mini II Linear is incredibly portable and gives you the option to add motion control to your timelapse and films without lugging around a big, heavy piece of kit.

It can attach to any slider on the market and even cable cam systems up to 328’ in length, so you can quickly and easily upgrade your ability to capture gorgeous timelapses and real-time video.
Additionally, the Genie II Linear is loaded up with features for key-framing, shooting interviews, b-roll and timelapse with future available features including live view, and camera control for ramping exposure, just to name a few. It’s wirelessly controllable as well, via an iOS or Android device.
At the same time, Syrp introduced the Genie II Pan Tilt, which gives you an ultra-portable camera motion control that you can carry in your backpack.
You can use it with a tripod for ultra-precise pan and tilt motion control, or if you want three-axis, use it in conjunction with the Genie II Linear for the most powerful 3-axis device on the market.
Like the Genie II Linear, the Pan Tilt offers tons of functionality, including timelapse and real-time video capabilities, key-framing, and much more. With multi-row Panoramas, you can capture high resolution ‘gigapixel’ images and shoot Panoramas all controlled from the app itself.
It also has a built-in screen so you don’t have to use the app if you don’t need it and you want to pack light, not to mention a built-in joystick for quick setup and re-positioning from the device itself. Not bad, right?!
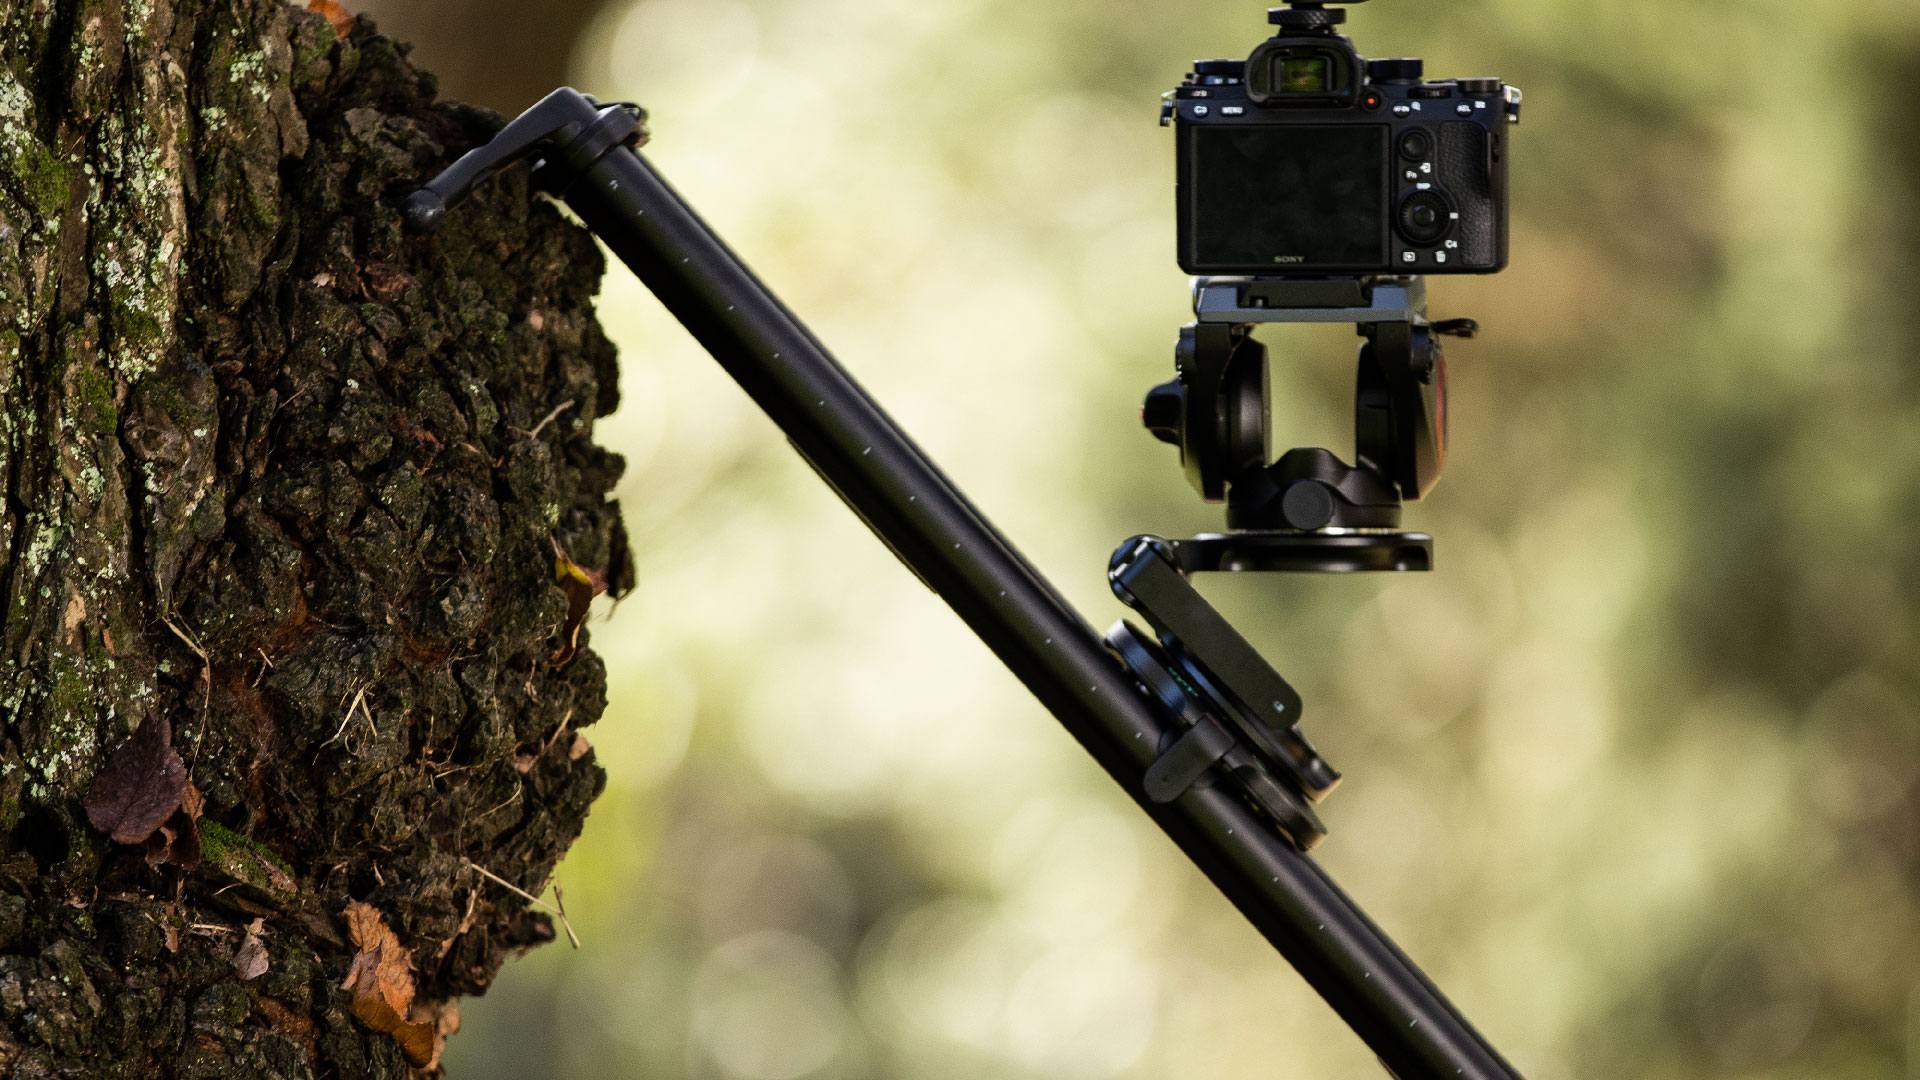
After that, Syrp brought us the Tilt Platform, which allows you to get perfectly level, vertical footage.
It couldn't be easier to use, either...
It requires no tools, has angle markings to help you dial in accurate adjustments, and it has a 3/8-16" - 1/4-20" UNC thread adapter in the base to expand its mounting options.
Just use the easy-adjustable knob to change the lever tension to secure your camera, and away you go!
You can position the Tilt Platform up to 180-degrees, it can be used with motion control or manual sliders, and it'll hold up to 13.2 pounds of gear.
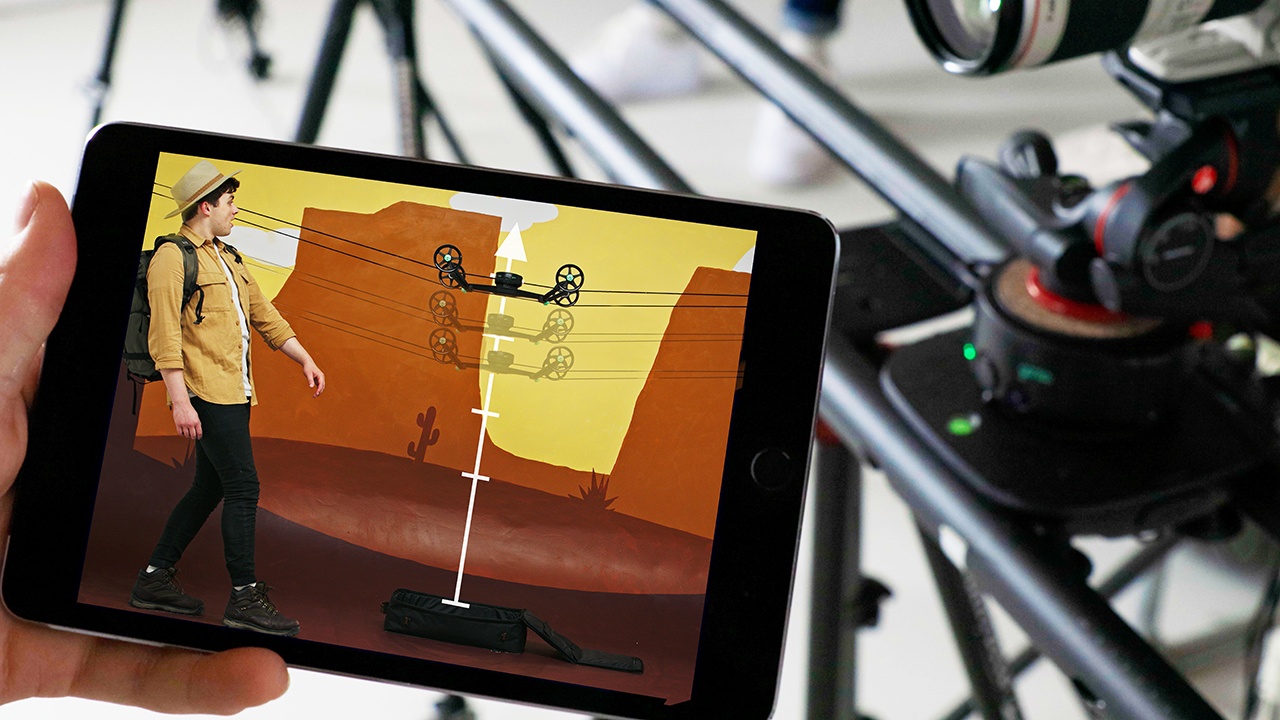
And as if all that isn't enough, Syrp just released a new app feature available through the Syrp Genie II app - stop motion.
This mode allows you to create stop motion videos more precisely (and faster) than ever.
You can set up any desired movement using the app's keyframe editor, and you have complete control over the video's frame rate.
Once you have the motion set up, all you have to do is move the motion controller to each frame and trigger the camera's shutter.
Stop motion videos have never been so easy to make!
Excire

Excire is an innovative product that I became familiar with last year, and I just have to continue singing its praises.
For me, there isn’t much that I hate doing more than manually tagging my photos in Lightroom. That’s why there are thousands and thousands of images in my Lightroom catalogs that aren’t tagged at all.
Until now…

What’s so great about Excire’s products - Excire Search and Excire Search Pro - is that they utilize artificial intelligence to tag your Lightroom photos for you.
Yeah...we’re living in the future, my friends!
Excire Search has 125 common keywords that can be used for tagging your images, so every shot you have of a mountain or a bike or a dog will be organized and easily identified.
Excire Search can obviously be used to search your images as well. Just use the plugin to find the images in your catalog that meet your criteria!

Even better, Excire Search Pro offers over 500 keywords for tagging, so you have even more capability to organize and search your photos.
It includes a keyword transfer function, too, which means you can use Excire Search Pro on your existing catalogs. That means no more hunting around for the images you need, even if you have an enormous Lightroom catalog of tens of thousands of images.
In other words, Excire transfers the keywords it extracts to your Lightroom catalog, and then those keywords can be used in Lightroom as if you had manually entered them.

Needless to say, Excire Search is a fantastic tool for beginner and hobbyist photographers, and Excire Search Pro is a great option for serious photographers and professionals.
It's this kind of innovation I looked for when considering my Best of 2019 list!
PolarPro Summit Filters

PolarPro has built a reputation over the years of developing well-built, high-performance products, and their newest filters are no exception.
The Summit filter system was specifically developed for the rough-and-tumble world of landscape photography.
These filters are built to withstand the rigors of shooting outdoors in harsh conditions while at the same time having a design that makes them incredibly easy to use.
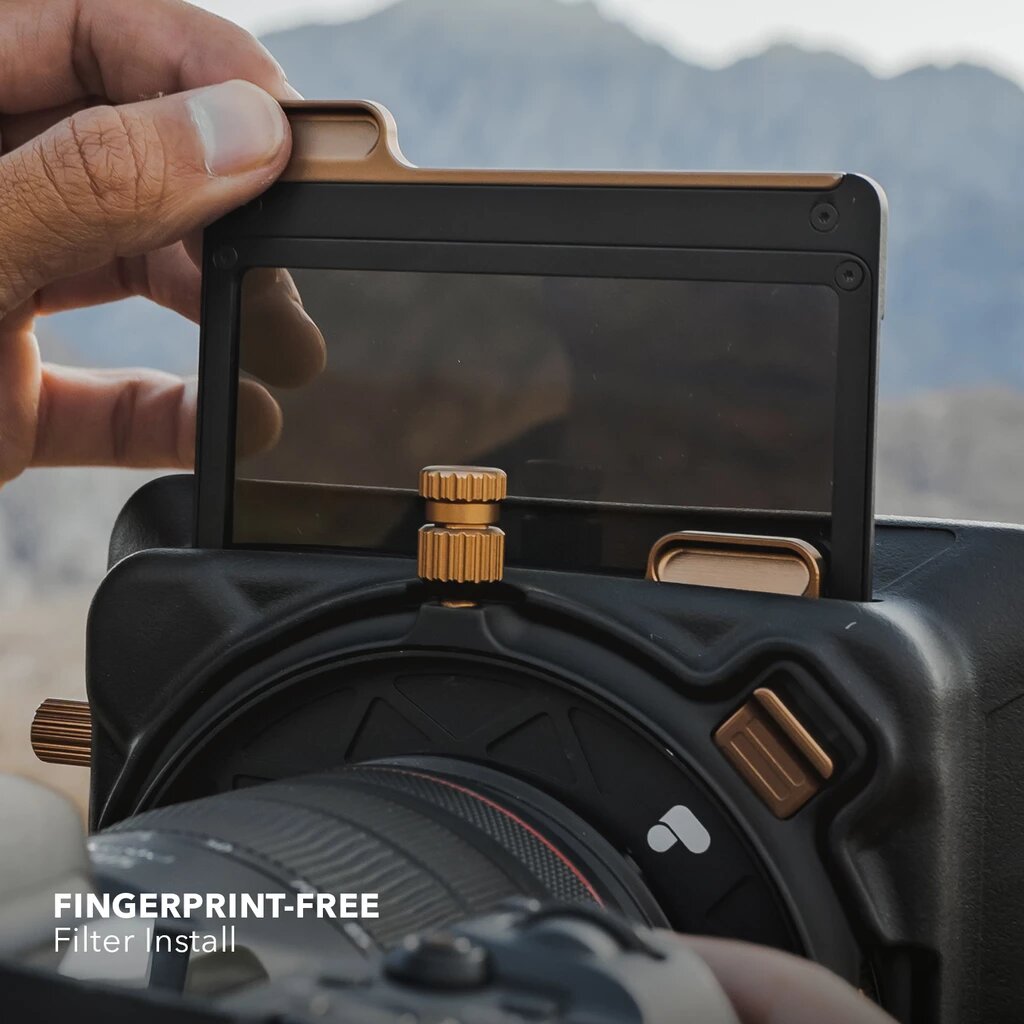
On the one hand, the ND and graduated ND filters have aluminum frames that both protect the filter and help minimize fingerprints getting on the filter glass.
So, not only do you get filters that are more durable, but you also won't spend as much time cleaning the filters to get rid of fingerprints. It's a win-win!
On the other hand, the filters and filter housing feature materials that ratchet up the build quality.
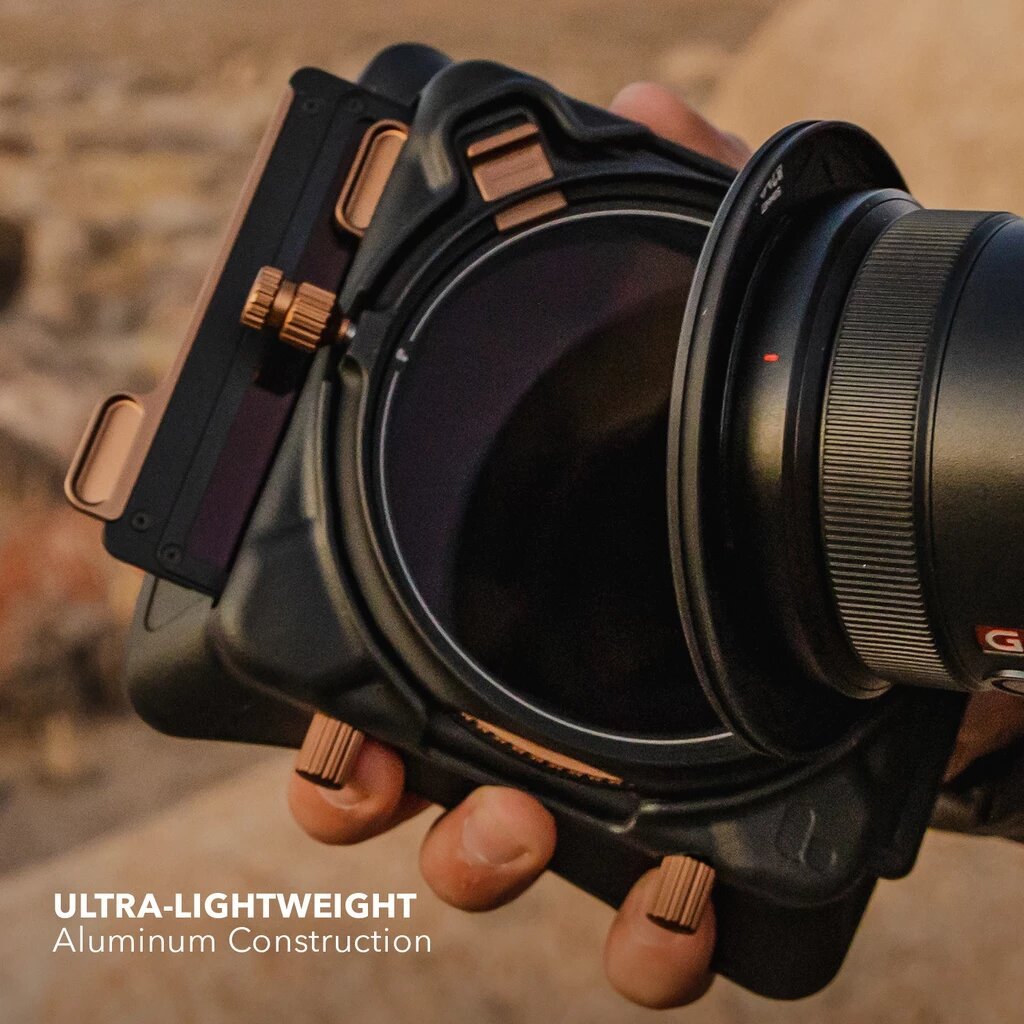
For example, the filters are made of fused Quartz glass with 16 layers of coatings that improve color fidelity and clarity while reducing glare.
As another example, the filter frames are made of lightweight aluminum that helps cut weight in your pack while providing you strong durability for years to come.
Add in a user-friendly design, light-sealed slots, filter locks to lock down the filter position, and the ability to rotate the filter system 360 degrees, and you have the makings of the ideal landscape photography filter kit - one of the best of 2019, in fact!!
Wolverine Data F2D Titan

What’s so great about the Wolverine Data F2D Titan is that it’s an 8-in-1 rig.
In addition to working with slides, 8mm movies, and Super 8 movies, the F2D Titan also works with 35mm, 110, 126, 127, and APS film.
It has a 20-megapixel sensor that turns your analog memories into high-definition digital files at up to 5472 x 3648 pixels.
The F2D Titan makes quick work of scanning, too. In just three seconds, the scan is complete thanks to its speed-load adapters that are perfectly sized to each format of slide or negative that you’re scanning.
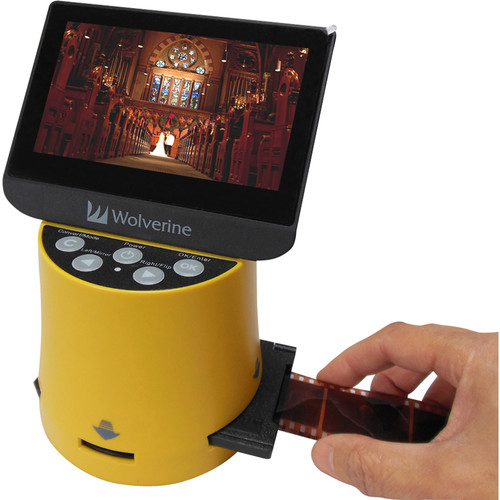
You can view the results of the scan on the onboard 4.3-inch color LCD. You can even fine-tune the brightness and color balance settings. If you prefer to see your newly digitized photos on a larger screen, simply connect the F2D Titan to a computer or a TV.
Saving the digitized images is a breeze, too. Just use its internal memory or add your own SD/SDHC memory card.
Better still, you don’t need a computer or external monitor or software of any kind, so this unit is totally self-contained. Just have a power source (via an AC outlet or USB) and you can digitize slides, film, and old movies anywhere you like.
If you’ve got a lot of old memories to digitize, there’s isn’t a better or faster way to do so than with this bad boy! It's simply the easiest, most functional film to digital scanner I've ever tested.
RODE Video Mics

I have several RODE mics, including the tiny shotgun microphone shown above.
The RODE VideoMicro is compact and lightweight, which makes it a perfect pairing for my GoPro.
But don't think that because it's a tiny mic that audio quality is sacrificed. In fact, it has a high-quality cardioid condenser mic capsule so you can get clear, crisp audio.
It's shocking just how good this little guy performs!
Since it's a directional mic, it minimizes sounds from the periphery so your video has focused audio from the subject.
Add to that a thermoplastic suspension structure for minimizing vibrations as you adventure around with your GoPro, and you have the ideal audio companion for the best adventure camera on the market!

For more heavy-duty action, I have a RODE VideoMic Pro.
This shotgun-style mic has a 1/2-inch condenser capsule, which results in ultra-clean audio that's broadcast quality. We're talking about a self-noise level of just 14db!
It has a super-cardioid polar pattern that reduces background noise while ensuring that it captures crisp audio of the source you want to record.
And, unlike lesser microphones, the RODE VideoMic Pro has a Rycote Lyre shock system that creates a buffer between the microphone capsule and electronics and the microphone mount. This, in turn, minimizes the vibrations of the mic and improves the quality of the audio even more.
Add in fantastic sound, easy-to-reach controls, and intuitive operation, and you have the makings of the ideal microphone for filmmaking!
Camera Canopy

I first learned about Camera Canopy last year, and I have to say that over the course of 2019 I've grown to appreciate this unique camera accessory more and more.
Photographers that spend any time outdoors understand that when it rains, it can really put a damper on their ability to get the photos they want. That’s because even weather-sealed gear isn’t completely water-tight.
And trying to manipulate camera controls with a traditional bag-like rain cover for a camera is a huge pain in the rear. That’s why Camera Canopy is a much better alternative.
Camera canopy attaches to a camera via its hot-shoe mount, and then acts like a roof to protect the camera and lens from rain. It even protects the from glass of the lens so there’s no water droplets messing up the shot.
Better still, it’s adjustable for lenses up to 500mm in length.

Camera Canopy also has a mirrorless camera version, so now that I've gone totally mirrorless, I can still enjoy the benefits of having my camera and lens protected by a Camera Canopy.
Just like its big brother, this mirrorless version is extremely easy to mount to your camera, simple to adjust for different lens lengths, and still provides you unfettered access to your camera's controls.
It's simply the best wet-weather camera accessory money can buy!
Hex Brand Ranger Sling Bag

I had an opportunity to head up to Los Angeles a while back and meet the masterminds behind HEX.
It was a fun time looking behind the curtain at their operation, plus I got to bring one of their Ranger Sling bags home to test out.
First impressions are good, to say the least! And that's coming from an admitted bag snob.

For instance, I check the stitching inside and out to see how well put together it is, and with this bag, it’s very well put together.
It’s part of thoughtful construction and design processes that make this bag one of the very best I've used this year.
One of the things I like most about the bag is the collapsible interior dividers - including the bottom divider. This gives you a bag that can not only be customized to your gear for each photoshoot, but you can also fold up or remove the dividers to allow the bag to be packed totally flat for travel inside another bag.
Speaking of customizations, this bag has side adjustable load straps and adjustable bottom carry straps so you can carry even more gear when needed.
This bag is also packed full of pockets to help you keep track of your stuff. There’s a front access organizer for small items, a faux fur lined pocket on the front for your phone or a pair of shades, a faux fur lined pocket for your table, and multiple hidden velcro stash pockets. And the bag sits very well when worn. It’s comfortable and easy to access your gear and really hugs your body.

With genuine Cordura material and YKK zippers with metal pulls, this bag will stand up to use and abuse, too. And since it’s so compact (just 1.3 pounds and 14.5"L x 7.25"W x 4.75"H), you can rock it in the urban jungle without worrying that it’ll be knocking into people as you move from shot to shot.
Something that really stood out to me was that, although the bag is listed at 8 liters, there is no wasted or negative space. In fact, I easily transferred all the gear I would normally carry in my Peak Design 10L Sling into the HEX Ranger Sling. I have to say that I am a big fan of the efficient use of space in this bag and the collapsible potential of the HEX bag certainly gives it a leg up.
With eight liters of storage space, a streamlined design, and looks that don’t quit, this is definitely one of the best products I tested this year!
TravelSchool.Info
 Photo by anyaberkut via iStock
This entry on my Best of 2019 list is a little different from the rest...
Rather than a camera accessory or some kind of service you use to take better photos, TravelSchool.Info makes it on this list because of its innovative approach to education and furthering your ability to make money.
TravelSchool.Info enables you to learn how to harness the power of affiliate marketing all the while traveling the world. Sounds nice, right?
By teaching you how to create multiple revenue streams from affiliate marketing, TravelSchool enables you to earn active and passive income that frees up your time to pursue things that are more fun than working!
Travel School is a comprehensive training program for starting an independent affiliate marketing business. It will take you step-by-step through the process of building a business that is not only wildly successful in the short-term, but can sustain steady growth for the long-term too.

Travel School founder Emilian travels the world with his furry friend, Divak, and is eager to share his knowledge and experience with you and help you build a successful affiliate marketing business that will allow you to quit your traditional job and travel the world like you want!
But Travel School isn’t just a step-by-step training program. Instead, it will change your outlook on what it means to work, and at the same time will be a transformational experience that will change their entire life for the better.
With specific, actionable steps, you will learn how to connect with established brands, develop core marketing skills, and activate multiple income streams to realize their dream of living a life full of travel and freedom.
Not only does Travel School aid in leveraging the credibility of amazing companies, but they will also offer weekly private webinars to keep your loved one motivated and on track toward accomplishing their goals.
Additionally, all training sessions are recorded and available at any time, that way if questions come up down the road or a little extra motivation is needed, the lessons can be easily accessed. There are opportunities to learn and collaborate with other students too!
It’s not often that you have the opportunity to learn how to live a life with more freedom, but in this case, Travel School is does just that!
Octopus.Camera OctoPad
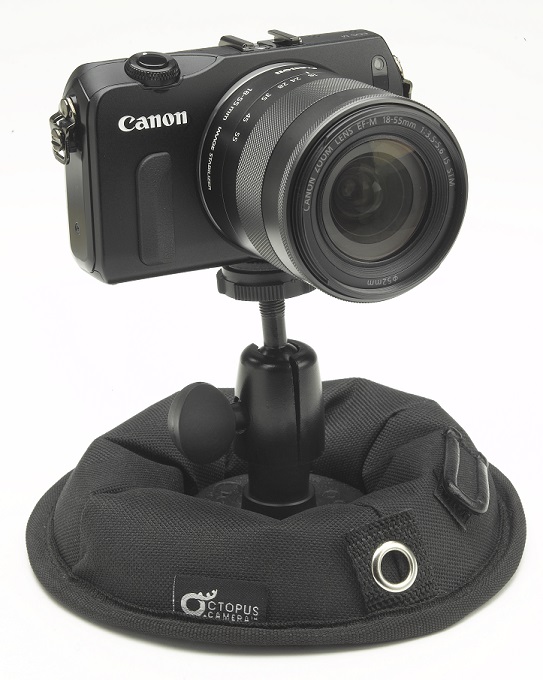
I’m a gear head and I buy and test all kinds of stuff - cameras, lenses, tripods, lights...you name it!
But one of the most pleasant surprises I had this year was the Octopus.Camera OctoPad.
I know what you’re thinking...how can a little weighted support system be all that innovative? Trust me when I say that OctoPad certainly is!
For starters, OctoPad is a much better alternative than suction cup mounts or even mini tripods because it actually stays put.
The weighted anti-slip mat keeps the OctoPad right where you want it, even if it’s on a smooth or uneven surface.
Additionally, OctoPad has a built-in 1/4-20 threaded male bolt for attaching any number of accessories like a microphone or a light. The included ball head also has a 1/4-20 threaded male bolt for accessory attachment.

That means that this little guy is a great option for supporting a compact camera or a smartphone, a GoPro, a microphone, or a light. Plus, it can be used for photo or video work, giving you even more versatility.
It’s easy to use and transport too - there’s a built-in grommet for attaching a lanyard and a cable strap to tuck cables out of the way of your shots.
This is just a well designed product that offers a ton of benefits for photographers and videographers alike. And the best part? It’s priced at just $26.95!
Snaptiles

One of the most innovative products I encountered this year is Snaptiles.
These ingenious patented magnetic photo tile system takes all the fuss and muss out of displaying your photos.
If you want to create a mixed tile array, you can do so in a matter of seconds thanks to the easy mounting system that Snaptiles employs.
All you do is attach the mounting bracket to the wall using four adhesive strips. Make sure to press down firmly for 10 seconds so that it holds tight to the wall. You can snap up to 12 photo tiles onto the first anchor tile. If you really want to have some fun push in the 4 included thumbtacks for additional support. You can then snap up to 30 Snaptiles to the anchor! Not a bad tradeoff for 4 small pin holes if you ask me.
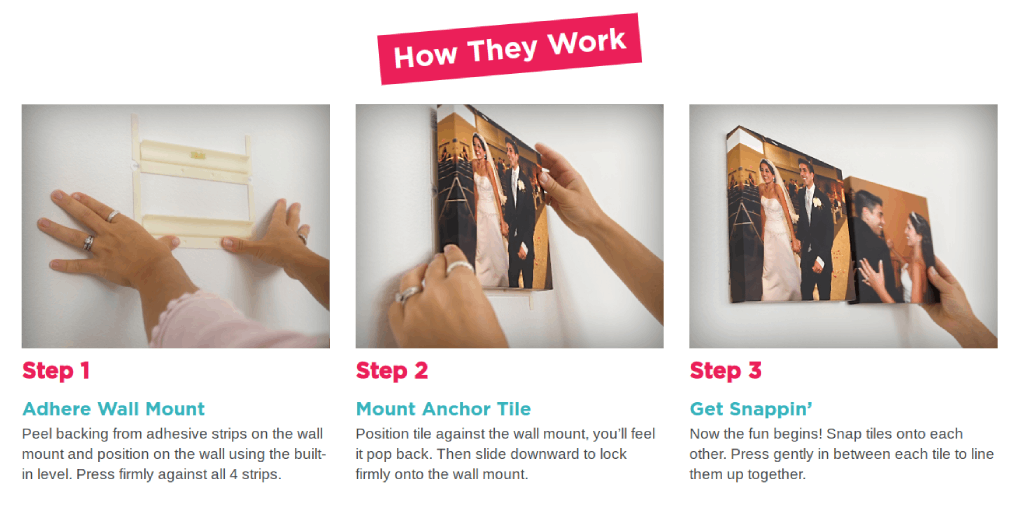
Next, you mount the anchor tile to the wall mount by snapping it into place.
Then, you can add any number of additional photo tiles, which connect together using rare earth magnets. And that’s it!
Now instead of having to put nails in the wall to hang additional photos, you can simply order 4 photo tiles from Snaptiles, add them to your array of mixed tiles, and enjoy your favorite photo (along with all your other favorites in the display).

These tiles are super lightweight so if they fall they won’t break. They are printed onto a premium SBS Acid-Free paperboard using the same printing technology as high-quality photo books. Likewise, the UV protective lamination ensures that the images don’t lose their color over time.
Snaptiles has a unique ability to let you display your photos in a creative and ever-changing way. When it comes to hanging art and your favorite images, being able to swap them out quickly and easily is a huge bonus.
Best of all, four tiles are just $59 with Free Shipping, so you can enjoy four of your favorite images without breaking the bank.
What’s not to like about that?!
Westcott Rapid Box Octa
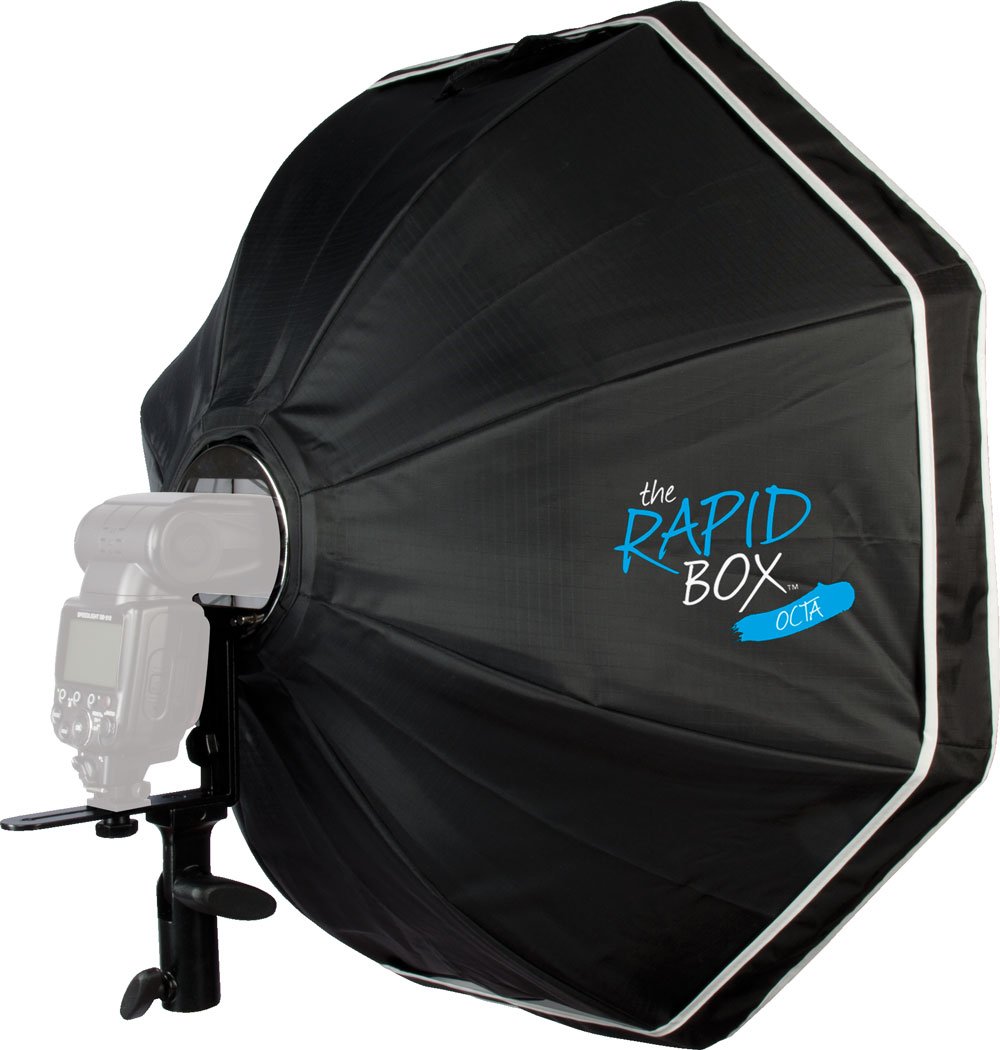
As photographers, we all know the value of good light for creating compelling photos. And when it comes to modifying light to get the precise look you want, Westcott should be your source.
After all, Westcott has been in this business since 1899, so they know exactly what they’re doing.
In fact, Wescott holds 12 patents and has a product line of more than 600 products, so they’re much more than umbrellas and lights - they’re the go-to for all manner of durable, high-end lighting gear.
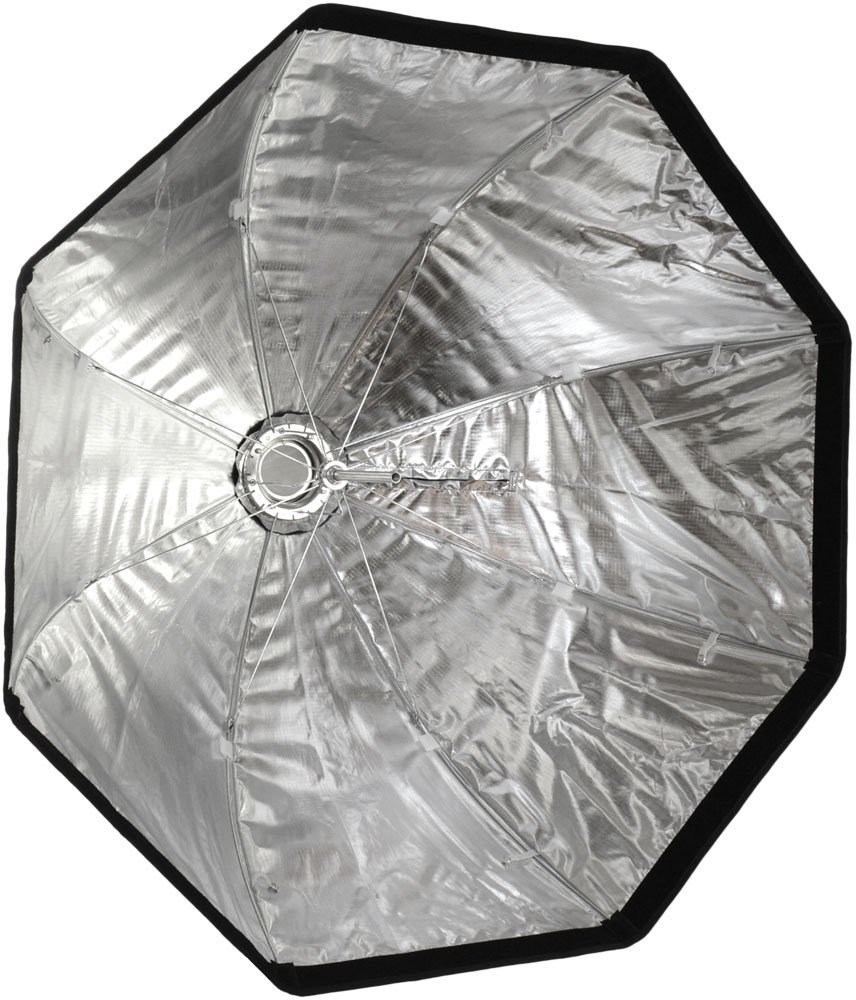
It would be impossible to expound upon Westcott’s vast array of products, so I’ll illustrate why they’re included on my list of the Best of 2019 by using their Rapid Box Octas as examples.
I know you’re probably thinking, “Aren’t all softboxes the same?” Well, no, my friend, they aren’t!
Westcott’s Rapid Box Octa, which come in small (26-inch), medium (36-inch), and large (48-inch) versions, are the ideal softbox for modifying speedlites.
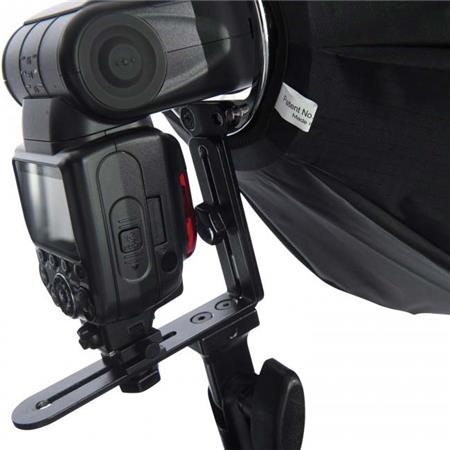
For starters, these things are supremely easy to set up - you can have them ready to go in a matter of seconds, so there’s no long, drawn-out procedure for getting your gear ready for the shoot.
They’re easy to transport as well, given that they are completely collapsible and super lightweight.
But don’t think that because they’re collapsible and easy to set up that they’re somehow not durable. Far from it.
The solid metal framework ensures that these softboxes retain their shape over the course of years and years of repeated use, and the built-in mounting hardware means there’s a snug fit with your speedlite whether it’s a Yonguo, Nikon, or something in between.
In other words, Westcott makes this list of the Best of 2019 not just because they create superb lighting gear, but because they also have a proven track record of innovation when it comes to lighting gear.
Their products are durable and easy to use and show a demonstrated effort by Westcott to think purposefully about design and functionality so you and I have a better user experience.
But don’t take my word for it...see the Rapid Box Octa in action in the video above!
We Recommend
Top 10 Last-Minute Gifts for Photographers - 2019 Edition
 Photo by evgenyatamanenko via iStock
Even though I'm writing this the last week of October, you and I both know that there will be some scrambling as the holidays draw near to find the perfect gift for the photographer in your life.
A lot of photographers are picky (myself included), so it can be difficult to find just the right gift that will bring a smile to their face and that won't end up shoved in the back of the closet.
With that in mind, I've put together the following list of awesome last-minute gifts for photographers that should give you some inspiration for your gift-buying this holiday season.
Let's get to it!
Camera Canopy

Those of you that follow my ramblings here on PhotographyTalk know that I love to shoot landscapes.
But something I definitely do not love is using those clingy camera rain covers that feel like you're reaching into a wet plastic bag.
Granted, I don't have to worry about the rain all that often here in Southern California, but when it does rain, I have my Camera Canopy with me.
As you can see above, the Camera Canopy sits above the camera and extends outward to protect both the camera body and the lens.
It attaches to the hot-shoe mount on your camera, so it's easy to attach when the weather turns sour.
The shield extends and retracts, so it'll protect your gear whether you're using a 50mm lens or a 300mm lens.
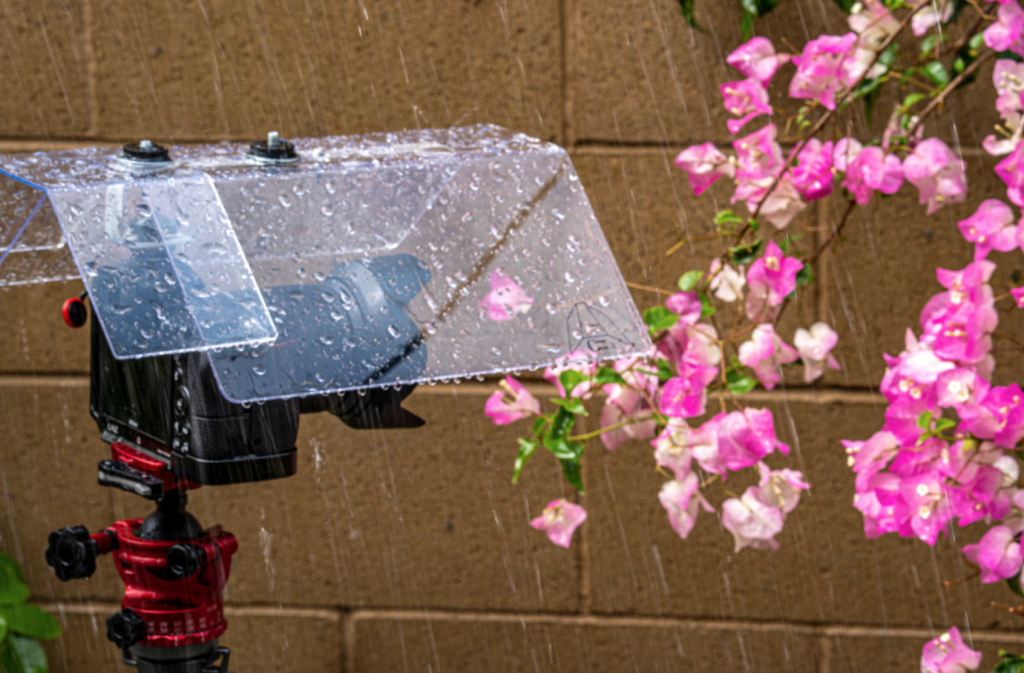
What's more, there are versions for DSLRs and mirrorless cameras, so no matter the camera system the photographer in your life uses, there's a Camera Canopy they can use.
Aside from the ease of use and the fact that the Camera Canopy protects the end of the lens from getting wet, I love that it doesn't obstruct the camera's LCD or controls. No more clingy wet plastic bag!!
So, this thing is convenient, functional, and well-designed, and would make an ideal addition to any photographer's kit.
Learn more about Camera Canopy for DSLRs or Camera Canopy for Mirrorless Cameras
A Large Print from AP Solutions & Graphics
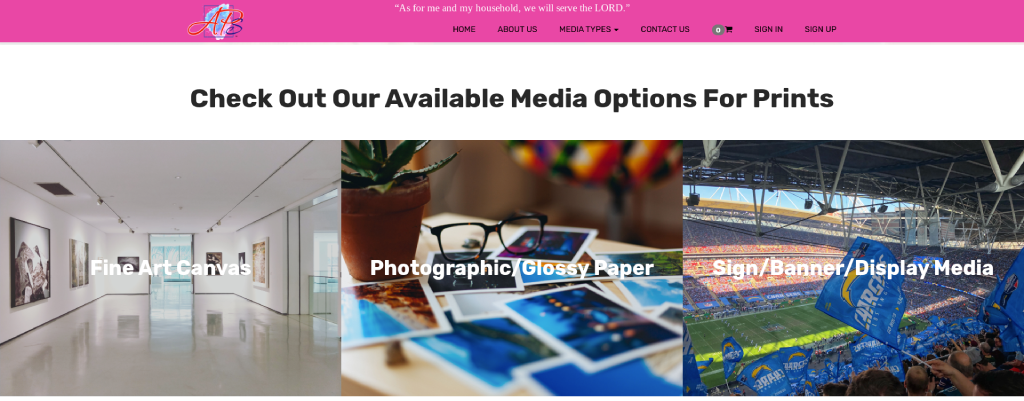
What photographer wouldn't appreciate a large print or graphic of one of their photos?!
AP Solutions & Graphics makes it easy to give the gift of a beautiful large print thanks to their quick and simple online ordering process.
In fact, you can easily get a quote for your print based on your specifications, including height, width, depth, and media type.
They offer fine art canvases, photographic prints, and signs, banners, and other display medias too.
If you order from AP Solutions & Graphics, you can rest assured that the item you order is made from the finest materials and is constructed right here in the USA.
I appreciate the fact that these guys are dedicated to turning your favorite photos into lasting memories. And the photographer on your holiday shopping list will certainly appreciate it too!
No one wants to get a sub-par print, especially if it's of their own photos. But you don't have to worry about print quality with AP Solutions & Graphics because they use high-quality canvas, fine art photo paper, quality fabrics, top-grade inks, and more.
As a U.S. Navy Veteran, I try to patronize businesses that are owned by fellow veterans, and AP Solutions & Graphics fits the bill.
This veteran-owned, U.S.-based business is ready to make your last-minute holiday gift dreams come true!
Learn more about AP Solutions & Graphics
Hazard 4® Freelance™ Sling-Pack

Rarely do you encounter camera bags described as “tactical,” but in this case, the rank definitely fits the Hazard 4® Freelance™ Photo Sling-Pack.
Hazard 4® designs exceed military specs, so these are trusted by demanding users in the harshest environments - special forces to expedition reporters. Thoughtful sizes, organization, and ergonomics, with 1000 D Cordura® fabric, YKK zips, and patented hardware protect cameras, accessories and survival gear in a futuristic aesthetic that deflects harsh use.
You can cleverly rotate Freelance™ from back to chest for quick gear access without taking it off. Sized for most mirrorless systems with movable padded dividers to organize lenses and accessories, it’s also made in a Drone Edition with special dividers and “Drone Pilot” patch on its velcro I.D. panel.
Three exterior pockets fit extra gear. A sweat managing thermo-molded zip back panel cradles 10.5” iPads®. An admin panel organizes pens and SD cards, among other small items. A molded shell fits two Mavic® Pro batteries and has a patented Hard Point® bus for attaching Hazard 4® systems loops and tie-downs or GoPros® via a ¼-20 screw.
Modular webbing (molle) throughout allows exterior gear expansion. A patented roto-lock buckle prevents drops. Add grab-handles, tripod/compression straps, and more for the makings of one killer last-minute gift for the active photographer on your holiday shopping list!
Learn more about the Hazard 4® Freelance
PolarPro Summit Filters
PolarPro has built a reputation over the years of developing well-built, high-performance products, and their newest filters are no exception.
The Summit series was specifically developed for the rough-and-tumble world of landscape photography.
These filters are built to withstand the rigors of shooting outdoors in harsh conditions while at the same time having a design that makes them incredibly easy to use.
On the one hand, the ND and graduated ND filters have aluminum frames that both protect the filter and help minimize fingerprints getting on the filter glass.
So, not only do you get filters that are more durable, but you also won't spend as much time cleaning the filters to get rid of fingerprints. It's a win-win!
On the other hand, the filters and filter housing feature materials that ratchet up the build quality.
For example, the filters are made of fused Quartz glass with 16 layers of coatings that improve color fidelity and clarity while reducing glare.
As another example, the filter frames are made of lightweight aluminum that helps cut weight in your pack while providing you strong durability for years to come.
Add in a user-friendly design, light-sealed slots, filter locks to lock down the filter position, and the ability to rotate the filter system 360 degrees, and you have the makings of the ideal landscape photography filter kit to give your favorite photographer this holiday season!
Learn more about the PolarPro Summit Filter System
Snaptiles

If you’re cutting it close for the holidays and need a killer photography gift, look no further than Snaptiles. Snaptiles are a new patented Magnetic Photo Tile that is 8”x8”x1” and super lightweight.
This innovative system uses a single wall mount with a built-in level to anchor a central print to the wall. Then you can snap together the other tiles onto the first! The wall mount uses four adhesive strips that don’t damage the wall, yet offer all the support that’s needed to display up to 12 tiles. Just make sure you press down firmly for 10 seconds. You can also push in the 4 included thumb tacks for additional support, then mount up to 30 tiles on the first tile! Not a bad tradeoff for 4 little pin holes in your wall.
The process is simple: just attach the wall mount to the wall, mount the anchor tile to it, and then begin to create an array of mixed tiles by adding additional Snaptiles.

Each tile connects with strong magnets, so there’s no worry of the tiles sagging or slipping.
Best of all, though, this system enables you to swap images out as you get new photo tiles, rearrange them in the display, and create different shapes with an array of images.
It really couldn’t be any easier!
The images are printed on a premium SBS Acid Free archival paperboard to give you long-lasting durability. On top of that, the UV protective lamination on the tiles has a beautifully soft touch.
I just ordered 25 of these photo tiles for my son’s room. He loves art and he loves building, and I think he will love putting his Snaptiles together (with my help of course!) on his bedroom wall.
This isn’t just a great last-minute gift, but it’s also a fun project you can share with whomever you give them to. It’s a win-win!
Travel School Membership
Photo by anyaberkut via iStock
Wouldn’t it be nice to travel the world as you make money, pursuing your dreams without being encumbered by a traditional job?
If that sounds like a dream that’s too good to be true - it isn’t! Even better, it’s a dream you can make a reality for that special person on your last-minute holiday shopping list.
Travel School is a comprehensive training program for starting an independent affiliate marketing business. It will take your loved one step-by-step through the process of building a business that is not only wildly successful in the short-term, but can sustain steady growth for the long-term too.
But Travel School isn’t just a step-by-step training program. Instead, it will change your loved one’s outlook on what it means to work, and at the same time will be a transformational experience that will change their entire life for the better.
With specific, actionable steps, the person on your holiday shopping list will learn how to connect with established brands, develop core marketing skills, and activate multiple income streams to realize their dream of living a life full of travel and freedom.
Travel School founder Emilian travels the world with his furry friend, Divak, and is eager to share his knowledge and experience with you and help you build a successful affiliate marketing business that will allow you to quit your traditional job and travel the world like you want!
Not only does Travel School aid in leveraging the credibility of amazing companies, but they will also offer weekly private webinars to keep your loved one motivated and on track toward accomplishing their goals.
Additionally, all training sessions are recorded and available at any time, that way if questions come up down the road or a little extra motivation is needed, the lessons can be easily accessed. There are opportunities to learn and collaborate with other students too!
It’s not often that you have the opportunity to give the gift of freedom, but in this case, Travel School is just that!
Learn more about Travel School
Deity D3 Pro Microphone

More and more photographers are getting into video production, and to do that, they have to expand their arsenal of tools beyond traditional photography gear.
And while having a camera with good video capabilities is a must, so too is having a high-quality microphone to record audio for the videos. After all, a video can have incredible footage, but with poor audio quality, the video will fall flat.
That's where the Deity D3 Pro comes in...
This super cardioid directional condenser shotgun mic has a sensitivity of -50dB to 28dB and uses an on-board microprocessor that digitally talks to the audio input it's connected with.
That means it can work with a tablet, a DSLR, a mirrorless camera, or a smartphone - essentially anything with a 3.5mm microphone jack.
The internal battery offers a whopping 51 hours of runtime, yet it charges in less than two hours.
A neat feature is that you can adjust the gain by using the stepless analog gain adjustment dial. This is the only microphone in the world that has this feature!
Add in on-board low-cut filters, a rycote shock mount, and broadcast-quality sound, and you have the makings of an ideal gift for a photographer that wants to step up their videography game!
Learn more about the Deity D3 Pro Microphone
Octopus.Camera OctoPad

If you’re rushing around trying to find that perfect last-minute gift for your favorite photographer, you might consider the Octopus.Camera OctoPad as an excellent choice.
The OctoPad offers what many other stabilization devices don’t - it doesn’t collapse under the weight of gear it’s supporting and it doesn’t slide around, even if it’s placed on a smooth or an uneven surface thanks to its weighted non-slip mat design.
The OctoPad has a built-in male 1/4-20 inch threaded bolt for attaching accessories and a high-capacity removable ball head that also has an adjustable 1/4-20 inch threaded male bolt.
That means that not only is the OctoPad well-equipped to stay in place, but it can also support a wide range of gear, from a GoPro to a smartphone to a light or microphone.
There’s even a built-in cable strap to keep cables from getting in your way and a clip grommet for attaching a lanyard to easily carry the OctoPad.
What photographers want in a gift is something that’s versatile and functional, and the OctoPad is definitely both. Best of all, it’s just $26.95, so you can give an awesome gift without busting your budget!
Learn more about the Octopus.Camera OctoPad
Aputure Amaran AL-MX Bi-Color LED Mini Light
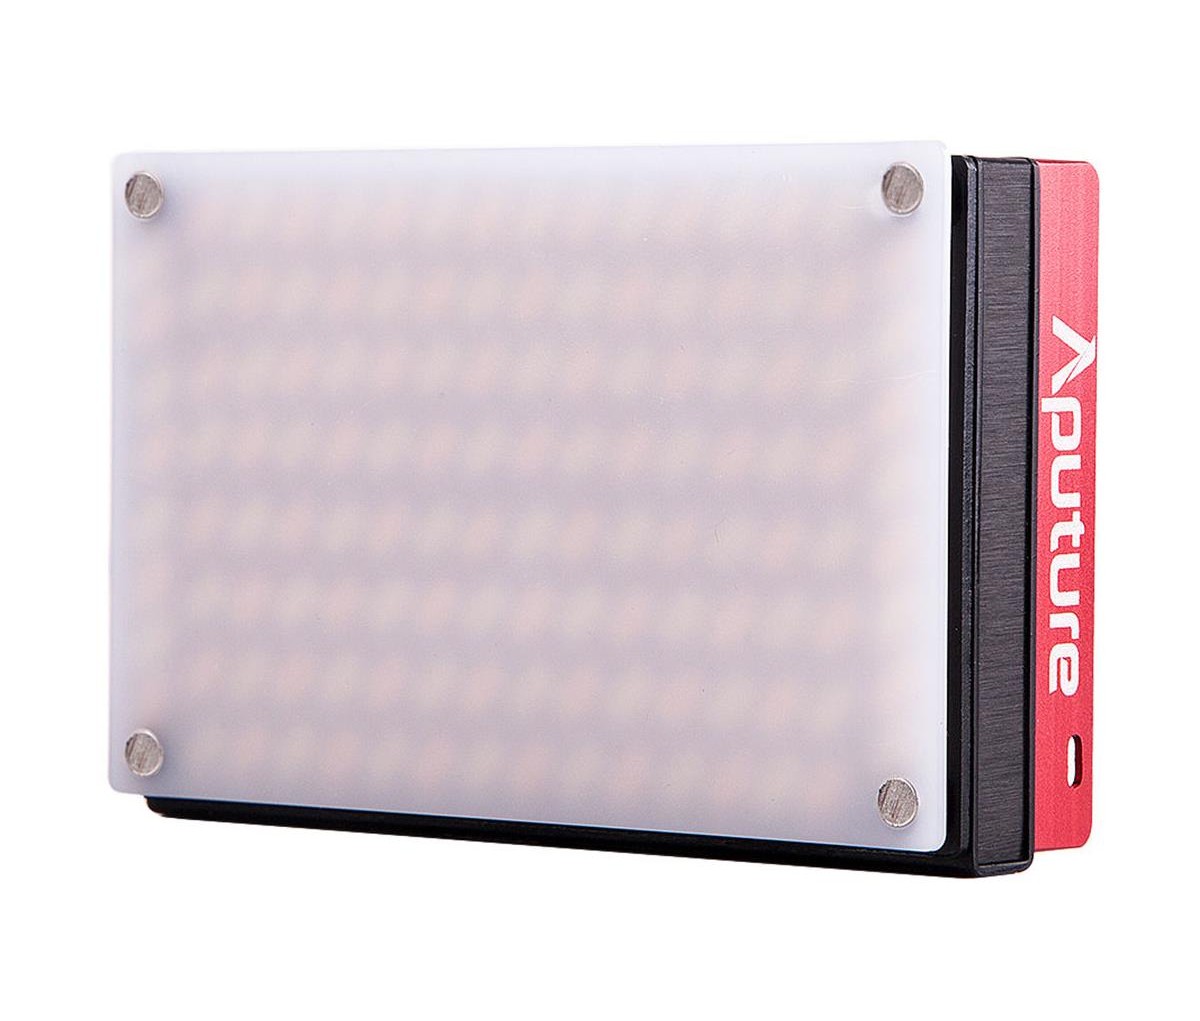
This pocket-sized light might be small, lightweight, and portable, but it packs a mighty punch with 128 LEDs, 3200lux of brightness, and a "boost mode" that increases brightness by 30 percent for bursts of 60 seconds.
Add to all that power the ability to tune the light from 2800-6500K so the photographer on your list can make fine adjustments to how the light looks to suit each and every photograph.
The quality of the light is top-notch, too - it offers a CRI of 95+ and a TLCI or 95+ as well.
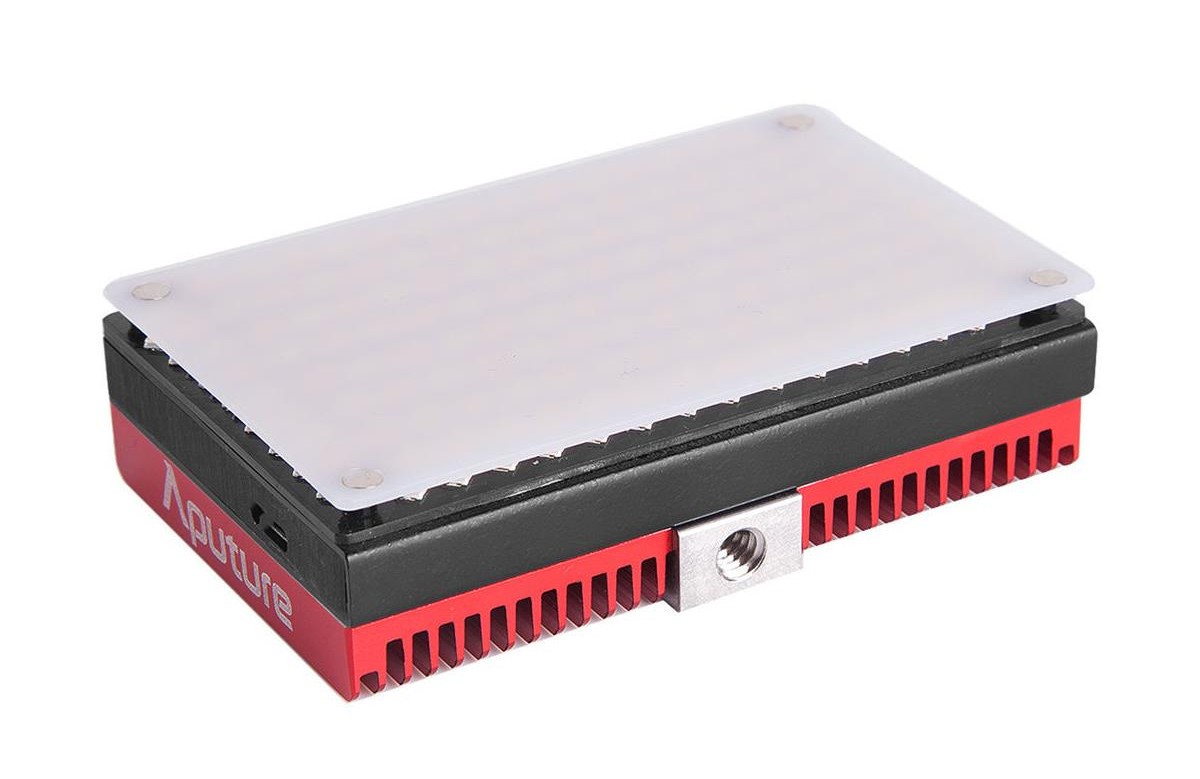
This light has a wide beam angle of 120-degrees, a portable design that's about the width and height of a credit card, and a durable metal body that's crafted of aircraft-grade aluminum.
It has a 1/4 screw and a universal cold-shoe mount so it can be mounted on a camera, a tripod, a light stand, and so forth.
This unit has a built-in battery that offers about an hour of runtime at full power and four hours of runtime at minimum power. The battery is rechargeable via a USB-C cable.
This is simply a well-built, bright, easy-to-use light that any photographer would appreciate in their stocking this holiday season!
Learn more about the Aputure Amaran AL-MX Bi-Color LED Light
Haida M-10 Filter System

One of the newest additions to my camera bag is the Haida M-10 Filter System, and I can't sing its praises enough.
The filter holder is super lightweight thanks to its aluminum construction, so it's durable and sturdy, but doesn't add unnecessary weight to your lens.
Inside the holder are slots where you can drop filters in. The slots are even lined with felt to help prevent scratches to the filters!
Another neat feature is that the holder has a quick-release clip for easy on and off. The clip is well-built and has a good amount of tension, so you don't have to worry about accidentally disengaging the clip as you work.

You can use square or circular filters with this holder. In fact, the kit comes with a variety of filters, including a circular polarizer, a variety of graduated ND filters, and solid ND filters as well.
And since the holder has two filter slots, you can mix and match filters as needed.
Both the filters and the holder are very well built - you can tell when you're holding them that they are high-quality products that will last a good, long while.
That being the case, if the photographer on your list has been hinting at needing a new filter system, you've got the perfect gift for them!
Learn more about the Haida M-10 Filter System
Exposure Software
The latest version of Exposure - Exposure X5 - was released just a few weeks ago to much fanfare.
Exposure has a ton of easy-to-use, yet powerful editing tools that any photographer would appreciate. This includes:
- An extensive library of film presets that you can customize
- Creative tools like tilt-shift, creative lens focus, and film grain
- Non-destructive editing with layers
- Selection and masking tools to apply effects to specific areas
- An intuitive and easy-to-use workspace
On top of all that, Exposure X5 has 3D color masking functionalities that will give the photographer on your shopping list the ability to have precise control over where an adjustment is made to an image.
These color controls can be defined by very specific features, like saturation, hue, and luminance, which means you can target the sky, skin tones, or other specific color ranges, all with just a few clicks.
This software also has vignette correction, chromatic aberration correction, fringe removal, and custom camera profiles to boot.
You can even test-drive Exposure for free for 30 days to see if it's something you want to give as a gift this holiday season.
Hakutatz Pocket Size RGB+AW LED Light
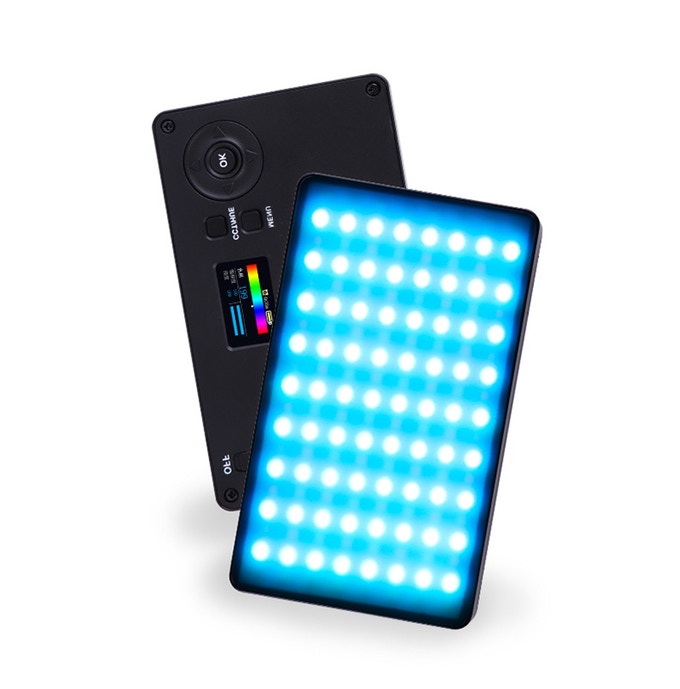
If you’re not sure what to get the photographer on your holiday shopping list, an ideal last-minute gift is the gift of light.
Light - good light - is essential for making high-quality photographs, and good light is exactly what you get with the Hakutatz Pocket Size RGB+AW LED Light.
This rechargeable light is ultra-portable and will fit in a photographer’s pocket for easy transport.
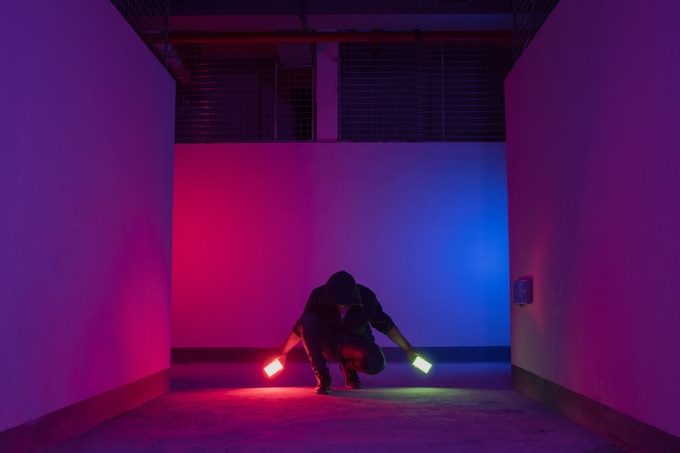
Photographers can utilize both white and amber light and a wide variety of RGB lighting options that allow for precise adjustments to get just the right light for each shot.
With 152 LEDs (40 white, 40 amber, and 72 RGB), adjustable saturation from 1-100%, 1480 lux brightness, and an adjustable color temperature from 3000-6500K, this light offers superb functionality and tons of customizations.
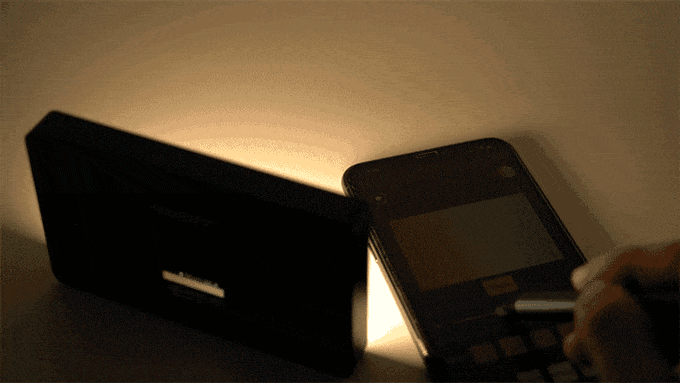
The light connects to any Android or iOS smartphone, which allows for changing the color temperature, the RGB color, and dialing in special effects. These changes can be made both quickly and easily thanks to the intuitive and user-friendly LCD display.
Use one light on its own or multiple lights to combine effects to get the perfect shot. Either way, photographers have the power to add vibrancy, visual interest, and accents to their photos right at their fingertips!
Learn more about the Hakutatz Pocket Size RGB+AW LED Light
BlueTooth Photo

I don’t know how many BlueTooth speakers I’ve had over the years. Come to think of it, I couldn’t even tell you how many BlueTooth speakers I have in my house right now.
They’re utilitarian. They’re forgettable. Most BlueTooth speakers are nothing special.
But the patent-pending BlueTooth Photo changes all that because it turns your favorite photo or piece of art into a canvas that sings.
All you have to do is upload your image and the fine folks at BlueTooth Photo do the rest. You get a premium-grade, artist-quality canvas that showcases your favorite images all the while being the perfect vessel for fantastic audio quality for your music.

What better way to enjoy music than by listening to it emanate from your favorite photo? And what better way to appreciate your favorite photo than by having a look at it each and every time you want to listen to your favorite songs?
It’s the best of both worlds!
BlueTooth Photo is a fantastic gift idea for the photographer (or anyone else!) on your holiday shopping list. Get them an 8x12 image in either portrait or landscape orientation this Christmas for just $89.00.
Use the coupon code PT20 to get $20 off your purchase!
Learn more about BlueTooth Photo
Luminar 4

Yet another top choice for a last-minute gift for the photographer on your list is Luminar 4.
At the time of this writing, Luminar 4 is still a couple of weeks from being released, but I've had a chance to look at it, and WOW is a word that immediately comes to mind.
Luminar makes use of artificial intelligence to allow photographers to make specific and detailed edits to their photos, but without the process being one that's laborious or time-consuming.
For example, Luminar 4 features an AI Sky Replacement tool that allows you to automatically change the sky in any photo. Yes, change the sky - not just edit it to look prettier.
Better still, you can change the sky without creating masks or making selections, and the AI Sky Replacement Tool will relight the entire image, that way the original image and the new sky match in terms of brightness.
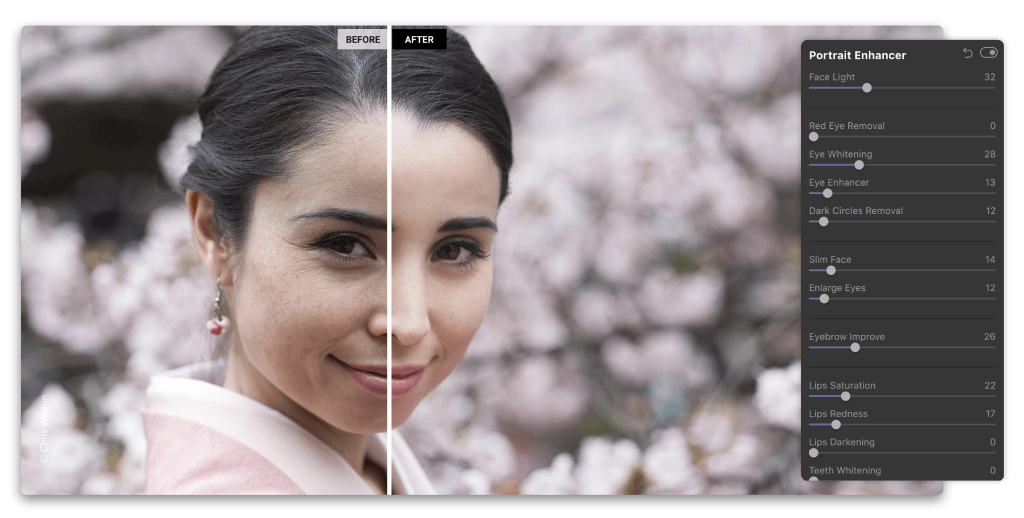
Luminar 4 also has handy tools for portrait photographers, like the AI Skin Enhancer, which detects blemishes and removes them, all the while preserving details in the skin. This tool will detect skin anywhere in the photo (not just people's faces), and its corrections are made with just one click.
There's also an AI Portrait Enhancer that has 12 tools that enable you to make corrections to the face, eyes, and mouth in a way that maximizes control while maintaining ease of use.
Needless to say, Luminar 4 is packed with features and will make a great addition to any photographer's workflow!
Wiral LITE Cable Cam

I've had the Wiral Lite Cable Cam for a couple of months now, and I can't tell you how much fun I've had using it.
It is incredibly easy to use, too, as it has a simple rope system that allows for quick setup.
And once you have it setup, you can get beautifully smooth, dynamic tracking shots that take your videos to the next level.
This patent-pending rope system is called "Quickreel," and uses an ultra static rope so you get superb performance with excellent safety. The beauty, though, is that this rope doesn't add bulk or weight, so it's easy to carry.
This rope system can be used with a variety of cameras, from a GoPro to your smartphone to a DSLR or mirrorless camera.
If you watch the video above, you can see the kind of long, smooth video sequences that are possible.
It looks like a video that was taken using a big, expensive setup!
But this rig is less than $500...
Quick setup, loads of features, huge functionality, and a great price. What more could you want in a last-minute gift for the photographer on your list?!
Learn more about the Wiral LITE Cable Cam
Holdfast MoneyMaker Solo

One of my favorite pieces of gear is my MoneyMaker Solo camera strap. This thing is gorgeously crafted, easy on the eyes, and super functional, too.
What I like most about this strap is the comfort it offers.
It has a big, contoured shoulder strap that helps keep fatigue at bay. The shoulder strap stays in place on your shoulder too (go figure!), so carrying your camera for extended periods of time doesn't turn into making constant adjustments to how the strap interacts with your body.
Part of what helps the strap stay in place is the stability strap that wraps under your arm.

The other component of that is the ingenious Belt Anchor, which keeps the camera attached to your hip, rather than flopping around as you walk.
Not only does that improve the comfort level, but it makes it a safer endeavor to carry your camera, especially in crowded areas.
The construction of this thing is worth mentioning, too.
It's made of a single piece of full-grain leather, so it's absolutely stunning to look at.
The high-quality leather is paired with stainless steel hardware, so you know that the strap and its components will last the photographer on your list for years and years and years to come!
Check out my Holdfast MoneyMaker Solo Review to get more details on this awesome gift idea for photographers.
Learn more about the Holdfast MoneyMaker Solo
We Recommend
Top Software and Gear Updates That Rocked 2019

photo byzeljkosantrac via iStock
It was a great year for photography, particularly on the software and gear fronts.
From camera accessories to post-processing software, camera bags to lighting gear, we saw tons of new, updated, and innovative products and services come to market in 2019.
It would be impossible to review everything that rocked the photography world this year, so we’ve done the next best thing and outlined more than a dozen of our favorite updates below.
Luminar 4
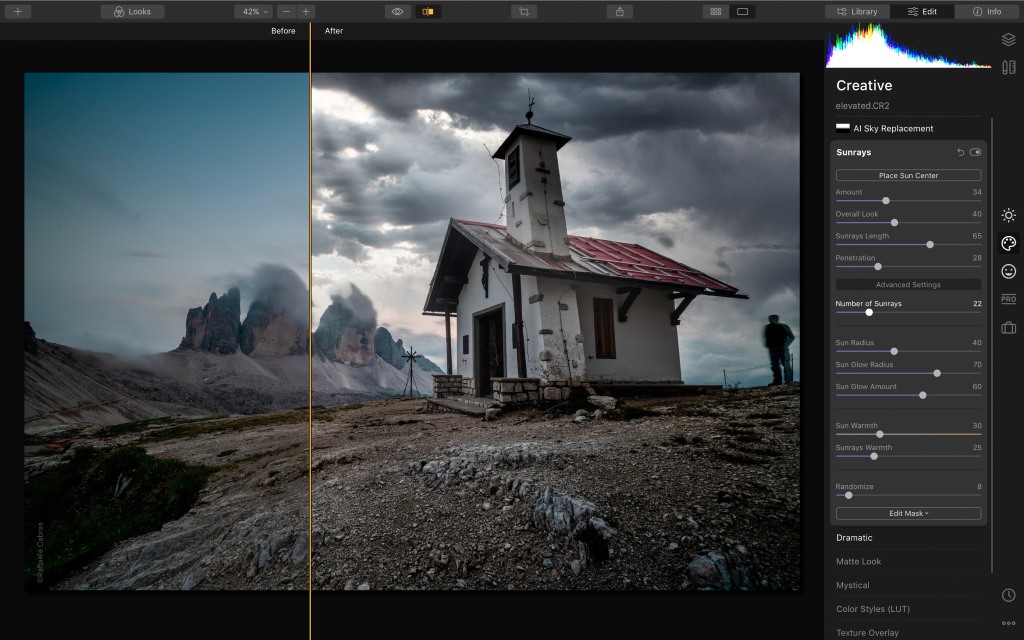
I’ve been a big fan of Luminar going back to when it was called Luminar 2018. And when Luminar 3 came out, I got my copy and began enjoying it immediately.
Now Luminar 4 is here, and with a host of improvements and expanded capabilities, it is the best Luminar yet.
If you’re unfamiliar with Luminar, let me give you a quick overview…
It’s chock-full of revolutionary tools that help you create better photos, faster.
That’s thanks in large part to artificial intelligence that drives easy-to-use tools that streamline your workflow yet still give you pinpoint control over how your images look.
Joining tools like the Accent AI Filter and the AI Sky Enhancer from Luminar 3 is a suite of new AI-powered tools that take image editing to a whole new level.
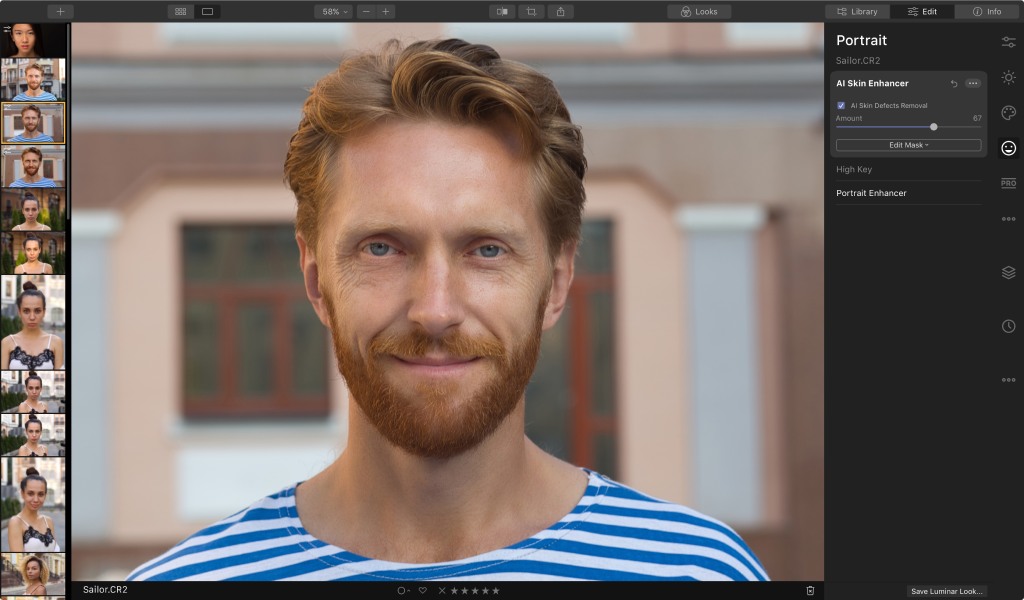
For portrait enthusiasts, the AI Skin Enhancer and Portrait Enhancer tools will revolutionize the way photo editing is done.
Using human-aware technology, the AI Skin Enhancer detects all the skin in a photo, smooths it out, removes blemishes, and does so while preserving the texture of the skin, pores, and hair.
It takes just one click to apply the Skin Enhancers edits, and then with a single slider you can adjust its strength for a picture-perfect result.
The AI Portrait Enhancer gives you a host of tools to quickly and easily make detailed changes to portraits, like whitening teeth and eyes, removing dark circles under eyes, and removing red eye, just to name a few.
In all, the Portrait Enhancer includes twelve revolutionary tools that turn editing portraits into a process that takes a minute or less!
Luminar 4 has some goodies for landscape photographers as well.
Primary among them is the AI Sky Replacement tool.
As its name suggests, this tool replaces the sky in your photos automatically - there’s no masking or selections to be made on your part.
The selection algorithms work so well, in fact, that it knows to exclude leaves, grass, and animals from the sky selection.

Not only that, but this tool relights the entire image, that way the foreground matches the brightness of the new sky.
It’s advancements like this that make Luminar 4 one of the most powerful, easy-to-use editing programs on the planet today.
Need more convincing? Get Luminar 4 today and see for yourself!
Hakutatz Pocket Size RGB+AW LED Light

Gone are the days when you have to lug around huge lights to get the key light or fill light you need for awesome portraits.
Instead, companies like Hakutatz have developed powerful pocket-sized LED lights that give you the power to customize the type of lighting to your specific needs.

This particular light has RGB, amber, and white LEDs, so you can add accent colors to your photos and videos or dial in the ideal white balance by using the amber or white lights.
This light is completely adjustable, with controls for saturation, brightness, and color temperature. Better still, you can adjust the light’s settings via a well-designed and user-friendly smartphone app.
That means that with a simple touch or a swipe of your finger, you can fine-tune everything from the RGB color to special effects. You can even control multiple lights at the same time right from the app. No wonder their Kickstarter campaign was such a huge success!

Hakutatz literally puts the power to dial in complex lighting schemes in the palm of your hand, and does so in a way that’s clean, simple, and super functional. That’s by this little light rocked the photography world in 2019!
Be on the lookout for Hakutatz’ online store to have these lights in stock in December!
Learn more about the Hakutatz Pocket Size RGB+AW LED Light
Hazard 4® Cyclone™

Framing shots with your action cam in direct sun can be frustrating; glare in your eyes and the camera’s tiny, reflective screen are really fatiguing. Blowing sand, water or snow don’t help. But the best action is shot outside - Cyclone™ is the first real solution.

This patent-pending optic blocks the sun, but it’s lens also magnifies the screen and protects it. You effectively add mirrorless camera style composition and review to your tiny affordable GoPro or DJI action cam that survive where real mirrorless can’t. Better still, the viewfinder mounts to your action cam’s bottom screw in seconds, so there is no fumbling. But you’ll probably choose to keep it on since this little guy doubles as a tiltable handle - keeping fingers out of frame and for extension. With cheap additional hardware you can even head mount it for hands-free composition while biking, paragliding etc, and it tilts out of the way at will.


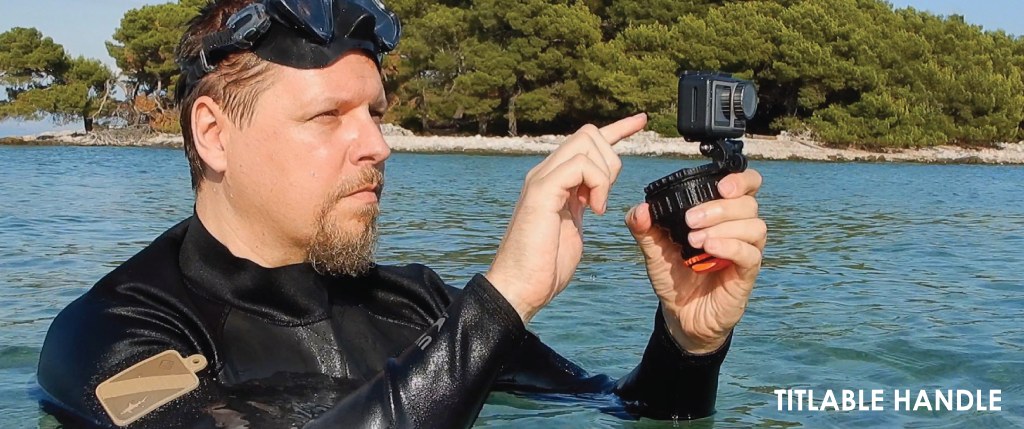
The simple, waterproof, tough, design accordions flat for easy portability and flattened can be a selfie mini tripod. It has diopter focus - even helping out ageing eyes. The high-vis cap self closes to protect the lens. And you get a tether loop action cams don’t include.

Hazard 4® has a reputation for innovating outdoor photo accessories; the Cyclone™ is no exception. As usual they have gone above and beyond to design a multi-functional, easy to use bombproof solution to a common video shooter problem. Perhaps this may push GoPro® or DJI® to finally up the resolution on their LCD’s under magnification and drive the mirrorless wars into the action cam space. Either way, you don’t have to rely on the wide angle lens for your framing anymore- you can actually compose like a pro.
This device is currently on Kickstarter, with a fund date of January 7, 2020. Head over to Kickstarter now to learn more about this device.
The Camera Pack by Nomatic and Peter McKinnon

Billed as a “functional camera pack for all types of travelers,” the Camera Pack by Nomatic and Peter McKinnon is certainly worthy of inclusion on this list.
The Kickstarter campaign to fund this pack had a goal of $100,000. It raised nearly $2.3 million. That speaks to the reputation of Nomatic and Peter McKinnon!
This bag is ridiculously well designed and has a functionality level that’s off the charts.
It’s designed to cure the woes of travel photographers who have to have one bag for their gear and another bag for their personal items.
The Camera Pack solves this problem by having a clothing side and a gear side which are separated by an interior panel. This keeps everything neat and tidy so you aren’t rifling through the entire back when you need something.
Better still, the bag has a “Cube Pack” inside, which serves as the ideal organizational module within the interior ecosystem. However, as the gif below shows, the Cube Pack converts to a daypack, so if you need to run and gun a little, you don’t have to take the larger Camera Pack with you. Ingenious!

Overall, the Camera Pack can hold 35 liters of gear, but can be expanded to accommodate up to 42 liters of gear. That’s a lot of stuff! And with a full clamshell opening, you can see all the gear you’ve stowed away with ease.
And everything is neatly organized thanks to a main camera compartment with moveable interior dividers. There’s a sleeve for your tablet, pockets for your camera accessories, and quick side access for easy retrieval of gear, too.

On the clothing side, there’s compression cubes for your clothes, compression straps to keep everything where it should be, and more pockets for smaller items.
This is just a really well designed and impeccably built backpack. And with the input of a photography expert like Peter McKinnon, you know that it’s been designed with photography needs in mind.
Learn more about the Camera Pack by Nomatic and Peter McKinnon
GearFocus.com
If you buy and sell your used photography gear on places like Craigslist, you’re doing it all wrong.
That’s because there are much better alternatives that take the hassle out of buying and selling used gear. GearFocus.com is certainly one of the best.
One of the top reasons GearFocus makes our list of the Top Software and Gear Updates is because they focused on building a community where people like you and I can buy quality used gear and get fair market value for stuff we sell.
Unlike other used gear sites, GearFocus doesn’t take a giant chunk of your profits when you sell your gear. Instead, they offer the lowest seller fees among B2C and C2C marketplaces, which means more money in your pocket when your item sells.
Additionally, GearFocus ensures each transaction is safe and secure by screening and monitoring every single post and transaction. Gear Focus was made by creatives, for creatives and they’ve been in this business long enough to be able to spot suspicious listings and red flags from a mile away. Without scammers creating fake listings, the buying and selling experience is enhanced so you can get the best deal on used gear and the most money for the items you sell.
Heck, they’ll even intervene on your behalf if something goes wrong! Having that kind of peace of mind alone is enough to land these guys on this list!
It’s not often that you find companies like this that prioritize community building and supporting one another over making a buck. That focus on customer service is just the icing on the cake for patrons of GearFocus. They are here to help FEED YOUR PASSION!
Learn more about GearFocus.com
Litra Studio

To say that the Litra Studio is powerful is an understatement.
Weighing in at just 33.5 ounces and measuring 5.5" x 3.9" x 2.9", the Litra Studio is certainly easily transported without taking up a ton of space in your camera bag.
But don’t let its small size fool you - this light can produce over one million unique colors that will help you light up your portraits and videos.

The Litra Studio can produce up to 3,000 lumens of continuous light and up to 6,00 lumens of flash. In CCT mode, you get 2,000-10,00K adjustable bi-color lighting with green and magenta color shift controls to allow for tunable blue and green screen optimization.
On top of that, this light is fully tunable and dimmable, and offers CCT, HSI, RGBWW, gel presets, flash modes, and effects, too.

The light it produces is clean and flicker-free at all shutter angles. The CRI and TLCI of 97 speak to its impeccable color accuracy.
Litra even made sure this light is rugged and durable. It’s waterproof, has highly efficient passive thermal management, and offers up to 20 hours of battery life on the low setting.
That makes this a go-anywhere, do-anything light that made huge waves in the photography world this year.
Learn more about the Litra Studio
GoPro HERO 8

While the GoPro HERO 8 doesn’t boast any major updates, it does represent a culmination of a wide range of smaller updates that, taken together, make it the best GoPro thus far.
In fact, I’d say this is the most innovative and user-friendly GoPro yet.
It has built-in mounting pins so you can directly mount the camera to accessories rather than needing a frame to do so.

There are built-in digital lenses for multiple field of view settings from Narrow and Wide to Linear and Superview. The camera’s physical lens cover is not not removable and it twice as strong as those found in older models.
Also on the ease-of-use front are numerous capture presets that allow you to create and save popular types of videos. SuperPhoto, which is GoPro’s version of HDR, gets a refresh that results in improved image quality as well.
The GoPro HERO 7 debuted incredible image stabilization with HyperSmooth, and the HERO 8 builds on that with even better results with HyperSmooth 2.0.
The HERO 8 also gets upgraded TimeWarp features, including an auto mode that uses sensor to detect motion and adjust the recording speed accordingly.
The camera also has improved photo-taking capabilities with face detection, smile detection, and blink detection functions, as well as LiveBurst mode for taking 1.5-second-long images before and after the shutter button is depressed.
Add in built-in GPS, motion sensors, live streaming capabilities at 1080p, 4K video at 60fps, and a host of mod accessories to expand the camera’s capabilities, and it’s no wonder that this rig set the photography world on fire in 2019!
Learn more about the GoPro HERO 8
Aputure 120D II

As far as studio lights go, it’s tough to beat the quality lights that Aputure puts out.
And at the top of their lineup is the 120d II, a light I reviewed earlier this year and was very impressed with.
This light is 1000-watt tungsten equivalent, so you get plenty of brightness for your studio work. It’s fully dimmable, too, and has a CRI and TLCI of 97+. That kind of quality light is a must-have for discerning photographers.
Aputure also included a variety of built-in lighting effects so you can dial in custom looks for your images. With this light, there’s nothing stopping your creativity!

But what’s really impressive about the 120d II is what’s “behind the scenes.”
It has an integrated power and control box, which keeps clutter to a minimum in the studio. Any studio photographer will appreciate that!
What’s more, it has an 18dB quiet fan, which keeps that annoying “whooshing” sound to a minimum so you can concentrate more thoroughly on getting killer shots.
Add in the fact that this light is 25 percent brighter than its predecessor and that it has DMX controls, a wireless remote, and excellent portability, and you have the makings of a top light for your photography studio.
Learn more about the Aputure 120d II
Exposure X5
Exposure X5 is yet another software update that sent shockwaves through the photography world in 2019.
Its predecessor, Exposure X4, was highly functional, user-friendly, and super powerful, so it was hard to imagine how the folks at Exposure could make X5 better. But they did.
For starters, Exposure X5 has custom camera profiles that allow you to control how the software interprets color from RAW files. These profiles (created by X-Rite, among others) can be applied automatically by matching the serial number of your camera or by using the camera model. Furthermore, these profiles can be matched to a specific lens or ISO range.
You get advanced chromatic aberration correction in X5 too. This allows you to remove unwanted artifacts using lens profiles, or you can remove them by making manual adjustments if you prefer.
There’s also a new fringe removal tool, so X5 makes getting rid of chromatic aberrations easier than ever before.
There are a host of other new features too.
Exposure X5 includes new complementary color presets, new season-inspired looks, and new light and airy presets that give you expanded creative potential when editing your photos.
There are more black and white film options than ever before, support for grayscale TIFF and JPEG images, and new image flip options too. Exposure X5 also has multiple language options, including English, German, and French.
But for me, the best new feature in Exposure X5 is 3D color masking.
Basically, you can use this tool to make incredibly precise selections for applying adjustments to your photos. You can see it at work in the video above.
This fine level of control is made possible by using specific color characteristics (hue, saturation, and luminance) to define the adjustment areas.
What this means is that you can quickly and easily target specific areas for color masking, like the sky in a landscape photo or skin tones in a portrait. This is all done with just a few clicks.
Exposure X5 is powerful, easy to use, and incorporates tons of new features that make it the best Exposure software to date. If you’ve never tried exposure, give it a test-drive for free.
Holdfast Tanker Belt

I’ve been a Holdfast customer for a long time, and what initially drew me to them was the absolutely outstanding build quality of their products.
They use only the finest materials - things like full-grain leather and stainless steel - so when you buy a camera strap or harness or bag, you get something that is durable and will last you for years.
But as the years have gone by, I’ve come to appreciate more and more the sheer innovation that these guys display when developing new products. That being the case, I had to include Holdfast on this list of the best gear updates of the year.

One of Holdfast’s latest products is the Tanker Belt, which changes the way you carry your gear.
It’s actually two belts in one, the first of which cinches around your waist like a normal belt and the second, outer belt, which forms loops for attaching your gear.
This ingenious design means the belt stays put (as do your pants) while maximizing the amount of gear you can carry around your waist.

There are three D-rings on the belt for attaching things like your keys or a wallet, and the D-rings are moveable, so you can customize precisely where your items hang on your waist.
And, as you’d expect with Holdfast, this belt looks and feels like a million bucks - it's gorgeous handmade leather is something to behold!
Better still, the Tanker Belt was designed with functionality in mind, so it’s compatible with a wide range of Holdfast products.

You can attach the Ranger Leash to the belt and take Fido for a hands-free walk, or you can add a cell phone pouch and keep your smartphone safe and secure and out of the elements.
Add a lens pouch or two (small, medium, or large) so you have extra glass for your next shoot too!
With sizes from 28-inches up to 44-inches and multiple colors (black, tan, chestnut, and burgandy), you can customize the Tanker Belt to your specific needs and tastes.
Learn more about the Holdfast Tanker Belt
Panasonic 10-25mm f/1.7 Lens
I picked up a Panasonic GH5 earlier this year, and it quickly won me over with its astonishing video capabilities.
It wasn’t until recently, though, that I got to test out the Panasonic 10-25mm f/1.7 lens, and I have to say, I wish I would’ve gotten my hands on it a lot sooner! This is a fantastic lens, to say the least.
You can get some of my thoughts on this lens in the video above, but I want to expound on its features a little bit more.
Make no mistake - this is a gigantic lens, especially for a micro four-thirds camera. Fortunately, it’s not hard to handle at all, and despite its footprint, it’s actually not all that heavy.

But it’s massive size means that Panasonic was able to cram lots of goodies inside to help you get superb images.
This lens is supremely sharp, beautifully responsive, and gets you clean, crisp images each and every time. Its bokeh is buttery smooth and there’s wonderful brightness throughout its aperture range.
It has 17 elements in 12 groups, including three aspherical lenses and four extra-low dispersion elements which work to all but eliminate spherical aberration, distortion, and chromatic aberration. The result is images with impressive quality.
But where this lens was a game-changer in 2019 was in its video capabilities…

It’s compatible with up to 240fps high-speed sensor drives and offers silent operation thanks to the inner focus drive system and the de-clicked aperture ring.
The focus clutch is a nice touch as well, as it enables instant switching between autofocus and manual focus as well as improved accuracy when manually focusing.
With next to zero focus breathing, a micro-step drive system that accommodates brightness changes when panning and zooming, and Leica build quality, this lens certainly doesn’t disappoint!
Learn more about the Panasonic 10-25mm f/1.7 lens
Sony a7R IV

When the Sony a7R IV was announced earlier this year, it set the internet on fire with news of its massive 61-megapixel sensor. And while the sensor is impressive, it’s just the beginning of the impressive specs of this camera.
Paired with a BIONZ X image processor, the a7R IV’s back-illuminated sensor is capable of rendering images that are beautifully crisp.
You get an eyeful of all that beauty with the brand-new UXGA OLED Tru-Finder viewfinder, which has a whopping 5.76-million dots of resolution for a clean, bright, detailed look at what you’ve framed up in the shot.
This camera has a native ISO range of 100-32000 for low-light shooting, and with 15-stops of dynamic range rendering, you’ll have no problem getting tons of details in the shadows and the highlights.
Of course, the a7R IV carries on the Sony tradition of excellent autofocusing, with an ultra-fast hybrid AF system that has 567 phase-detect AF points to give you quick and accurate autofocus tracking.
Throw in UHD 4K video at 30p, Real-Time Eye AF tracking, 10fps shooting, and a bevy of other features, and you can see why the Sony a7R IV was one of the best gear updates of 2019.
Learn more about the Sony a7R IV
Haida M10 Filter System

The Haida M10 filter system is something I’ve been testing as of late, and I have to say that I’m impressed with this system.
Like the other products and services on this list, I’ve found numerous innovative and unique features that compelled me to include this product on this list.
Haida is a great value for the money with well-built components that show an attention to quality and detail that many filter companies just can’t match.
I have multiple components in my kit - the M10 filter holder, a circular polarizer, a couple of solid ND filters, and a soft-edge grad (shown above) - but you can also buy complete kits of varying sizes, including their Master Filter Kit, their Professional Kit, and their Enthusiast Kit, if you’d rather go that route.
Either way, I think you’ll find, as I have, that the Haida system is one that enhances your ability to get quality shots.
The aluminum alloy filter holder can accommodate two 100mm filters, but it can expand to include a third slot if needed. The Haida filters are made of shock-resistant optical glass and features 10 layers of anti-reflective nano coating and 10 layers of scratch and water resistant coatings.
The holder rotates a full 360-degrees, which is enormously helpful for getting just the right positioning when using graduated ND filters.
I also like the fact that Haida incorporated gaskets in the filter slots to help prevent light leaks. They even include a “dummy” filter housing that can be dropped into the filter if you’re shooting without the circular polarizer in place. Again, this helps prevent light leaks so you get a cleaner exposure.
The pinch and pull system for adding and removing filters make using this system super easy, as do the rounded edges of the rectangular filters - they’re much easier to slide into the filter holder without sharp edges.
This is just a well thought out system for beginners and enthusiasts alike!
Learn more about the Haida M10 filter system
Sony a6600

Though the Sony a7R IV probably got more attention, the Sony a6600 is certainly not something to forget about…
With a much smaller price tag than the a7R IV and more applicability for more photographers, the a6600 rocked our world this year by bringing many flagship features to a mid-range camera.
Its 24.2-megapixel Exmor CMOS sensor is ideal for capturing beautifully resolute images while the native ISO range of 100-32000 gives you excellent low-light shooting capabilities with reduced noise.

As I get more into video creation, I appreciate the fact that this camera sports UHD 4K video capabilities that can be internally recorded in XAVC S format.
The five-axis image stabilization is a dream, giving you five full stops of stabilization, while the weather-sealed construction means you can head out in adverse weather with less worry about what will happen to your camera.
With additional features like a beautiful XGA OLED Tru-Finder viewfinder, a tiltable LCD monitor, 11 fps continuous shooting, and much more, this camera is certainly worthy of the title of gear that rocked 2019!
Learn more about the Sony a6600
RODE Wireless GO

A final product I wanted to mention on this list of the top software and gear updates is this handy little guy, the RODE Wireless GO.
This wireless system automatically pairs in just three seconds and transmits via RODE’s new Series III digital transmission system. It’s a 2.4GHz system that’s optimized for short-range operation, particularly in environments in which there is a lot of RF and Wi-Fi interference. It also offers line-of-sight range of up to 70 meters.
You also get broadcast-grade audio thanks to the built-in condenser mic’s superb isolation and transparency. Alternatively, you can use it with a lavalier mic using the 3.5mm TRS input.
Additionally, the Wireless GO system operates up to seven hours on a full charge, and since the unit is so small and compact, it’s super lightweight and portable.
You can even use up to eight systems in one location if you have the need!
If you’ve ever used a ROD mic before, you know they’re some of the best in the business. The RODE Wireless GO is certainly no exception!
Learn more about the RODE Wireless GO