10 Breathtaking Photos of Tuscany
Ask any landscape photographer for a top-10 list of places they want to go, and the chances are good that Tuscany will be somewhere on their list.
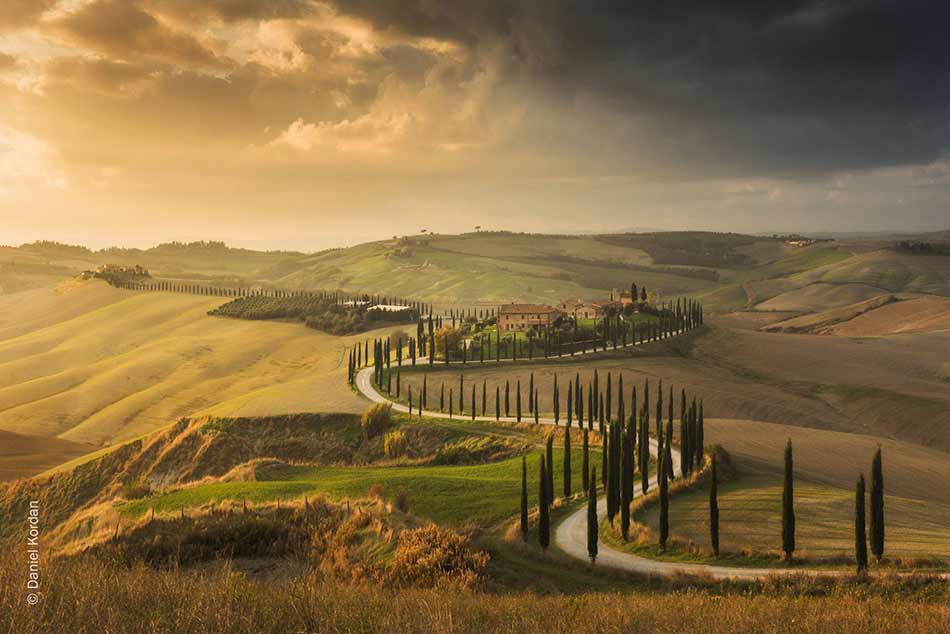
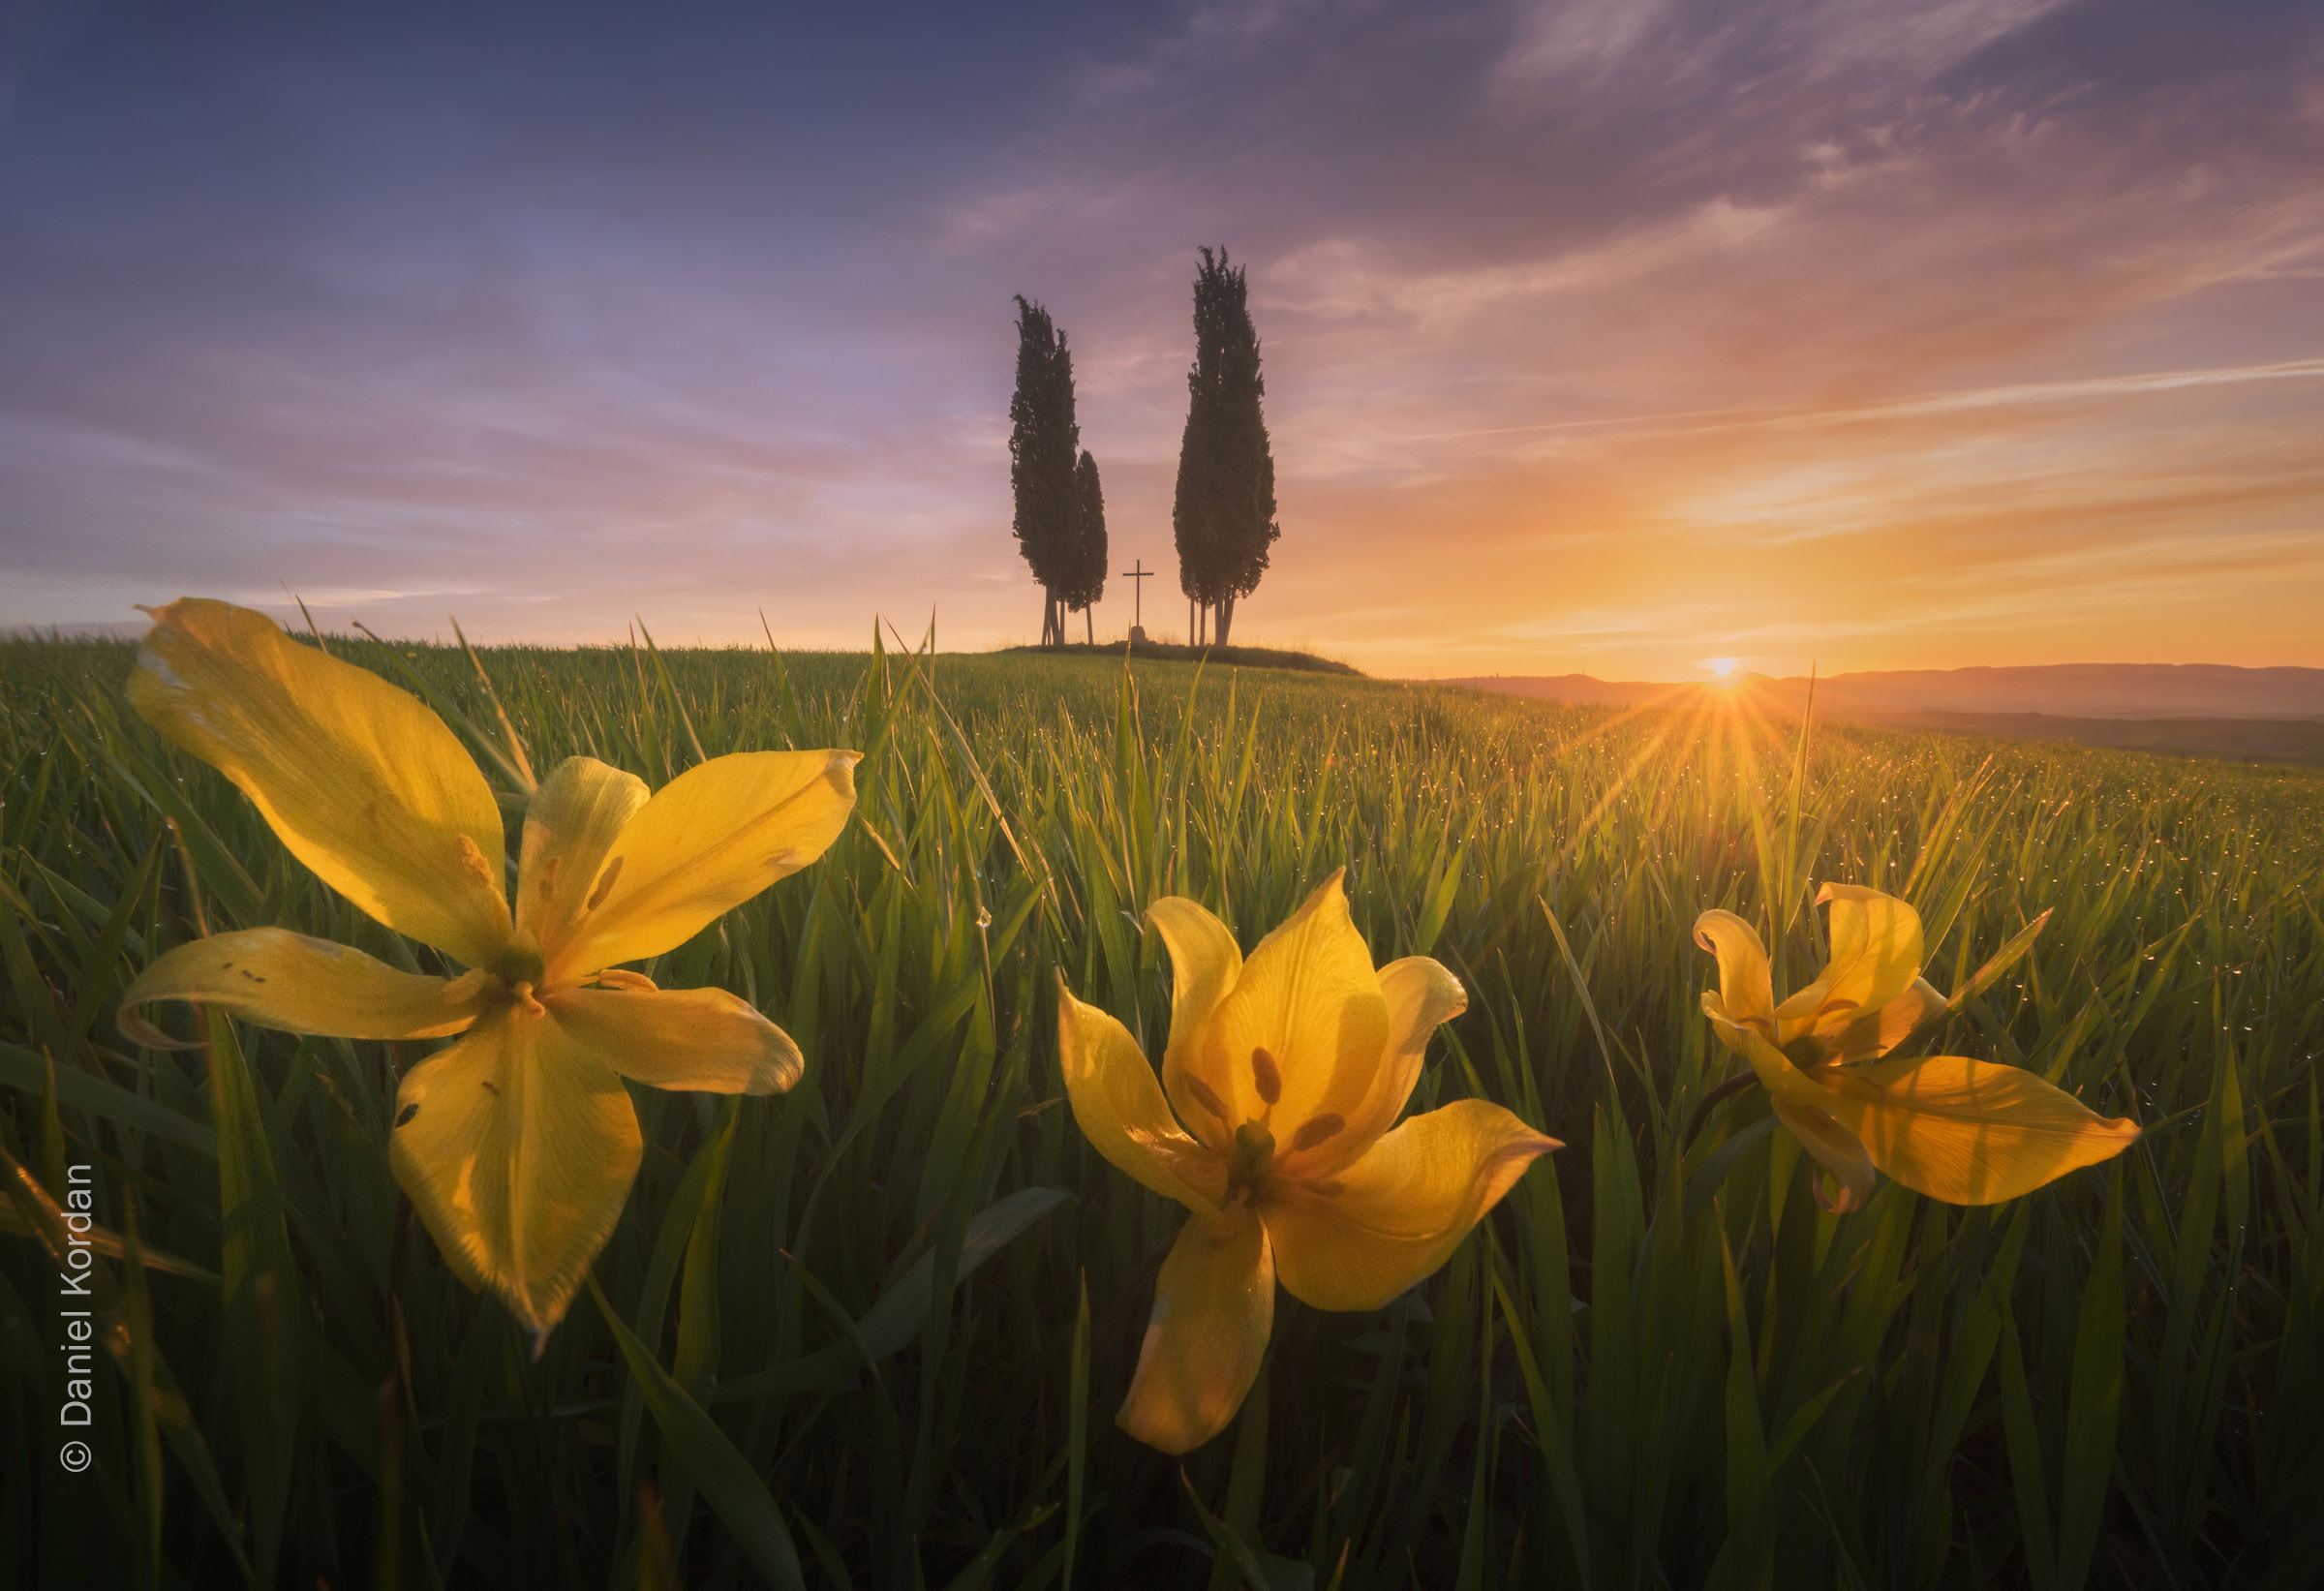
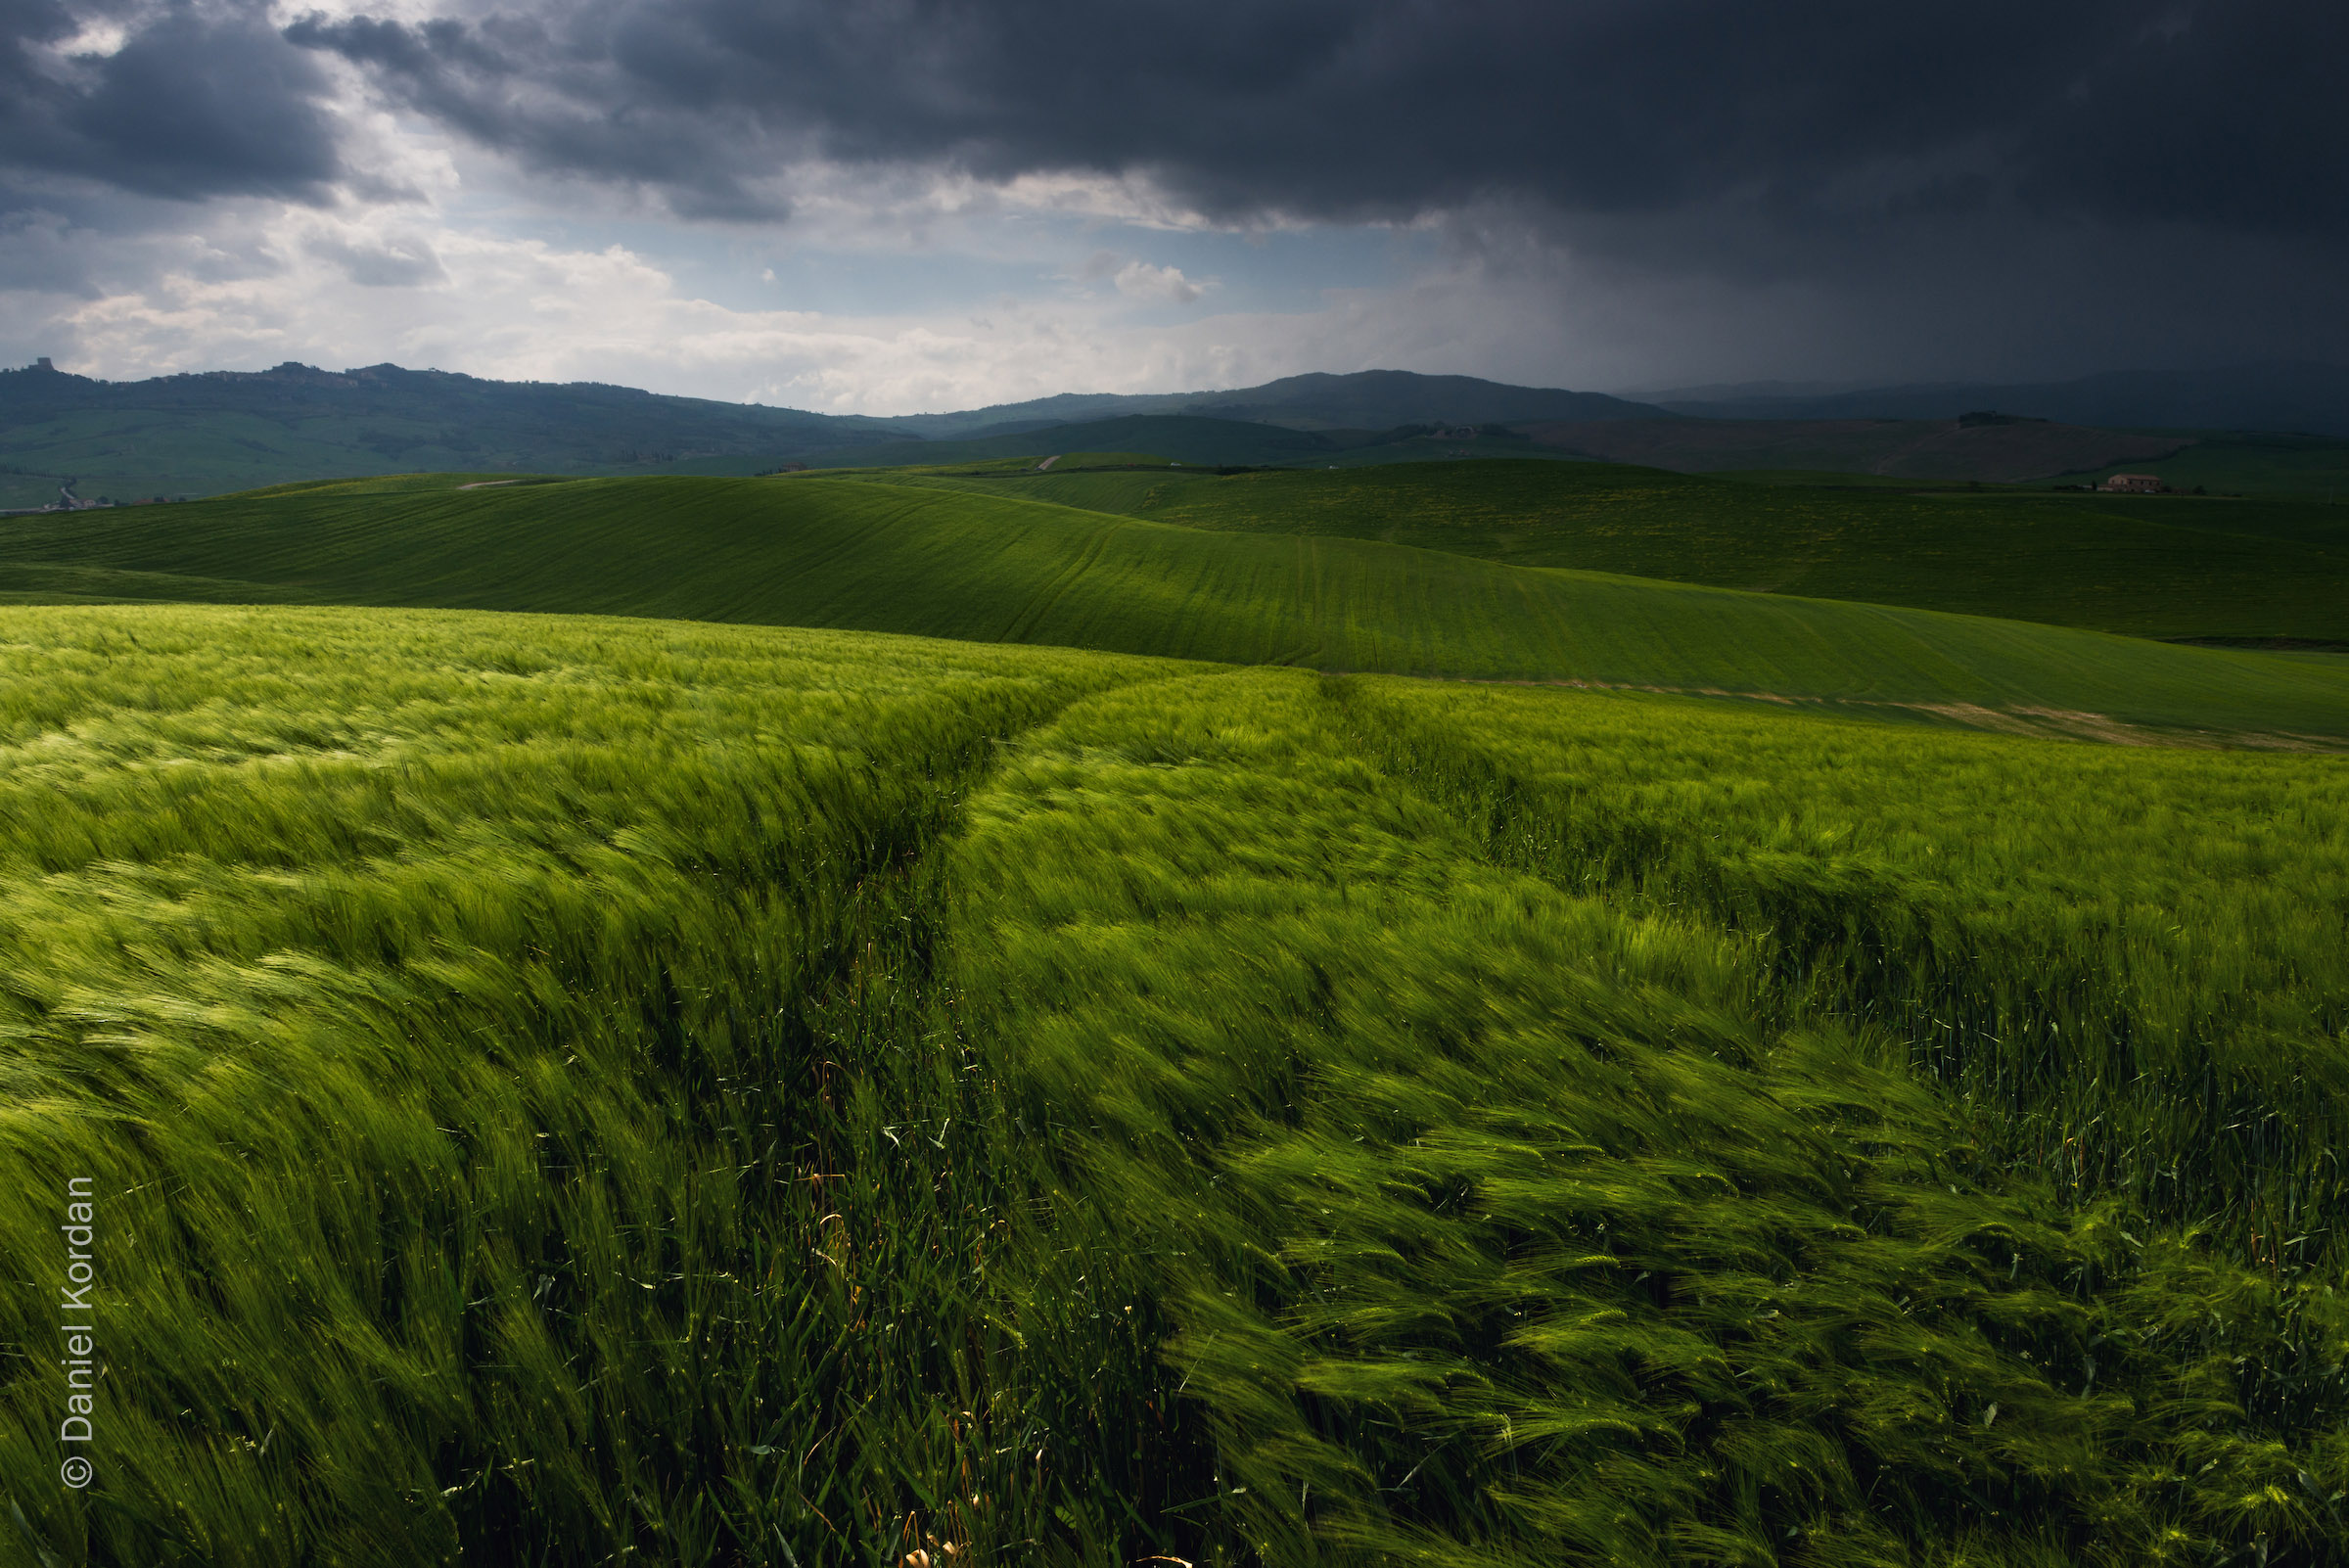
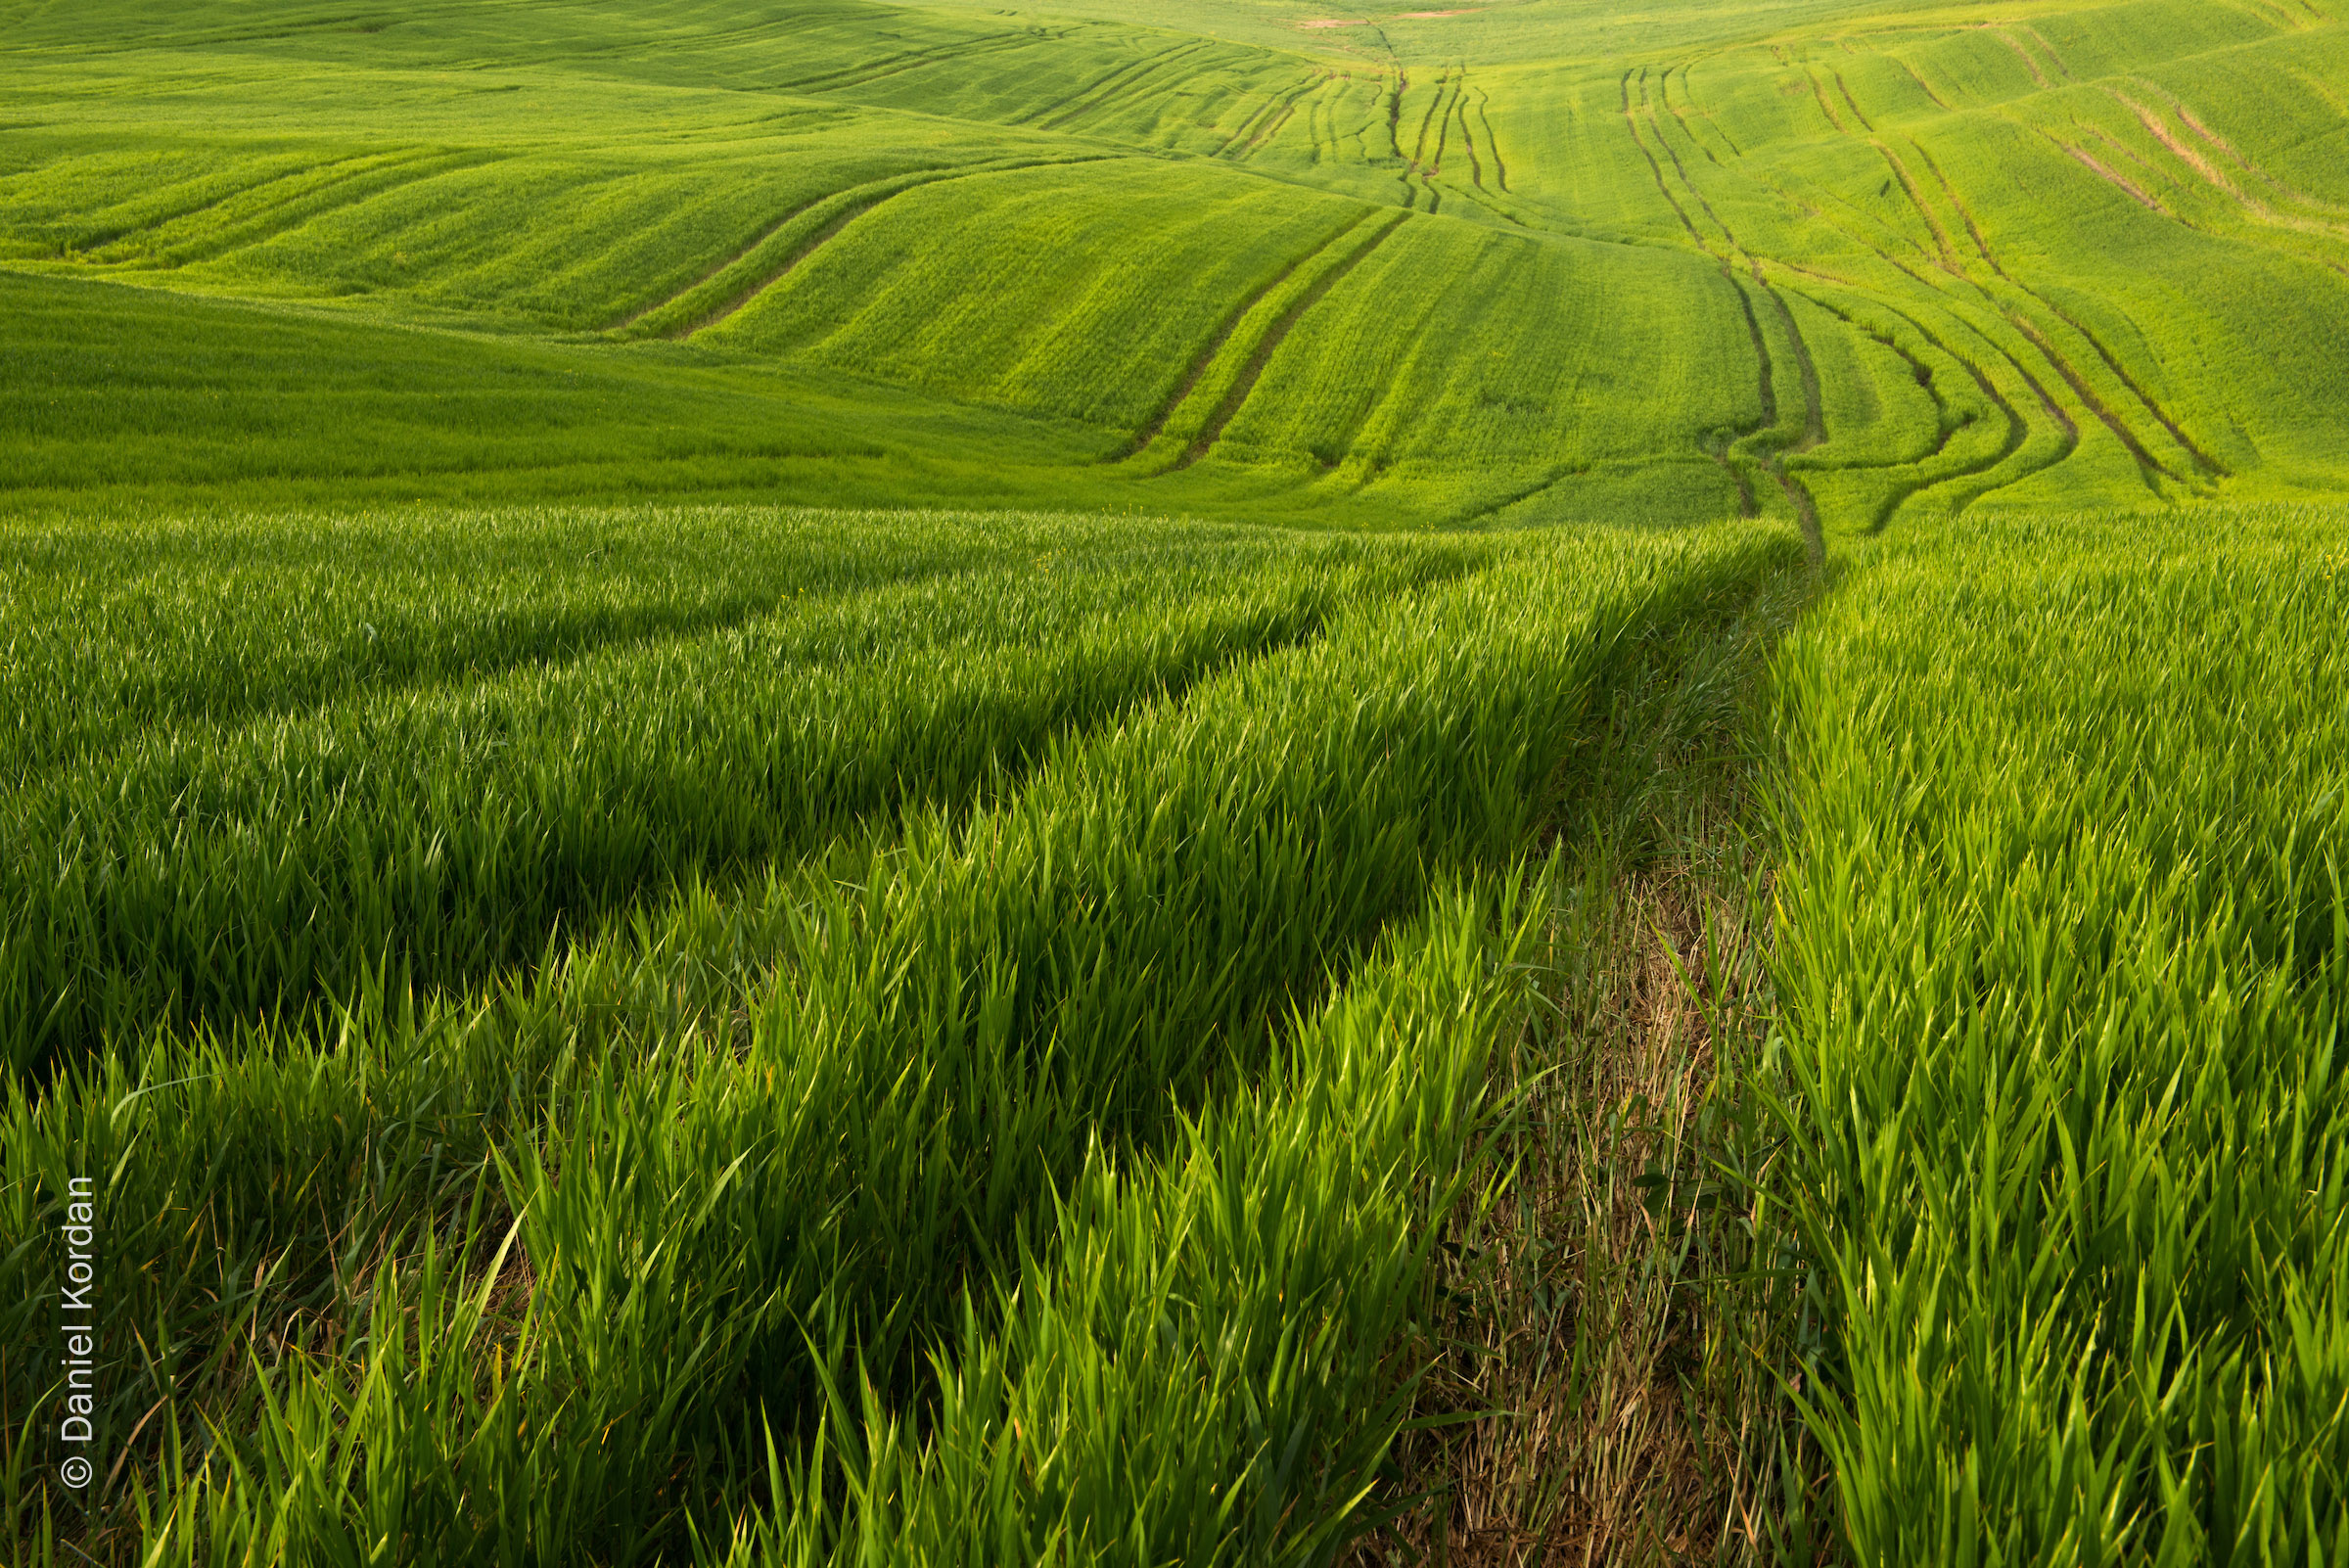
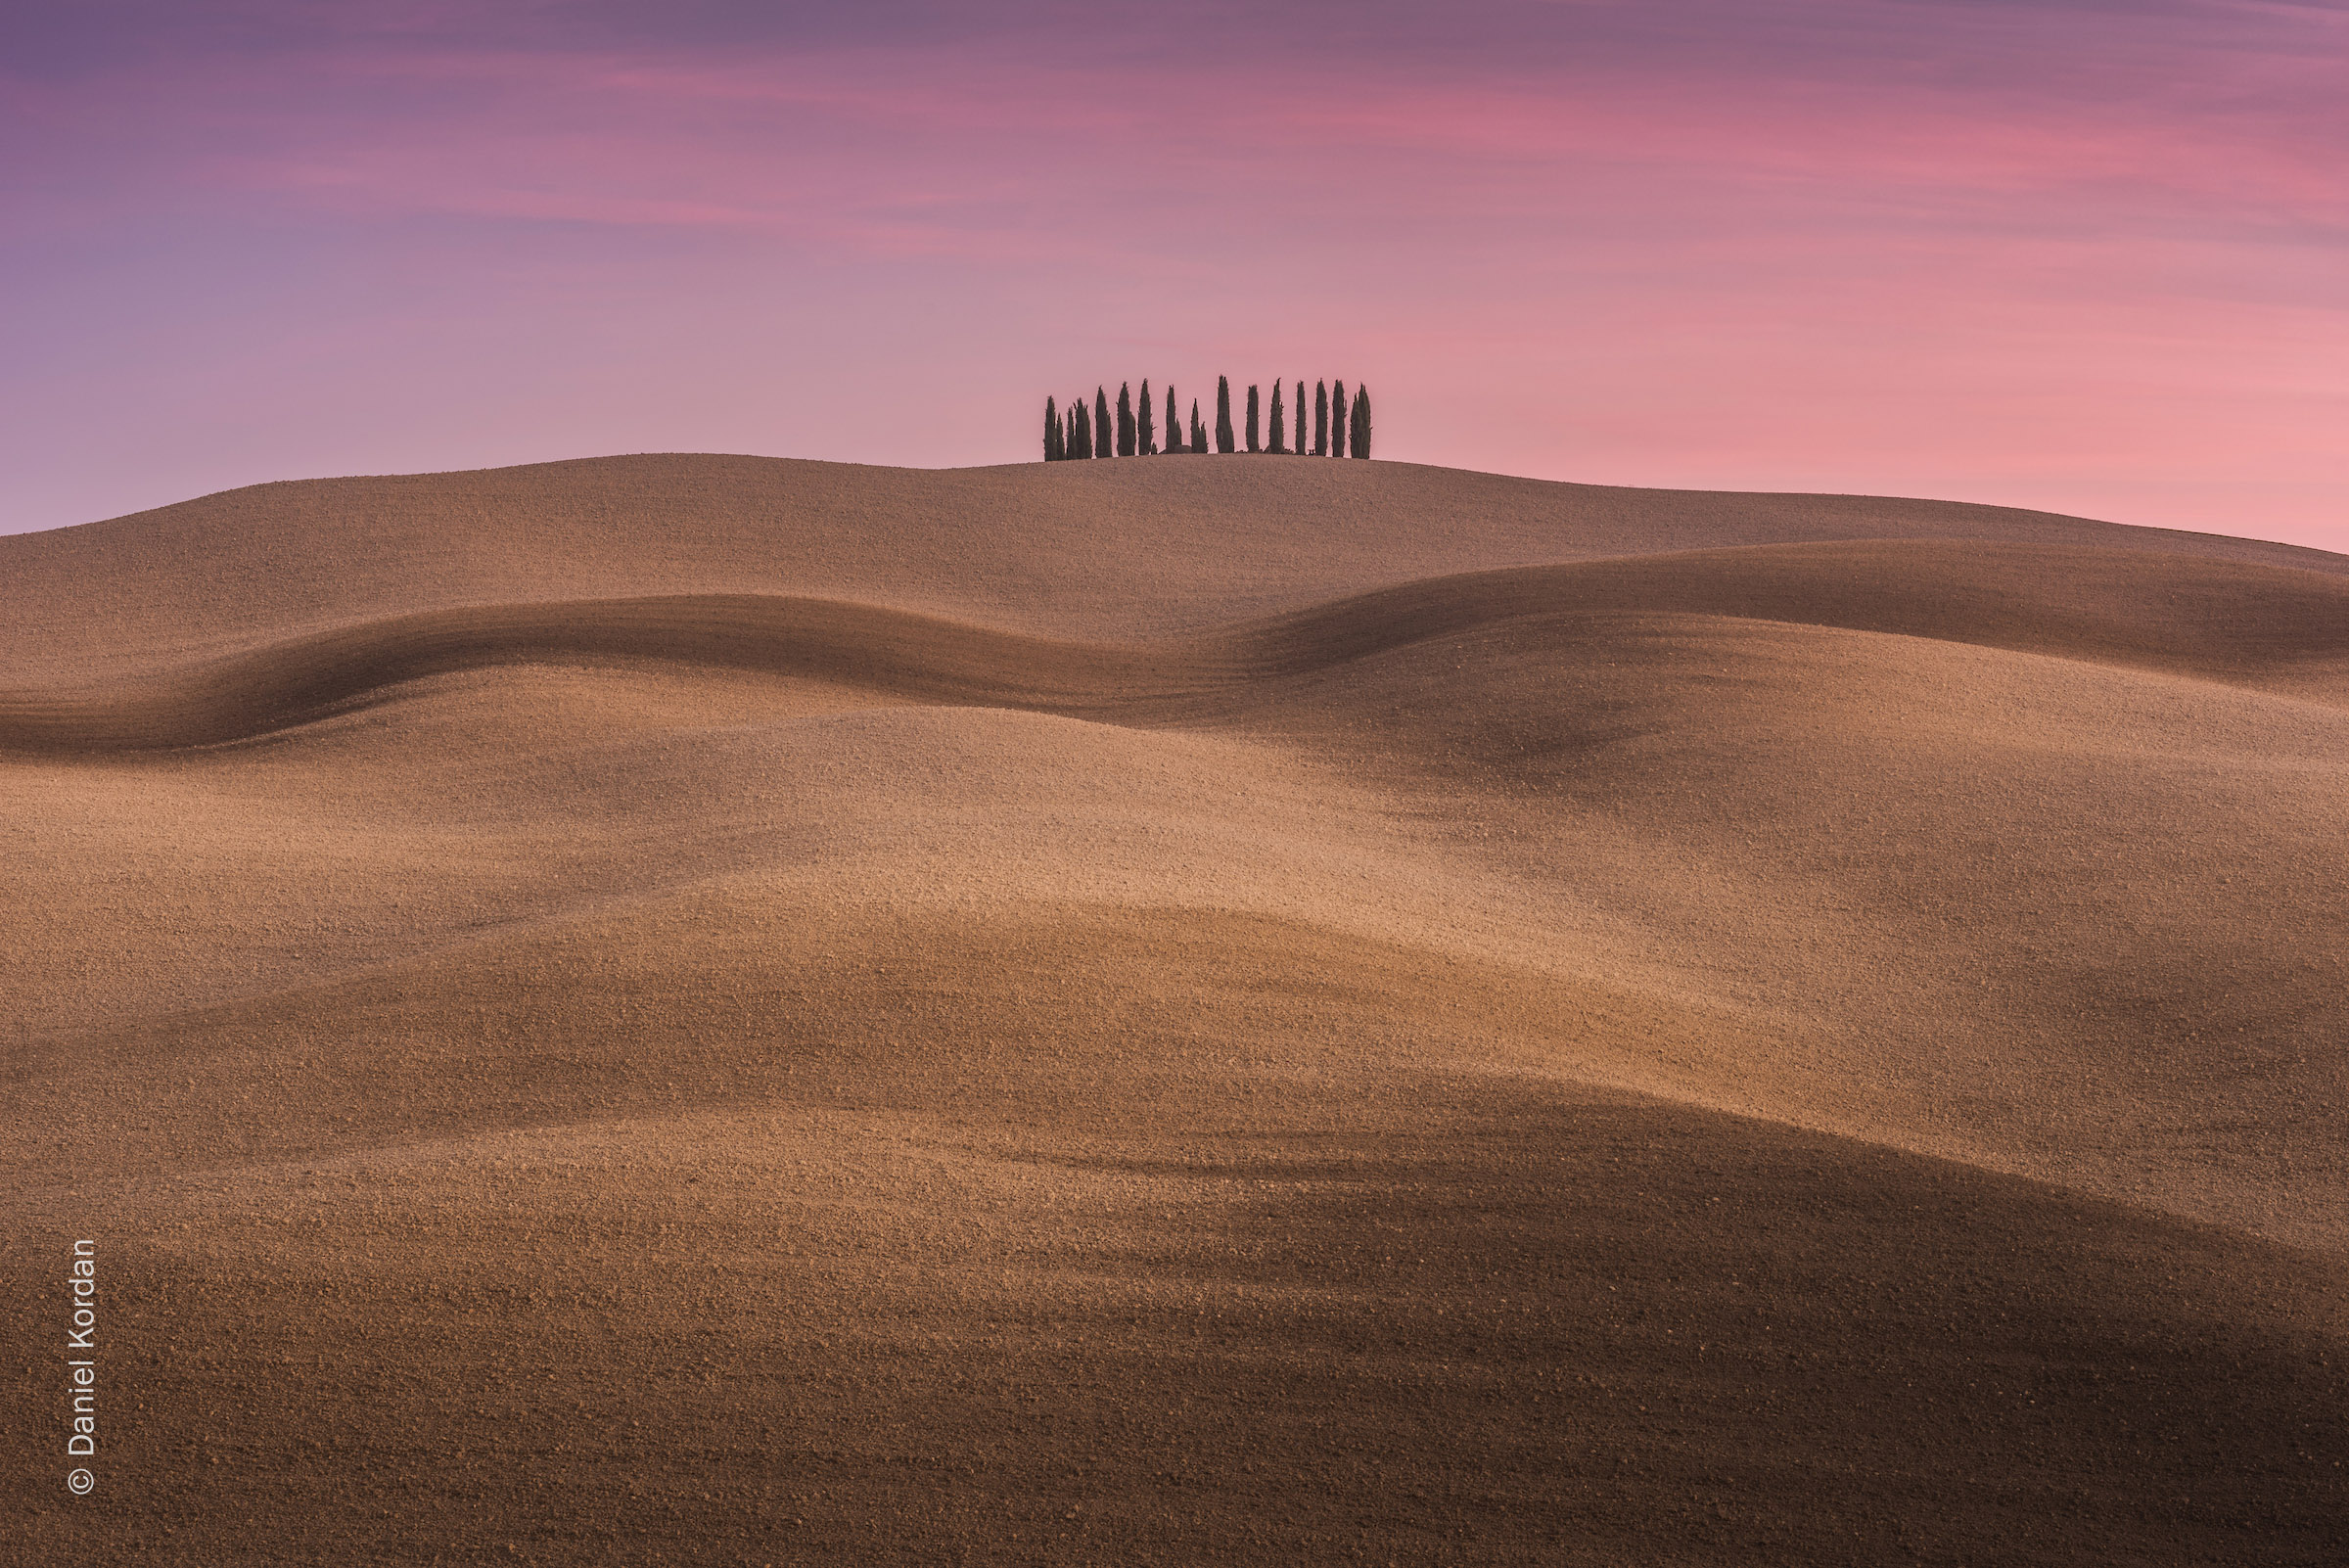
It's a stunningly beautiful place, with rolling hills, soaring Cyprus trees, and field after field grains that add texture and dimension to the landscape.
The storms that roll through Tuscany are a sight to see and present an opportunity for a truly dramatic landscape photo.
Sunsets in this part of the world are often out-of-this-world spectacular, too.
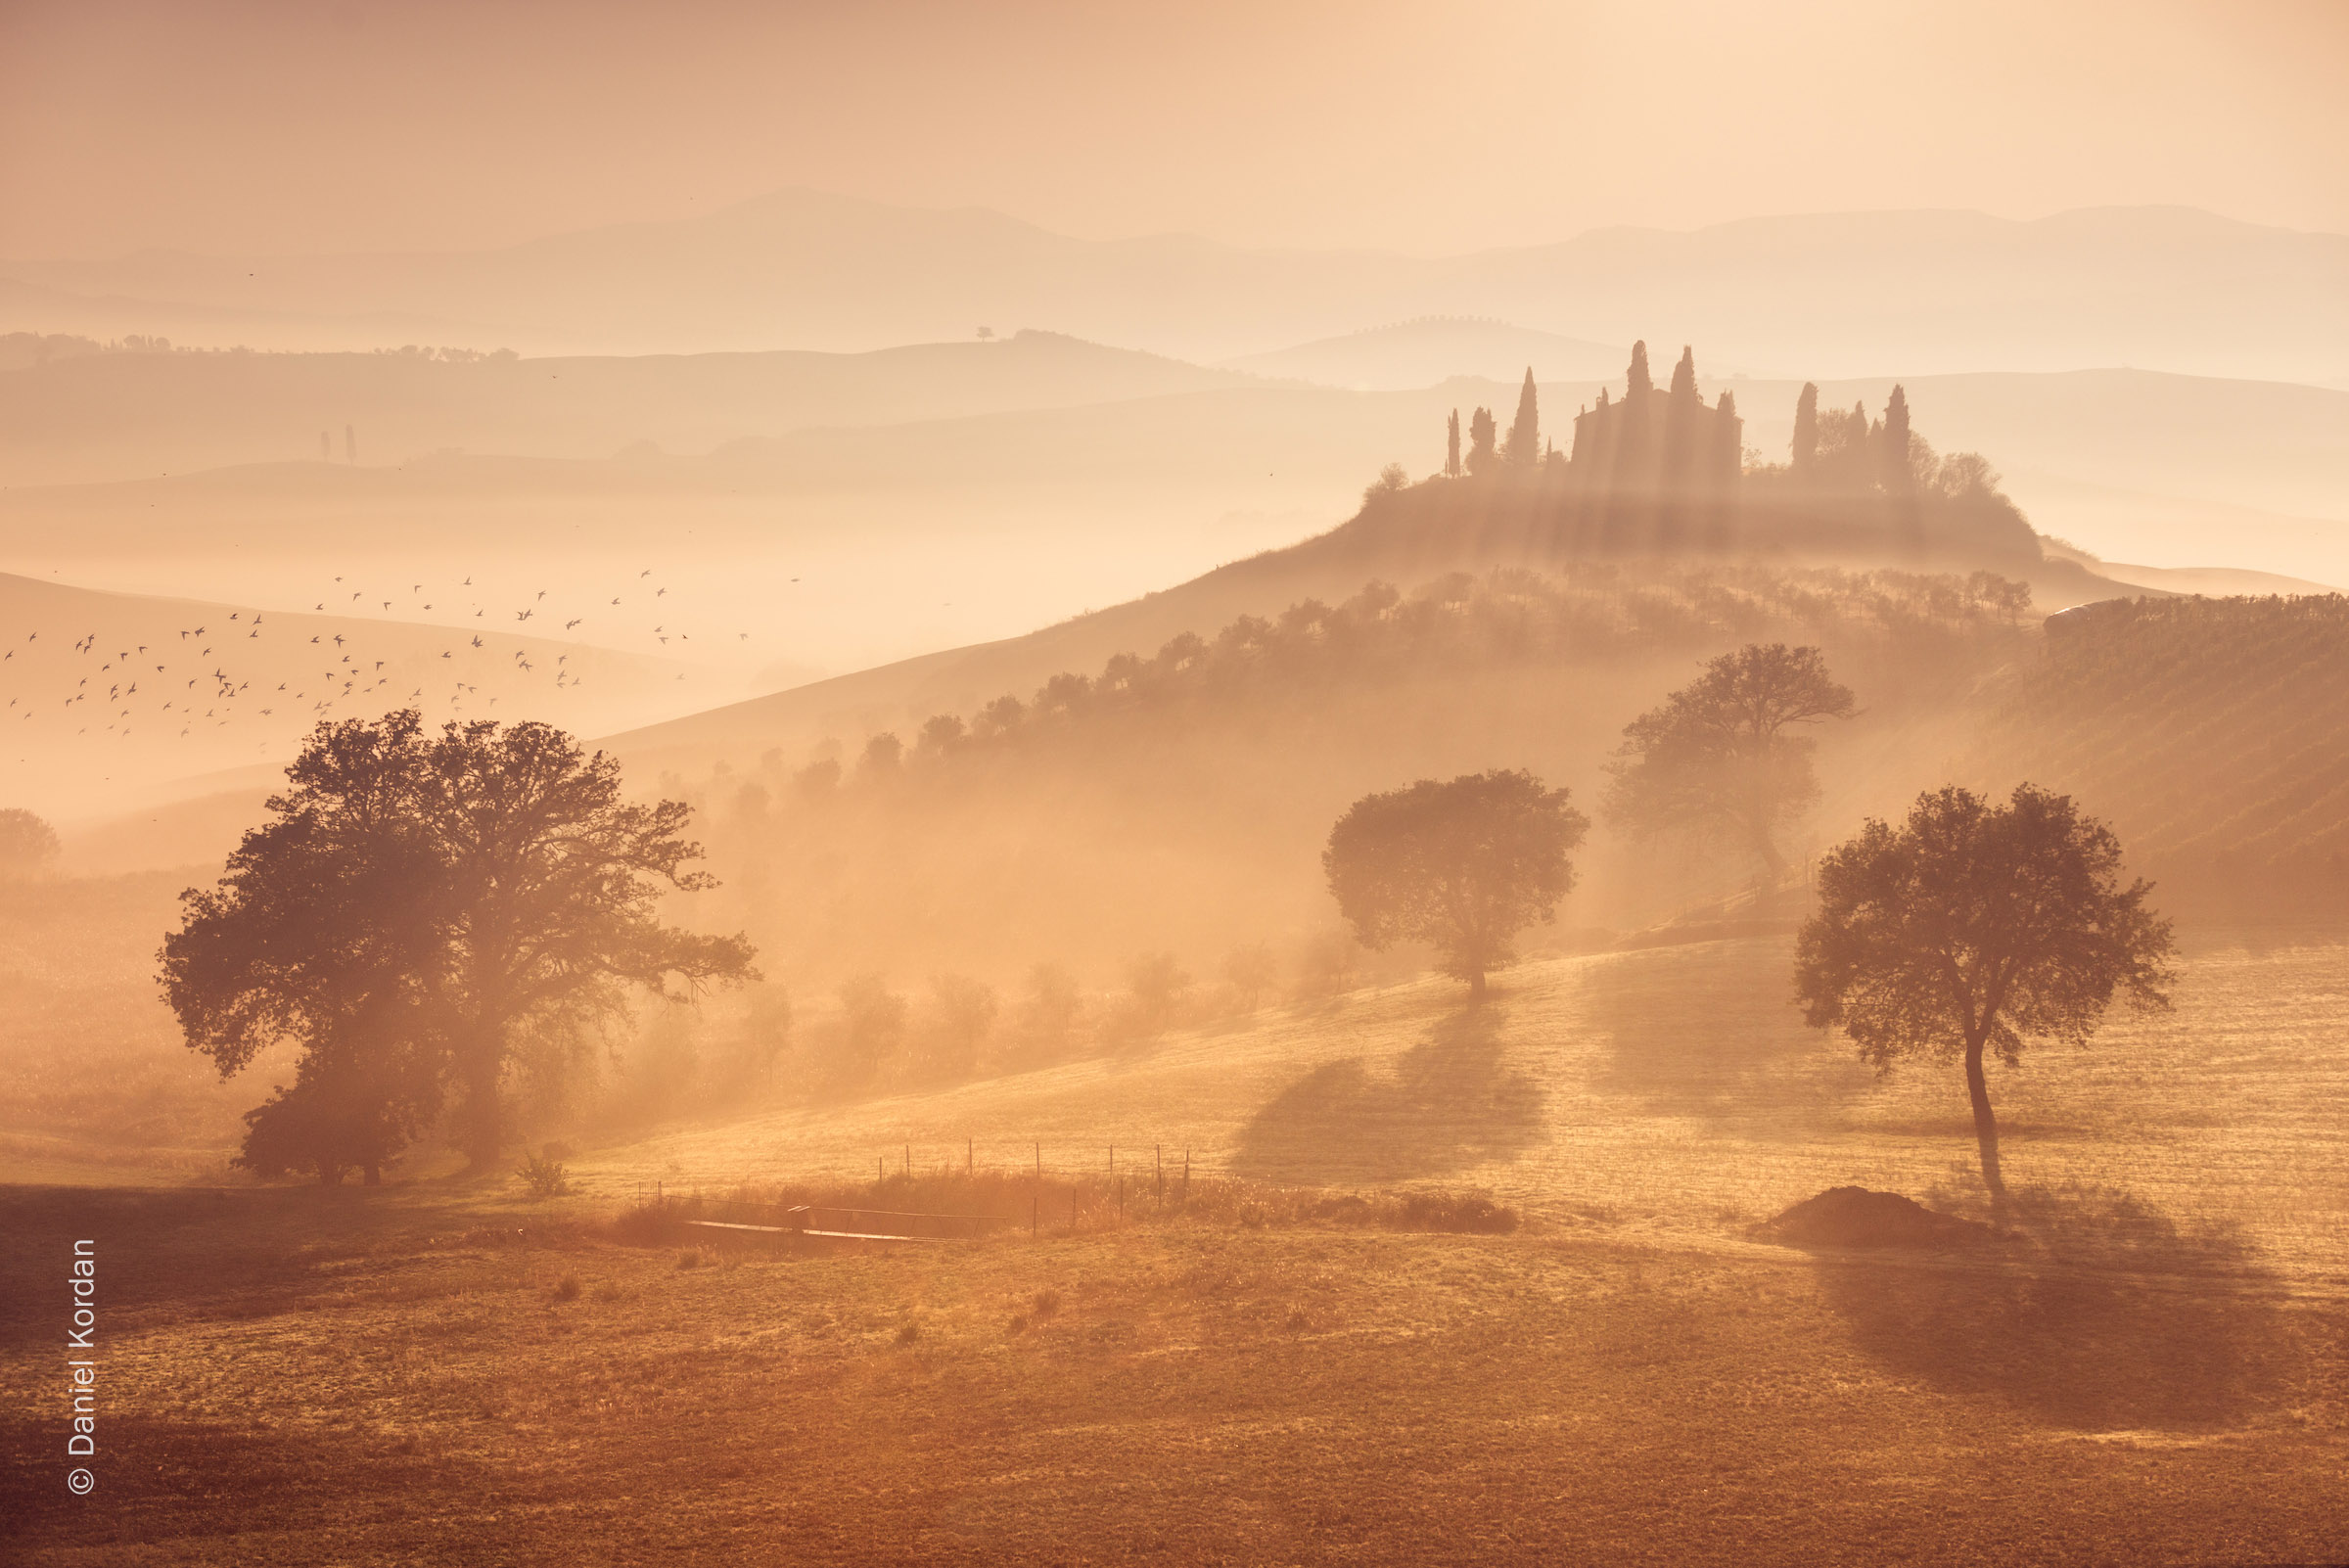
Combined with these natural features, Tuscan landscapes also have beautiful manmade elements.
Long, winding roads over the hills are a perfect leading line that adds depth to a photo.
Generations-old homesteads add character and charm to a Tuscan landscape as well.
That's to say nothing of the rich culture, history, and tradition of the area, as well as the incredible opportunities to examine world-famous art.

The photos above and below are just a taste of what you might find in Tuscany.
All of these shots are by Daniel Kordan, who processed each image using Luminar.
If you're unfamiliar with Luminar, it's an affordable ($69 at the time of this writing), that is both easy to use and has a ton of powerful tools. In fact, some of Luminar's filters are powered by artificial intelligence, so you can literally improve your photo in a matter of seconds.
Luminar has presets or "Looks" to help you get the editing process started, and there's also pre-defined Workspaces that have common tools to tackle certain tasks, like editing a landscape photo or a portrait.
Daniel's photos are proof positive of what can be done in Luminar!
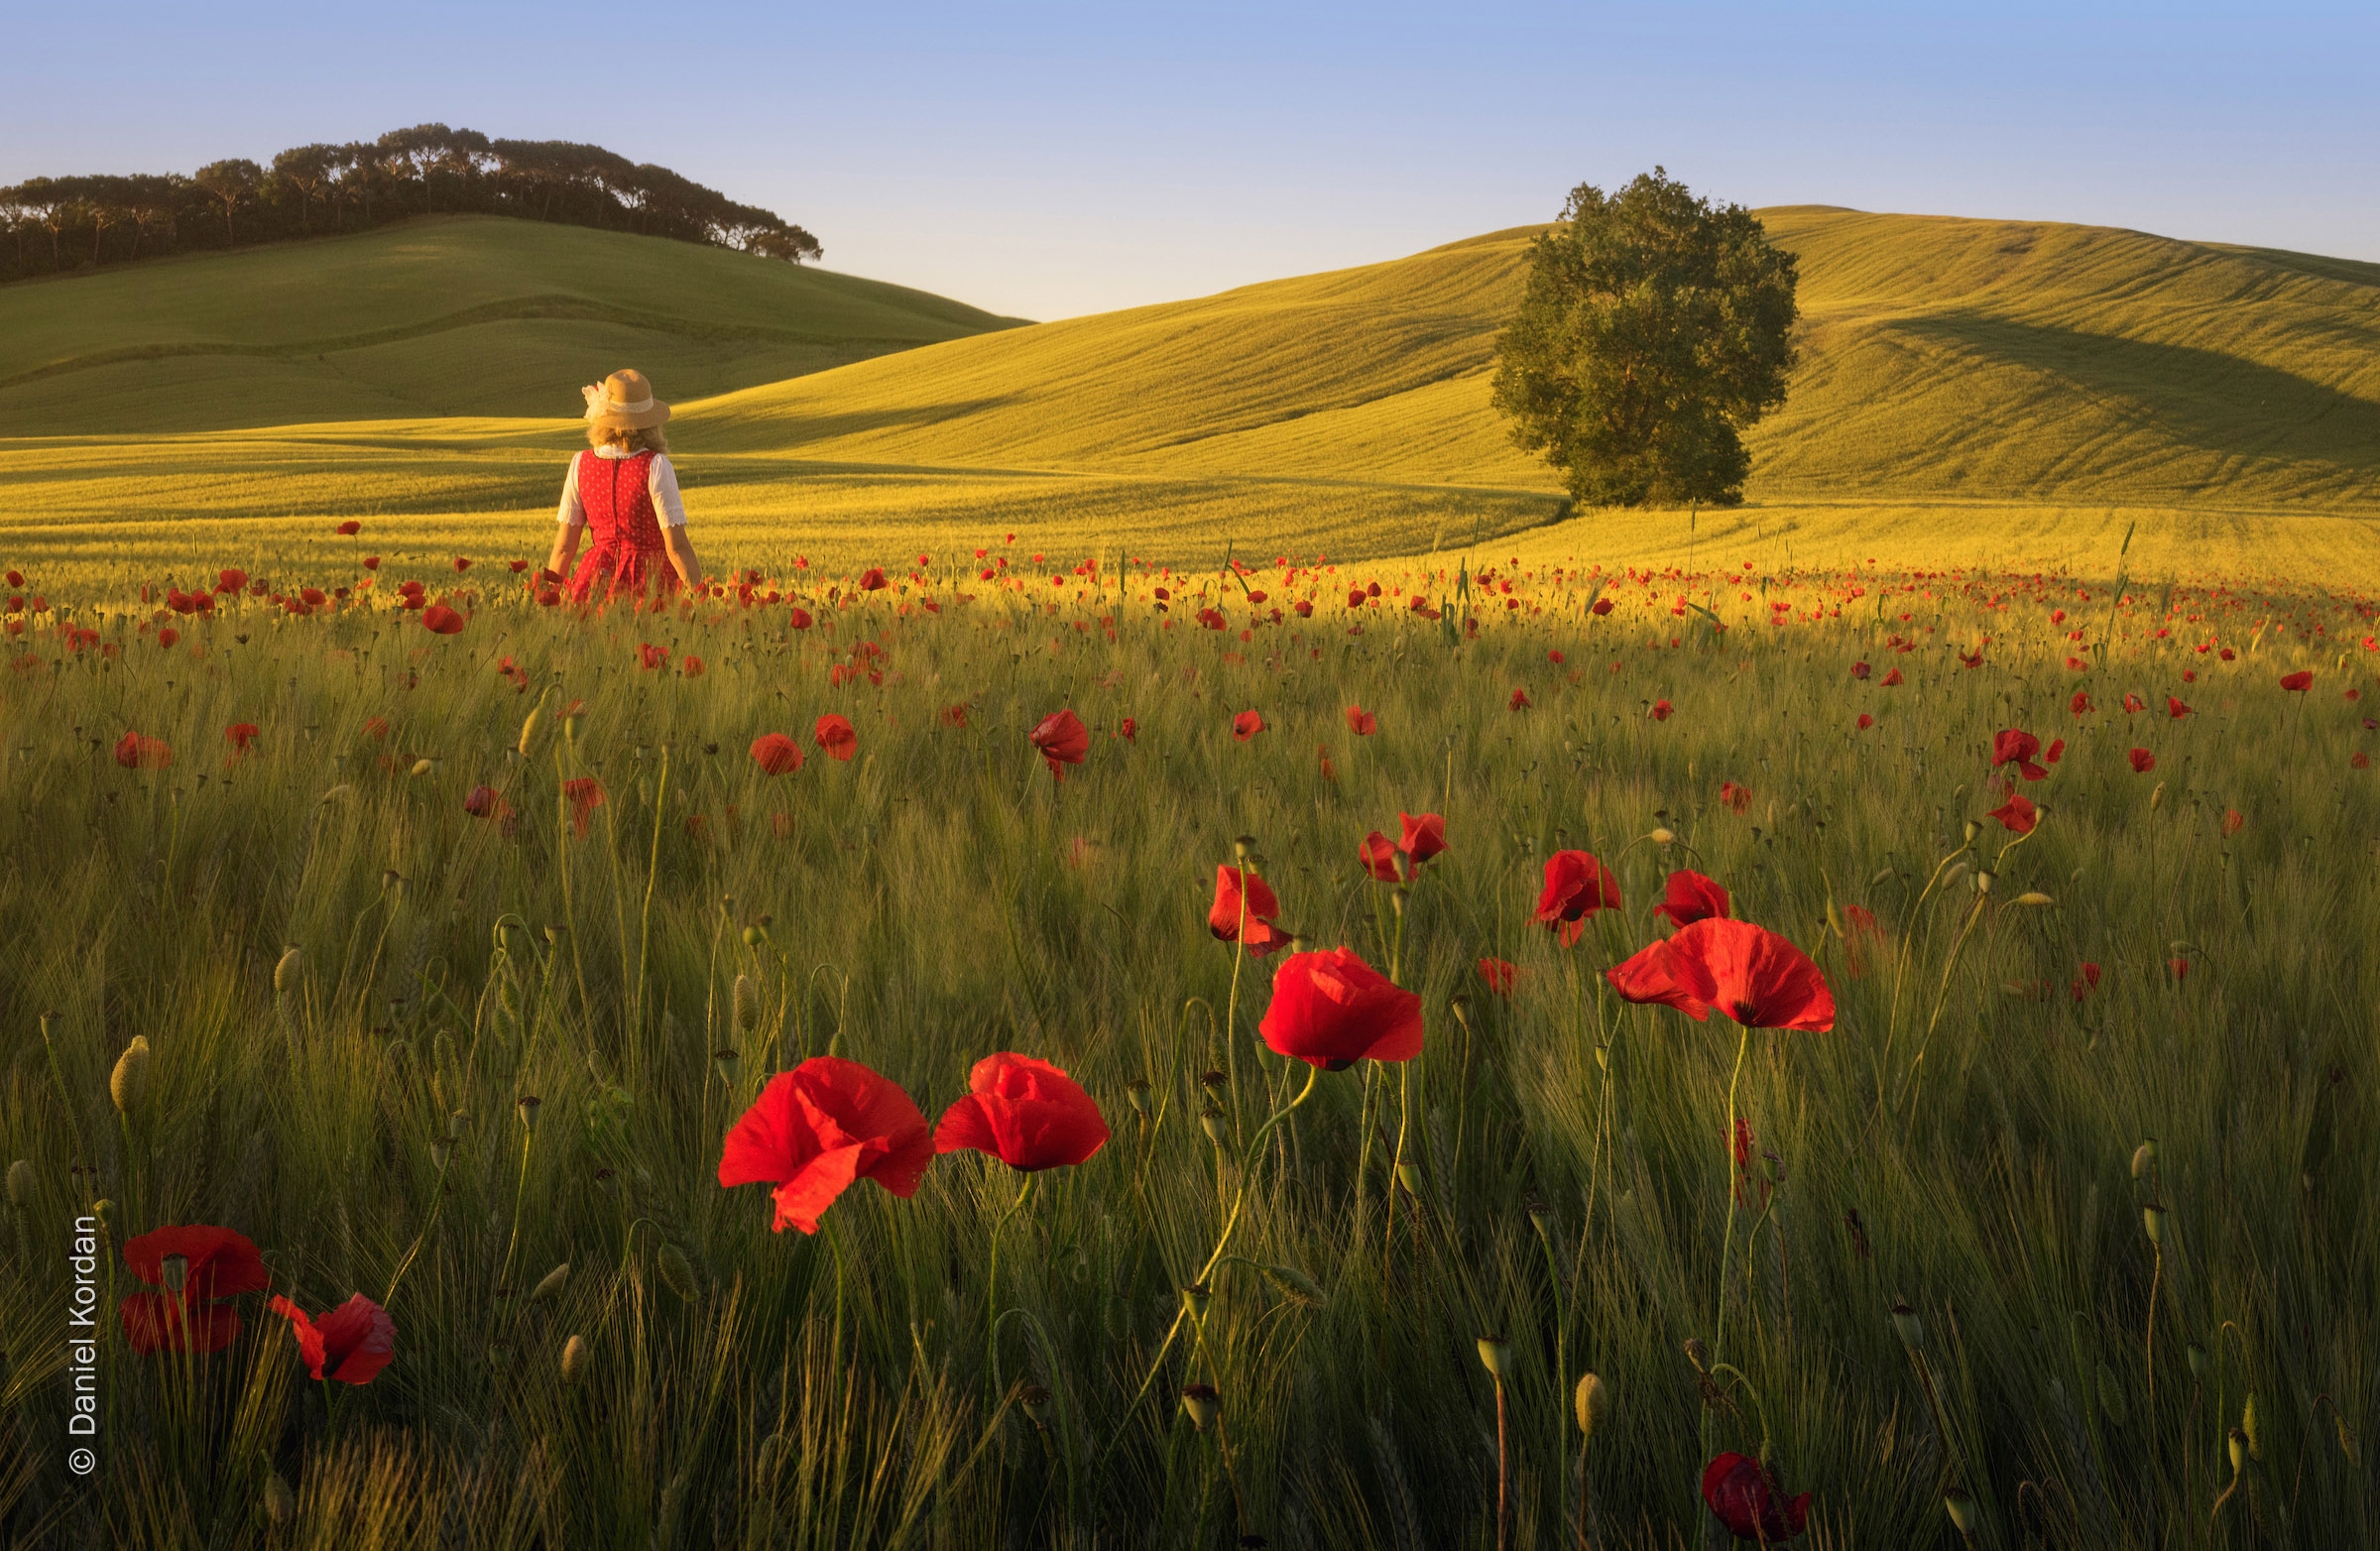
Tuscany Flower Photos
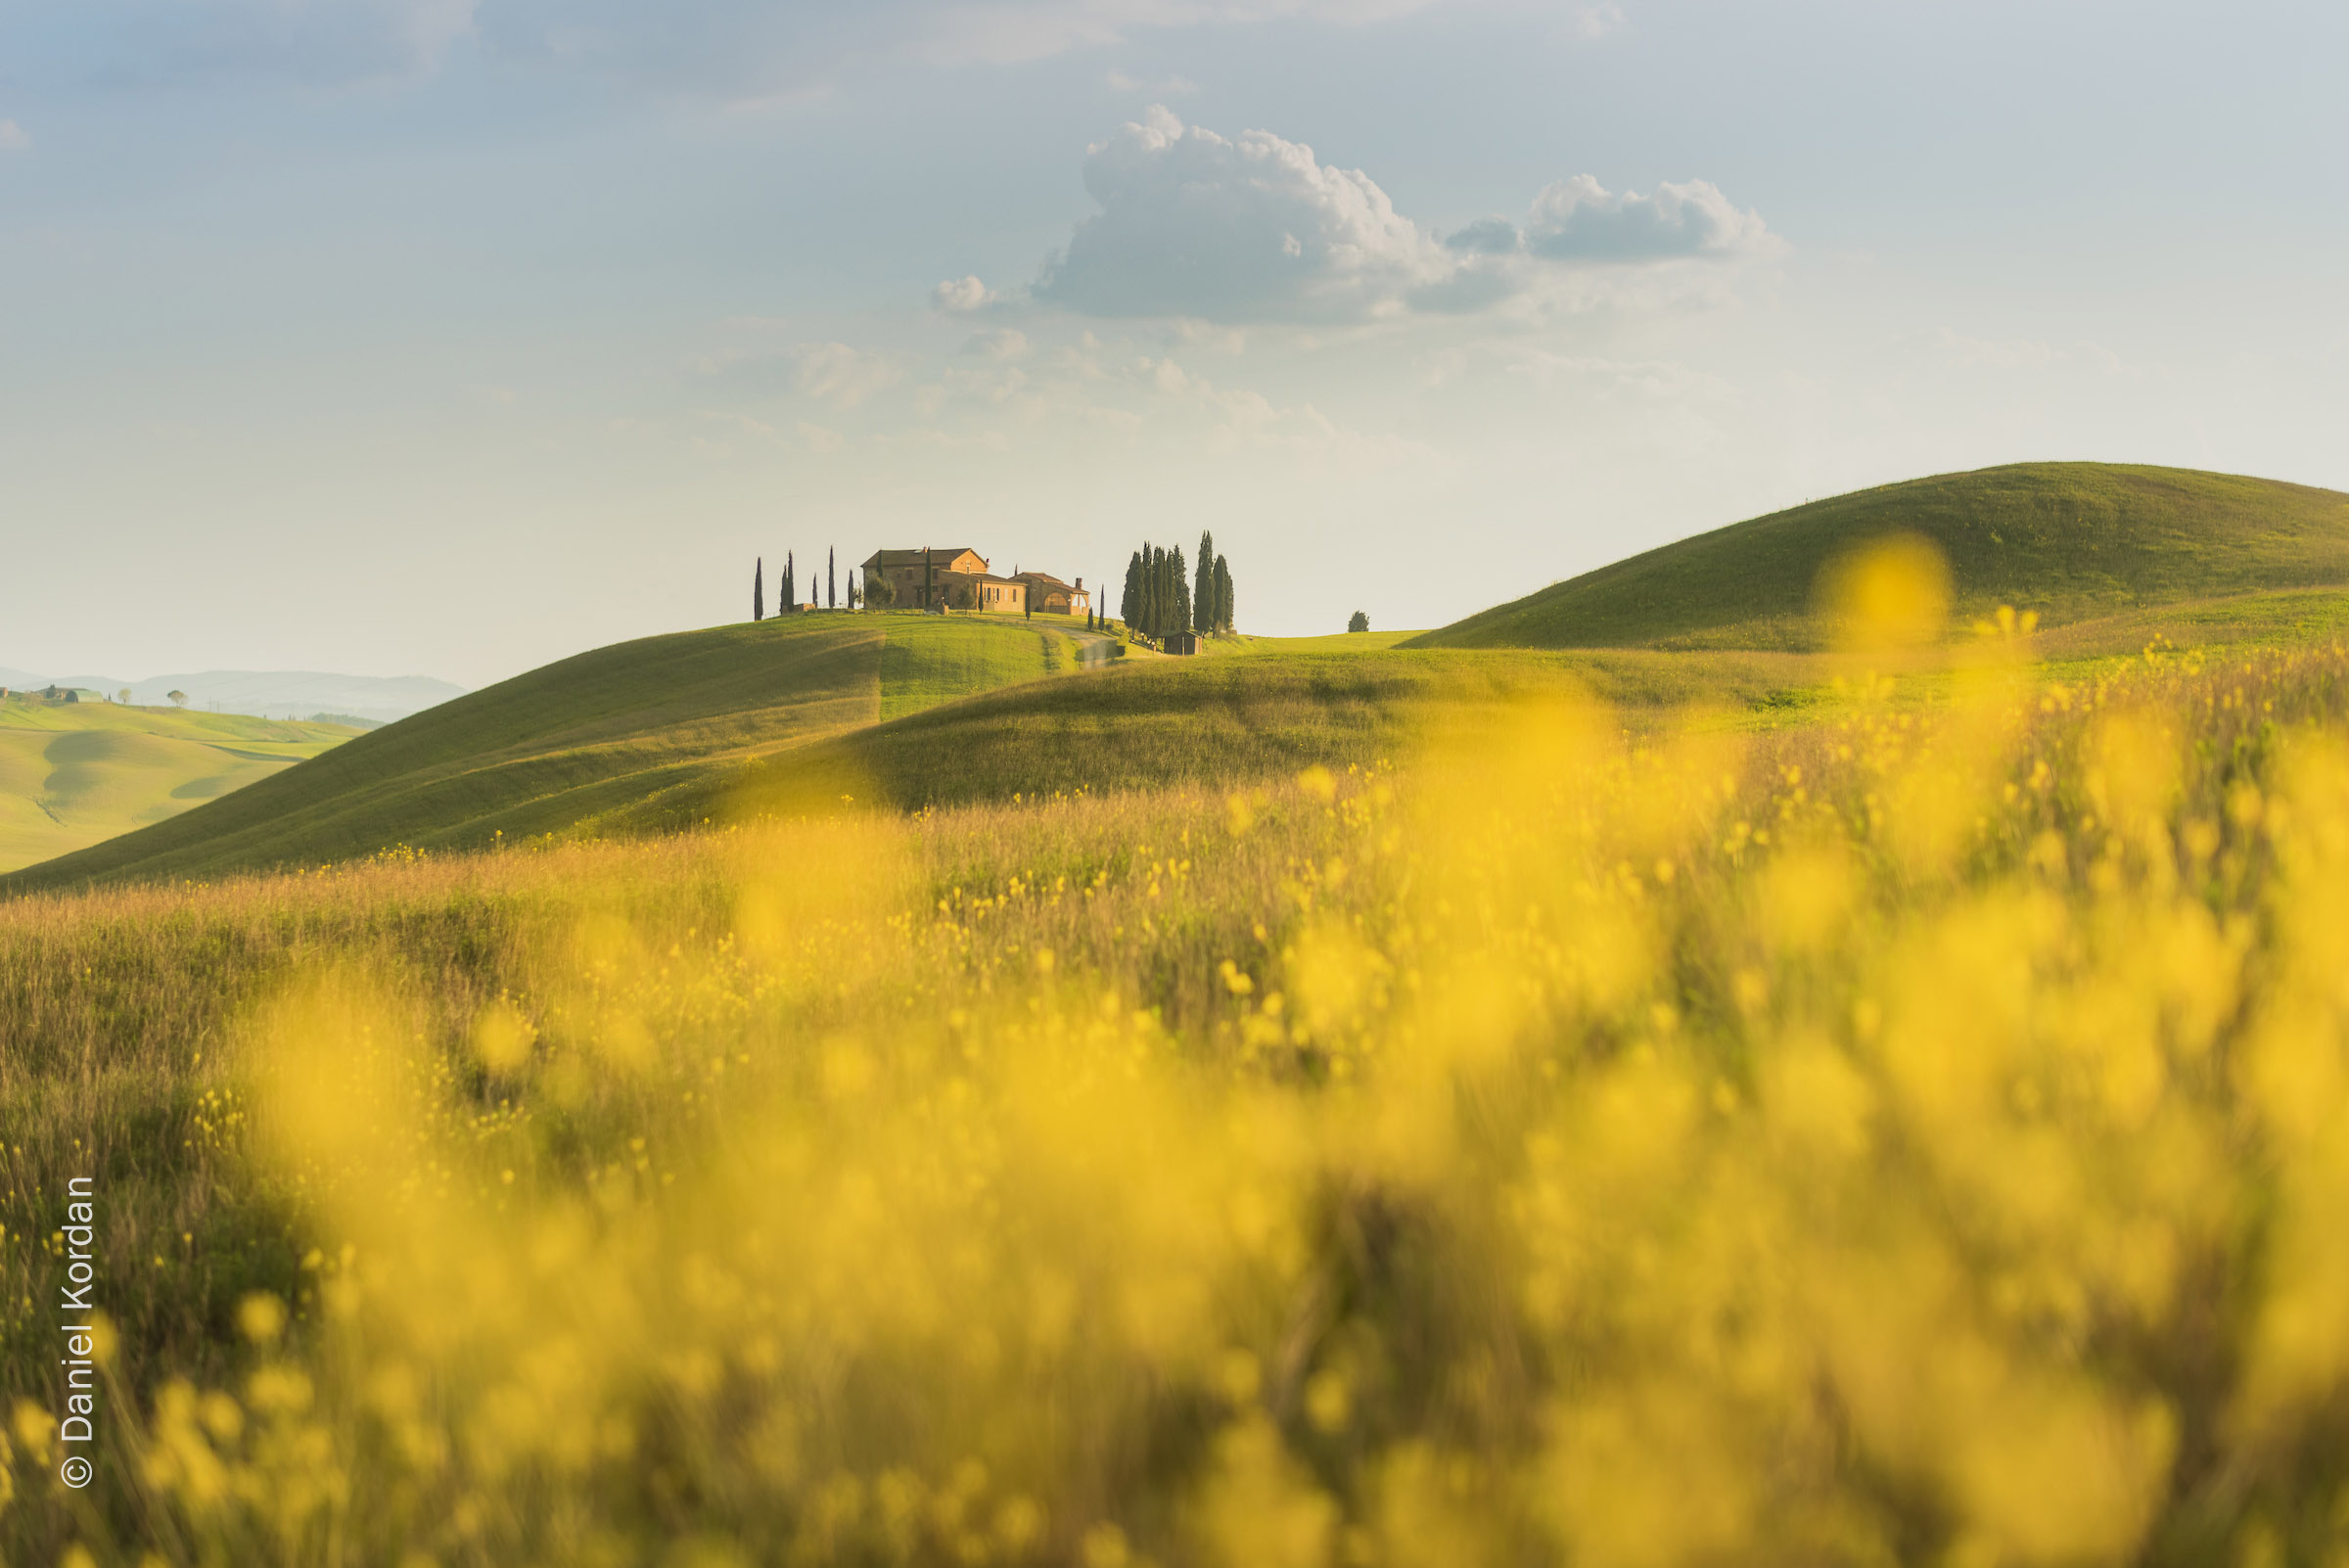
Photos of Rolling Hills in Tuscany

We Recommend
10 Mesmerizing Photos of Iceland
Beautiful Iceland Photos
There's no mistaking it...
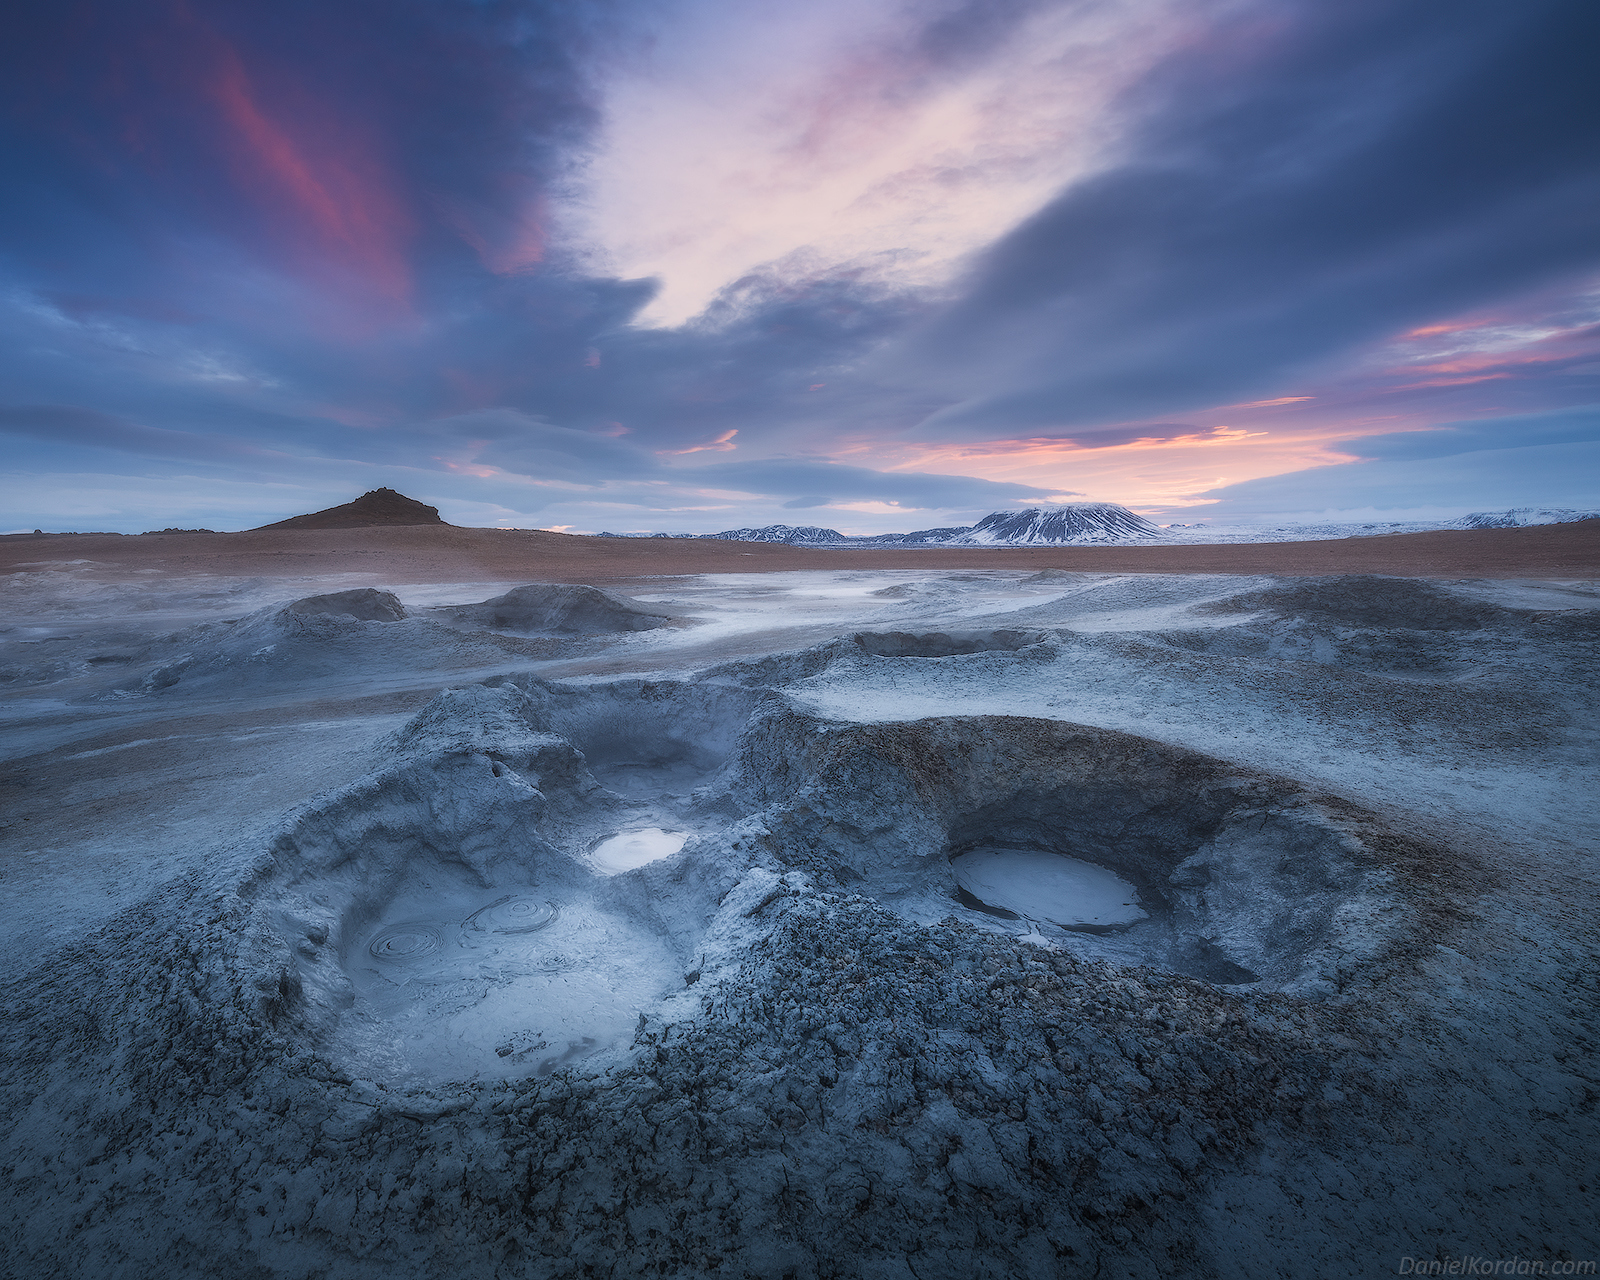
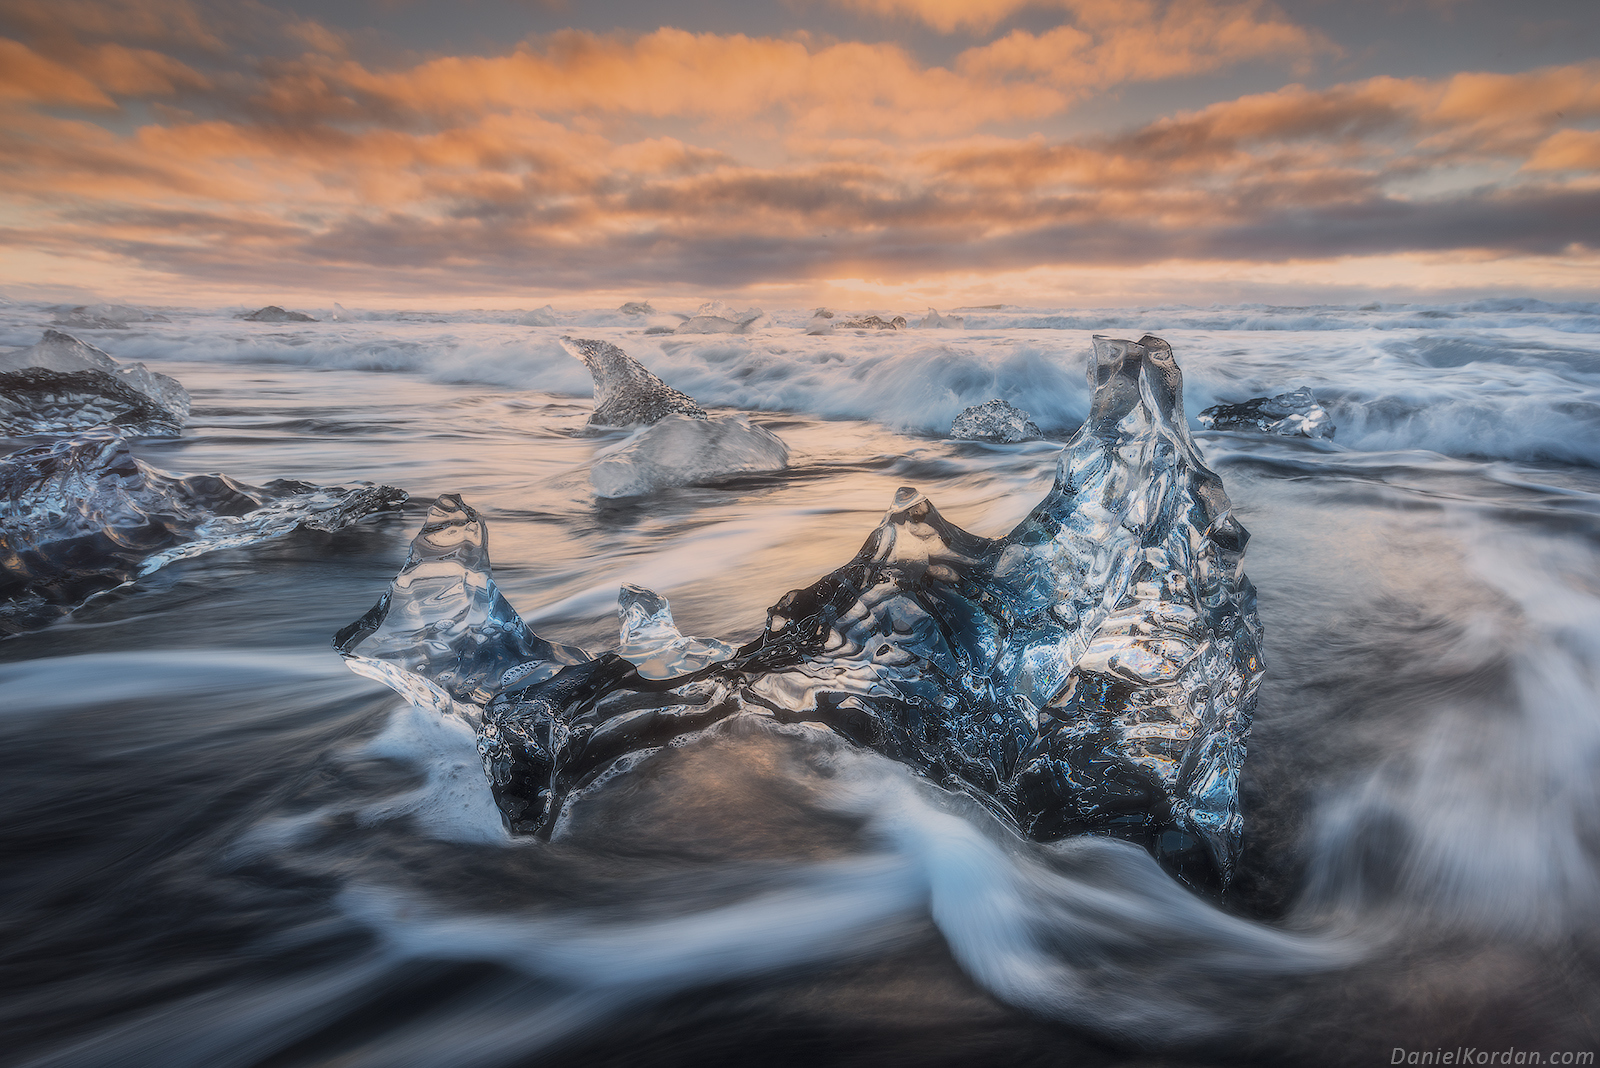
Iceland is a landscape photographer's paradise with an incredible array of scenery that's a delight for any photographer.
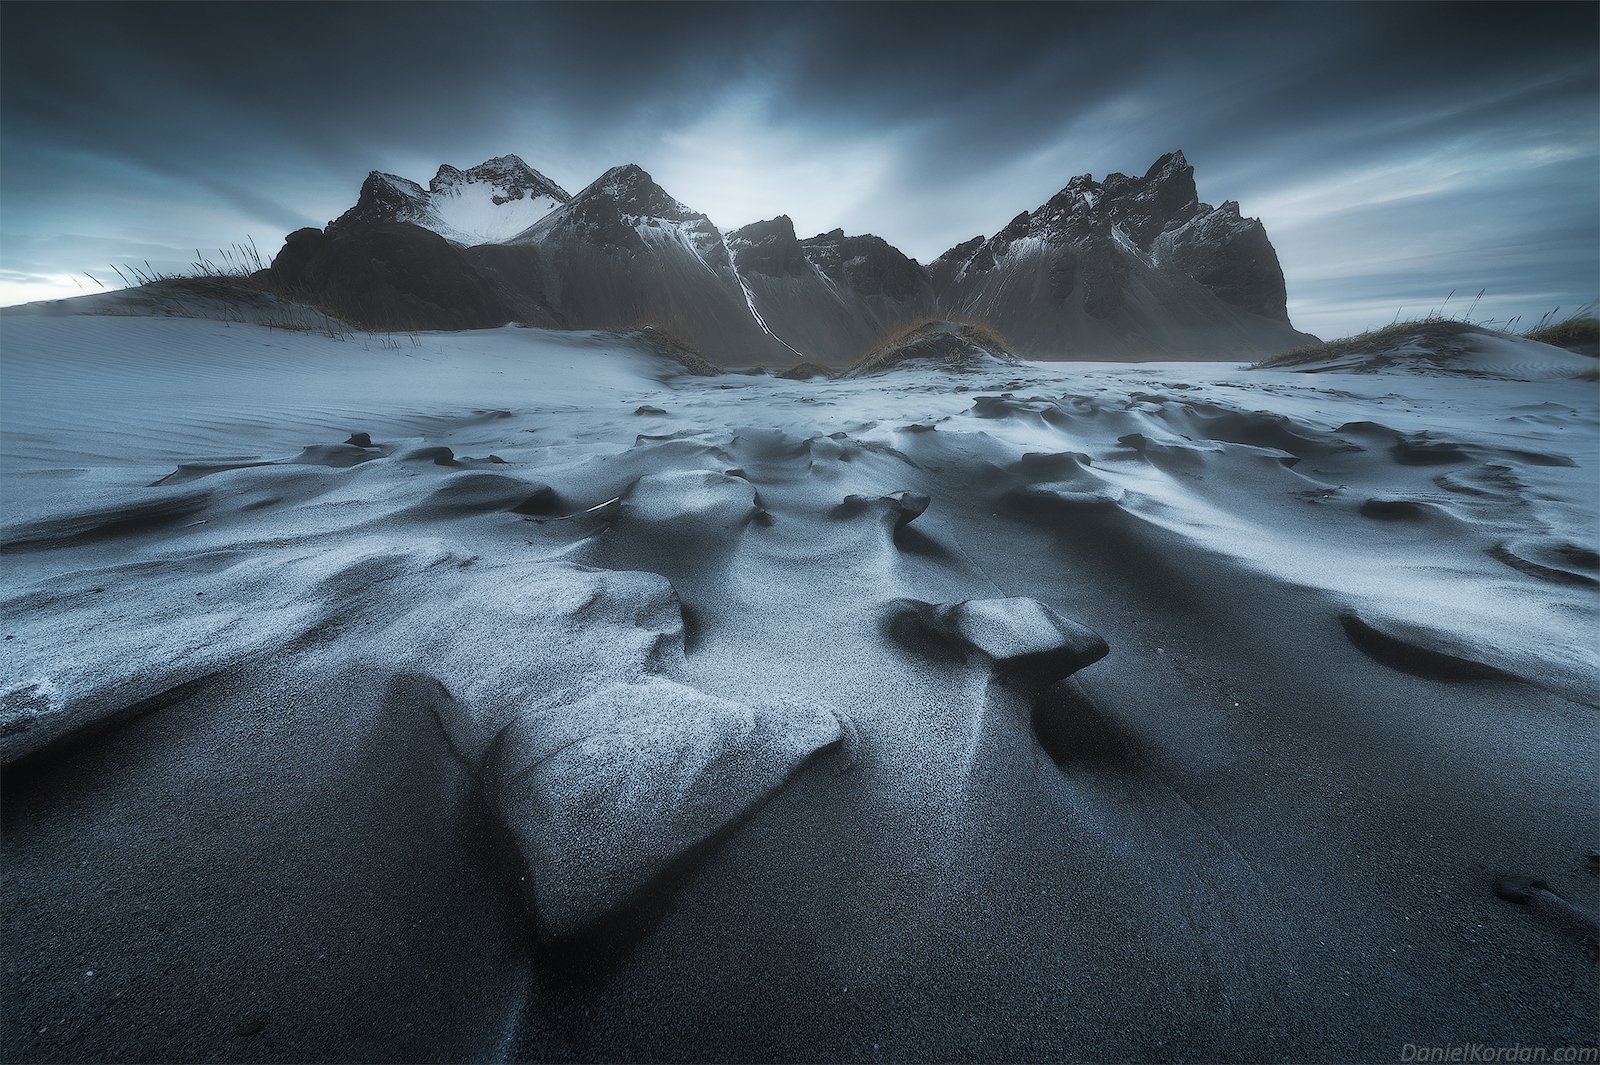
From volcanoes to glaciers, black sand beaches to waterfalls, and a wide range of terrain in between, there is no lack of opportunity to take breathtaking photos.
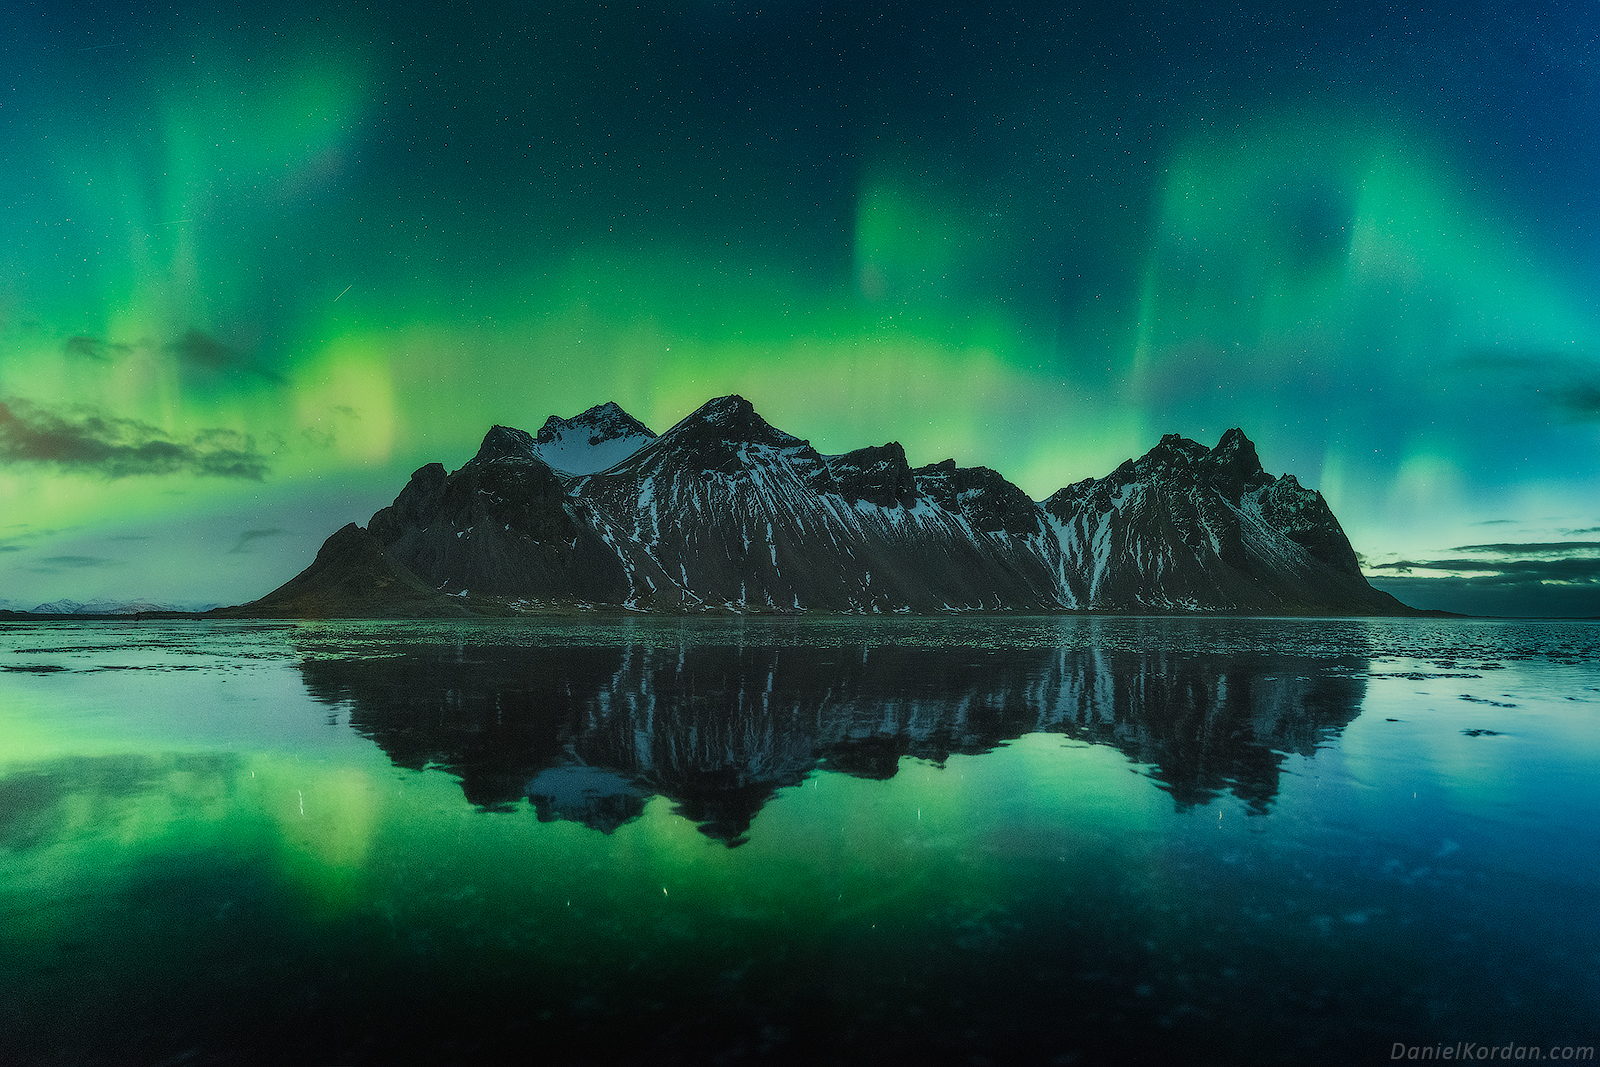
That's especially true when you capture images of these gorgeous landscapes underneath a blanket of stars, the Northern Lights, or a breathtaking sunrise or sunset.
But Iceland isn't just about the vast vistas and rugged landscape features.
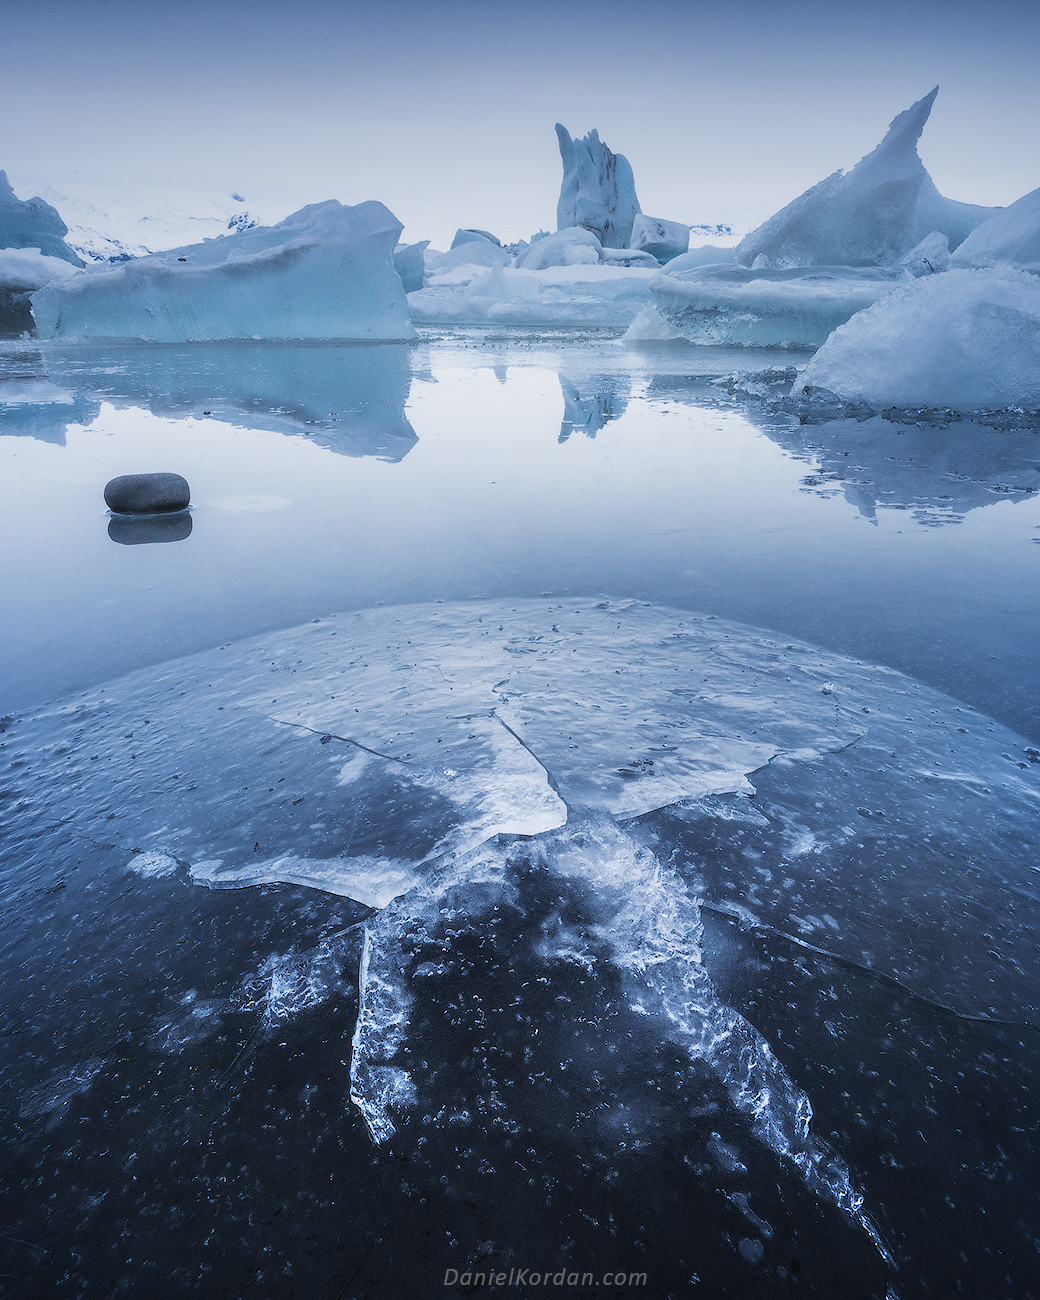
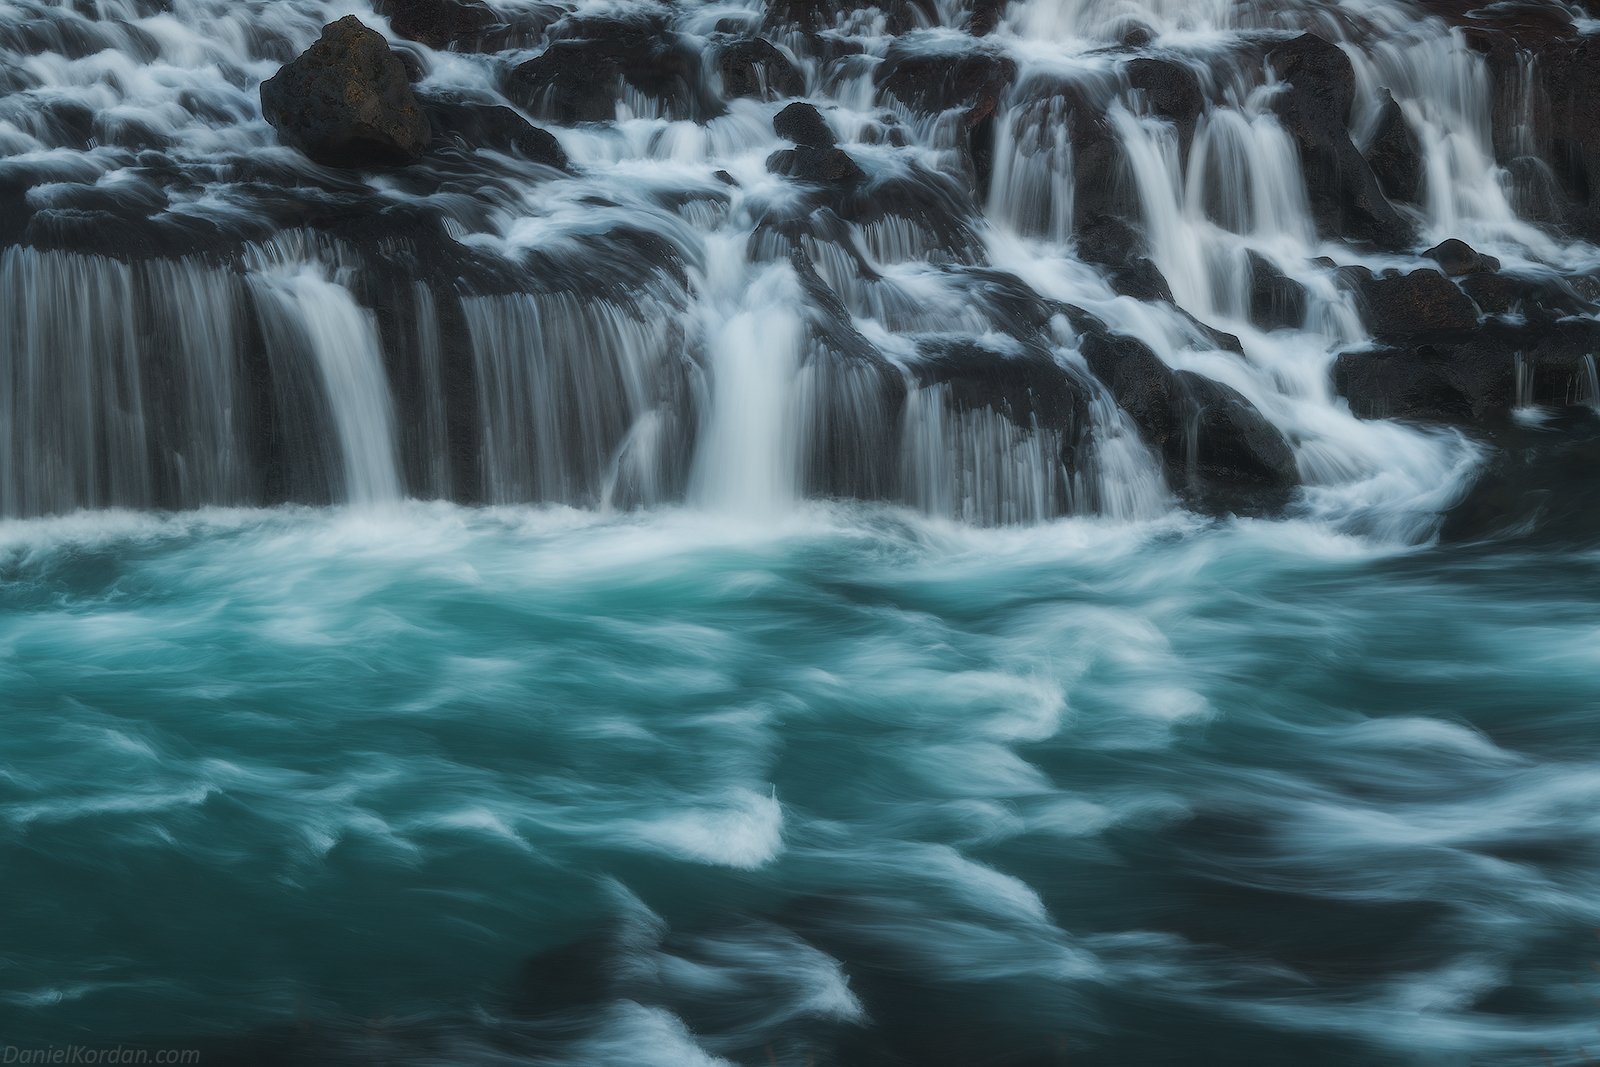
Instead, there is ample opportunity to photograph the small details - the shape and texture of an icy river flowing over rocks or chunks of ice floating in a lagoon.
This combination of big and small, fire and ice, and bright and dark can make for some truly mesmerizing photos.
Below, we've compiled some stunning shots of Iceland by Daniel Kordan.
Each of these images was processed using Luminar, an affordable yet high-powered editor. Luminar includes artificial intelligence-powered filters, presets or "Looks," and Workspaces with content-specific tools for landscapes, portraits, black and white photography, and more, which make editing photos faster and easier while getting jaw-dropping results.
See the images below as proof of that!
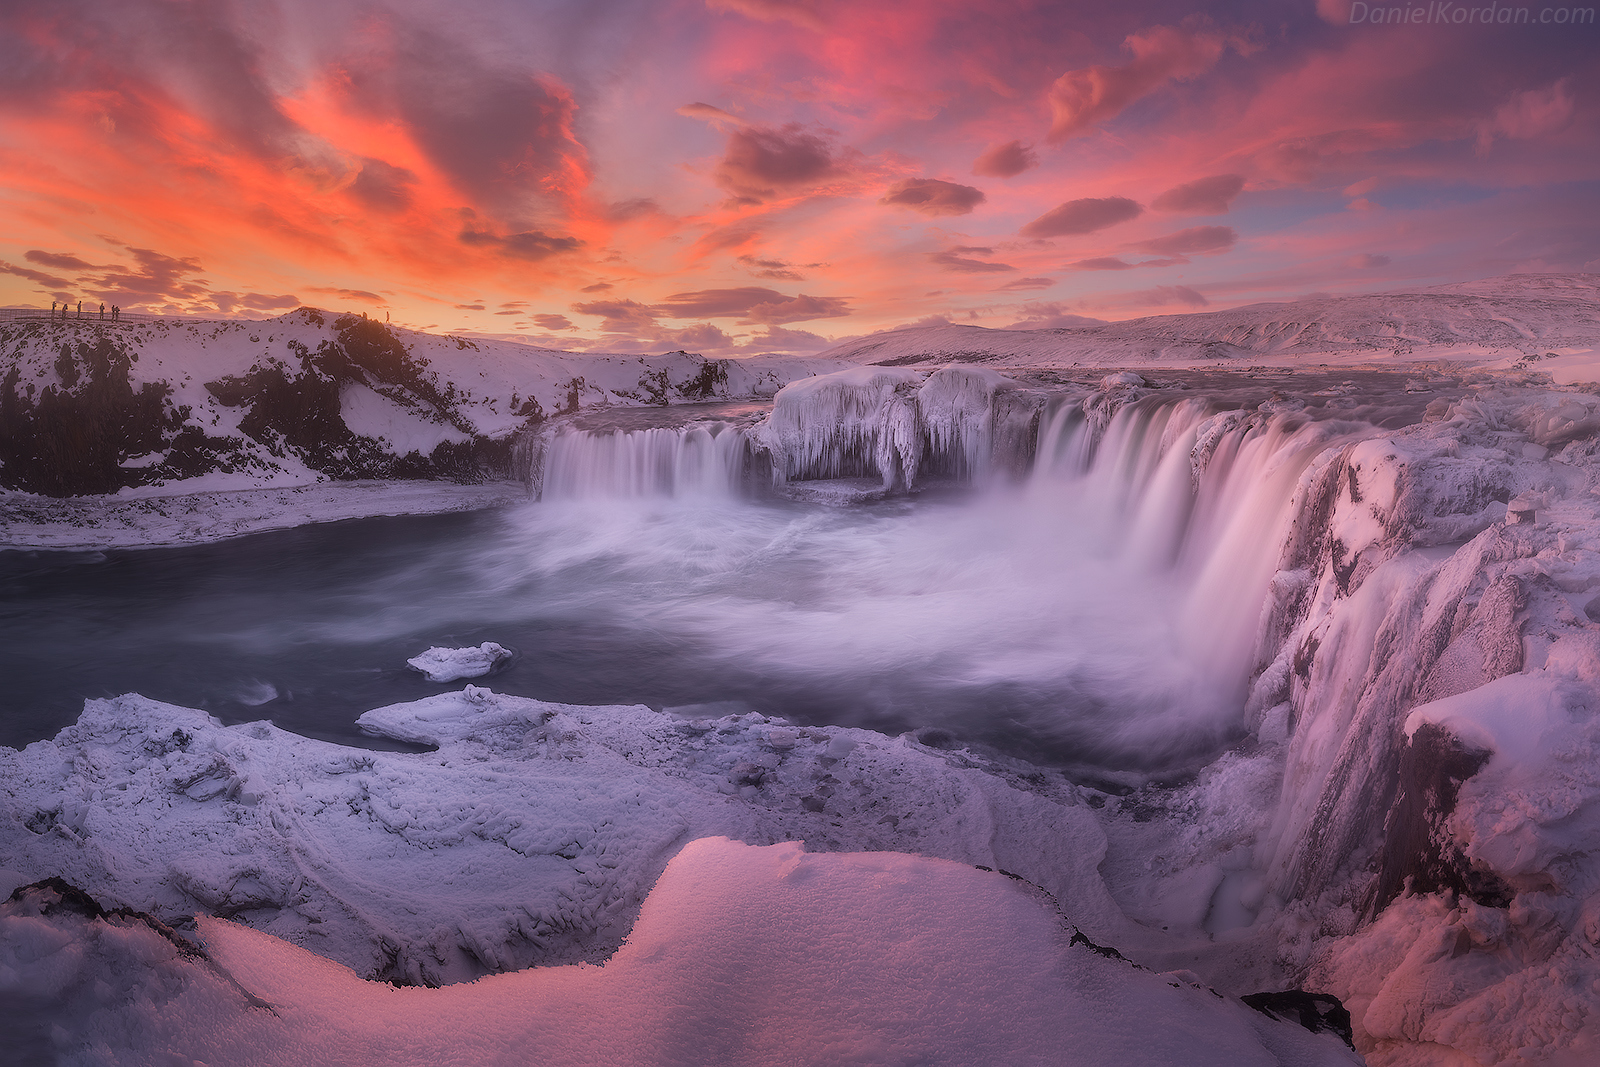
Photos of Iceland Waterfalls
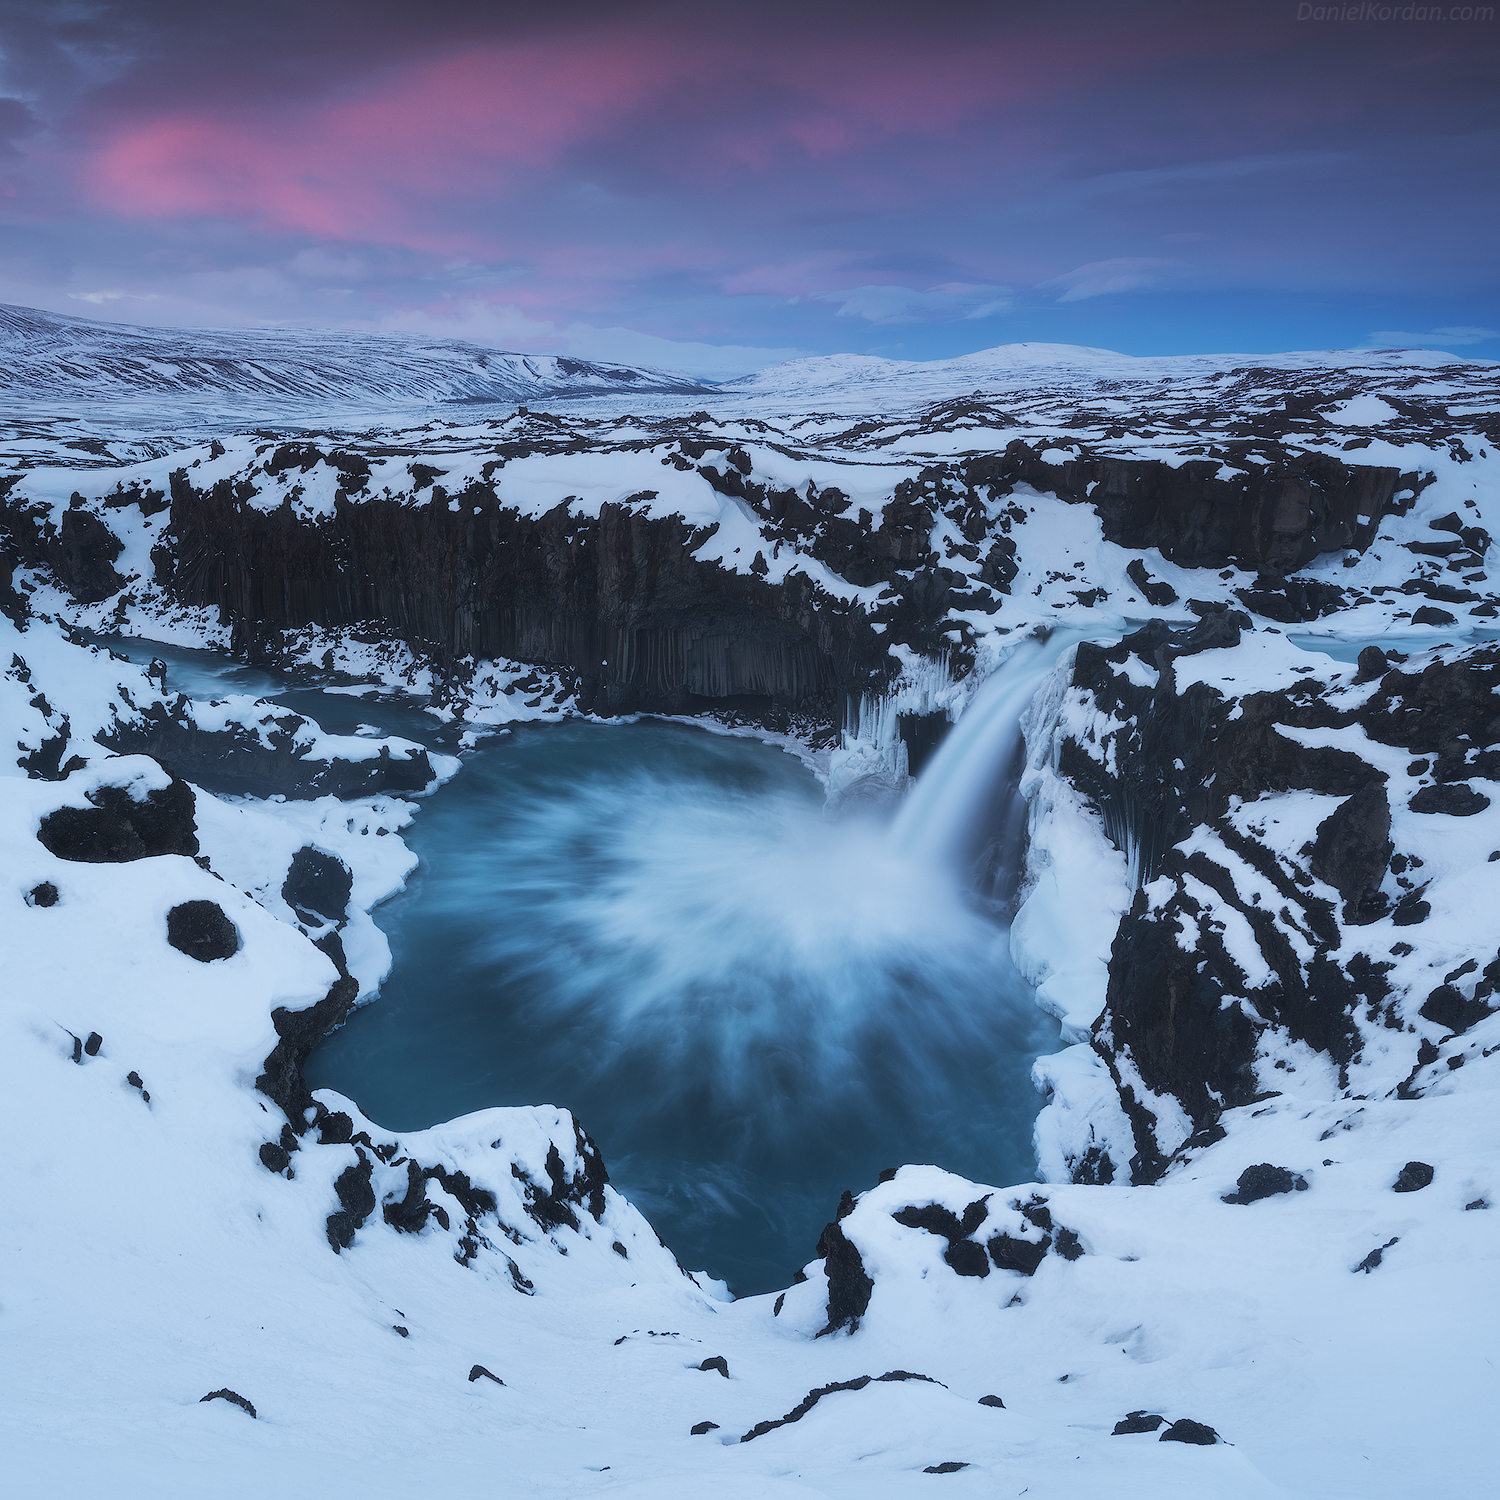
Breathtaking Photos of Iceland Mountains
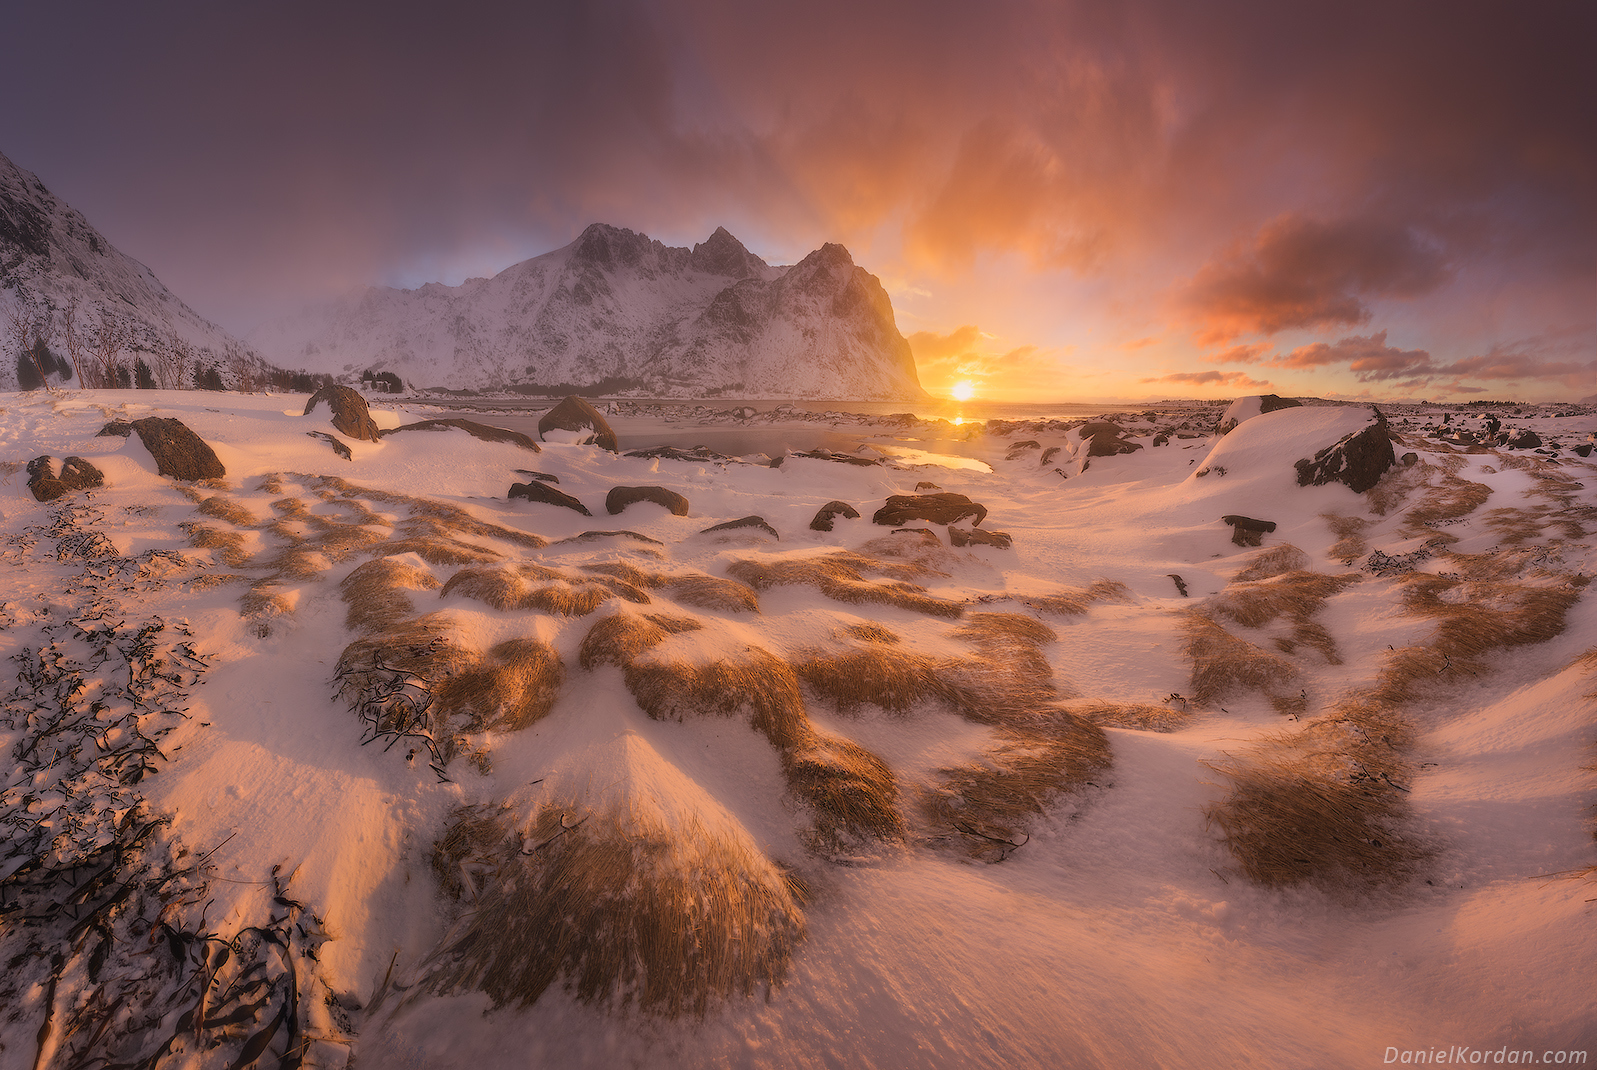
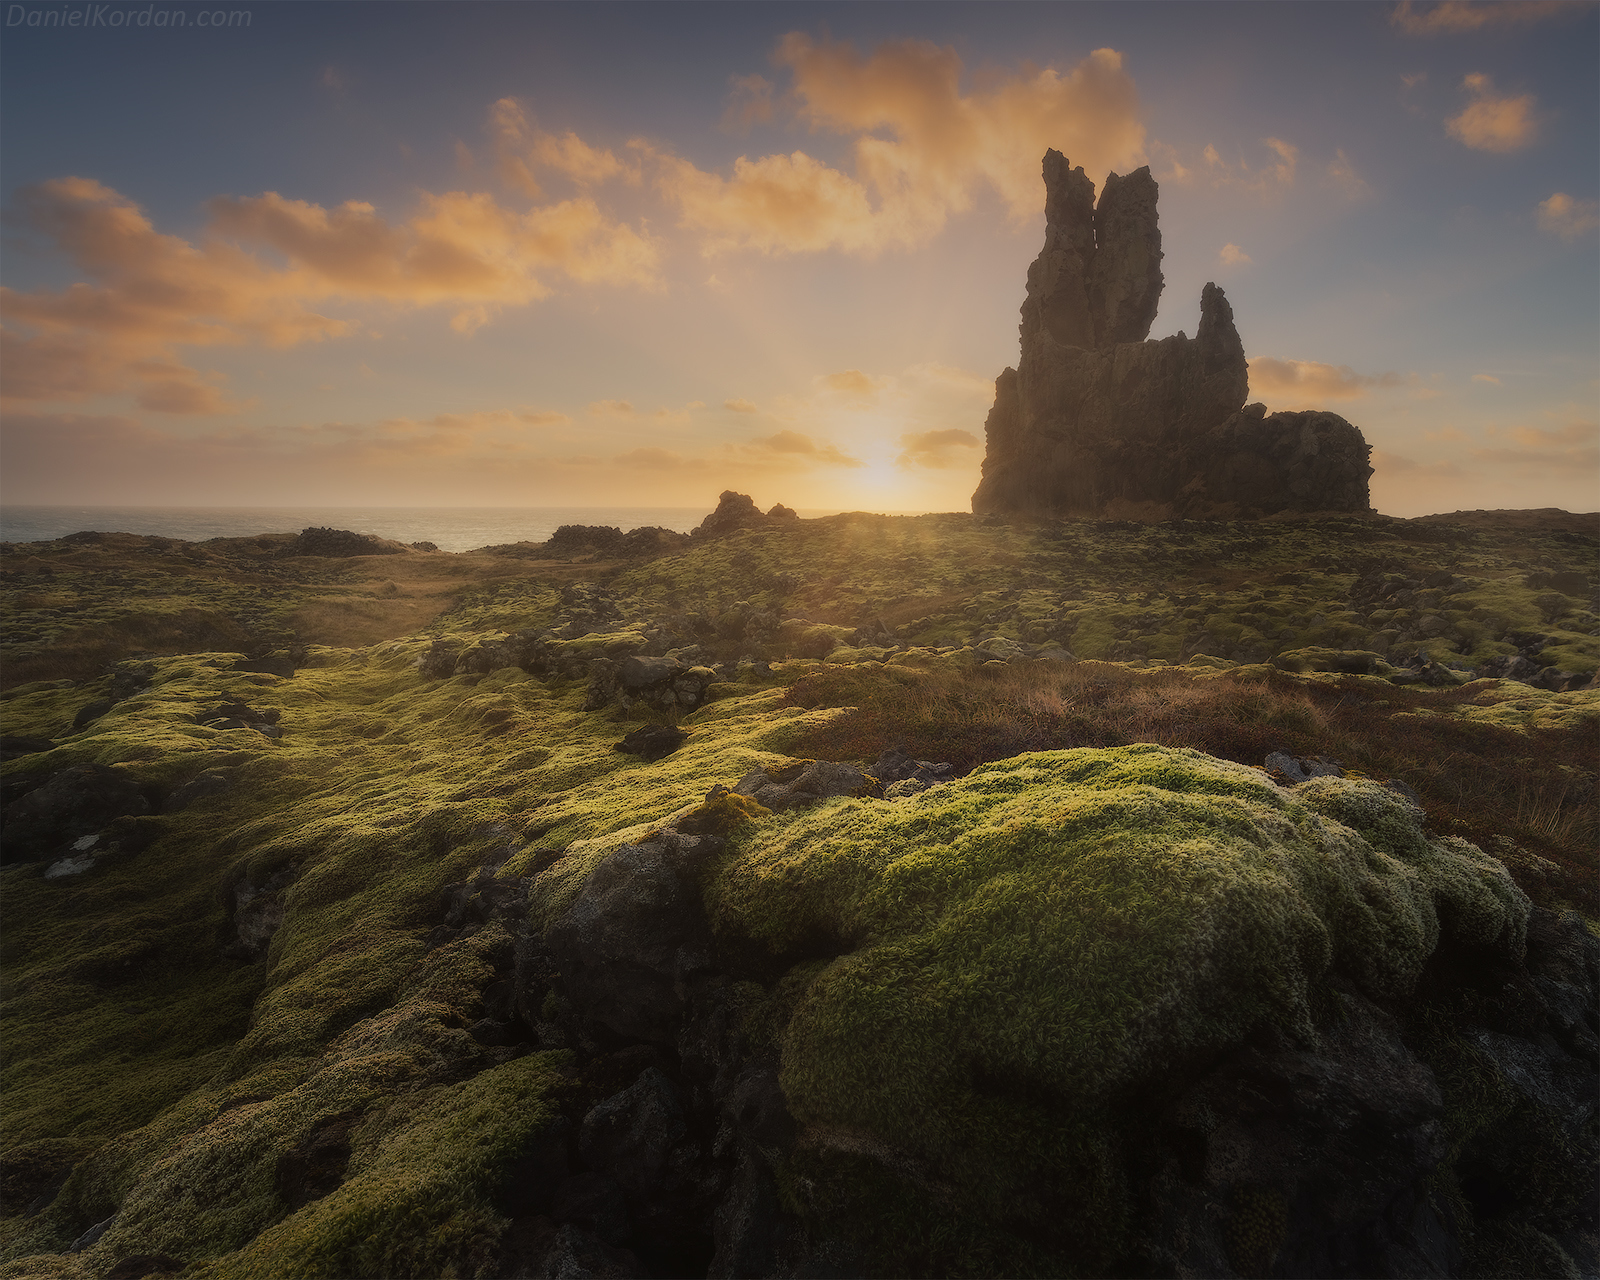
Landscape Photos of Iceland
We Recommend
5 Features We Love in Skylum's Luminar Neo Photo Editor
Today, whether you like it or not, editing is a key part of the photography process. So, if you want to make the most of your photos and improve as a photographer, it’s time to start taking it seriously. With that in mind, one tool that can help you immensely along your photography journey is Luminar Neo!
Luminar Neo is an innovative photo editor designed for both beginner and experienced photographers. It’s super easy to use and can help you achieve professional results in the blink of an eye. Moreover, its powerful lineup of AI tools increases workflow speed, and its customizable interface lets you create a flexible workspace that boosts productivity.
While we could go on and on about why we love Luminar Neo, we narrowed it down to our five favorite features for this article. They include the program's core editing tools, new AI tools that make images brighter and erase distractions, plugins that allow you to merge Luminar Neo with other editing programs, and extensions that expand its power even further.
Now, join us as we explore some of the benefits of using Skylum’s Luminar Neo Photo Editor and how it will help you take your editing skills to the next level!
Table of Contents
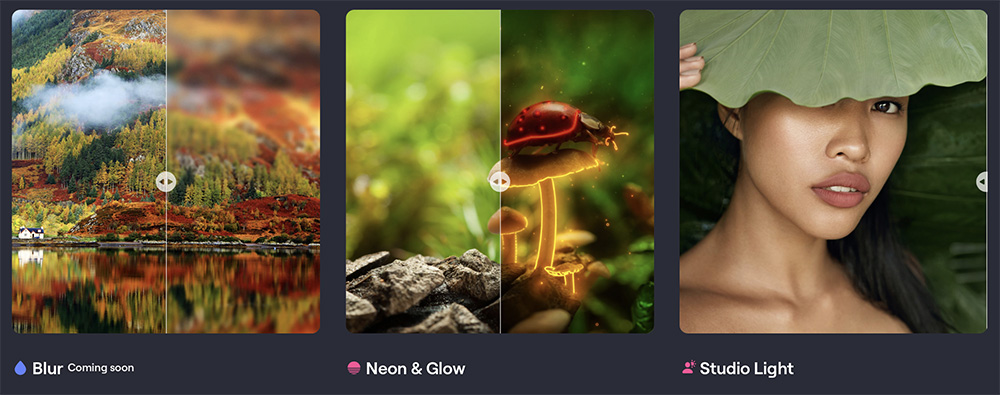
- Skylum’s Luminar Neo Photo Editor Allows You to Relight Dark Images
- You Can Also Easily Erase Distractions in Luminar Neo
- Luminar Neo's Core Tools Set You Up for Success
- Skylum’s Luminar Neo Photo Editor Adapts to Your Workflow
- Get Even More Editing Power Out of Available Extensions
- Final Thoughts on the Luminar Neo Photo Editor
- Recommended Photography Gear
Skylum’s Luminar Neo Photo Editor Allows You to Relight Dark Images
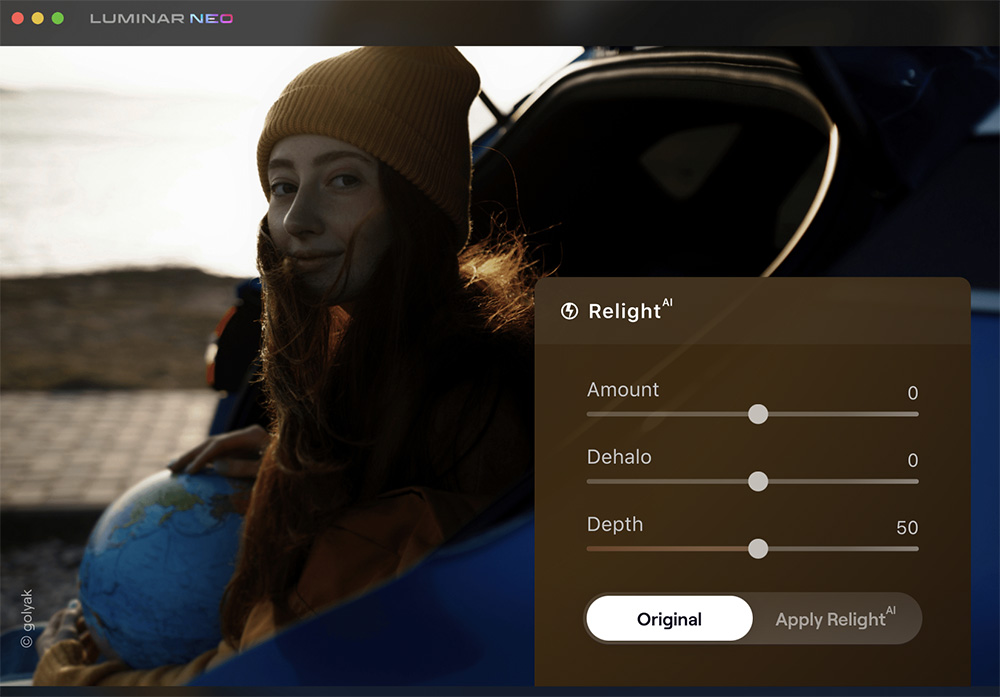
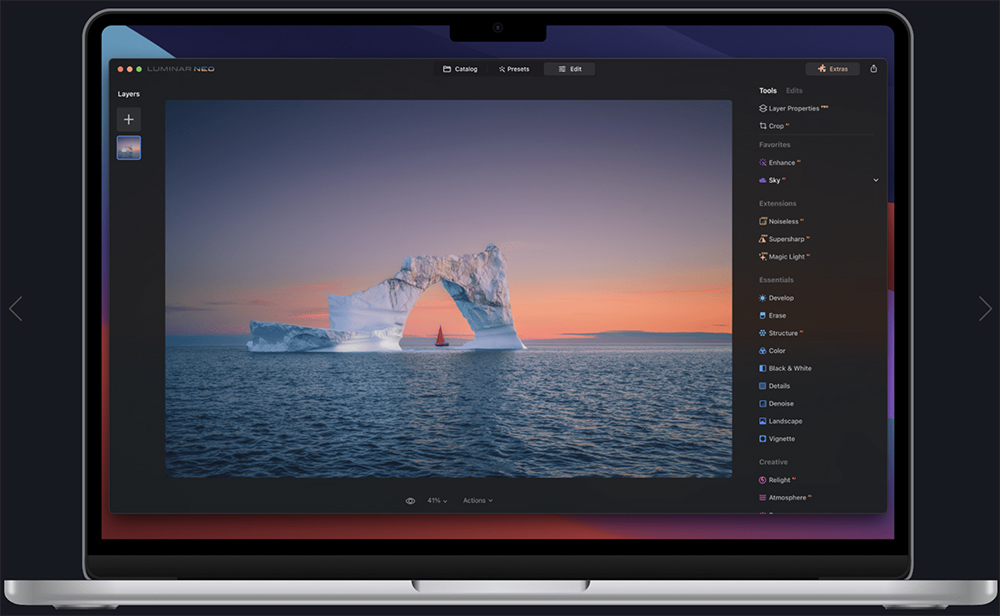
When your images come out darker than you originally planned, it’s time to turn to the Relight AI tool of the Luminar Neo photo editor. This incredible tool lets you lighten up any photo instantly by clicking a button. Then, make micro-adjustments to perfect your images using the built-in sliders.
Relight AI lets you place virtual light sources anywhere in your scene to highlight a specific subject or part of a photo. This is particularly useful in portrait photography, where you can backlight a photo to make it clearer and brighter. You can also use Relight AI to create a virtual flash effect to brighten faces or underexposed landscapes.
You Can Also Easily Erase Distractions in Luminar Neo

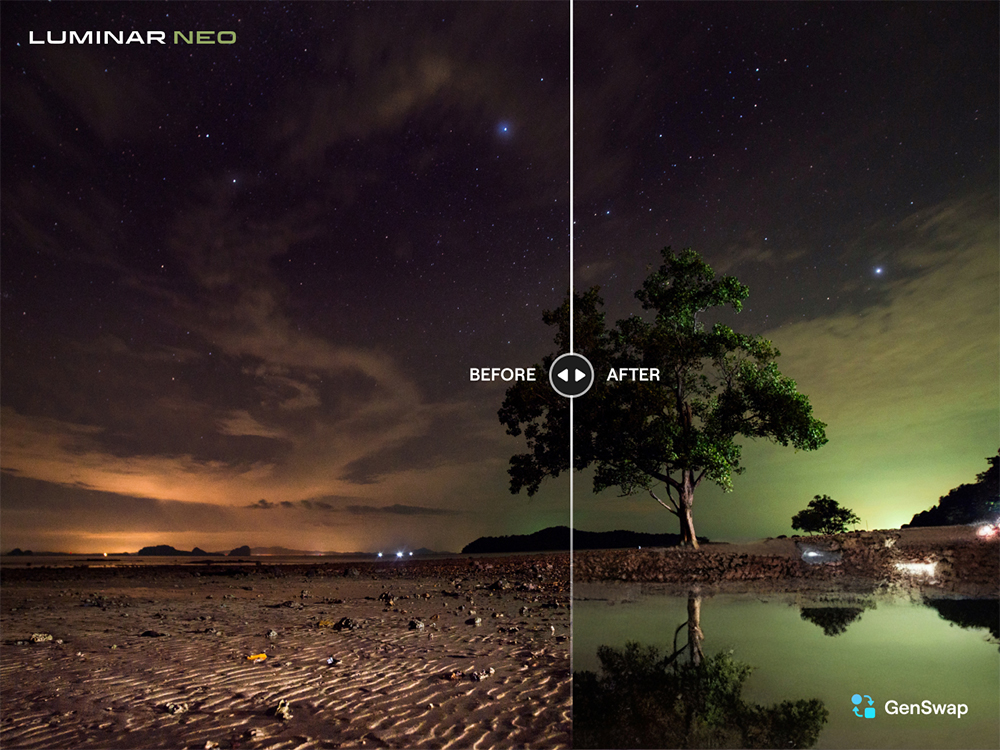
Did a bird fly into your frame just as you took a photo? Was it impossible to capture the beauty of the pyramids without someone walking in front of them? Well, we’ve got good news for you. With the GenErase tool from the Luminar Neo photo editor, you can quickly and easily remove anything you want from your photos!
Better yet, not only does the GenErase tool remove unwanted distractions, but it also uses content-aware AI technology to replace them with content that perfectly matches its surroundings—leaving your photos looking cleaner, totally natural, and just like you envisioned them in your mind.
Check out the video above on the Luminar Neo YouTube Channel to learn more about eliminating unwanted objects from your photos using their GenErase tool.
Luminar Neo's Core Tools Set You Up for Success
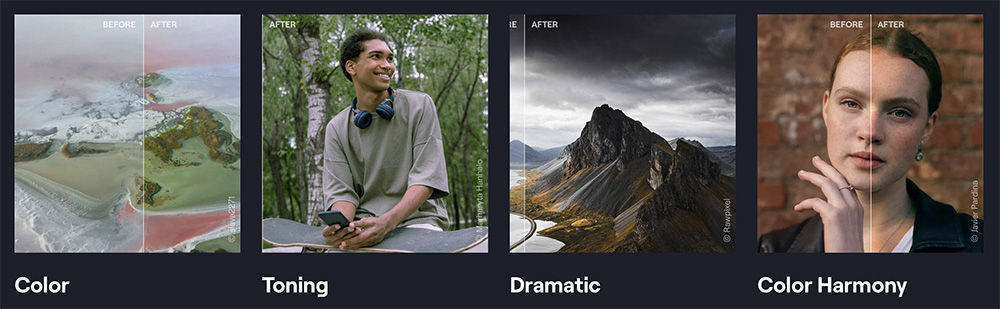
Along with all the flashy new AI tools, the Luminar Neo photo editor also boasts an excellent set of core tools for editing. In total, there are more than twenty core tools that you can use to fine-tune your images. The four most common things photographers must fix in their images are detail, noise, tone, and color.
Luminar Neo has sliders for all of them. With the detail sliders, you can transform blurry content into crystal-clear images. The denoise sliders make photos sharper by reducing grain created by shooting with high ISO levels. Using toning sliders, you can control the warmth and contrast of images. You adjust color settings with the saturation, vibrance, luminance, and hue sliders.
Learn More:
- Photo Editing Tips for Beginners
- Skylum’s Luminar Neo Helps Streamline Photo Editing With Incredible Generative AI Tools
Skylum’s Luminar Neo Photo Editor Adapts to Your Workflow
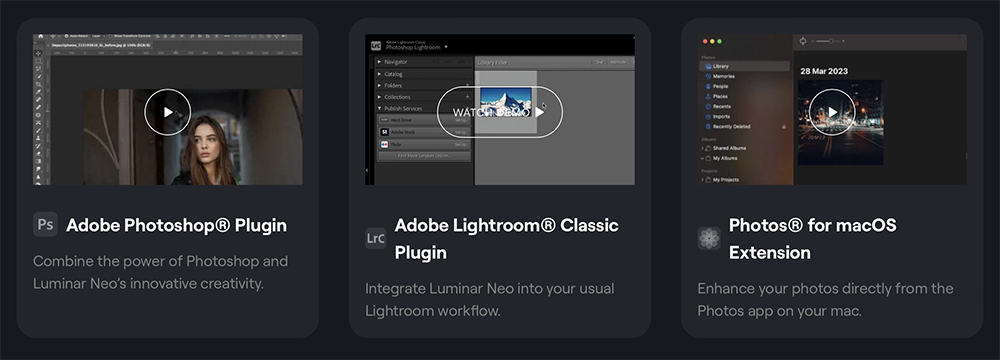
If you don’t already have a photo editor or want to change because you don’t like your current one, you can use Skylum’s Luminar Neo photo editor as a standalone program. When you use Luminar Neo on its own, everything is done inside the program itself, including importing and exporting photos.
Alternatively, if you are happy with your current editor but want access to Luminar Neo’s tools, you can combine multiple editors using a plugin. Other benefits of plugins are you can maintain your current workflow and don’t have to spend time learning a new system. Luminar Neo plugins exist for Adobe Photoshop, Adobe Lightroom, and Photos for macOS.
Get Even More Editing Power Out of Available Extensions
Depending on the type of photography you like to shoot, you may want more tools not included in the standard Luminar Neo photo editor package. That’s where Luminar Neo extensions come in! They allow you to customize your photo editor in a way ideal for you and your photography needs without taking up unnecessary space on your hard drive.
For example, Panorama Stitching, Structure AI, Accent AI, and Supercontrast extensions are ideal for landscape and nature photography. On the other hand, Relight AI, Noiseless AI, and Supersharp AI add tons of value to portrait and wildlife photographers.
Final Thoughts on the Luminar Neo Photo Editor
Luminar Neo is an amazing photo editor every photographer should have in their tool kit. Not only will it improve the quality of your work, but it will also save you lots of time. Therefore, you get the best of both worlds—better photos and more free time to spend with your family and to do the things you love!
Finally, check out the links below to discover how Skylum’s Luminar Neo photo editor can help enhance different types of photography:
- Landscape Photography
- Wildlife Photography
- Portrait Photography
- Family Photography
- Wedding Photography
- Newborn Photography
- Real Estate Photography
Recommended Photography Gear
Heads up: Clicking on our affiliate links and exploring our sponsored content helps us at no extra cost to you, and we only recommend gear we're absolutely crazy about!
Learn More:
- Level Up Your Portrait Photography Editing With These Advanced AI Tools
- 4 Reasons Why Skylum’s Luminar Neo is a Landscape Photographer’s Dream Editor
We Recommend
5 Signs You're Overediting Your Photos
 Photo by GaudiLab via iStock
Editing photos is easier today than ever before, thanks to a wide range of editing programs for our computers and apps for our phones.
Whether you fancy using Photoshop or Lightroom, Luminar or On1, VSCO or Snapseed, you have extremely powerful tools right at your fingertips for correcting mistakes and bringing out the best in each photo you take.
But if you've perused Instagram lately, you have no doubt seen examples of editing gone wrong. More specifically, editing gone too far.
We've all stepped over the editing line at some point - I know I have.
The difficulty with editing photos, especially when you're a beginner photographer, is simply knowing when to say when, according to Mark Denney.
In the video above, he expounds on this issue and offers a few tips for avoiding the cardinal sins of post-processing.
As Denney explains, though the signs that you've overedited a photo might be hard to spot at first, understanding what to avoid as you edit your photos will help you recognize when it's time to hang up your editing hat.
 Photo by GaudiLab via iStock
As you'll see, there are five common signs of overediting of which you need to be aware. These include:
- Unrealistic highlights and shadows
- Adding too much contrast to the image
- Sharpening the image too much (and/or adding too much clarity)
- Too much vignetting
- Oversaturated colors
Clarity was my big issue back in the day. I overamped so many photos by turning the clarity up way too high.
In the end, less is usually more, so heed Denney's advice and know when to say when!
Learn More:
We Recommend
Beginner Photography Tip: How to Create Dramatic Landscape Photos

When it comes to landscape photography, good images are a dime a dozen.
Part of what makes so many landscape photos just “okay” rather than spectacular can be chalked up to the approach.
For example, many novice photographers simply frame their shots from their eye level which can be quite boring.
Additionally, so-so landscape photos often result from not having the right gear, not pursuing the best light, and not taking the appropriate measures to process the images.
This guide seeks to change all that…
If you’re ready to create photos with eye-popping drama, start implementing the steps below into your workflow.
How to Create Dramatic Landscape Photos: Timing is Everything
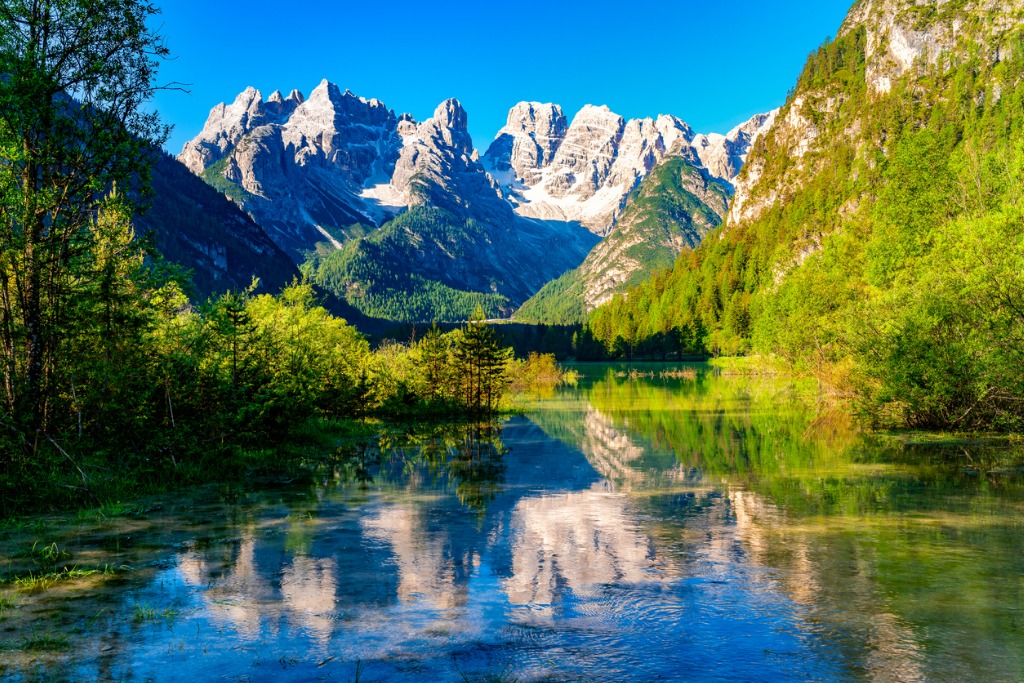
photo by takepicsforfun via iStock
You can have the most spectacular landscape in front of you, but if your timing is off and the light isn’t perfect, you can still end up with a poor-looking shot.
More specifically, Golden Hour, that hour or so just after sunrise and just before sunset offers the most dramatic and beautiful light of the day.
As you can see when comparing the image above with the image below, the first image shows the harshness of light during the middle of the day. On the one hand, elements facing the sun are extremely bright while elements in the shadows are extremely dark. Also notice how the sky - though spectacularly blue - lacks much in the way of interest.
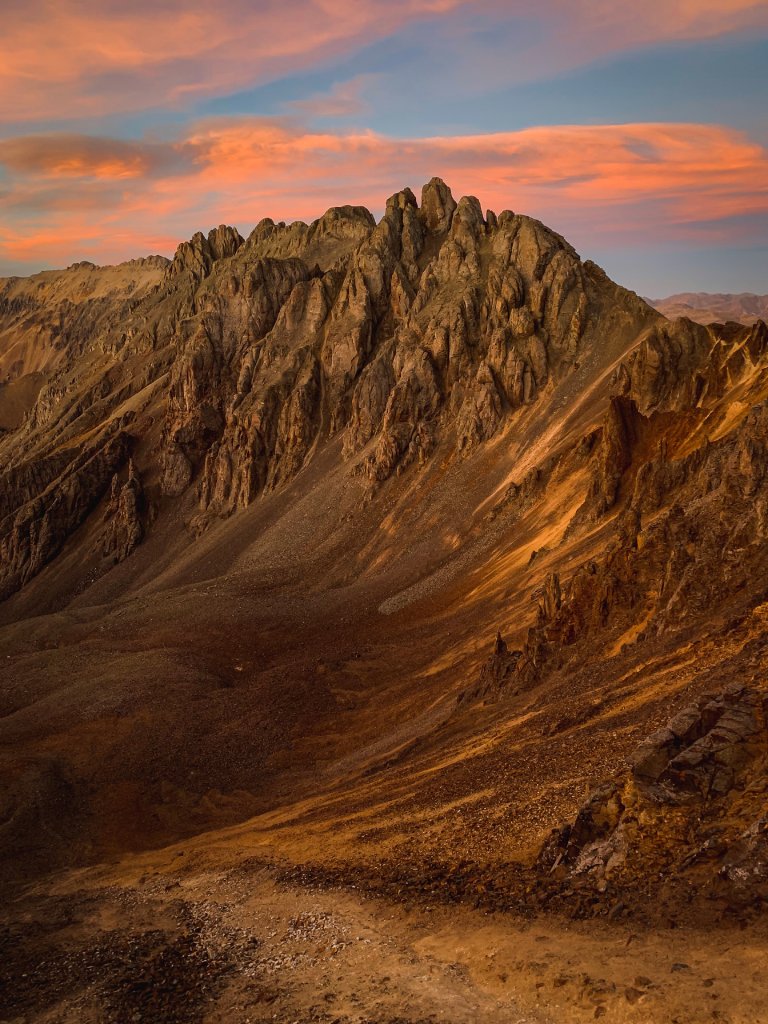
photo by a_Taiga via iStock
A similar shot taken in the same location at sunrise, however, has far more drama.
In this case, note how the temperature of the light is much warmer while also being much softer.
Now, instead of harsh highlights and dark shadows, we have a more even exposure, and with the fog and the clouds, the drama is enhanced even further.
Quick Tip: Photographing early in the morning makes it more likely that there will be fog, especially if you’re photographing rivers, lakes, and other bodies of water. Incorporating weather elements like this can help you increase the drama in your photos.
Learn More:
- How to Take a Photo From Blah to Beautiful in a Matter of Minutes
- Testing a New Affordable Lightroom Alternative
Beginner Landscape Photography Tip: Use a Tripod and a Remote Shutter Release
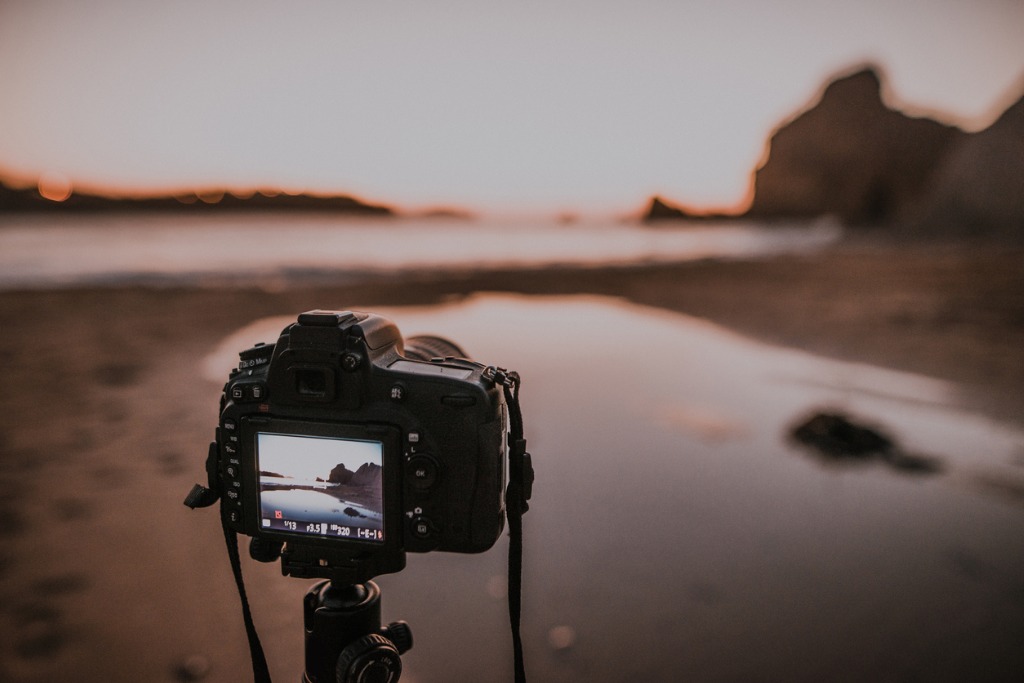
photo by MarioGuti via iStock
One of the most common causes of poor landscape photos is camera shake - blurriness that occurs due to the natural movements of your hands, arms, and body as you take a photo while holding your camera.
Even the slightest movement can cause your photos to lack sharpness, which is why it’s so important to utilize a tripod and a remote shutter release when you take your landscape photos.
You don’t have to get too spendy here, either.
I use a ProMediaGear TR424L tripod, which, at $1,200 is not exactly inexpensive. But you can get the support your camera needs for a couple of hundred bucks or less. In fact, this well-reviewed rig from Manfrotto is just $60.
In addition to keeping your camera stable with a solid tripod, you need to be able to trigger the shutter remotely, that way you don’t have to physically touch your camera to take the shot.
Again, you can go all-out with a fancy, multi-functional remote like the Alpine Labs Spark, but a simple wireless remote like this one will do the trick too, and it’s just $9.00.
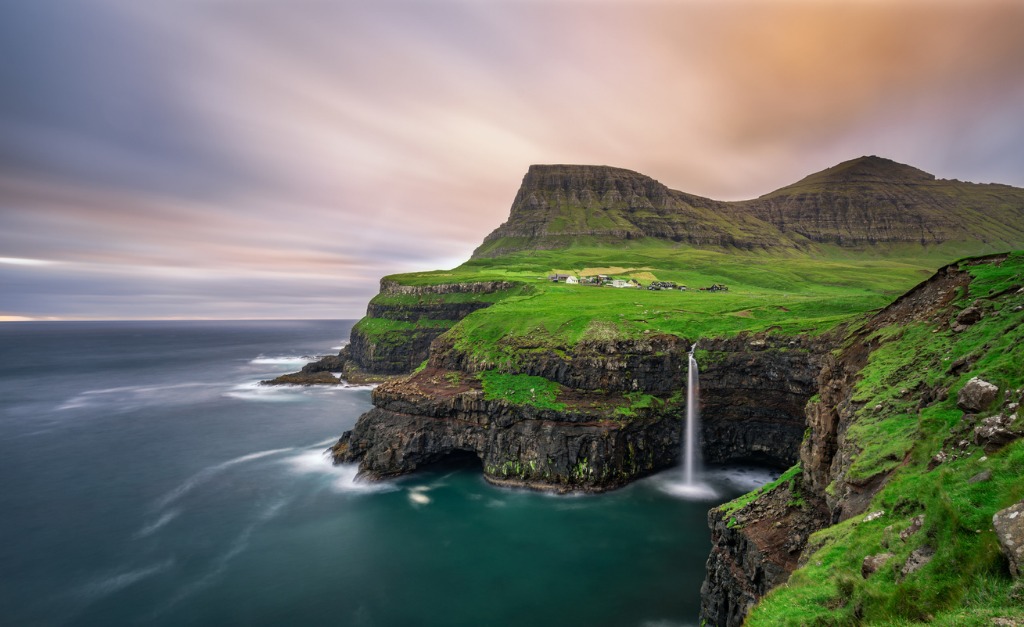
photo by miroslav_1 via iStock
What’s more, if you use a tripod you can begin dabbling in long exposure photography and blurring the movement of elements like clouds or water to get drop-dead gorgeous results like the image above.
You can also use your camera remote to take selfies - no, not that kind of selfie.
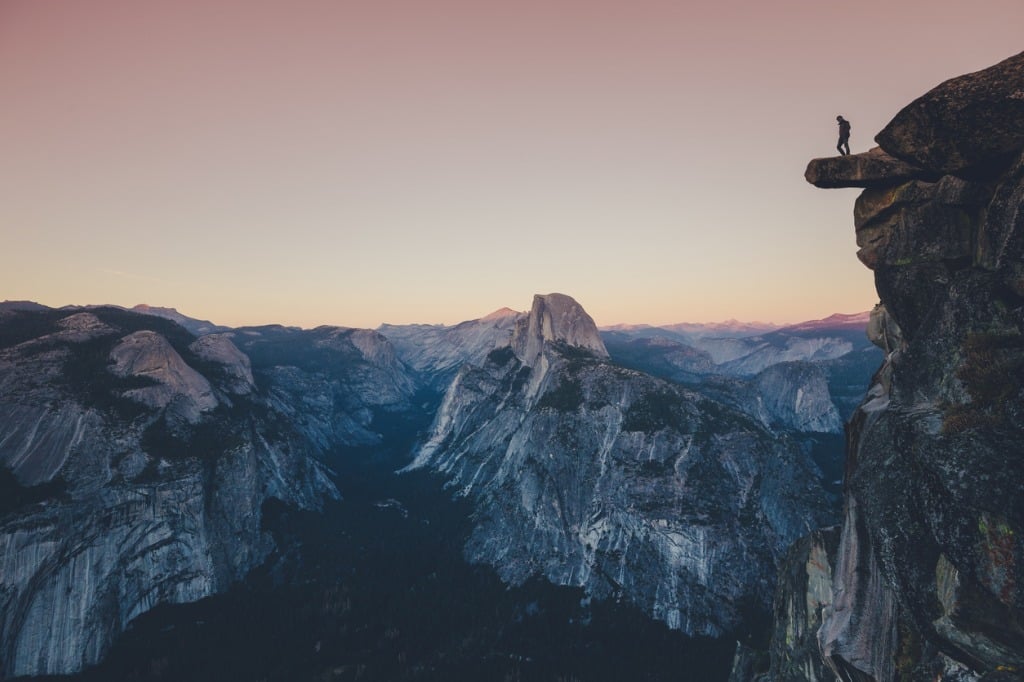
photo by bluejayphoto via iStock
People and landscapes are a great combination because the addition of a person gives the shot context, interest, and helps others put themselves in that person’s place.
With a remote, you can place yourself in the shot, craft a create people-and-landscapes image, and have tons more drama in your photo all at the same time.
How to Improve Landscapes: Shoot Wide and Low
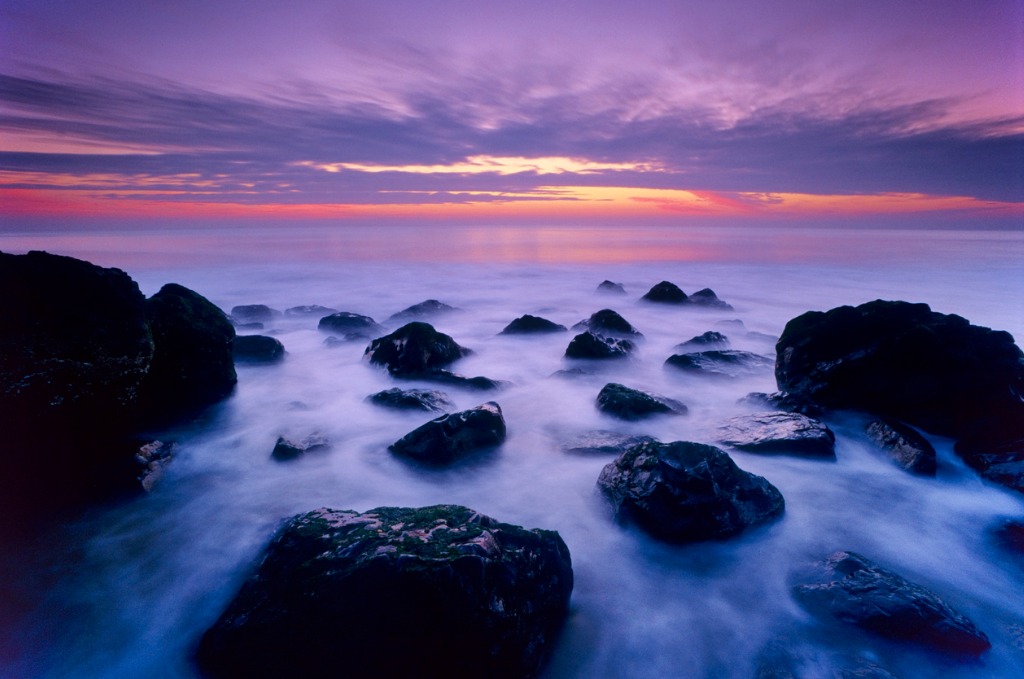
photo by stanley45 via iStock
Yet another way to create more dramatic landscape photos is to use a wide-angle lens and incorporate foreground interest into the shot.
As I mentioned in the introduction, too many newbie photographers stand up straight and take landscape photos from their eye level
By dropping the point of view downward, you immediately create an image that looks and feels completely different.
Additionally, a lower perspective combined with a wide-angle lens allows you to create a scene with much more depth and dimension.
The change in perspective doesn’t have to be enormous to get this effect, either.
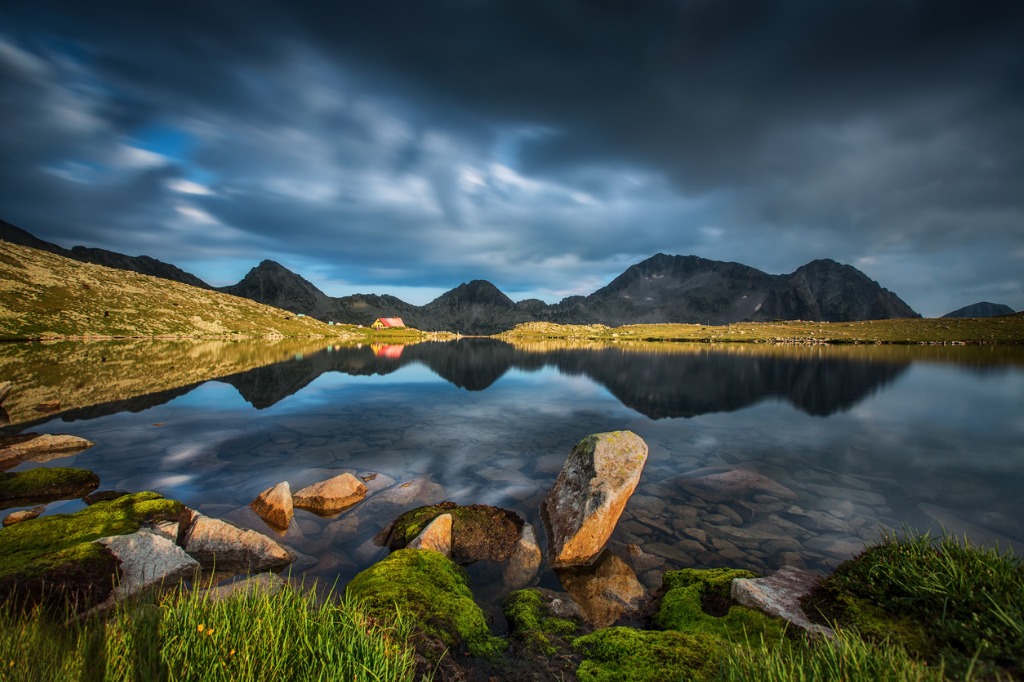
photo by valio84sl via iStock
In the image above, the shot was taken just below eye level, but the result is that more of the foreground is in the shot.
Notice how the individual blades of grass and the texture of the moss on the rocks adds so much richness and detail to the photo.
This shot incorporates other drama-inducing elements too - a long exposure to blur the movement of the clouds and the warm, soft glow of Golden Hour.
Sometimes these tips are enough on their own to help you create a beautifully dramatic shot; other times, you need to layer them to get the ultimate effect.
Quick Tip: To connect the foreground, midground, and background of a landscape photo, try using leading lines. Fences, roadways, and paths are just three examples of leading lines you can incorporate in your landscape compositions.
Learn More:
- Here’s the Key to Better Landscape Photos With One Simple Trick
- Best Camera Settings for Landscape Photography
Landscape Tip for Beginners: Don’t Neglect Processing

photo by Anchiy via iStock
To bring it all home and have a final image that is knock-your-socks-off good, you need to develop a post-processing workflow that allows you to highlight all the beautiful details in the shot.
The problem that beginners have with post-processing is twofold: the software can be difficult to use and it can be expensive.
In years past, you could opt for an expensive, pay-by-the-month option, but the cost of doing so adds up. What’s more, some popular processing programs are just plain difficult to learn how to use.
Luminar 3 is different, though.
For starters, it’s $69. That’s a one-time fee, so you get access to all the powerful tools Luminar has to offer for life.
And though it’s packed full of absolutely amazing features, it’s easy to use, even if you’ve never processed an image in your life.
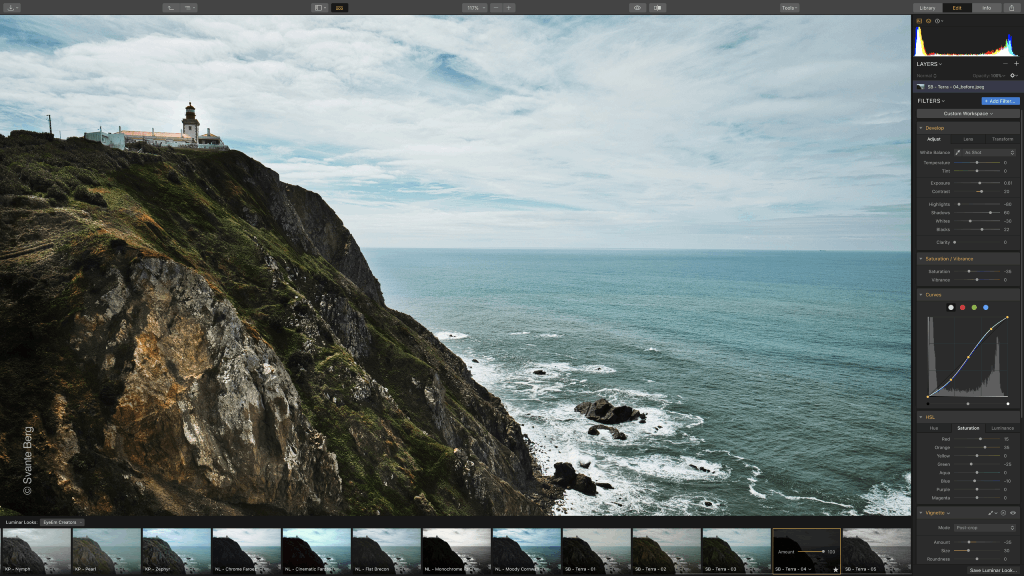
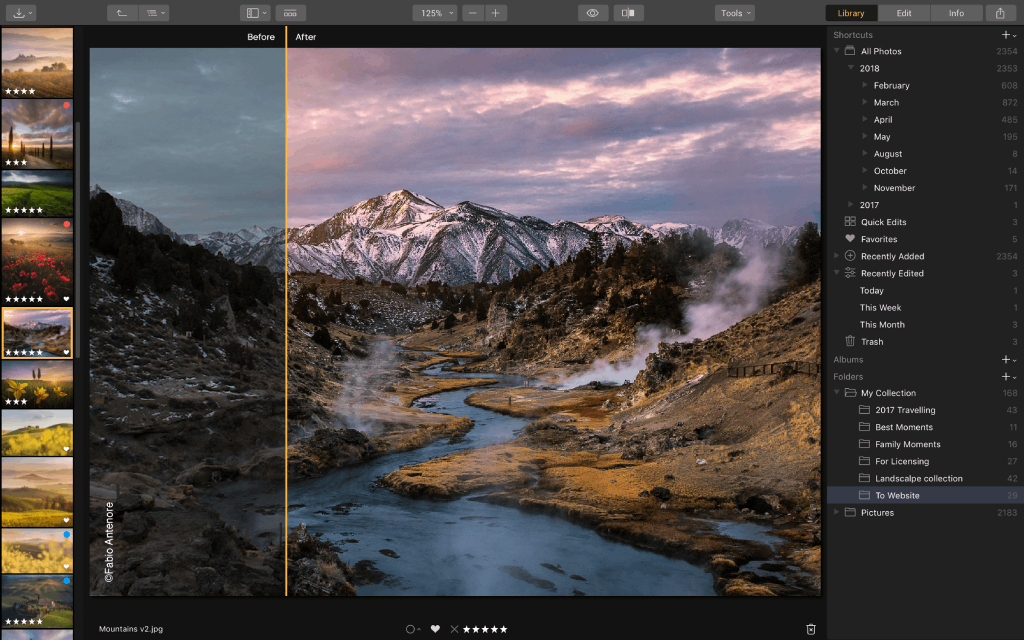
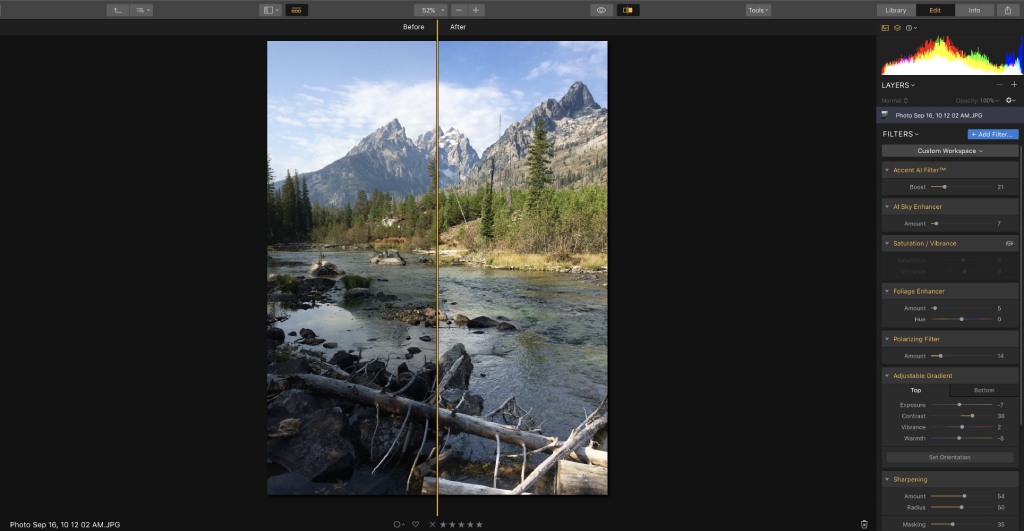
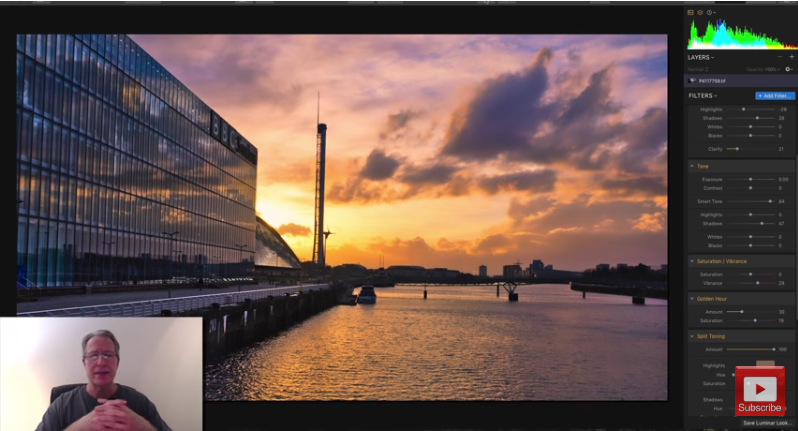
For example, you can use any number of presets - or “Looks” as they’re called in Luminar - to get the ball rolling. There’s several groups of looks, including for landscapes, which you can use to add morning fog, autumn colors, and a warm sunset feel. There’s even one called “Dramatic Landscapes.”
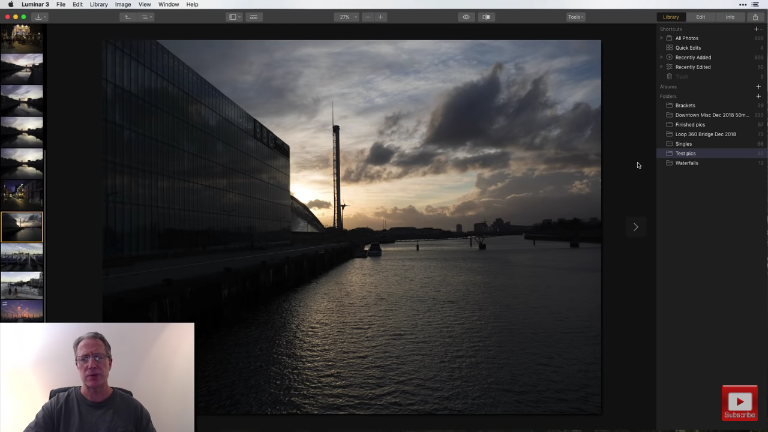
As you can see above, the looks are displayed along the bottom of the editing window, each with a preview that allows you to see what the Look will do to your photo at quick-glance.
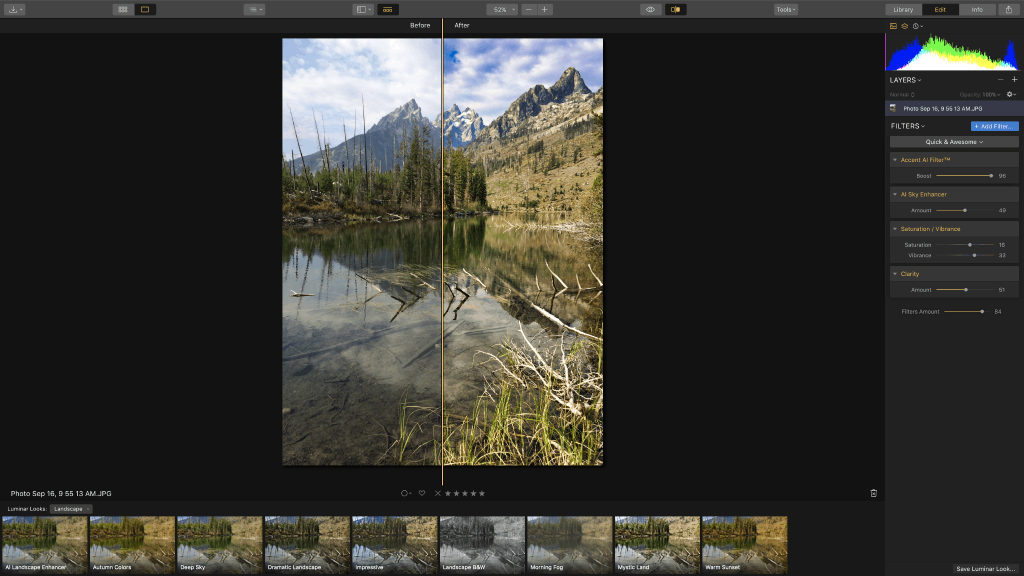
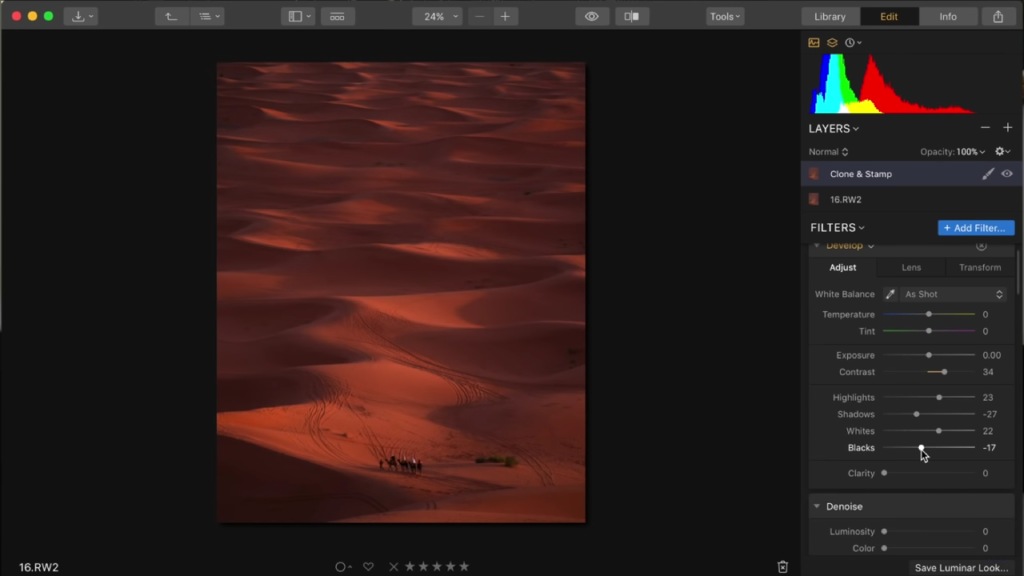
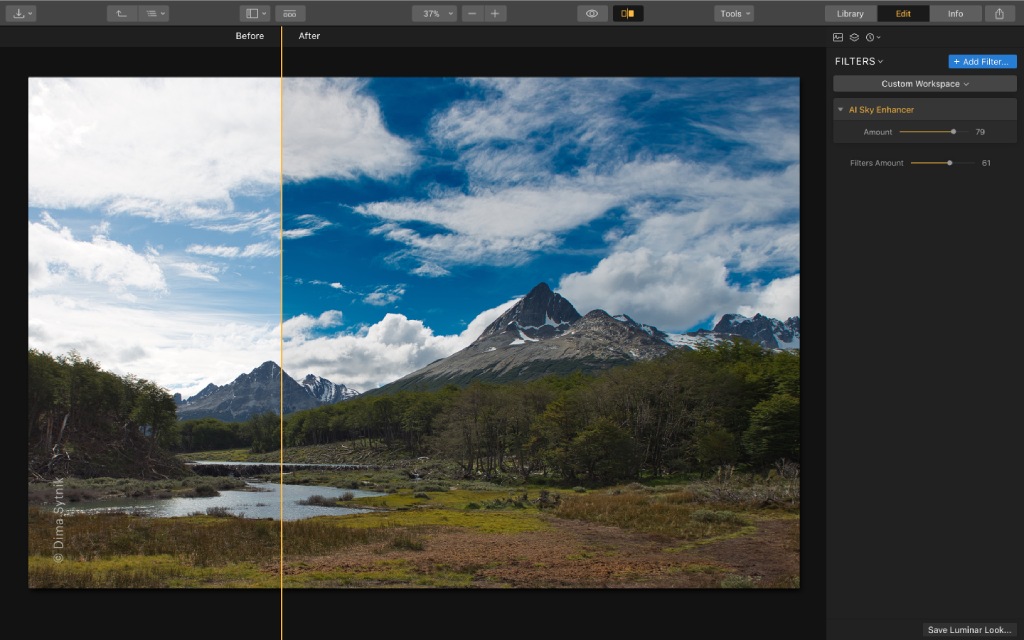
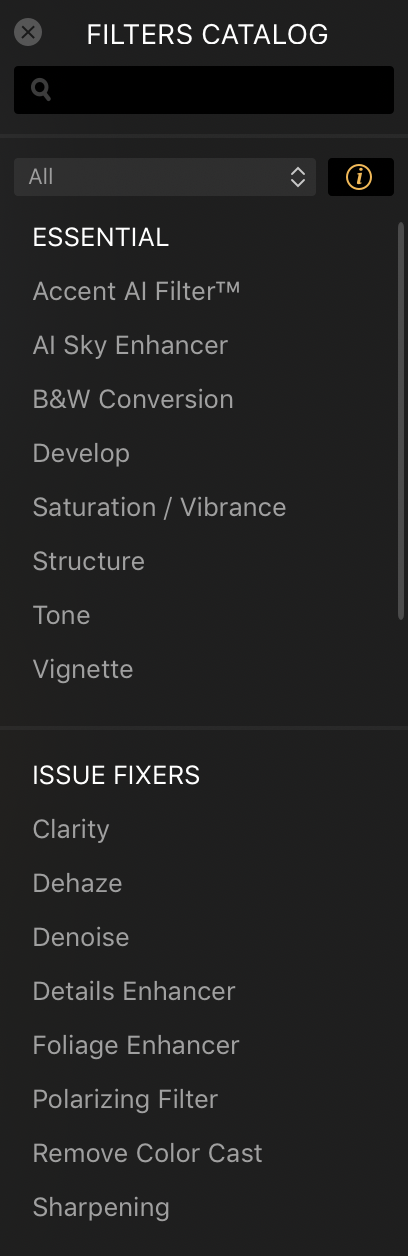
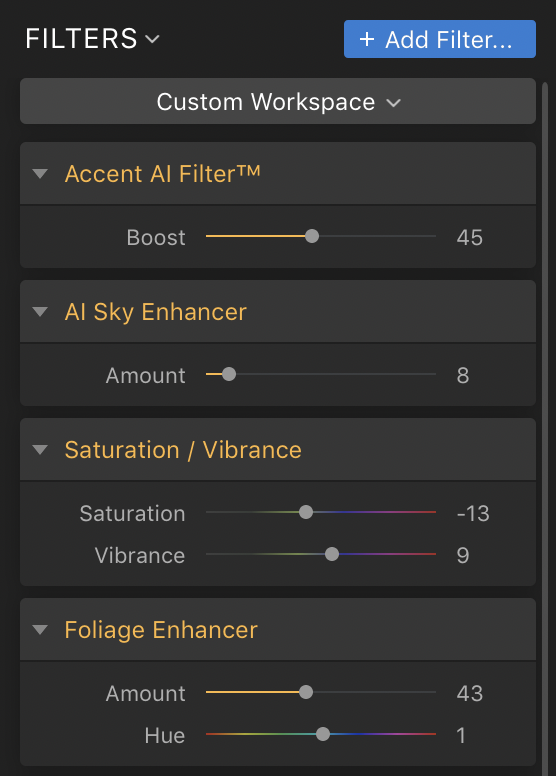
Luminar 3 also has a wide range of Filters that let you drill down and manage specific aspects of the image. That includes AI-powered filters like the AI Sky Enhancer that brings out the details and the structure of the sky in a matter of moments.
As you can see in the GIF below, manipulating just one slider gives you incredible control over how the sky looks:
You can also use Luminar’s Accent AI Filter to make about a dozen adjustments to the photo in mere seconds as well. And best of all, these filters are adjusted using just a single slider, so they’re super easy to manipulate, as you can see above.
But don’t take my word for it…
In the video above, Scott Williams provides an overview of his workflow for creating a dramatic landscape in Luminar.
As you’ll see in the video, Scott makes quick work of his original photo and turns it into something completely different using the tools I mention above (and a few others as well).
If you’re ready to step up your landscape photography game, post-processing is just as important as composition, timing, and gear.
Focus on these tips, pick up Luminar 3 and get cracking!
Learn More:
- Luminar Review: What You Need to Know About Luminar 3
- Make Beautiful Edits to Your Images With This Basic Post-Processing Workflow
We Recommend
Cheap Camera Accessories You Should Never Leave Home Without
 Photo by DieterMeyrl via iStock
When you are on a budget or just getting started, stretching that hard-earned dollar as far as you can, can be the difference between not having enough photography gear and sliding on through...
Of course, you don't just want to slide by with the bare minimum, but you also don't want to spend a ton of money.
That's where this list comes in.
Below, I've outlined some of my favorite budget-friendly photography accessories. Whether you're a beginner, enthusiast, or a pro, this gear will work hard for you without busting your budget.
Cheap Camera Accessory: Filters

If you're been in the photography game for any amount of time, you know that a lot of the best gear is also very expensive.
Good filters, by and large, can set you back hundreds of dollars. That's a big hit to your budget after buying a camera, a lens or two, a tripod, and other accessories.
You can save money without sacrificing quality by getting Kenko filters, though.

Kenko has two must-have filters for your kit:
- Kenko Nyumon Circular Polarizer - This filter helps reduce glare, improve contrast in the sky, and reduces atmospheric haze for improved landscape photos. Prices start at around $15.00.
- Kenko Variable ND Filter - A neutral density filter blocks a certain degree of light from entering the lens, thus allowing you to use a much slower shutter speed when shooting in daytime conditions. This enables you to blur water, cloud movement, and so forth. Variable ND filters are circular and screw onto the lens, and are adjustable by turning the filter in its housing. This one filter is like having a whole set of ND filters in your bag. Prices start at around $240.00, which is a bargain when compared to other filter sets that are double or triple that price.
Editor's Tip: Get Kenko’s latest updates and access to promos for discounted gear. Click here to sign up.
Cheap Camera Accessory: Camera Strap

One of the top accessories you need to buy to upgrade your kit is a better camera strap.
Though some straps cost hundreds of dollars, there are excellent budget options out there.
The HiiGuy Camera Strap is a great example of affordability and functionality.
It has a big, comfy shoulder pad to soften the weight of the load you're carrying. There's even a zippered compartment to keep your spare memory cards!

The strap is highly adjustable, too - I'm over six feet tall and I can adjust this strap perfectly, as can my wife, who's barely over five feet tall.
What's more, this strap is high-grade metal components, so it can support a great deal of weight. I used it to tote my Nikon D-850 with an L-bracket and a 70-200mm zoom lens attached around Boston last fall, and never once did I think the strap wasn't up to the task.

Better still, HiiGuy throws in some swag with the strap, including a microfiber cleaning cloth, a memory card case, an eBook, and a 3-year warranty.
Best of all, this strap retails for under $30!
Cheap Camera Accessory: Tripod

Tripods can be among the most expensive photography accessories - some are in excess of $1,500!
But when you're on a budget, that's simply out of the question, and a good, solid, affordable tripod is needed.
The Vanguard Espod CX 204AP fits the bill with loads of features at a great price.

This tripod weighs just 2.2 pounds, even with the included pan/tilt head attached. It folds down to 20.7-inches, so it's easy to pack away in your bag, too.
It's got 4-section legs that extend the tripod to a height of 61-inches, quick-flip leg locks that make deploying the tripod a quick task, and a central column anti-shock ring to dampen vibrations that cause blurry photos.
You get all that for about $71.50!
Cheap Camera Accessory: Editing Software

Okay, so editing software is probably something that will stay at home (but hey, bring your laptop and find some free WiFi and you can edit on the go!).
If you've looking into getting something like Photoshop or Lightroom, it can certainly be sticker shock.
Though many companies have moved to the monthly fee-based model, one that still offers its (really good) product for a one-time fee is Skylum.

Their Luminar 3 software has all the bells and whistles you could want in an editor, and then some.
The well-designed and intuitive UI is easy to use and puts all the controls you need to make beautiful edits right at your fingertips.
Luminar 3 has a library feature, so you can sort, organize, and rate your images quickly and easily. It also has presets (called "Looks," shown above) that apply a range of edits to your images automatically. They're a great way to get the editing process started.

Luminar 3 also uses AI to make editing simpler and easier. In fact, their Accent AI filter applies about a dozen edits to the photo, so you can literally drastically improve the quality of your images in mere seconds. The AI Sky Enhancer (shown above) brings contrast and definition to otherwise plain Jane skies.
It's software that's easy to use for beginners, yet has all the tools that veteran photographers need and want to edit their photos.
It's only $69, too, so of all the affordable photography accessories you can buy, Luminar 3 is one of the best-priced.
Cheap Camera Accessory: Lenses
 Photo by yipengge via iStock
If there's anything you DON'T want to skimp on, it's the lenses you use.
Cheap lenses often produce cheap-looking results that aren't quite sharp, have ghosting, show vignetting, and so forth.
That means investing in the best glass you can afford is the way to go.
To save money, you can buy a better lens at a lower price by buying a used lens.

When buying used, where you get it is as important as what you're buying.
I use Lensfinder to buy and sell lenses, and it's been an awesome experience every time.
Lensfinder was built by photographers, for photographers, so the platform speaks to your specific needs.
You don't have to sift through all sorts of unrelated products like you do on eBay, and there's no scams like you often find on Craigslist.
Just enter the details of the lens you want (a 50mm f/1.8 is a great, inexpensive choice!), search the listings, find what you need, and proceed with buying it.
Everything is taken care of right on the Lensfinder platform, from product searches to communicating with sellers to leaving feedback.
And it's less expensive than paying all those eBay fees. Nice!
Cheap Camera Accessory: Cleaning Kit

It's shocking how many photographers don't clean their camera and lenses on a regular basis.
It's not a task that needs to be done weekly, by any means, but every few months, for sure.
You can pick up a good cleaning kit on the cheap with all the tools you need.
Look for a kit like the one shown above that includes a cleaning pen, a lens brush, an air blower, and lens-cleaning cloths.
This one also includes three microfiber cloths and a refillable plastic spray bottle.
Cheap Camera Accessory: Camera Bag

Of course, you need something to carry all your new accessories in, and a good, solid backpack is a great choice.
Like any other photography gear, you want to get something that's well-made and durable, but without breaking the bank.
The Vanguard VEO 42 backpack is a comfortable bag to carry thanks to the heavily padded shoulder straps.
You can fit a ton of gear in this thing as well - a mirrorless camera with a lens attached, 1-2 additional lenses, spare batteries and memory cards, a flash, a tripod, and a 13-inch laptop, too.

Vanguard has made it easy to get your gear out of the bag with a bottom access panel that makes swapping out your gear a quick task.
This bag is even convertible. Just remove the padded camera insert and you have a regular backpack that you can use for school books, clothes for a weekend trip, and so forth.
Best of all, this bag is just $49!
Cheap Camera Accessory: Camera

I know a camera isn't a camera accessory, but I still wanted to offer a recommendation for an inexpensive camera.
I've used the Sony Alpha a6300 for years now, and it has proven to be an excellent little camera.
It's mirrorless, so it's small and lightweight and easy to carry.

It's got a 24-megapixel sensor, an astounding 425-point autofocus system, and a water-resistant body.
Add to that a 2.36-million dot OLED viewfinder, 4K UHD video capabilities, WiFi, and NFC, and you have the makings of a highly capable little camera.
Brand new, these things go for about $750 for the body only, but if you buy used, you can pick one up in like-new condition for about $644 at MPB. That's not bad at all!
We Recommend
Creating Timeless Moments: Exploring the Beauty of Still Life Photography

Photo by Muenz via iStock
It’s time to discuss still life photography, where simple, everyday objects turn into timeless pieces of art!
Whether you're a new photographer who wants to learn a few skills or an experienced photographer who wants to try something new, still life photography offers a fantastic way to develop your skills. Of course, it’s not just about the technicalities of creating a photo - you need to learn a thing or two about the creative aspects of photography as well.
So, let’s discuss both!
And, as a bonus, I’ll share one of my favorite tools to edit my photos - still life or otherwise. Let’s get to it!
Table of Contents
- Setting the Scene: Choosing Your Still Life Photography Subject
- Mastering Light and Shadows in Still Life Photography
- Composition Techniques for Still Life Photography
- Essential Equipment for Capturing Still Life Photography
- Post-Processing Magic: Enhancing Your Still Life Images
- Embrace the Journey of Still Life Photography
- Recommended Photography Gear
Setting the Scene: Choosing Your Still Life Photography Subject

Photo by Black Lollipop via iStock
First things first…
The selection of your subject is the most essential component of still life photography. Everyday objects can become gorgeous, eye-catching subjects when you arrange them in a thoughtful way!
Get started by choosing objects that have visual interest of some kind - shapes, textures, and colors, for example. Experiment with a variety of subjects, too. You might try fruits and flowers to start, then explore using personal items, like family heirlooms. No matter the subject, the key is to find inspiration in everyday objects and highlight them in a way that makes them seem extraordinary.
Remember, though - still life photography isn’t just about choosing the right subject. You also have to consider how the subject is presented in the shot.
For example, rather than throwing random fruit in a bowl and taking a photo, take some time to arrange it to highlight the varying colors, shapes, and textures of the fruit. By carefully composing the shot, you’ll end up with an image that has much more visual appeal.
Mastering Light and Shadows in Still Life Photography
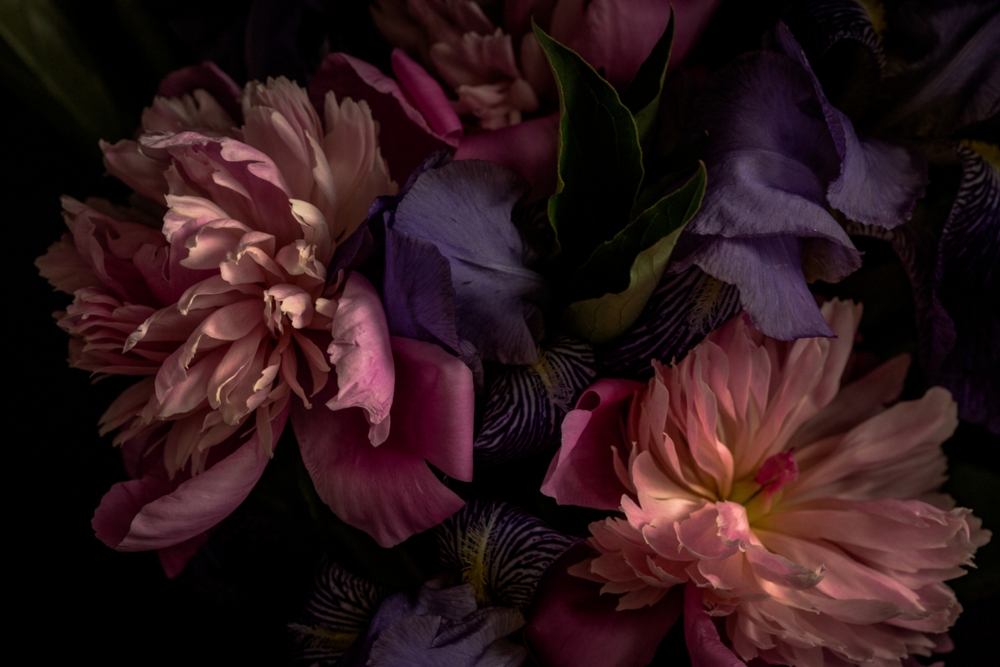
Photo by Jeja via iStock
Lighting is crucially important in still life photography (not that it isn’t important in other genres, but it’s even more important here).
To start, try experimenting with natural light. A good example of this is utilizing sunlight streaming through a window. Try pulling a curtain or shade to help filter the light (or hang a sheet over the window), as that softens the light for a more pleasing look.
You can also try the warm glow of the golden hour for a subtle touch with light that’s a much warmer color temperature. Alternatively, give artificial lighting a try to see how you can use it
for more dramatic effects, like harsh shadows or emphasizing the texture of your subject.
What helps move a typical snapshot to a work of art is this give-and-take of shadow and light. You can see how this plays out in the image above - it contains deep, black shadows in the background, crisp highlights in the foreground, and varying midtones throughout. Combined with the interesting colors and shapes of the flowers, the lighting helps give this image wonderful depth.
Composition Techniques for Still Life Photography
Photo by wichianduangsri via iStock
Composition is another important part of how a still life image is brought to life. As noted earlier, you need to take time and care to compose your image for the best results.
Compositional rules like the rule of thirds, leading lines, and using a frame within a frame are great places to start to help you compose more interesting still life scenes. Experiment with various angles and perspectives, too, to find the most compelling composition for your subject.
Don't be afraid to get close and capture intricate details, or step back to showcase the overall arrangement, either. The art of composition is a powerful tool in transforming everyday scenes into captivating narratives!
Essential Equipment for Capturing Still Life Photography

Photo by miss_j via iStock
You don't need a high-end camera to start your still life photography journey. A basic DSLR or mirrorless camera is great. Alternatively, you can use any modern smartphone and get stunning results.
Invest in a sturdy tripod to ensure stability no matter what camera you use, especially when you’re shooting in low-light conditions. Experiment with different lenses to discover the unique perspectives they offer as well. If you have a basic interchangeable lens camera setup with a kit lens (e.g., an 18-55mm zoom) try taking photos at different focal lengths to see how it changes the visual impact of the photos. Learn more about still life photography gear and other tips in the video below by Visual Education:
As you progress, you can explore additional equipment, such as reflectors and diffusers, to enhance your control over light and shadows. But, for now, a simple camera and tripod setup and using natural light will get you started!
Post-Processing Magic: Enhancing Your Still Life Images
Photo by scyther5 via iStock
Once you've captured your still life images, the post-processing stage allows you to add the finishing touches.
Experiment with photo editing software to fine-tune colors, contrast, and sharpness. Consider black and white conversions for a timeless and classic feel, too. Remember, post-processing is an art in itself, so don't hesitate to explore and find a style that resonates with your vision!
And don’t fret if post-processing seems like a laborious and confusing task…today’s photo editors like Luminar Neo make it easy to get breathtaking results.

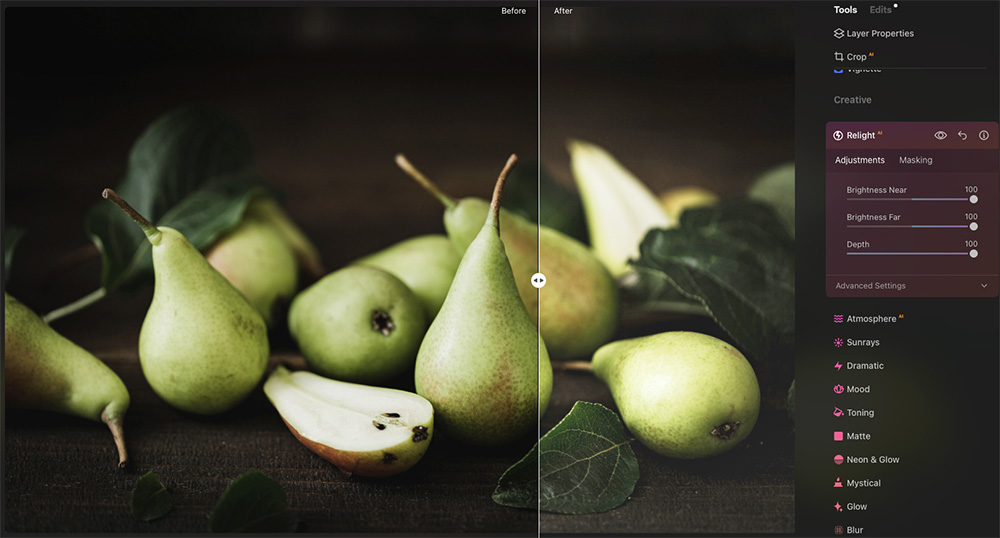
Luminar Neo utilizes advanced AI technologies that enable you to make dozens of impactful changes to your images in seconds. For example, you can use tools like those shown above to quickly adjust exposure, contrast, highlights, and shadows by using a slider. The same goes for blacks and whites, sharpness, noise reduction, and much more.

The sample image shown in the editor panel is by alvarez via iStock
But Luminar Neo takes functionality up a notch with AI-powered tools that give you the ultimate flexibility for creating your photographic vision. Above, you can see the difference between the original image on the left and the editing version on the right, which used Luminar Neo’s RelightAI to adjust the brightness of the shot in the foreground and background, and adjusted the depth of brightness, too.
Of course, there are dozens of other tools in Luminar Neo that boost your ability to get creative. In the image above, you can see how I used the blur tool to add a tilt-shift vibe to this still life image. Doing so brings your attention to the center of the image at the stem of the most prominent pear.
These are just a few examples of the power of Luminar Neo, though. And with numerous extensions and consistent updates, your ability to use this program to create epic still life photography will only increase with time. I’ve been using Luminar Neo for about three months now, and it has proven to be the simplest and easiest editor I’ve ever used - and I think you’ll find the same!
Embrace the Journey of Still Life Photography
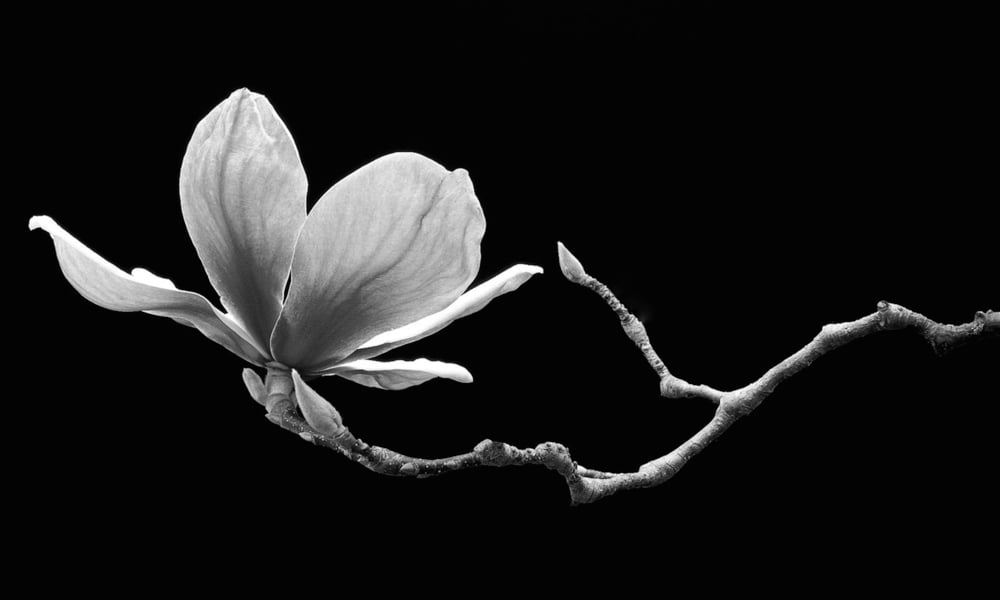
Photo by BethMyervia iStock
With that, you have a road map for improved success with your still life images. As you expand your photographic forays into this niche, remember that you aren’t just snapping photos and calling it good. Instead, really focus on building interest within the frame. Commit yourself to learning more about still life imagery, and embrace the process of making mistakes - so you can turn those mistakes into successes, later.
Need more instruction? No problem! Continue to explore the art of still life photography by checking out our collection of thousands of articles and tutorials. There, you’ll find more in-depth resources to further enhance your skills.
The world of still life photography is full of all kinds of possibilities—enjoy the photographic adventure that awaits. Happy shooting!
Recommended Photography Gear
Disclaimer: A quick heads-up: If you snag something through our affiliate links or check out our sponsored content, we might earn a commission at no extra cost to you. But fear not, we're all about recommending stuff we're truly stoked about!
Learn More:
We Recommend
Easy Landscape Photography Tips With Tons of Impact
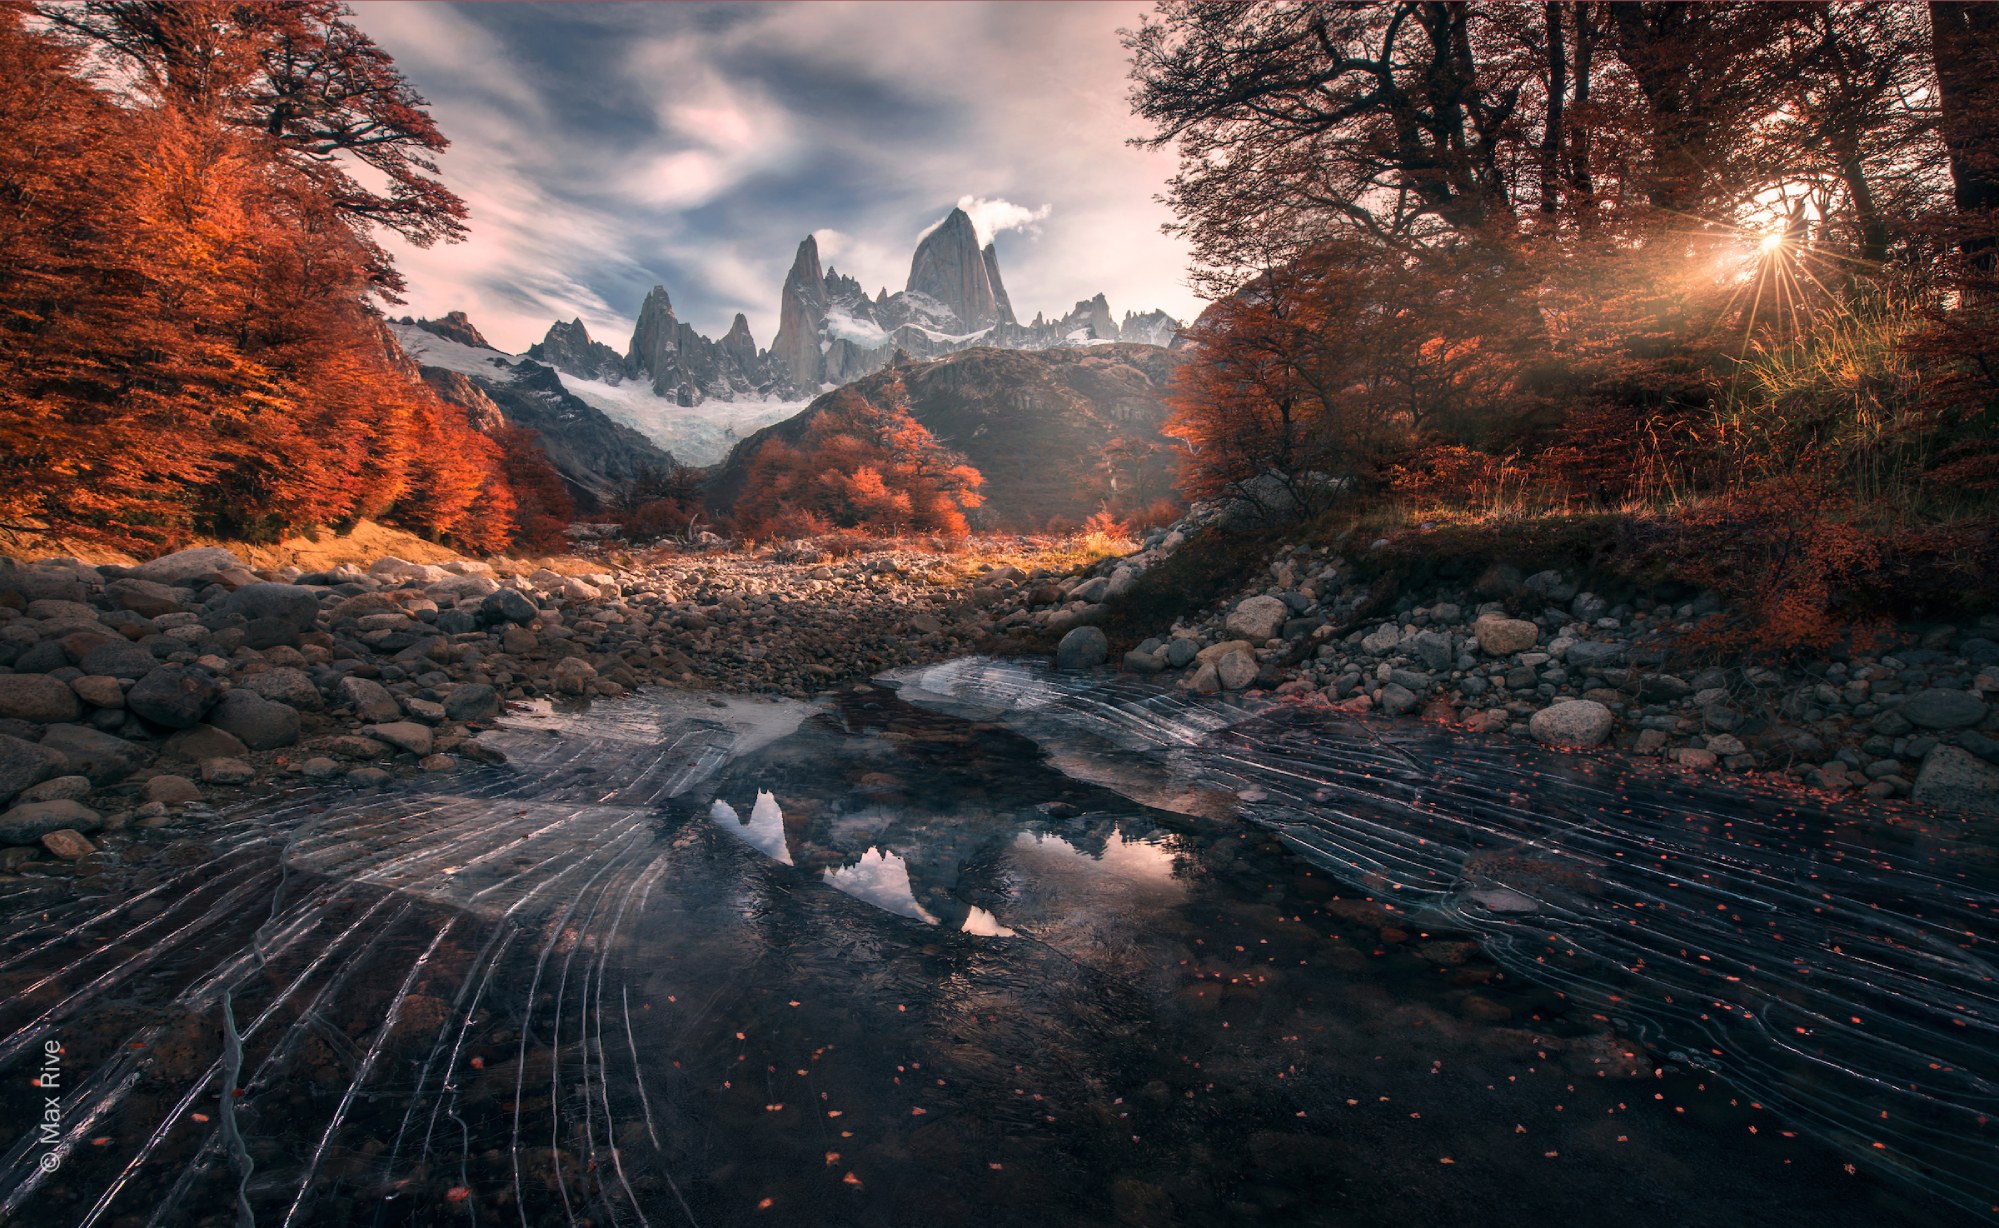
Photo by Max Rive
If you aren’t quite satisfied with the quality of your landscape photos, don’t fret…
There are about a million landscape photography tips, tricks, and techniques you can rely on to improve the quality of your photos. The tips I outline below are no exception!
I’ve hand-picked these tips because they’re easy to implement, yet can have a profound impact on how your landscape photos look.
Without further ado, let’s get to it!
EASY LANDSCAPE PHOTOGRAPHY TIP #1: FIND THE BEST SPOTS TO PHOTOGRAPH
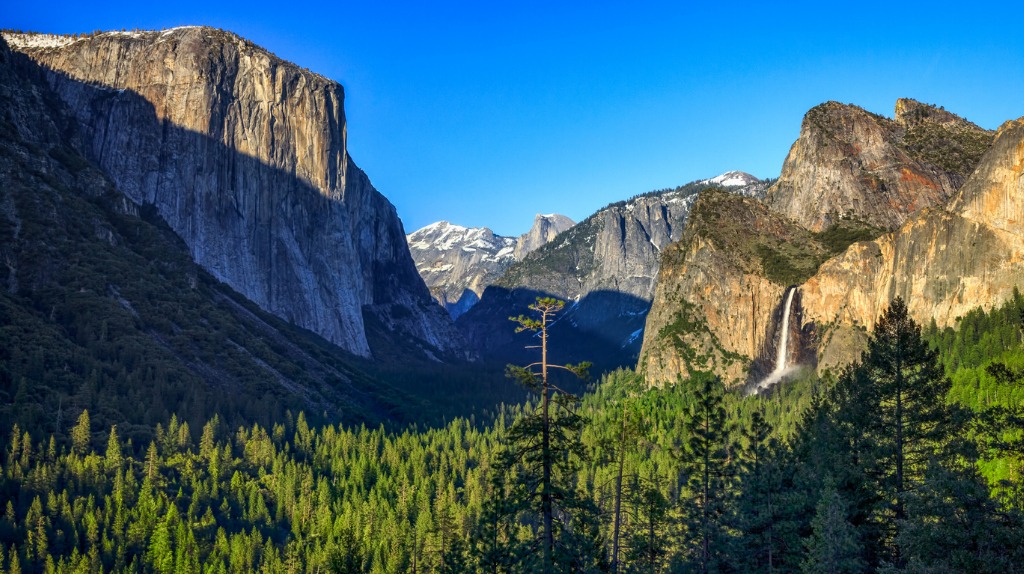
photo by GoranQ via iStock
I know this sounds like kind of a “duh” tip, but it really is important to find spots to photograph that are (1) beautiful and (2) haven’t been photographed to death.
Sure, the Tunnel View at Yosemite (shown above) is a drop-dead gorgeous scene, but everyone that’s ever been to Yosemite has photographed it. That doesn’t mean you should skip it, but what it does mean is that you should strive to find a different point of view to create a more unique photo.
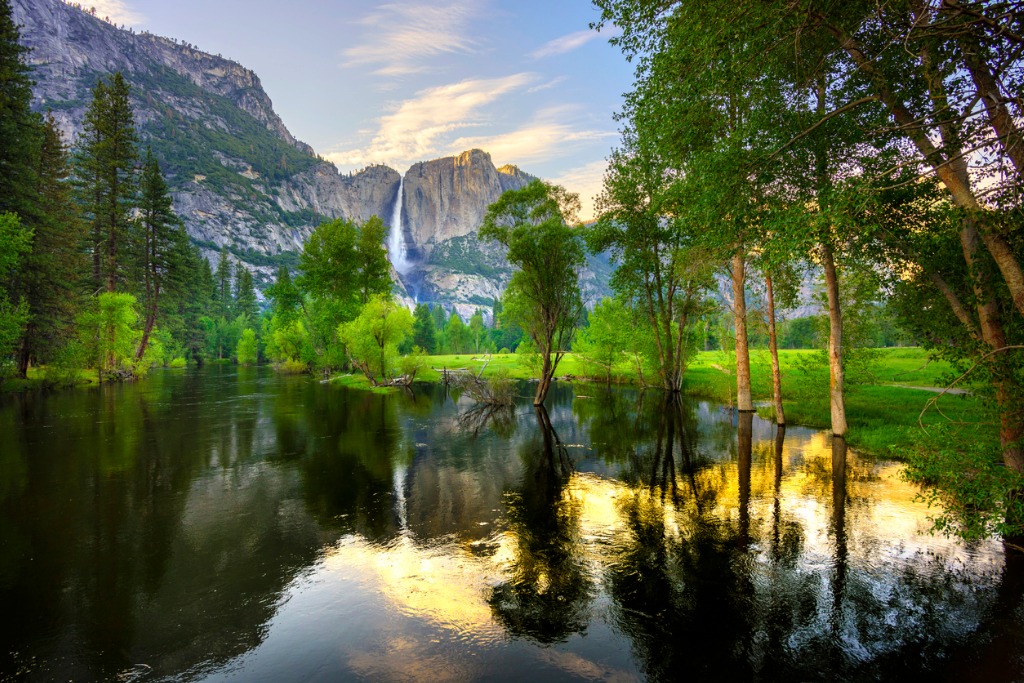
photo by 4kodiak via iStock
The image above offers that unique perspective on the same location.
Not only does this shot tick the box for having beautiful scenery, but it also isn’t nearly as popular a spot as Tunnel View. That means your photo will stand out more in the ocean of landscape photos taken each year.
Quick Tip: Look for scenes that have elements that move (i.e., a river or waterfall), bodies of water for reflections (like a still lake), or elements with texture you can highlight in the foreground (i.e., grass or rocks). Any of these elements will improve the visual appeal of your photos that much more.
Easy Landscape Photography Tip #2: Chase “Bad” Weather

photo by primeimages via iStock
Though shooting photos in the rain, snow, wind, and other elements might not be the most fun, those elements can help you create beautifully impactful landscape images.
For me, bright, sunny days are great, but I prefer the look I get in my images when there are dramatic clouds that add interest to the sky, fog in mountain valleys to add a bit of mystery, or wind that kicks up the surf when I’m taking photos at the beach.
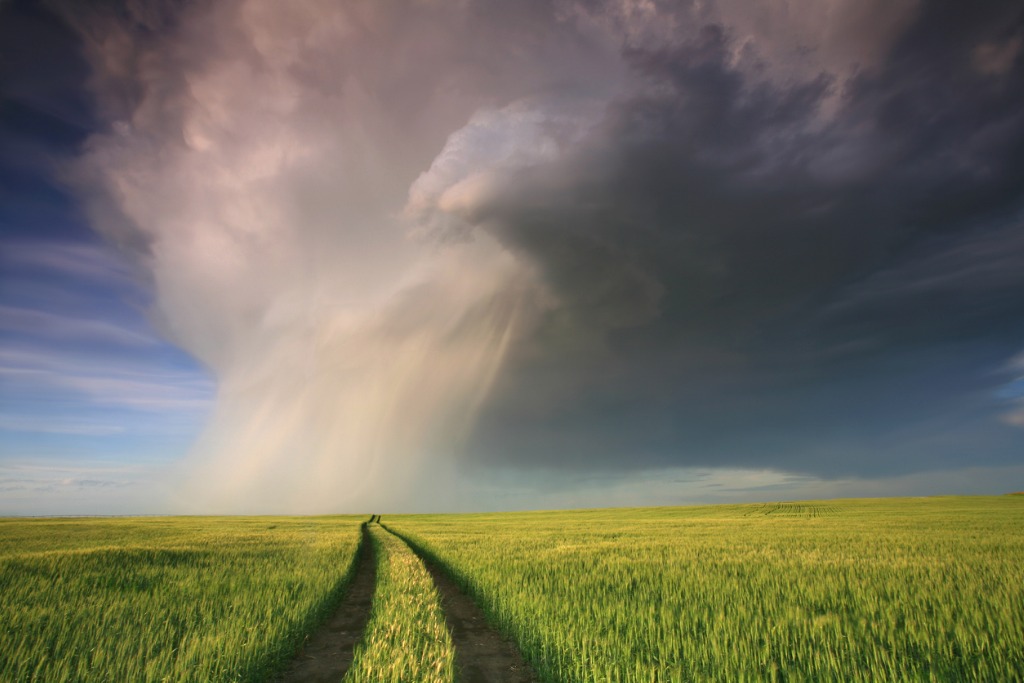
photo by ImagineGolf via iStock
You don’t need to go out and chase huge tornadoes to reap the benefits of weather, either.
Just a little fog here or a few thunderclouds there, and you can create landscapes that wow!
Learn More:
- Beginner Photography Tip: How to Create Dramatic Landscape Photos
- How to Take a Photo From Blah to Beautiful in a Matter of Minutes
Easy Landscape Photography Tip #3: Add Something Man-Made
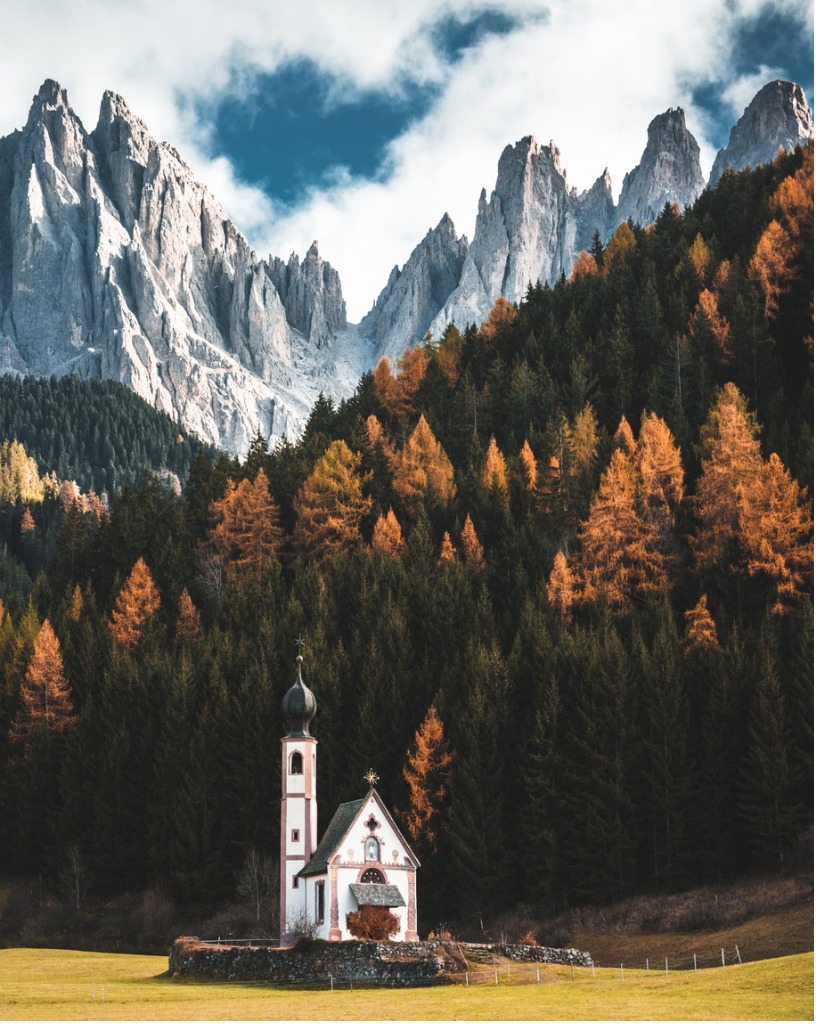
photo by franckreporter via iStock
I know plenty of landscape photographers that shudder at the thought of incorporating man-made elements into a landscape photo. After all, it’s supposed to be a landscape shot, right?
I disagree, though.
I think human elements add a richness to landscapes that can make a scene more interesting.
In the image above, for example, the church has interesting architecture, shapes, and colors that elevate the quality of the shot. I also like how the height of the church mimics the height of the mountains in the background.
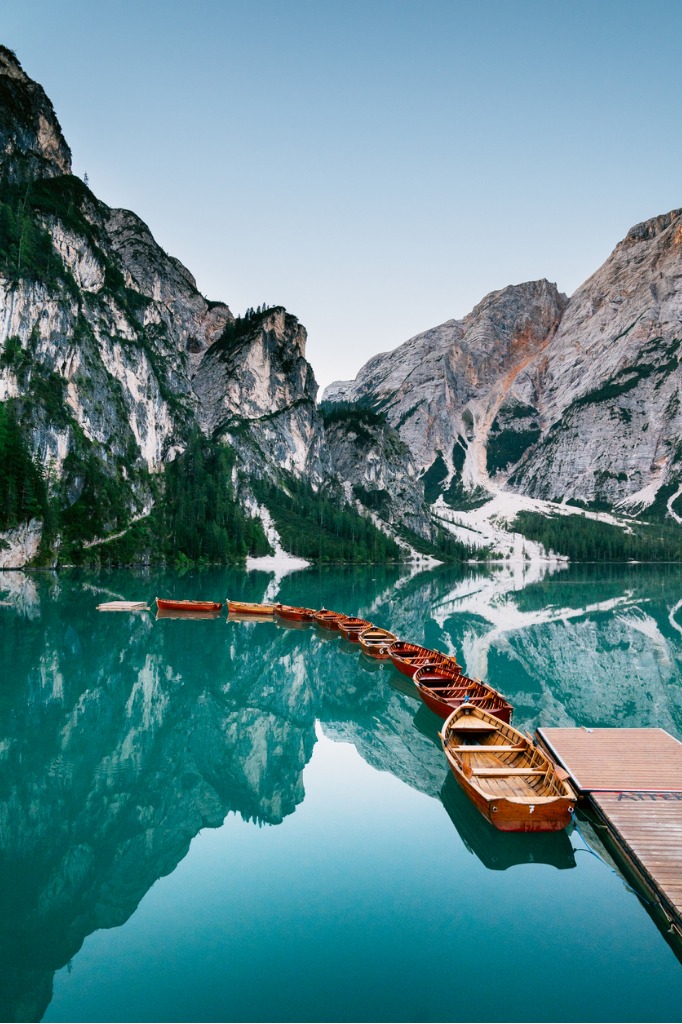
photo by Andrey Danilovich via iStock
You can use human elements to create a more harmonious shot as well.
In the example above, the boat dock and line of boats act like a leading line to connect the foreground and background. As a result, the image not only has more visual appeal, but it also has improved depth and dimension.
Quick Tip: If you don’t have a church or a line of boats handy, insert a person into your landscape photos for instant appeal. Adding people gives context to the shot and also helps viewers understand the scale of the scene.
Easy Landscape Photography Tip #4: Make Processing Images an Easier Task
People that know me know that I’m all about efficiency. I have too many things to do to lollygag around!
That’s why I’ve spent years developing a quick-fire post-processing workflow that minimizes my time in front of my computer and maximizes my time out taking photos.
The thing is, as awesome as my workflow was, I’ve found an even faster workflow that produces even better results.

My new routine starts and ends with Luminar 3.
What makes Luminar 3 so easy to use is that it has tons of features that turn tasks that would take minutes in other programs into tasks that take mere seconds.
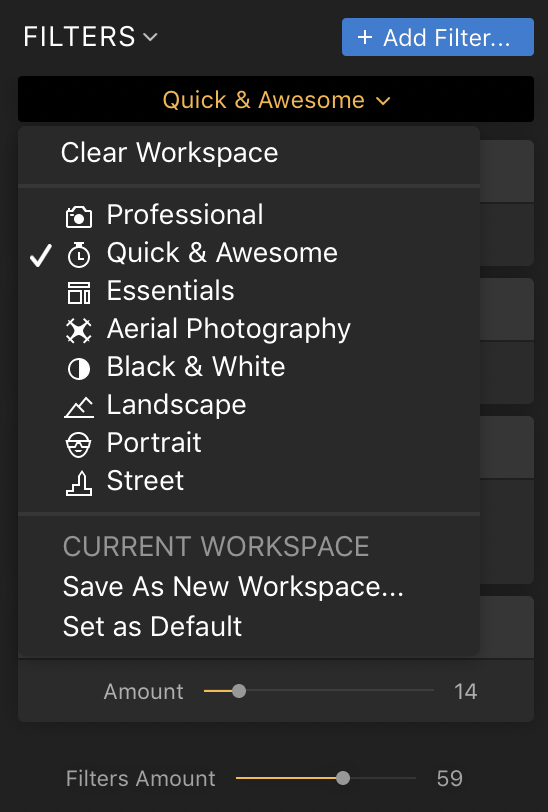
That’s thanks in part to a host of pre-built Workspaces that have common filters to address certain types of editing. That includes a Landscape Workspace, Portrait Workspace, Black and White, and a host of others.
There’s even a “Quick and Awesome” Workspace that has the tools to significantly enhance your photo in seconds.
The image above shows the original RAW file on the left and the edited version on the right. It took me about 20 seconds to adjust the six sliders, and if you ask me, the photo is massively improved.
Luminar 3 doesn’t stop there in the “quick and awesome” department…
There are a number of different presets (Looks, as Luminar calls them) that are a powerful way to enhance your photos in short order.
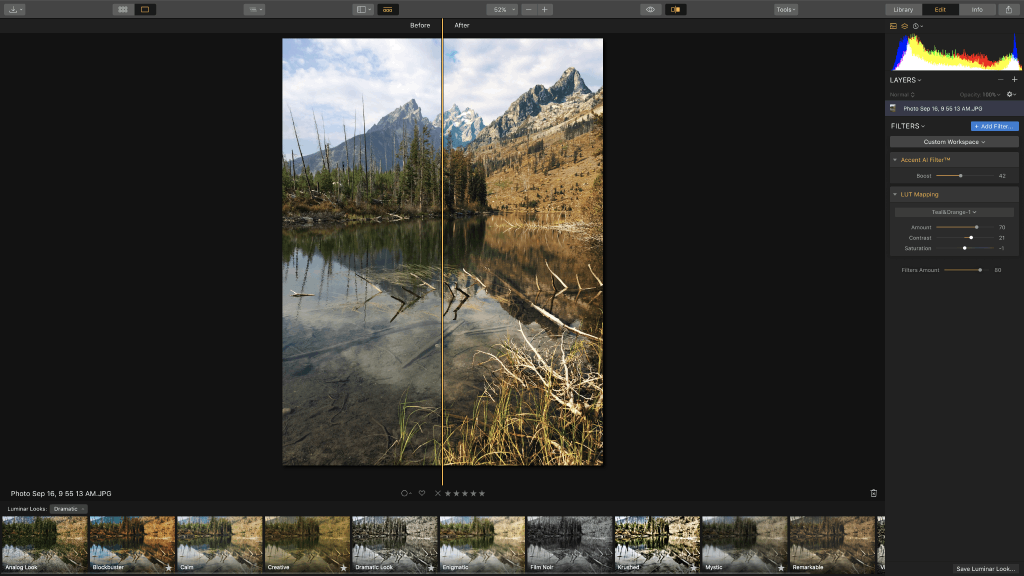
In the image above, I applied the Blockbuster Look from the Dramatic Looks collection.
As you can see, adjusting five simple sliders resulted in an image on the right that has a totally different, much warmer look than the original image. Again, using this Look took just seconds.
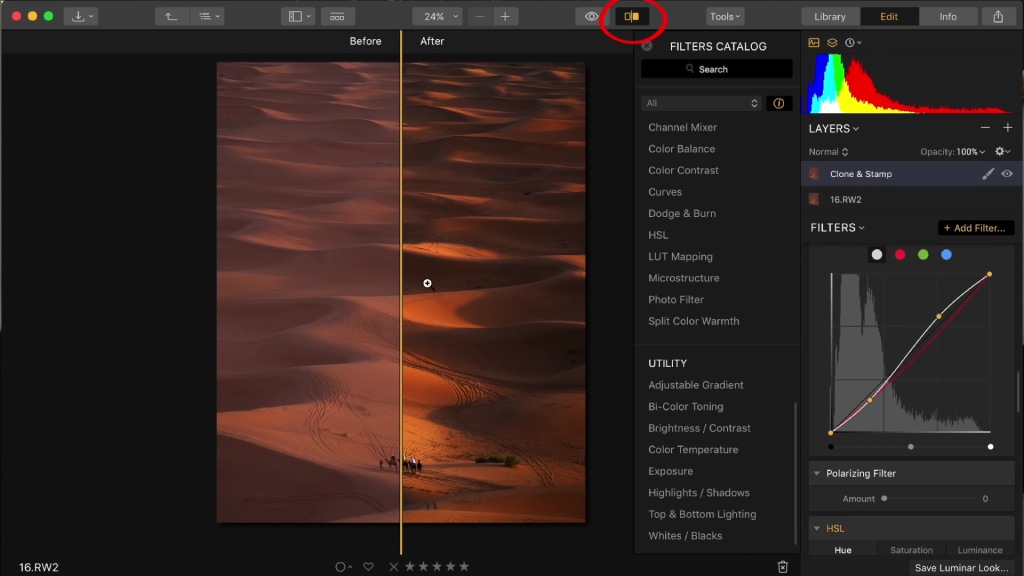
Luminar 3 also has a variety of filters you can use to easily improve the quality of your photos.
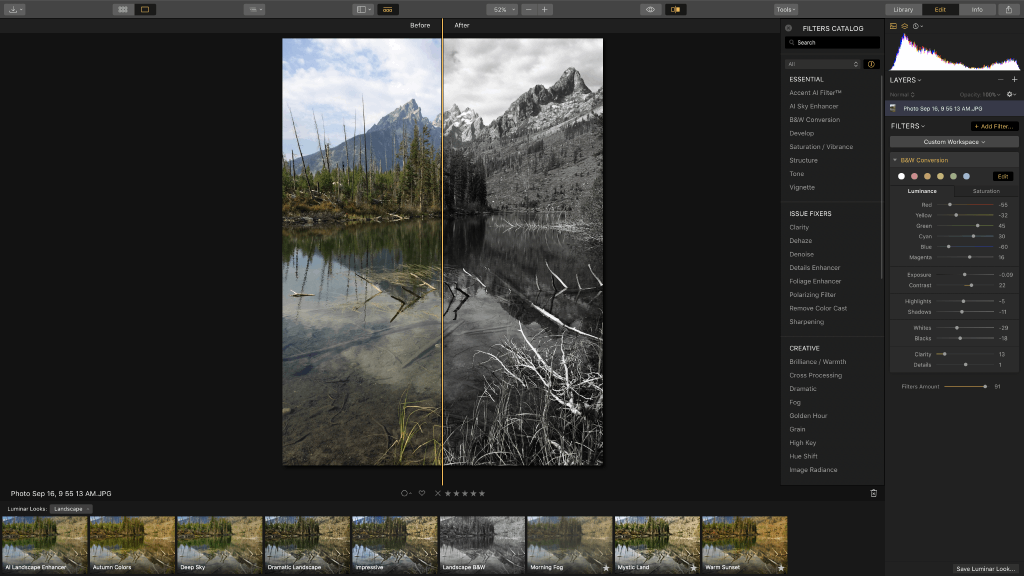
Above, I used the Black and White filter to completely alter the mood of the shot.
And though this filter has many more individual controls than the Workspace and Look I used on the previous examples, I still only invested about 60 seconds to perfecting the shot just how I want. You can see just a sampling of the filters in the menu shown to the right of the photo in the screenshot above.

I think you get the point…
I've found that Luminar 3 is fast, easy to use, and has an intuitive layout that’s easy to learn.
There are no recurring fees, either. It’s $69, a price that gets you lifetime access!
Learn More:
- Luminar Review - What You Need to Know About Luminar 3
- Easy Workflow for Amazing Landscape Photography
We Recommend
EASY Workflow for AMAZING Landscape Photography
 Image Credit: Max Rive
I've said it before, and I'll say it again...
The workflow you use to create your final images is going to depend on who you are, what your skill set is, and, most importantly, your personal style.
That being said, there are some tricks that you can use to speed up and streamline your post-processing workflow, that way you're sure to get the best results without spending all day and night on editing.
This mantra of developing an easy, yet effective workflow is outlined in detail in the video below by David Johnston.
What's great about David's workflow is that it truly is quick and easy. Better still, with a free Luminar 2018 trial available, you can get loaded up with the very software he used to create the gorgeous images from the video.
Just for the sake of having some written instructions, let's review some of the pointers David offers in the video.
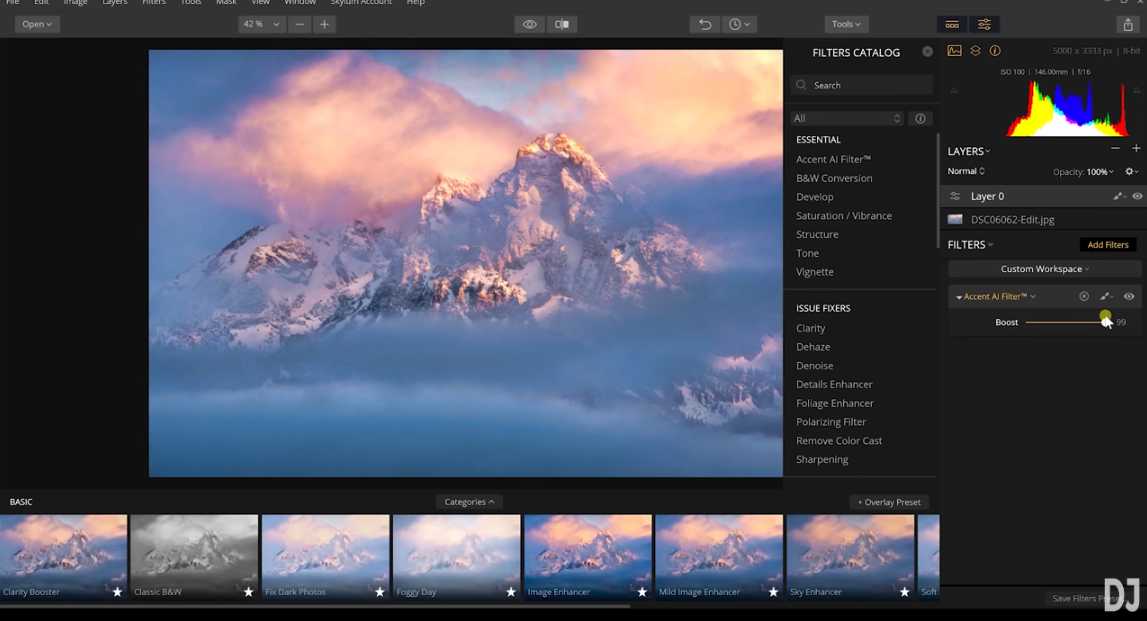
Step 1: Select and Adjust a Preset
 YouTube Screenshot/David Johnston
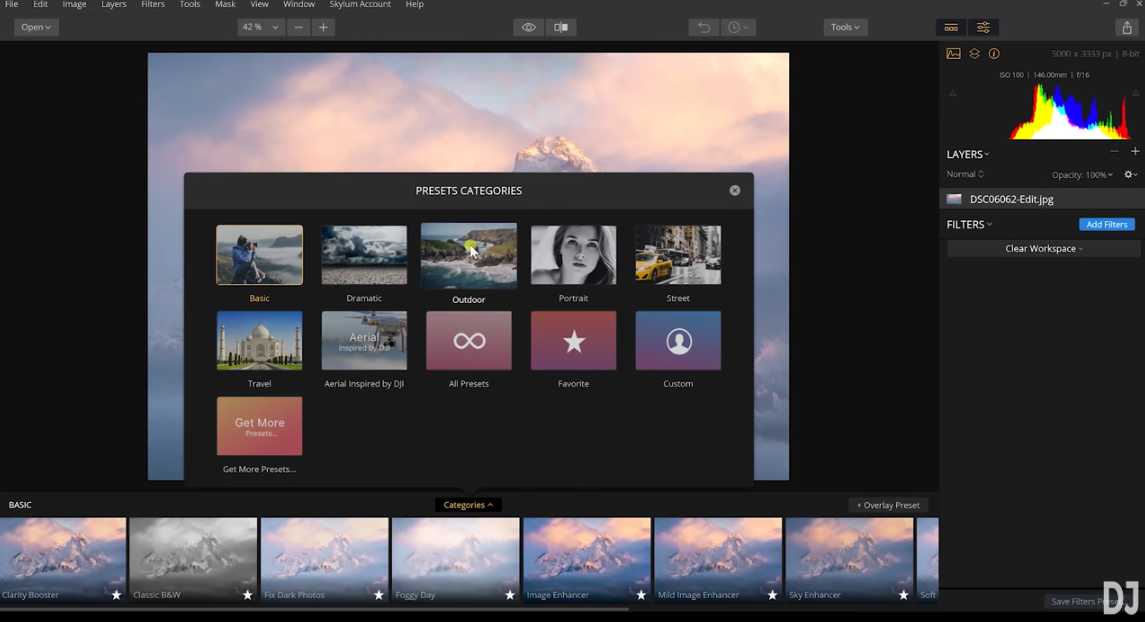
Starting out with a preset is a great way to kick off editing an image because you can make instant changes to the shot that have tons of impact.
As you can see above, it's a simple matter of selecting which category of presets you want to inspect, and then selecting the desired preset in that category.
A handy feature in Luminar 2018 is that you can preview the effect the preset will have in the carousel at the bottom of the screen (shown above).
So not only can you speed up your workflow by using presets, but the fact that you can see the effect the preset will have before applying it only speeds things up more.
 YouTube Screenshot/David Johnston
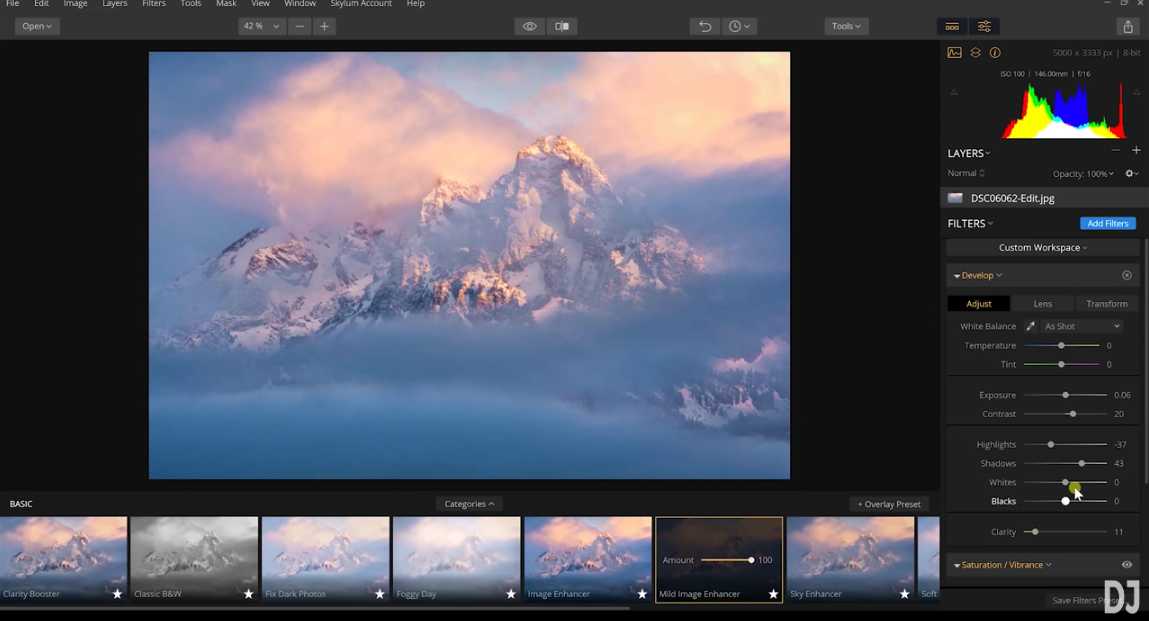
Once you select a preset, you're presented with a number of sliders that you can fine-tune should you desire.
With the jumpstart you get from the preset, it's often just a matter of making slight adjustments here and there to the adjustments that have already been made via the preset.
As David demonstrates in the video, it can also be advantageous to leave the individual preset controls alone in favor of changing the "Amount" or the intensity of the preset's effects by adjusting that slider by itself.
Learn More:
Step 2: Add Filters
 YouTube Screenshot/David Johnston
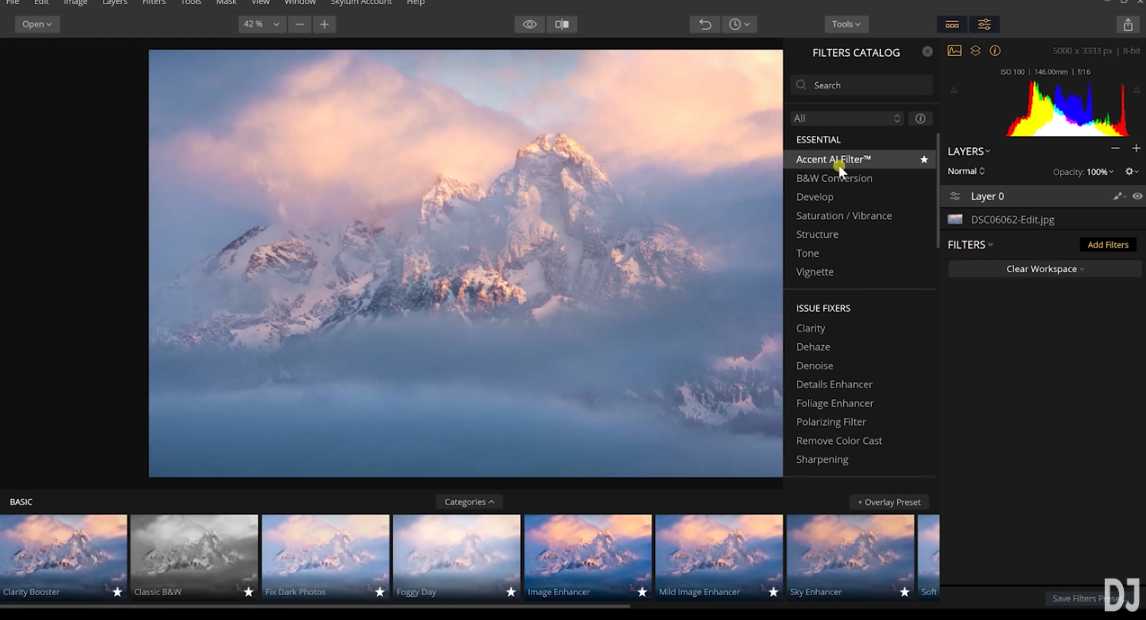
To customize your image even more, David suggests adding filters.
To do so, go to Layers > Add New Adjustment Layer. Then, with the new layer active, click on the blue "Add Filters" button in the toolbar on the right side of the screen.
As shown in the video, a great option for enhancing your photo is the Accent AI Filter.
This filter has a variety of effects, including boosting saturation, bringing out details in shadowed and highlighted areas, and increasing contrast. Compare the screenshots above and below to see the difference that this one filter has on the look of the image.
 YouTube Screenshot/David Johnston
Naturally, you don't have to use this filter if you don't want.
That's what's so great about the selection of tools at your disposal in programs like this - you can pick and choose what filters to use (if any) to get the desired results.
Editor's Tip: Ready to start editing your photos? Take advantage of the Luminar 2018 free trial while you still can!
Step 3: Work on the Hue, Saturation, and Luminance (HSL)
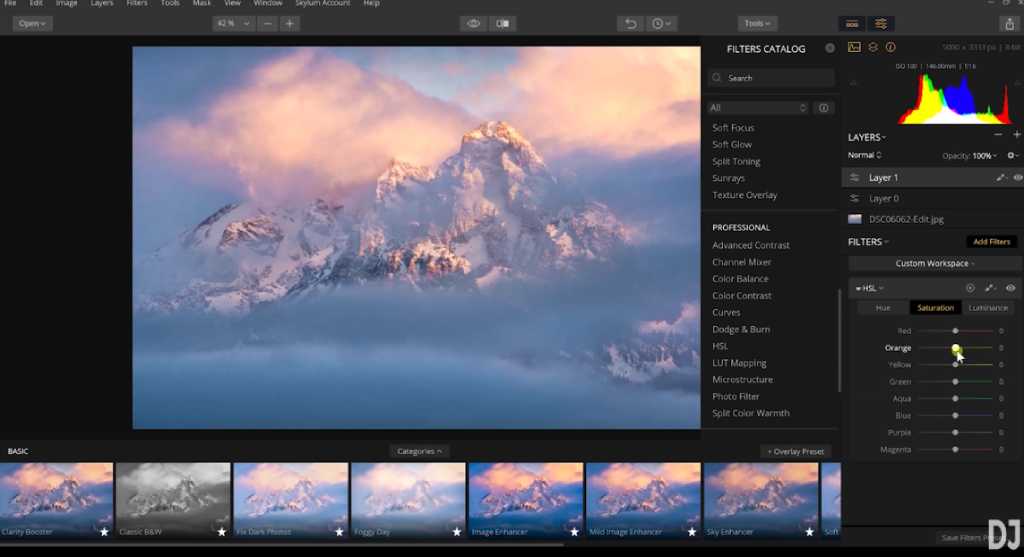 YouTube Screenshot/David Johnston
The next step in David's landscape photography workflow is to work on the HSL sliders to bring out the desired colors in the shot.
Again, create a new layer, and then as you can see in the screenshot above, you can manipulate individual colors on each of the three HSL scales. This gives you incredible control over the colors in the final image.
The Hue sliders are typically left alone unless something went wrong with the white balance when the shot was taken.
That means that most of the manipulations here will be made on the saturation and luminance scales.
But, again, as you develop your own workflow, you might find that your approach to HSL edits might be slightly different.
Quick Tip: Making HSL adjustments is all about subtlety. Rather than going bonkers with wild, overdone edits, strive to enhance the colors just enough that your photo has more visual appeal while still looking realistic.
Step 4: Adjust Tone Curves
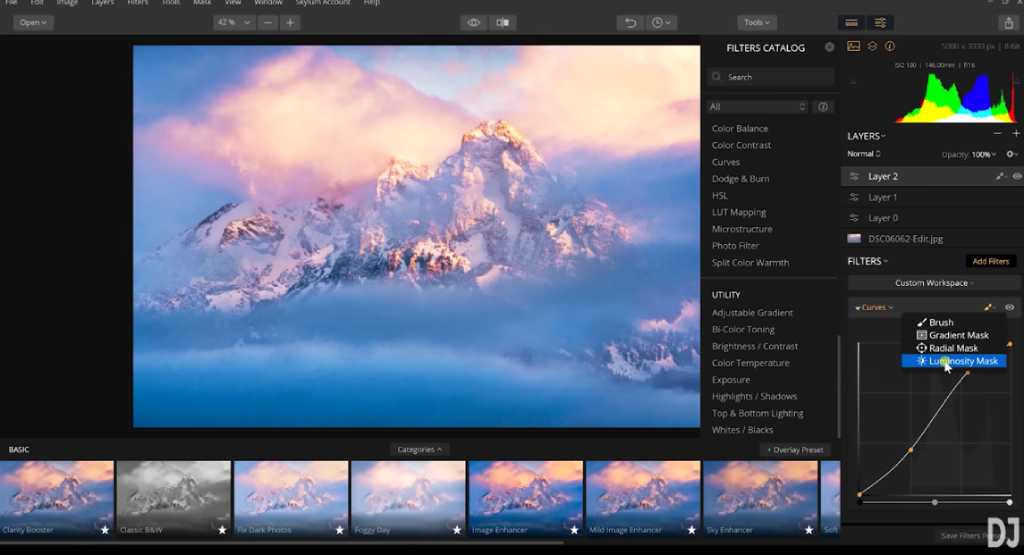 YouTube Screenshot/David Johnston
By adjusting the tone curves, you can completely change how your image looks.
Typically, photographers like to boost contrast a little bit by manipulating the tone curves into an S-shape.
David takes this approach, bringing up the highlights and bringing down the shadows.
A great trick to use with tone curves is to convert them into a luminosity mask.
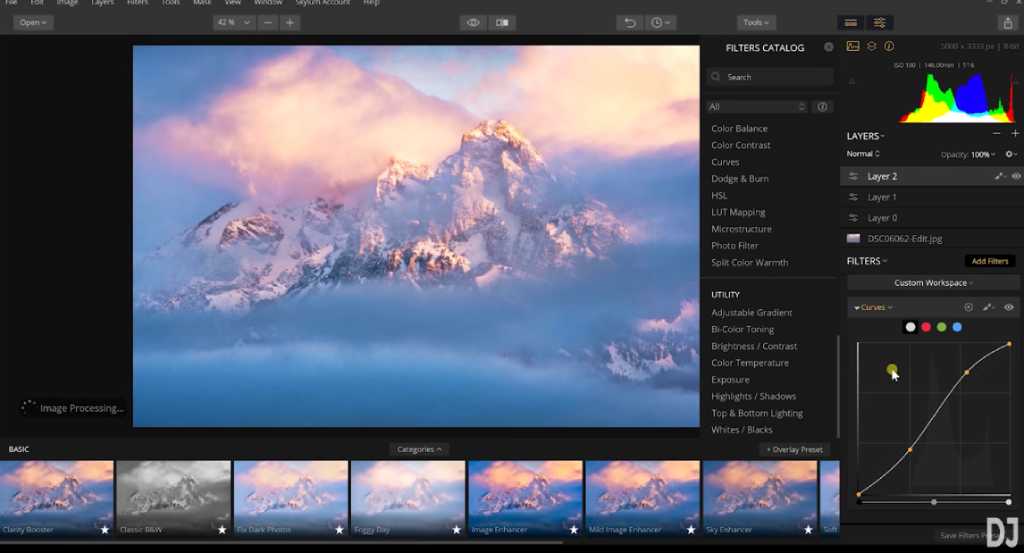 YouTube Screenshot/David Johnston
To add a luminosity mask, go to the Custom Workspace panel and click the brush tool. From there, click Luminosity Mask.
What this will do is add the tone curve effects to anything that's 50 percent gray or lighter.
Though you might not be able to see the difference between the screenshot above and the one previous to it, the latter is slightly more subtle thanks to the luminosity mask.
Step 5: Make Further Adjustments as Needed
 YouTube Screenshot/David Johnston
The process of fine-tuning your landscape images might include other adjustments, but of course that depends on the image and the look you'd like to achieve.
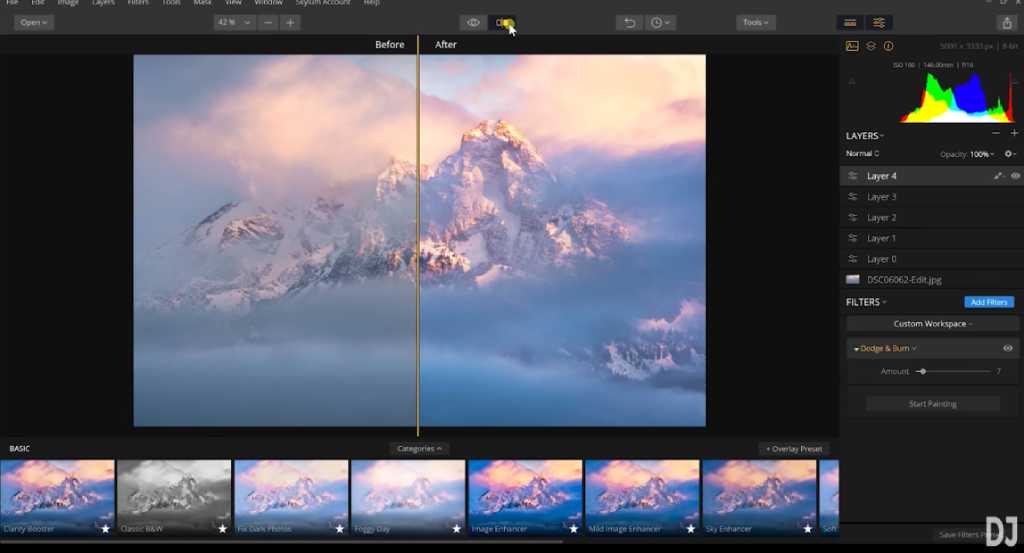
In Luminar 2018, you can dodge or burn, which David chose to do in his image, to bring out even more detail in the image.
Of course, there's a host of other tools at your disposal as well that you can explore.
Ultimately, though, this quick 5-step process had a significant impact on David's image, as you can see in the before and after above. Talk about a difference!
All that was done in less than 10 minutes, too, so it's effective and quick to use this program to fine-tune your landscape photos.
My Experience With Skylum
Interesting Fact: Way back in 1998, I picked up Adobe’s Photoshop 5.0: Classroom in a Book, and started to teach myself Photoshop. I subsequently spent nearly five years of my life, all the way up to CS 8.0, picking up every Classroom in a Book that Adobe released on Photoshop.
Still to this day, I’m a Photoshop user and always learning what I can as the program grows and evolves. Typing this, I’m realizing it’s been a 20-year journey. Crazy!
Back in 2012, I started playing around with Lightroom. However, it wasn’t until 2014 and version 5.0 that I got serious with Lightroom with the help of watching a TON of YouTube videos. Roll forward four years and I’m still grinding away at it.
The point I’m making here is that I’ve heavily invested myself into a very long journey with Adobe. They have done a great job, and I’ve created some decent photos along the way using their software, if I do say so myself.
Keeping that in mind, a few years ago, a company called MacPhun came on board as a supporting vendor of PhotographyTalk. They had a good product with a growing following of loyal users. But, if I’m completely honest, it didn’t have that WOW factor that I felt could pull users away from Adobe.
Earlier this year, Macphun changed their name to Skylum and released Luminar 2018. Three months ago, they sent me a copy to play around with. Again, if I’m being honest, I didn’t touch it for a couple weeks, and thinking back on it, it might have actually been three weeks.
When I opened it - no joke - it was within minutes that I converted a blah photo into a wow photo (I know that sounds corny!). The software is crazy intuitive with a number of presets that makes editing photos extremely efficient with remarkable results.
And the best part…there’s manual development tools for those days when I don’t want to use presets and want to adjust my photos myself. All the tools I need to do that are easily found on the right side of the screen as I’m working in Luminar 2018.
Folks, I’ve not closed this program out since I opened it over 2 months ago! It’s that good. Skylum has really made post-processing fun again, fast, and freakin’ awesome! In short, they have hit an out-of-the-park home run!
If I can make one recommendation to you, it’s to go download the free trial now. Don’t wait to open it like I did…download it and you’ll see why so many professional photographers (myself included!) are so excited about this software. You’ve got nothing to lose - see Luminar 2018 for yourself!
We Recommend
How to Get Started in Luminar

I know it can be difficult to learn how to use a new software program.
That's especially true when it comes to post-processing because it's easy to get comfortable with the program you have, even if it isn't the best program for you.
But many photographers are fed up with Lightroom and Photoshop, if for no other reason than the monthly fee.
If you're one such photographer, Luminar is a cost-effective and highly powerful program that's worth a good, long look.
In the video above, Mark Harrison (who converted from Lightroom to Luminar), offers a quick Luminar tutorial that shows you a few basic and advanced tools that will help you get started in Luminar.
Also featured in the video are some of Luminar's fancy tools that Lightroom simply does not have.
See below for an overview of a few of the tools Mark discusses.
Luminar Looks Get the Editing Process Started Quickly
One of the most popular features of Luminar 3 are its Looks, or presets.
The Looks can be used as a starting point for your editing process - simply apply the Look and use the slider to refine the effect it has on the image.
 YouTube Screenshot/Mark Harrison
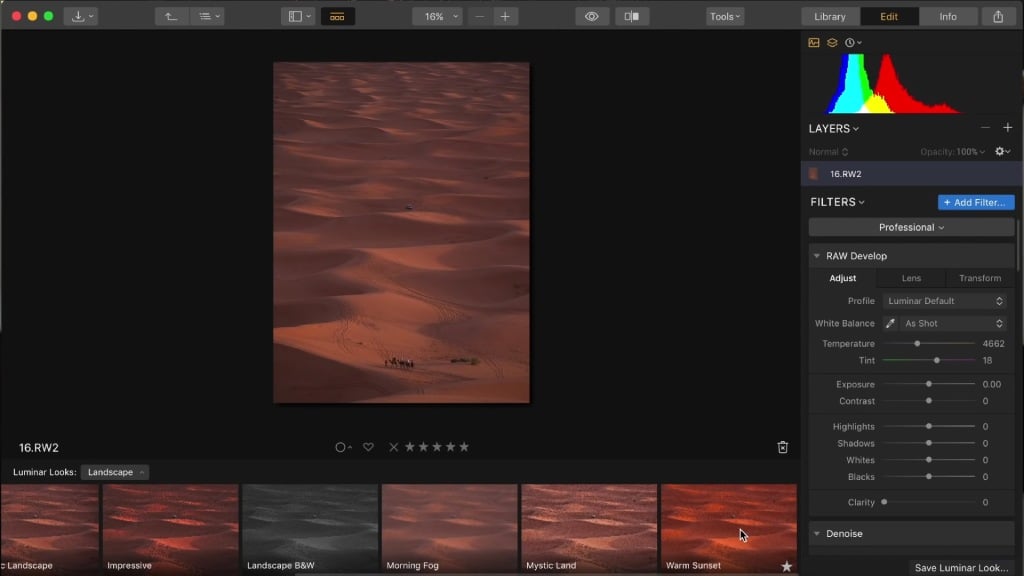
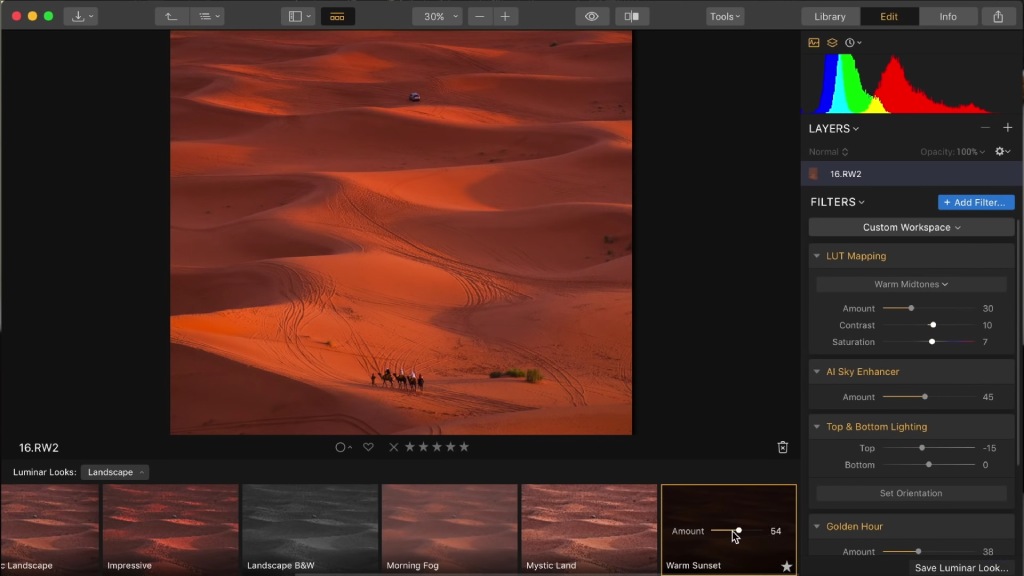
As you can see when comparing the two screenshots above and below, by applying this one Look (in this case, the Warm Sunset Look from the Landscape Collection), Mark's photo has much more drama and visual appeal.
 YouTube Screenshot/Mark Harrison
Luminar has a variety of collections as well, including Portrait, Landscape, Street, Lifestyle, Dramatic, Aerial, and Essentials, just to name a few.
You can favorite Looks and create your own collection of your most-often-used ones, and you can also create your own custom Looks to streamline your editing process even further.
Not only are these Looks simple to use, but you also won't find this feature in the much more expensive Lightroom!
Learn More:
Luminar Has the Precise Editing Tools You Want
 YouTube Screenshot/Mark Harrison
One thing that Lightroom and Photoshop users adore is the ability to make precise and non-destructive edits.
Luminar offers that same functionality with all the non-destructive editing tools you could possibly want.
Take advantage of Layers, Brushes, and Masking for the ultimate in selective editing.
You can also Clone and Erase to your heart's content.
Using these tools couldn't be easier...
In the screenshot above, you can see a car in the middle of the photo. To remove it, Mark just has to use the Clone and Stamp tool.
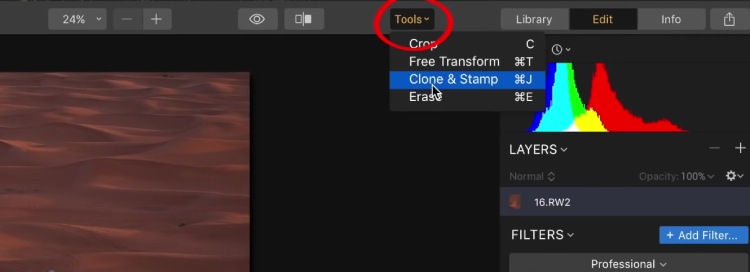 YouTube Screenshot/Mark Harrison
To use this tool to remove the car, Mark selected it from the Tools dropdown menu.
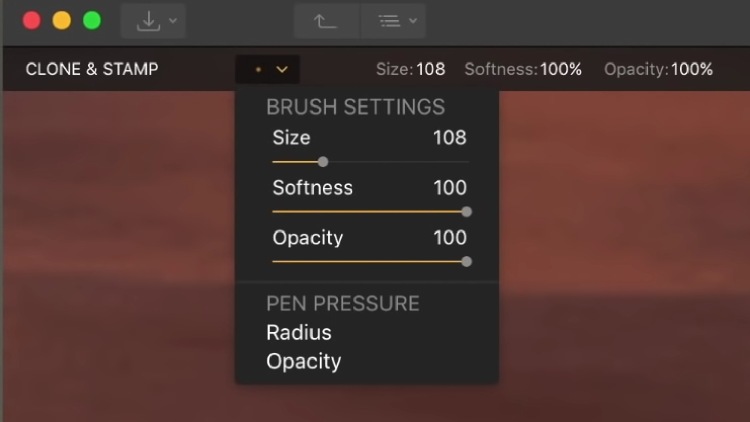
Then, select the source by clicking on the area that you wish to clone and adjust the size, softness, and opacity of the brush as needed.
 YouTube Screenshot/Mark Harrison
The final step is to just paint away the undesired object.
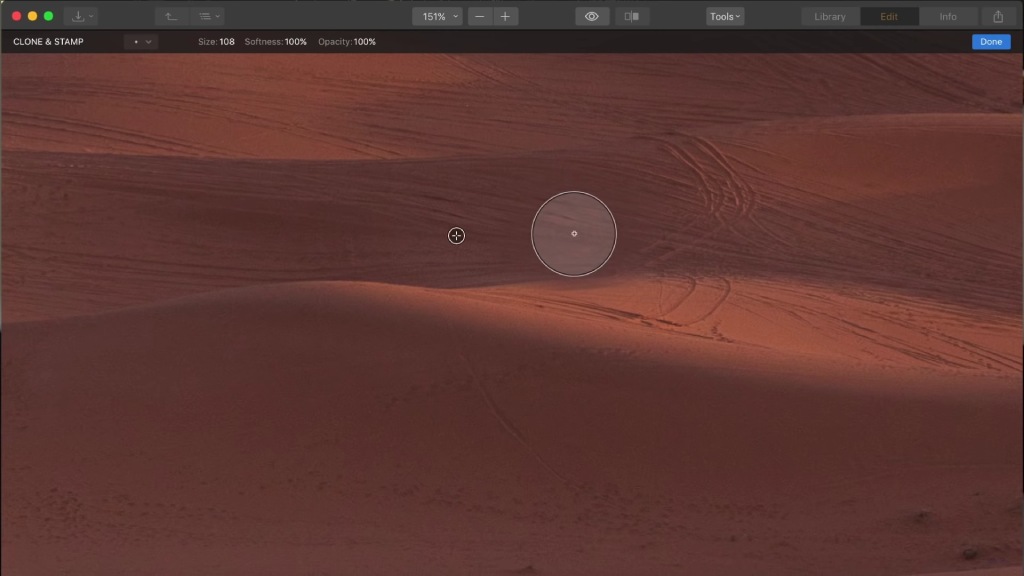 YouTube Screenshot/Mark Harrison
As you can see in the screenshot above, the Clone and Stamp tool is highly effective in removing the car.
Remember as well that this is a non-destructive edit, so the original image file is not impacted in any way.
Luminar Workspaces Make Editing Much More Convenient
 YouTube Screenshot/Mark Harrison
Editing a portrait? Luminar has a Workspace for that.
Working on a landscape? There's a Workspace for that as well.
Luminar has a variety of Workspaces that include recommended tools for specific types of photographs, from Black and White to Street Photography to Aerial Photography.
There is also a Workspace for making super-fast edits - the Quick & Awesome Workspace puts incredible results at your fingertips with less than 10 seconds of editing.
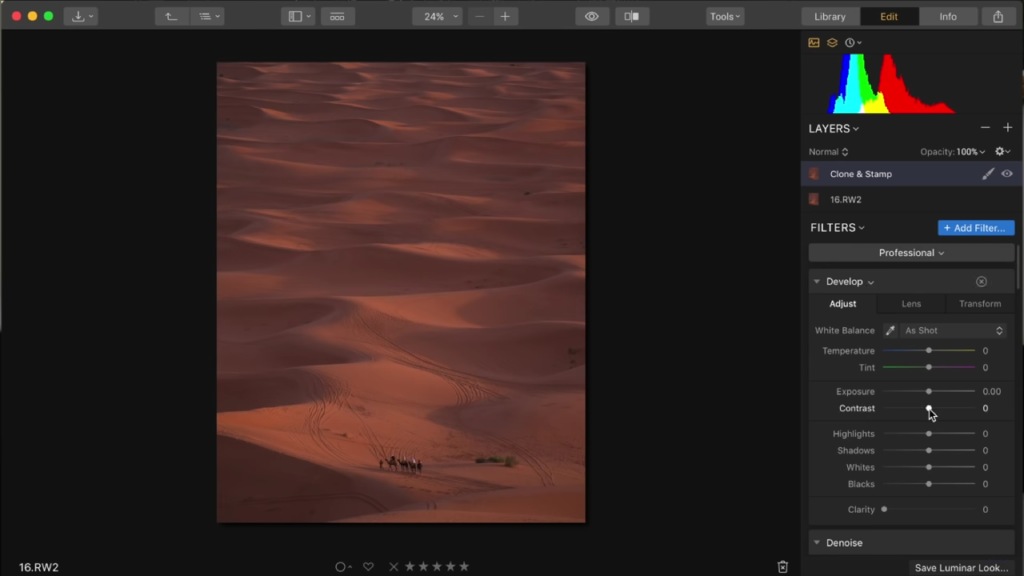
Luminar has even included a Professional Workspace (shown above) if you really want to get into the nitty-gritty of editing. The best part? You can customize any of these workspaces or make your own.
 YouTube Screenshot/Mark Harrison
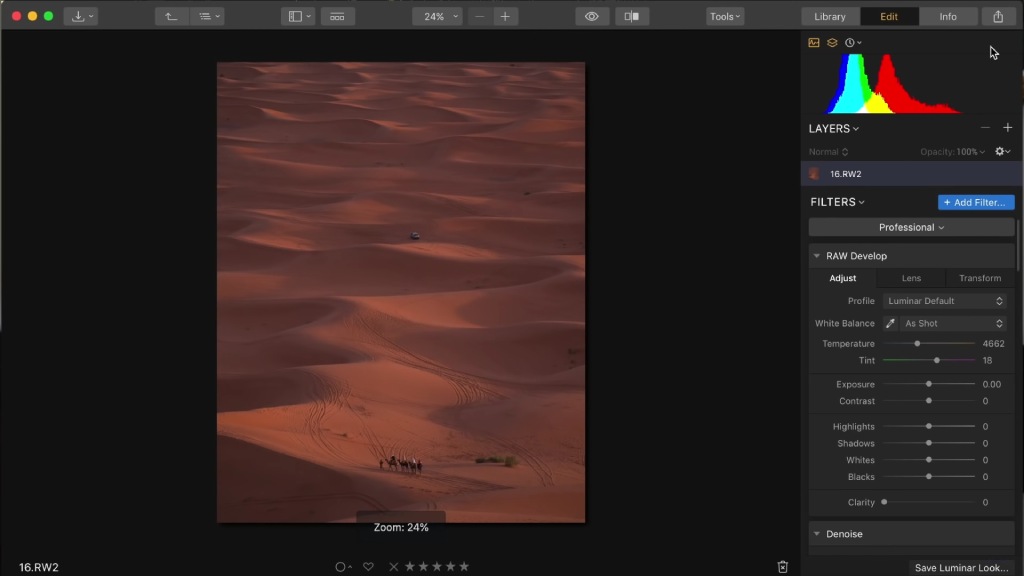
As Mark demonstrates in the video, even using the souped-up Professional Workspace is easy.
You can use it to make basic RAW adjustments to elements like contrast, highlights and shadows, whites and blacks, and so forth, as seen in the screenshot above.
There are also tools for Dehaze, Denoise, adjusting Curves, Split Toning, Structure, and Dodging and Burning, to name just a few.
Luminar has also implemented a variety of tools in the Professional Workspace that Lightroom doesn't have.
For example, you can use the Advanced Contrast tool to make adjustments to the Highlights, Midtones, and Shadows.
Even better, there's AI-powered tools that can make a dramatic difference in your photo automatically.

For instance, the Accent AI filter is an intelligent slider that improves the color, tone, details, and depth of a photo in a matter of seconds.
In fact, this tool analyzes the photo and makes about a dozen changes automatically so you don't have to do it manually.
As you can see in the image above, just using the Accent AI filter creates a photo that is miles better than the original.
And the best part? It works on any kind of photo, be it a landscape, portrait, street scene, or something in between.
Just adjust the Boost slider left or right to make instant changes to highlights, shadows, contrast, saturation, and much more.
And since it’s powered by AI, the filter intelligently “understands” what each area of the photo needs and improves it based on the parameters of the shot, like dark and light zones, structures, objects, and colors.
In other words, though you still have control by moving the slider, Luminar’s Accent AI filter makes editing your photos much, much easier.
Luminar has an AI Sky Enhancer as well.
As the name implies, this AI-powered tool works only on the sky to boost contrast for much more dramatic shots.
You can learn all about how to use the AI Sky Enhancer in this detailed tutorial.
Learn More:
How to Get Started in Luminar
 YouTube Screenshot/Mark Harrison
As you can see, getting started in Luminar is a simple process.
On the one hand, you can use the existing Looks, Filters, and Workspaces to make fast edits, but still have plenty of control over how they look.
On the other hand, you can use Luminar's AI-powered tools to beautifully enhance your images.
There are plenty of tools for making fine, manual adjustments as well.
As you can see above, Mark was able to transform his photo into something quite eye-catching using just a few tools.
Photographers of all skill levels can utilize Luminar to take their photos to the next level as well! That’s true whether you use Luminar as a standalone editor or as a plug-in. Give it a try for free!
We Recommend
How to Pump Life Into Your Landscape Photo in Under 15 Minutes

I learned how to post-process my landscape photos from Serge Ramelli. It goes without saying that this guy is a master at his craft.
So, when I came across the video below, it was a topic that I had to share with you.
As I’m sure you’ve encountered before, there are times when the lighting just isn’t working for you or when the photo just doesn’t have the visual pop you want.
Those are bummer moments, for sure.
But there’s a way that you can breathe new life into your photos that’s fast, easy, and beautifully effective.
Thanks to Luminar, you can take your so-so landscapes and turn them into true works of art!
 YouTube Screenshot/Serge Ramelli
Above, you see Serge’s original photo of the Tunnel View at Yosemite National Park. I think you’ll agree that at this stage, it’s not the most impressive and that it lacks a bit of drama that we know the scene is capable of producing.
As Serge points out in his video, there’s a lot you can do in Lightroom to enhance an image like this.
 YouTube Screenshot/Serge Ramelli
For example, after some tweaking using only Lightroom, Serge managed to turn his original photo into something far more interesting, as shown above.
Yet, there’s still something missing…

That’s where Luminar comes in.
Think of Luminar as the extra bells and whistles that you need to really punch up the drama in your photos.
 YouTube Screenshot/Serge Ramelli
Even better, Luminar is incredibly easy to use, with presets and filters that get you going and tools that allow you to make more precise changes to your photos if need be.
In the screenshot above, you can see how the Misty Land preset in Luminar adds a ton of drama to the shot.
 YouTube Screenshot/Serge Ramelli
You can even mix presets and filters to get a custom look for your image.
In the screenshot above, Serge has mixed Misty Land with Mild Image Enhancer, which brings a little more definition to the shot. All that took just a couple of minutes!
In other words, Luminar is extraordinarily powerful so you get incredible results, but it’s streamlined and easy to use.
That means that even a beginner photographer with very little experience post-processing their images can make something gorgeous.
You can see the difference that just a few enhancements made to Serge’s image below:
 YouTube Screenshot/Serge Ramelli
This just scratches the surface of what Luminar can do, though.
Be sure to watch Serge’s full video above for a detailed guide to Luminar. You can also learn more by clicking here.
We Recommend
How to Sync and Quickly Edit Photos
I don't know many photographers that would rather sit in front of their computer editing photos than be out with their camera taking pictures.
Don't get me wrong - I enjoy editing my photos and seeing the final result come to fruition. I just want that final result to come more quickly!
In this guide, we'll take a look at how to sync edits and how to quickly edit photos so they have maximum visual appeal.
To act as our guideline, let's refer to the video above by Jim Nix.
Jim is a photographer extraordinaire and experienced in using Luminar 3 for syncing and editing images.
Below, I've outlined Jim's workflow for easy reference.
Ready to take your photo editing abilities to the next level? Try Luminar 3 now.
How to Sync Edits in Luminar 3
Syncing edits is a great way to make quick work of editing photos because you can copy edits from one image and apply those edits en masse to other images.
As Jim notes in the video, Luminar 3 makes this a streamlined process that allows you to apply edits across any number of photos in a matter of seconds.
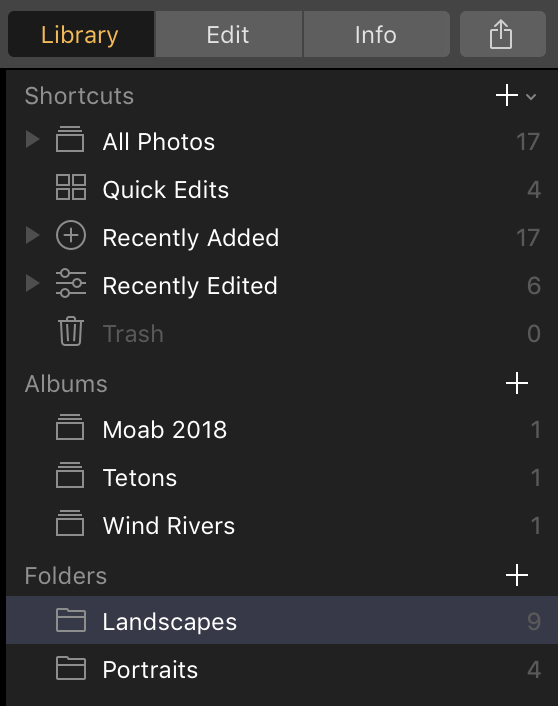
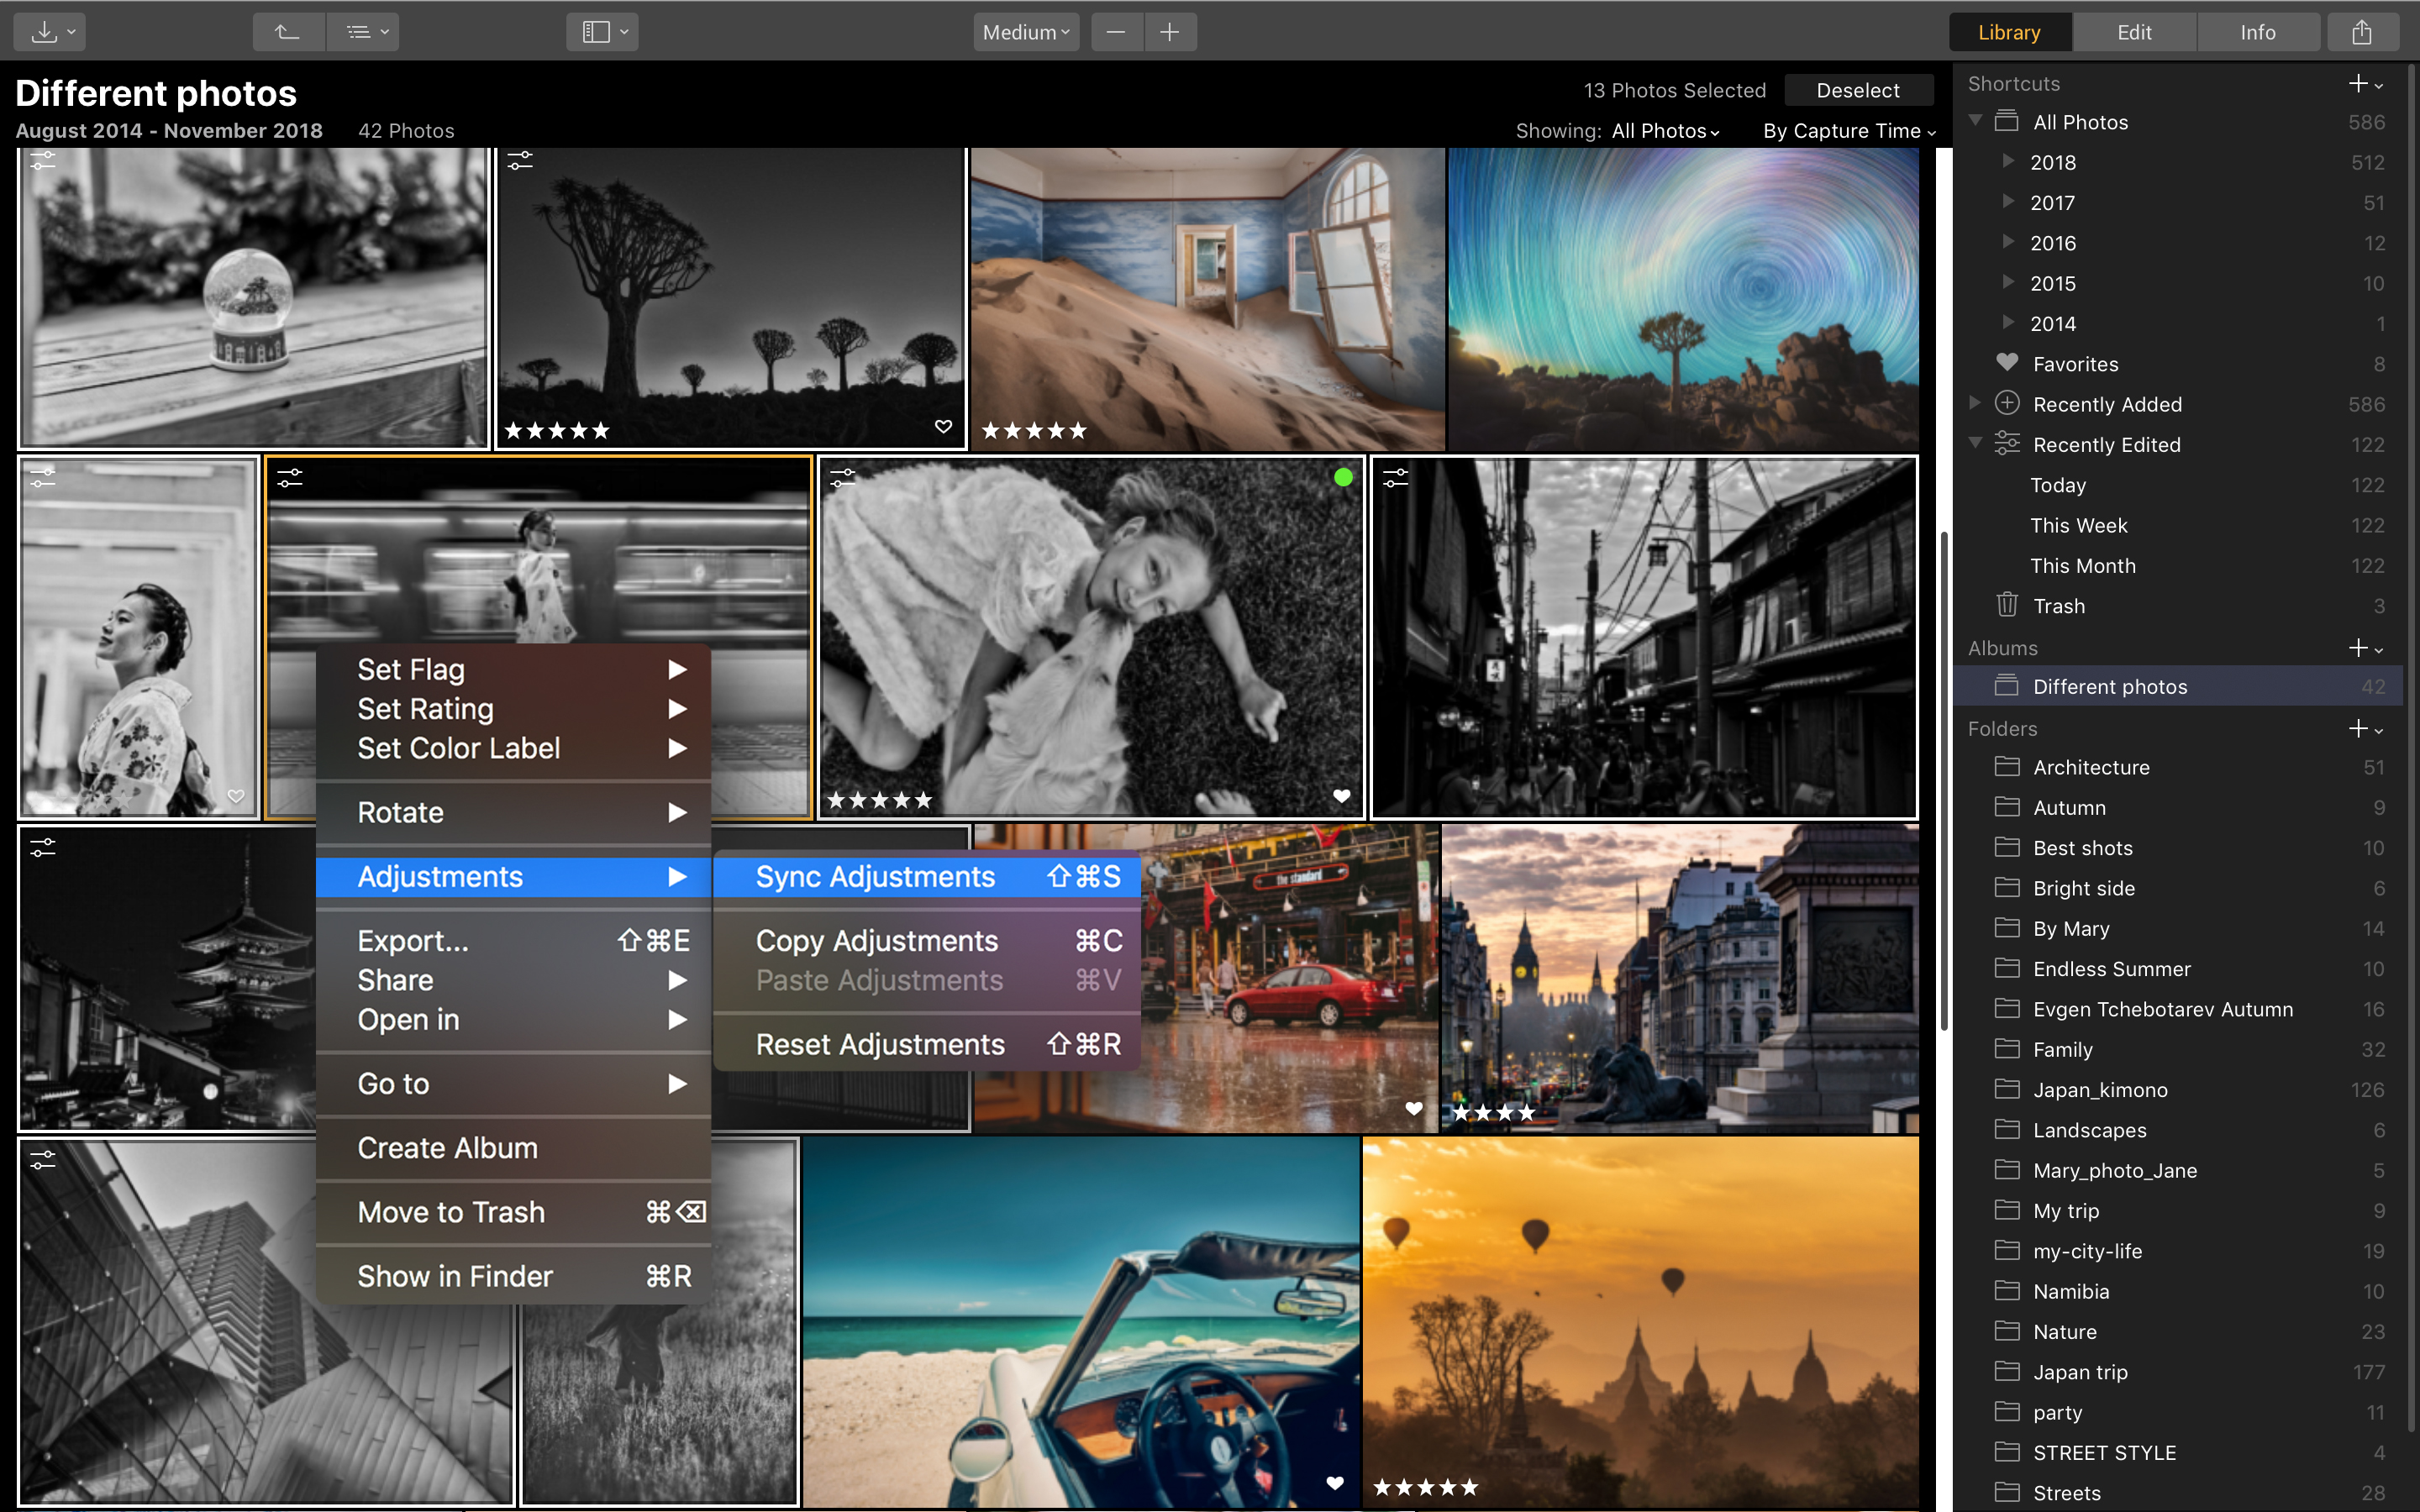
First, select the folder you wish to work in from the Luminar 3 Library, as shown above. I've selected the Landscape Folder to work in.
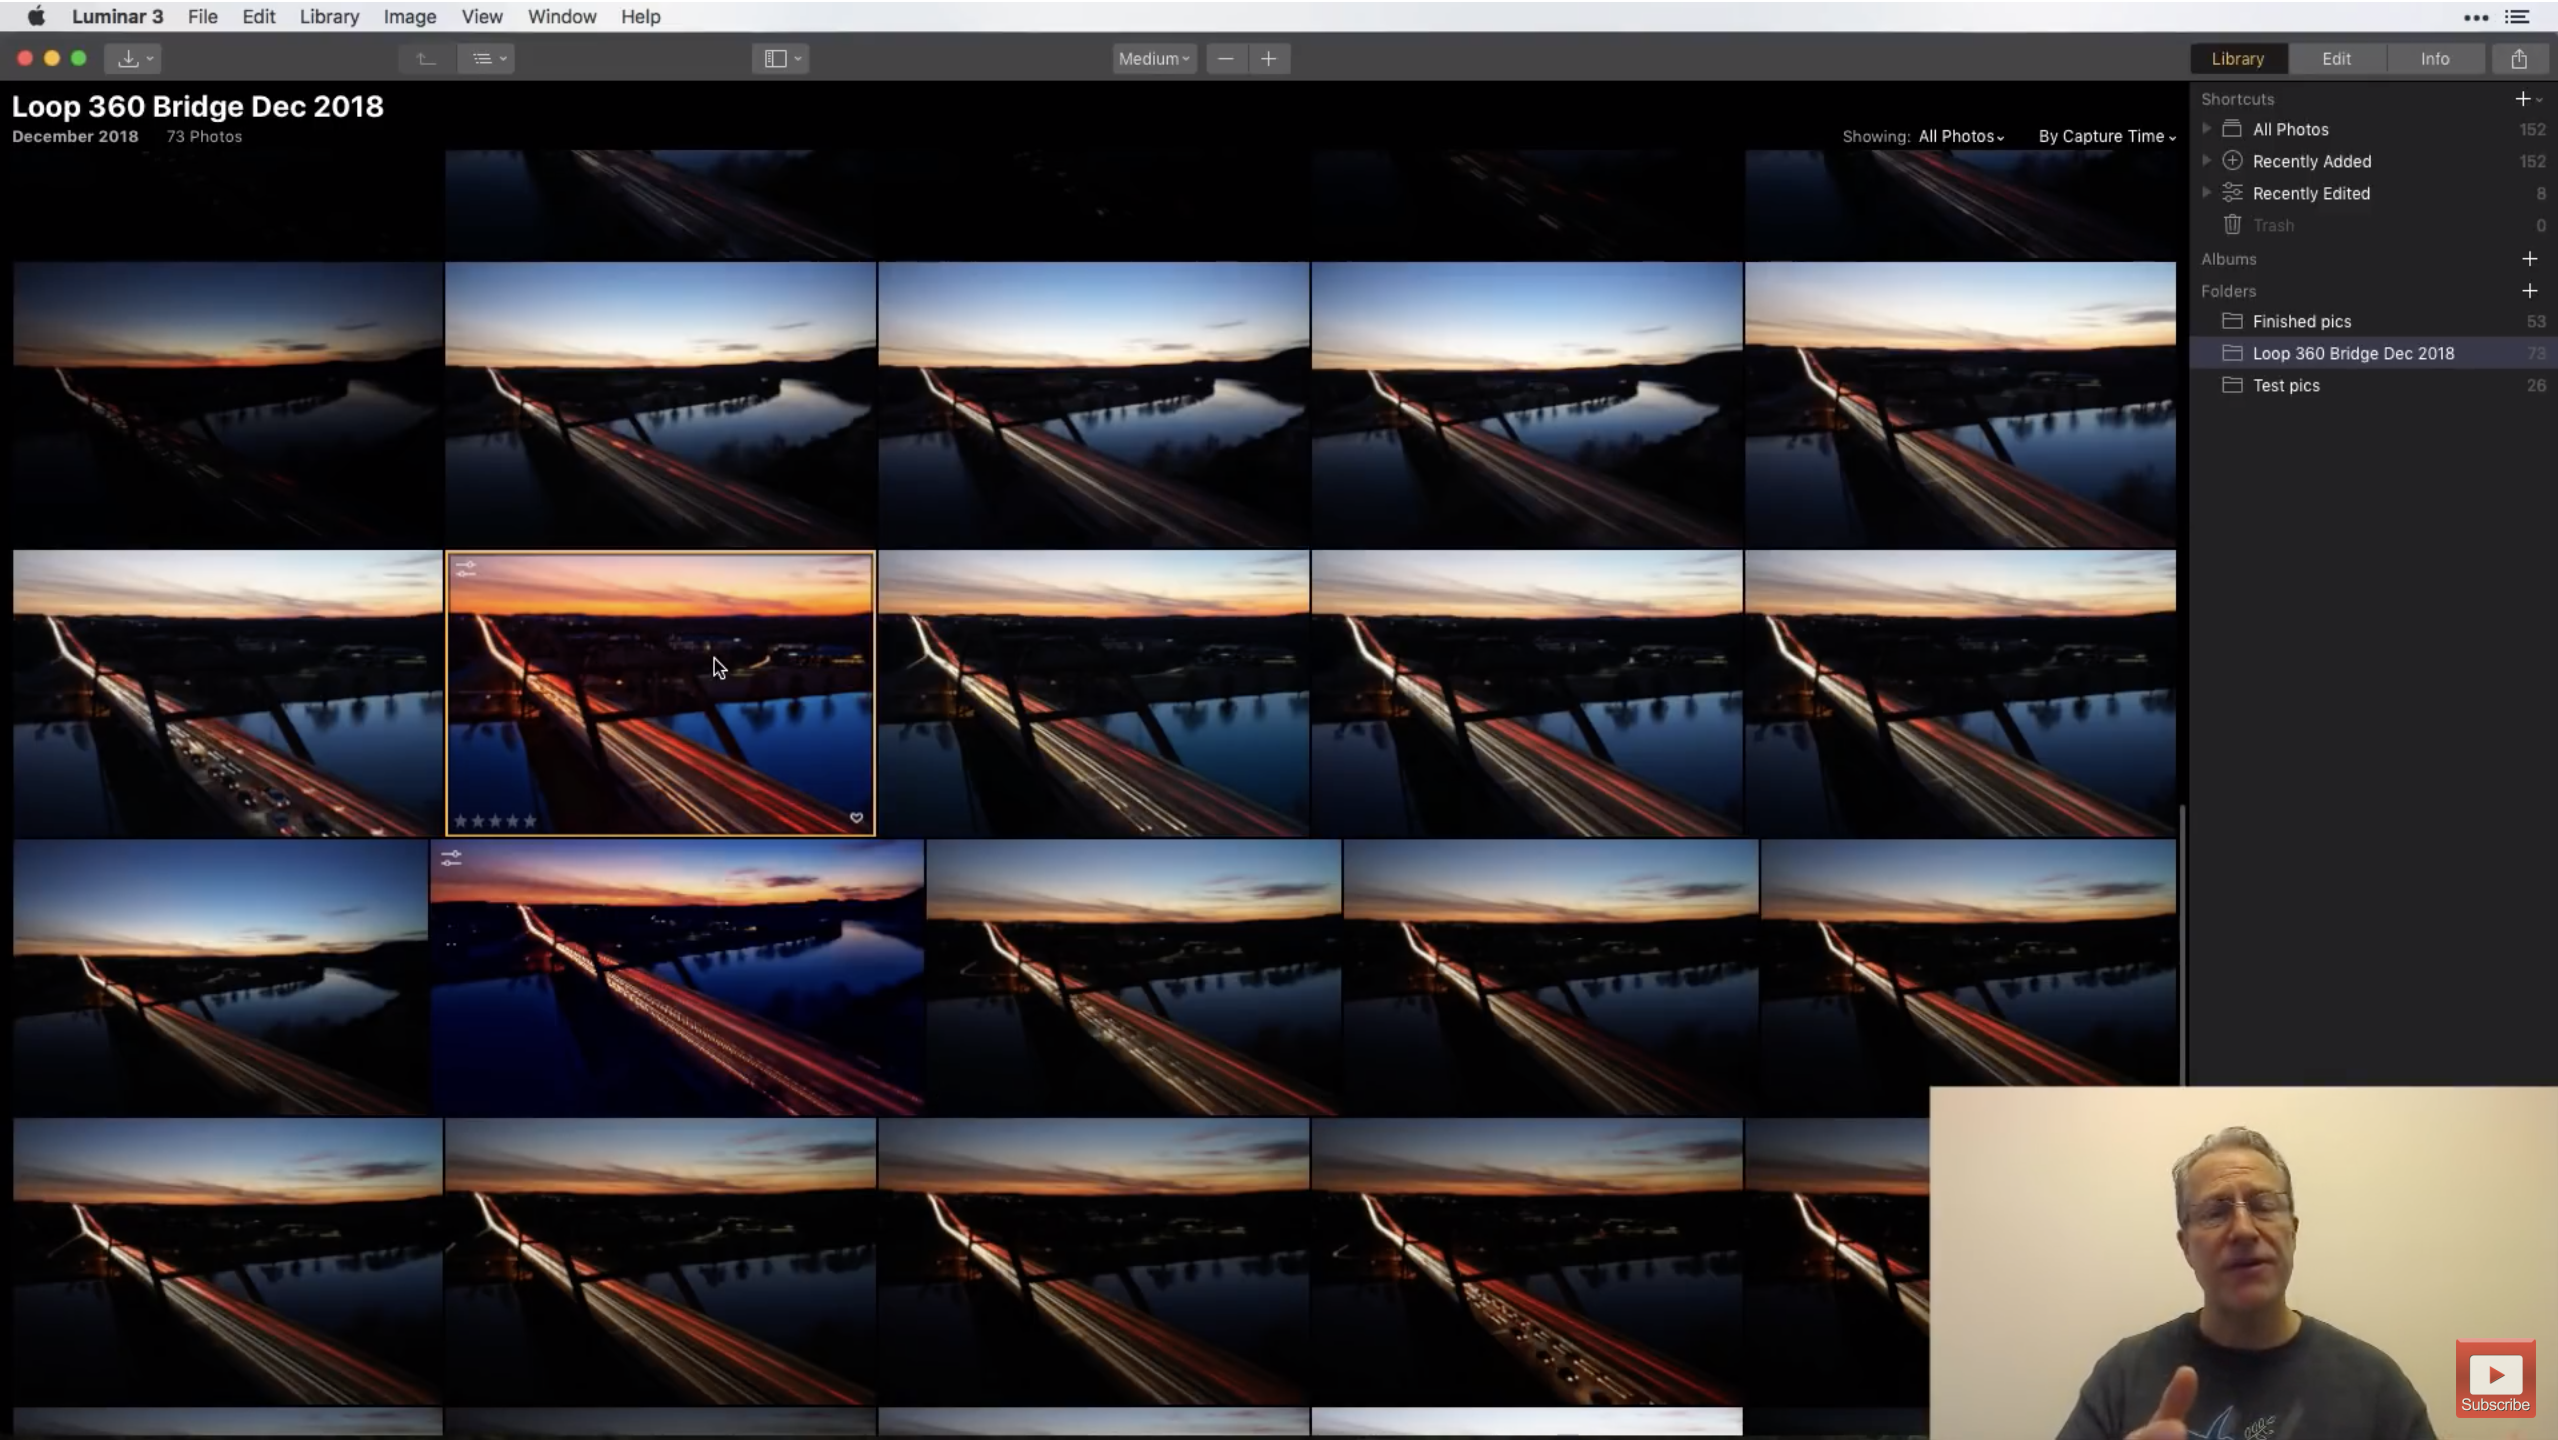
Next, select an edited image in the folder to serve as the source for the sync (this image will have a yellow box around it to indicate it's been selected as the source, as shown above).
Then, press CMD/CTRL and click on additional photos you'd like to sync. These photos will have a white box around them to indicate that the edits will be synced to them. In Jim's case, he's selected two other photos, as shown above.

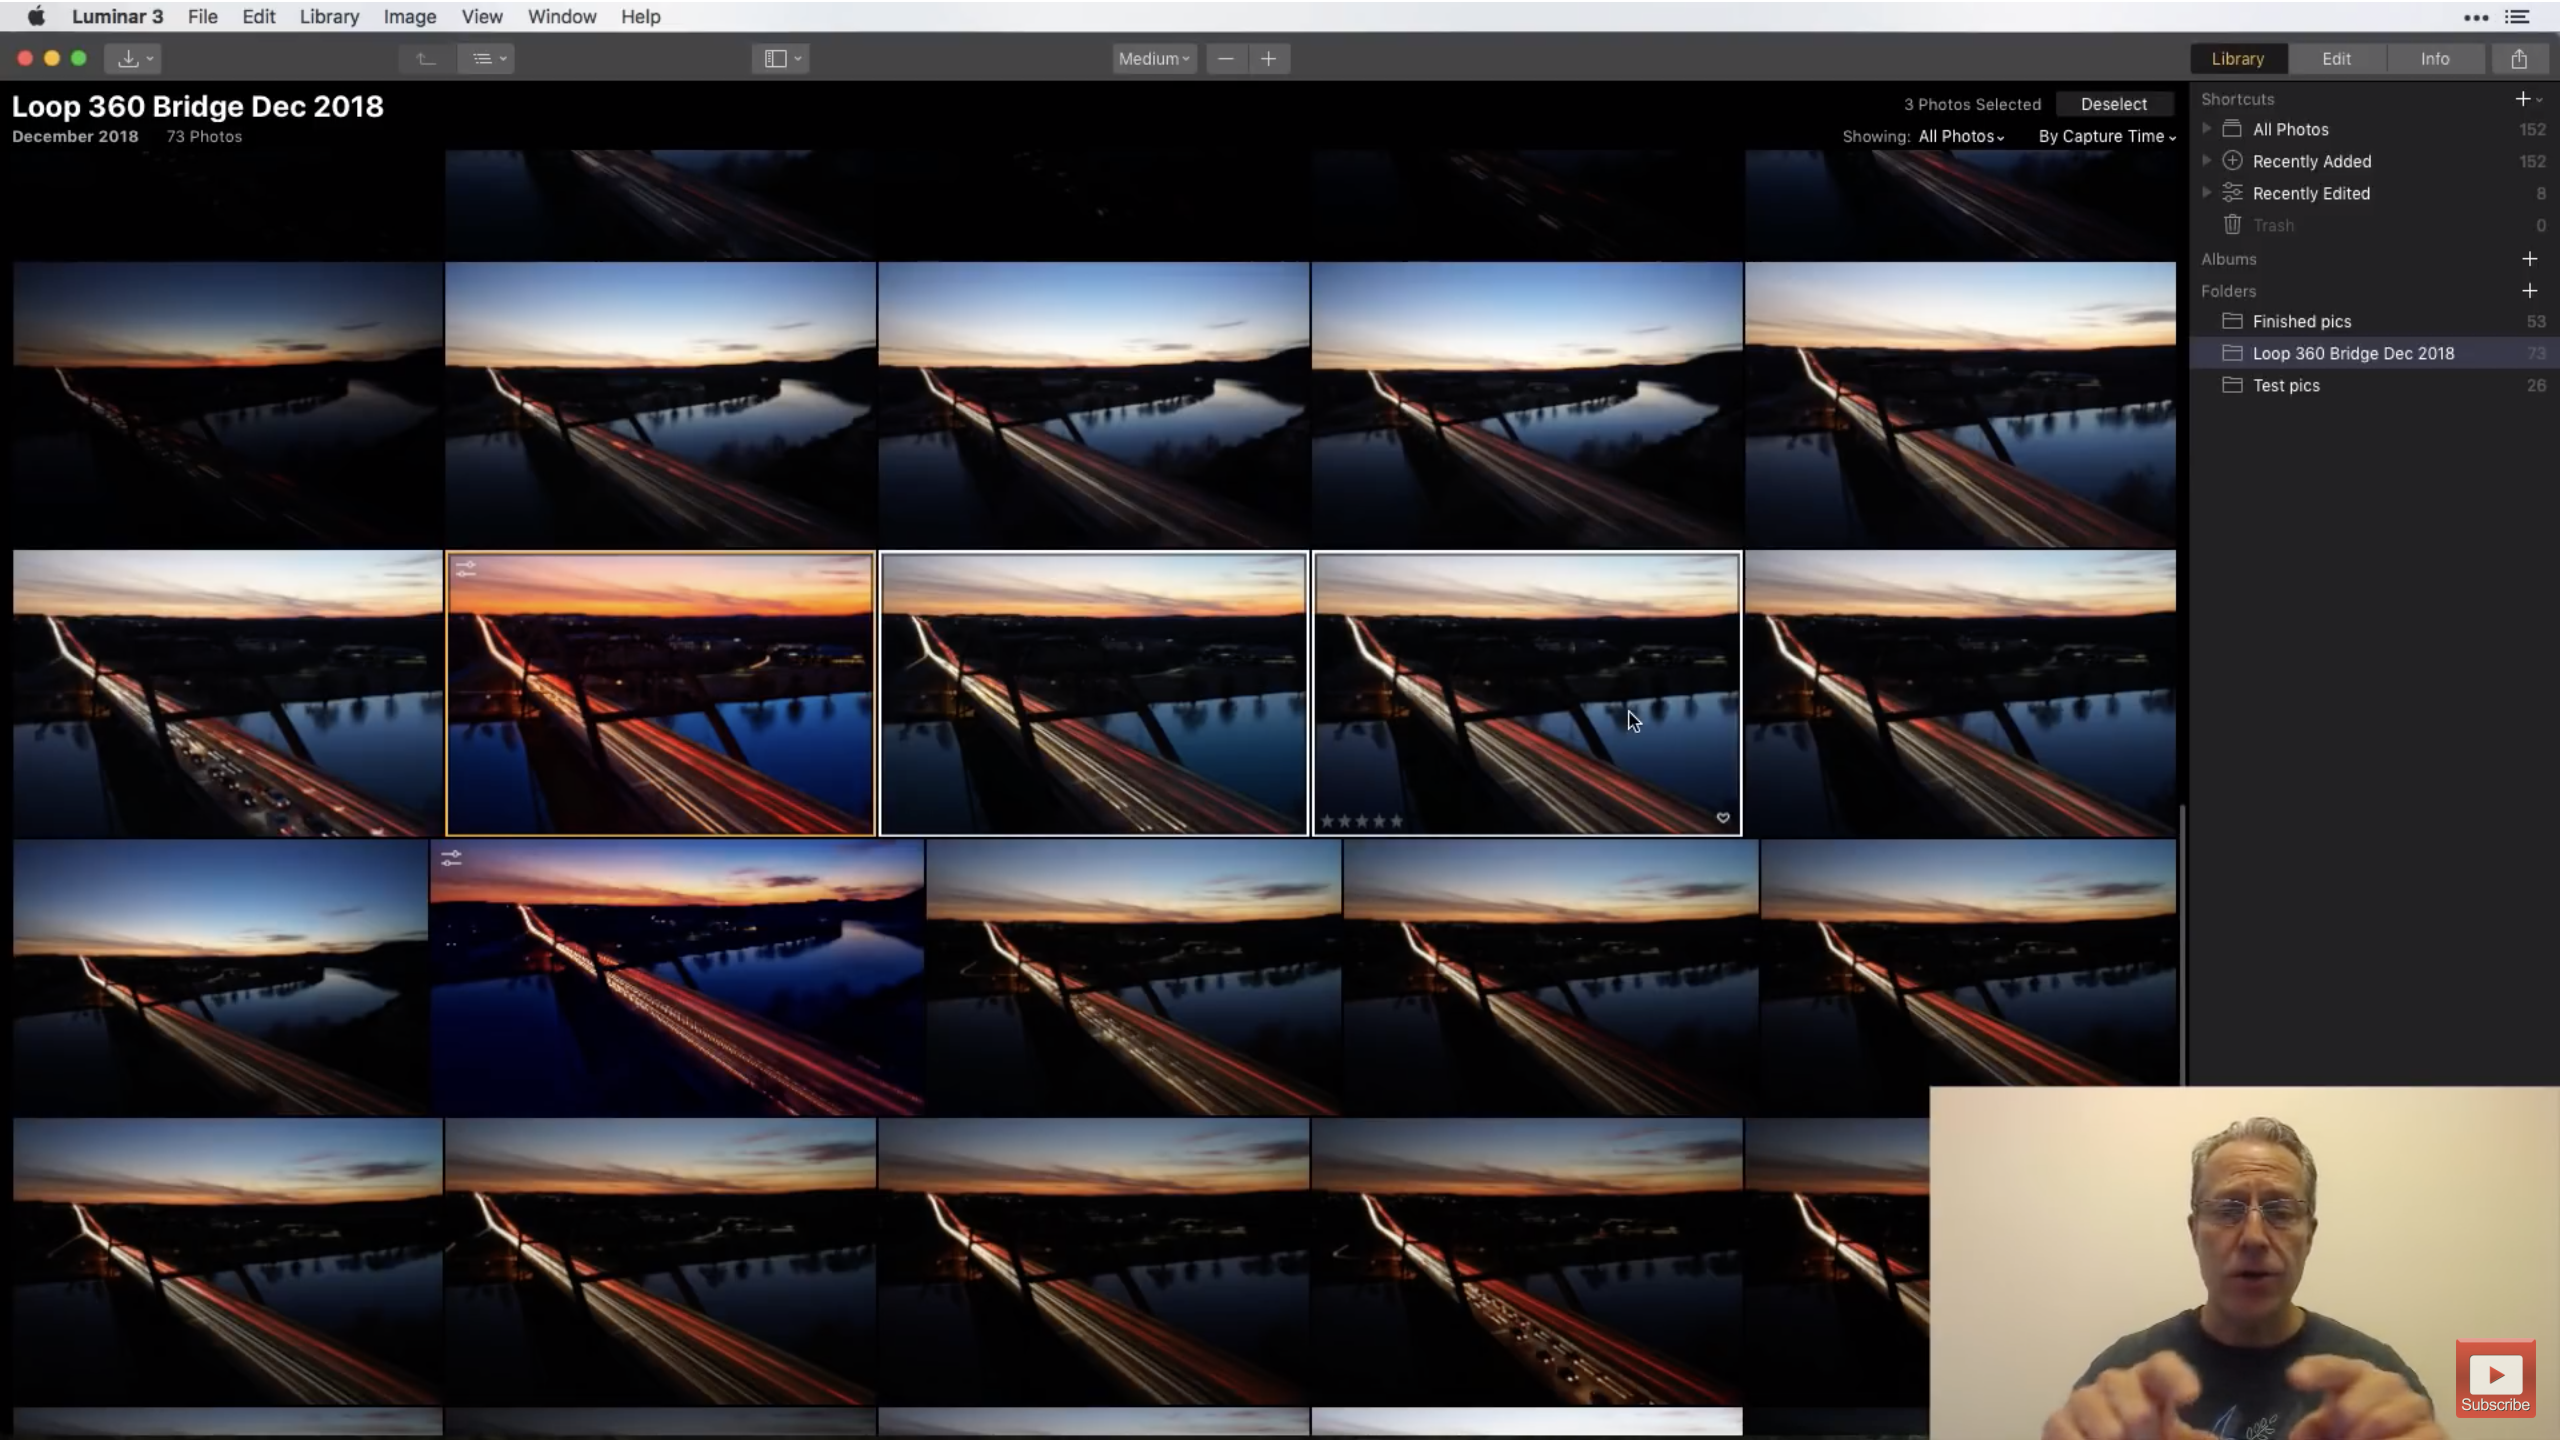
With the source and destination images selected, just go to Images > Adjustments > Sync Adjustments, and the edits will be synced. You can also simply right-click on one of the images and select Adjustments > Sync Adjustments from the pop-up menu or use the shortcut CMD/CTRL+Shift+S to sync edits.
Note that when you right-click on an image and go to Adjustments > Sync Adjustments that you have the option to copy and paste as well as reset adjustments if need be.
Quick Tip: You can also sync adjustments in the filmstrip on the left side of the editing window. Just follow the same procedure above for selecting the source and destination images, right-click, and select Adjustments > Sync Adjustments.
Learn More:
How to Quick Edit in Luminar 3
If you just need to do a few simple things to a photo or a group of photos, the Quick Edit feature in Luminar 3 is for you...
You can access this feature in one of two ways. First, if you have a folder on your desktop, just drag it onto the Luminar icon, and the images will automatically open in Quick Edit.
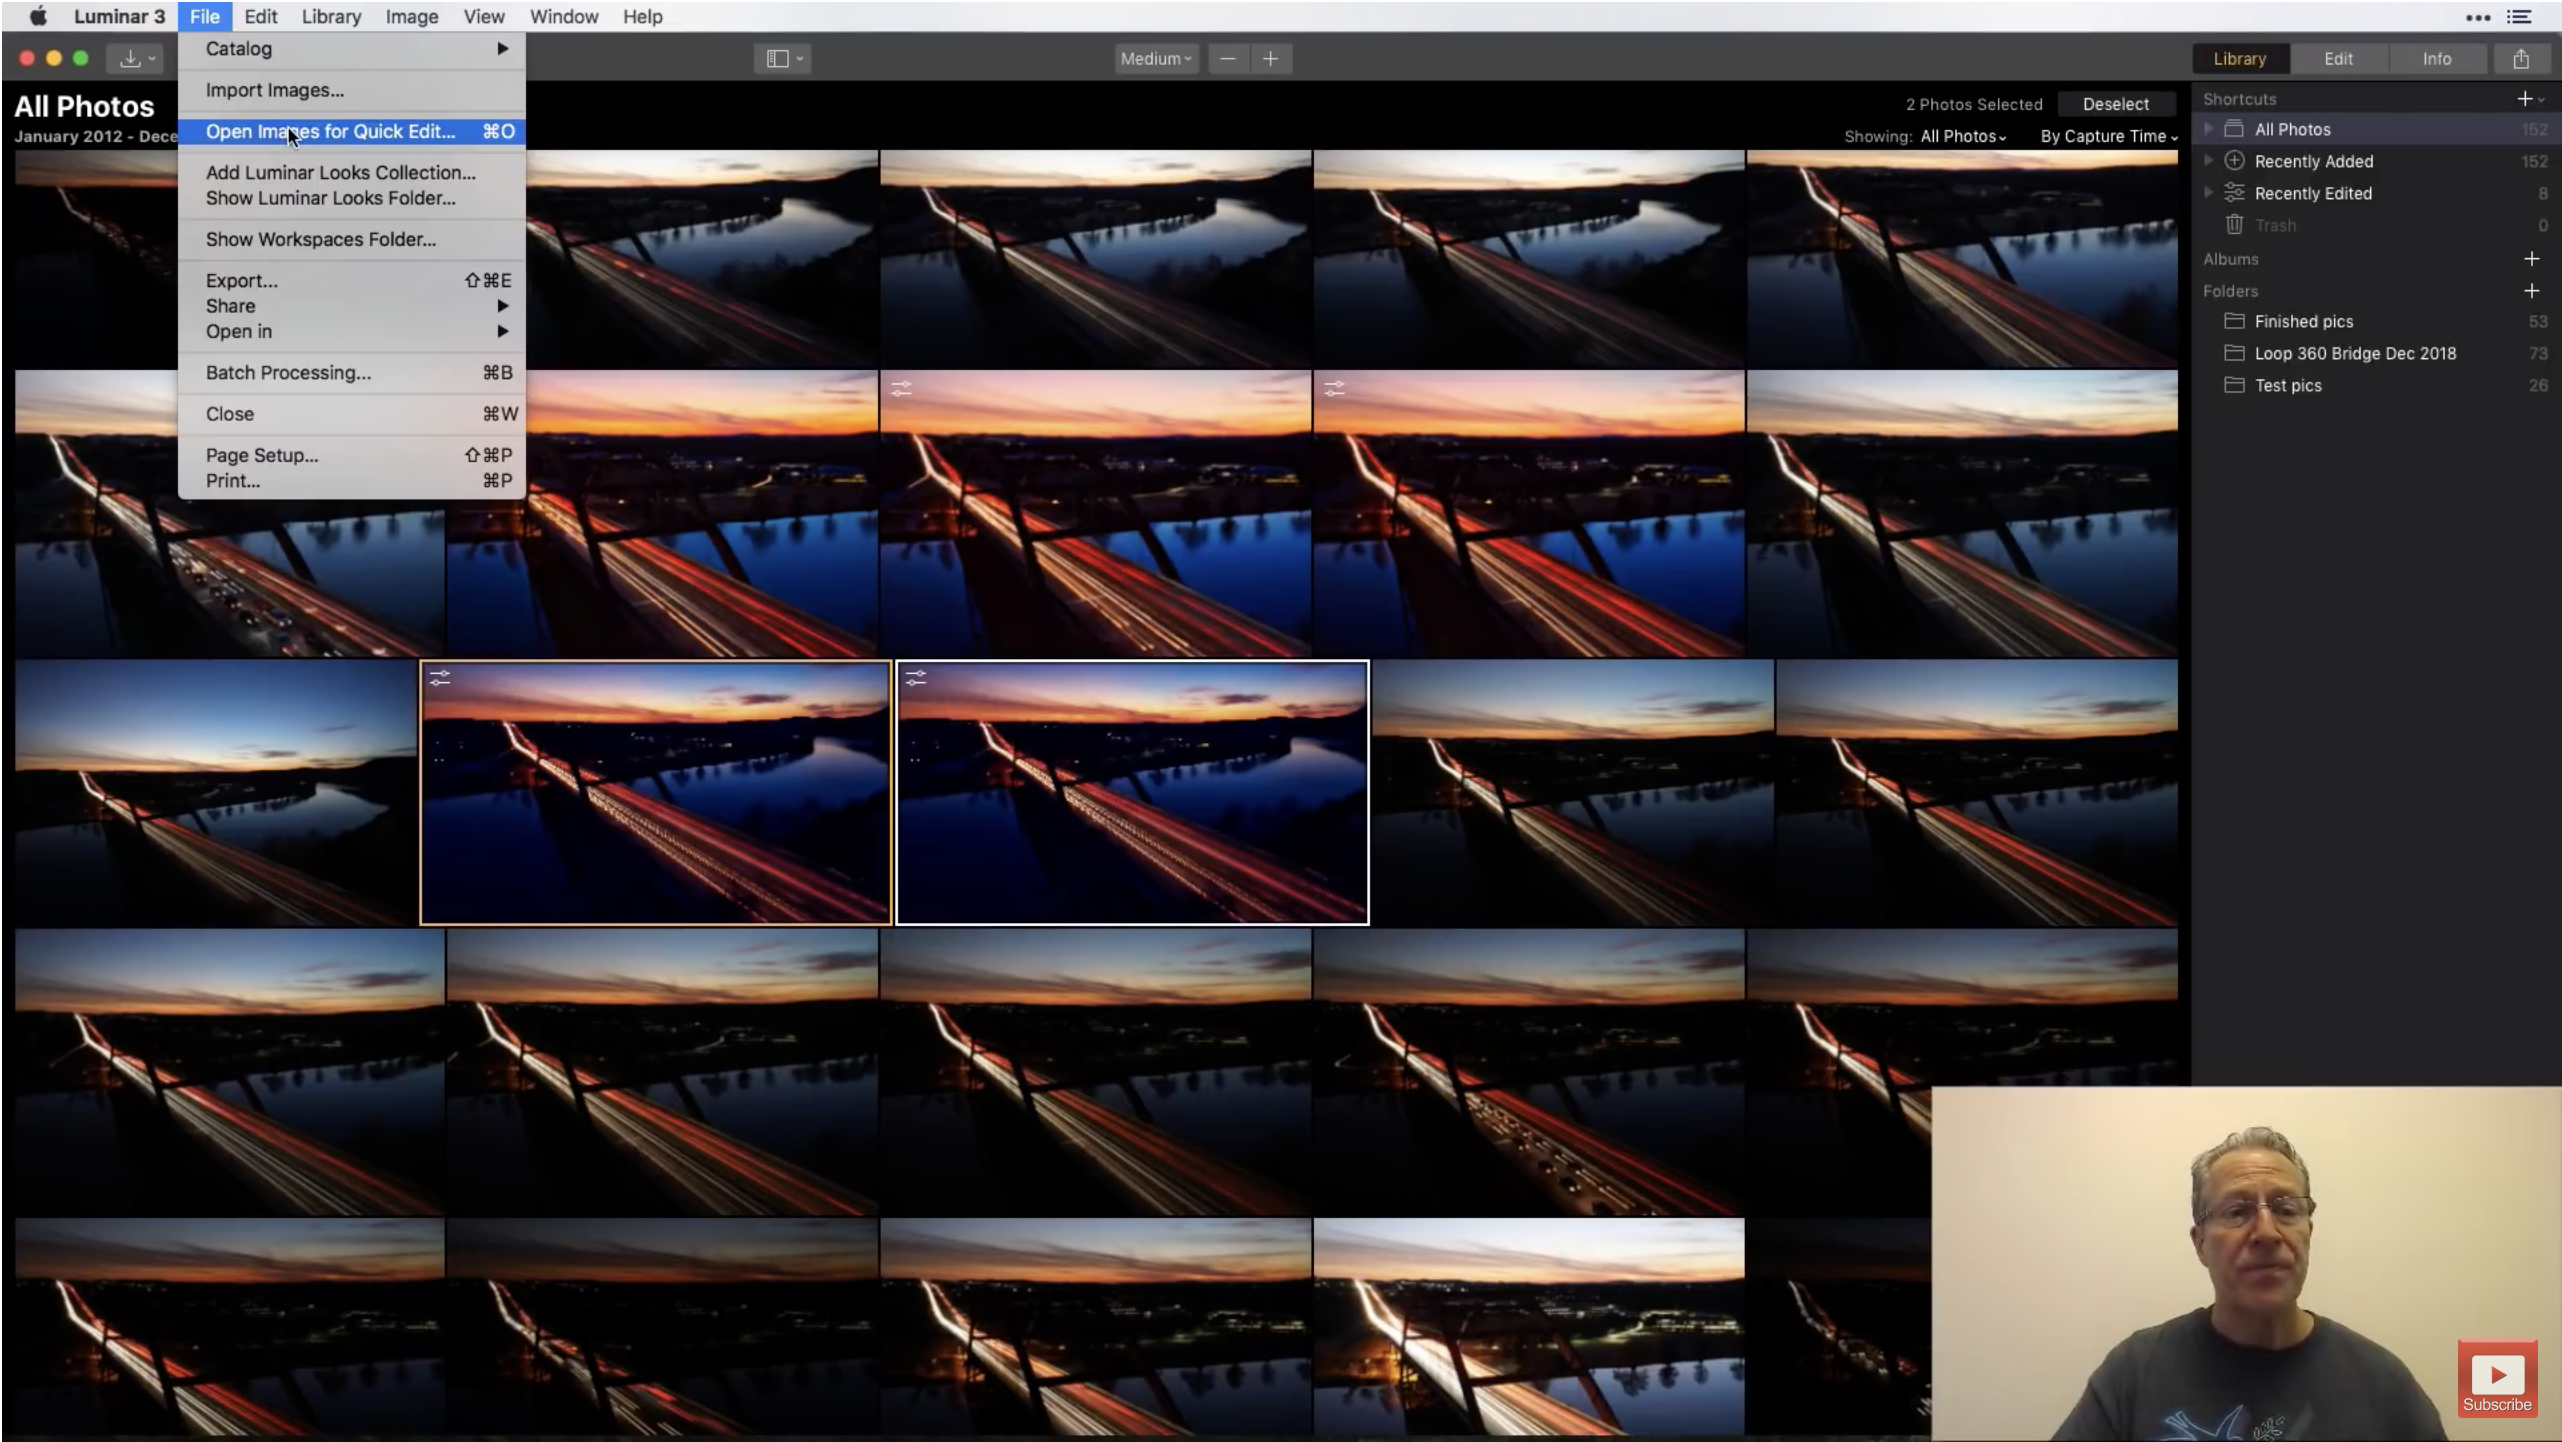
Alternatively, you can do what Jim has done above, and that is to go to File > Open Images for Quick Edit, and select the photos you wish to work on. You can also use the CMD/CTRL+O shortcut to access images for Quick Edit.
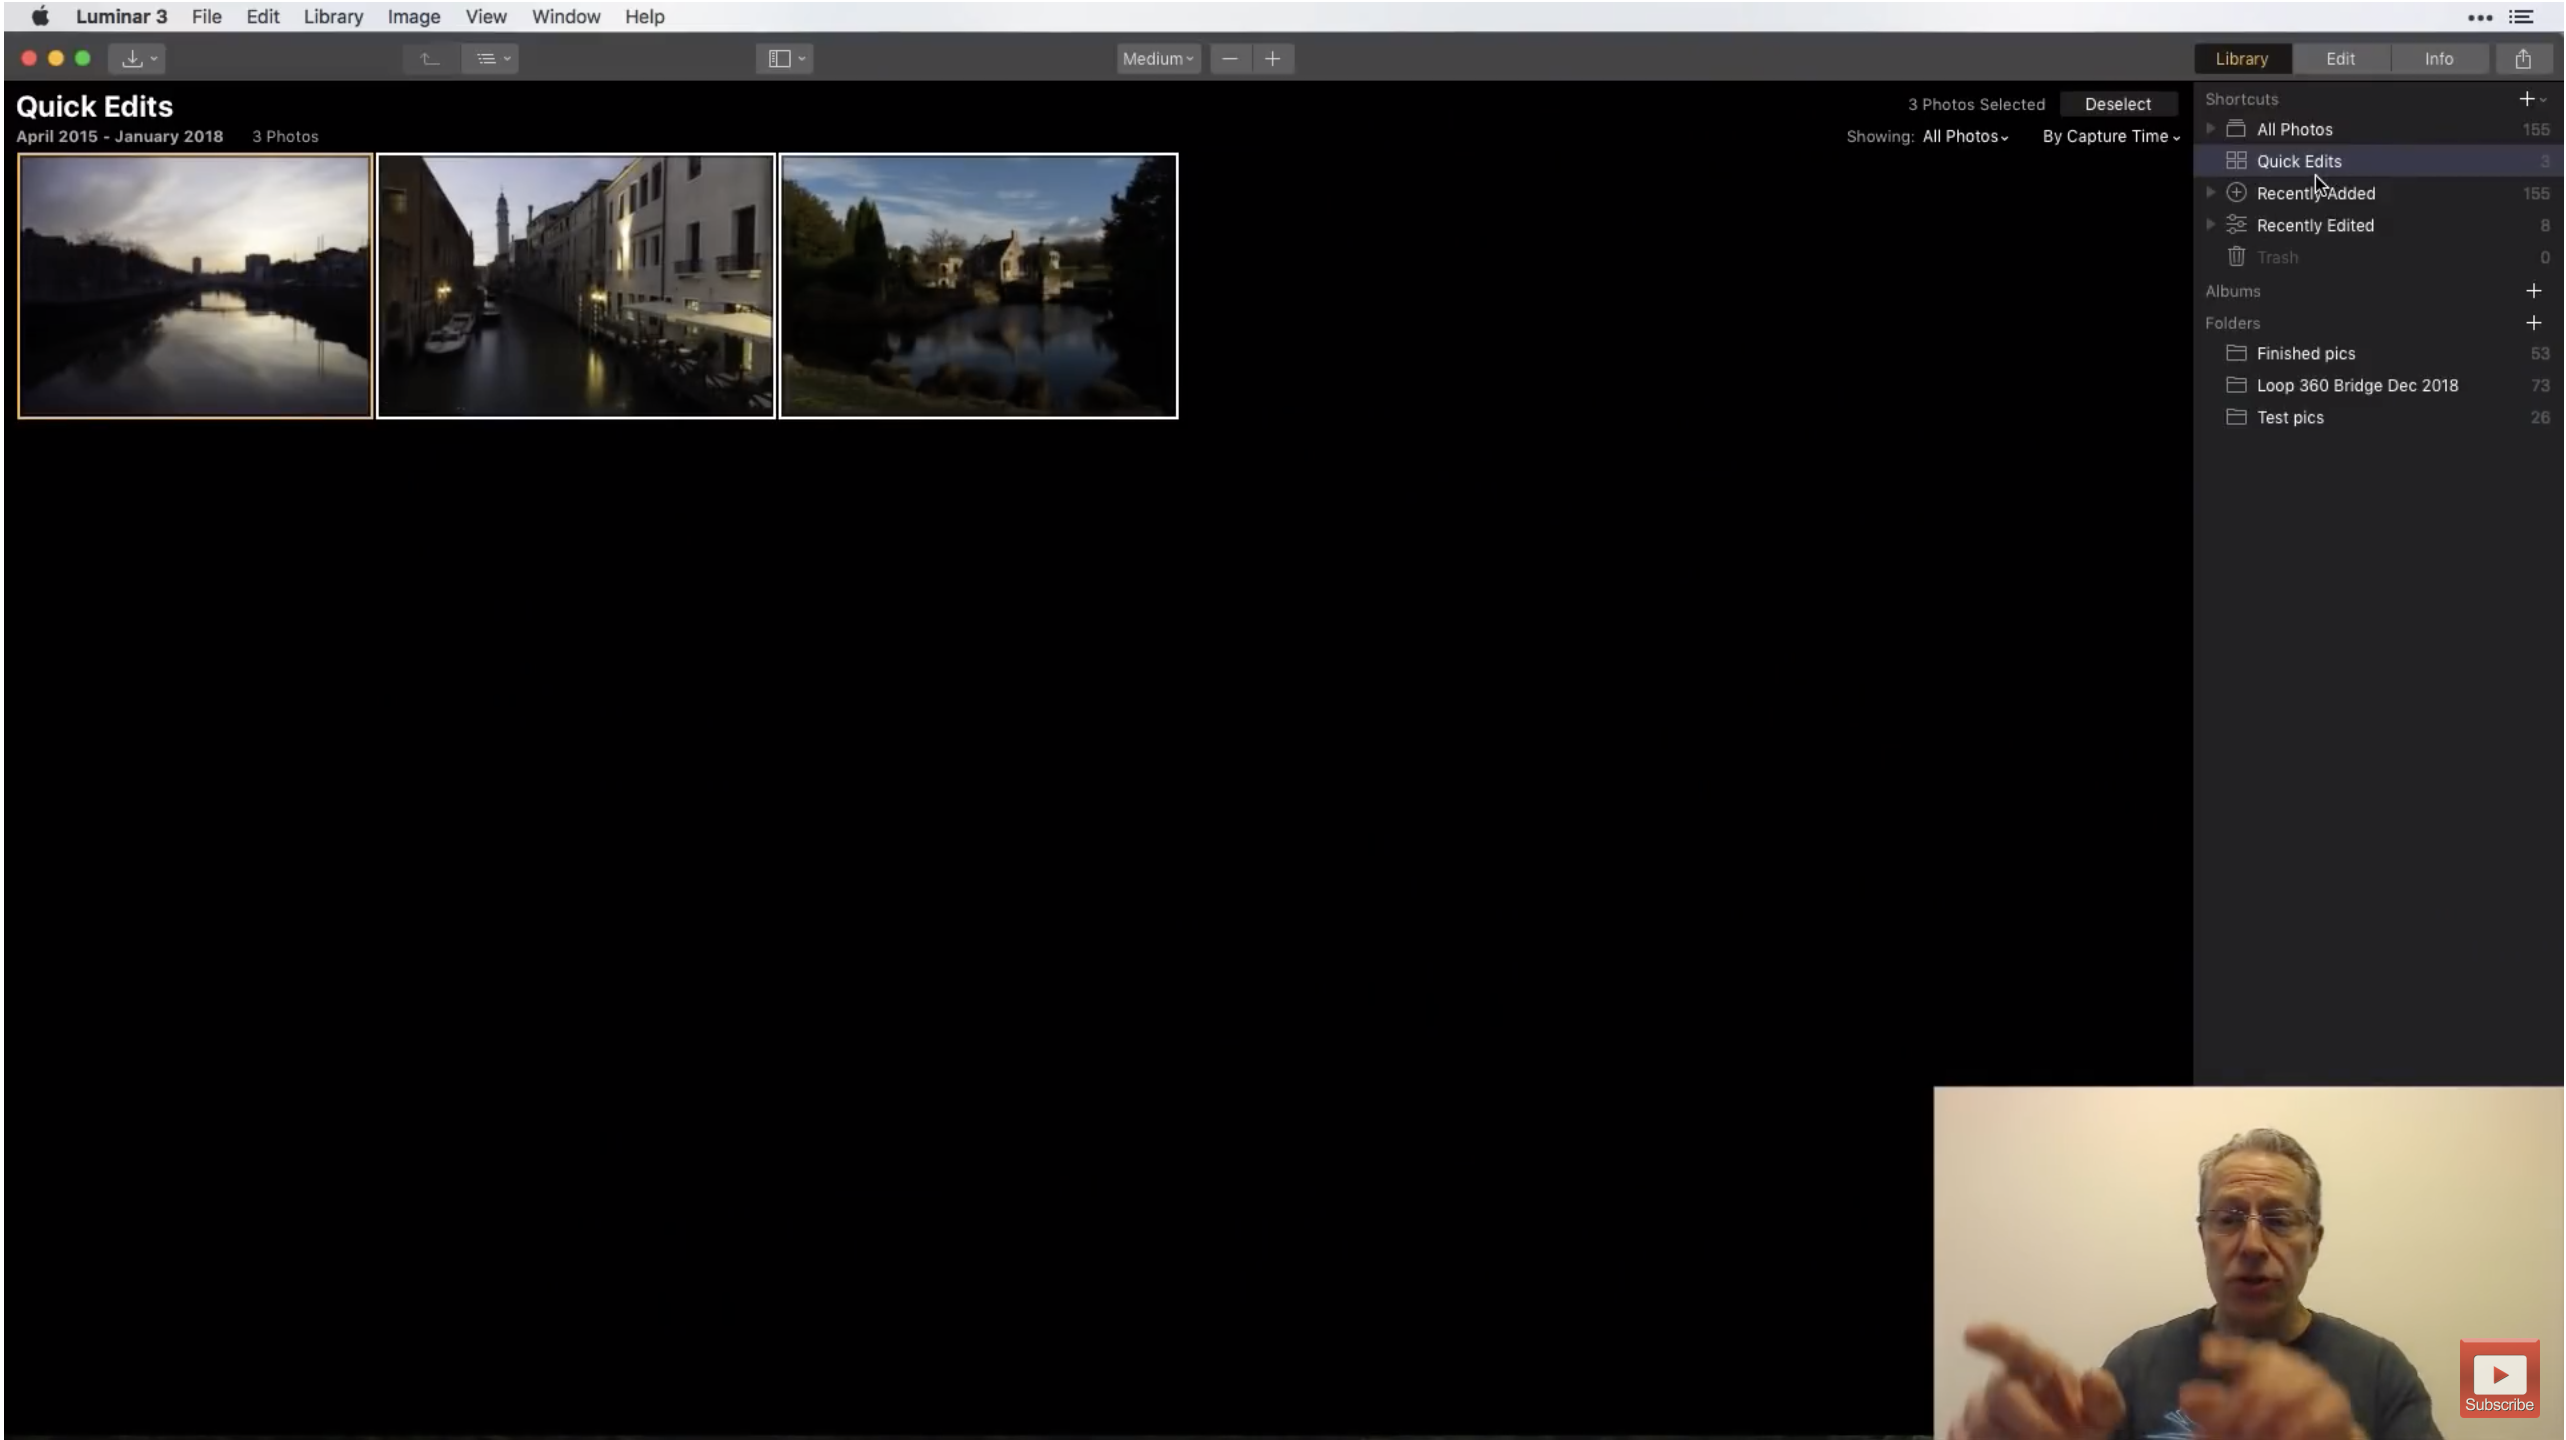
Once the images are selected, they're opened in the Quick Edits folder in Luminar 3, as shown above.
As Jim notes, it's important to point out that these images have not yet been added to a folder in the Luminar Library, though you can choose to add them to an existing folder or a new folder once the Quick Edits are completed.
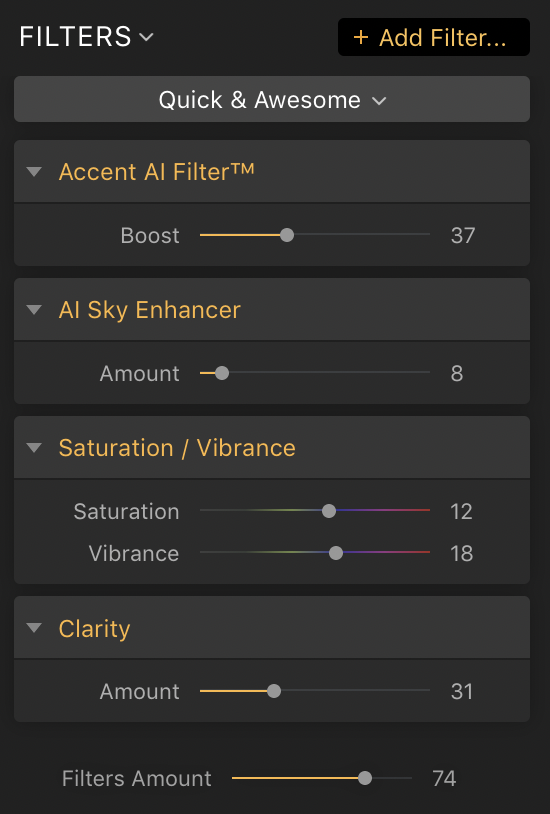
To edit these images, simply go to the Edit tab and you can use the Quick & Awesome Workspace (shown above) to enhance your images in a matter of seconds.
By just using the tools in the Quick & Awesome Workspace, you can apply fast edits to your images that enhance their appeal.
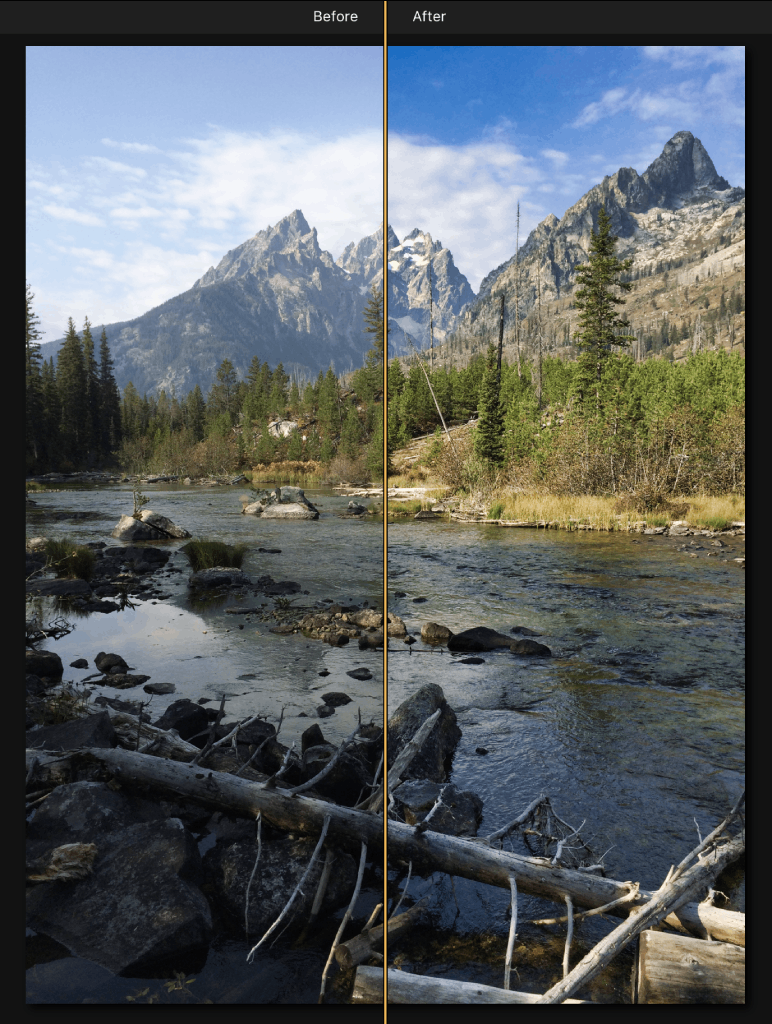
You can see the difference these tools can make in the side-by-side comparison above. The "after" image has more saturation and vibrance, there's more definition in the sky, and foreground has been brightened up as well.
If you want to make more extensive edits, you can select a different Workspace and utilize the pre-selected tools.
Alternatively, you can add individual filters to the Quick & Awesome Workspace to create your own custom Workspace.
Once you've completed your edits, if you want to add the images to a folder in your Luminar Library, it's a simple process.

Just highlight the images in the Quick Edits folder and drag them to the Library folder or subfolder where you want them saved.
Quick Tip: Remember that Luminar 3 syncs its folders with folders on your desktop, so if you add images to your Luminar 3 Library, the images will be added to the same folders on your desktop.
Wrapping It Up: Syncing Photos and Making Quick Edits
As we've seen above, syncing edits between photos, making quick edits, and adding photos to folders and subfolders takes just a few moments of your time in Luminar 3.
If you've used Luminar, you understand what a time-saving tool it can be. If you haven't yet used Luminar, you should give it a try.
It's $69.00 - a one-time fee, no less - for Mac or PC and comes with a 60-day money-back guarantee. What have you got to lose?
Learn More:
- Make Beautiful Edits to Your Images With This Basic Post-Processing Workflow
- These Powerful Tools Make Editing Photos Easier and Faster
We Recommend
How to Take a Photo From Blah to Beautiful in a Matter of Minutes

We've all been there...
You're exploring your image library and have some pretty blah photos that you continually pass up because they just aren't that inspiring.
Sure, you could spend hours and hours editing it, but who has that kind of time?
As Jim Nix explores in the video below, you can take your blah photos to something beautiful in a matter of minutes if you go about it the right way.
In the video, Jim uses various tools in Luminar 3 to bring his photo to life.
As you can see in the screenshots below, the before and after versions couldn't be more different!
 Jim's photo before any editing. Screenshot via YouTube.
 Jim's photo after editing in Luminar. Screenshot via YouTube
In the tutorial below, I explore the tools Jim used to create this breathtaking edit.
By using these same tools, you too can elevate the quality of your photos in just a matter of minutes.
Let's get started!
Start the Process by Using Luminar's Filters
As Jim explains in the video, he began the process of editing his photo by using several filters in Luminar.
In addition to adding a Tone Filter to adjust brightness and contrast and a Golden Hour Filter to give the image a nice, warm glow, Jim also added a Split Toning Filter to work on highlights and shadows with different tones, Saturation and Vibrance to boost the colors in the photo, and Structure to improve clarity and detail.
The beauty of these filters is twofold: first, there are a lot of them - more than 50 - so you can truly fine-tune your photos as you see fit, and second, the filters are incredibly easy to use.
In the screenshot above, for example, you can see how each filter has a slider to make quick work of increasing or decreasing the filter's effects.
What's more, you can apply the filters as a brushed on mask, a radial mask, or a gradient mask, as well as adjust the luminosity and the blending mode.
And since editing in Luminar is non-destructive, you can go wild with your experimentation, knowing that your original image won't be impacted.
Quick Tip: You can toggle each filter on and off to see the effect it has on the photo. You can do so by clicking the eye icon in the upper-right corner of the filter layer. To see a side-by-side before-and-after of your work, simply click the before and after icon (shown at the top of the screen, highlighted in orange).
Work on the Light Before You Work on the Color
 YouTube Screenshot/Jim Nix
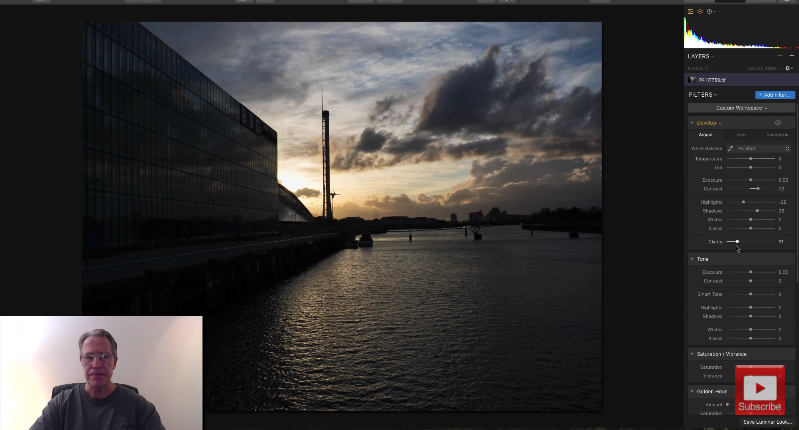
As Jim suggests, you need to fine-tune the lighting in the photo before you can start fine-tuning the color.
To do this, he starts by manipulating the slider controls in the Develop Filter.
By increasing the Contrast, reducing the Highlights, opening the Shadows, and adding some clarity, the image begins to brighten, as shown above.
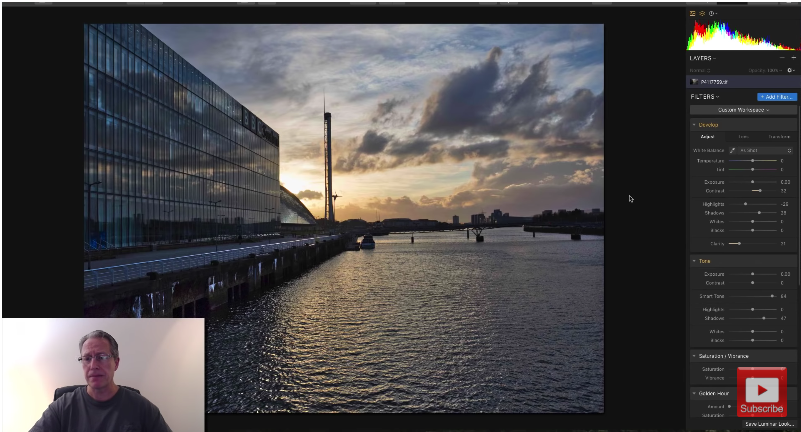 YouTube Screenshot/Jim Nix
Next, Jim uses the Tone Filter to further improve the lighting in the shot.
By increasing the Smart Tone slider to a level of 84 and opening up the shadows again, the image became much brighter, as shown above.
Use Color-Based Filters to Give Your Photos Pop
 YouTube Screenshot/Jim Nix
Once you've perfected the light in your shot, the next step is to start working on the colors to give your photo more visual appeal.
In Jim's case, that meant adding a little vibrance to intensity the more muted colors in the shot, as well as boosting the level of the Golden Hour filter.
This filter is one of many smart filters in Luminar 3 that can have a dramatic impact on how your photos look.
As the name indicates, the Golden Hour Filter adds warm tones to the shot to emulate the soft, golden light you see during Golden Hour.
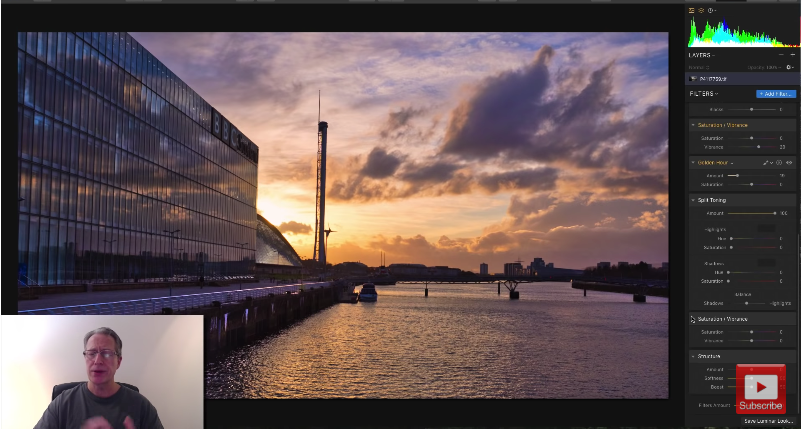
 YouTube Screenshot/Jim Nix
Jim's next move to improve the color in this photo was to manipulate the Split Toning Filter.
As mentioned earlier, Split Toning allows you to change the tone of the shadows and highlights independently.
Jim elected to add a warm hue to the highlights and a cool hue to the shadows, which as you can see above, really amplified the drama of this sunset.
So, in a matter of minutes, Jim was able to completely transform his photo using Luminar 3.
In fact, the image went from being an afterthought to something dramatic and eye-catching!
You can try Luminar 3 today for free, or if you prefer, use it as a powerful plugin to supercharge your editing workflow.
Learn More:
We Recommend
Level Up Your Portrait Photography Editing With These Advanced AI Tools

Photo courtesy of Skylum
Regardless of whether you love it or hate it, there’s no denying that the age of Artificial Intelligence (AI) is upon us. Companies like Google, Microsoft, and Adobe have been developing AI programs for years, but it wasn’t until the release of ChatGPT in 2022 that AI officially went mainstream.
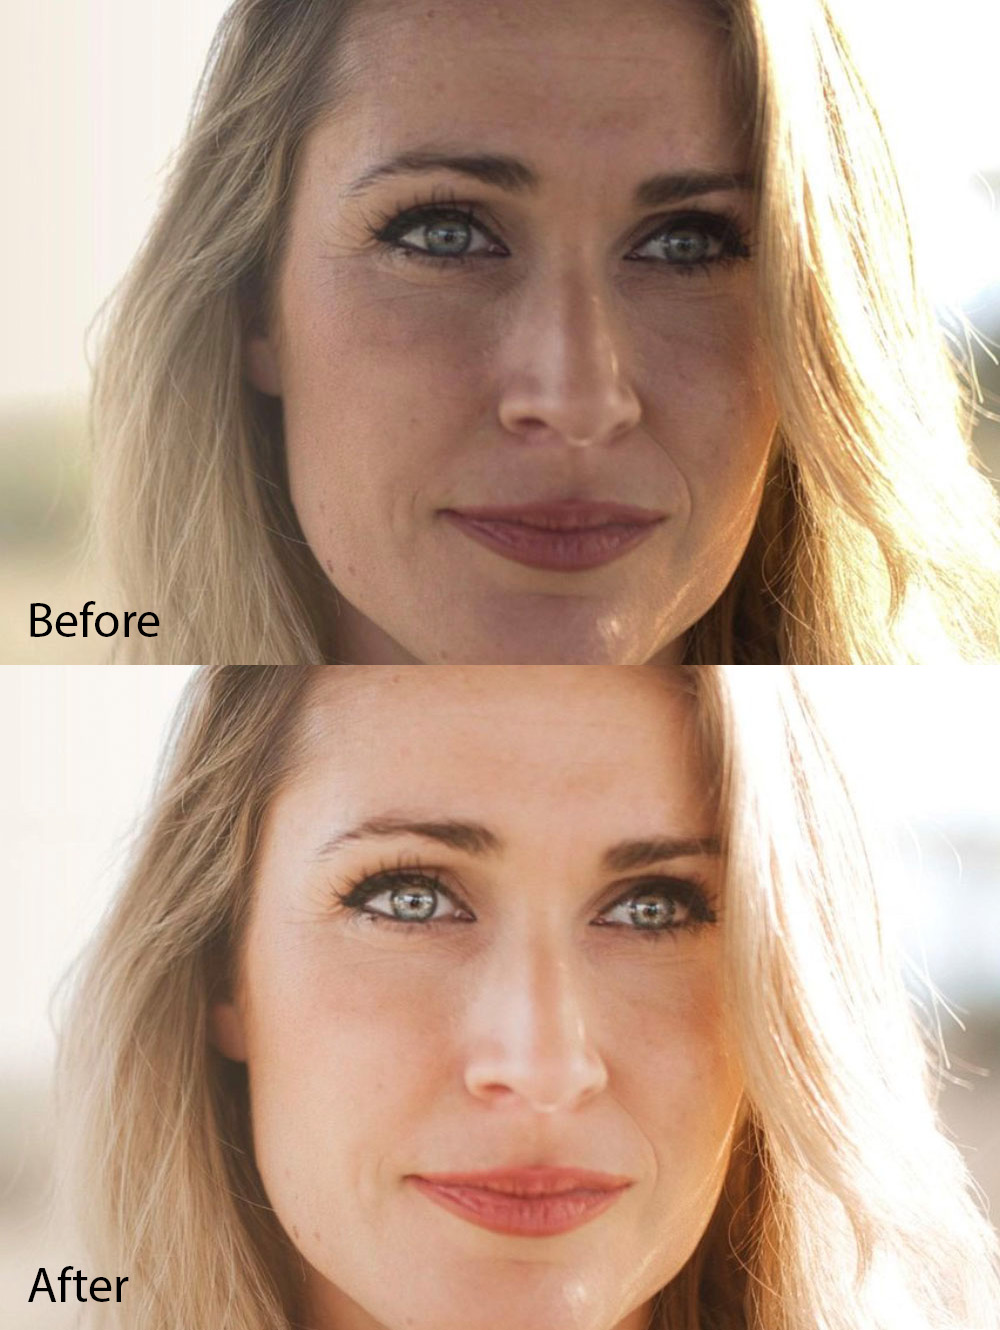
While the uses of AI are limitless, in this article, we’ll focus on how AI can help during the photo editing process—specifically portrait photography editing. We’ll share advanced AI tools that smooth skin, make eyes sparkle, add bokeh, and more! That said, only one program, Skylum Luminar Neo, boasts all the tools covered below.
Skylum Luminar Neo is an innovative picture editing software that offers a wide range of powerful editing capabilities, is easy to use, and is available across all platforms (macOS, Windows, and mobile devices). Additionally, a plugin lets you integrate it directly into Lightroom and Photoshop and allows you to use both programs hand-in-hand.
Now, keep reading to discover how AI can simultaneously increase your productivity, enhance your images, and take your portrait photography editing skills to the next level!
Check out the video above on the Luminar Neo YouTube Channel to learn more about portrait photo editing with Skylum Luminar Neo.
Table of Contents
- Portrait Photography Editing: Skin AI
- Portrait Photography Editing: Face AI
- Portrait Photography Editing: Eyes AI
- Portrait Photography Editing: Silhouettes AI
- Portrait Photography Editing: Portrait Bokeh AI
- Portrait Photography Editing: GenSwap AI
- Final Thoughts on Portrait Photography Editing
- Recommended Photography Gear
Portrait Photography Editing: Skin AI
Whether you are shooting professional headshots, family portraits, or weddings, smooth skin is one of the principles of portrait photography. Images with too much grain and texture are among the most common problems, particularly when shooting in low-light conditions. However, that’s super easy to fix with the help of Skin AI.
Skin AI automatically adjusts the softness and shine of skin to make it look better and more realistic. If you want to make further micro-adjustments, Luminar Neo provides two adjustable sliders and a “Skin Defects Removable” box you can check/uncheck.
Portrait Photography Editing: Face AI
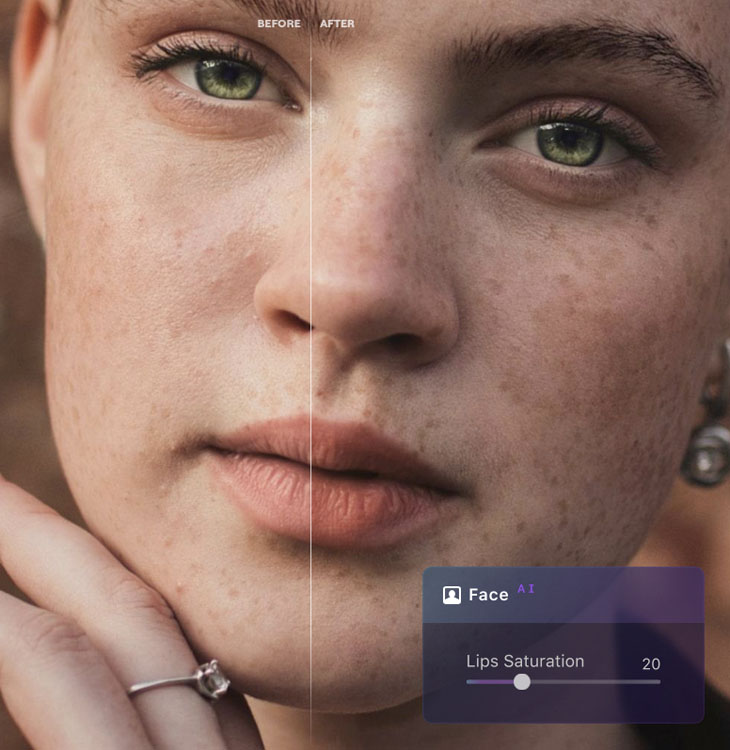
Photo courtesy of Skylum
Do you want to highlight the beautiful smiles of your subjects and make them pop? That’s where Face AI comes in. It reads people's faces, detects their lips, and makes them stand out from the rest of the face—all with the push of a button and without using a mask or creating extra layers.
The three main parts of Face AI are redness, saturation, and darkening. They work together to show off gorgeous smiles, leading to more memorable photos.
Portrait Photography Editing: Eyes AI
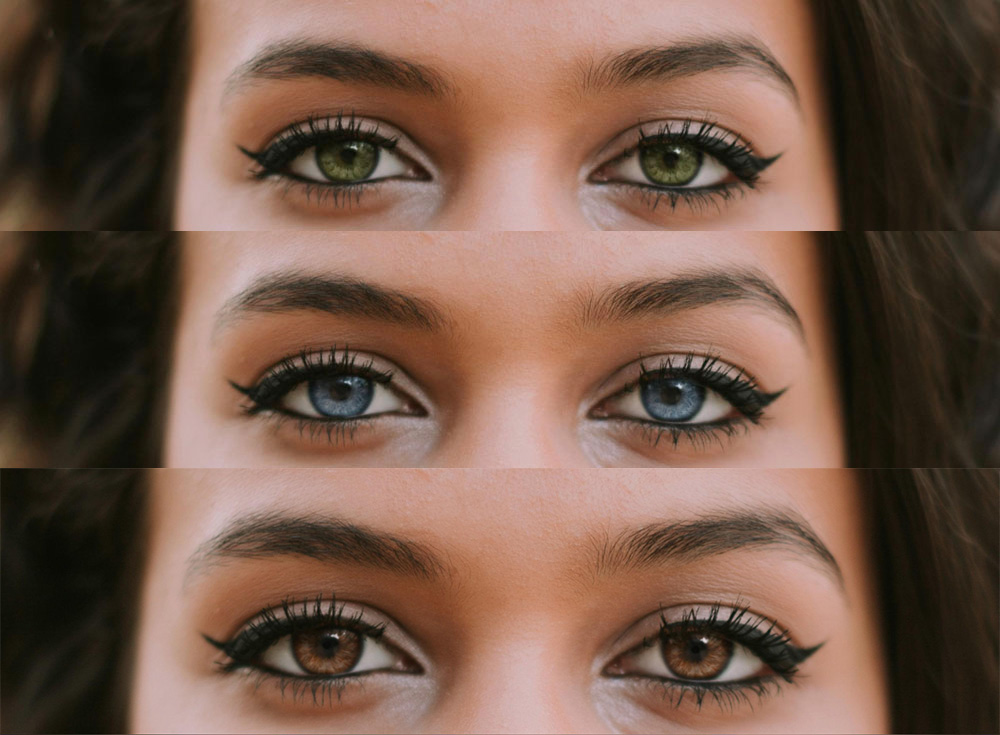
Photo courtesy of Skylum
People frequently say, “Eyes are the gateway to the soul,” and that is just as true in photos as it is in real life. In portrait photography, eyes have a magical way of transmitting emotion and telling a story to viewers. On top of that, they are often the first thing people notice and what attracts them to a good portrait.
With Eyes AI, you can brighten people’s eyes to make them shine. Alternatively, you can quickly and easily change the color of someone's eyes with the click of a button! Color choices include blue, green, brown, hazel, honey, mint, etc.
Learn More:
- 4 Reasons Why Skylum’s Luminar Neo is a Landscape Photographer’s Dream Editor
- Best Portrait Lens: What Focal Length Should You Use?
Portrait Photography Editing: Silhouette AI
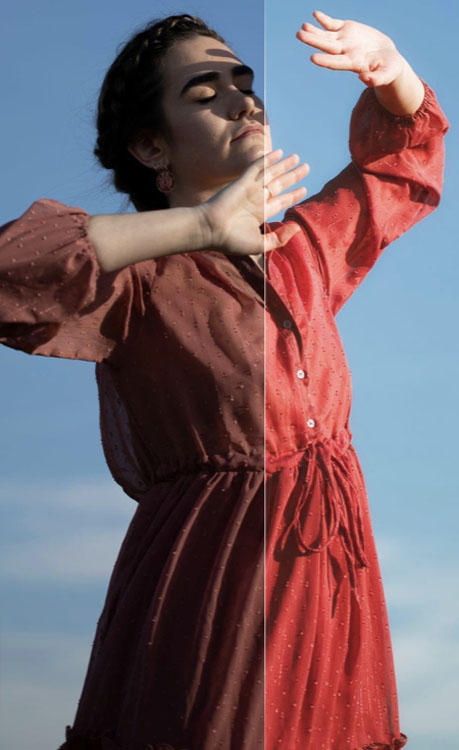
Photo courtesy of Skylum
Sometimes, people tend to blend in with their background, leading to portraits being less impressive than they should be. There are two ways to fix this. The first way is using Silhouette AI. It maintains the clarity of your background while enhancing your subject.
You’ll be surprised how much a simple silhouette makes a difference in the final image. Silhouette AI is ideal for images with stunning backgrounds (landscapes, skies, props, etc.) you wish to leave untouched.
Portrait Photography Editing: Portrait Bokeh AI
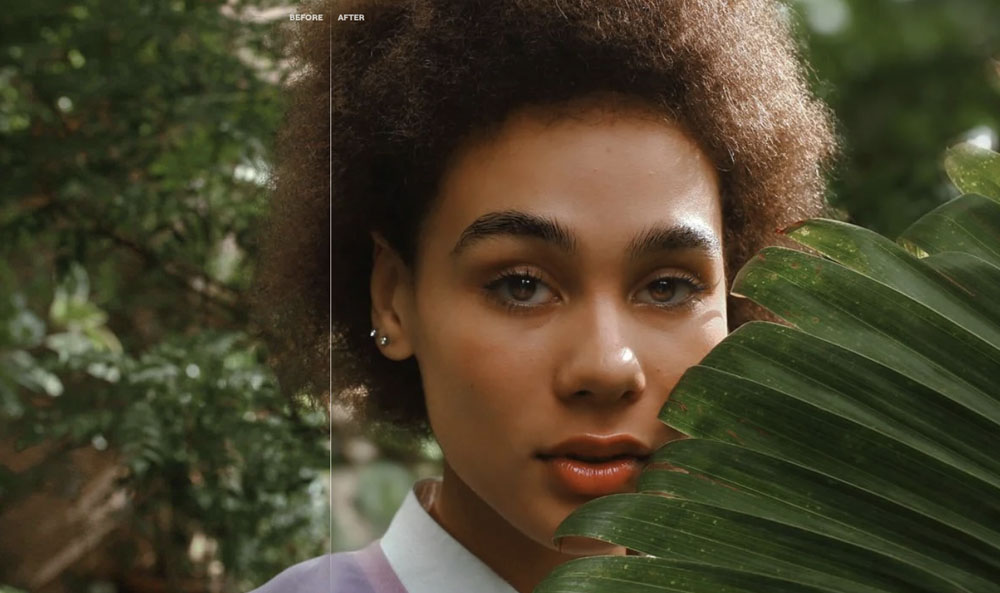
Photo courtesy of Skylum
Using Portrait Bokeh AI is the other way to separate your subjects from their background. It’s the opposite of Silhouette AI because it doesn’t apply any edits to your subject but instead changes the background.
It adds realistic bokeh to your images, creating beautiful depth-of-field effects and isolating your subjects from their background. Sliders let you adjust the amount of bokeh applied as well as its radius, softness, and opacity.
Portrait Photography Editing: GenSwap AI

Photo courtesy of Skylum
Lastly, Luminar Neo recently unveiled a new feature called GenSwap AI. It allows you to easily transform portraits by changing the color of objects (clothes, hair, etc.), replacing a distracting element in the background, or adding new AI-generated details to the image based on prompts.
Think of GenSwap as a one-of-a-kind time machine. You can use it to enhance your photos and generate the final results you would have liked to create when you initially framed up the shot.
Final Thoughts on Portrait Photography Editing
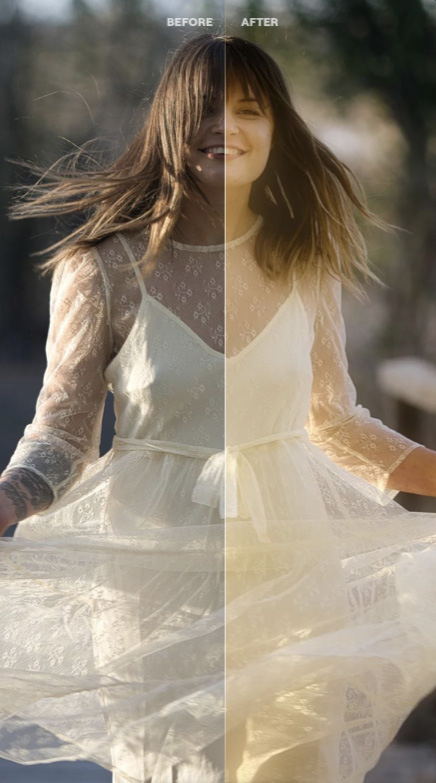
Photo courtesy of Skylum
As you can see, there are tons of amazing AI tools for portrait photography editing. We only recently started taking advantage of them thanks to Skylum Luminar Neo, and the results have absolutely blown us away. Today, we spend less time than ever photo editing, and our pictures have never looked better!
On top of that, Luminar Neo is extremely affordable. The month-to-month subscription runs at $14.95/month, the 12-month plan costs $9.92/month (billed $119 yearly), and the 24-month plan is $7.46/month (billed $179 every two years). They also offer a lifetime purchase option currently on sale for a one-time payment of $299. Visit their Pricing Page to learn more.
Do you shoot more than portraits? Check out the list below to see the other types of photographers who can benefit from working with Luminar Neo:
- Beginner Photographers
- Landscape Photographers
- Wedding Photographers
- Newborn Photographers
- Family Photographers
- Real Estate Photographers
So not only does Luminar Neo save you time and money, but it also provides targeted tools for your work, no matter what photography niche you specialize in. What more could you want from your picture editing software?!
Recommended Photography Gear
A quick heads-up: If you snag something through our affiliate links or check out our sponsored content, we might earn a commission at no extra cost to you. But fear not, we're all about recommending stuff we're truly stoked about!
Learn More:
We Recommend
Luminar 2018 Might Just Be a Lightroom Replacement

I’ve used Lightroom for a good long while, and I’m happy with the features it offers me to improve the quality of my photos.
But now there’s a new sheriff in town that is sure to give the Develop Module a run for its money – Luminar.
In the video above, post-processing master Serge Ramelli offers his thoughts on the Lightroom vs. Luminar question.
 YouTube Screenshot/Serge Ramelli
In the screenshot above, you can see Serge’s original image from the Imperial Dunes in California.
In Lightroom, Serge’s usual workflow would include bringing down the highlights, opening up the shadows, working on the blacks and whites in the image, adjusting the white balance and tint, and so forth.
Each of these adjustments is made in Lightroom using a different slider or tool in the toolbar, so it’s not a terribly complicated process.
 YouTube Screenshot/Serge Ramelli
As you can see in the screenshot above, Serge was able to make pretty drastic changes to the original shot by using multiple tools in Lightroom.
The final product is an image that I would certainly describe as being beautiful.
The problem with Lightroom is that it isn’t exactly cheap. That’s particularly true since it shifted to a subscription service a couple of years ago.
But with Luminar, you can do everything you can do in Lightroom – and for less money.
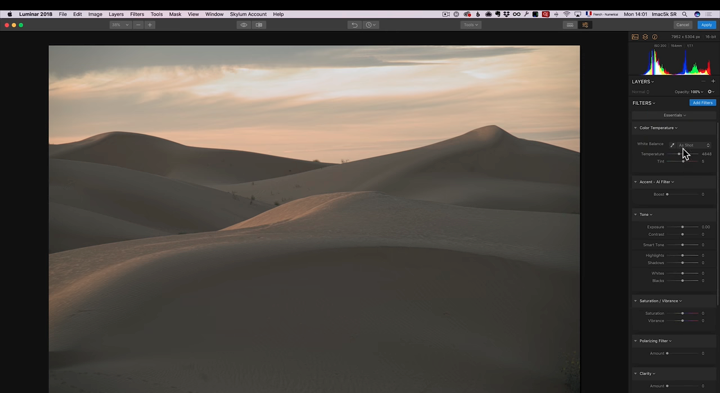 YouTube Screenshot/Serge Ramelli
In the screenshot above is the Luminar workspace. You’ll notice right off the bat that it’s a familiar arrangement with similar tools as Lightroom. That makes learning to use Luminar a breeze for Lightroom users.
But Luminar has features that Lightroom doesn’t have, which make it a more effective tool for post-processing.
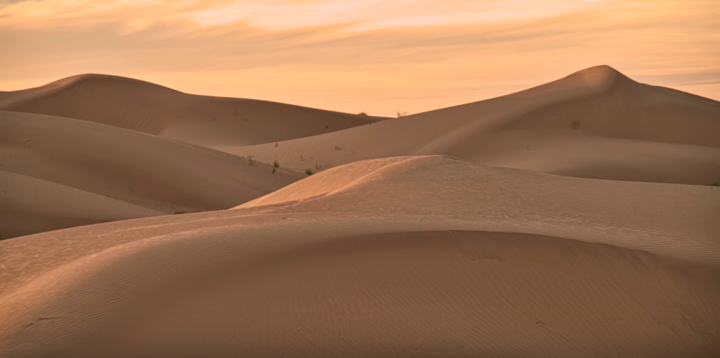 YouTube Screenshot/Serge Ramelli
Take the Boost Slider as a prime example.
In the image above, you can see the Boost Slider’s artificial intelligence-powered filter at work. It magically takes into account over a dozen different aspects of a photo and makes your photo better.
The colors are bright and vibrant, the foreground has been lightened, and there’s more definition in the sky.
 YouTube Screenshot/Serge Ramelli
Luminar has a host of other filters as well, including a polarizing filter, a channel mixer, a golden hour effect, and just about anything else you can think of as well. You have dozens of filters from which to choose that makes for fun experimentation with your photos.
Serge also used the Image Radiance Filter and the Fog Filter on the image above, adding more interest and depth to the shot. Not bad, right?
In fact, if you look at this image next to the image from Lightroom, they look really similar.
A lot of photographers use Luminar and Lightroom together when processing their photos.
But as these images demonstrate, Luminar is a more than capable editor on its own. For more information about Luminar, head over to their website.
We Recommend
Luminar 3 With Libraries Hands-On Test
I started using Luminar 2018 a while back, and though it was impressive with its huge array of filters and presets and AI-powered tools, one thing it sorely lacked was libraries.
But now that Luminar 3 is out, that's all changed.
Now, Luminar users can browse, organize, rate, and group photos in a clean, intuitive library panel.
What's more, you can add existing images in folders from multiple locations, import images from a memory card or hard drive, automatically group images by month, year, and day, and much more.
In the video above, Omar Gonzalez takes a deep dive into these and other features of the Luminar 3 library.
Follow along as he offers his hands-on test of libraries and some of Luminar's other handy features.
Below, I've outlined some of the top features of Luminar 3 library for easy reference.
The Luminar 3 Library Has a Beautiful UI

To be fair, Luminar 3 as a whole has a beautiful UI...
As Omar points out in the video, the grid view is particularly nice because it shows nice, clean thumbnails of your images without all the extra space and image information that clutters up the Lightroom library.

What's more, you can choose between various sizes of thumbnail previews to customize how you interact with your library of images.
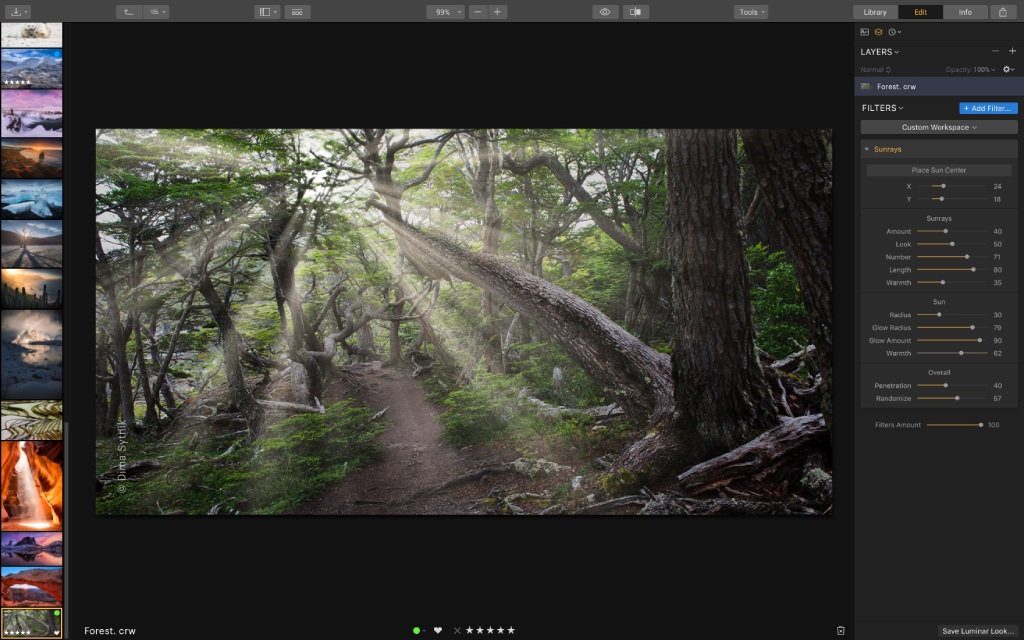
When you select an image to view, the beautiful UI continues.
As you can see in the screenshot above, not only are the editing controls neatly organized on the right side of the screen, but a handy filmstrip view of your other library images is tucked onto the left side of the screen. Yet despite having a wealth of tools and information at your disposal, the screen doesn't feel cluttered at all.
Quick Tip: You can toggle between the editing view shown above and the grid view in the library by pressing the spacebar or pressing G.
Learn More:
How to Add Images to Luminar 3 With Libraries
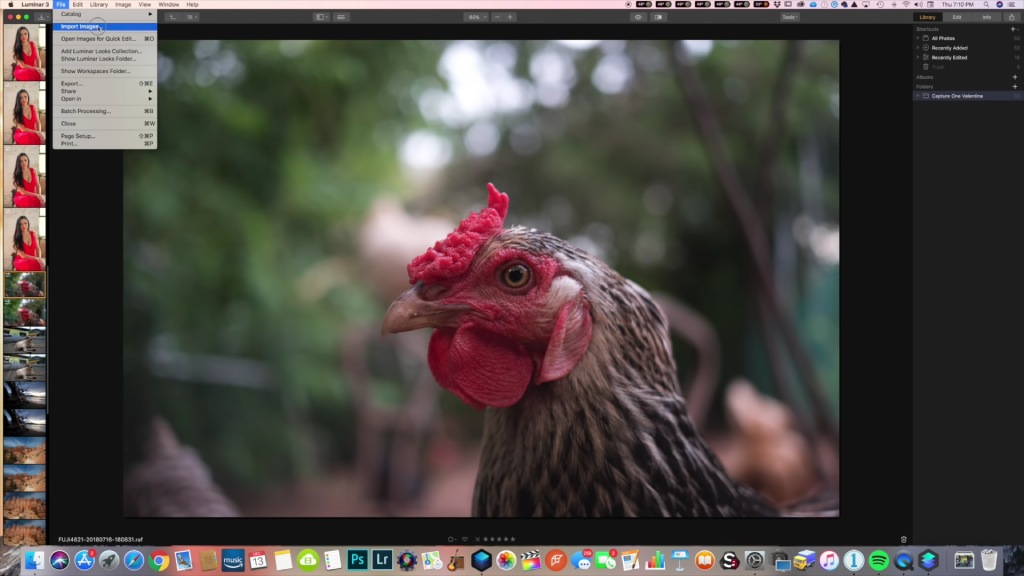 YouTube Screenshot/Omar Gonzalez
As noted earlier, you can add images into your library from memory cards or hard drives, and then once they're in the library, you can move them, group them, rate them, and so forth. You can even make your own virtual albums.
To add images, simply click File > Import Images and navigate to the location of the images on your memory card or hard drive. Then click "Import to Folder."
Better yet, when you add a folder to Luminar, you can work within that folder and any changes you make either in Luminar or on the desktop will be synced. That means keeping your images organized is much more straightforward.
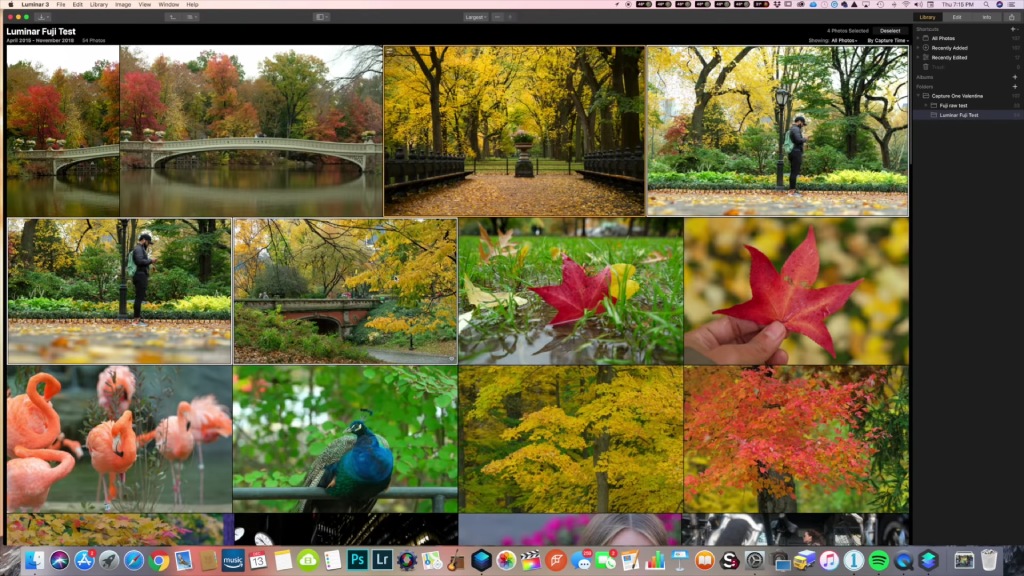 YouTube Screenshot/Omar Gonzalez
Another handy feature in the Luminar 3 library is that you can quickly copy edits from one image and paste them onto another.
For example, when in the grid view, as shown above, you can select an image, press CMD/CTRL+C and then select another image and CMD/CTRL+V to paste those edits.
Additionally, you can Shift and click to select multiple images to apply edits to a series of photos at once. You can also press Shift+CMD/CTRL+S to select multiple images to apply edits.
This feature is available in the filmstrip view as well. That means that as you make edits to an image, you can copy and paste them onto other images in the folder without even leaving the editing window.
Not only does this feature work very well, but it's also a huge time-saver - if you have a number of photos that require the same type of editing, you can apply the same edits to all the images you select in a matter of seconds.
Quick Tip: You can also copy and paste things like cropping - crop one image and use the keystrokes above to paste the same crop dimensions onto other photos.
Learn More:
- Easy Workflow for Amazing Landscape Photography
- Post-Processing Tip: How to Create Realistic Sun Rays in Your Photos
Luminar 3 Provides Simple Image Organization
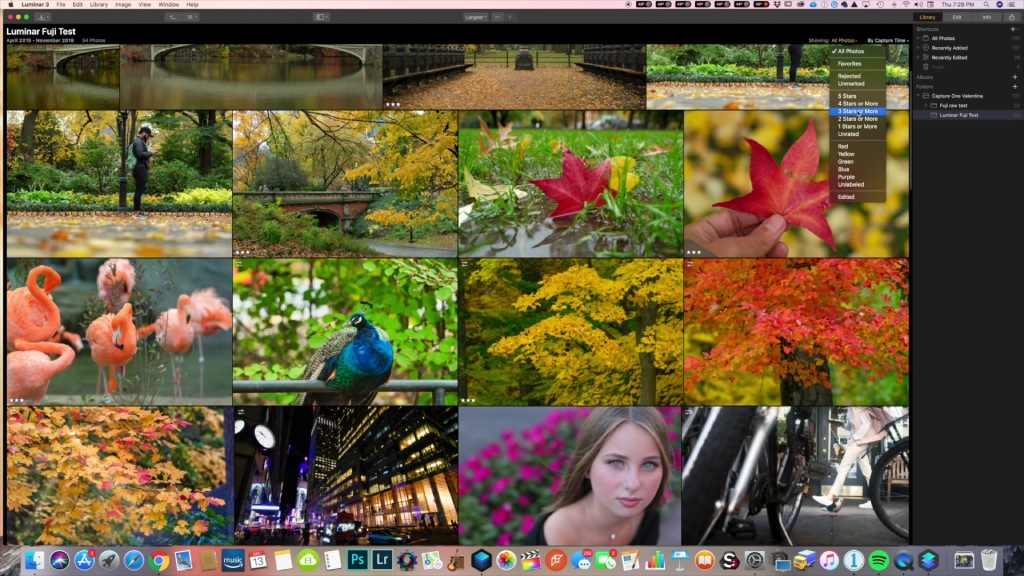 YouTube Screenshot/Omar Gonzalez
Not only does Luminar automatically sync images, but there's also a variety of ways to keep those images organized.
You can assign star-ratings to images and sort based on those ratings from 1-5.
You can also use colors to rate the images (i.e., green is a rating of 8) to further sort your images or sort them by date as well.
In other words, Luminar 3 offers total image organization with tools that allow you to rate and sort photos in a matter of seconds. Combined with its vast suite of innovative editing tools, it offers photographers a complete editing and organizing experience.
We Recommend
Luminar 4 First Impressions
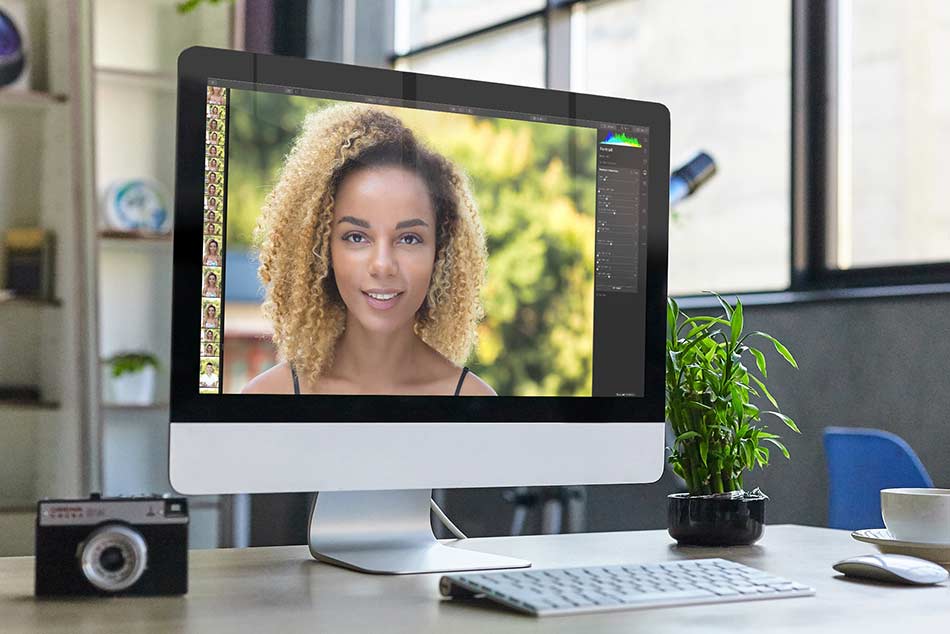
Those of you that follow us here at PhotographyTalk know that we’ve been impressed with past versions of Luminar in addition to other Skylum products, like the venerable AuroraHDR.
But Skylum, never wanting to miss an opportunity to wow us with advanced editing tools, is about to drop Luminar 4, and it’s certainly something we should all be excited about.
To say that Skylum has brought it in Luminar 4 is an understatement - this first look at this new update gives you a sneak peek at some of its most impressive features.
New Features in Luminar 4
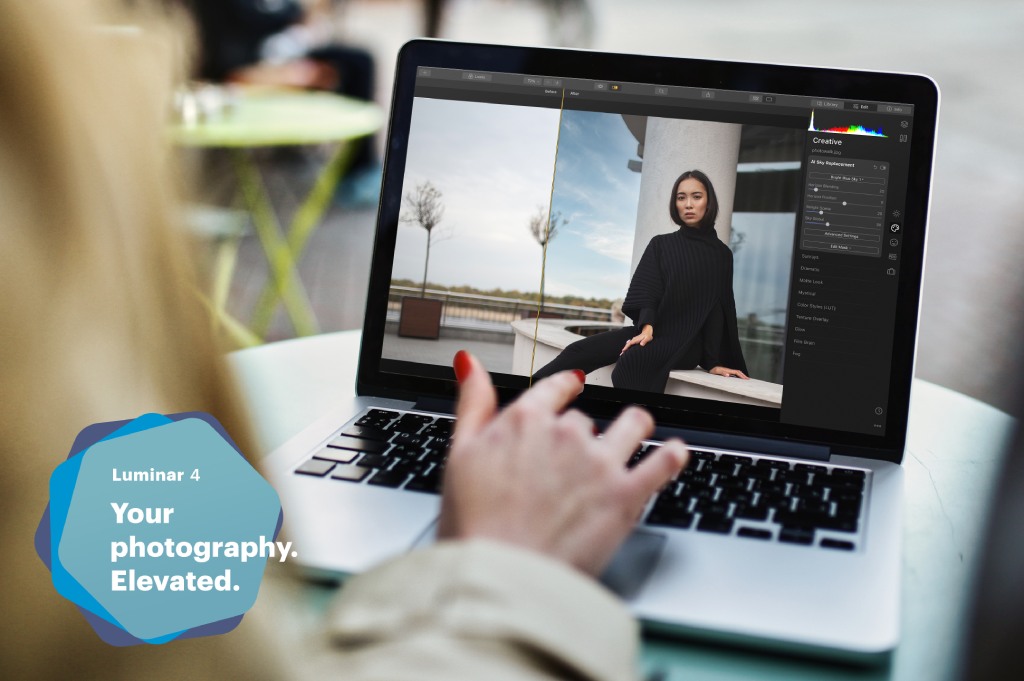
One of the best new features in Luminar 4 is the updated Edit Module.
It’s not like Luminar 3 wasn’t super easy to use with an intuitive layout, but Luminar 4 takes it up a notch with a redesigned experience that improves your ability to find and use the tools you need to get the job done.
Also new in Luminar 4 is the Color Style Library that allows you to change the color and mood of your images with cinematic color styles. This feature works beautifully with a vast library of Luminar Looks - creative presets that give you the power to customize the look of your images with just a few clicks.
What’s great about Looks, though, is that they aren’t just a “click-and-apply” preset. Instead, you can fine-tune the Looks to your specifications and make them truly adaptive to your needs. See what I mean in the video above by The Art of Photography.
Add to that improved stability and performance, an upgraded Golden Hour Filter, and improved Denoise Filter, and an upgraded Adjustable Gradient Filter, and you have the makings of a high-powered photo editor!
But that’s not all that’s new in Luminar 4…
There are plenty of AI-powered features that make it a next-level image editor.
Luminar 4 Features AI Sky Replacement
Yep, you read that right…
In Luminar 4, you can actually replace the sky - not just edit it, but totally replace it!
And it’s an intelligent replacement, too. That is, you don’t have to make selections or create masks. Instead, it’s an automated process by which intelligent selection algorithms selects only the sky, leaving tiny details like leaves, grass, birds, or hair alone.
The Sky Replacement Tool also removes artifacts like halos and hard edges. It even relights the entire photo, that way the original image matches the new sky. It will even choose the best orientation of the replacement sky, that way it looks and feels realistic when paired with the original image.
See AI Sky Replacement in action in the video above by Dustin Abbott.
Luminar 4 Includes AI Portrait Tools Too
All you portrait enthusiasts out there can take advantage of Luminar 4’s new Portrait Enhancer and Skin Enhancer tools to create breathtaking portraits.
The Portrait Enhancer has a dozen different tools that give you total control over precise edits.
From removing red eye to whitening eyes, relighting the model’s face to adjusting the details of the model’s lips, and more, you can manipulate sliders to get the perfect look in your portraits. You can even brighten the model’s face, as shown above.
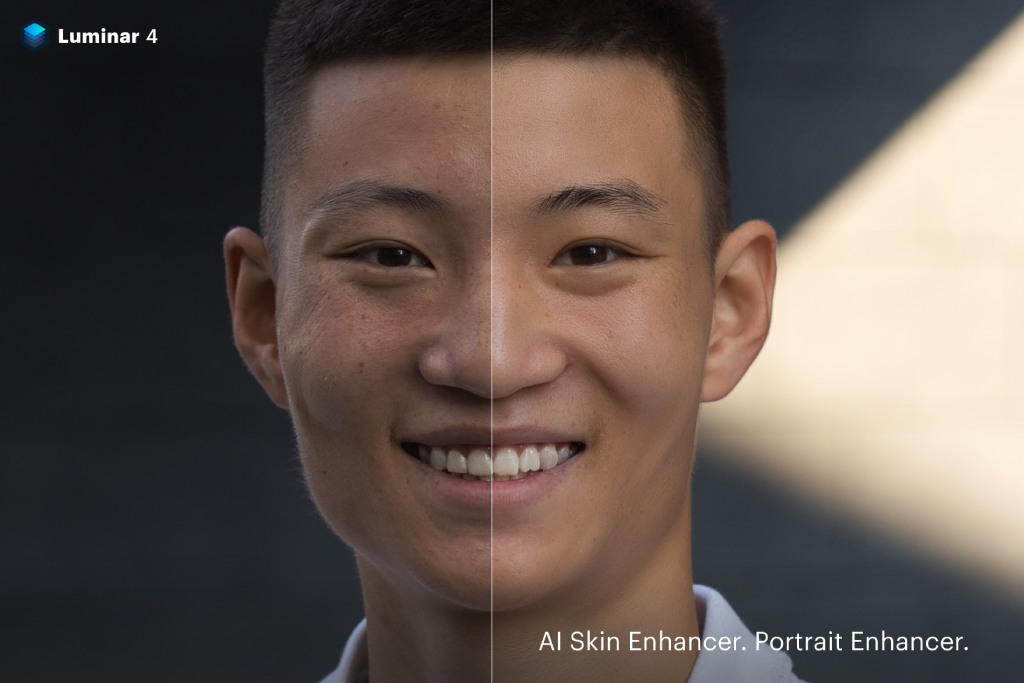
As if that’s not enough, Luminar 4 also includes an AI Skin Enhancer, which uses human-aware technology to find all the skin in a photo - face, arms, legs, and so forth - all on its own, regardless of skin type or the age of the model..
Then, it removes blemishes and smooths out skin, all without losing details like pores, texture, and hair.
Again, these portrait tools make use of AI, so there is no masking or selections needed. Instead, these changes can be made with one click with easy adjustments to their strength via sliders.
Use AI Structure to Reveal Details in Images
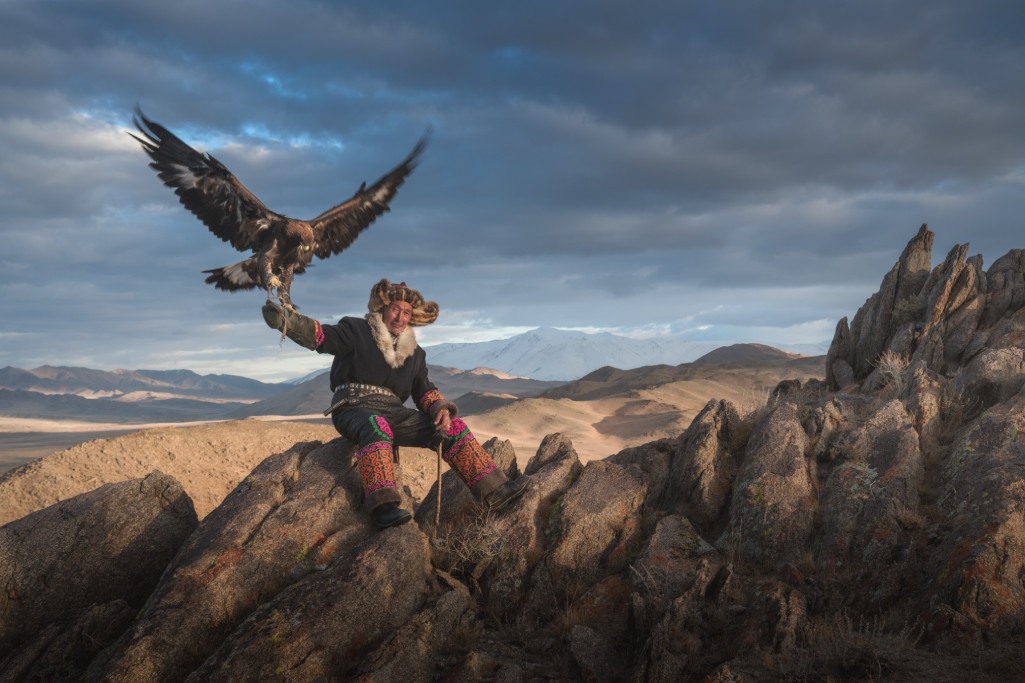
Traditionally, photographers have used tools like Structure and Clarity to enhance details in their images, but to the detriment of other parts of the photo because these tools were applied to the entire photo.
Not anymore…
Luminar 4 has an AI Structure feature that automatically identifies objects and improves their details in a content-aware way.
Whether it’s a person’s face, clouds, buildings, water, or some other object, the AI Structure tool brings a greater level of detail and richness without any part of the image looking overworked.
On top of that, AI Structure improves texture, clarity, and dynamic range. It does this without introducing any artifacts, noise, or halos.
Luminar 4 Turns Hours of Editing Into Minutes
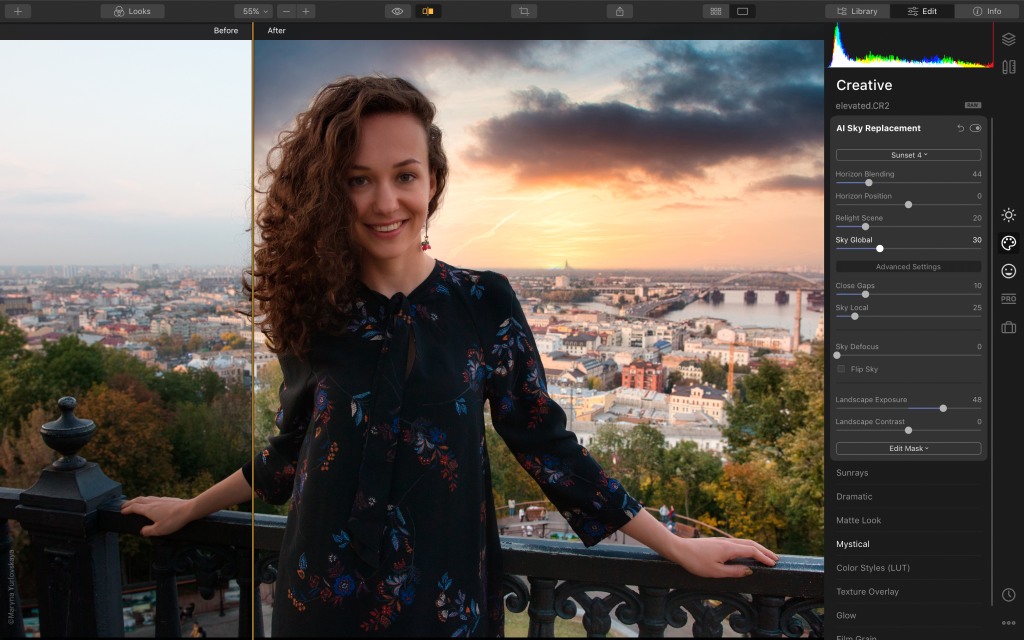
Truthfully, with all these high-powered tools, Luminar 4 makes your photo editing workflow so much more timely.
Combined with the best features from Luminar 3 - like the Accent AI Filter (which makes a dozens of selective adjustments using human-aware technology), Smart Contrast, which carefully preserves colors and details while boosting contrast, a library feature to help you organize, sort, and find images, and more than 70 Looks to unleash your creativity - there is nothing stopping you from creating epic photos.
You can check out our complete Luminar 3 Review to see what features it has to offer, and be sure to stay tuned for our full Luminar 4 Review coming up soon!
In the meantime, watch the quick overview of Luminar 4 in the video above, then go ahead and pre-order Luminar 4 (with additional goodies)!
We Recommend
Luminar Review
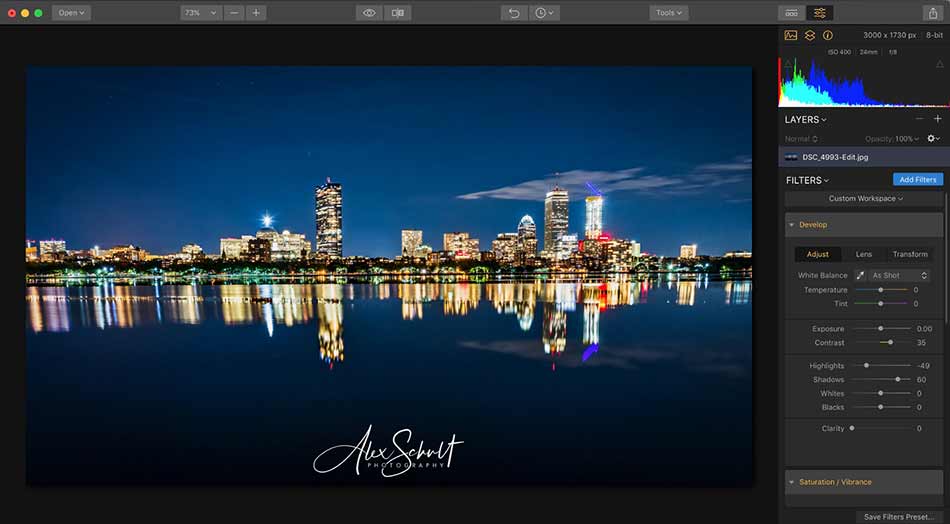
If you're not familiar with Skylum's Luminar software, you need to be.
I've been using Luminar for a few months now, and I honestly can't imagine my workflow without it.
In short, it's an intuitive image editor with powerful, innovative tools that have allowed me to take my photos to the next level.
Below, I offer the results of my months-long, real-world test of Luminar 2018.
What is Luminar?
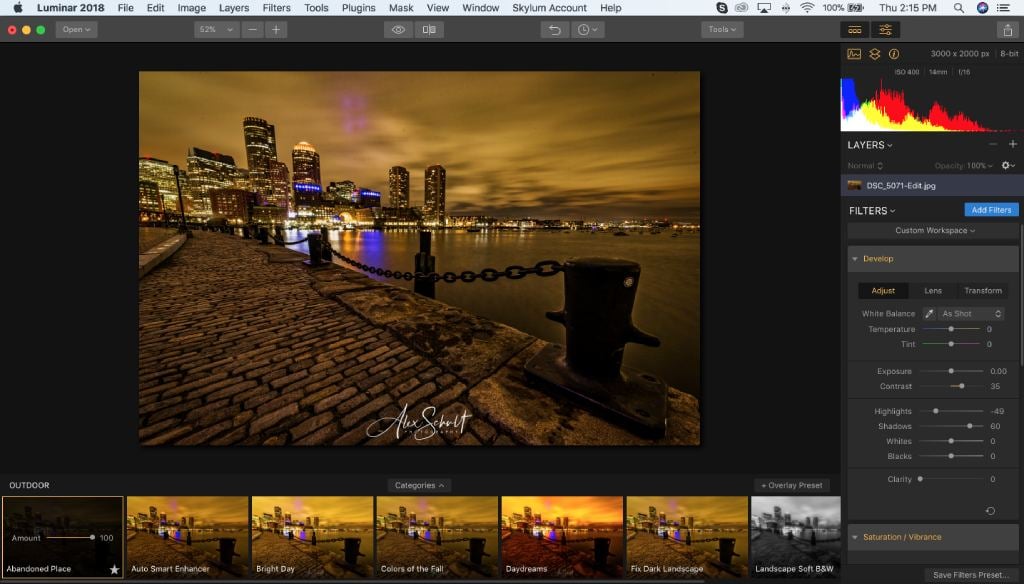 The Luminar editing screen. At the bottom, you can see just a few of the presets that are available. To the right is the editing workspace.
Luminar is a high-powered RAW photo editor that was first introduced a couple of years ago by Macphun (which is now called Skylum).
Skylum is responsible for the much-loved Aurora HDR, an app for HDR imaging that has received its fair share of accolades.
Like Aurora HDR, Luminar was originally released for the MacOS ecosystem but is now available for Windows machines as well.
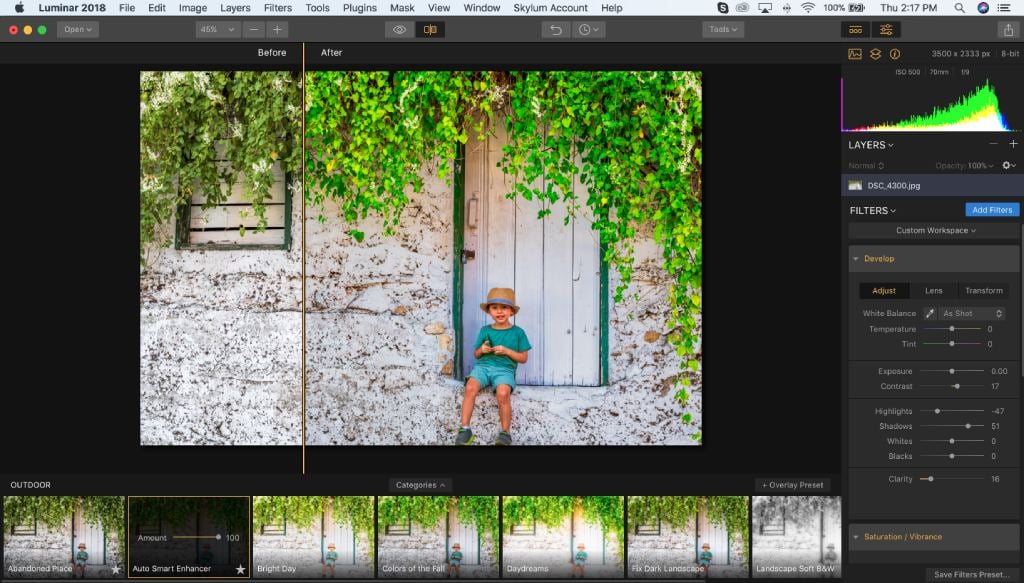 Luminar has a beautiful UI with a workspace that's smartly organized and intuitive to use.
The Luminar interface is clean and well-organized, with an intuitive layout that makes editing images a faster, easier process.
It has all the basic tools you'd expect for cropping, adjusting colors, exposure controls, saturation, vibrance, and so on. But for me, Luminar's value is in its easy-to-use filters (more on that later).
It's also important to note that unlike other products, Luminar has no monthly fees.
You simply buy the license for $69 and the program is yours for life. You can even give it a go for two weeks for free before you buy.
What are the Best Features of Luminar?
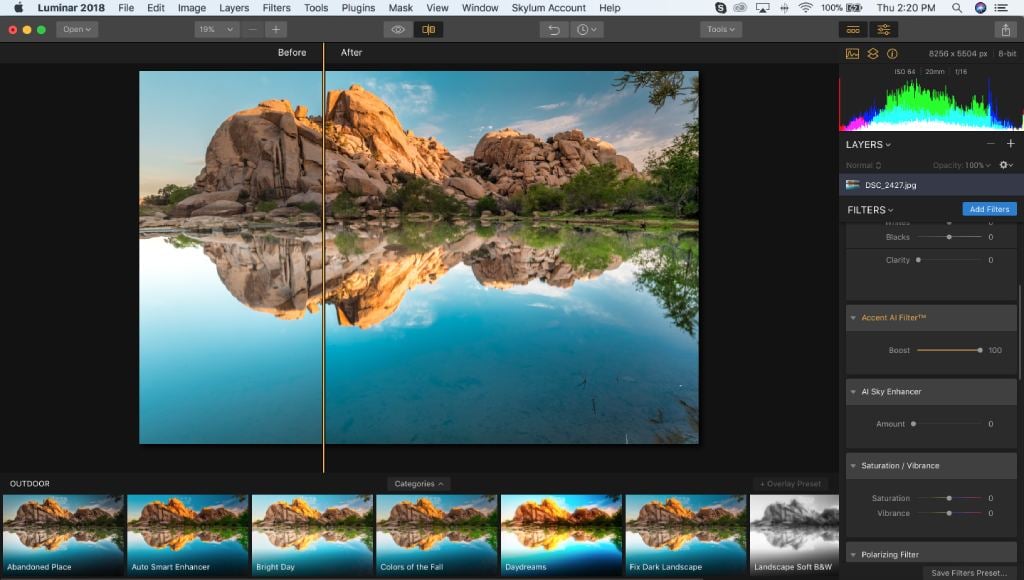 The Accent AI Filter gives you the power to apply about a dozen quick edits to your image at once.
If I had to break it down into the top five best features of Luminar, I'd have to go with the following:
- The Accent AI Filter - Using one simple filter, you can drastically alter how your images look.
- A Huge Collection of Presets - Luminar's presets make quick work of editing images in a way that enhances their look. There are tons of filters you can use as well.
- Customizable Panels - If you're a portrait photographer, you can customize the workspace so that only the portrait panels are on-screen. You can do the same for landscapes. It creates a much less cluttered and easy-to-use space.
- Room for Growth - Luminar manages to cater to every type of photographer from those that are brand-new to those that are grizzled veterans. It's truly a program that can grow with you as your skills expand and your needs change.
- Lifetime License - Who doesn't like to save money?!
Is Luminar Easy to Use?
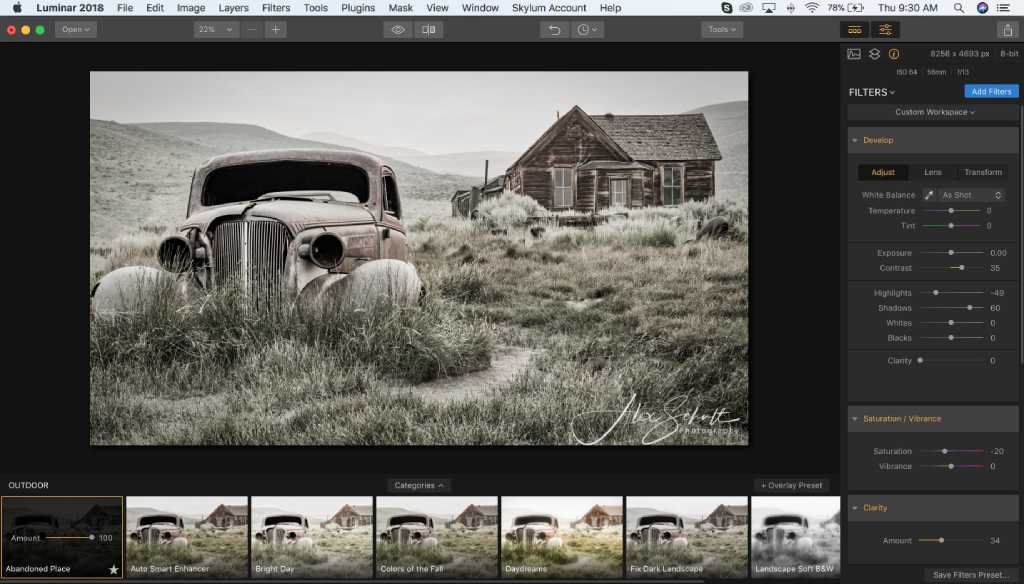 Using Luminar is a breeze, particularly if you utilize the presets. My favorite preset? For me, “Abandoned Place” just rocks and brings such a healthy blend of grit, sharpness, and all that other cool post-processing magic with it.
In a word, yes, Luminar is easy to use.
This program can be as simple or as complex as you need it to be.
On the one hand, if you need to tackle a few quick edits, just pop your image into the program, apply one of the awesome presets, save and export the image, and you're done. You can literally edit a photo in a couple of minutes. The crazy thing is that your photos won't look like they were edited in short order.
You can apply presets to a single image or to multiple images all at the same time, and adding filters and presets is non-destructive, too.
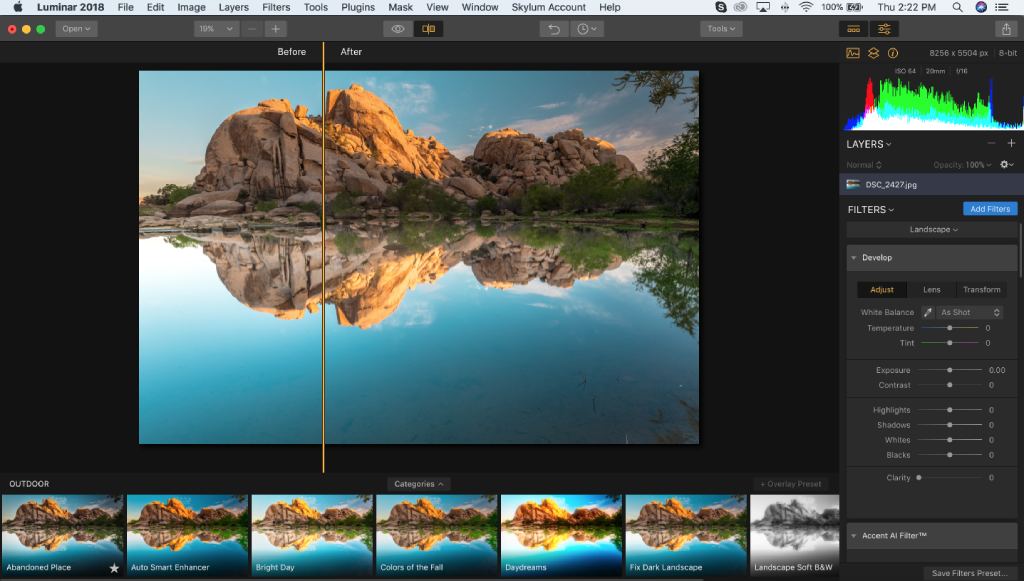 Using customizable panels like the Landscape workspace helps keep things uncluttered.
But don't think that Luminar isn't capable of being a high-powered editor.
There are dozens of filters you can use to enhance your image, each of which has multiple sliders to fine-tune how the filter is applied to the image.
You can add layers, use masking tools, work on contrast, highlights, shadows, and make other detailed edits as well.
What's more, as noted above, using customizable panels helps keep the workspace uncluttered.
Above, you can see the Landscape workspace with just a few of the tools available for enhancing your landscape photos. There's workspaces for portraits, black and white, and street photography as well.
Regardless of which approach you take - quick and easy with presets or a deep-dive into detailed photo editing - Luminar manages to keep itself uncluttered, intuitive, and easy to use.
In short, it's fun to use, easy to be productive, and never confusing.
Can You Customize the Luminar Workspace?
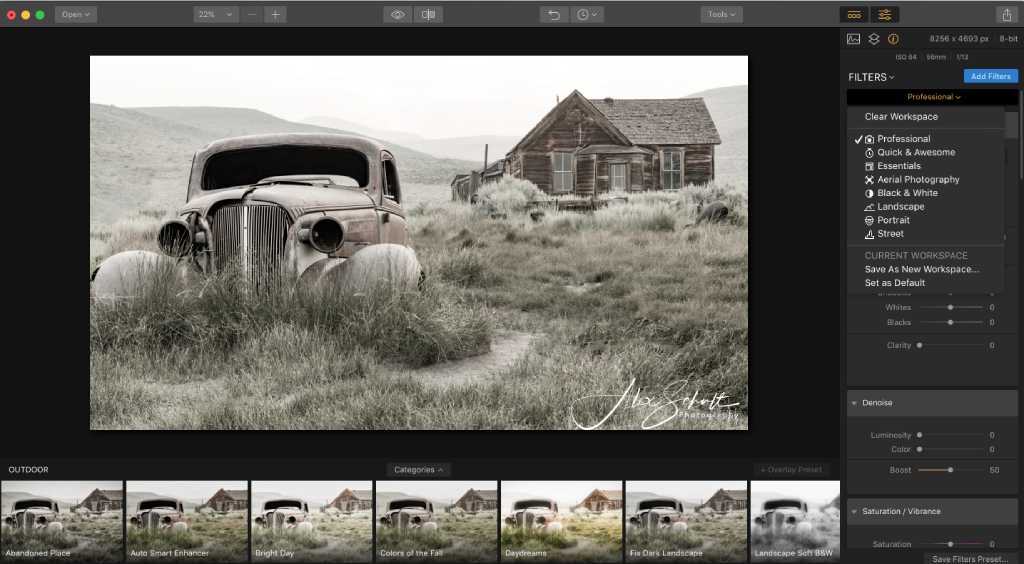 For the ultimate control over your edits, you can create a custom Luminar workspace.
For more advanced photographers, Luminar offers the ability to customize the workspace to meet your specific needs.
On the one hand, if you're a landscape photographer and want to add your own filters to the existing Landscape workspace, you can do so quickly and easily.
On the other hand, if you want the ultimate in control, you can also create fully customized workspaces.
Editor's Tip: Luminar 3 with libraries is available for pre-order. GET YOUR COPY NOW AND SAVE $10.
A Quick Visual Tour of Luminar
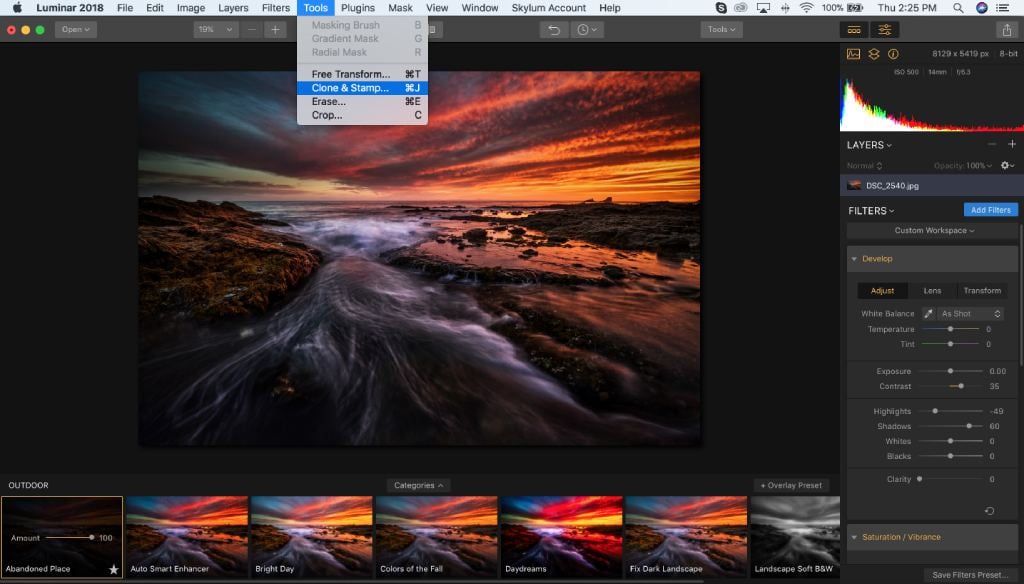 The top toolbar offers quick and easy access to commonly-used features.
At the top of the editing window is a toolbar that houses the bulk of tools and utilities you'll use. That includes:
- Opening new images and batches of images
- Redo and revert (as well as a list of changes in the History)
- Zoom-in and out buttons with drop-down presets of common zoom levels
- Before and after, show and hide, and split-screen tools for making image comparisons
- Common tools like transform, clone stamp, eraser, and crop
- Exporting options
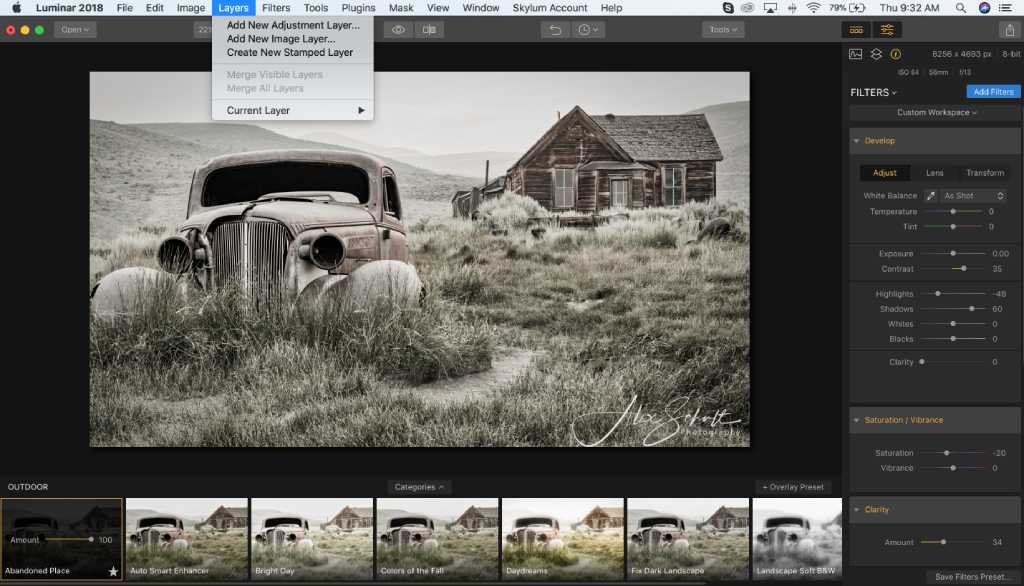 Luminar allows you to work in non-destructive layers.
On the right side of the screen are the tool panels for processing image files.
That includes buttons for toggling the Histogram, Layers, and Image Information on and off.
The image's layers are displayed below the histogram with options for adding or removing layers, changing blending modes or opacity, merging layers, and so forth.
You can also add Adjustment Layers, Stamped Layers, and apply a Mask to any layer.
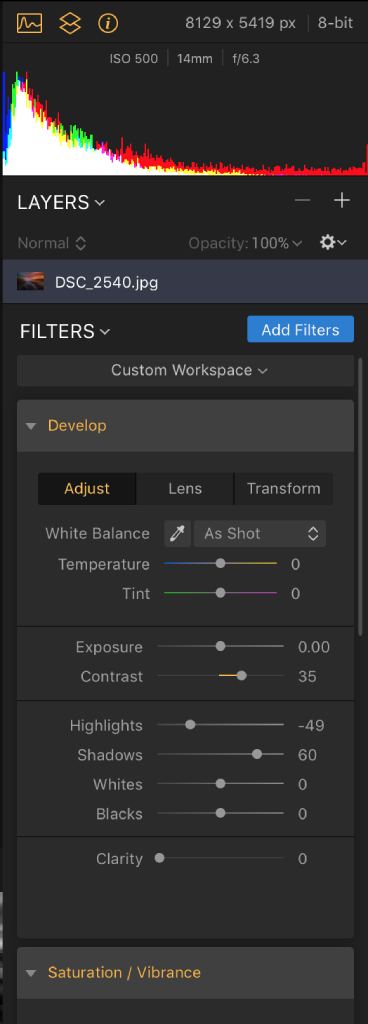 The workspace on the right side of the editing screen gives you a quick look at the adjustments you've made to your photos.
The workspace below the Layers Panel is where you'll see all the adjustments you've made to the image.
As noted earlier, there are workspaces for landscapes, portraiture, street photography, and black and white. Also available are Professional, Quick & Awesome, Essentials, and Aerial Photography.
Each workspace has its own filters and tools that make quick work of editing specific types of images.
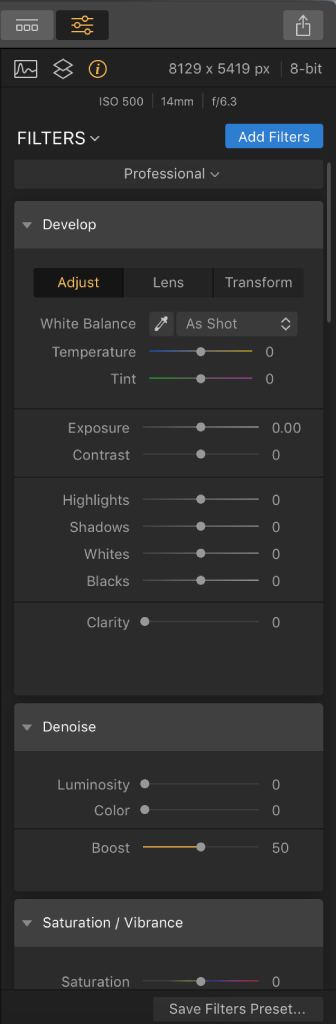 The Professional Workspace is loaded for bear with all the tools needed to make professional image edits.
For example, the Professional Workspace has, as you might have guessed, all the tools pros need to edit images. This includes curves and HSL, Dehaze and Raw Develop, a Polarizing Filter, among others.
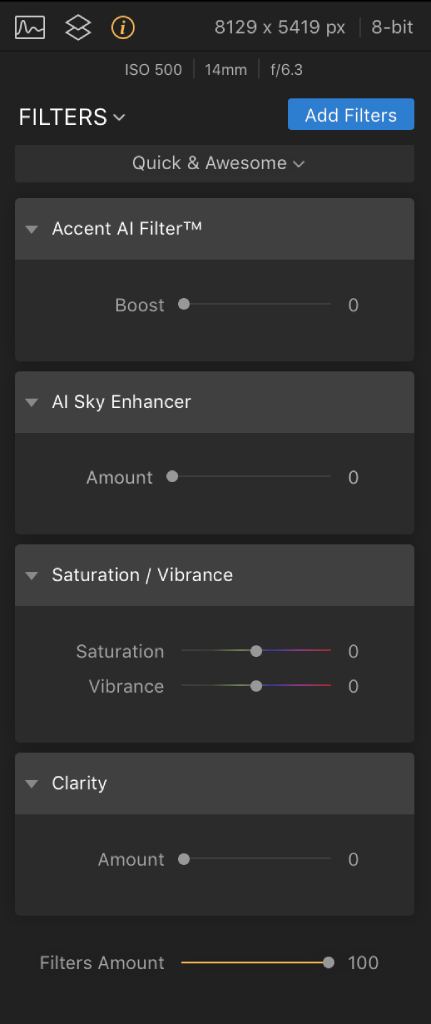 Need to make quick edits? The Quick & Awesome Workspace in Luminar gives you all the tools you need.
If the Professional Workspace is a bit too much for you, the Quick & Awesome workspace offers a more basic - yet still highly effective - set of tools that includes Luminar's excellent Accent AI Filter, saturation and vibrance, and clarity adjustments.
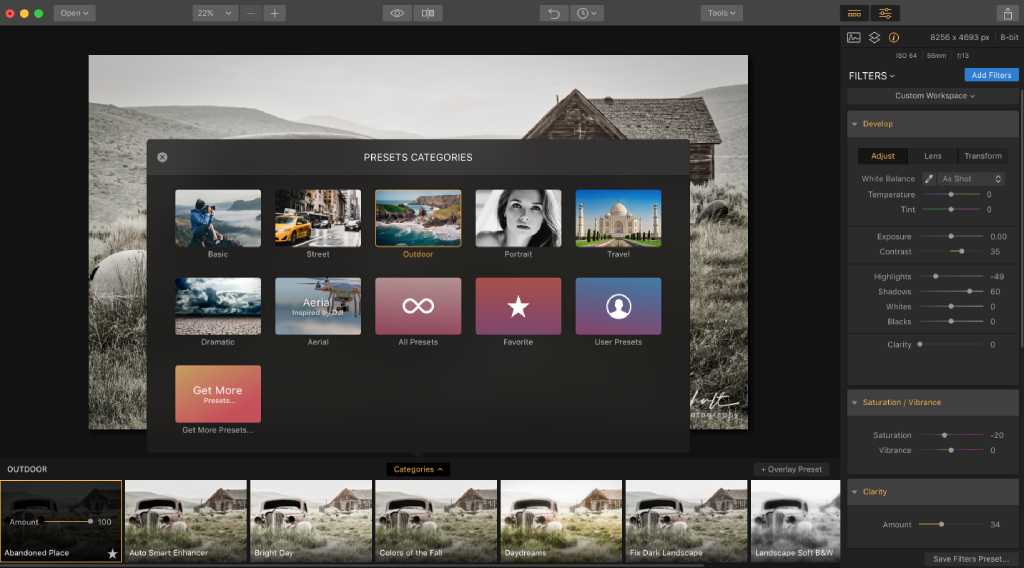 Use pre-defined presets to enhance your images or create your own custom presets for a more personalized touch.
At the bottom of the editing window is a carousel of image presets.
There are tons of different presets that you can use and fine-tune for your images for quick editing.
Luminar also smartly includes the ability to save your own presets by combining different filters, should you desire.
How Good are Luminar's Filters?
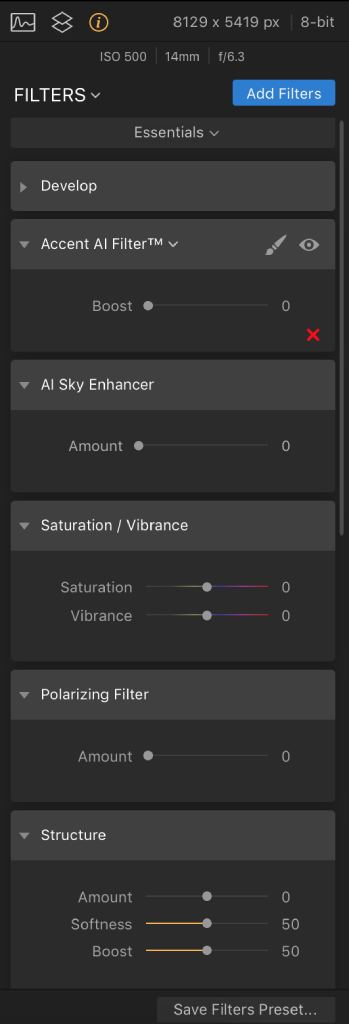 With dozens of filters available for use, Luminar maximizes your ability to get creative.
Don't let the word "filters" - which many associate with rubbish Instagram filters - fool you.
Luminar's filters are high-powered adjustments that run the gamut from basic image editing tools to creative adjustments that allow you to experiment and add special effects.
The filters are parceled into five different categories for easier navigation:
- Essential Filters - Basic adjustment tools like Tone, Structure, Saturation, Vignette, and Black and White. Also included is the excellent Accent AI filter that applies about a dozen different effects to the shot at the same time.
- Issue Fixers - These filters seek to address problems related to things like sharpness, haze, and noise. Tools include Denoise, Clarity, Sharpening, Dehaze, and Foliage Enhancer, just to name a few.
- Creative Filters - The most robust set of filters in Luminar, these tools are designed to let your creativity run wild. Included in the Creative Filters are adjustments for Cross Processing, Split Toning, Hue Shift, Warmth, and Brilliance, among others. Also included are special effects like Soft Glow, Fog, Radiance, Sun Rays, and Soft Focus.
- Professional Filters - As you'd expect, these tools cater to pros that need to adjust color balance, HSL, curves, mix channels, dodge and burn, and so forth.
- Utility Filters - These filters give you further ability to enhance your images with things like adjustable gradients, top and bottom lighting adjustments, bi-color toning, and brightness/contrast adjustments.
Polarizing Filter in Luminar
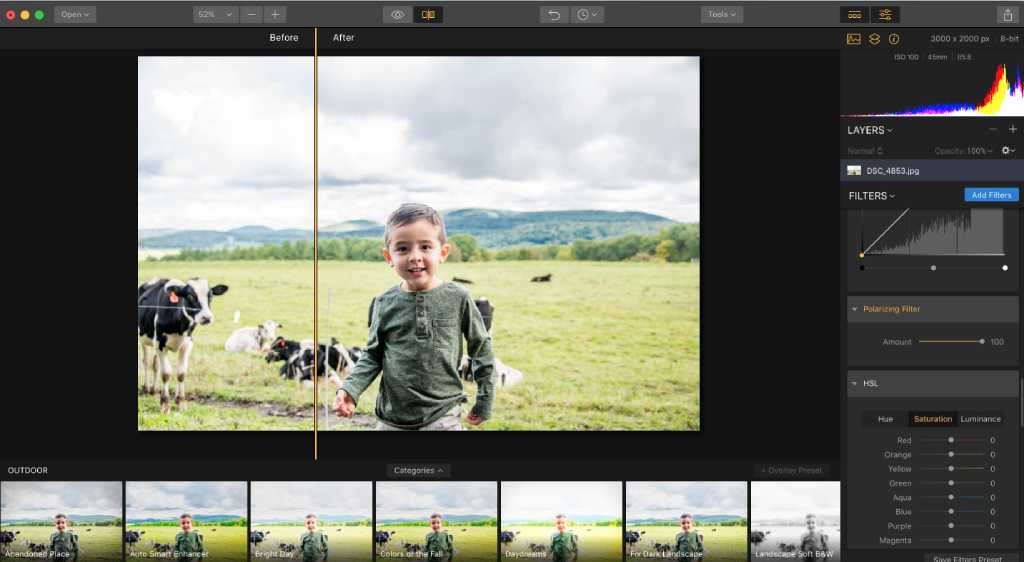 The polarizing filter in Luminar works beautifully for adding more definition to clouds and minimizing haze.
I wanted to discuss the Polarizing Filter in Luminar separately because it was such a pleasant surprise when I found it in the Issue Fixers set of filters.
I've preached for years that digitizing the effects of a polarizing filter simply doesn't work. Well, that's changed...
In the photo above of my son, you can see the clouds on the right have a more ominous look and depth to them.
What's more, the mountains in the back have more color and tone thanks to the effectiveness of the filter.
It's hard to describe just how well this thing works, but bravo Skylum for finally giving us an effective digital polarizing filter!
Luminar AI Sky Enhancer
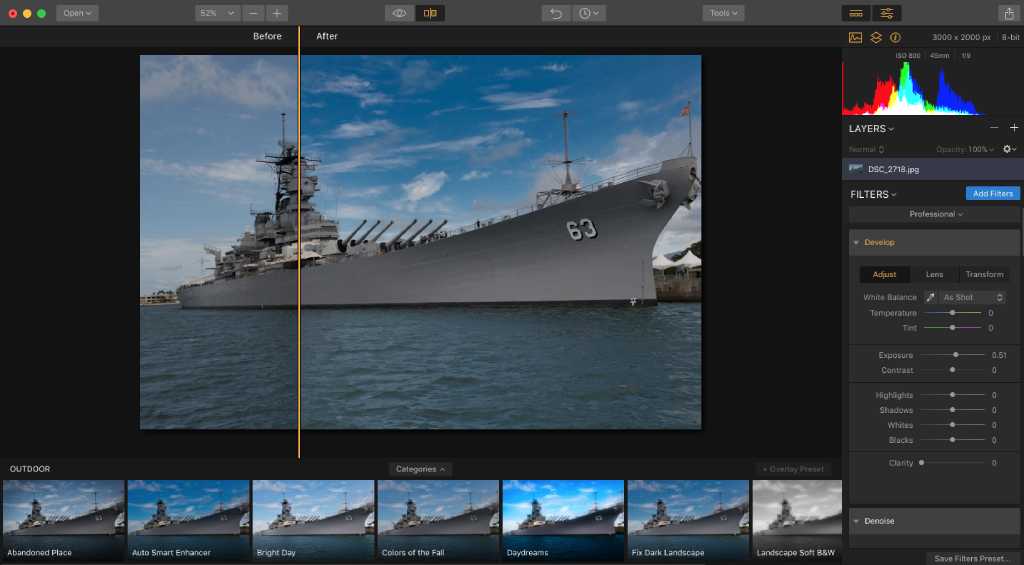 The innovative AI Sky Enhancer works like a charm to add drama and detail to the sky without impacting the rest of the image.
Another feature that deserves some recognition on its own is one of the coolest new features in Luminar - the AI Sky Enhancer.
In short, the creative folks over at Skylum created artificial intelligence that identifies and targets only the sky portion of your image, adding drama and detail in a quick and easy-to-use slider.
Seriously how cool is that?!
The best part about this is that it doesn’t touch the rest of the photo, only the sky.
I tested it on the image above because if you look at the top of the battleship, there are canons and wires where the sky is broken up, and it worked like a charm.
Lightroom vs. Luminar
Could Luminar be better than Lightroom?
If you were to ask me this earlier this year, I would have said no because Lightroom has the catalog.
But as of this writing, Luminar 3 is on pre-order, and it has libraries! Holy smokes!!
Luminar has done it - they have created something that is nothing short of extraordinary, and now, in my opinion, it's a better option than Lightroom.
Final Thoughts: Luminar 2018 Review
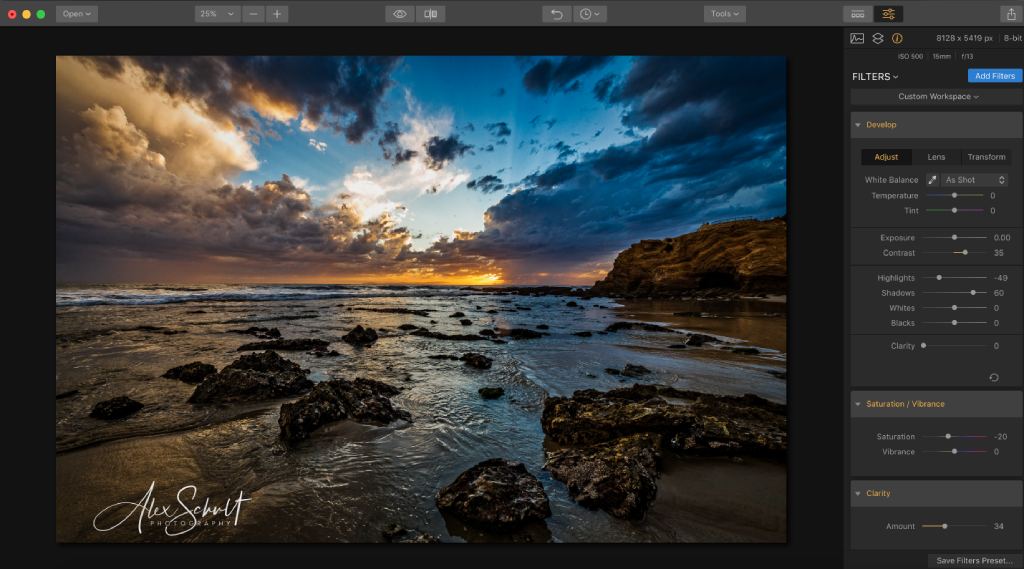 Luminar has managed to create an editor that is robust, easy-to-use, intuitive, and fun.
I've had a good deal of time to work in Luminar, and I have to say that it's more powerful, more feature-rich, and more responsive than I could have hoped.
It's clean UI, customizable workspaces, and abundance of tools really does give you the ability to enhance and edit your images quickly and easily. It's just plain fun to use as well!
As noted earlier, the presets and filters in Luminar have to be among its best features. Whether you have just minutes for quick edits or you need to really dig deep and fine-tune the image from a macro level, Luminar has the tools to help you do so.
The learning curve is minimal, but the results you can generate are out-of-this-world. That's a great combination if you ask me!
We Recommend
Luminar Review - What You Need to Know About Luminar 3

Luminar 3 was released in December 2018 and features many of the same innovative features as its predecessor, Luminar 2018.
However, Luminar 3 got a number of upgrades, not the least of which is a Library feature that allows you to import and organize images into folder and albums, sort and rate photos, and sync photos between your Luminar library and your desktop.
But Luminar with Libraries isn't the only feature and benefit worthy of note.
In this Luminar review, I outline some of its top benefits, compare it to Lightroom, discuss pricing, and more.
Luminar Key Features and Benefits

One of the best features of Luminar is that it has an interface that you can adapt to your specific workflow.
Not only is it scalable and adaptive to your needs, but it's also highly customizable.
That includes the ability to adjust the size and layout of the photo gallery, using shortcuts to find photos based on date, rating, label, or even editing status, and pre-made workspaces populated with tools for specific types of editing, such as for landscape photography, portraiture, and black and white photography, among others.
The benefit to you is that you can work faster, find images you want to edit with greater ease, and have a totally custom workspace that perfectly fits your workflow.
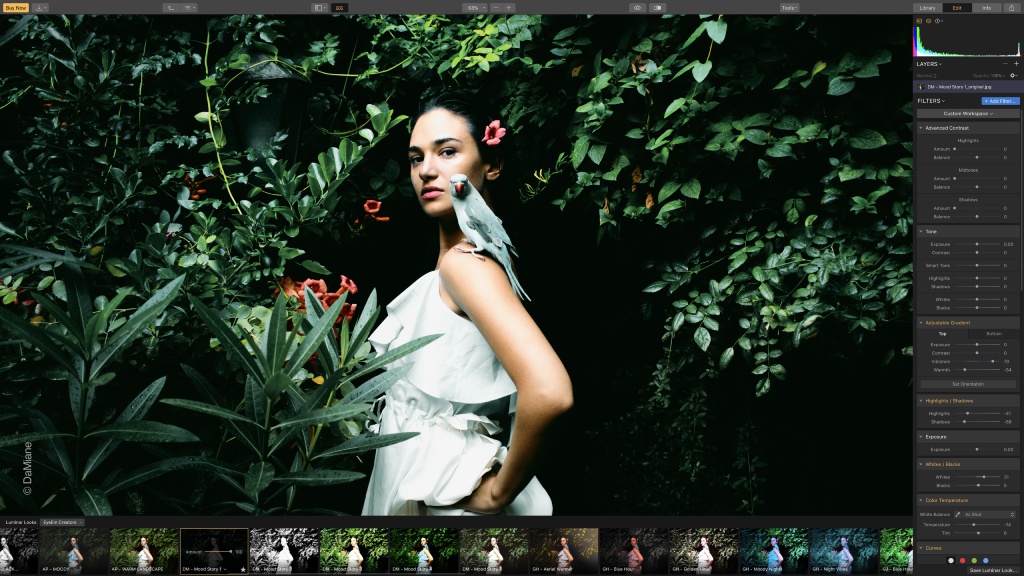
Another excellent feature of Luminar is that it has dozens of enhancement filters that allow you to kick off the editing process in literally seconds.
There are 51 filters in total, ranging from "Issue Fixers" like Clarity and Dehaze to "Creative Filters" like adding Golden Hour effects, Soft Focus, and Fog.
Likewise, more traditional filters like Curves, HSL, and Dodge and Burn are also available, each of which is easily adjusted via a series of sliders (as shown above).
But if you ask me, one of the best filters of the bunch is Luminar's AI-powered Accent AI Filter, which is shown in the GIF above.
The Accent AI filter analyzes your photos and applies about a dozen enhancements automatically, including improving the color, tone, and depth of the photo.
And while the Accent AI filter does all this on its own in a matter of milliseconds, you still retain control over the final product by adjusting a slider control. Simply move the slider to the right to enhance the filter's effects and move it left to reduce them.
Naturally, the benefit of using this and Luminar's other filters is that you can quickly make highly impactful edits to your photos. Not only does this save you time in the short-term, but it also helps you develop a workflow that saves you time in the long-run as well.
Luminar vs Lightroom
With every update from the Luminar folks, we're seeing more and more of this "Luminar vs. Lightroom" question coming up.
That's certainly true now that Luminar has a Library feature, which was one of the knocks against previous versions.
Above, Sawyer Hartman offers a detailed, hands-on review of Luminar 2018 with some insights into Luminar 3 as well.
He tackles the Luminar vs. Lightroom issue and provides his insights on the comparison between the two. Have a look, and you can be the judge regarding which program stacks up best for your specific needs.
Luminar for Landscape Photographers

Luminar has a variety of tools aimed specifically and landscape photography.
One such tool is the AI Sky Enhancer, which, like the aforementioned Accent AI Filter, is powered by artificial intelligence.
This filter analyzes a landscape image to determine which part of the photo is the sky. This analysis is done accurately whether the sky is clear or cloudy, whether it occupies most of the frame or very little, and if the sky is blue, orange, pink, or some other color. The GIF above shows the Sky Enhancer in action.
Once the filter determines which parts of the photo are the sky, it intelligently applies a filter mask and enhances it based on numerous factors, including its color, size, and texture.
Then, you can fine-tune how the filter is applied by adjusting a single slider.
Again, this is a feature that benefits users both in terms of ease of use and in time savings as well.
Get a detailed look at the AI Sky Enhancer in the video above by David Johnston.
 Photo by Max Rive
Another innovative landscape photography feature you'll find in Luminar is the Sun Rays filter.
Again, Luminar smartly applies this filter to add realistic sun rays to any photo.
You exert a lot of control over the look of the sun rays, and can determine their location, look, and intensity.
The truly neat thing is that Luminar applies the filter in a way that it interacts with features in the shot. That means that if you place the origin point of the filter behind a mountain peak, Luminar will automatically mask the rays behind the peak.
You can see this process in action in the video above by Mads Peter Iversen.
How to Use Filter Masks in Luminar
Masking is a great way to enhance certain parts of a photo. The problem in some programs is that masking is a laborious process.
That's not the case in Luminar.
In fact, you can apply filter masks in a matter of minutes, and the results of applying edits in this very fine, specific manner can be quite extraordinary.
In the video above, David Johnston walks us through how to use filter masks in Luminar.
Luminar With Libraries
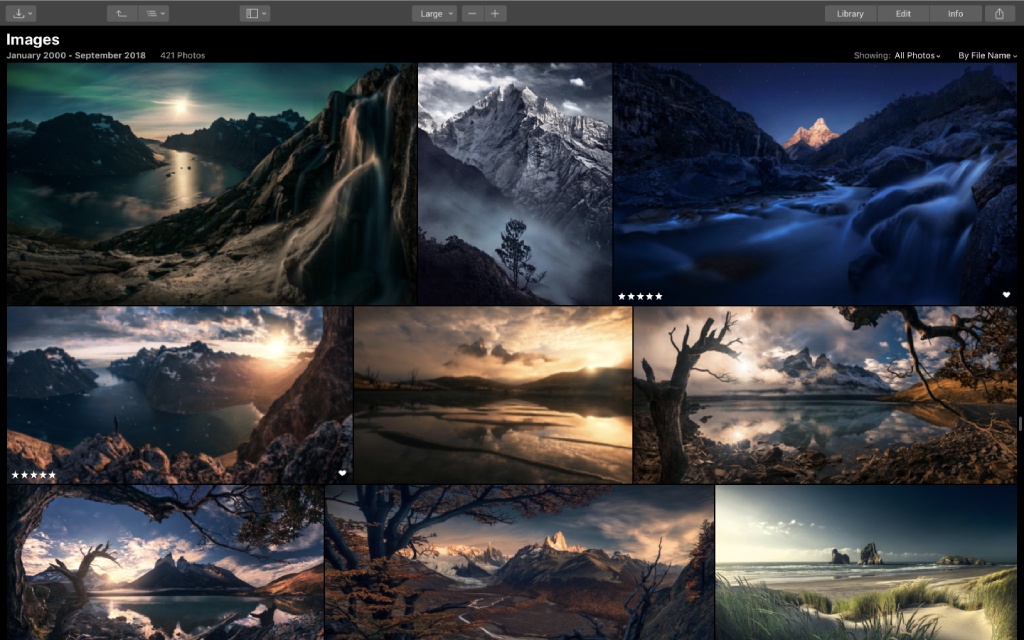
As noted in the introduction, Luminar 3 comes with a library feature that makes organizing and sorting your images a breeze.
But Luminar 3 has other enhancements and improvements that make it even easier and more efficient to use.
Have a look at the video above by Jim Nix to explore ten things in Luminar 3 that you'll be glad to know.
His tour of the Luminar interface will help you identify ways in which you can streamline your workflow for more productive editing sessions.
Luminar for Windows

Until recently, Windows users were left out in the cold as Luminar was exclusively available for Mac.
That's no longer the case...
Skylum, which was once called MacPhun, has expanded their universe to include Windows-based users and have started catering to the demands of photographers that use PCs.
What's more, Luminar is available on Windows and Mac as a standalone application or as a Plugin for Lightroom and Photoshop. You can even use it as an extension for Apple Photos if you're a Mac user.
In other words, Luminar offers you a whole host of ways to use it either independently or as an addition to programs you already use whether you're on a Mac or a PC.
Luminar Free Trial
From time to time, Skylum offers a free trial of Luminar.
You can check availability of free trials by visiting their website.
Luminar Price
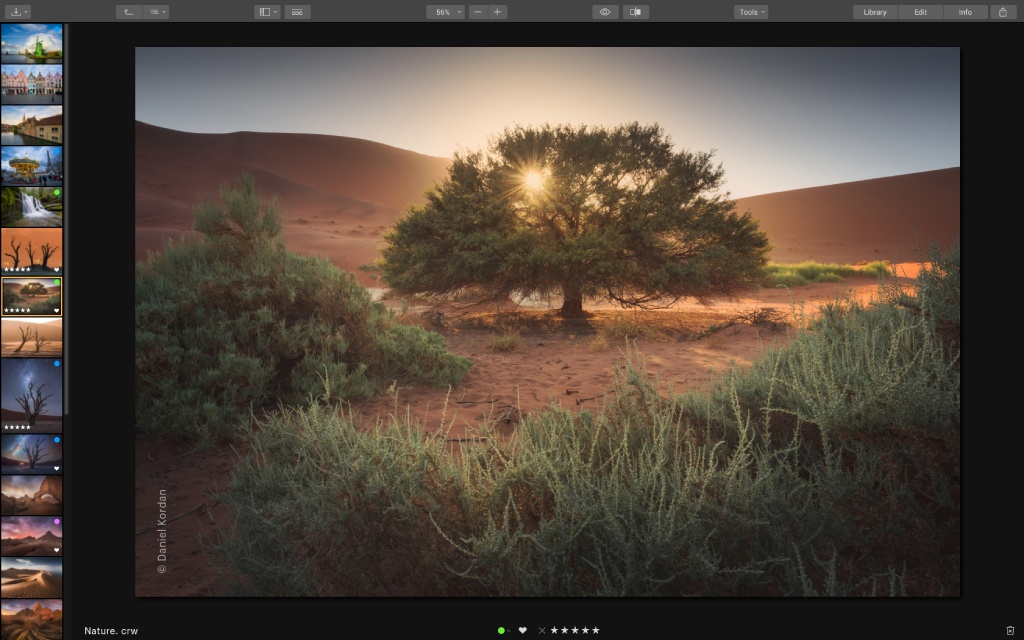
Ask any photographer what they think about Adobe's recurring fees for Lightroom and Photoshop, and you'll likely get an angry earful.
Skylum took that dissatisfaction to heart, and offers Luminar for a one-time fee of $69.00. Luminar affiliates often have Luminar discount codes available for a percentage off the purchase price, so keep your eyes peeled for those. You can often find discount codes on YouTube by searching for Luminar 3-related videos.
Not only that, but that one-time fee gets you one license for five Macs or five PCs. There's also a 60-day money-back guarantee.
Luminar 3 Download
If you're ready to pull the trigger and get a copy of Luminar 3, just visit the Luminar website.
From all indications from reviewers and in my own hands-on testing of Luminar, it's a more than worthy option for editing your photos.
We Recommend
Make Beautiful Edits to Your Images With This Basic Post-Processing Workflow

Creating a beautiful photo is much more than planning your photo shoot, having the necessary skill, and mastering things like composition and lighting.
In fact, the workflow to create the final image involves very little time behind the lens, and much more time planning and prepping beforehand and editing the photo after the fact.
In this tutorial, you'll learn a basic post-processing workflow in Luminar 3 that will help you enrich your images and get the most out of the photos you take.
Let's get started!
Supercharge your post-processing workflow with Luminar 3. Try it today!
Use Luminar Looks to Speed Up Your Workflow
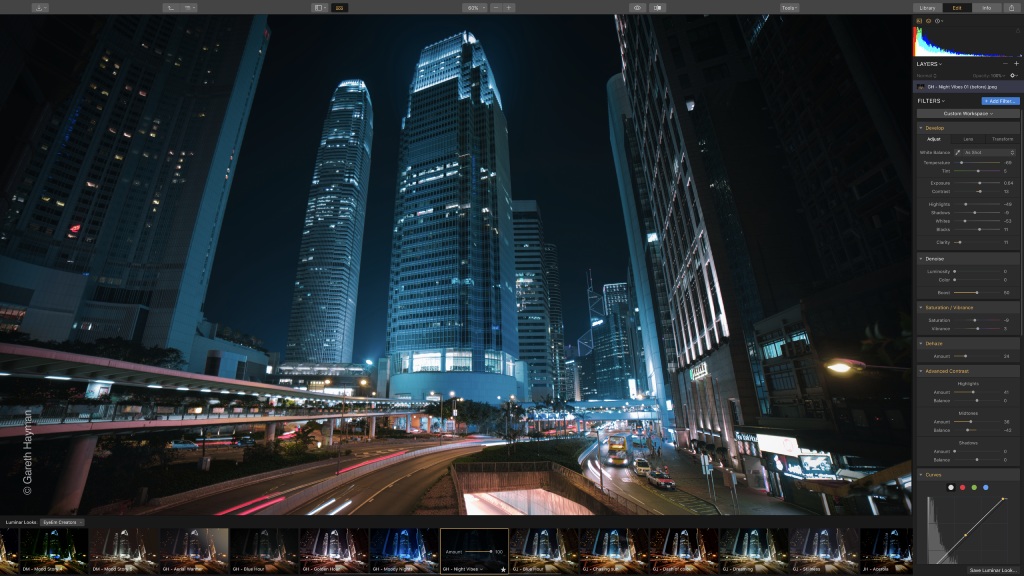
One of the most impactful - and easiest - things you can do to improve your photos in post-processing is to apply presets.
Presets give you the advantage of making a number of changes to the image automatically, that way you don't have to spend a ton of time getting the same look by manipulating a bunch of different controls independently.
In the video above, Scott Davenport explains how presets in Luminar - which are called "Looks" - offer you a wide range of options for improving your photos.
In fact, Luminar 3 has nearly 70 looks preloaded for you with the ability to get additional Looks as well.
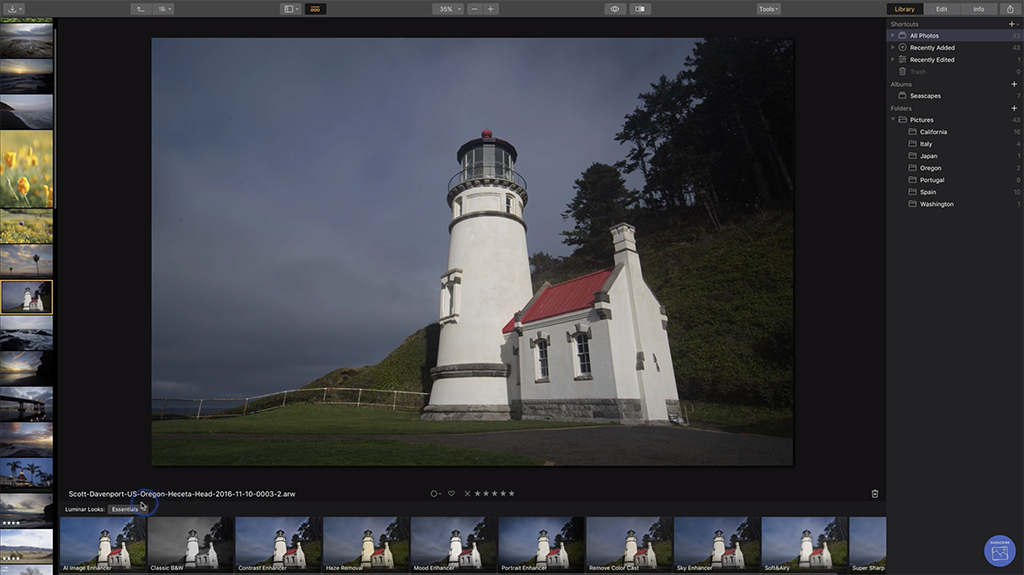
For example, Scott begins the editing process with the image above of a lighthouse.
The image is perfectly fine as it is, but it has the potential to be much more.

Choosing the Mood Enhancer Look, you can see how the photo is immediately improved - the sky has more definition and detail and the lighthouse is brighter and crisper.
Note as well that when a Look is selected, there's a slider control that gives you the power to increase or decrease the impact of the Look on the image.
It's the best of both worlds - you get an immediate change to your photo, but you still have final say over how the image looks.
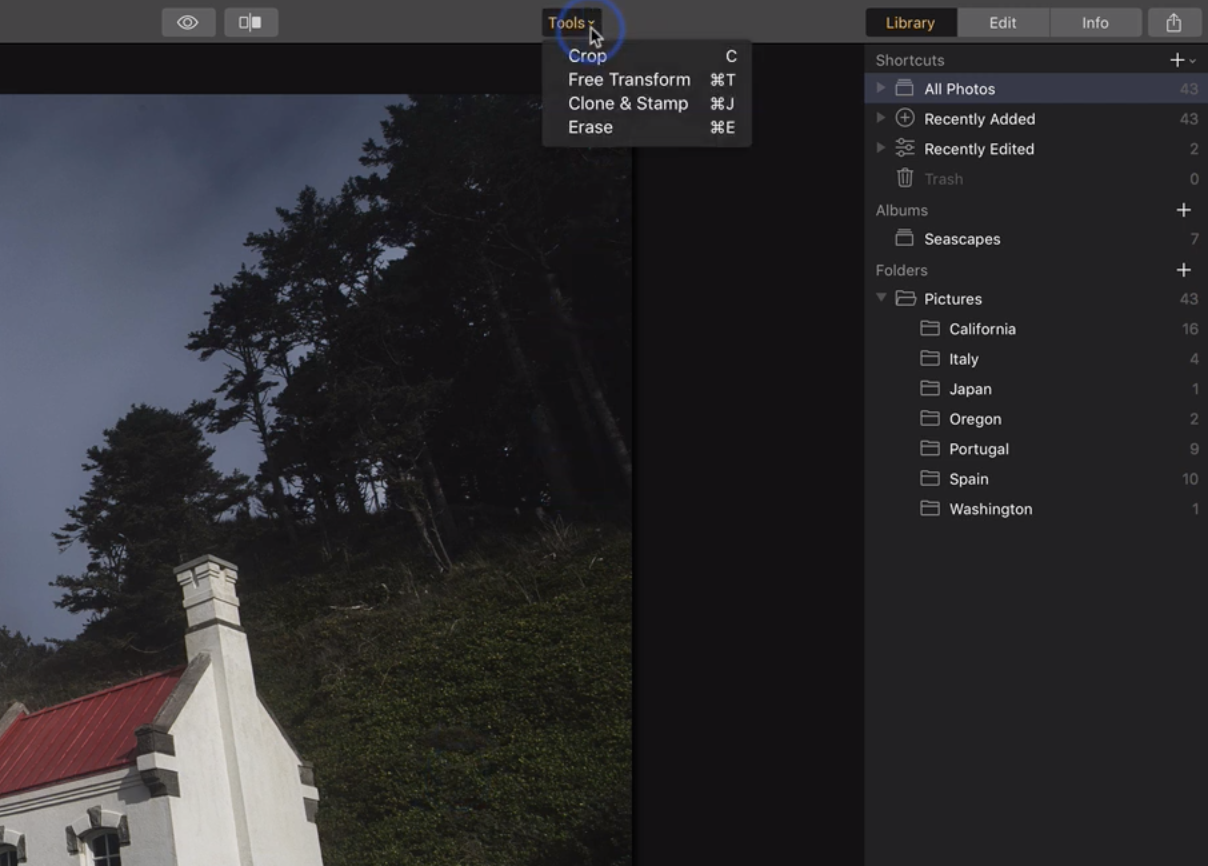
Quick Tip: Sometimes editing brings out details that need to be retouched - like sensor dust. You can utilize tools like the Eraser to quickly take care of such issues. In Luminar 3, the Eraser tool can be accessed via the tools menu at the top of the screen (or by pressing CMD/CTRL E), as shown above.
Learn More:
- How to Get Started in Luminar
- Post-Processing Tip: How to Use Filter Masks to Enhance Your Landscape Photos
Luminar Workspaces Make Fast Work of Editing
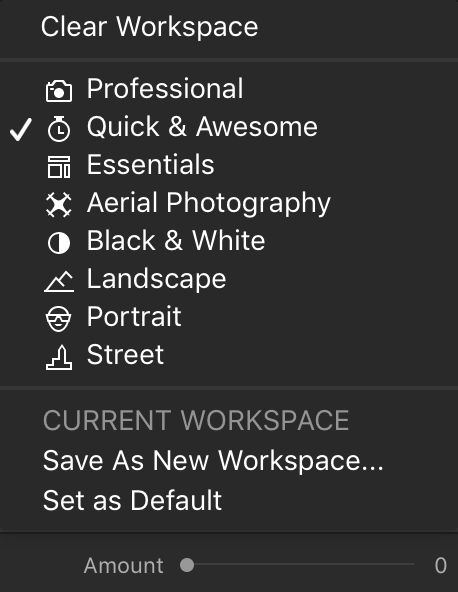
When editing images, beginner photographers (and many enthusiasts, for that matter) can get lost in the sea of so many different controls and editing possibilities in editing programs.
That's why Workspaces - preset "bundles" of filters (shown above) - are so nice for making pinpoint edits to your images.
As the name states, the Quick and Awesome Workspace is designed to make fast edits that have a lot of impact.
There are specific workspaces for Landscapes, Portraits, Black and White, and so forth. There's even a professional workspace that has all the precise editing tools that the pros need to make their photos spectacular.

As Scott shows in the video, you can use Luminar's Workspaces as another means of jumpstarting your editing process.
He uses the Quick and Awesome Workspace (shown above), which includes controls for Saturation and Vibrance as well as Clarity.
More importantly, this workspace also includes two artificial intelligence-powered tools, the Accent AI Filter and the AI Sky Enhancer.
 Original image before the Accent AI Filter and other changes from the Quick & Awesome Workspace are applied.
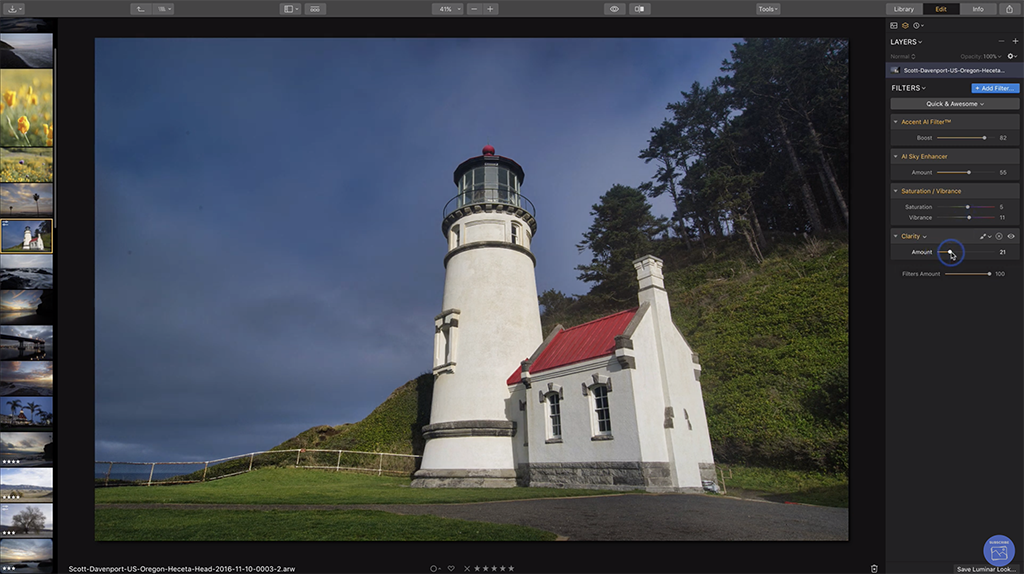 Image after the Accent AI Filter and other changes from the Quick & Awesome Workspace are applied.
The Accent AI filter analyzes the photo an applies about a dozen enhancements automatically, including improvements to the color, details, tone, and depth of the photo.
That certainly saves you time, but just like with Luminar's Looks, you retain control over how the filter is applied by using a single slider.
Get a detailed overview of Luminar 3 in our Luminar 3 review.
As you can see in the before and after images above, the difference between the original RAW image and the image after the Accent AI filter, AI Sky Enhancer, and other changes have been applied is quite dramatic.
The AI Sky Enhancer Filter works much the same way. Again, AI intelligently analyzes the photo and masks out everything but the sky.
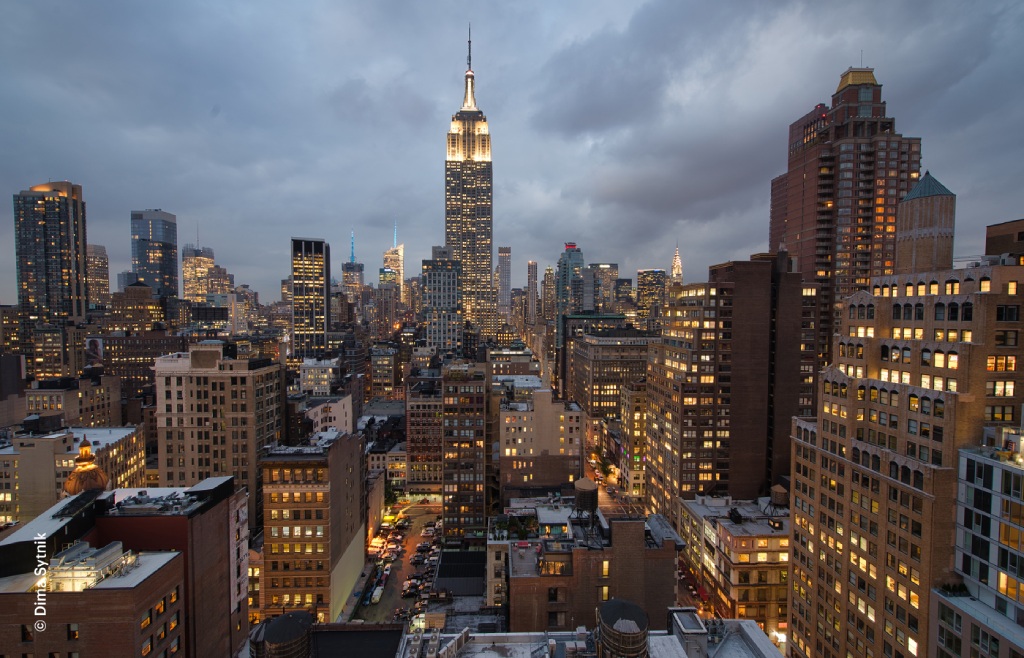 Before AI Sky Enhancer is applied. Photo by Dima Sytnik.
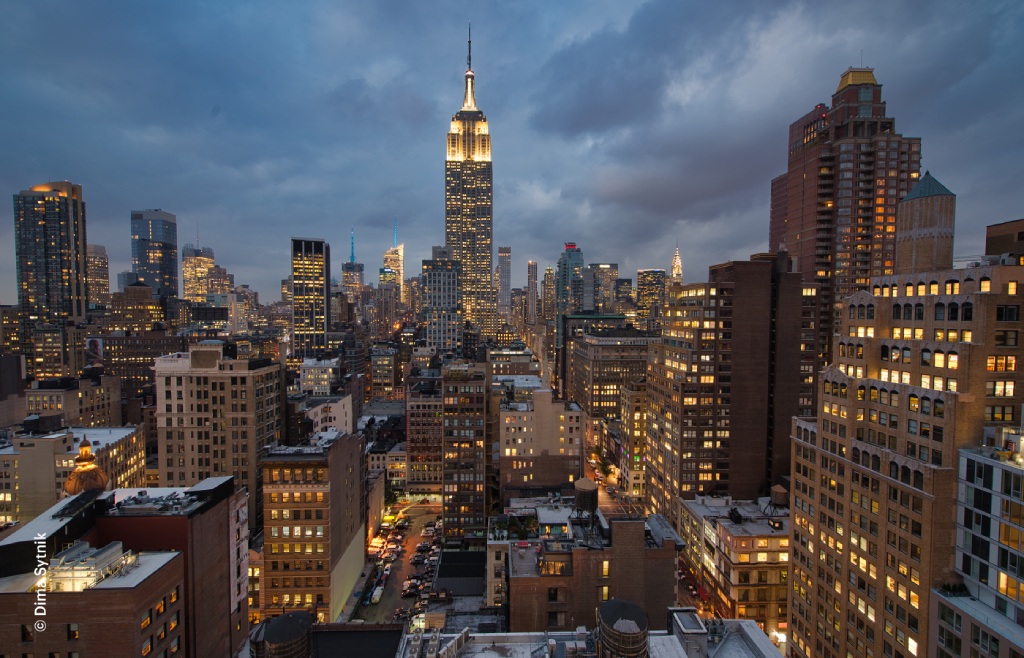 After AI Sky Enhancer is applied. Photo by Dima Sytnik.
That means that when the filter is applied, it only impacts the areas of the photo that include the sky - no matter if it's blue or gray or occupies a lot of the shot or very little.
In the before and after images above, you can see how there is much more detail and definition in the sky once the Sky Enhancer Filter has been applied.
Again, each of these filters can be increased or decreased to achieve a specific look with a simple slider control.
Learn More:
- How to Take a Photo From Blah to Beautiful in a Matter of Minutes
- Luminar 3 With Libraries Hands-On Test
Luminar Workspaces are Customizable to Your Specific Needs
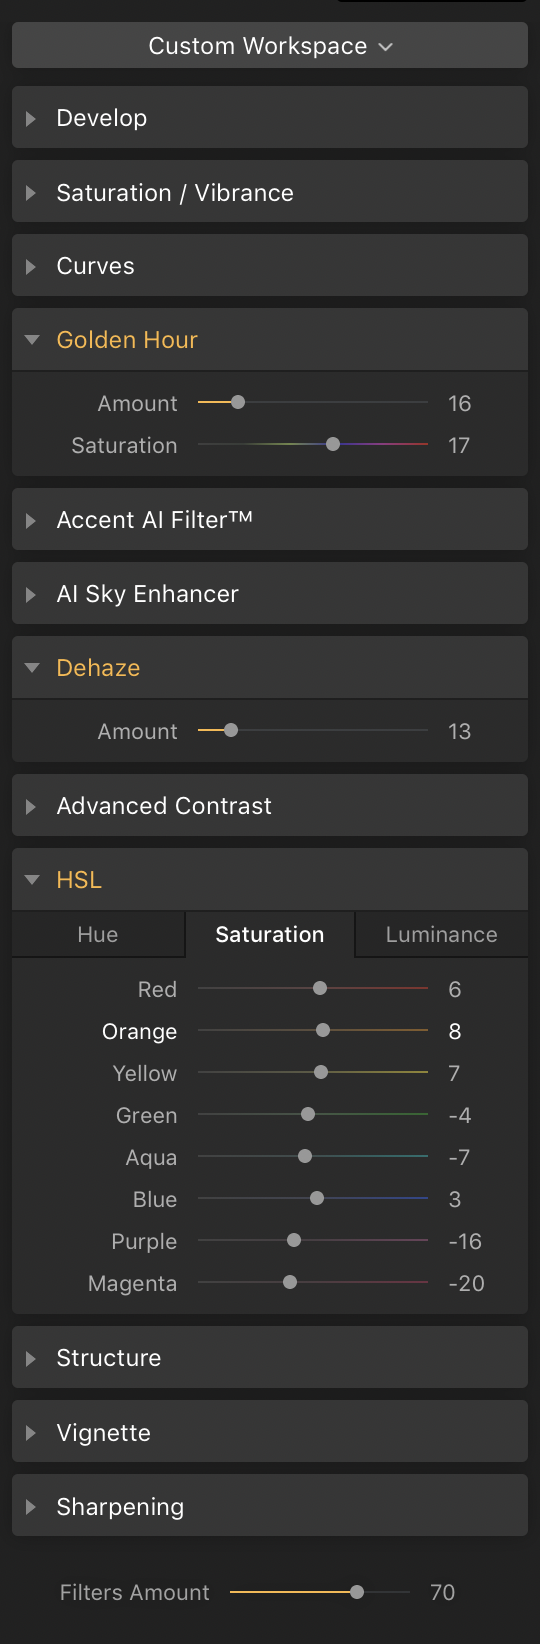
Getting into a groove with your editing not only saves you time, but it also allows you to fine-tune your edits so you can apply them across many different photos.
In Luminar, this process is aided by the fact that the Workspaces are customizable to fit your specific editing needs.
You can add filters to existing Workspaces - Scott added the Vignette filter to the Quick and Awesome Workspaces - or you can create totally custom workspaces of your own making, as shown above.
In the end, what makes editing photos a drag is that it can take forever to accomplish even the smallest tasks.
But by using Looks and Workspaces, you can cut your editing time by a wide margin without sacrificing quality results.
Grab a copy of Luminar 3 today for $69.00.
We Recommend
Photo Editing Tips for Beginners

Photo by scyther5 via iStock
Today, one of the most important steps in the photography process is editing your photos. However, we understand that photo editing is harder than it seems and that there’s a significant learning curve when getting started. Don’t worry, though. That’s exactly why we wrote this article. To help you improve your photo editing skills!
Below, we’ll share the top photo editing tips for beginners. They include choosing a beginner-friendly editing program, adjusting your images with curves/levels, cropping/resizing photos, using layers, and embracing the power of AI to make editing quicker and easier.
Regardless of your photo editor, our tips and tricks will lead to faster, more efficient editing and better, more impressive results. Now, without further ado, it’s time to dive in and discover the best photo editing tips for beginners!
Check out the video above by James Popsys for more photo editing tips for beginners from a professional landscape photographer.
Table of Contents
- First Things First: Set Yourself Up for Success With a Beginner-Friendly Photo Editor
- Photo Editing Tips for Beginners: Master Curves and Levels
- Learn How to Crop and Resize
- Photo Editing Tips for Beginners: Use Layers to Create Intricate Images
- Let AI Help You!
- More Photo Editing Tips for Beginners
- Recommended Photography Gear
First Things First: Set Yourself Up for Success With a Beginner-Friendly Photo Editor

Photo courtesy of Skylum
When dipping your toes into the world of photo editing, the last thing you want is to get in over your head and feel overwhelmed. The best way to avoid that is by using a good photo editor for beginners. For us, that means Skylum’s Luminar Neo.
Why is it the best photo editor for beginners? For starters, it boasts a simple and clutter-free user interface. Moreover, its intuitive workflow and powerful editing tools allow you to improve the quality of any photo in a minute or less with only a few button clicks.
You can download Luminar Neo and use it as a standalone app or pair it with other programs like Adobe Lightroom, Adobe Photoshop, or Apple Photos using the Luminar Neo plugin. Finally, you can try it risk-free thanks to its 30-day money-back guarantee.
Photo Editing Tips for Beginners: Master Curves and Levels
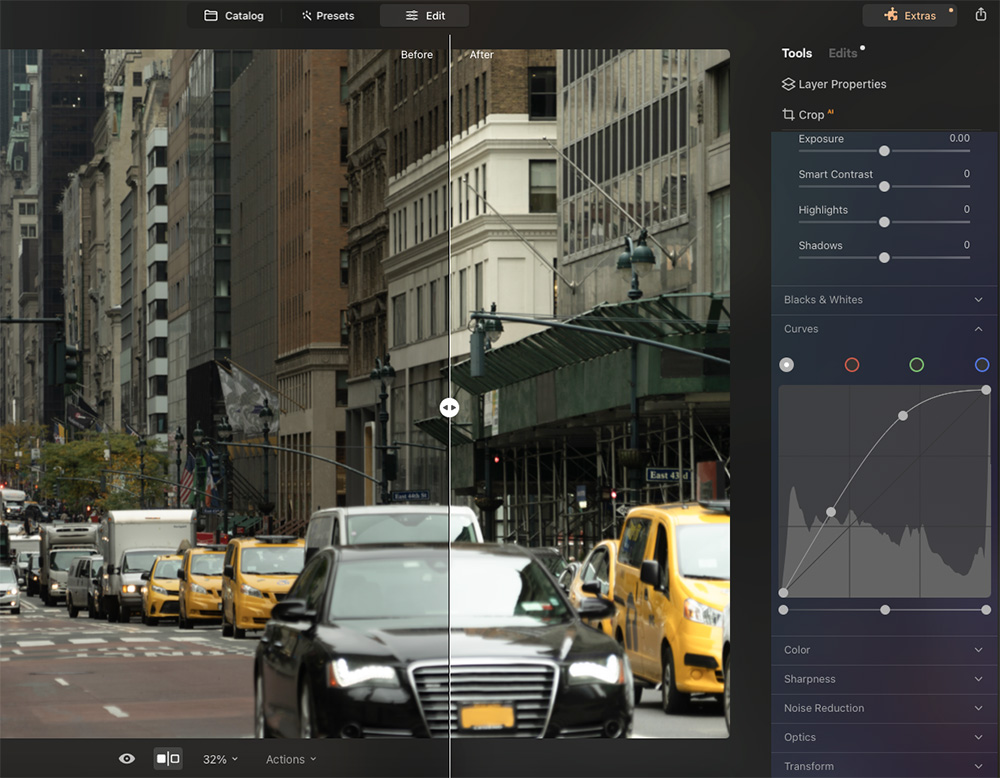
Photo courtesy of Skylum
Regardless of what adjustments you want to make to your photos, the two primary ways to do it are using curves and levels. For total beginners, we recommend adjusting the levels using your photo editor's built-in sliders. Sliders are easy to use, and you can see how they change your pictures in real-time.
Once you have a little more experience, you can play around with curves. They are a little trickier, but they can boost your productivity and workflow speed once you get the hang of them. Curves are good for adjusting tonal range, colors, and contrast.
Learn How to Crop and Resize

As a beginner, chances are you are still learning the rules of composition. Luckily for you, though, thanks to editing, you can easily fix any composition mistakes you make during shooting. Cropping lets you change the shape of an image to fix the composition or to draw more attention to your subject.
Alternatively, you can make files smaller by resizing them. Resizing photos ensures they take up less space on your storage devices and makes them easier to share with others and upload to the internet. If that wasn’t enough, Luminar Neo’s amazing new GenExpand tool allows you to expand your photos like never before.
Learn More:
- Skylum’s Luminar Neo Helps Streamline Photo Editing With Incredible Generative AI Tools
- Level Up Your Portrait Photography Editing With These Advanced AI Tools
Photo Editing Tips for Beginners: Use Layers to Create Intricate Images
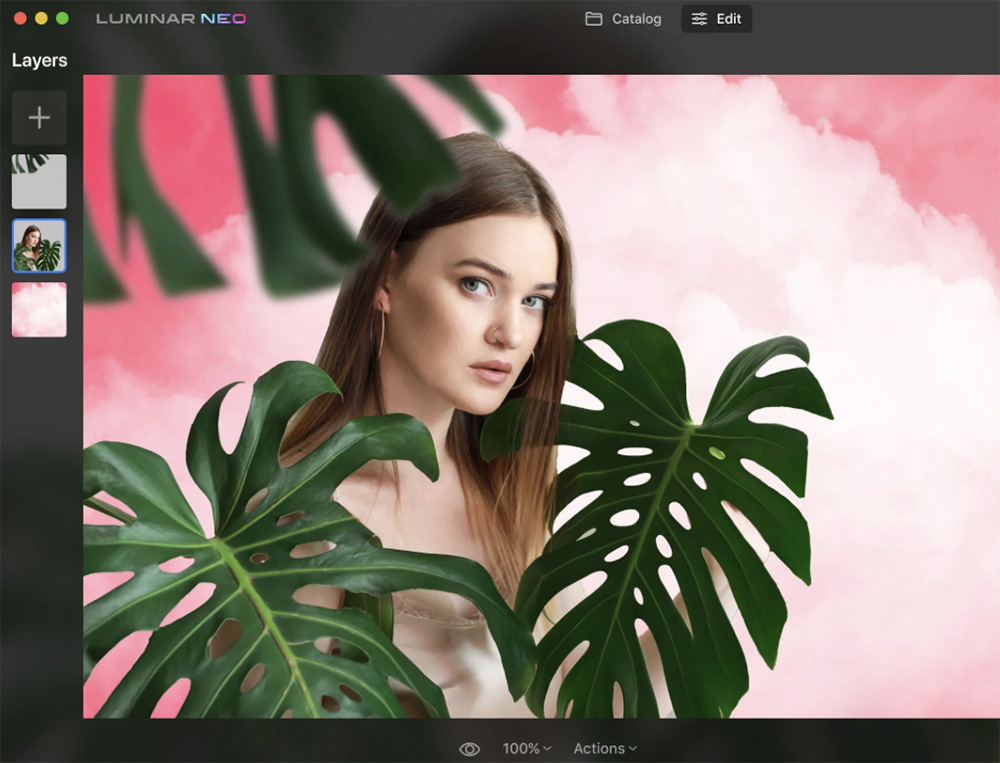
Photo courtesy of Skylum
Adding layers to images is an excellent way to make them stand out from other pictures. Using the layer tool in your photo editor, you can retouch images, blend multiple images together, make photo collages, create new textures, and more.
Another cool way to use the layer tool is masking. Masking is when you create two unique layers featuring the same image. Once you have both layers, you can edit specific parts of the image (i.e., foreground vs background) without affecting the the other. While masking can help with any photo, it’s particularly useful for nature and landscape photography.
Let AI Help You!
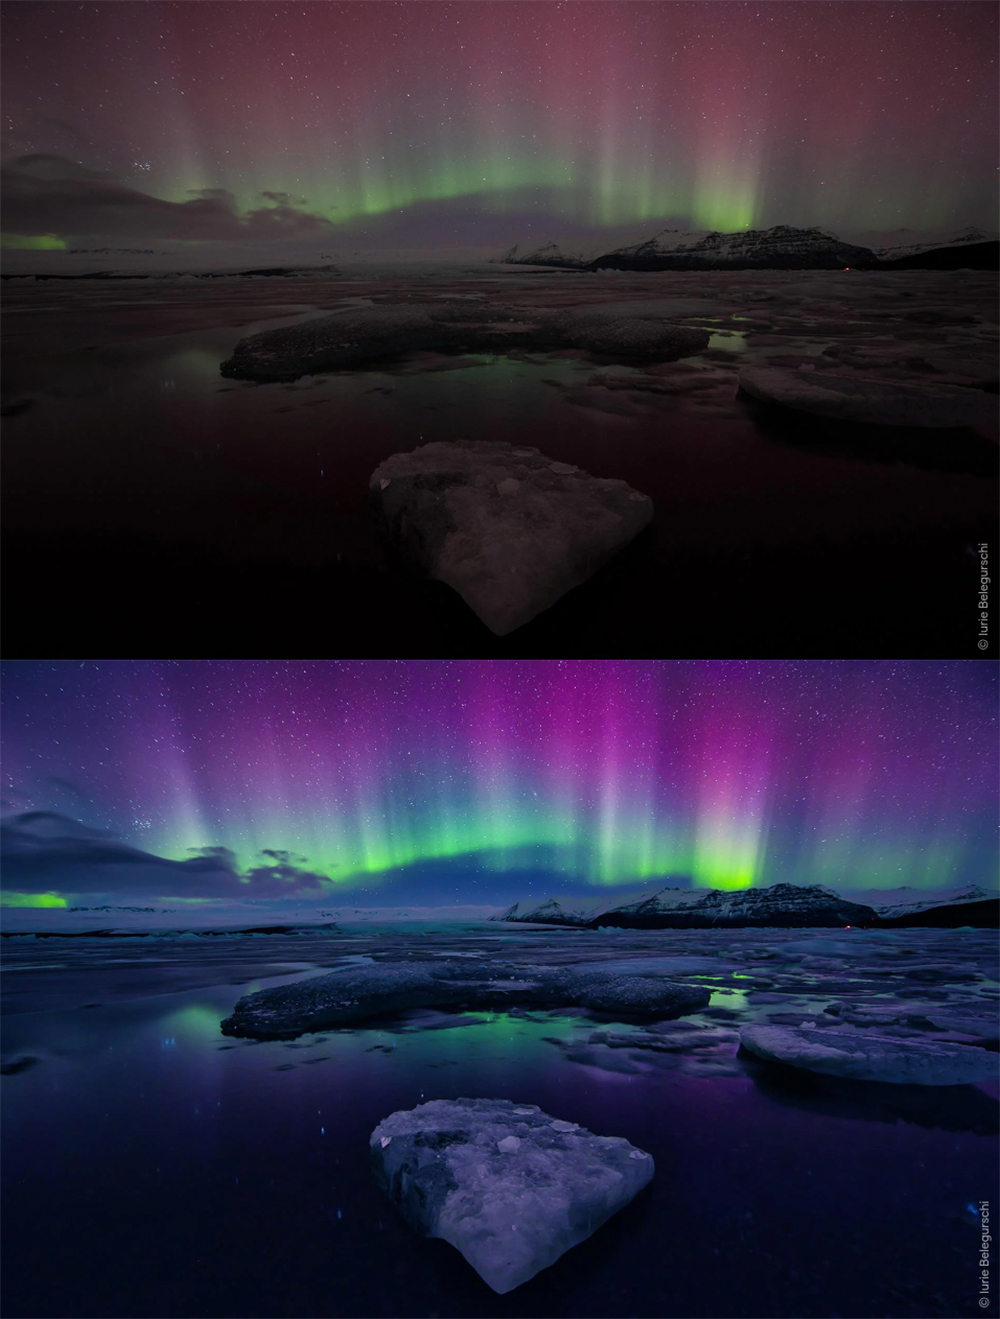
Photo courtesy of Skylum
Did you know some photo editors, like Luminar Neo, now feature innovative AI tools? AI technology makes it possible to accomplish all the same edits people used to have to do manually but in remarkably less time. This gives you more free time to take photos, spend time with your family, enjoy other hobbies, etc.
Here’s a quick look at some of Luminar Neo’s advanced AI tools:
Check out the video above on the Luminar Neo YouTube Channel to learn more about one of their most powerful AI tools, Sky AI.
More Photo Editing Tips for Beginners

Photo by gorodenkoff via iStock
As you can see, there’s so much to learn about editing photos. But by implementing the photo editing tips for beginners covered above, you can start to edit like a pro in no time. Additionally, to make your lives easier, we highly recommend using Luminar Neo to simplify the editing process.
Lastly, while those photo editing tips for beginners are a good starting point, check out the list below to enhance your photo editing skills further.
- Shoot RAW Photos instead of JPEGs.
- Learn to correctly white-balance your images.
- Use vibrance and saturation to make your colors pop.
- Make sure you control the noise levels of your pictures.
- Don’t overedit your photos to the point where they look unrealistic.
Recommended Photography Gear
Heads up: Clicking on our affiliate links and exploring our sponsored content helps us at no extra cost to you, and we only recommend gear we're absolutely crazy about!
Learn More:
- This AI-Powered Photo Editor Will Drastically Improve Your Real Estate Photography Workflow
- 4 Reasons Why Skylum’s Luminar Neo is a Landscape Photographer’s Dream Editor
We Recommend
Photography Gifts to Buy Yourself in 2021
 Photo by anyaberkut via iStock
Not happy with the gifts you got for Christmas?
Or did you get a little money from Santa to spend on new photography gear?
Either way, there's no lack of awesome photography gifts to buy yourself in the new year.
Here's a few of my favorite photography accessories that I've enjoyed using over the course of the last year.
Holdfast MoneyMaker Solo

One of the best photography accessories I bought this year was hands-down the Holdfast MoneyMaker Solo.
I've been a Holdfast customer for a long, long time, and I have their original MoneyMaker dual camera strap.
The "problem" - if you can call it that - with the original MoneyMaker is that it was purpose-built for two-camera shooters. I'm not always a two-camera shooter, though.
So imagine my excitement when Holdfast unveiled the MoneyMaker Solo, which is specifically designed for single-camera shooters.

It's made of the same impeccable materials as the original MoneyMaker, with gorgeous full-grain leathers and high-quality metal components.
That makes it a durable (and beautiful!) addition to any photography kit.
It's also functional, too, with an innovative Belt Anchor that keeps your camera right next to your body. When you're ready to shoot, you can release the Belt Anchor with one hand for taking a quick shot. You can reattach it one-handed as well!

The comfort level of the MoneyMaker solo is next-level, too.
The shoulder strap is nice and large, which helps distribute the weight of your gear evenly across your shoulder.
The stabilizer strap helps keep the shoulder pad in place as well, so you don't have to worry about constantly adjusting it as you work.
This camera strap really is the pinnacle of form, function, and comfort. I highly recommend spoiling yourself a little bit by giving one a try!
Learn More:
CanvasHQ Prints

As with Holdfast, I've been a customer of CanvasHQ for years now, and I keep coming back over and over again because the quality of their canvas prints is simply outstanding.
What I like about canvas is that it gives my photos a little more depth and character thanks to the texture of the canvas.
And since CanvasHQ is at the top of their game and uses only the finest canvas, inks, and wood for the frames, I know that when I order a print, it'll look spectacular.

Heck, even if there's something wrong with the print, I don't have to worry...
That's because CanvasHQ has a 30-day money-back guarantee. I've never had to utilize that guarantee, but if I did, it would be as simple as returning the print and getting my money back (or getting a new print sent to me).
On top of that, CanvasHQ has a lifetime guarantee against cracking, bubbling, or fading. Talk about peace of mind!

The process of getting a print is easy, too.
Just upload your image and CanvasHQ will give you tips for sizing, color adjustments, and so forth. You even get free proofs emailed to you before your image is printed.
Once it's printed, you'll get your artwork in a jiff - current turnaround time is just two days!
In other words, you can really treat yourself to something nice in the new year by getting a gorgeous, handcrafted print made of your favorite photo. And since it'll have a prominent place on the wall in your home, it's a gift that will keep on giving!
Learn More:
- Why Your Photos are Bad - and How to Fix Them
- Reignite Your Love of Photography With These Simple Tips
Wolverine Data F2D Titan

What I like about the Wolverine Data F2D Titan is that it's an 8-in-1 rig that converts my slides, 8mm movies, and Super 8 movies, as well as 35mm, 110, 126, 127, and APS film to digital.
And the digital copies are beautiful thanks to the Titan's 20-megapixel high-resolution sensor.
You can use the F2D Titan to scan, too - it takes a mere three seconds to complete the process thanks to the Titan's innovative speed-load adapters that are sized just right for each format of slide or negative you're scanning.

Not only is this thing easy to use, but you can also see the digitized images on the 4.3-inch color LCD. You can also connect the unit to a computer or TV to view the results on a larger screen.
There's internal memory for storing images or you can use your own SD/SDHC memory card for more storage capacity.
Best of all, the F2D Titan is fully self-contained. You don't need a computer or monitor or software of any kind.
Just plug it into a power source and you'll be ready to preserve your memories!
Learn More:
Inexpensive Lenses are a Great Gift for Yourself
 Photo by yanik88 via iStock
As we all know, photography can be one heck of an expensive hobby or profession.
That's why I've started to buy used lenses to help stretch my budget a bit further.
Think about it - if you can find good-quality lenses for a fraction of the price, that's a lot of money you can save over the long haul.
What's more, when you buy used lenses, you might even be able to buy a couple of them for the price of one new one. That's a deal if you ask me!

Though I've tried buying used lenses on places like Craigslist before, it was usually a shady deal that made me uncomfortable.
Then I found Lensfinder, and those troubles have gone away completely.
Lensfinder was built by photographers, for photographers, which makes it the ideal place to find great used glass.
There's no sifting through a million unrelated items on eBay, no creepy sellers on Craigslist to deal with, either.
 Photo by FatCamera via iStock
Instead, you just enter what you're looking for, and Lensfinder will present you with lenses that match your criteria.
Better still, it's an all-in-one platform, so once you sign up for a free account, you can buy all the lenses you want, pay for them via PayPal, communicate with the seller, and leave feedback without having to leave the site.
Not bad, right?!
If you're in the market for a new lens, pop over to Lensfinder and see what you can find. You might be surprised at just how much you can save versus buying new!
Learn More:
Make Editing Videos Simpler and Faster in the New Year

It's become apparent over the last couple of years that photography and videography are merging more and more.
That being the case, many photographers aren't just creating beautiful photos, but they're also creating compelling video content.
Given that video production is taking a much more important role in the lives of photographers, in the new year, I'd suggest investing in one of the best video platforms available - Kizoa.

What I appreciate about Kizoa most is how easy it is to use.
Whether I'm using their cloud-based platform online or using their free iOS app, I can edit my videos and turn them into professional-looking creations in short order.
Kizoa has a huge suite of tools that make the process of editing so much easier. That includes the ability to add transitions and special effects as well as music and text overlays.
There's even a collection of pre-made video templates to help you get started. Naturally, basic tools for straightening, cropping, and rotating, among others, are also available.

Once I'm done editing my videos, sharing them couldn't be more streamlined.
I can share the video via the built-in YouTube or Facebook integrations, download it in various file formats, burn it to a DVD, or even email it.
And since Kizoa starts at just $29.99 for a lifetime premium membership, it's a gift you can get yourself without breaking the bank!
Learn More:
Kenko Nyumon Circular Polarizing Filter

If you're like me and you shoot a lot of landscapes, a circular polarizing filter is a must-have.
Not only do they help minimize glare off non-metallic surfaces like water, but they also reduce atmospheric haze and boost contrast in the sky.
The result of all that is a landscape photo that's cleaner, crisper, and has more drama. What's not to like about that?!

Buying a lens filter is a lot like buying a lens - you get what you pay for.
But that doesn't mean that you have to spend an arm and a leg to get a great polarizer.
I've used a Kenko Nyumon Polarizing Filter for a while now, and it has performed beautifully.
Its optical-grade class is polished and coated to aid in resisting water and oil from your skin.

On top of that, these filters have a SLIM mounting ring, which minimizes vignetting when you're shooting with a wide-angle lens.
Kenko offers these filters in various sizes from 37mm to 82mm, and also offers models that fit Nikon, Canon, Sony, Fuji, and many other brands of lenses.
If you invest in one filter in 2021, make it a circular polarizer. It simply offers too many benefits not to have one in your bag!
Editor's Tip: Get Kenko’s latest updates and access to promos for discounted gear. Click here to sign up.
Learn More:
Syrp Genie II Linear

One of my New Year's resolutions for 2021 is to shoot more timelapse videos. To do that, I'll be using the Syrp Genie II Linear.
I haven't used this rig yet, but I've used its predecessor many times and to say that I've been impressed with it is an understatement.
Syrp really has made making timelapse videos so much easier thanks to the innovative features they've packed into their little motion control device.
And when I say little, I mean it - the Genie II Linear is every bit as small as the original Genie, so you can pop it in your camera bag and you'd never know it was there.

This little guy can attach to any slider on the market and can even work with cable cam systems up to 328' in length.
That means you can quickly and easily upgrade your timelapse setup to get beautiful timelapse videos and real-time videos as well.
On top of that, you can control the Genie II with your smartphone and tackle tasks like key-framing, shooting interviews, creating timelapses, and shooting B-roll as well. Syrp is working on future features that include live view and camera control for ramping exposure, among others.
It really doesn't get much easier than that to create a timelapse video!
Learn More:
The Vest Guy Colorado Vest

Even though I've only had my Colorado Vest from The Vest Guy for a couple of weeks, I'm already at the point of being so happy with it that I had to include it on this list.
Seriously - if you don't have a photography vest, you need one!
I never thought I would ditch my camera bag in favor of a photography vest, but now that I've experienced how much easier it is to carry gear on me instead of in a bag, I'll never go back.

For starters, these vests are designed and made in the U.S., which as a veteran of the armed forces, I really appreciate.
The design of the vest makes shooting photos so much easier with large cargo pockets on the front where you can carry a couple of lenses up to 400mm in length.

The integrated camera strap is highly adjustable for a custom carrying experience, and keeps your camera right at your fingertips for quick shots.
There's even a scratch-proof pocket for filters as well as optional accessories like padded shoulders, an additional camera strap, a hydration pack, and custom name tags, just to name a few.
Why not make 2021 the year you step up your game, streamline your workflow, and shoot in greater comfort?! You can do that with a photography vest from The Vest Guy!
Learn More:
Luminar 3

As someone that's used Photoshop and Lightroom for years and years, I understand how difficult it is to switch to a new editor.
Recently, though, I made the move to Luminar 2018, and once the new Luminar 3 was released, I jumped on board with it. Talk about a great decision!
What sets Luminar apart from programs like Lightroom is that it's much, much easier to use.
There are a host of presets (called Looks) that you can apply to your images with just one click for quick editing, but you still have the option of making fine adjustments with a variety of slider controls.

Luminar 3 also has artificial intelligence-powered editing tools that make dozens of adjustments simultaneously to further speed up the editing process.
That includes AI tools for enhancing the sky as well as the Accent AI filter (shown above) that applies about a dozen changes to your image that improve the colors, detail, and tone of your image, among others.
With non-destructive editing, a new library for organizing and sorting your photos, customizable workspaces, precise adjustments without having to make selections, and a host of other innovative tools, Luminar isn't just powerful, but it's also easy to use and affordable!
Learn More:
Click Props Backdrops

I know not everyone is a portrait photographer, but if you are, you can step up your game in 2021 with a high-quality backdrop from Click Props.
I've known the Click Props team for years, and I've even spent time with them at their Las Vegas studio. I've seen these backdrops up close and personal, and they're gorgeous!
These backdrops are made of 550gsm vinyl, so not only are they super strong, but they're also easy to clean when your shoot is wrapped up.
You can use and abuse these things without worry that they'll be trashed - they're that durable!

The backdrops come with reinforced grommets along the top, which makes it easier to hang them and swap them out between shoots. You can even order your backdrop without grommets and set it up on a roller system if you prefer.
Either way, the backdrop will hang straight and clean, so you don't have to worry about folds or creases causing a distraction in the background.

There's a huge selection of backdrops (and floors) to choose from as well - more than 200 unique designs that will help you fulfill your creative vision.
When you create portraits, the background might not be the star of the shot, but the background certainly matters when it comes to the quality of the photo.
Boost the appeal of your portraits in the new year with a gorgeous backdrop!
Learn More:
SIRUI SR-Series Tripod

I got my hands on SIRUI's new SR-3004 tripod a couple of months back, and this thing is an absolute beast.
I've used SIRUI tripods for the better part of a decade, and the quality of craftsmanship of these things is what has kept me a loyal customer over the years.
My old tripod - the SIRUI W-2204 - is a great tripod. But I got the SR-3004 because it's a bigger, beefier tripod that can extend to 80 inches in height with the optional two-stage center column and can hold up to 55 pounds of gear.
And even though it's not advertised as being waterproof, as you can see in the image above, my trip to the beach involved a lot of water. So long as I rinse the tripod off and dry it before I head home, I've experienced no problems whatsoever from sea water or sand.

SIRUI has loaded this thing for bear with features as well.
That includes a flat top plate with 3/8" mounting screw for maximum stability, a removable top plate for quickly converting the tripod into a video tripod, a multi-function hook with built-in adjustment tool, and a 1/4" socket built into the spider for quick and easy attachment of accessories.
Add to that simple 1/2 twist leg lock mechanisms and three-position leg angles, and you have the makings of a tripod that's the ultimate in functionality and ease of use.
What a great gift to buy yourself in 2021!
Learn More:
We Recommend
Post-Processing Tip: How to Create REALISTIC Sun Rays in Your Photos
 Image Credit: Max Rive
All you landscape photographers out there know that capturing beautiful sun rays just isn't possible all the time.
The timing has to be just right. The atmospheric conditions have to be just right. Your positioning relative to the sunset needs to be spot on to get the maximum impact as well.
But what if I told you that you can add realistic sun rays to your landscape photos by using Luminar 2018?
In the video above, Mads Peter Iversen, explains precisely how to use this neat little trick to enhance your images.
Using his step-by-step process, you can take your "okay" landscape photos and turn them into something that truly stands out, and in not all that much time, either!
Here's the process, one step at a time...
Step 1: Add Sun Rays Using the Luminar Filter Feature
 YouTube Screenshot/Mads Peter Iversen
After opening Luminar 2018, on the right side of the screen you'll see an "Add Filters" button.
Clicking that button opens a huge list of filters, but in this case you want to scroll towards the bottom of the list and click on "Sun Rays."
Next, you'll need to place the sun rays in the desired location in the photo.
As Mads explains in the video, Luminar uses AI to determine how the sun rays should interact with the scenery in the shot. You can see how they change based on where Mads places them in the screenshots above (in which some of the sun rays are blocked by the cliff) and below (in which they appear to emanate from the clouds).
 YouTube Screenshot/Mads Peter Iversen
Obviously, the goal here is to place the rays in a position that looks natural for the scene. As a result, Mads places them over the sun between the rock formations, as seen below.
 YouTube Screenshot/Mads Peter Iversen
What makes Luminar so fun to use is the ease with which you can place sun rays in the image.
In a matter of seconds, Mads was able to drag and drop the sun rays and place them in the desired location. It doesn't get any easier than that!
Learn More:
Step 2: Fine-Tune the Look of the Sun Rays
 YouTube Screenshot/Mads Peter Iversen
As with any editing program, it's usually good practice not to max out the position of the sliders as you fine-tune the effects you've implemented into the photo.
As Mads shows in the video, less is more when it comes to the sun rays effect in this particular image.
As you can see in the screenshot above, just one of the sliders is skewed all that far from center, which results in a much more pleasing (and realistic) look.
The "Amount" and "Look" sliders are responsible for how strong the sun ray effect is in the image. Immediately below that, the "Number" changes how many rays of light there are and "Length" manipulates how long the rays are.
You can also make adjustments for the warmth of the ray's color, the glow of the sun center, how much the rays appear to penetrate objects in the shot, and the appearance of how the rays shine through in the photo.
Once you've created the rays as you want them, simply click "Apply" in the upper right-hand corner of the editing window and the image will either be saved (if working in Luminar as a standalone program) or exported to Photoshop.
Step 3: Mask Out the Unwanted Sun Rays in Photoshop
 YouTube Screenshot/Mads Peter Iversen
In Mads' case, he wanted to eliminate some of the sun rays in his photo so that the final result showed only the rays shining through the archway of the rock formation.
To do that, he created a mask, inverted it, and used the Brush Tool with a white brush to brush in the rays he wanted to keep.
As you can see above, the subtle rays beaming through the arch gives this shot a gorgeous and realistic look.
And that's it! Using this simple three-step process, you can add natural-looking sun rays to your landscapes.
Mads offers two other examples of how to utilize this sun rays feature in his video. Be sure to check that out starting at about the 5-minute mark for more inspiration for using this awesome feature.
Learn More:
My Experience With Skylum
Interesting Fact: Way back in 1998, I picked up Adobe’s Photoshop 5.0: Classroom in a Book, and started to teach myself Photoshop. I subsequently spent nearly five years of my life, all the way up to CS 8.0, picking up every Classroom in a Book that Adobe released on Photoshop.
Still to this day, I’m a Photoshop user and always learning what I can as the program grows and evolves. Typing this, I’m realizing it’s been a 20-year journey. Crazy!
Back in 2012, I started playing around with Lightroom. However, it wasn’t until 2014 and version 5.0 that I got serious with Lightroom with the help of watching a TON of YouTube videos. Roll forward four years and I’m still grinding away at it.
The point I’m making here is that I’ve heavily invested myself into a very long journey with Adobe. They have done a great job, and I’ve created some decent photos along the way using their software, if I do say so myself.
Keeping that in mind, a few years ago, a company called MacPhun came on board as a supporting vendor of PhotographyTalk. They had a good product with a growing following of loyal users. But, if I’m completely honest, it didn’t have that WOW factor that I felt could pull users away from Adobe.
Earlier this year, Macphun changed their name to Skylum and released Luminar 2018. Three months ago, they sent me a copy to play around with. Again, if I’m being honest, I didn’t touch it for a couple weeks, and thinking back on it, it might have actually been three weeks.
When I opened it - no joke - it was within minutes that I converted a blah photo into a wow photo (I know that sounds corny!). The software is crazy intuitive with a number of presets that makes editing photos extremely efficient with remarkable results.
And the best part…there’s manual development tools for those days when I don’t want to use presets and want to adjust my photos myself. All the tools I need to do that are easily found on the right side of the screen as I’m working in Luminar 2018.
Folks, I’ve not closed this program out since I opened it over 2 months ago! It’s that good. Skylum has really made post-processing fun again, fast, and freakin’ awesome! In short, they have hit an out-of-the-park home run!
If I can make one recommendation to you, it’s to go download the free trial now. Don’t wait to open it like I did…download it and you’ll see why so many professional photographers (myself included!) are so excited about this software. You’ve got nothing to lose - see Luminar 2018 for yourself!
We Recommend
Post-Processing Tip: How to Use Filter Masks to Enhance Your Landscape Photos
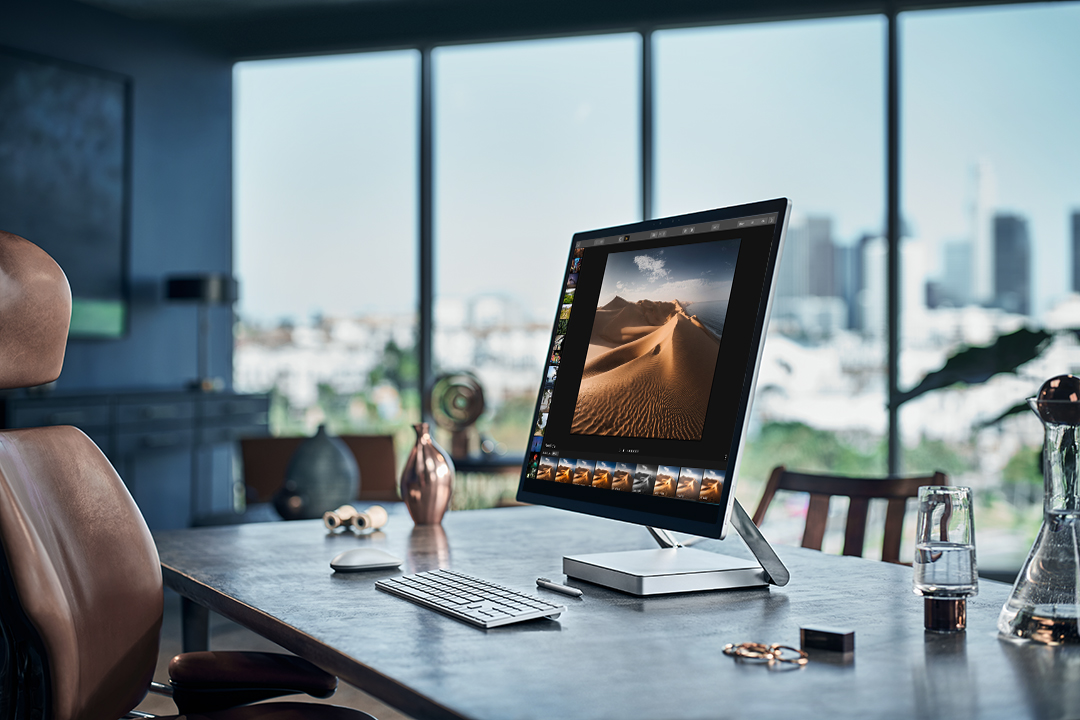
Let's face it - no matter how gorgeous a landscape is, no matter how dialed in you are in the process of creating the photo, the chances are good that you will need to do some fine-tuning to your images to get them just right.
In many cases, that means pinpointing your edits by using layer masks to make very fine, non-destructive edits.
In this quick post-processing tutorial, you'll learn how to use layer masks to create powerful, eye-catching landscape photos.
Using David Johnson's video above as a guide, we'll go step-by-step through the process using Luminar 3.
Step 1: Add an Adjustment Layer
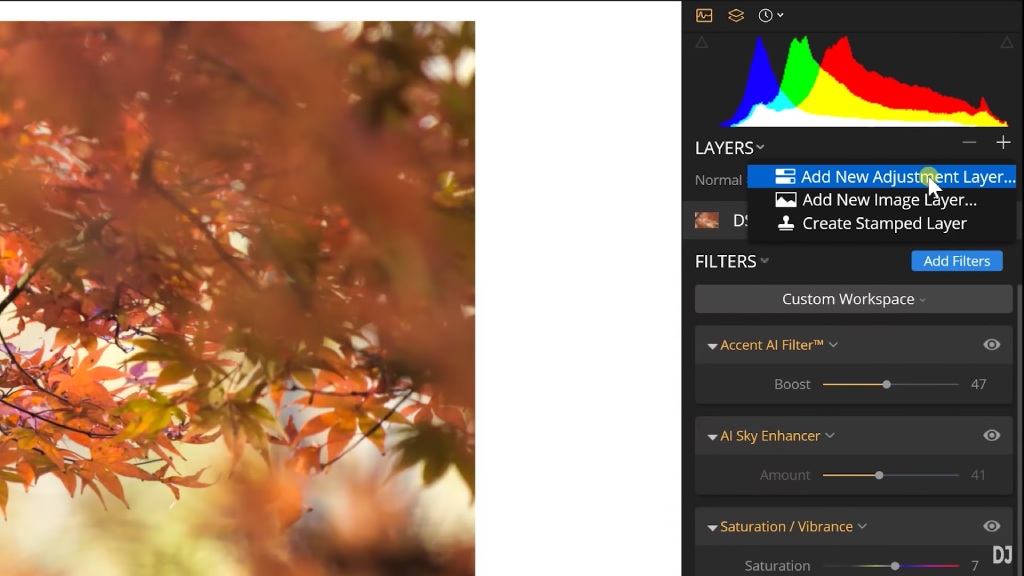 YouTube Screenshot/David Johnston
By adding an adjustment layer, you give yourself the option to perform edits on your image without working on the original image itself.
This enables you to preserve the original details of the photograph while also experimenting with changes that can make your photo pop. You can stack layers as well, so you can utilize each layer to work on a single, specific aspect of the photo without interfering with the adjustments you've made on any of the other layers.
In Luminar 3, the process of adding an adjustment layer is simple - as shown in the screenshot above, simply click on the plus sign in the Layers panel and click "Add New Adjustment Layer."
Learn More:
Step 2: Add an Effect to the Adjustment Layer
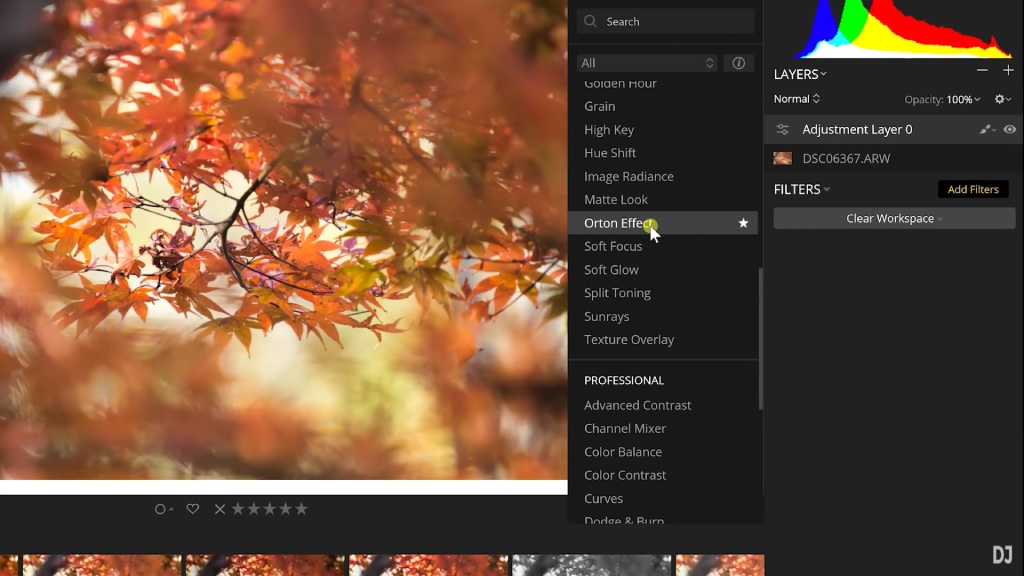 YouTube Screenshot/David Johnston
Now that you have a new layer created, it's time to add an effect to the layer.
In David's video, he elects to add the Orton Effect, which add glow and focus effects to the shot to give it a dreamy, ethereal look (as shown below).
The Orton Effect is just one of 16 Creative Filters. There are also Essential Filters, which includes the powerful Accent AI filter that automatically applies about a dozen changes to the photo that you can adjust quickly and easily using a single slider. Also included in the Essential Filters is the AI Sky Enhancer, which automatically detects the sky area in a landscape and enhances the color, contrast, and details to make the sky pop.
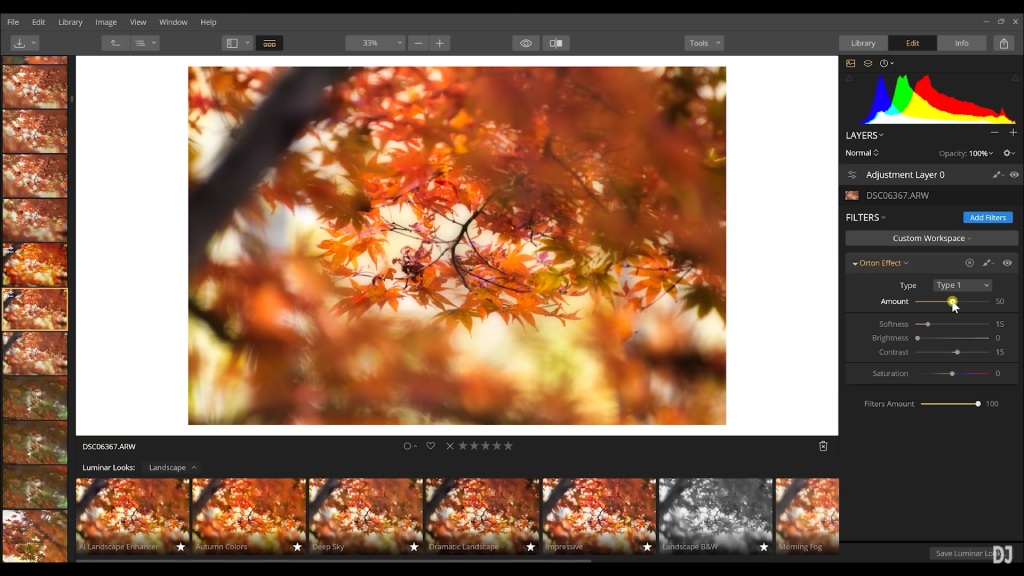 YouTube Screenshot/David Johnston
Additionally, you can choose from the Issue Fixers Filters, which include Clarity, Dehaze, Denoise, and sharpening, among others.
There are Professional Filters as well, which give you the ability to control everything from color balance to curves, HSL to LUT mapping, and a variety of other things.
The Utility Filters round out the selection, and include Adjustable Gradients, Brightness and Contrast, Exposure, and Highlights and Shadows, among many others.
The point is that in Luminar 3, you not only have the power to make non-destructive edits to your images by using layers, but in those layers, there are a multitude of options for enhancing your photos.
Step 3: Use a Filter Mask to Fine-Tune Your Edits
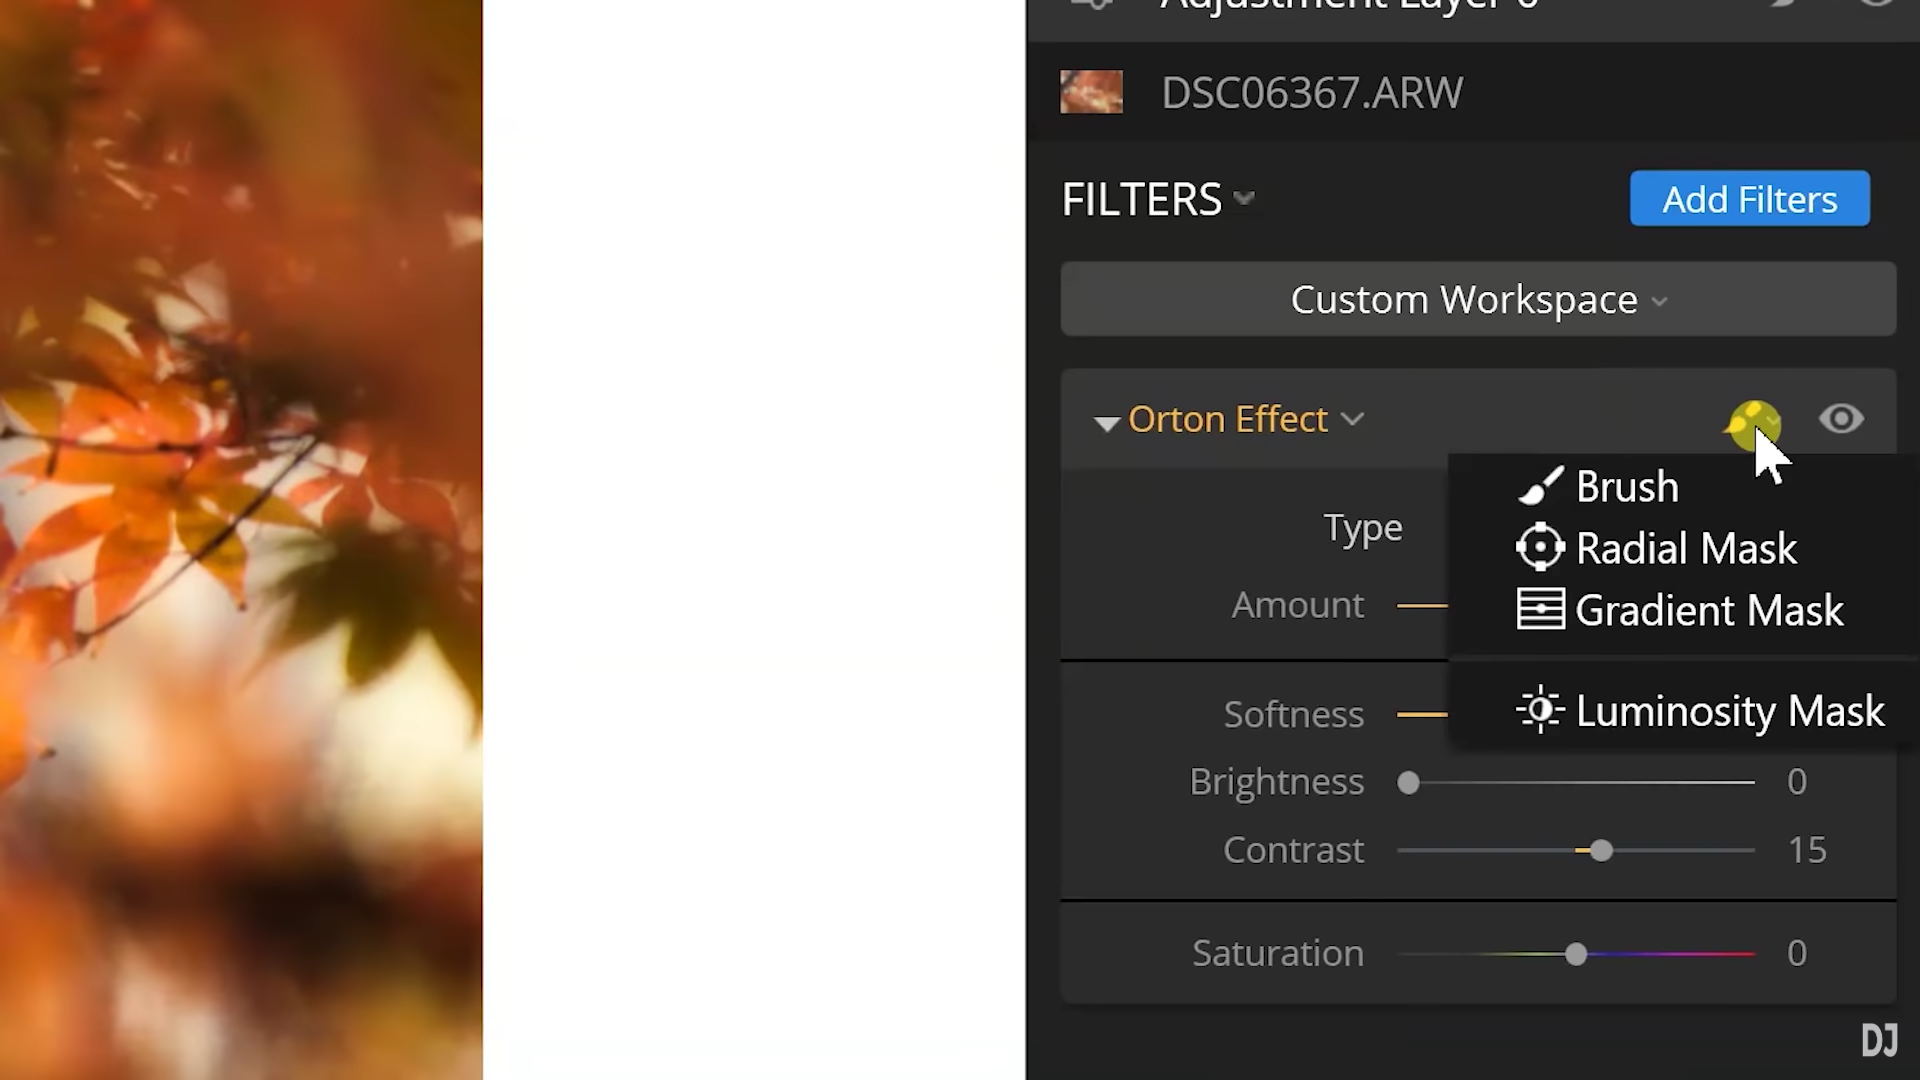 YouTube Screenshot/David Johnston
When editing your image via an adjustment layer, the changes you make will be evident throughout the entire image.
But sometimes you might want the changes you've made to impact only part of the image. That's where masking comes in.
If you look at the filter you've applied to the image (in this case, the Orton Effect), you'll see a paintbrush icon as shown above.
When you click this icon, you're given a number of masking choices, including a Brush, a Radial Mask, a Gradient Mask, and a Luminosity Mask.
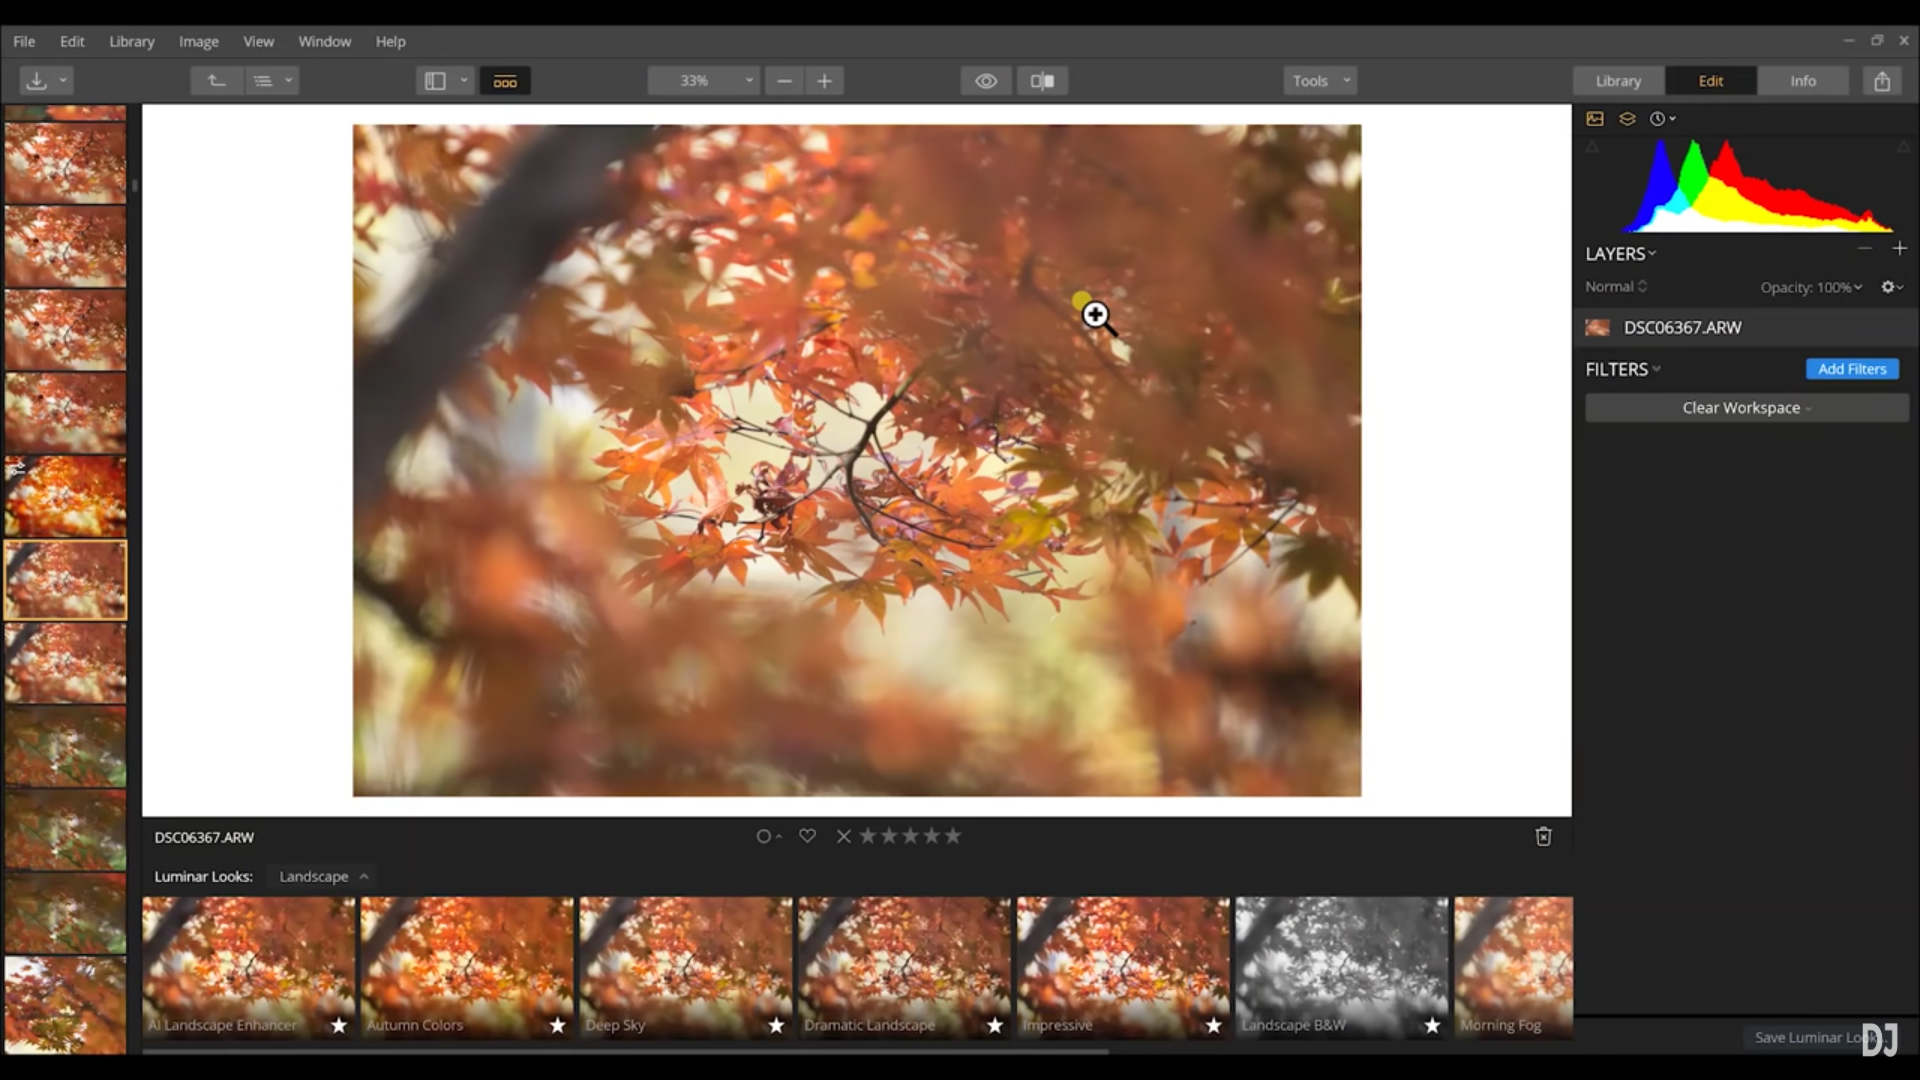 Before Layer Mask is Applied. YouTube Screenshot/David Johnston
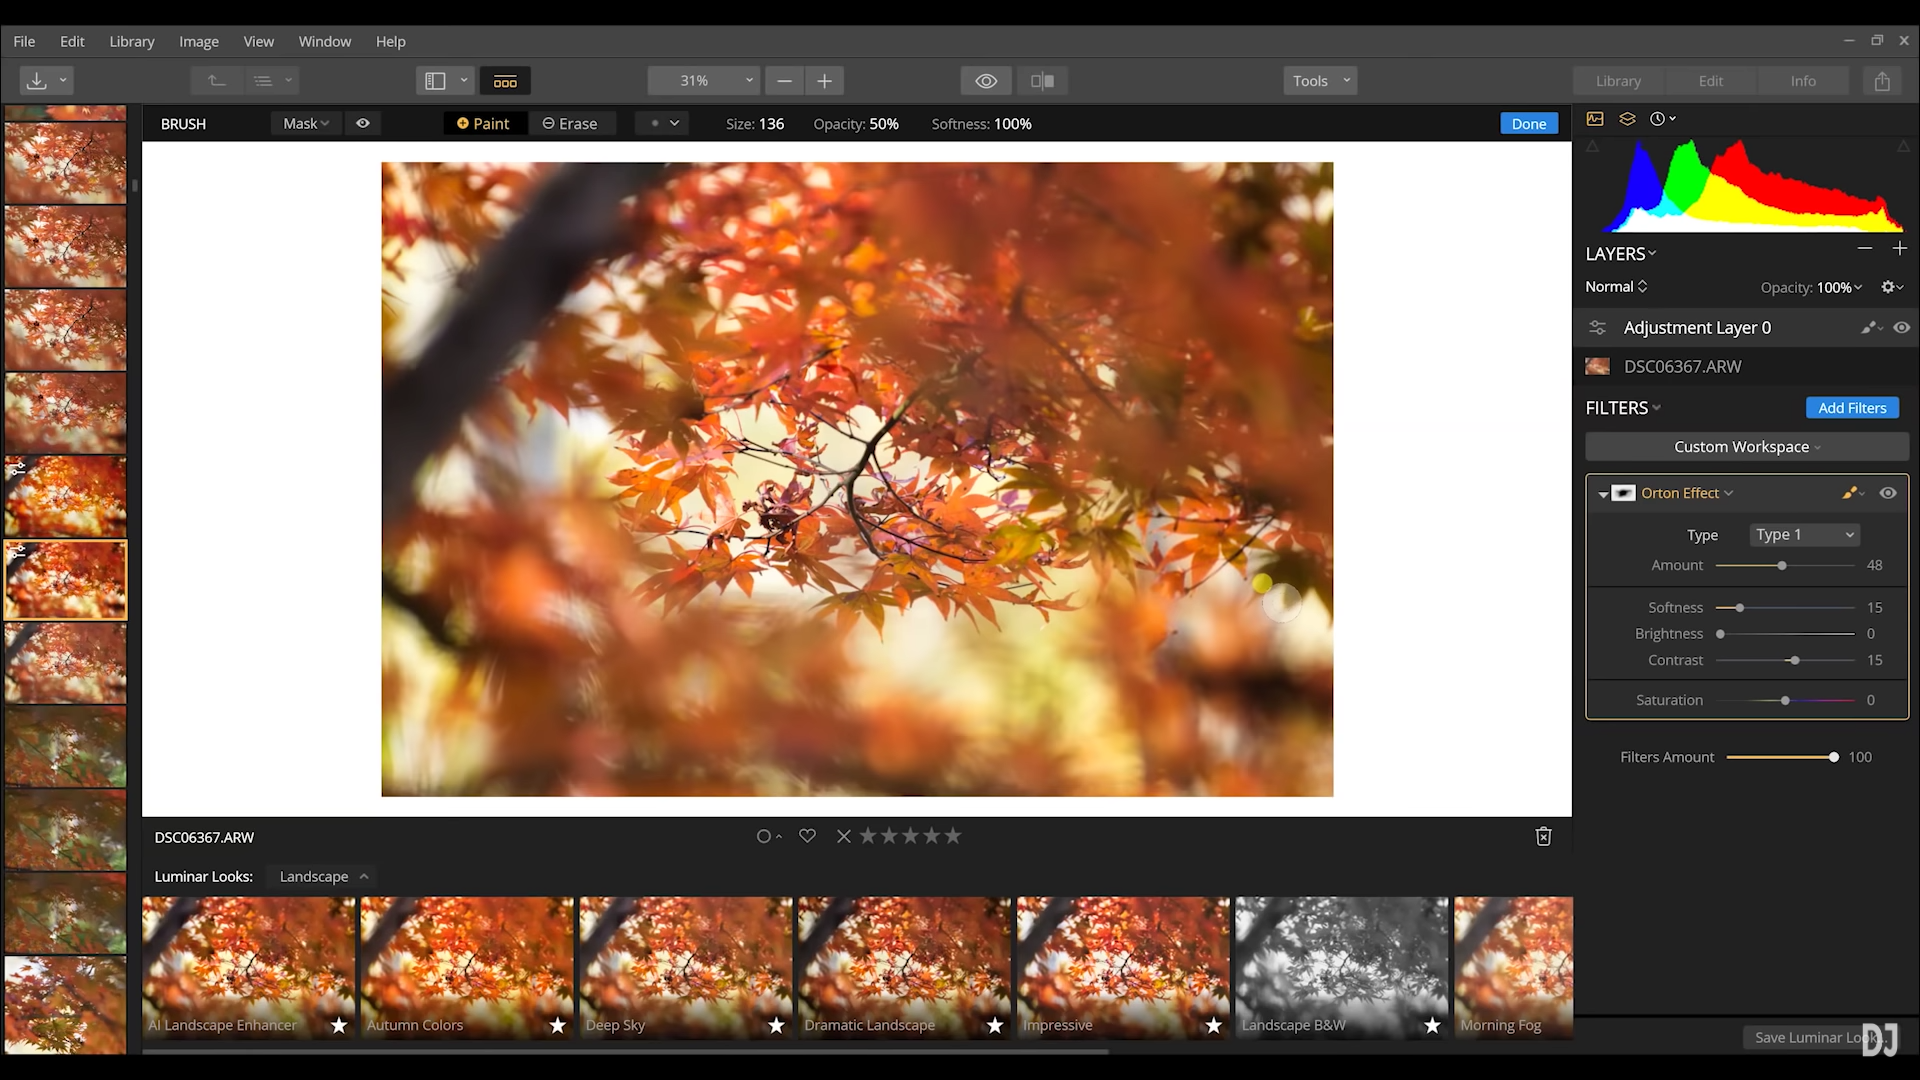 After Layer Mask is Applied. YouTube Screenshot/David Johnston
By using a brush, you can paint the masked area freehand, as David does in the video. This gives you the most control over what parts of the image are masked and unmasked.
If there are circular or oval shapes (like the sun) in your photo, a Radial Mask is a good choice because you can create a circle or an ellipse-shaped mask to create a smooth blend between the masked and unmasked areas.
A Gradient Mask, on the other hand, can be used to create a very smooth, linear transition between the masked and unmasked areas.
Finally, a Luminosity Mask allows you to make changes to the layer based on how dark or light the pixels are. This is particularly useful for adjusting areas of the image that are overexposed or underexposed.
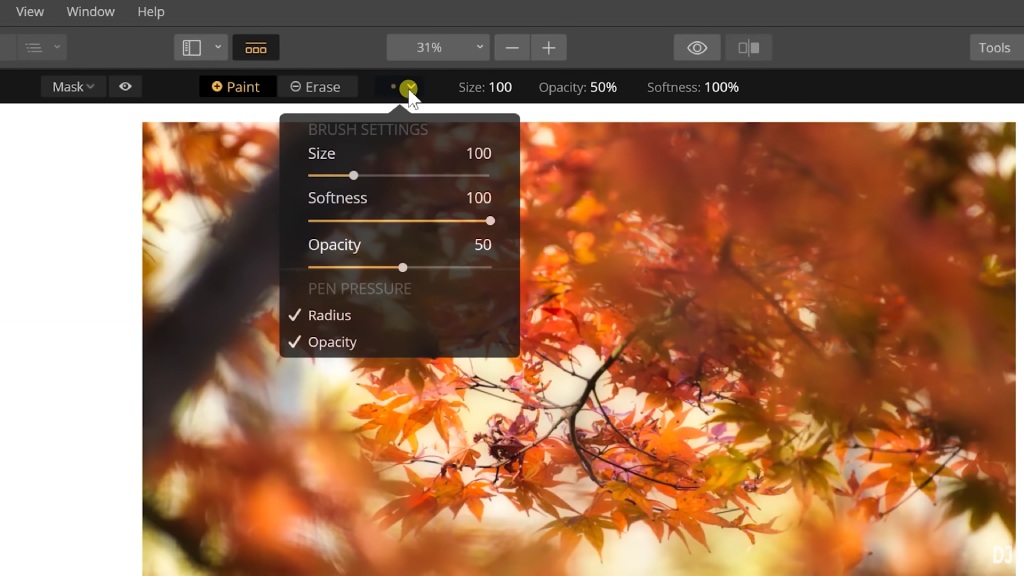 YouTube Screenshot/David Johnston
It's important to note that when creating a filter mask, you have a great number of adjustments you can make to get the desired effect when using the brush tool.
As you can see above, you can adjust the size and softness of the brush as well as its opacity.
You can also elect to use the brush to paint in the mask or to erase masked areas.
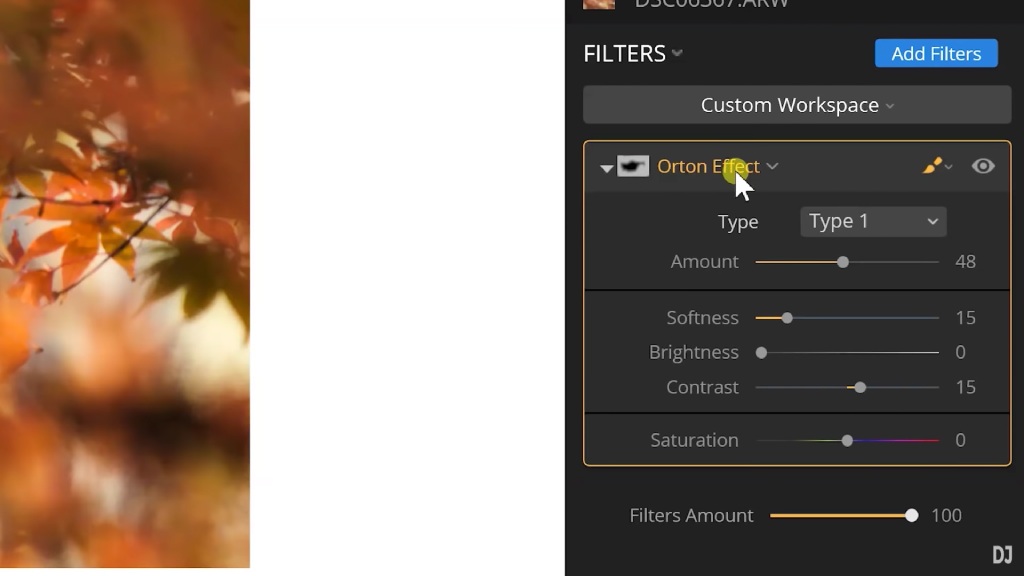 YouTube Screenshot/David Johnston
Additionally, when using the brush to add a mask, you can see the areas that have been masked and those that remain unmasked.
In looking at the screenshot above, you can see the white and black square to the left of "Orton Effect."
The white areas are those that are masked while the black areas are those that are not masked.
In other words, the filter mask that David has applied has allowed him to make a local adjustment with the Orton Effect as opposed to applying it globally to the entire image.
You can use this same process of adding layers and filter masks to include many other filters and effects. The key is to practice fine-tuning the process of layering and masking, that way you can pinpoint your edits to create beautiful and impactful landscape photos.
Learn More:
We Recommend
Sky Enhancement Just Got Easier and Faster

If you're like me, you love taking landscape photos, but sitting in your home office editing them...not so much.
Part of the reason why editing seems like a drag (for me, anyway), is the length of time it takes to make the edits I want to make in programs like Lightroom and Photoshop.
Don't get me wrong - I'm not a lazy photographer looking for an easy way out. What I want is a powerful tool that helps me enhance my images quickly and easily in a non-destructive manner.
Luminar does just that. With one swipe of a slider, you can achieve more dramatic skies. There's no need for messing around with neutral density filters in the field, nor do you have to learn how to use layers and masks to isolate the sky in post-processing, either.
What is Luminar?
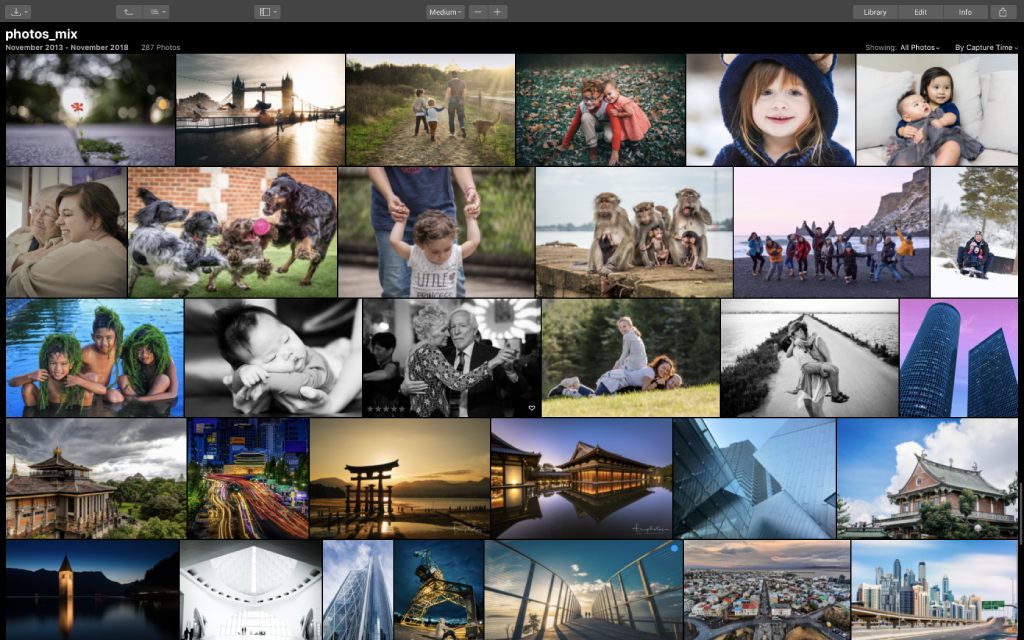
First things first...If you aren't already familiar with Luminar, it's an incredibly powerful, yet easy-to-use photo editor.
I've been using it for months now, and I can say without hesitation that it is on par with Lightroom. In fact, it might just be better.
Luminar's claim to fame is its Looks - presets that allow you to make instant changes to your images - as well as its AI-powered filters like the Accent AI Filter and the AI Sky Enhancer.
I've taken a deep-dive into these and other features in my Luminar Review, so for a detailed look at these, be sure to check that out.
Learn More:
Now, What About the AI Sky Enhancer?
In the video above, David Johnston takes us on a complete tour of Luminar's AI Sky Enhancer.
As you'll see, the power of this tool to bring out the details in the sky is quite astounding.
Using Sky Enhancer is a Breeze
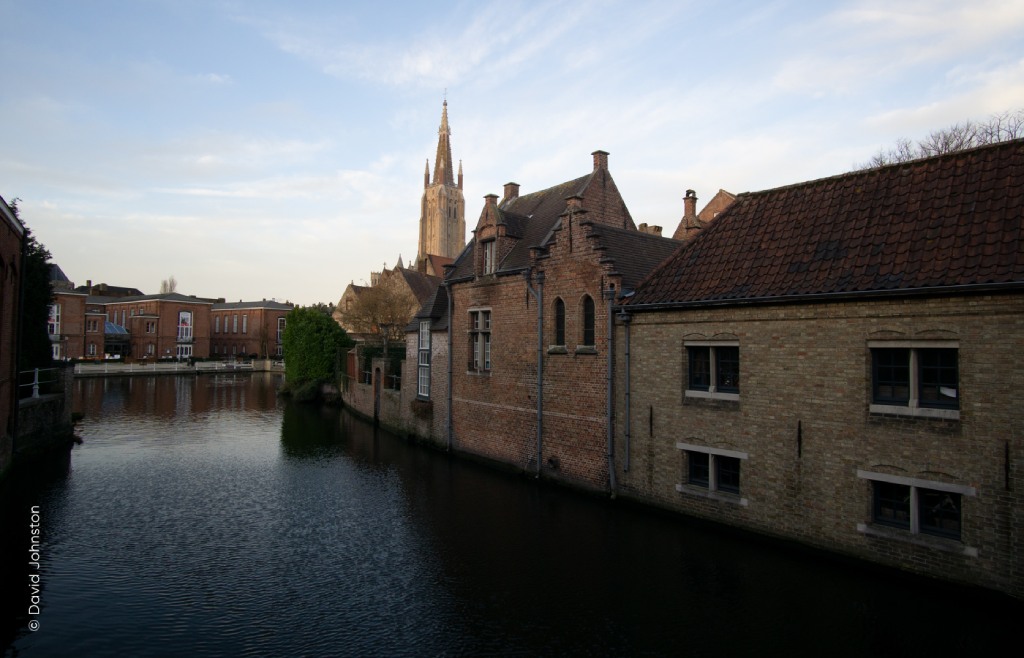 Photo by David Johnston
Before even discussing the power of this tool, it's worth noting that it's incredibly easy to use.
Just open an image, open the Luminar Filters Catalog, and select AI Sky Enhancer.
But don't think that because it's simple to use that it doesn't work very well...
Just take a look at the starting image above and the image below, and you can see quite a difference after making one simple change.
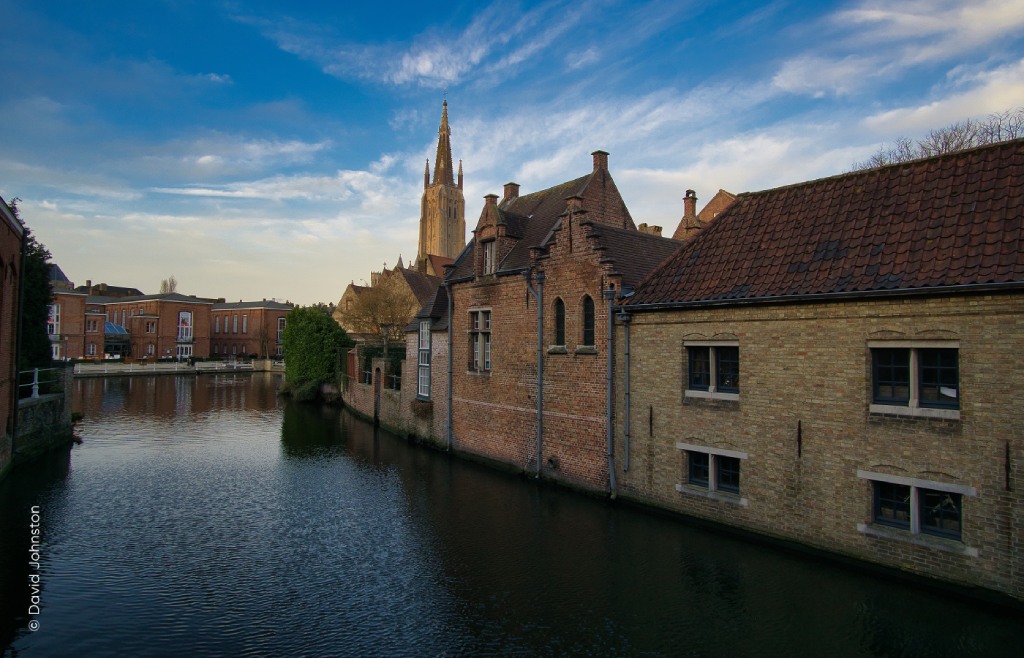 Photo by David Johnston
For one adjustment that literally took two seconds, the image sure has a much better look, doesn't it?
Notice how the second image has a much more defined sky that's darker with clouds that have more definition.
The Sky Enhancer is able to do this because it uses artificial intelligence to apply the changes only to the sky - that's true if it's a blue sky, a sunset, or just a hint of sky peeking through a canopy of trees.

First, Sky Enhancer analyses the photo to identify the sky, then it precisely forms semantic segmentation to separate the image into layers depending on the objects it detects, the tones of the sky, the definition of edges, and so forth.
Then, it applies an invisible mask to the sky to enhance it based on its colors, texture, size, and more. All that occurs in milliseconds!
No matter what the sky looks like or how much of the image it occupies, Sky Enhancer is able to work its magic - all the while saving you tons of time.
What Does the Luminar AI Sky Enhancer Do?
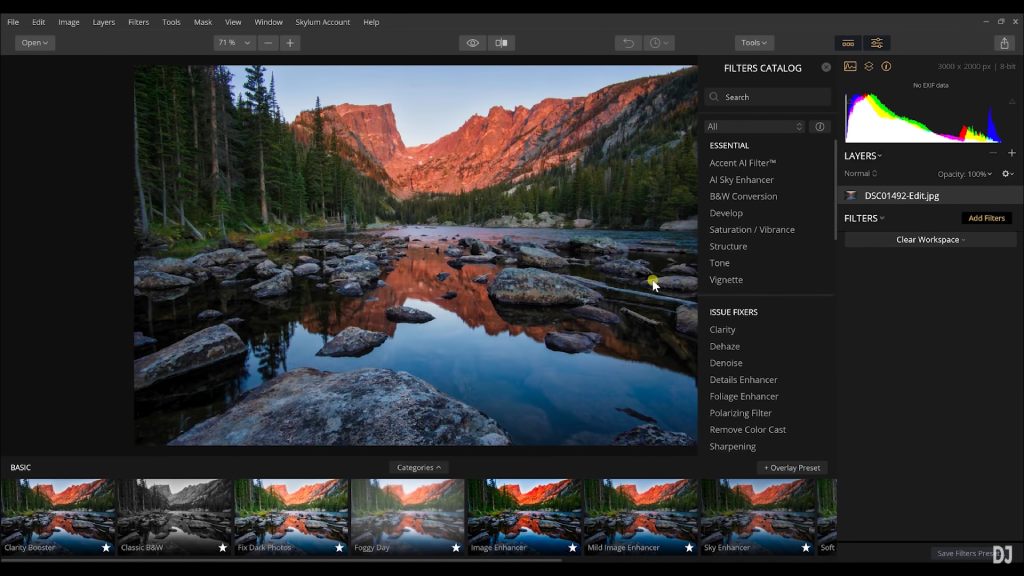 YouTube Screenshot/David Johnston
As noted above, the AI Sky Enhancer gives the sky more definition and drama without changing how other elements in the shot look thanks to its ability to intelligently analyze the image.
As David demonstrates in the video, the effect on the sky is done without changing how the lighthouse looks, or how the grasses in the foreground look, for that matter.
That means that essentially the AI Sky Enhancer is doing the job of a graduated ND filter, but on a higher level.
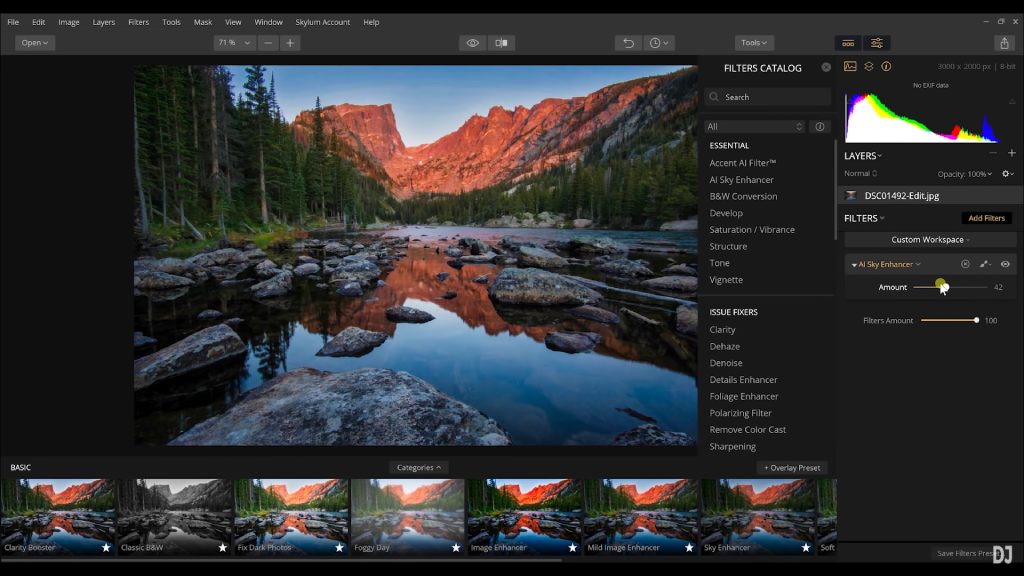 YouTube Screenshot/David Johnston
That is, using an ND filter in the field for David's shot of the lighthouse would be impossible - the filter would darken the lighthouse along with the sky.
But since the AI Sky Enhancer is so intelligent, it can separate the subject from the sky, allowing you to create more precise, impactful edits.
This works with all kinds of skies and subjects, too. Looking at the screenshots above, you can see how the Sky Enhancer darkens the sky, again, without darkening anything else in the shot.
Not bad, right?!
Learn More:
Final Thoughts: Luminar vs. Lightroom
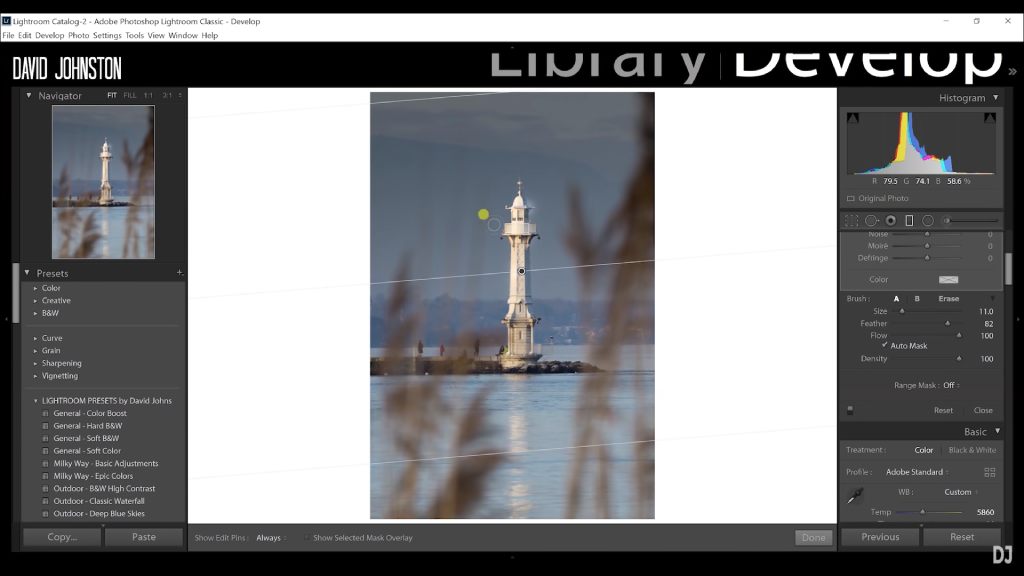 YouTube Screenshot/David Johnston
As I mentioned earlier, Luminar is certainly on par with Lightroom, if not better, and the AI Sky Enhancer is just one reason why.
That's because it makes editing the sky a simple, easy task using just one slider.
In Lightroom, by contrast, the process is more difficult and generates less pleasing results.
As you can see in the screenshot above, David applied a roughly 2-stop ND filter using Lightroom, but just like using a filter in the field, the effect has darkened the lighthouse.
You can lighten those areas using the Brush tool in Lightroom, but that takes a lot of precise editing, which takes a lot more time.
In other words, you can use Lightroom to enhance your skies, but it's difficult, to say the least.
Why spend more time getting less pleasing results when you can get just what you want using Luminar's AI Sky Enhancer?!
Learn More:
We Recommend
Skylum's Luminar Neo Helps Streamline Photo Editing With Incredible Generative AI Tools
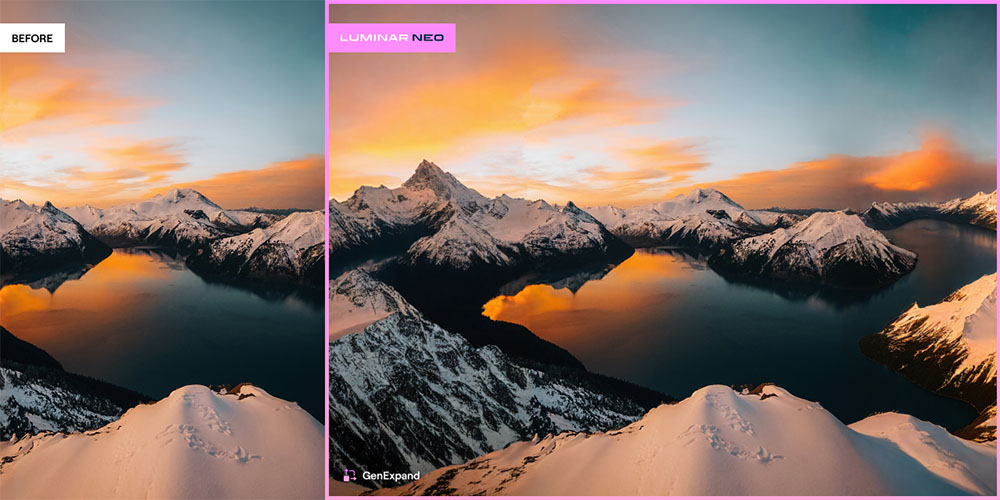
Photo courtesy of Skylum
In 2023, state-of-the-art artificial intelligence (AI) technology finally hit the mainstream market and became available for everyone to use. That trend will only continue to grow in 2024. While AI chatbots like ChatGPT have garnered most of the attention to this point, the truth is that AI tech is everywhere, from new cars to photo and video editing programs.
One example is Skylum’s Luminar Neo. It’s an innovative photo editor that’s easy to use, jam-packed with powerful generative AI tools, and available across all platforms (macOS, Windows, and mobile devices). Furthermore, a super useful plugin lets you integrate Luminar Neo directly into Adobe Lightroom and Photoshop and use the programs hand-in-hand.
In this article, we’ll first explain exactly what generative AI is. Then, we’ll break down three of Luminar Neo’s incredible generative AI tools: GenErase, GenSwap, and GenExpand. For each one, we’ll share what it does, how it can enhance the quality of your photos, and why it will increase your productivity.
Join us below to explore generative AI and discover how Luminar Neo’s one-of-a-kind generative AI tools can help you become a better photographer!
Table of Contents
- What is Generative AI?
- Luminar Neo Generative AI Tools: GenErase
- Luminar Neo Generative AI Tools: GenSwap
- Luminar Neo Generative AI Tools: GenExpand
- Final Thoughts on Luminar Neo
- Recommended Photography Gear
What is Generative AI?
Whereas traditional AI can only read, analyze, and output pre-existing data, generative AI is a newly developed type of artificial intelligence whose goal is to create new, original content. It can be used to create stunning images, text, audio, and more. Popular examples of traditional AI are Siri and Alexa. On the other hand, ChatGpt is the most famous generative AI program.
For photographers, generative AI is a game-changing technology that makes post-processing images faster and easier. You can use it to make tiny edits or transform your images into gorgeous new art pieces. Keep reading to find out more about Lunminar Neo's generative AI tools.
Luminar Neo Generative AI Tools: GenErase
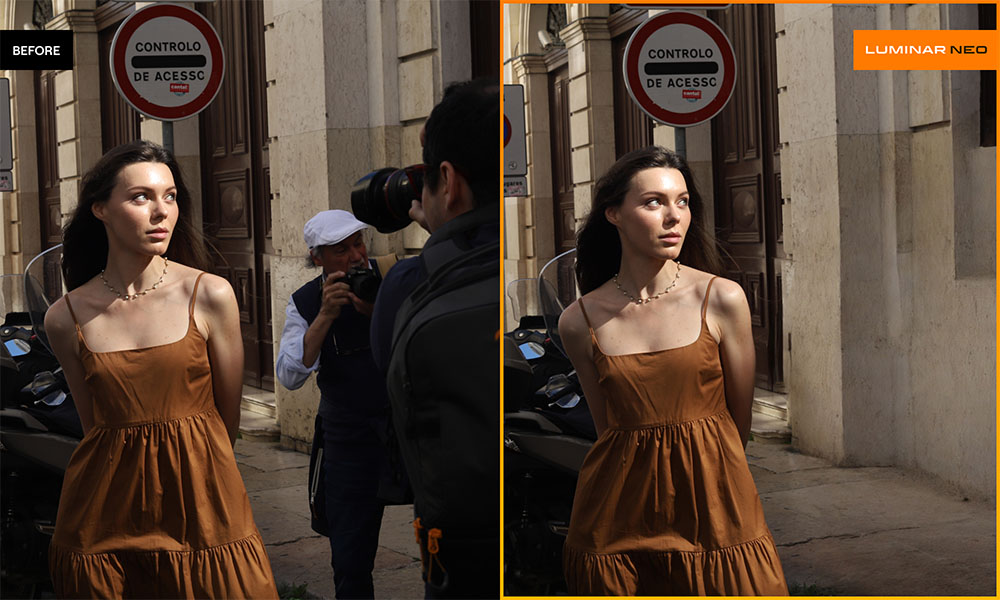
Photo courtesy of Skylum
Everyone has experienced the disappointment of taking a beautiful photo, only to realize later that an unwanted person or object was accidentally in the frame. That’s where the GenErase tool comes in! It lets you quickly select distracting elements from an image and delete them with a single click.
Better yet, it automatically scans the rest of your image and intelligently fills the removed areas with content that flawlessly matches its surroundings. This means your photos will come out looking like you originally planned, and nobody will be able to notice you’ve altered the image.
GenErase is ideal for removing objects such as people, animals, reflections, vehicles, electric wires, trash, etc., making it a great tool for landscape, street, and travel photographers.
Check out the video above on the Luminar Neo YouTube Channel to learn more about their GenErase AI tool.
Learn More:
- 4 Reasons Why Skylum’s Luminar Neo is a Landscape Photographer’s Dream Editor
- This AI-Powered Photo Editor Will Drastically Improve Your Real Estate Photography Workflow
Luminar Neo Generative AI Tools: GenSwap

Photo courtesy of Skylum
Ok, let’s say you want to get a bit more creative. Instead of simply deleting something from an image, you want to add something, too. That’s the job of the GenSwap tool. It allows you to effortlessly enhance the composition of an image by replacing existing subjects or adding entirely new elements to your photos.
This generative AI technology can add everything from trees and mountains to animals and houses. So, if some of your pictures came out a little duller than you expected, GenSwap can change them into captivating images that will impress your family and friends.
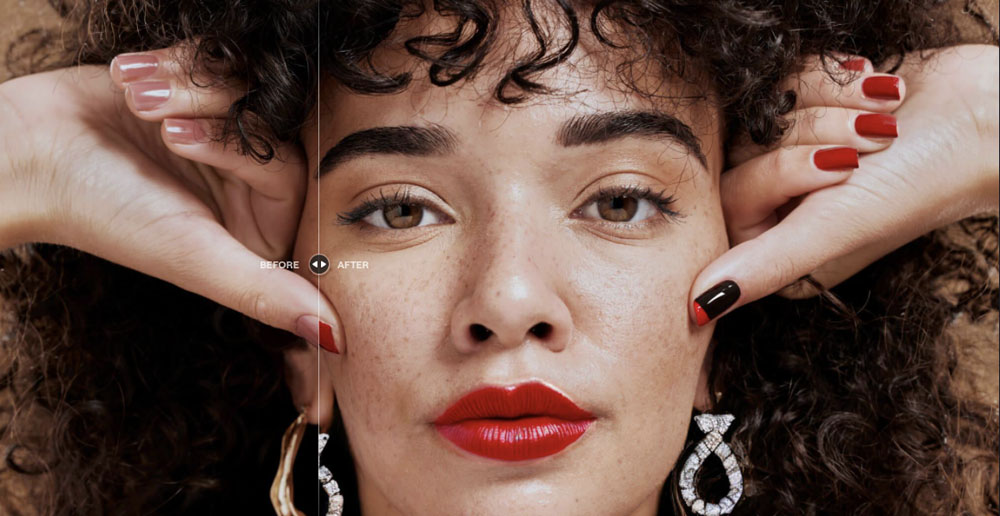
Photo courtesy of Skylum
One time we love to use the GenSwap tool is when editing portraits. You can swap out the background, change the model’s clothes, or even change the colors of physical features like hair and eyes (or fingernails, as shown above).
Check out the video above on the Luminar Neo YouTube Channel to learn more about their GenSwap AI tool.
Luminar Neo Generative AI Tools: GenExpand
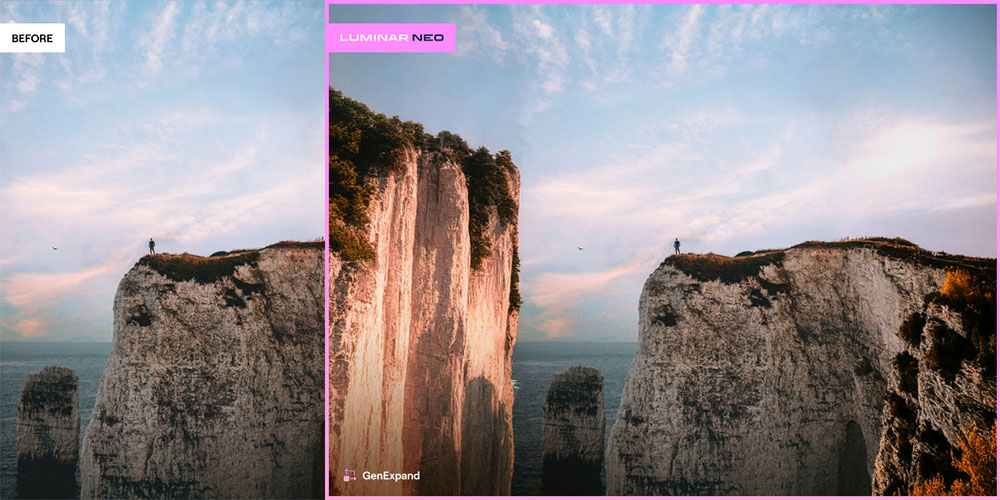
Photo courtesy of Skylum
Luminar Neo’s newest generative AI feature is the recently announced GenExpand tool. This groundbreaking invention lets photographers expand their images beyond what they captured on camera. Think of it as the opposite of cropping. Rather than changing a photo's composition by making it smaller, GenExpand makes it bigger by adding content-aware elements.
Three situations in which it can be used are when you want to create a panoramic photo, give your subjects more breathing room, or if you accidentally cut off an important part of a scene. Therefore, GenExpand is perfect for editing landscapes, cityscapes, and wildlife photography, to name a few.
Check out the video above on the Luminar Neo YouTube Channel to learn more about their GenExpand AI tool.
Final Thoughts on Luminar Neo
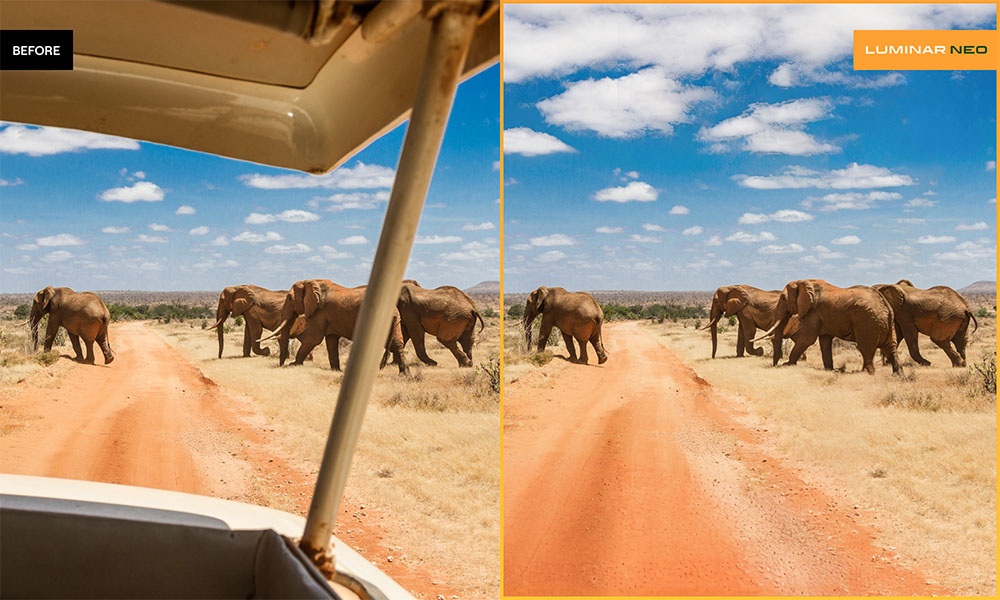
Photo courtesy of Skylum
Wow! Luminar Neo offers an amazing package of generative AI tools no photo editing software can match, not even traditional powerhouses like Adobe Lightroom and Photoshop. So, if you want to boost the quality of your photos while simultaneously saving time and money, try it out today.
Speaking of money, Luminar Neo is extremely affordable. The month-to-month subscription runs at $14.95/month, the 12-month plan costs $6.58/month (billed $79 yearly), and the 24-month plan is $4.96/month (billed $119 every two years). They also offer a lifetime purchase option currently on sale for a one-time payment of $149. Visit their Pricing Page to learn more.
Finally, check out the links below to see how Luminar Neo helps with different types of photography.
- Landscape Photography
- Wildlife Photography
- Portrait Photography
- Family Photography
- Wedding Photography
- Newborn Photography
- Real Estate Photography
Recommended Photography Gear
A quick heads-up: If you snag something through our affiliate links or check out our sponsored content, we might earn a commission at no extra cost to you. But fear not, we're all about recommending stuff we're truly stoked about!
Learn More:
We Recommend
Speed Up Your Workflow With This New Lightroom Alternative
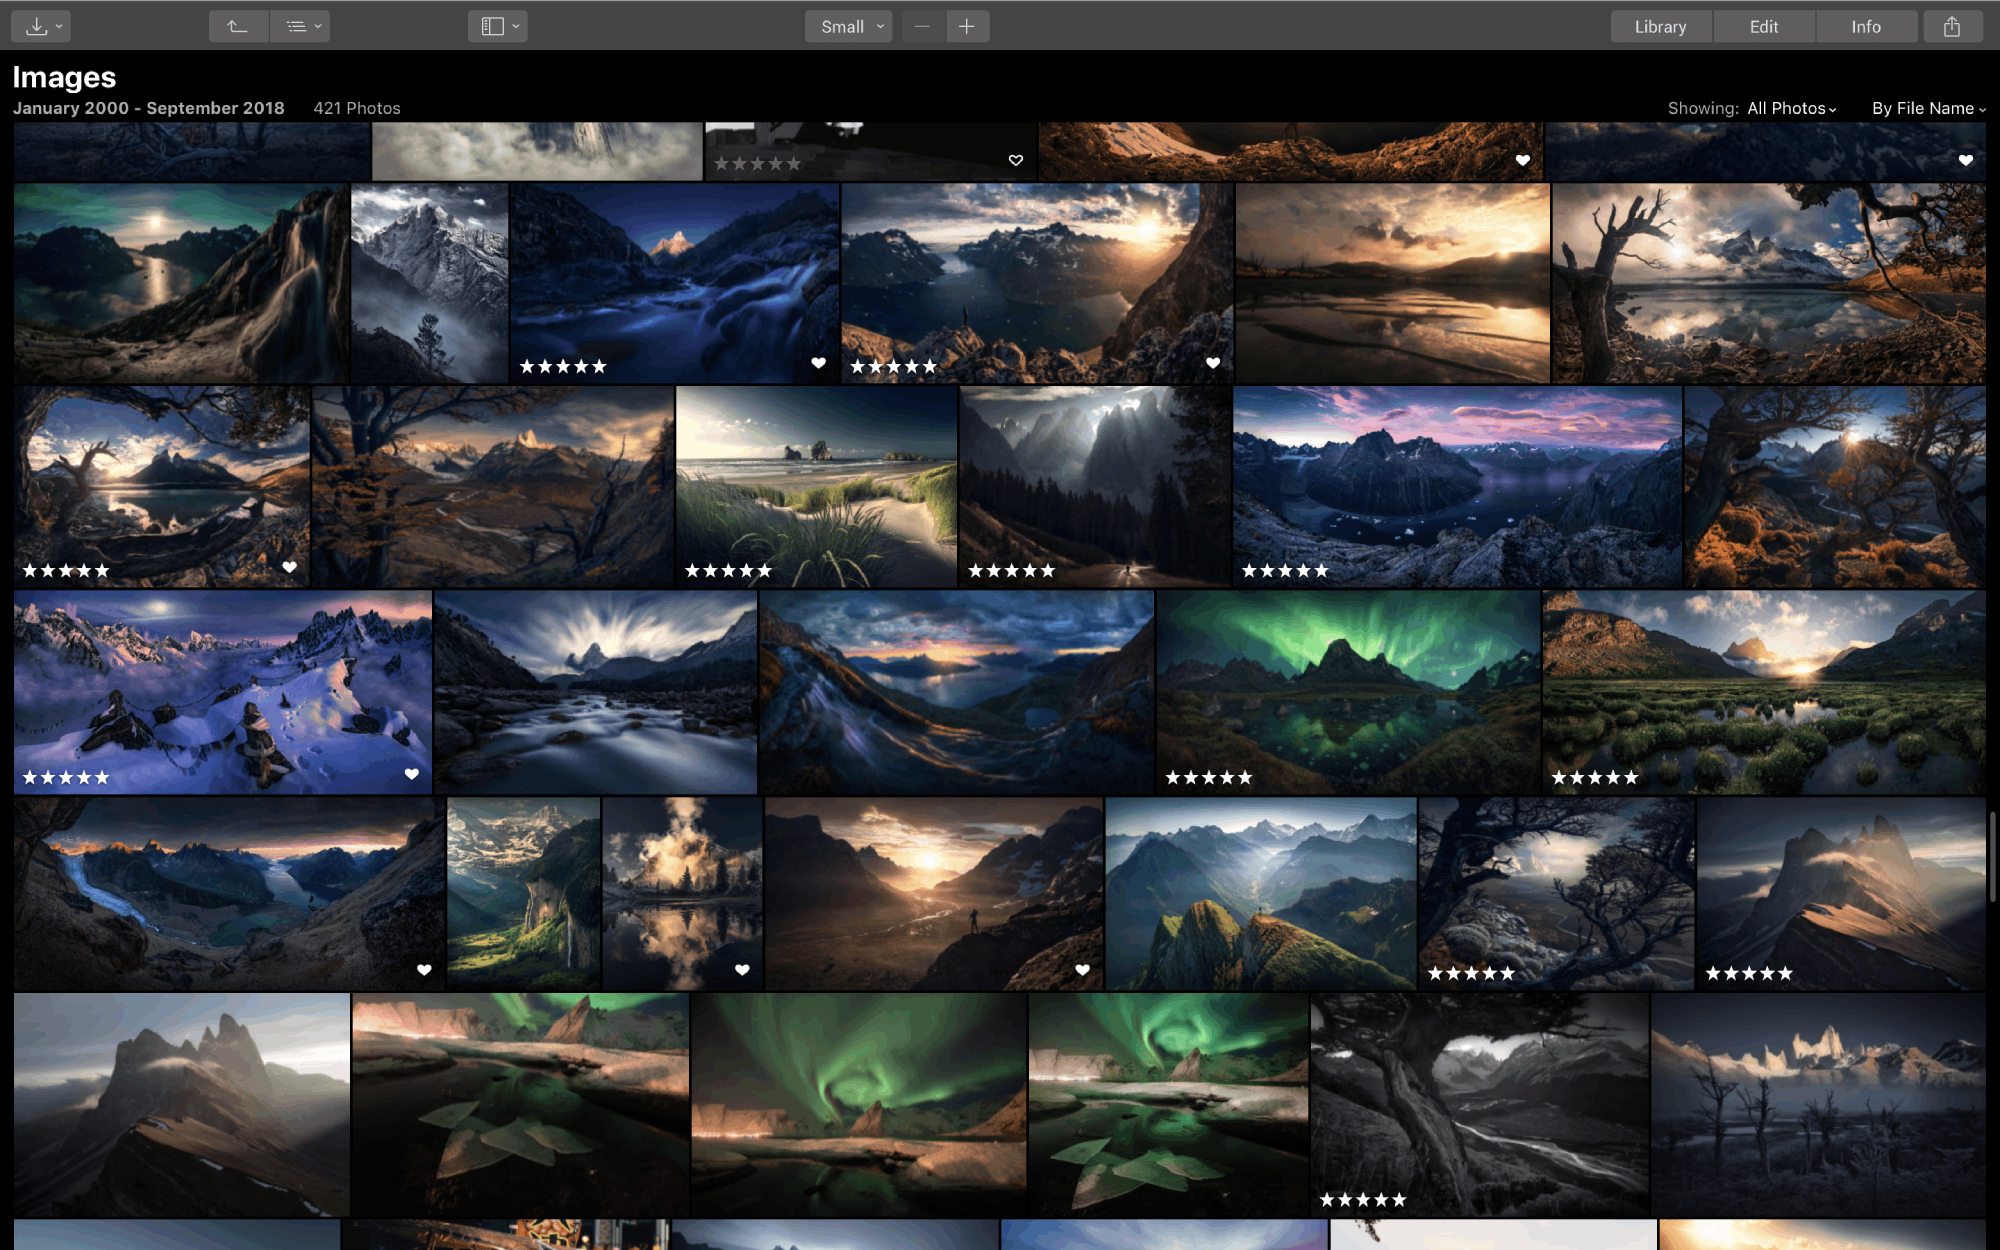
Luminar 3 with libraries was released earlier this month and includes a number of upgrades over its predecessor, Luminar 2018.
The library feature is certainly the biggest news in the most recent version of Luminar, though there are plenty of other features that prove valuable for photographers of all skill levels and abilities.
In the video above, Jim Nix offers a detailed look at Luminar 3 and offers ten tips for getting to know the software a little bit better.
Jim's pointers will help you get settled in Luminar and develop a faster and more efficient workflow.
Have a look at the video for his hands-on Luminar tutorial, and for a quick breakdown of each of Jim's tips, read on below!
See the Editing History of an Image in a Single Click
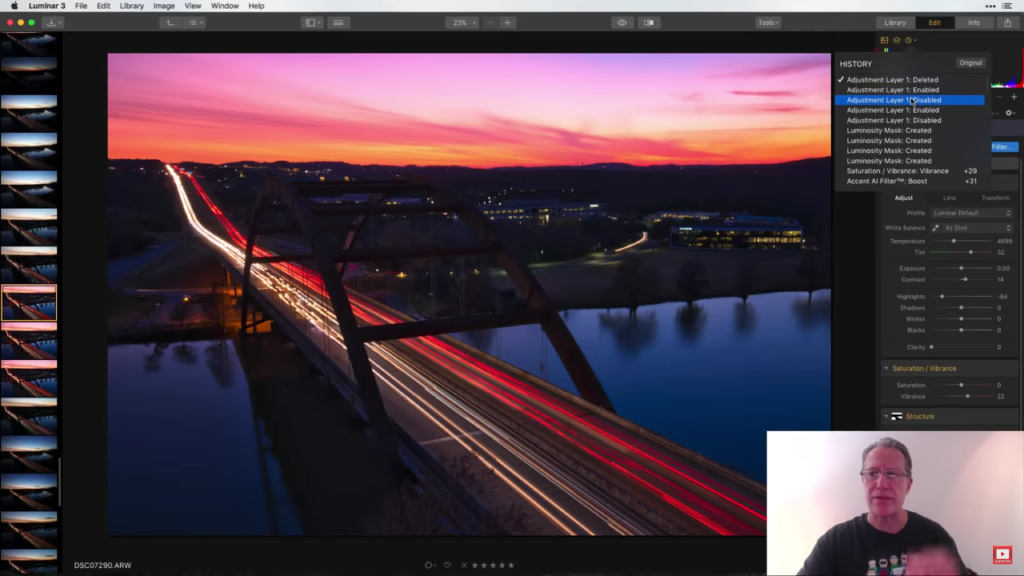 YouTube Screenshot/Jim Nix
Can't remember what edits you applied to an image?
In Luminar 3, viewing the editing history is as simple as a single click.
Located above the histogram, you'll see a clock icon. Just press that, and the editing history for the image will appear, as shown above.
Learn More:
How to View File Names in Grid View

As you can see in the image above, when viewing your images in grid view, the individual file names do not appear with the photo.
To see the file names in Grid View, simply go to View > Show Tab Bar.
 YouTube Screenshot/Jim Nix
The screenshot above shows that once you enable the Tab Bar, the image file name will appear at the top of the screen.
Just click on an image to see the file name!
How to Add More Space to the Luminar 3 Editing Window
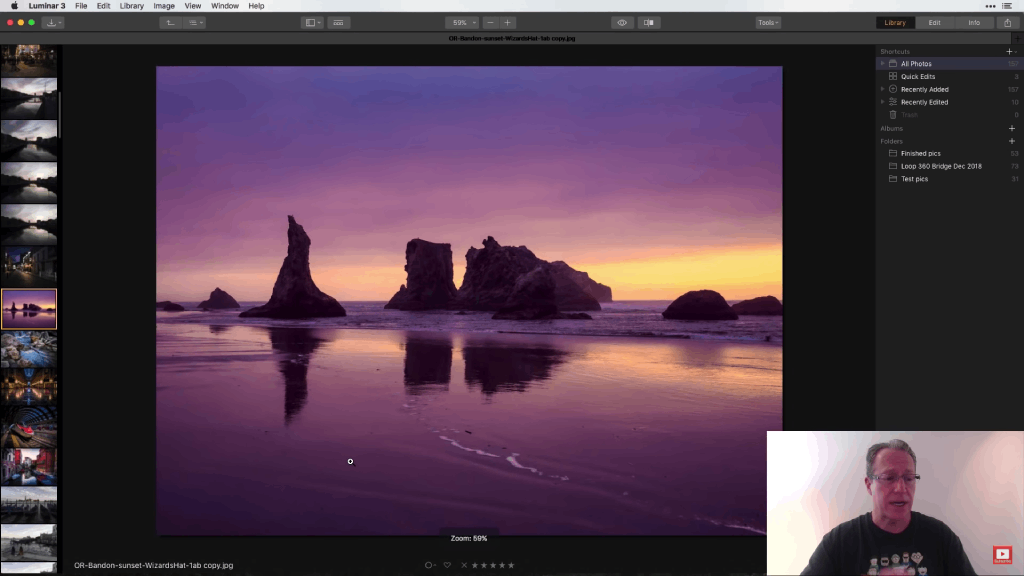 YouTube Screenshot/Jim Nix
The Luminar 3 UI offers you a wealth of information while still giving you plenty of room to see the image you're editing.
As shown above, the filmstrip on the left shows the images you have in your library while the editing workspace on the right offers you the tools needed to process your image.
At the bottom are tools for starring and favoriting images, and of course, the at the top of the window are the various menus for accessing different features and functions of Luminar 3.
But what if you want a little more space dedicated to the image you're editing?
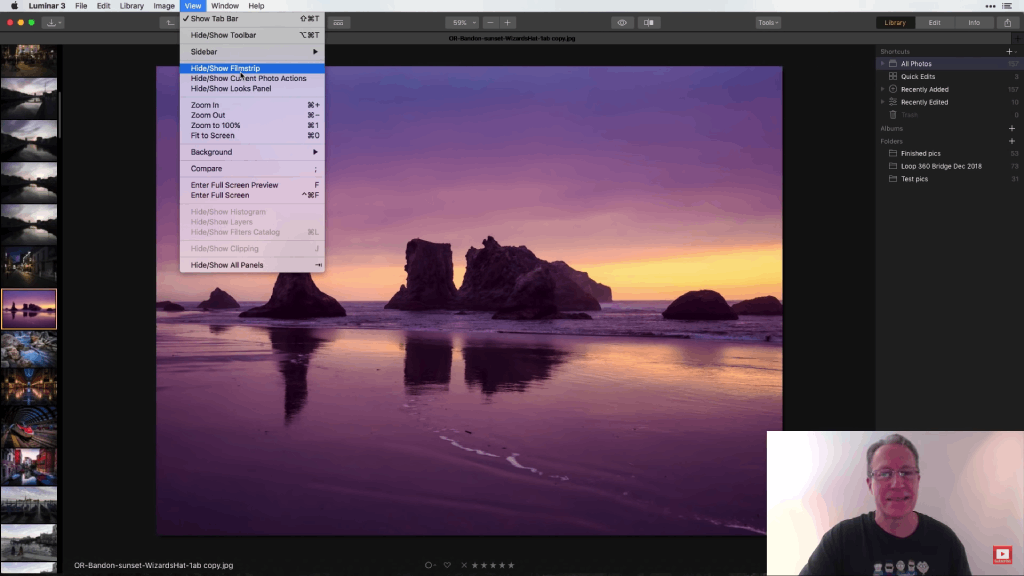 YouTube Screenshot/Jim Nix
By going to View > Hide/Show Filmstrip, you can gain more real estate for editing your image by hiding the filmstrip from view.
Going to View > Hide/Show Current Photo Actions allows you to hide the bottom panel for rating images as well.
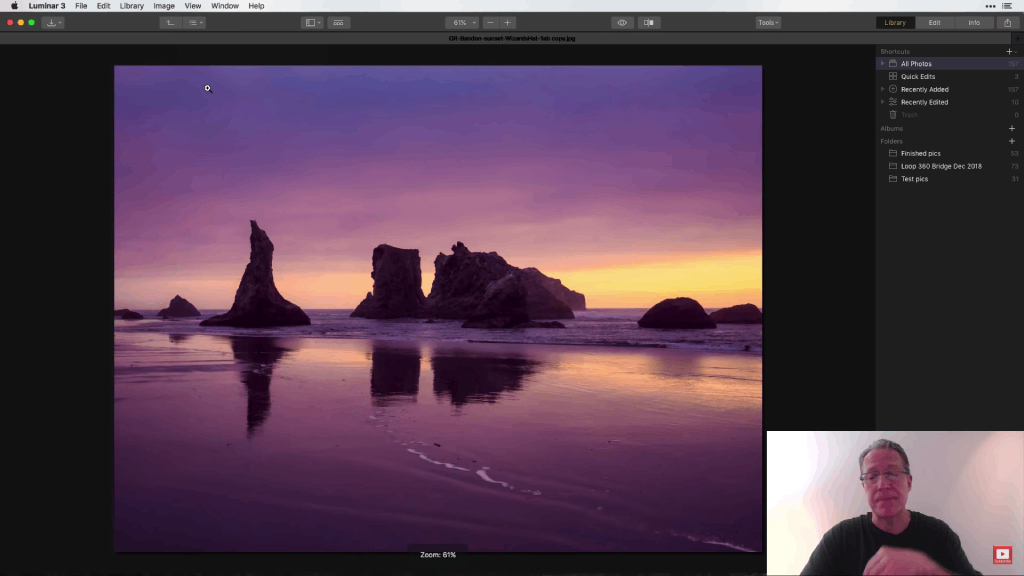 YouTube Screenshot/Jim Nix
Just doing those two things opens up the editing window with much more area to view and inspect your image. Of course, reversing those actions is a simple matter of toggling the Filmstrip and Current Photo Actions back on.
Quick Tip: You can also toggle the Looks Panel on and off by going to View > Hide/Show Looks Panel. Hide the editing sidebar by going to View > Sidebar > Edit for a large-screen view of your image.
Learn More:
Change the Background of the Editing Window in Luminar 3
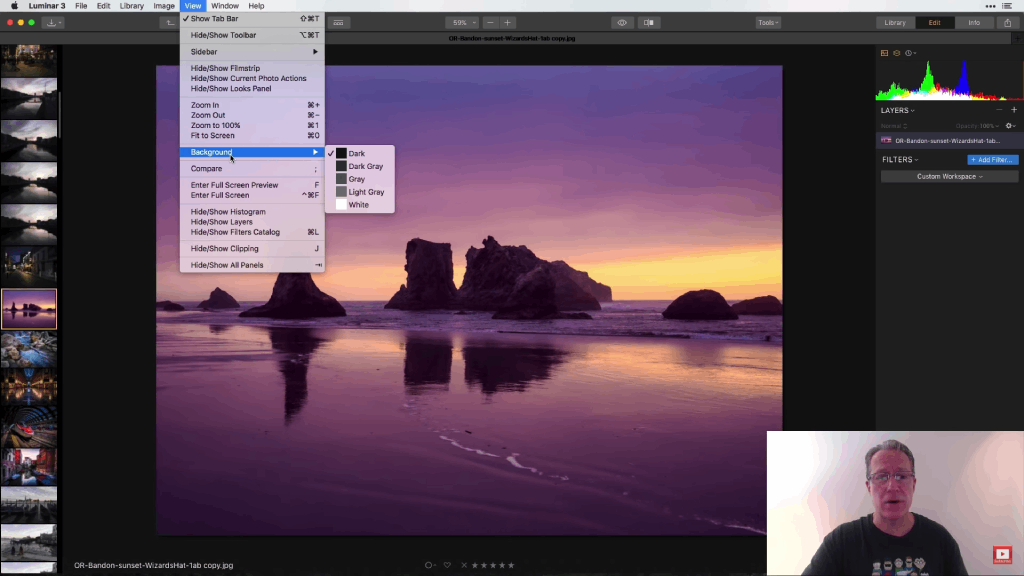 YouTube Screenshot/Jim Nix
Though changing the background color of the editing window isn't a new feature in Luminar 3, if you aren't sure how to do it, you can access that feature in the View menu.
Just go to View > Background and change the background to white, various shades of gray, or black.
Moving Images to the Trash
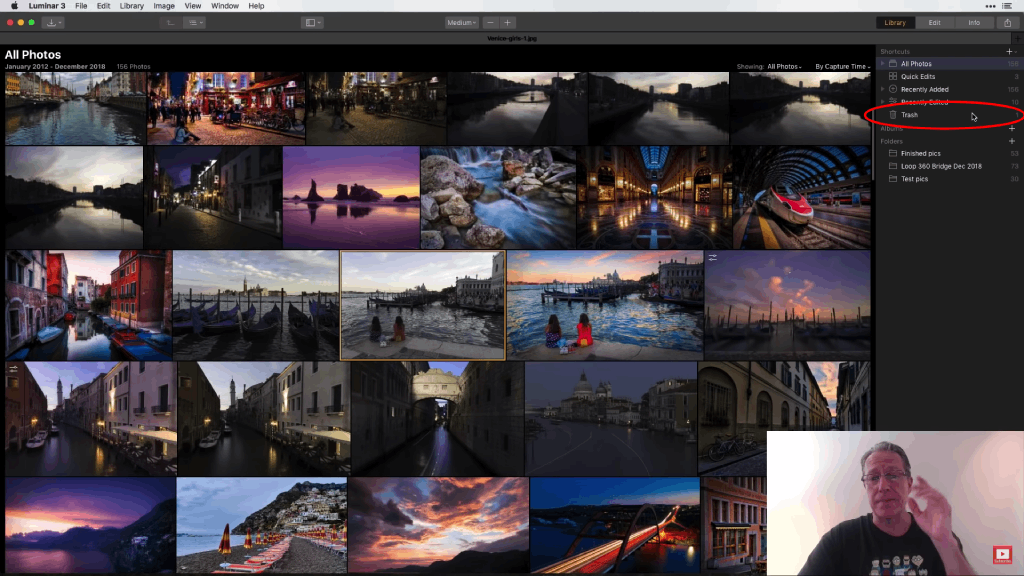 YouTube Screenshot/Jim Nix
Let's say that you have duplicate images in your grid view and you want to trash one of them.
By clicking on the image and dragging it to the Trash icon on the right side of the screen, you can remove that item from the grid.
However, though the image will no longer appear in the grid view, it will still appear in your folder. This is handy if you decide later that you don't actually want to trash the image.
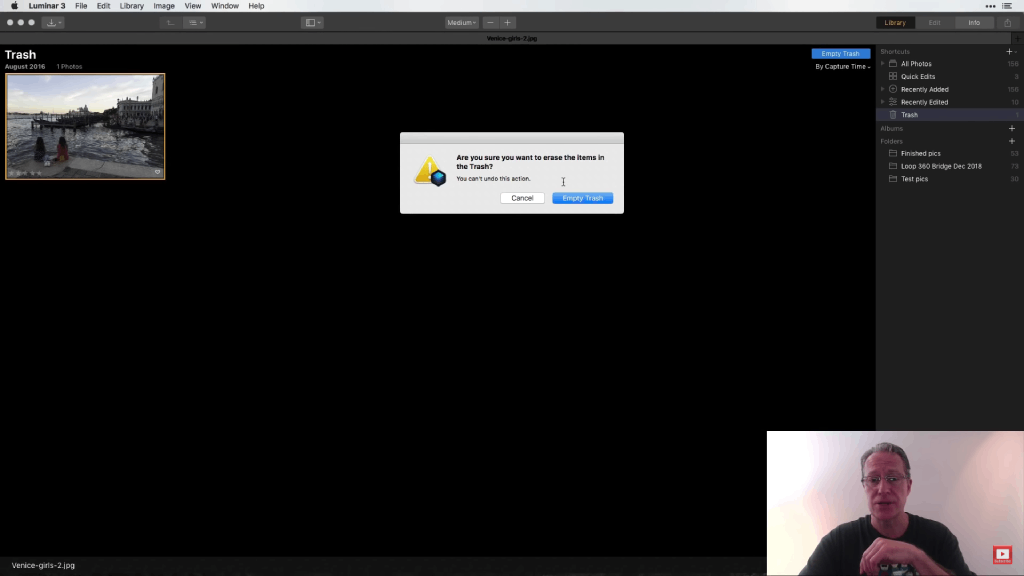 YouTube Screenshot/Jim Nix
To completely delete the image from Luminar 3 and the folder on your computer, you must go to Trash > Empty Trash, and then select "Empty Trash" from the pop-up window. At that point, the image will be moved to the system trash folder.
This is a thoughtful system of deleting images because it provides you with opportunities to reverse your decision - once in the Luminar 3 trash and again in the system trash folder.
Adding Folders and Albums
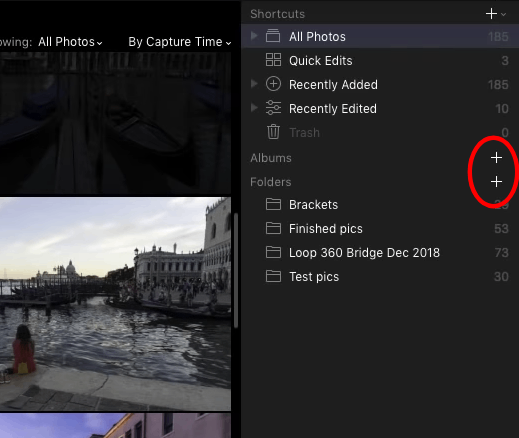 YouTube Screenshot/Jim Nix
Luminar 3 makes it easy to create folders and albums for simplified image organization.
To create a new Folder or Album, simply press the "+" button next to Folders or Albums on the right side of the screen, as shown above.
Folders in Luminar mirror the folder on your computer, so adding images to the folder in Luminar will add the images to the same folder on your hard drive, and vice versa.
Albums, on the other hand, are virtual collections of images. That means that you can add and delete images from an Album without impacting what images are or are not in the folders in Luminar or on your computer.
Learn More:
How to Move Presets from Luminar 2018 to Luminar 3
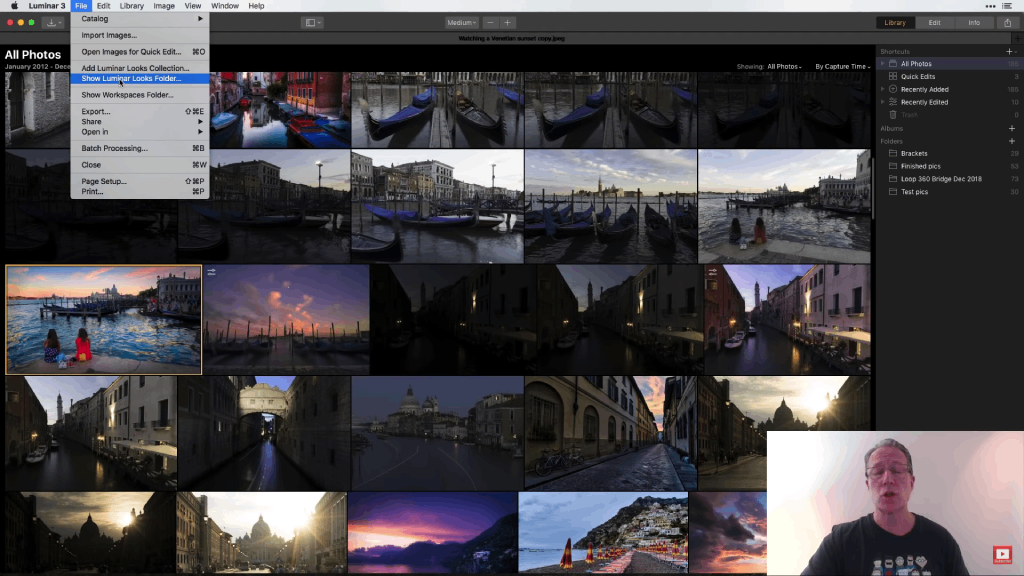 YouTube Screenshot/Jim Nix
If you've used Luminar 2018 and have created presets (called Looks in Luminar 3), they should be automatically imported for you into Luminar 3.
However, if that doesn't happen, you can manually add your Looks and Workspaces by going to File > Show Luminar Looks Folder, as shown above.
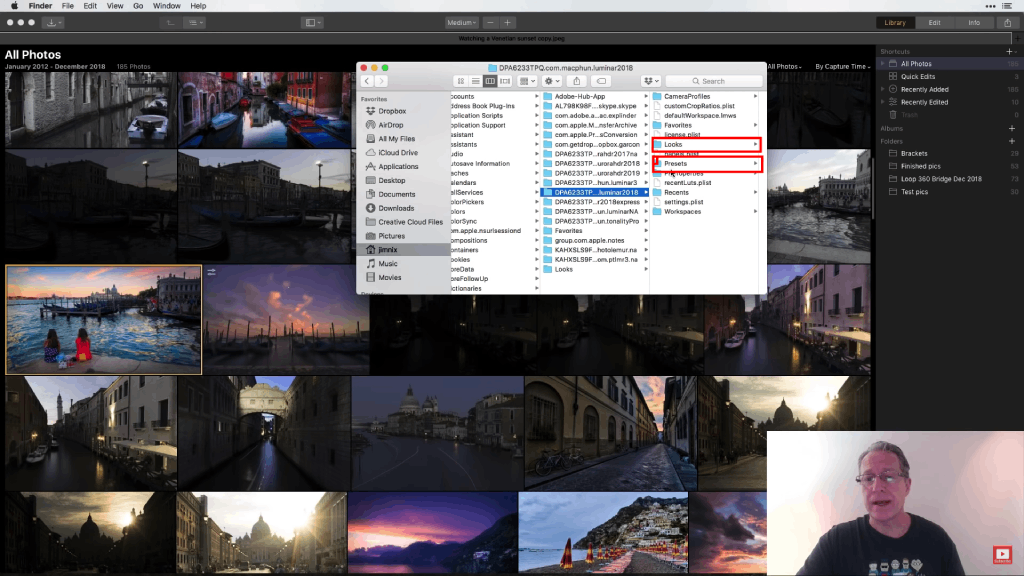 YouTube Screenshot/Jim Nix
On the next screen, find the Luminar 2018 Preset folder (highlighted in blue above) and click on it to reveal its contents.
By selecting the Looks and Presets subfolders, you can drag their contents into the Luminar 3.
Quick Tip: Follow a similar procedure as outlined above to import your custom Workspaces as well. Just go to File > Show Workspaces Folder, and copy and drag the workspaces from the Luminar 2018 folder to the Luminar 3 folder.
How to Rate and Color Label Photos in Luminar 3
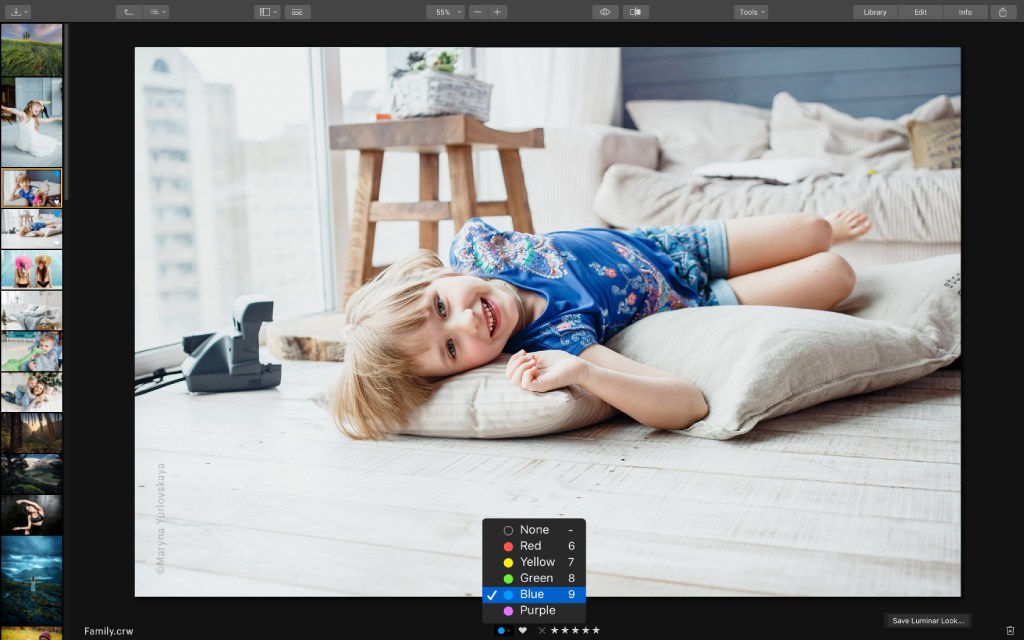
Rating your images can be done by clicking on the star icons at the bottom of each image.
Alternatively, you can go to Image > Set Rating and select the appropriate rating that way.
From the Image menu, you can also flag an image, reject it, or leave it unmarked.
Luminar has color labels as well, so you can utilize a color rating system to further organize your images (i.e., labeling unedited images as red, edited images as blue, and so forth).
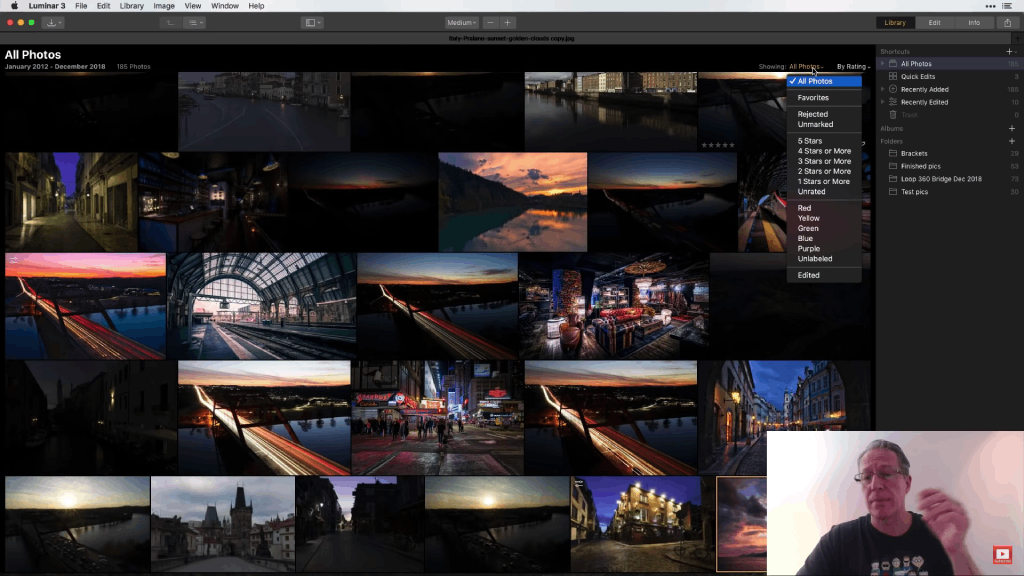 YouTube Screenshot/Jim Nix
You can also sort your images by any of the criteria mentioned above.
In Grid View, click on the drop-down menu next to "Showing" at the top of the screen and select the criteria you wish to use for sorting images.
This gives you an abundance of control over the organization and sorting of your images, which will speed up your workflow by allowing you to find the images you want more quickly.
See the Image Information in a Jiff
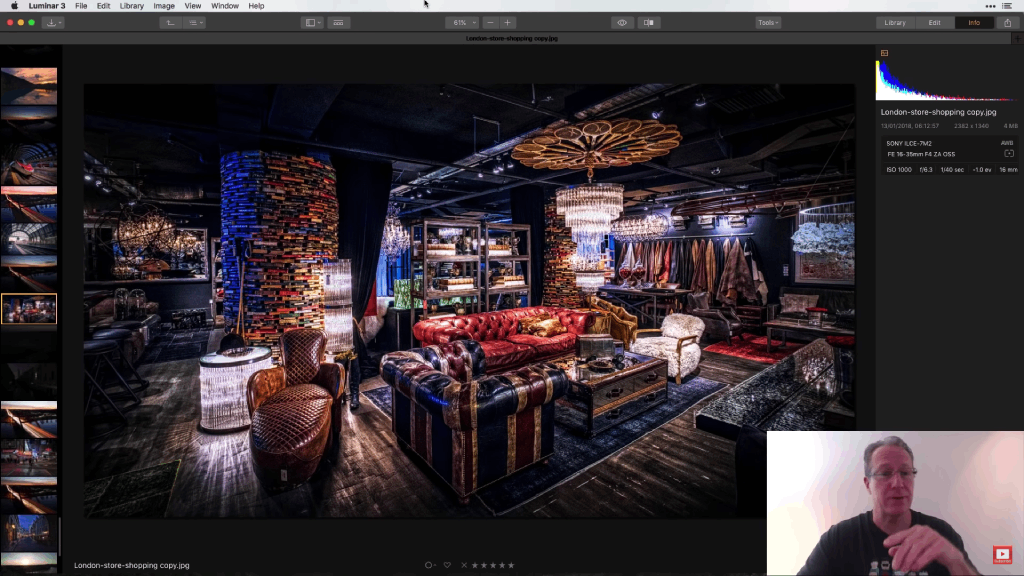 YouTube Screenshot/Jim Nix
Can't remember when you took an image or the camera settings you used? Accessing that information can be done by going to the Info Panel at the top-right of the screen.
Opening that panel reveals an abundance of information about the image, including its name, the date the image was taken, the file size, camera and lens details, as well as the exposure settings used to create the photograph.
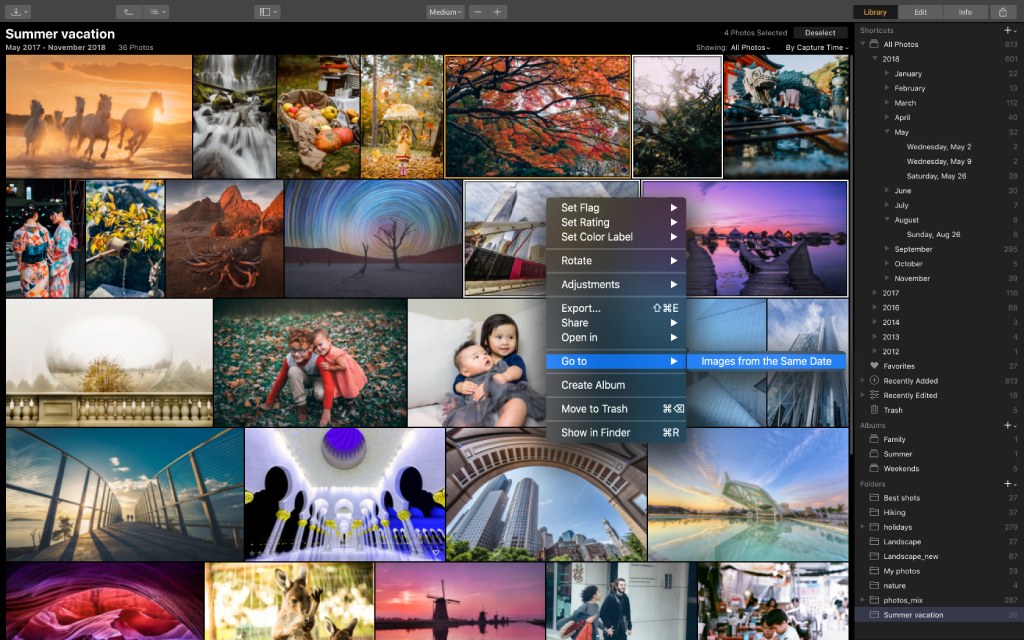
Quick Tip: You can search your images in Luminar by date. Just right-click on an image and select Go To > Images from the Same Date. Functionality to search images using keywords, EXIF information, and file names will be added in 2019 as well.
How to Move Images from Luminar 3 to Aurora HDR
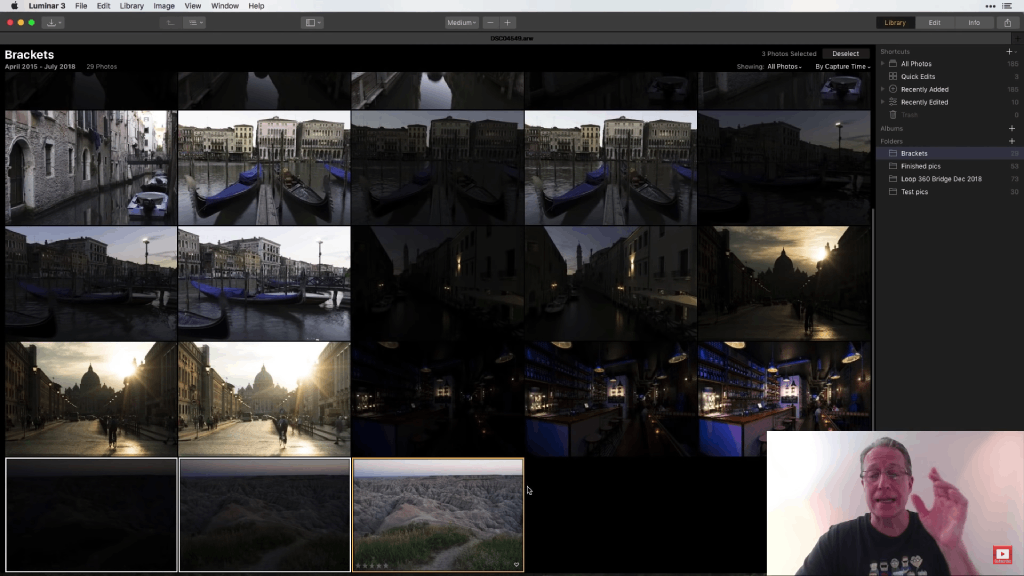
If you have both Luminar 3 and Aurora HDR, you can easily move a set of bracketed images from Luminar into Aurora HDR.
As shown above, simply highlight the bracketed images you wish to open in Aurora HDR, and then drag those images to the Aurora HDR icon on your desktop or dock.
The images will move as RAW files, that way you have all the sensor information you need to create an HDR image.
With that, you have a tour of some of Luminar 3's features that speed up your workflow and simplify how you go about editing images.
Learn More:
We Recommend
Testing a NEW Affordable Lightroom Alternative
If you've been looking for a better, less expensive alternative to Lightroom, Luminar might just be it.
I've personally tested Luminar for a few months now, and can say first-hand that it very well could be a Lightroom killer.
Aside from the fact that Luminar has no monthly fees - just a one-time price of $69.00 as of this writing - it also has a suite of incredibly powerful tools that make it an ideal choice for professional photographers.
But Luminar is so uncomplicated to use that beginners with little or no editing experience can completely transform their images.
Don't believe me?
In the video above, Sawyer Hartman gives us a detailed tour of Luminar 2018 to show off its incredible features.
It should be noted that the new version of the software - Luminar 3 - was released on December 18th and features some big changes, not the least of which is the addition of libraries for organizing your images and new LOOKs (called presets in Luminar 2018) that give you virtually instant changes to your photos.
Nonetheless, Sawyer's video offers a great overview of what's possible when working with Luminar.
Here's a few of the best features Sawyer points out about Luminar.
Luminar Features Non-Destructive Editing
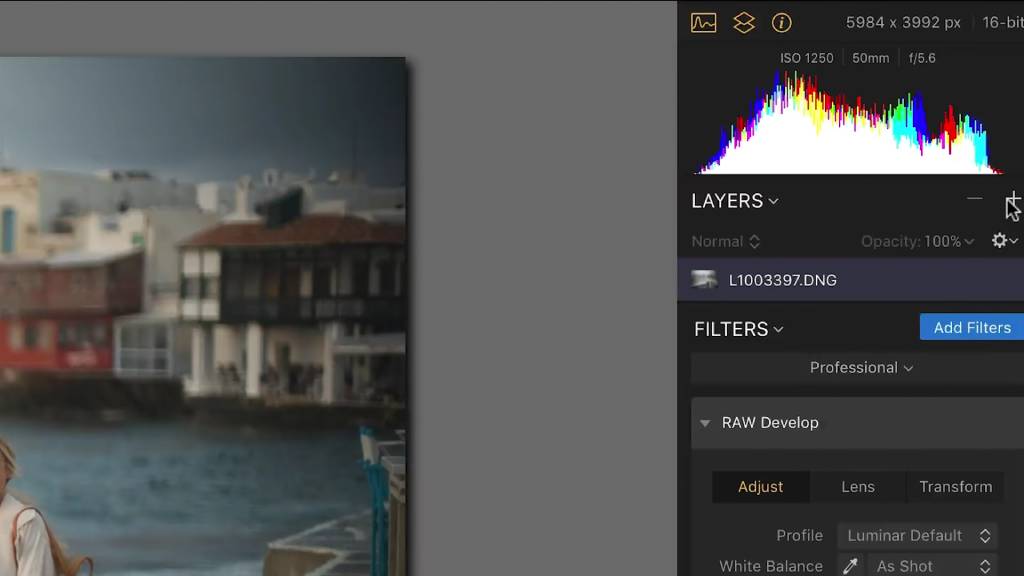 YouTube Screenshot/Sawyer Hartman
One of the biggest selling points of Luminar is that you can edit your images non-destructively.
That is, unlike other programs in which you have to make edits to the original image, in Luminar, you can add layers to add effects without working on the original photo.
By adding an adjustment layer, you can manipulate everything from the color to the contrast, eliminate parts of the photo you don't want, add filters, and so forth, yet the original image remains untouched.
As you can see in the screenshot above, adding a new layer is as simple as going to the Layers Panel and clicking the + sign. From there, you can edit away and add multiple layers without changing the original file.
Learn More:
Luminar Filters are Powered by AI
The Accent AI Filter in Luminar 3 offers you the power to make about a dozen different changes to your photos automatically.
Skylum, the company responsible for Luminar, has it's own AI Lab where they work on developing artificial intelligence, machine learning, and neural networks that are designed to make photo editing more productive while taking less time.
When using Luminar, it almost feels like you're in the future thanks to a couple of artificial intelligence-powered filters.
The Accent AI Filter - which can only be described as the world's most intelligent photo enhancer - improves the color, details, tone, and depth of an image in mere seconds using a single slider control.
That means that you can make about a dozen different enhancements to your image automatically without having to make each adjustment individually.
Not only does that put an incredibly powerful editing tool at your fingertips, but it also saves you a ton of time!
What's great about this is that you still have control over the effect by adjusting the slider from 0 to 100.
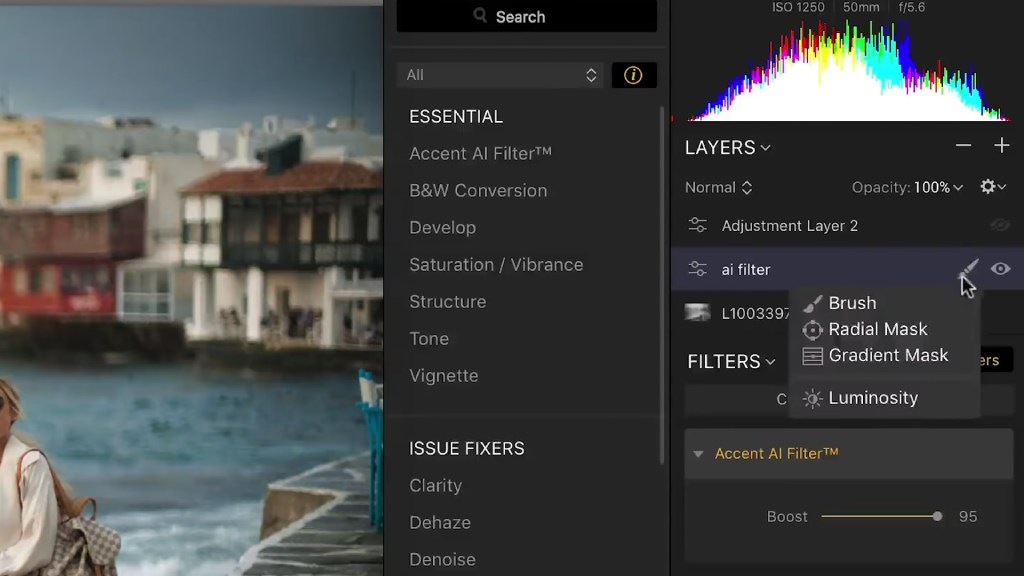 YouTube Screenshot/Sawyer Hartman
But, if you fancy having a bit more control over how the Accent AI Filter works, you can apply it using a brush, a gradient, or a radial mask.
As you can see in the screenshot above, accessing these more advanced tools is as simple as clicking on the brush icon on the Accent AI layer.
Again, it's simple to use and can totally change how your images look.
Quick Tip: Luminar also features an AI Sky Enhancer that analyzes your images for sky tones, automatically applies smart masks to contain those sky tones to the sky, and applies the changes for skies that have more drama and detail. Learn more about the AI Sky Enhancer in this article.
How to Process Images: Luminar Makes It Effortless for Anyone
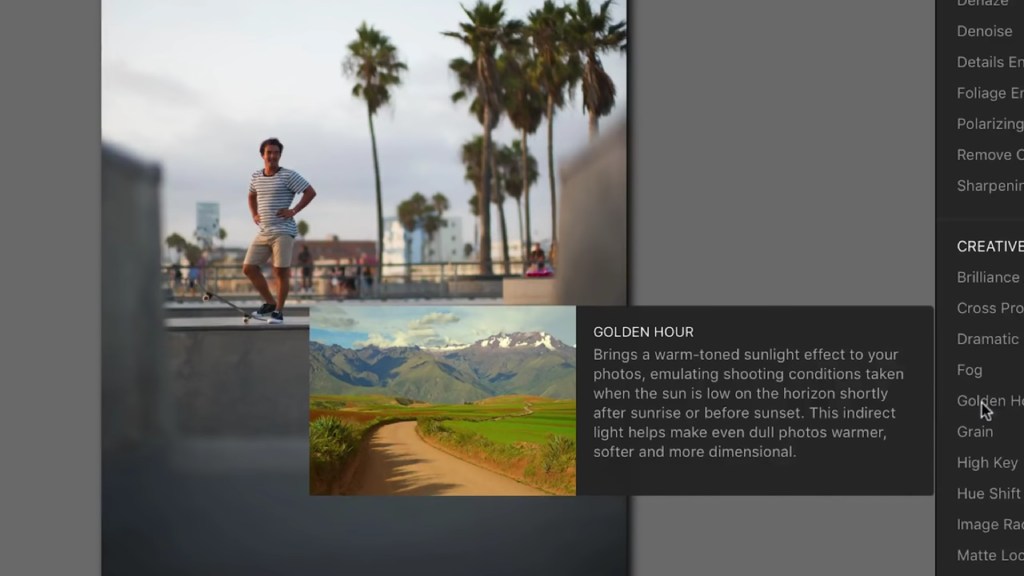 YouTube Screenshot/Sawyer Hartman
As Sawyer points out in his video, one of the nicest aspects of Luminar is that it makes editing such an easier process.
Not only are the editing tools in Luminar extremely powerful, but as explained above, many of them are controlled with just a single slider.
In addition to that, Luminar has labeled virtually everything so that you get a better understanding of what each tool does.
For example, in the screenshot above, you can see how Luminar's filters have little labels that explain what sort of impact they'll have on your image. It's like having your own post-processing guide built right in!
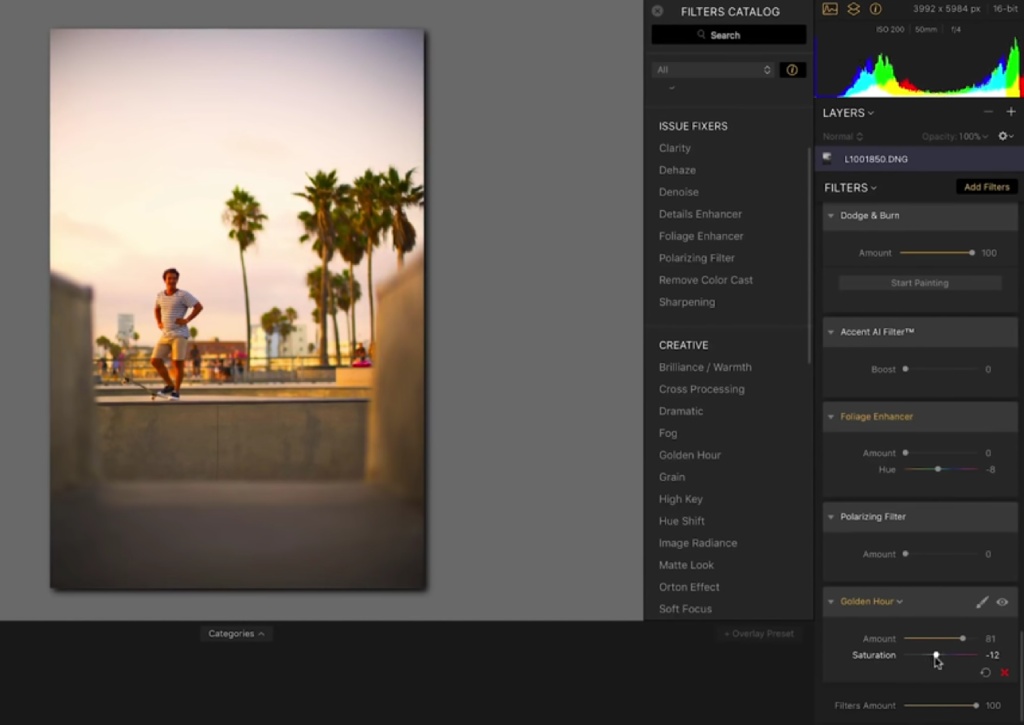 YouTube Screenshot/Sawyer Hartman
You can even search for filters by name if you know what you're looking for. It doesn't get much more effortless than that!
Learn More:
- EASY Workflow for AMAZING Landscape Photography
- Post-Processing Tip: How to Create REALISTIC Sun Rays in Your Photos
Final Thoughts: Is Luminar the Best Image Editor?
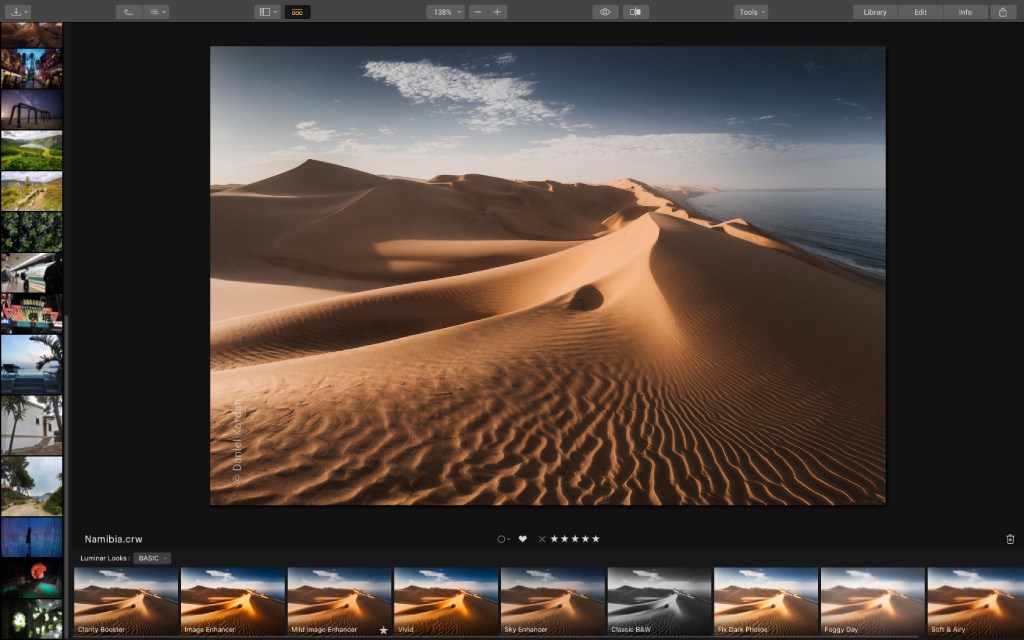 With the addition of Libraries, Luminar 3 is an even more powerful image editor.
As I said earlier, I've been testing Luminar for a while now, and to say that it is surprisingly powerful and straightforward to use is the understatement of the century.
It is an incredible editor, and it is certainly more than capable of giving other editors a run for their money.
If you aren't at least trying Luminar, you're missing out!
We Recommend
The Lightroom Killer is Gaining Momentum
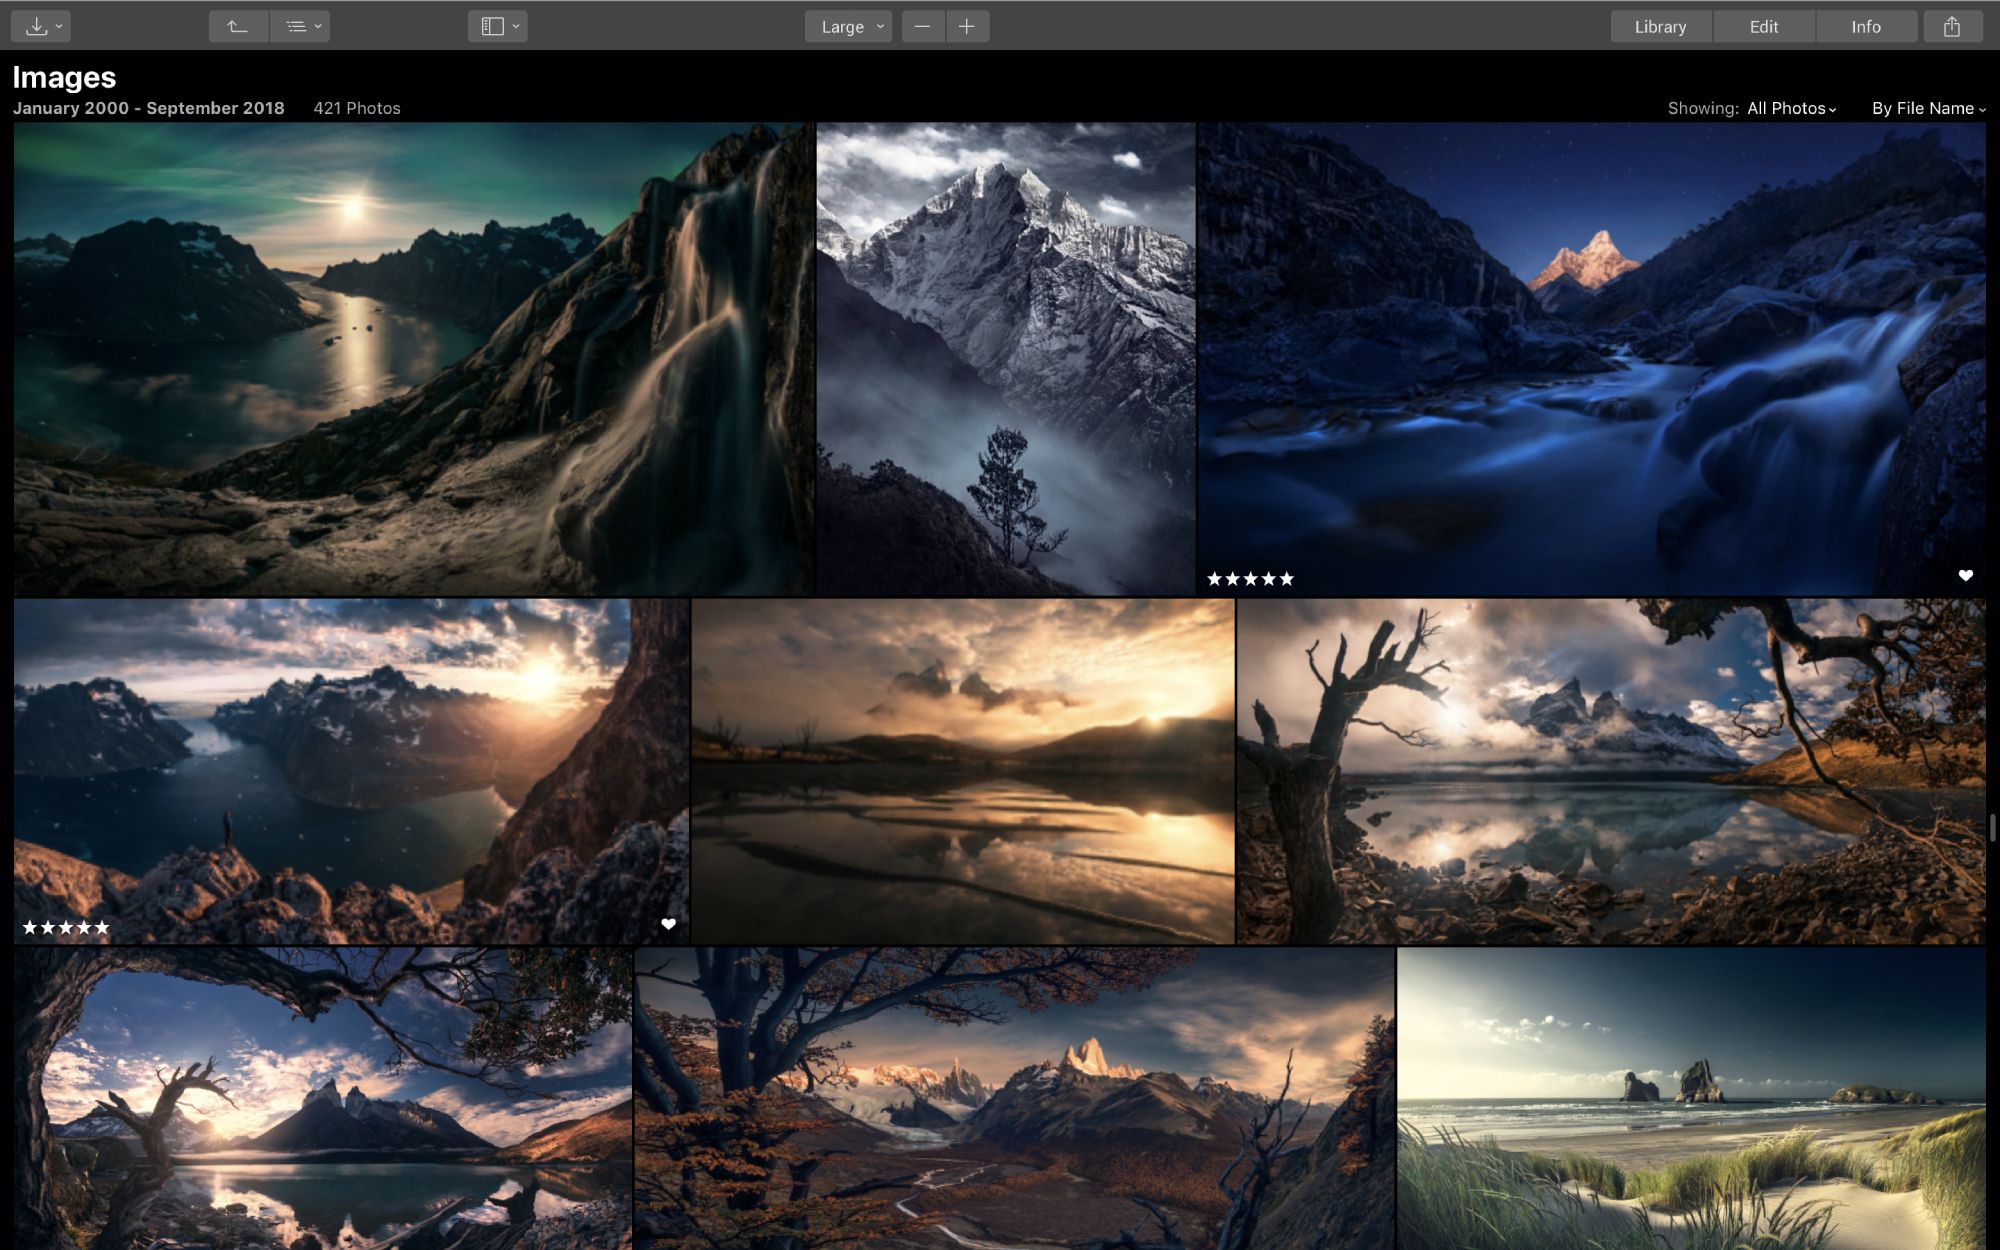
If ever there was a reason to leave Adobe (and their monthly fees) behind, Luminar 3 and its $59 pre-order price is it.
Now on pre-order, Luminar 3 adds a library function that makes it a better option for editing and organizing your photos than Lightroom.
Don't believe me? Just check out the long list of incredible features in the review of Luminar 3 below by Massimo's Fotografie.
Naturally, the big hype around Luminar 3 is in the new library function.
But as you'll find out in the video (and below), the library is just one of many awesome tools you can use in Luminar.
Let's do a quick overview of some of the best features you can expect in Luminar 3.
The Luminar 3 Library is a Game-Changer
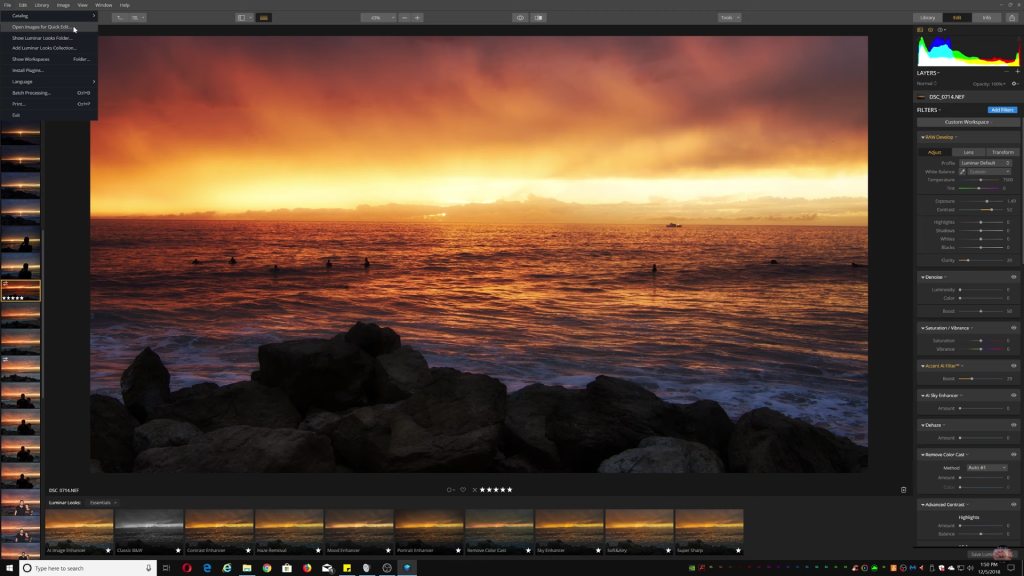 YouTube Screenshot/Massimo's Fotografie
Previous versions of Luminar got excellent reviews from users, but something was missing - a library.
But with Luminar 3, that all changes with the addition of a library feature that super-charges Luminar's capabilities.
As you can see in the screenshot above, you can access existing catalogs or create new ones via File > Catalog. If you want to open one or more images to edit rather than opening an entire folder, you can do so by clicking File > Open Images for QuickEdit.
Quick Tip: There is no need to re-import images into Luminar. Just select the folder of images you wish to work with, and it's automatically added to Luminar!
Speaking of opening images, Lightroom allows you to import massive numbers of images in relatively short order.
As Massimo demonstrates in the video, he was able to upload hundreds of RAW images in just seconds (all the while doing a 4K screencast for the video).
If you're sick of sluggish imports in Lightroom, you might find that the luminar experience is superior!
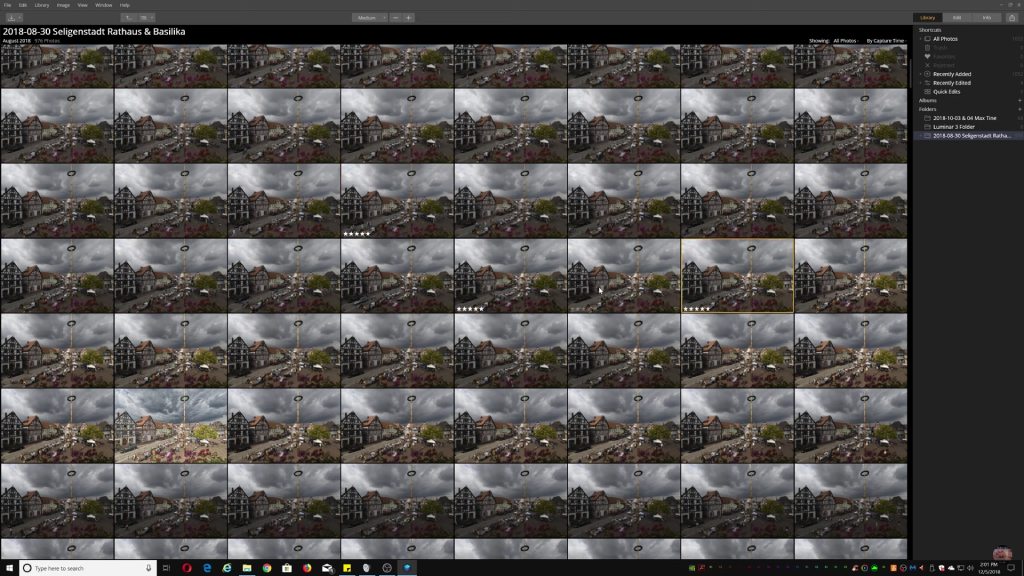 YouTube Screenshot/Massimo's Fotografie
Other features of the Luminar library will look familiar if you've used other programs that have a library function.
For example, you can rate individual images from 1-5 stars, and then sort the library based on the star ratings of images.
Something Luminar has that other programs don't is the Library Sync feature, which automatically updates your Luminar library when you add or remove images from its source folders on your computer.
Learn More:
Are Luminar's Looks Really That Good?
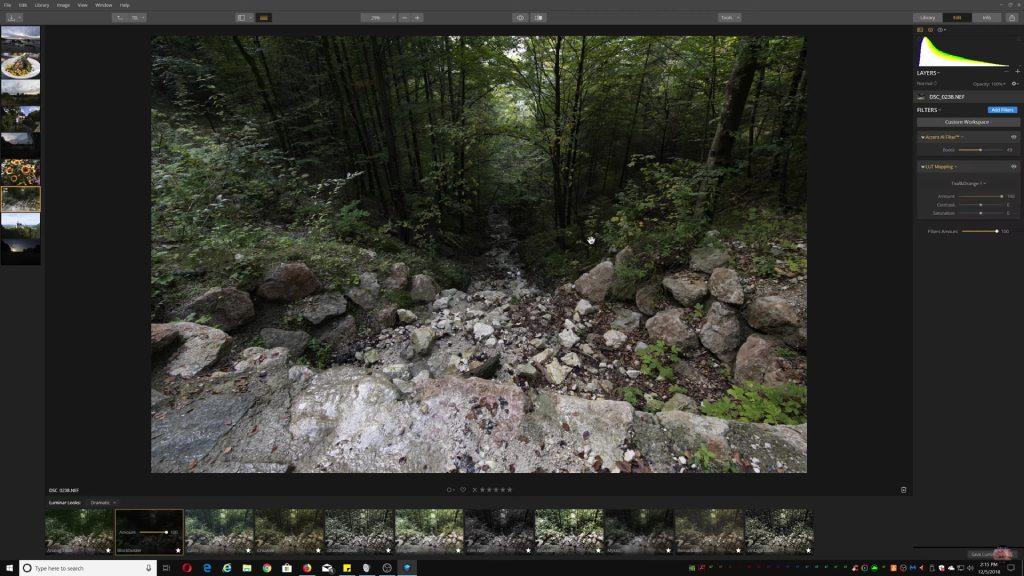 YouTube Screenshot/Massimo's Fotografie
One of the best features of Luminar has always been its powerful collection of presets that enable you to make quick, impactful edits to your images (in Luminar 3, those presets are now called "Looks").
Luminar 3 continues that tradition with looks for virtually any kind of photo.
As you can see when comparing the images above and below, using one look - in this case "Blockbuster" - the image takes on a completely different appearance.
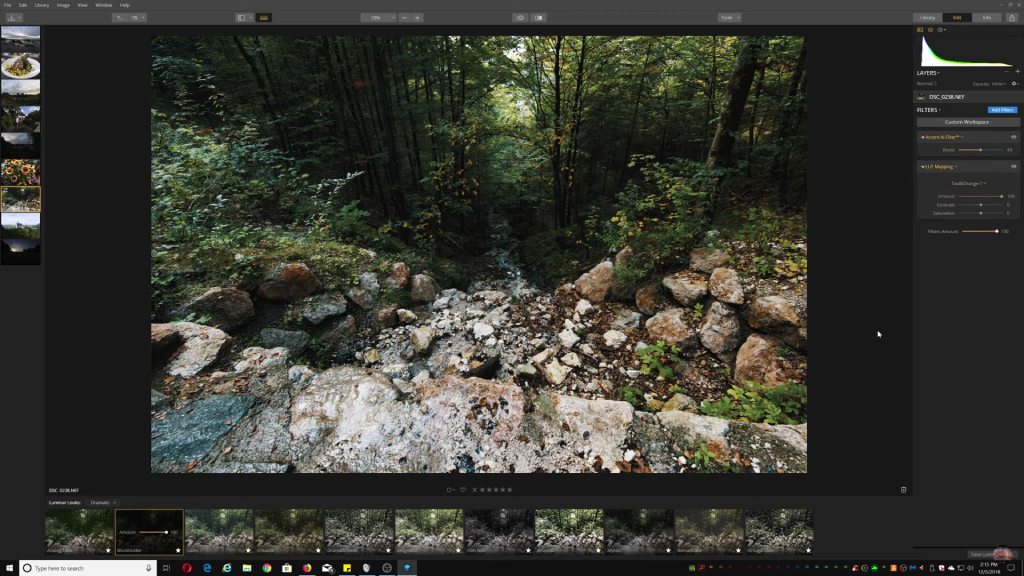 YouTube Screenshot/Massimo's Fotografie
Of course, you can make further edits to the image, even if you use a look.
That includes adding any number of filters to the image.
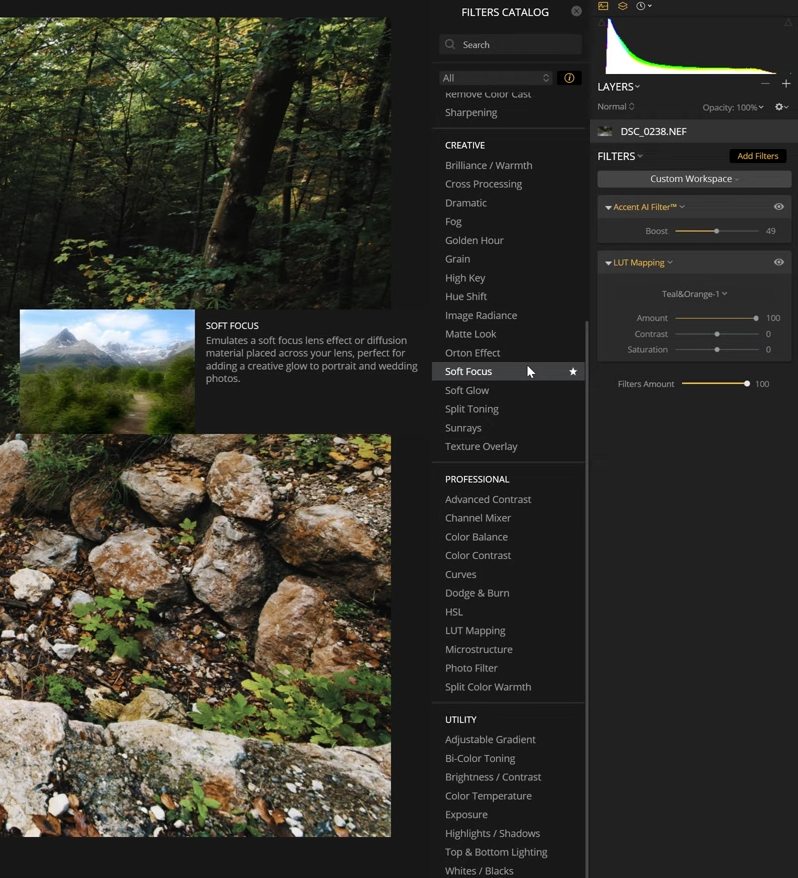 YouTube Screenshot/Massimo's Fotografie
But Luminar's filters aren't the same as what you find on the likes of Instagram or even Lightroom.
Instead, what you find is an extensive array of filters that you can use to tailor the look of your shot with fine precision.
Shown above is just a sampling of the filters that are available in Luminar 3's filter catalog. I especially like the functionality of Luminar explaining the effect each filter has on the image. The fact that you can search the filter catalog for the specific effect you want is a nice touch as well.
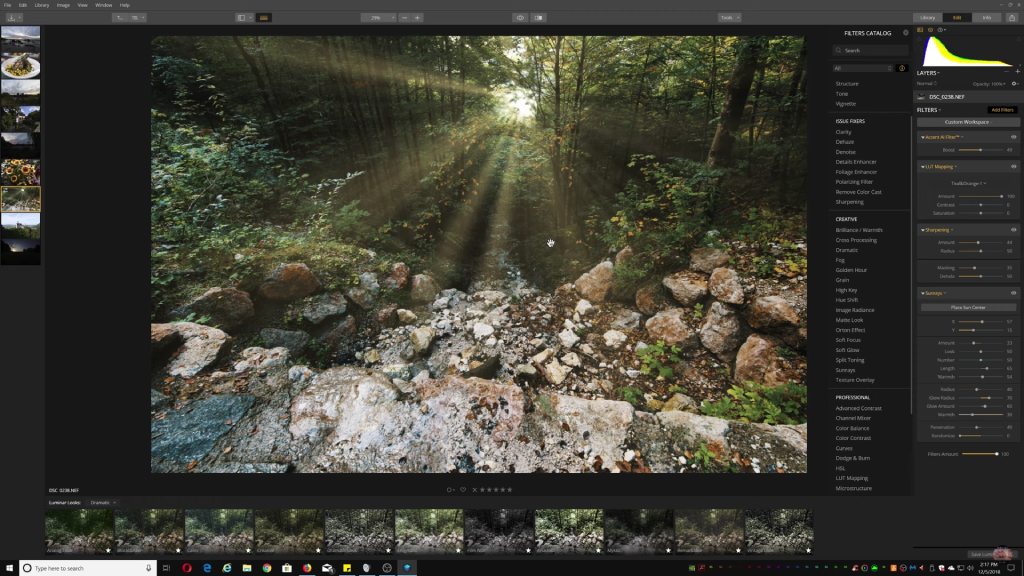 YouTube Screenshot/Massimo's Fotografie
The variety of filters is astounding, too.
For example, you can add realistic sun rays to any image, as Massimo has done in the screenshot above.
The great thing about this filter is that you can adjust everything from the number of the rays to the intensity of the rays to the color of the rays.
Even better, Luminar intelligently determines how the rays would interact with the scene in real life, so if you place them behind a tree, no rays will penetrate the tree. It's a super realistic look!
Luminar's Workspaces Help Streamline Its Functionality
 YouTube Screenshot/Massimo's Fotografie
I typically shoot landscapes. You might shoot more portraits. Maybe you're a jack-of-all-trades.
Whatever the case, as Massimo shows in the video, Luminar has workspaces for various types of photography so that you get the tools precise tools you need.
That includes workspaces for street photography, landscapes, black and white, portraiture, and aerial photography.
Better still, Luminar has created additional workspaces that include a streamlined (yet still amazingly powerful) Quick and Awesome Workspace, a Professional Workspace that's loaded for bear with tools, and an Essentials Workspace as well. You can even create a custom workspace that perfectly fits your editing workflow.
Learn More:
The Inclusion of Artificial Intelligence Takes Luminar to the Next Level
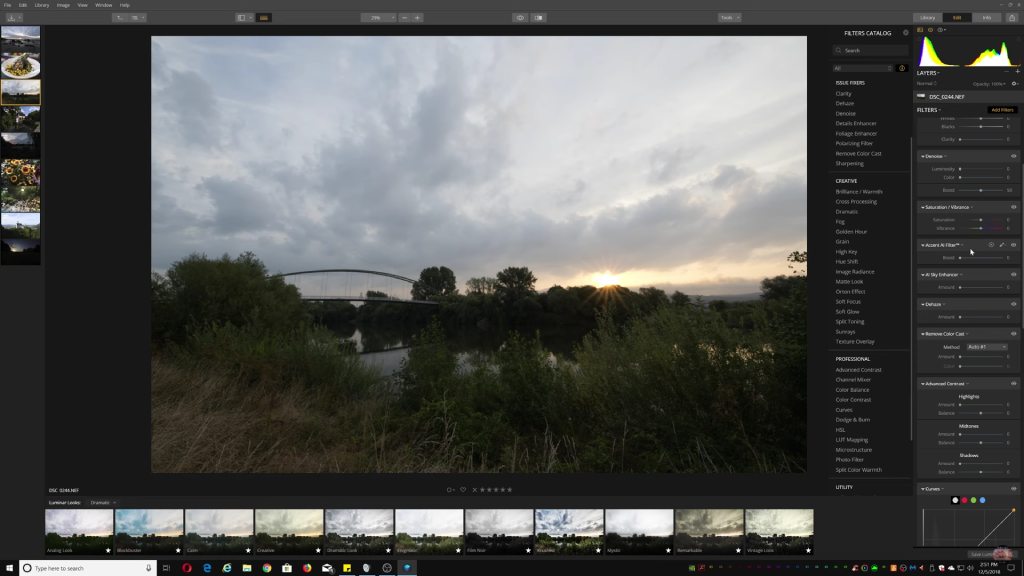 YouTube Screenshot/Massimo's Fotografie
Of course, all the functionalities explored above are great, but sometimes you just need to make a couple of tweaks to your image.
In that case, Luminar makes it easy with AI-powered features that literally allow you to edit an image in seconds by manipulating just a couple of sliders.
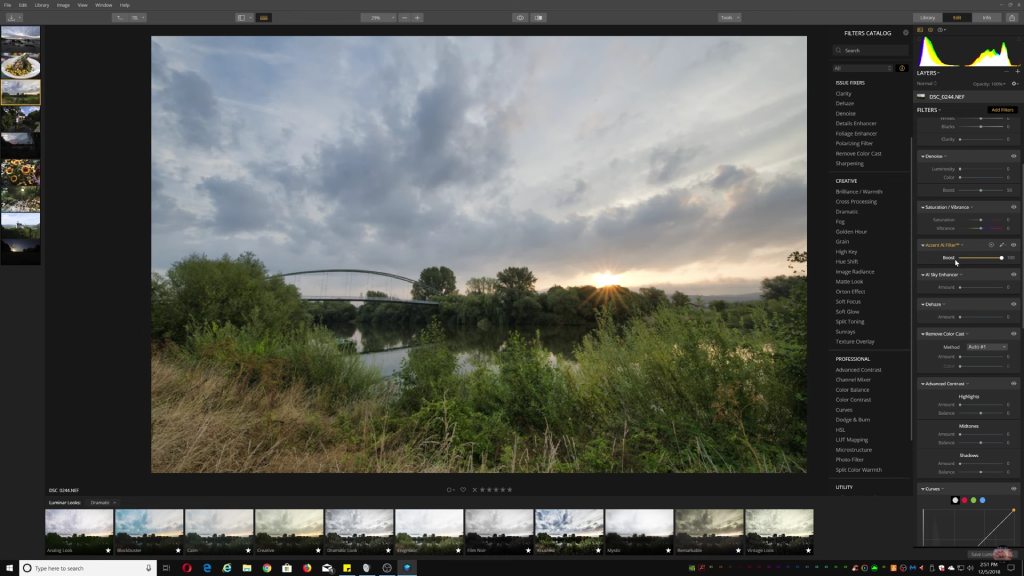 YouTube Screenshot/Massimo's Fotografie
The Accent AI Filter, for example, applies about a dozen effects to the image at once. As you can see in two screenshots above, the effect is quite dramatic from the before to the after shot.
This is really the coolest filter in Luminar because it's the smartest slider in the world.
With just one adjustment, you can improve the color, details, tone, and depth of a photo in seconds thanks to Accent AI's ability to analyze your photos and apply enhancements automatically.
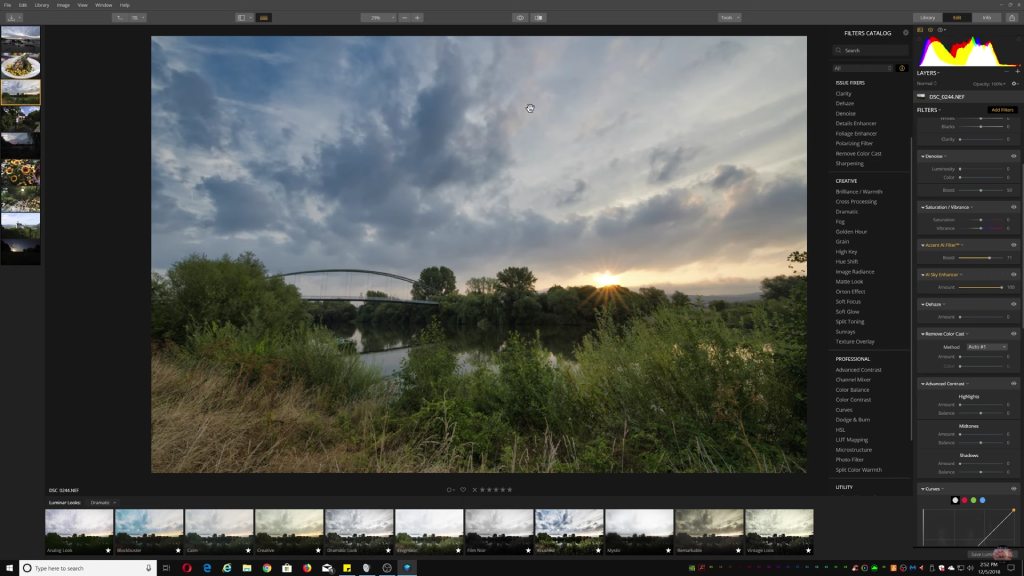 YouTube Screenshot/Massimo's Fotografie
Additionally, you can use the AI Sky Enhancer filter to give the sky more detail.
Again, by just dragging the Sky Enhancer slider, you can add dramatic effects to your photos, as shown above.
Not only does this speed up your workflow, but every change you make is still under control.
It works perfectly with any type of sky from partly sunny to stormy to blue skies and virtually any other sky scene imaginable. Better still, the Sky Enhancer is able to detect and make adjustments to only the sky, leaving other elements of the image untouched.
All of this happens without having to use masks or layers, so it's ideal for new photographers because it's so easy to use to enhance skies and ideal for pros as well who need to streamline their workflow.
Luminar 3 Review: This Will Change How You Edit & Organize Photos
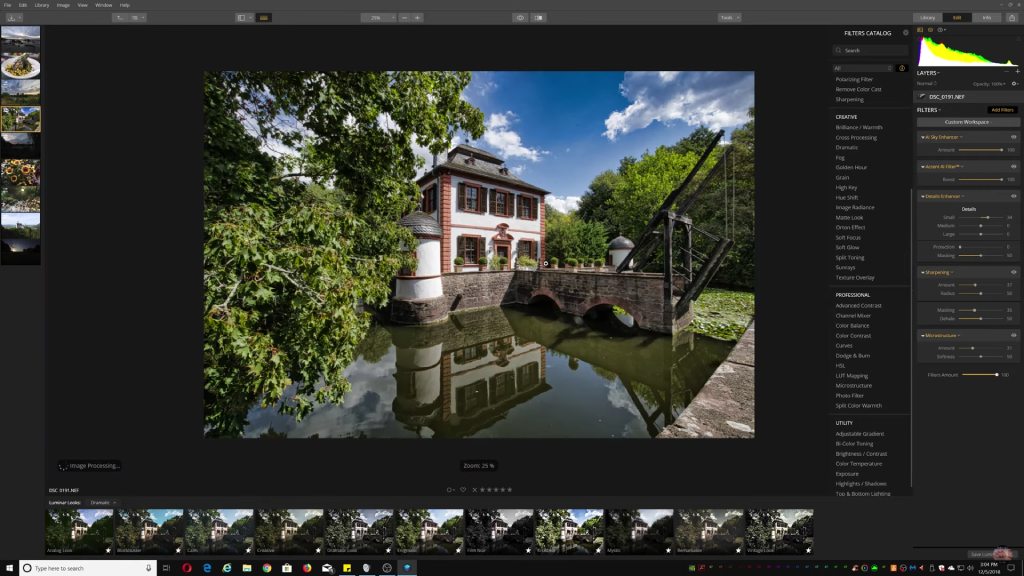 YouTube Screenshot/Massimo's Fotografie
Just based on the few features that I've outlined above, Luminar 3 is clearly a game-changer for photographers.
But this is just the tip of the iceberg...
Be sure to check out Massimo's complete video so you can get the full tour of Luminar 3 and see all it has to offer.
If you're ready to take your photos to the next level and take advantage of the all-new library feature (and all the other goodies Luminar offers), you can pre-order Luminar 3 here.
We Recommend
This AI-Powered Photo Editor Will Drastically Improve Your Real Estate Photography Workflow

Photo courtesy of Skylum
Photo editing software maker Skylum has introduced an AI-powered software package that will drastically improve your real estate photography workflow.
It’s called Luminar Neo, and if you do real estate photography as an agent or as a photographer, you will be amazed at how this fantastic software will benefit you.
Let’s dive in and explore this game-changing software!
Table of Contents:
- Why You Need to Simplify Your Real Estate Photography Workflow
- Non-Destructive Editing Improves Your Real Estate Photography Workflow
- AI Tools Ease Your Real Estate Photography Workflow
- How To Get Luminar Neo
- Other Recommended Photography Gear
Why You Need to Simplify Your Real Estate Photography Workflow
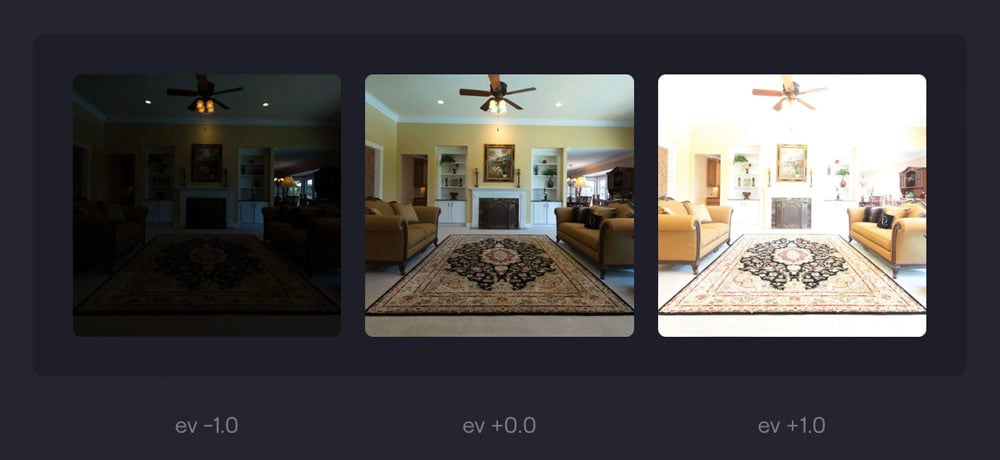
Photo courtesy of Skylum
Real estate photography needs to be as good as possible because of the big-ticket nature of the subject and also because it’s a very competitive field (both the real estate market itself and the field of real estate photography).
Your workflow will become clear when we see how many raw images are needed for the most common types of real estate images.
For example, bracket and merge HDR photography is a staple of real estate imaging for many photographers. With all of the advantages of that method, it really adds on a lot of workload because, while it doesn’t take much time to capture the image files, it can suck up time in the editing.

If you aren’t using bracket and merge HDR, you are likely still spending a fair amount of time editing the single exposures to end up with images with detail in the highlights and dark tones.
Good editing software like Luminar Neo minimizes the time you spend post-processing as part of your real estate photography workflow. Minimizing that is vital to providing the photos on time so they can be used in the listing as soon as possible.

Photo courtesy of Skylum
For example, the series of three images at the beginning of this section is quickly and seamlessly combined in Luminar Neo to create the image above - one that is beautifully lit with details in the shadows, midtones, and highlights.
This process takes seconds - not minutes as it used to in traditional digital editing. Like I said, Luminar Neo can drastically improve your real estate photography workflow!
Non-Destructive Editing Improves Your Real Estate Photography Workflow
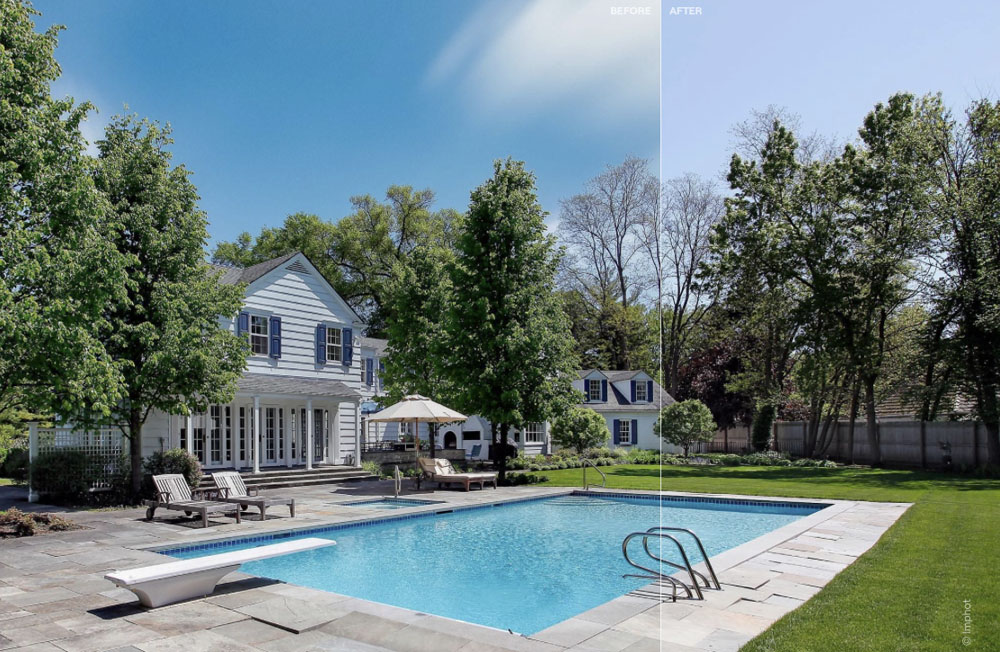
Photo courtesy of Skylum
Luminar Neo uses non-destructive photo editing for its post-processing features.
Non-destructive editing means that the original image file is not changed as you make your edits. Instead, the program takes note, as it were, of all of the changes you’re making and then applies them to the image only as it’s being saved as a specific type of file for exporting.
This speeds up your real estate photography workflow in several ways. You don’t have to save copies of the image you’re working on, which uses less computer space. Your workflow speeds up because you aren’t doing as many steps, and because the computer memory isn’t taken up, the computer can run faster.
Another way in which non-destructive editing speeds up your real estate photography workflow is that you aren’t waiting on your computer to refresh RAM to save this file or that file or search for the part of the file batch you’re adjusting. It’s a win-win!
AI Tools Ease Your Real Estate Photography Workflow
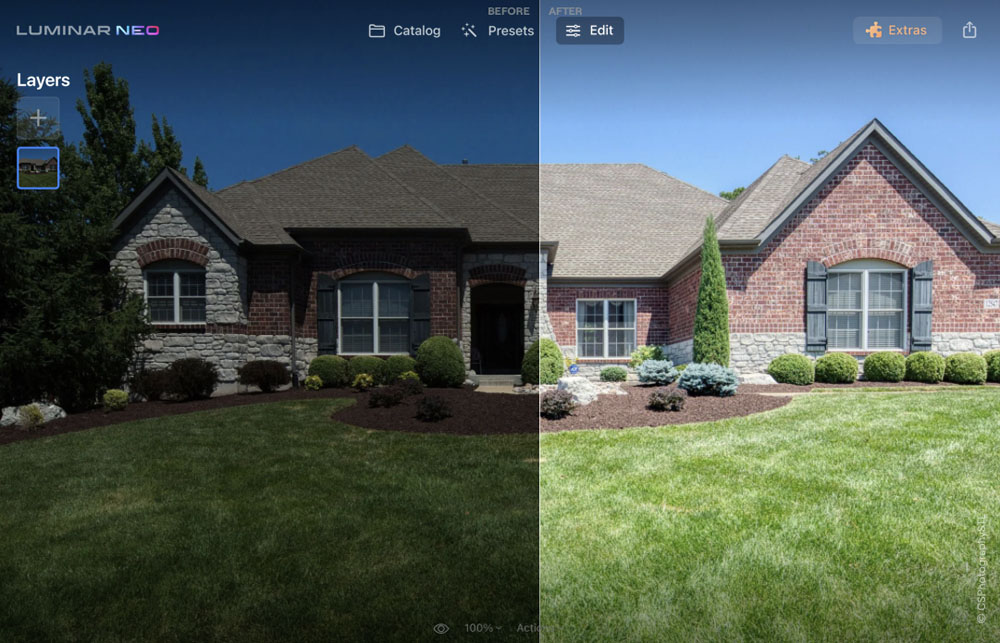
Photo courtesy of Skylum
The feature of Luminar Neo that really helps your real estate photography workflow is the AI power built into the program (the workspace, shown above, is clean, intuitive, and easy to use as well).
Have a look at this video from the Luminar Neo YouTube channel that helps explain the concept of AI-powered photo editing:
In real estate imaging, AI means that the standard and special processing tools work quicker and more intuitively. Luminar Neo has excellent real estate-optimized editing tools.
HDR Merge Extension is one of the AI-powered tools most useful for real estate photography. It uses the settings you enable but makes optimal changes and adjustments to create the best, most balanced image from the files you input.
If you’re not using bracket and merge HDR due to time constraints or shooting last-second images for listings, Luminar Neo will expand the dynamic range by bringing down highlights and opening up shadows for you.
It can also add sky detail to make your final images stand out - another top feature for real estate photography. If you’ve ever taken exterior photos of a property at the wrong time of day, you know that the sky can look drab and lifeless. See how Luminar can help you with that in the video above!
In other words, Luminar Neo's AI power means you aren’t constantly readjusting as you try to figure out what looks best. Instead, the program guides you with intuitive input, easy-to-use tools, and a wealth of adjustments to help you create the best possible images.
How To Get Luminar Neo
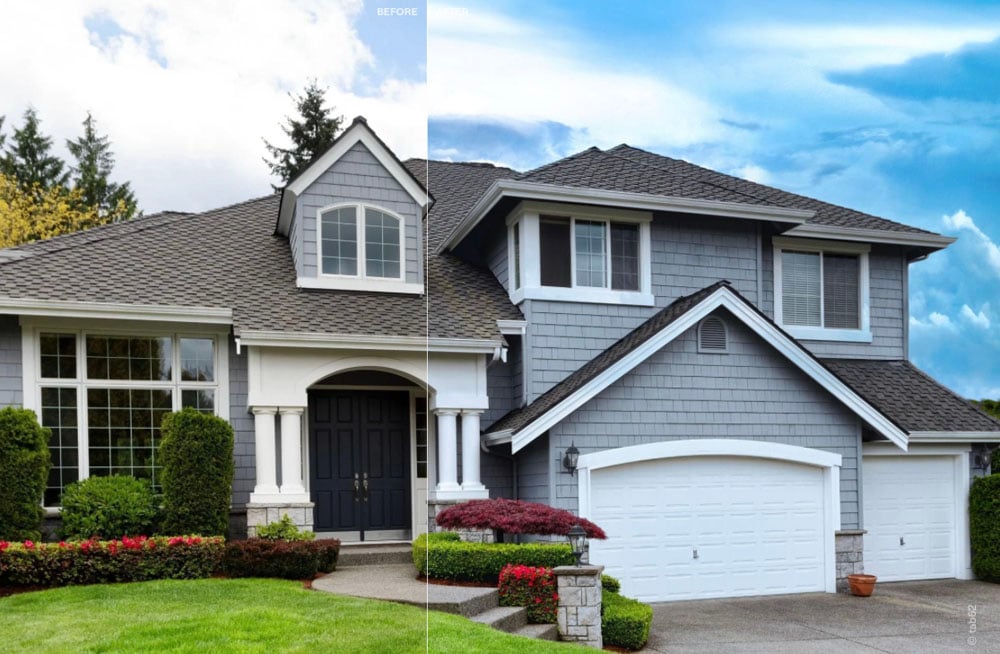
Photo courtesy of Skylum
There are three ways you can get Luminar Neo for yourself, either as a subscription or as a one-time purchase. All are exceptional values.
For example, you can subscribe on a monthly basis for $14.95 per month or opt for a yearly subscription for $179.00 annually. However, Skylum is currently offering a deal that gives you the 12-month subscription plus the Creative Assets Collection (a $300 value on its own) for just $79 per year.
The best deal, though, is the 24-month subscription. You get Luminar Neo for two years and the Creative Assets Collection for $119.00. These deals end December 4th, 2023, so don’t waste any time signing up!
AI-powered photo editing, combined with non-destructive editing and the intuitive controls of Luminar Neo, means that your real estate photography workflow will improve drastically. Try out all of the features and tools for improving your editing for other types of photography as well. It’s an all-in-one tool that I’m sure you’ll find is worth its weight in gold!
Other Recommended Photography Gear
A quick heads-up: If you snag something through our affiliate links or check out our sponsored content, we might earn a commission at no extra cost to you. But fear not, we're all about recommending stuff we're truly stoked about!
We Recommend
Use This One Landscape Photography Trick to Enhance Your Photos
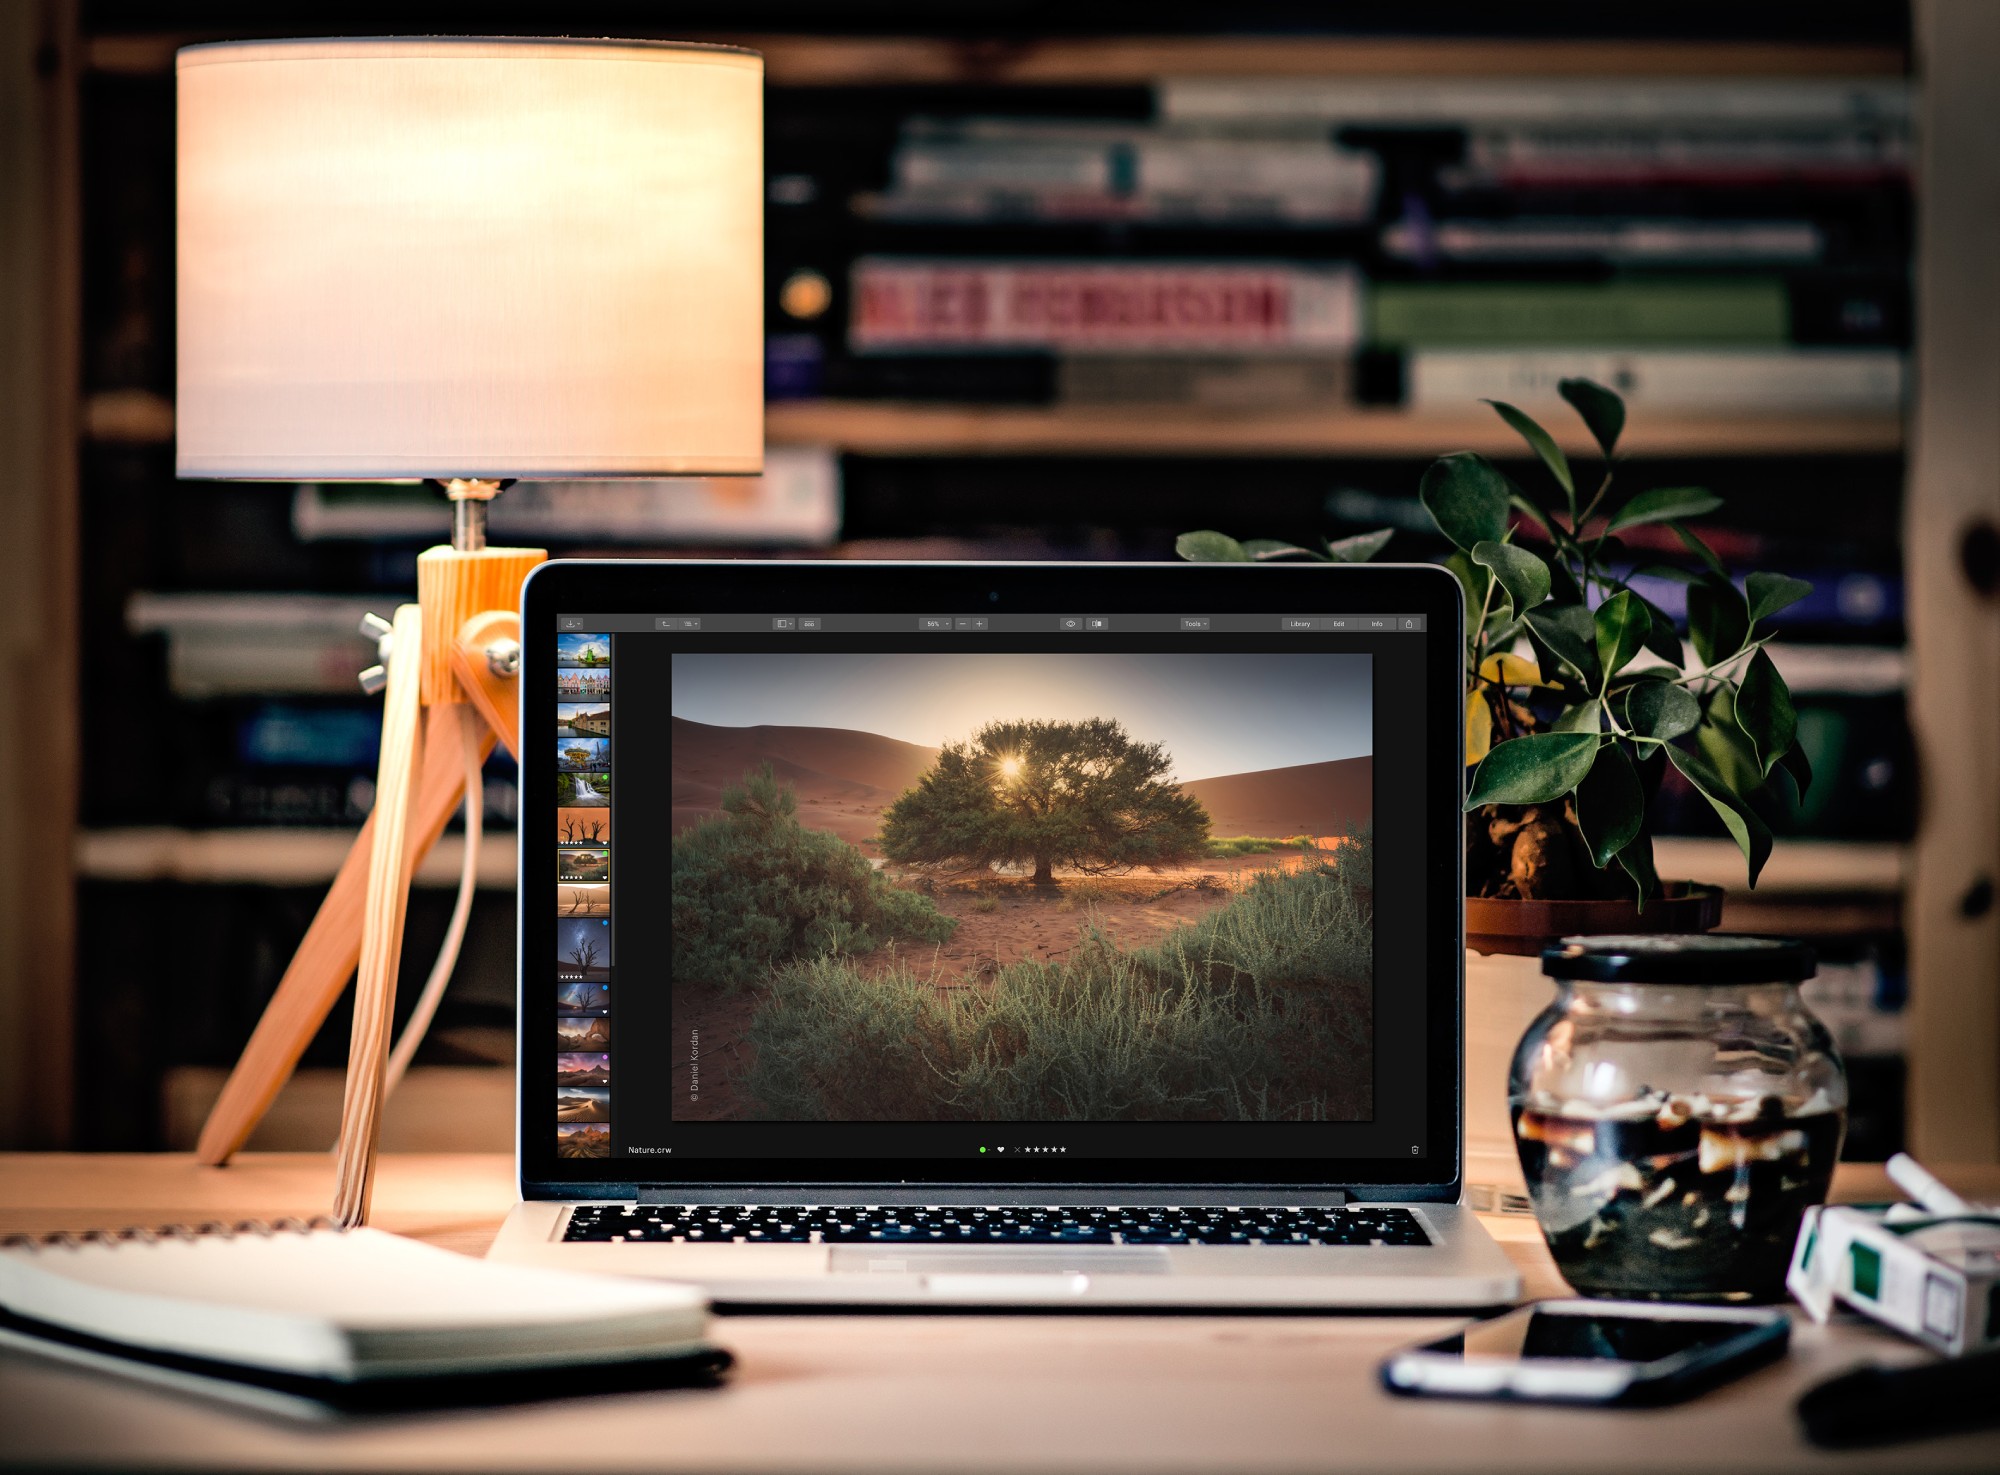
Back in the day, if you wanted to enhance your landscape photo by applying a different color to the background and foreground, you’d have to attach a bi-color filter to your lens.
These days, many different editing programs have a bi-color filter in their toolkit,Luminar 3 among them.
What’s so great about applying a bi-color filter is that you can use it to warm up the sky and cool down the landscape, which makes it ideal for sunset photos, especially those taken with a body of water in the foreground.
Of course, bi-color toning can be used in all sorts of different applications in landscapes, but seascape sunsets happen to be my favorite!
In the video above, Jim Nix walks us through the process of using Bi-Color Toning in Luminar 3.
I’ve used his instruction to develop a step-by-step process of using this filter, which you can find below.
Bi-Color Toning in a Nutshell
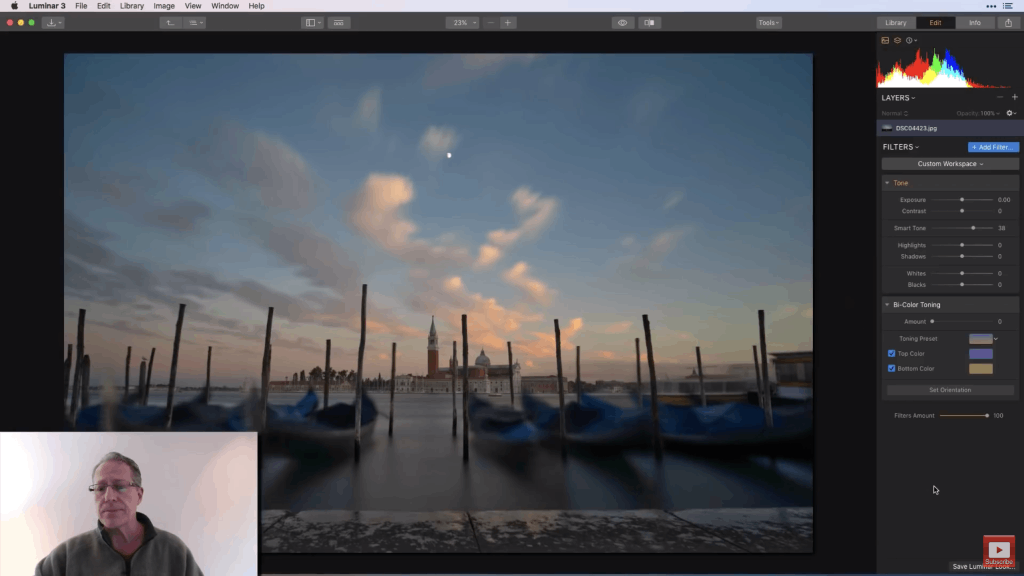
As noted above, Bi-Color Toning is all about enhancing different areas of a photo with two different colors.
To get started, open an image in Luminar 3.
Next, select the Bi-Color Toning filter from the Filter menu. As you can see below, the filter has a number of controls that allow you to fine-tune how the filter is applied.
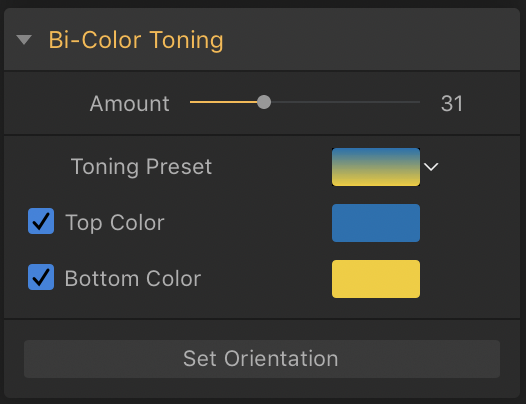
On the top is the Amount Slider, which controls the intensity of the filter. Below that is a Toning Preset, which gives you a variety of options to choose from regarding the tones that are applied, including brown, violet/pink, moss, green/brown, and cool/warm. You can also make a custom preset if you wish.
This filter also has independent controls for the top and bottom colors. This enables you to use a color picker to make precise color selections for the filter, as shown below.
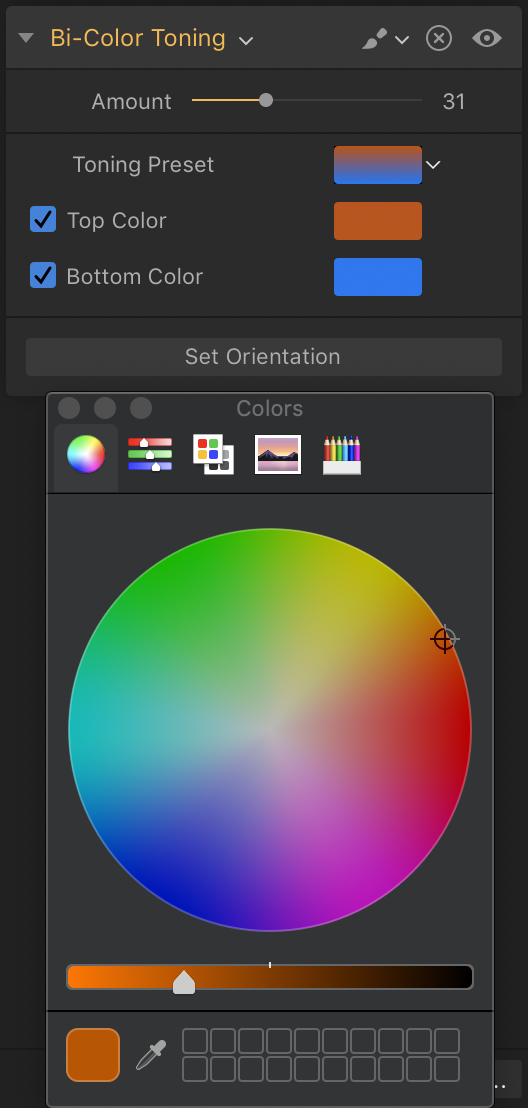
Lastly, the Bi-Color Toning Filter has a control to set the orientation of the filter.
In other words, you can determine where the transition between the top color and bottom color occurs.
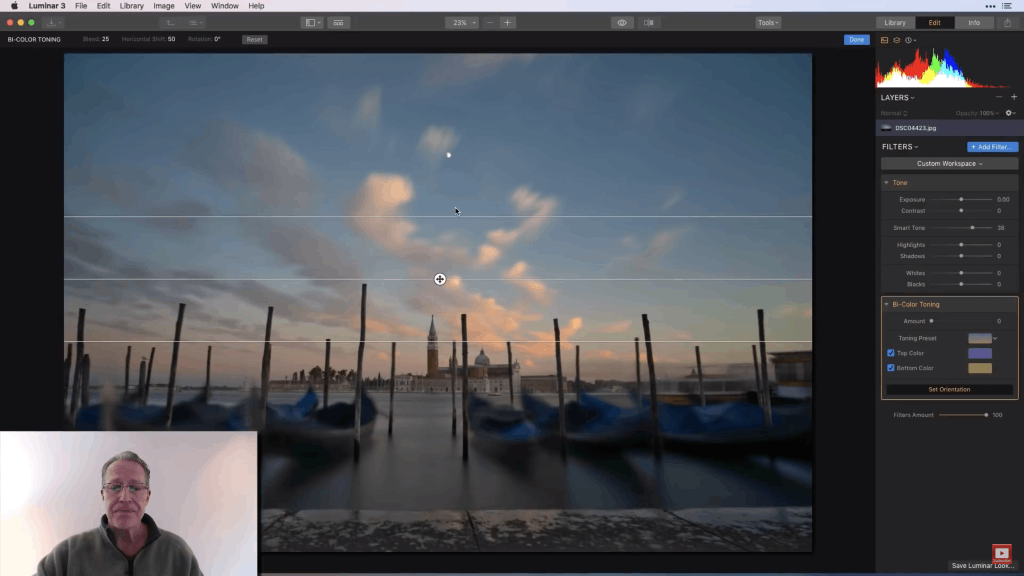
As you can see in the screenshot above, the Set Orientation tool is essentially a gradient -you can determine whether the filter is applied in horizontal or vertical fashion (or somewhere in between) as well as how gradually the filter transitions from one color to the other.
So, with the basics of Bi-Color Toning out of the way, let’s explore how to use it.
Learn More:
- Make Beautiful Edits to Your Images With This Basic Post-Processing Workflow
- How to Get Started in Luminar
How to Use Bi-Color Toning

As Jim explains in the video, sometimes the presets in the Bi-Color Toning Filter might not perfectly fit the scene you have in the photo.
As he suggests, it might be more useful to use the individual top and bottom color pickers to get the precise look you’re going for.
Jim shows us this workflow in action using the image above. As you can see on the right side of the screen, some editing has already been done in the Develop Workspace, but no Bi-Color Toning has been done yet.
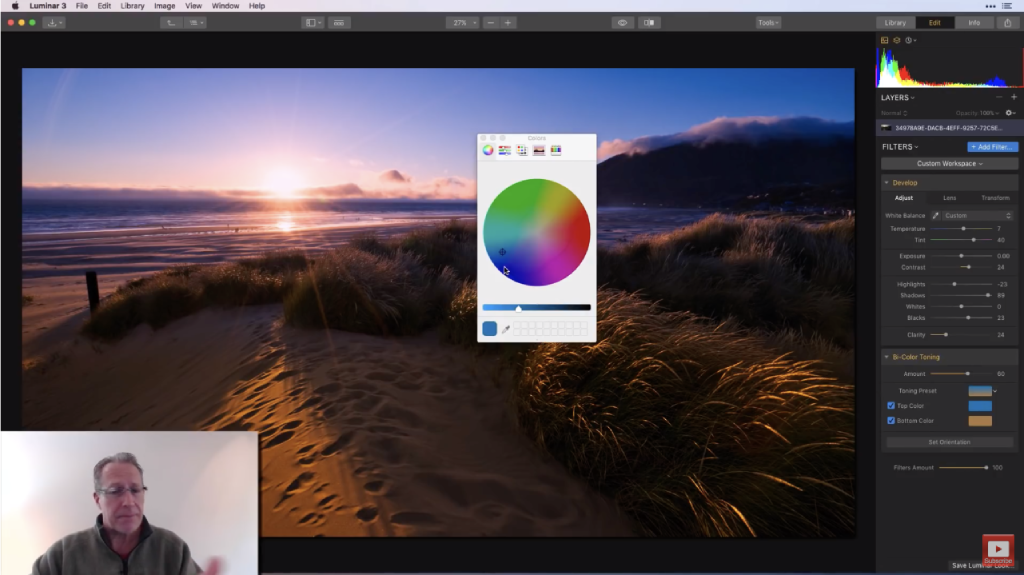
As you can see above, adding a Bi-Color Filter has a significant effect on the photo.
In this case, Jim placed the filter right at the horizon line so the top color impacts the sky and the bottom color impacts the landscape.
Using the color picker, Jim selected a deep blue color for the top to give the image more of a Blue Hour feel.
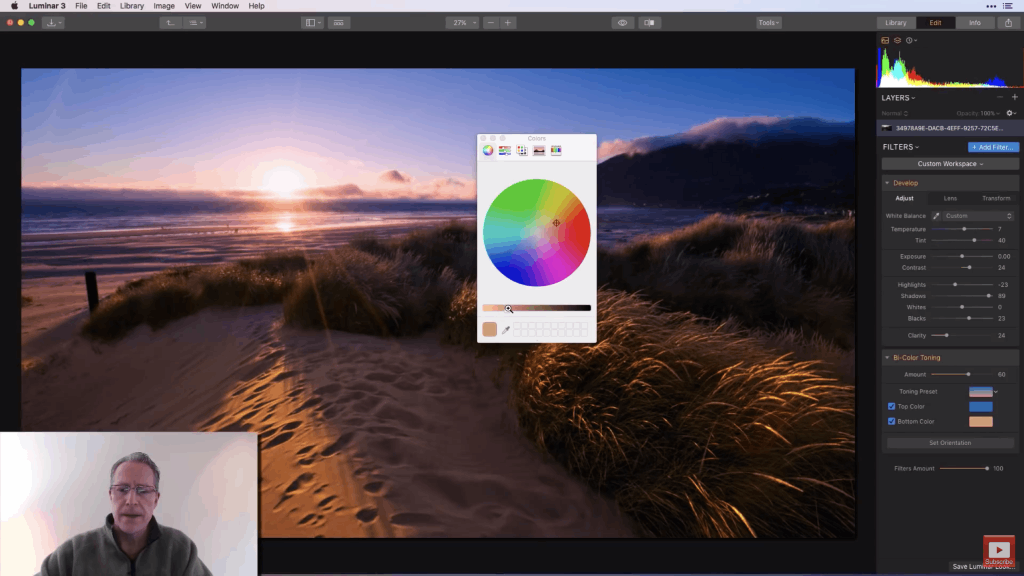
Next, he followed the same procedure for the bottom color of the filter, selecting an earthy brown color that works well with the sand on the beach and the golden tones of the setting sun.
As Jim shows us, it’s important to note that you can easily change the color that has been selected by simply dragging the bullseye around the color wheel. Doing so gives you an immediate preview in the image, that way you can select the perfect color combination.
Learn More:
How to Quickly Enhance Your Photos

photo by trumzz via iStock
As we’ve seen here, enhancing your photos is a straightforward process if you use the Luminar 3 Bi-Color Toning Filter.
Granted, this filter isn’t ideal for every type of photo, but it is certainly a valuable asset to have when editing seascapes, landscapes, and even cityscapes.
Now that you’re familiar with Bi-Color Toning and how to use it, it’s time to experiment! Grab a copy of Luminar, upload a few photos to the library, and see how much this one filter can improve your photos.
Learn More:
- Luminar Review - What You Need to Know About Luminar 3
- How to Take a Photo From Blah to Beautiful in a Matter of Minutes