
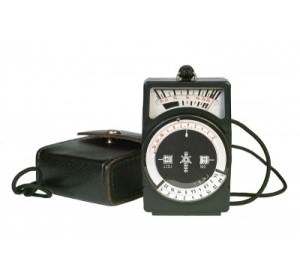
 If you’re ever seen a photo shoot where the photographer walks up to the model and holds a strange device close to their face, you probably wondered what it was. The answer is he was taking a measure with his light meter.
Many photographers who have developed in the digital era rarely consider them and, more likely, avoid them. The reason for that is probably the advanced metering technology that is being put into DSLRs nowadays. Indeed, built in light meters have come a long way , and they truly are great for most situations. But when things get tricky, not even the prettiest, most high end digital camera can be compared to a hand held light meter.
How does it work?
A camera meter works by processing the scene it measures, to ensure the subject comes out as an average. That means that the camera calculates a single brightness value which it then uses to determine shutter speed and aperture opening. That single brightness value is the equivalent of a mid tone grey, which is absolutely fine when the subject has various tones. It’s gets a lot more difficult if the scene is all white, like a snowy landscape, or all black, like a groom’s black suit. In cases like this , the camera will try to compensate the black or white by trying to make it grey. The same thing will happen if you use a hand held meter.
Incident and reflected reading
There are two ways of reading light. Reflected reading takes place when you measure the light that is reflected of the subject. This is the way cameras work.
The other option, is called incident reading, and it works by turning the meter away from the subject and measuring the light that falls onto it, thus avoiding calculation errors that may occur when the subject is too bright or too dark. All basic meters have this type of measuring, but the more advanced models can measure with an accuracy of up to 1/10th of a stop. Some of them can measure flash as well and have a spot metering mode that narrows the measuring angle to anywhere between one and five degrees.
After you set the ISO to match the value on your camera, you hold the meter with its sensor pointed at the camera ,close to your subject’s face, but make sure it is positioned in the same light that is falling on the subject , and not in a shade. If you’re shooting from a longer distance and can’t get a reading near the subject, try and look for an even light, as it will read the same regardless of distance.
When using filters
Mounting a filter on your lens, like a polarizer or Neutral Density filter will make your camera read the light differently. Compensation will be required. To get a proper reading with a hand held meter, take the value indicated and compare it to the exposure details from the filter manufacturer. Most of them issue the number of stops indicated for compensation. A polarizer might take down the exposure with two stops, so if the meter reads f4 at 1/200, make and adjustment to f2.8 and 1/90 .
External light meters, when properly use can make your photos significantly better. It takes a while to get used to them, but afterwards, you’ll be making sure they don’t stay in the bag on any shoot.
Recommended Reading:
- 2013 Photographer's Market: The Most Trusted Guide to Selling Your Photography
- Best Business Practices for Photographers
- The Fast Track Photographer Business Plan: Build a Successful Photography Venture from the Ground Up
- Group Portrait Photography Handbook
- The Best of Family Portrait Photography: Professional Techniques and Images
- 500 Poses for Photographing Group Portraits
- 75 Portraits: Lighting and Posing Techniques for Portrait Photographers
- The Portrait Photographer's Guide to Posing
- Portrait Photographer's Handbook
- 500 Poses for Photographing Women
- 500 Poses for Photographing Men
- Posing for Portrait Photography: A Head-to-Toe Guide for Digital Photographers
- Doug Box's Guide to Posing for Portrait Photographers