
What Do These Buttons Do?
- 2013 Photographer's Market: The Most Trusted Guide to Selling Your Photography
- How to Create Stunning D igital Photography
- Best Business Practices for Photographers
- The Fast Track Photographer Business Plan: Build a Successful Photography Venture from the Ground Up
- Group Portrait Photography Handbook
- 500 Poses for Photographing Women
- The Best of Family Portrait Photography: Professional Techniques and Images
- 500 Poses for Photographing Group Portraits
- Selling Your Photography: Ho w to Make Money in New and Traditional Markets
- Starting Your Career as a Freelance Photograp her
- Photographer's Survival Manual: A Legal Guide for Artists in the Digital Age
- Legal Handbook for Photographers: The Rights and Liab ilities of Making Images
- Taking Stock: Make money in microstock creating photos that sell
- Going Pro: How to Make the Leap from Aspiring to Professional Photographer
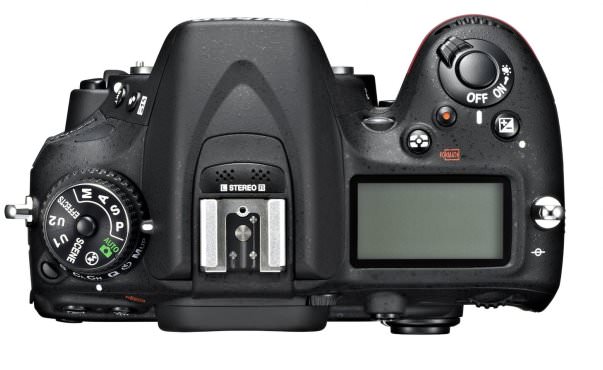 Are you familiar with all of the buttons on your camera? Sure you know the shutter button, and that the trash can means delete, but what about the exposure compensation button? Or the bracketing button? If you don't know the functions of every button on your camera, check out this list:
This is the metering button. It allows you to quickly access and change your metering mode between matrix, center-weighted, and spot. Keep in mind though, that if you want to change the area size in spot metering that you'll have to dig through a few menus.
Of all the buttons, this is perhaps one of the most commonly used ones, second only to the shutter button. This allows you to adjust the exposure compensation. It's super handy for fine-tuning your camera when it's in any kind of auto exposure mode. So say you're in aperture priority, but your scene looks a big overexposed. Without switching to manual, you can change the exposure compensation to lighten or darken the image by as little as one-third of a stop.
Fn
This is the customizable button. It allows you to set its function to whatever suits you best.
Info
This button simply shows you all of your basic settings on one screen: your ISO, aperture, shutter speed, exp. comp., metering mode, etc. etc. From this display you can select and change whatever settings you like.
WB
White balance of course! A button that you should be using frequently as the color temperature of lights changes drastically from place to place.
?/![]()
This is the help/lock button. In the menus, this button will give you extra information on what a certain settings does, while in playback mode this button will lock the current photo so that you don't accidentally erase it later.
ISO
This lets you change the ISO setting on your camera. Another button that is used quite often when you shift from bright to a dark settings or vice versa.
Qual
This changes the quality of your images and also the size. With the scroll wheels you can change between basic, normal, and fine, and small, medium, large, and RAW.
AE-L/AF-L
This stand for auto exposure lock and auto focus lock. It's function can be changed between these two in the menus.
Lv
This stand for live view. All cameras may not have this button, but if you do, it means that you can view your scene live through the LCD screen rather than the viewfinder.
BKT
This is the bracketing button which lets you adjust the number of photos and degree of difference in the exposure between each photos when doing a bracketing shot.
The flash button. Turns your built-in flash on or off and often lets you adjust the flash compensation too.
Also Read: 41 REASONS WHY YOU SHOULDN’T DATE A PHOTOGRAPHER
Recommended Reading:
Written by Spencer Seastrom