Photographers all know that the most magical time of day to shoot anything outdoors is either dawn or dusk. The sun sits low in the sky, which makes for warm tones, lower contrast and colorful skies and backgrounds.
When it comes to outdoor portraiture, however, sometimes sunlight or dusk light is not enough. Sometimes, you need a little supplementary light to help enhance or create the look you're going for.
This lesson features some new portable Photoflex equipment, including the StarFire shoe mount flash, the FlashFire wireless triggers and the LiteReach LiteStand, and demonstrates some simple-yet-powerful methods in achieving stunning outdoor portraits.
(Click on any image below for an enlarged view.)
Topics Covered:
The Gear
The Concept and Setup
The Second Box
Countdown to Magic Hour
After the Sun Goes Down
Comparisons
Equipment Used:
LiteDome®: medium (24x32 inch)
The Location Kit
The Gear
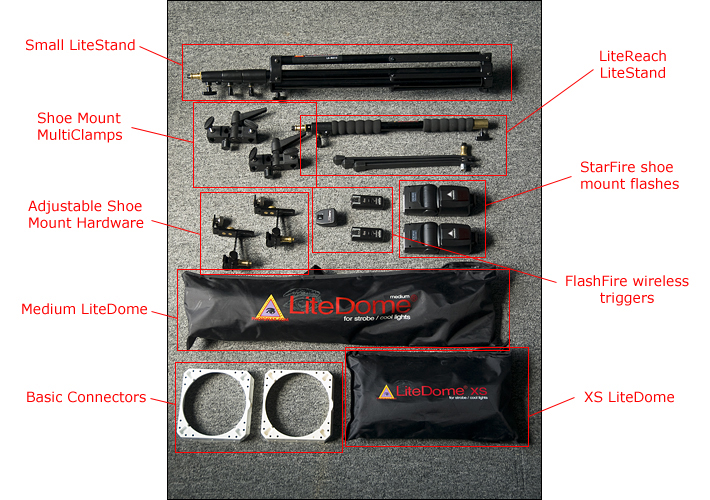
For this dusk portrait lesson, I wanted to try out the new Photoflex Wedding/Assistant Powered XS LiteDome Kit, which consists of the following equipment:
XS LiteDome
Basic Connector
Adjustable Shoe Mount Hardware
Shoe Mount MultiClamp
StarFire ShoeMount flash
FlashFire wireless transmitter and receiver
LiteReach LiteStand
Small LiteStand
Gig Bag
In addition to this gear, I decided to bring along a Medium LiteDome and supporting hardware (StarFire shoe mount flash, FlashFire wireless receiver, Basic Connector, Adjustable Shoe Mount Hardware, Shoe Mount MultiClamp) in case I wanted to use a second light.
Everything, including the additional gear, fit nicely into the Gig bag with room to spare. Here is the equipment laid out on my studio office floor, sans Gig Bag. [figure 1]
Figure 1
The Concept and Setup
The basic idea for this lesson was to demonstrate how straightforward it can be to light and photograph an action portrait at dusk for spectacular results. After mulling it over a bit, I decided to use a surfcasting fisherman at a local west-facing beach.
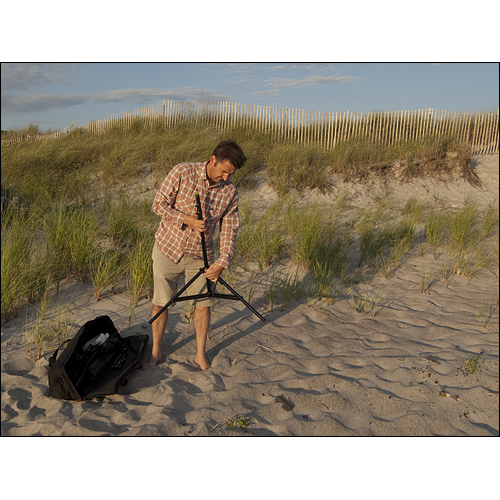
The three of us, Paul (surfcaster), Aaron (assistant) and I, met at the beach about an hour and a half before sunset so that we could plan out and document our shoot. After deciding on the general shooting area, I asked Aaron to take some shots of me setting up the lighting gear.
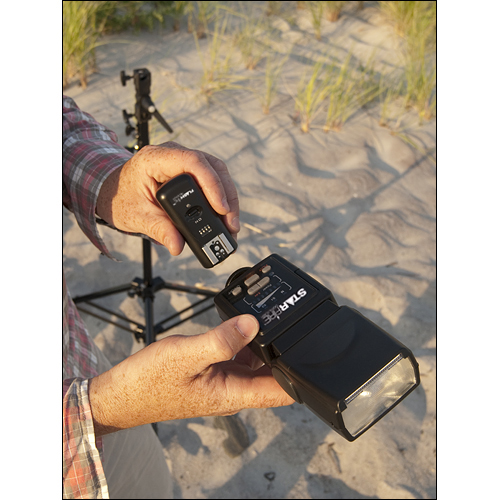
I wanted to keep the gear out of the sand for the most part, and thus kept it either in the Gig Bag or attached to a stand. First, I set up the Small LiteStand and attached a ShoeMount MultiClamp to it. [figures 2 & 3]
Figure 2
Figure 3
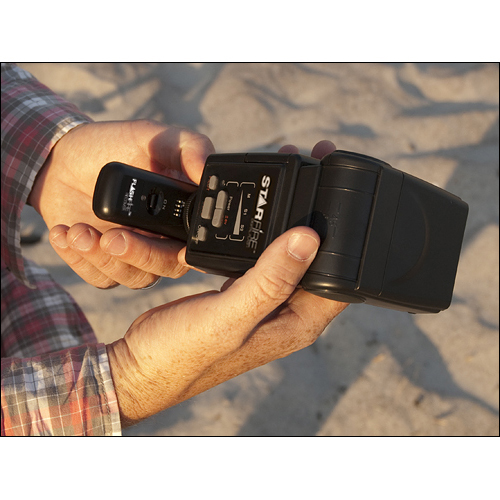
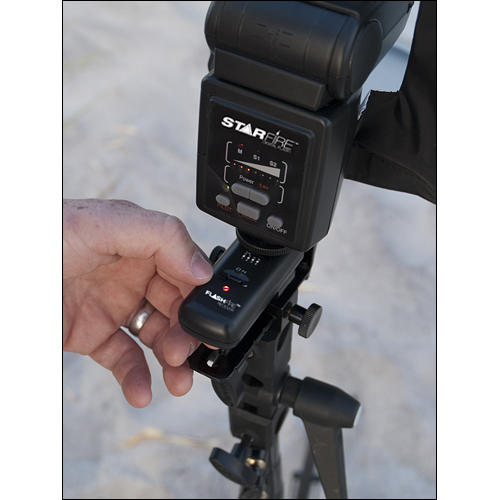
Next, I mounted the StarFire shoe mount flash to a FlashFire wireless receiver. As you can see, the FlashFire has a hot shoe mount to accommodate the flash. [figures 4 & 5]
Figure 4
Figure 5
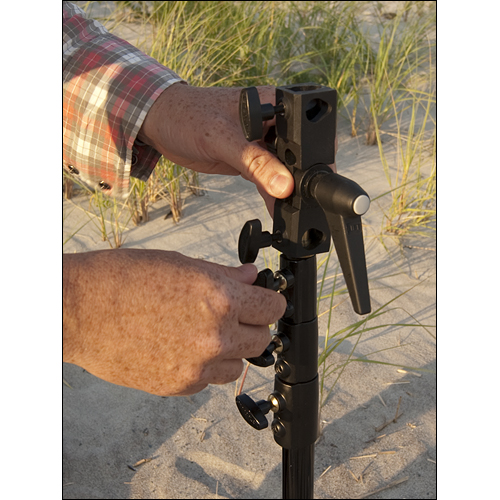
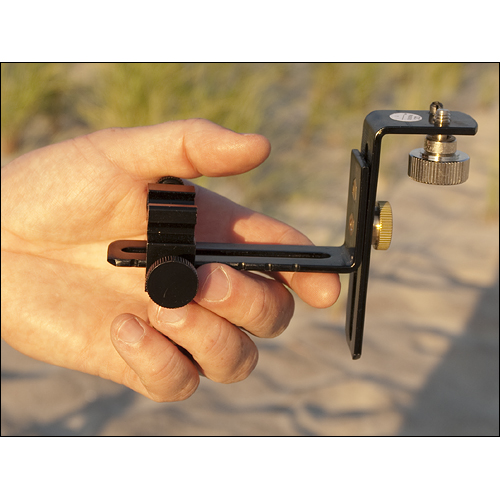
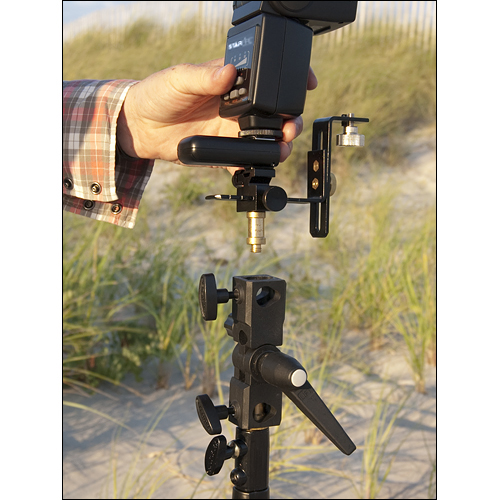
The next step was to be able to mount the flash to the LiteStand and for that I needed the Adjustable ShoeMount Hardware, which also has fittings to support a small soft box. Note that there's a cold shoe that can be positioned laterally along the horizontal plate for custom placement. This cold shoe is where you mount your shoe mount flash, or in this case, your shoe mount flash + wireless receiver. Note that this hardware comes with two easily removable cold shoes in case your wireless receiver does not have a hot shoe mount like the FlashFire. [figure 6]
Here, you can see the StarFire flash and FlashFire receiver mounted to the cold shoe of the Adjustable ShoeMount Hardware. [figure 7]
Figure 6
Figure 7
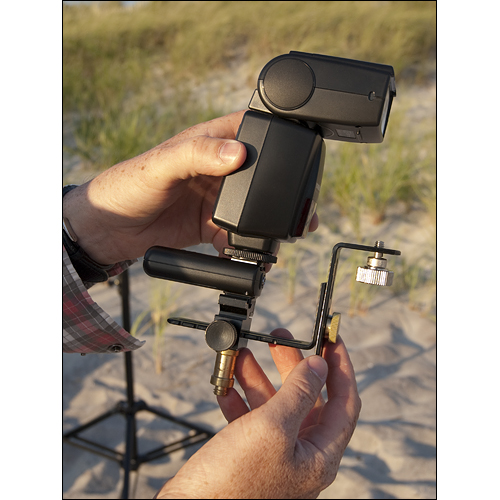
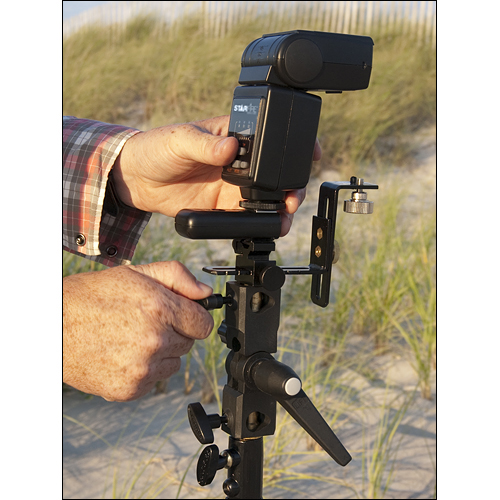
Next, I simply mounted the Adjustable Shoe Mount Hardware to the Shoe Mount MultiClamp. [figures 8 & 9]
Figure 8
Figure 9
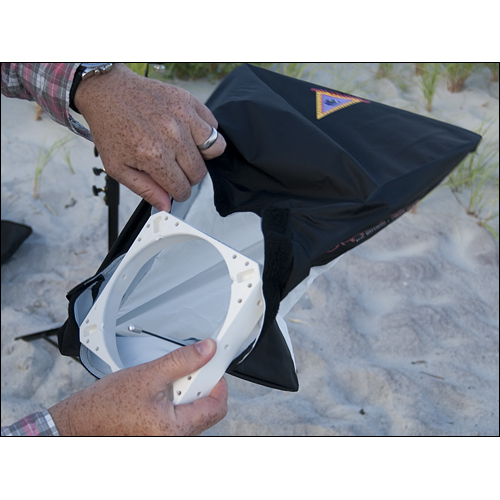
At this point, I was ready for the Extra Small LiteDome SoftBox. I grabbed the Basic Connector (mindful of which side the threaded receiver was on so that I could orient the LiteDome vertically) and inserted the rods of the Extra Small LiteDome into each of the four holes of the Connector. [figure 10]
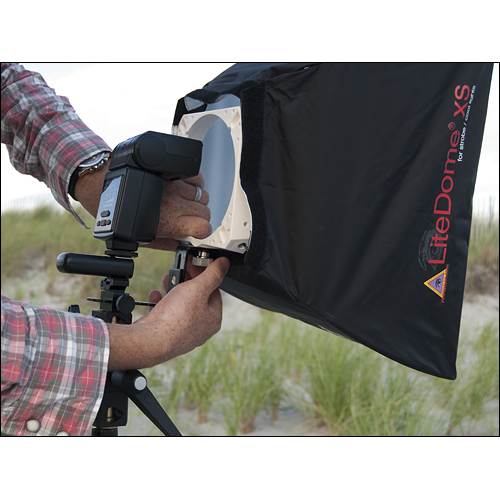
Once the Extra Small LiteDome was set up, I mounted the bottom side of the Connector to the ShoeMount Adjustable Hardware and adjusted the Hardware so that the Flash was optimally positioned to project light through the Connector and into the LiteDome. [figure 11]
Figure 10
Figure 11
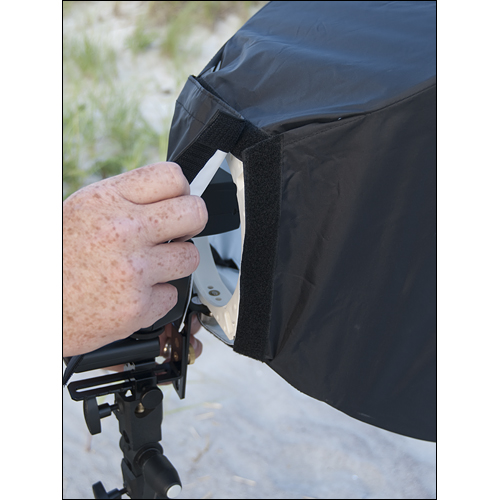
I then Velcroed the back flap to the back of the Extra Small LiteDome to prevent any potential light spill from the flash. [figure 12]
With everything attached, I powered up the flash, set it to about 1/2 power, and powered up the wireless receiver. [figure 13]
Figure 12
Figure 13
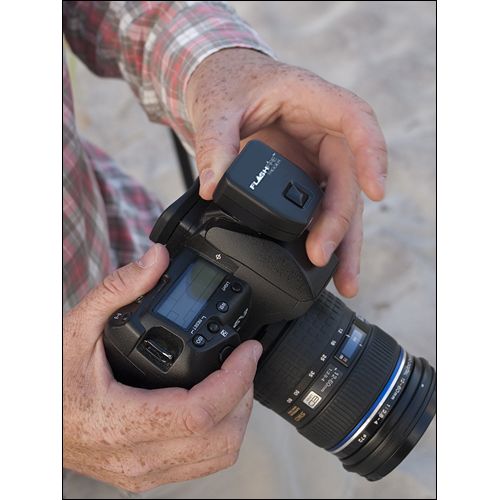
To sync up the camera with the flash, I mounted the wireless FlashFire transmitter to the hot shoe of the camera and tested the connection repeatedly, which worked every time. [figures 14 & 15]
Note: I've used a variety of wireless triggers over the years and am thrilled to find that the StarFire/FlashFire setup is more consistent with respect to radio transmission than any other setup I've used. For this lesson, and two other lessons I recently shot, transmissions were successful every time.
Figure 14
Figure 15
The Second Box
I knew that once we started shooting, I'd have a brief window of time to capture the shots I wanted, so I decided to set up the Medium LiteDome as well, attach it to another StarFire flash and FlashFire receiver and have it close by when it was needed.
Countdown to Magic Hour
With the sun getting closer to the horizon, we were just about ready to shoot. While Aaron and I had been setting up the gear, Paul was actually surfcasting with the fishing gear he had brought. Several times, we had seen some very large fish jumping out of the water and Paul thought he had a good chance of landing one. Unfortunately, though, his line got caught on some nearby rocks. As he tried to free the line, it occurred to me that this was an ideal mishap photographically, as Paul could make it look as though he was battling a large fish. So we decided to leave the line caught until after the shoot.
Figure 16
As Paul mock-fished, I got the camera and started to frame up the shot. Initially, I wanted to go for a backlit angle and so I took a shot without any lighting gear involved to get a sense of the ambient light. In reviewing the result, I felt like the sun was still a little too high and decided to go with a different angle. [figure 16]
Figure 17
I came around the to the other side so that the sun was split-lighting Paul and took another test shot. In reviewing the result, I found I liked the warm light hitting Paul and decided to build on this perspective. [figure 17]
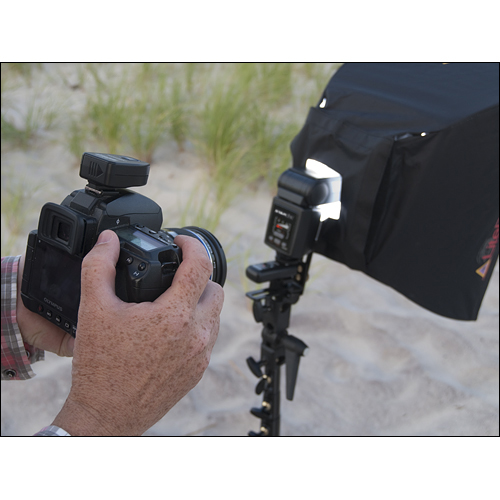
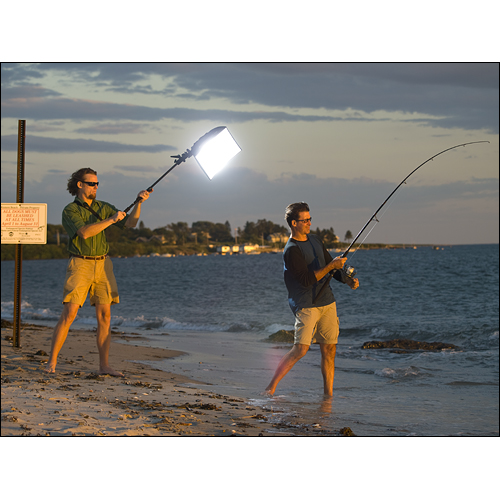
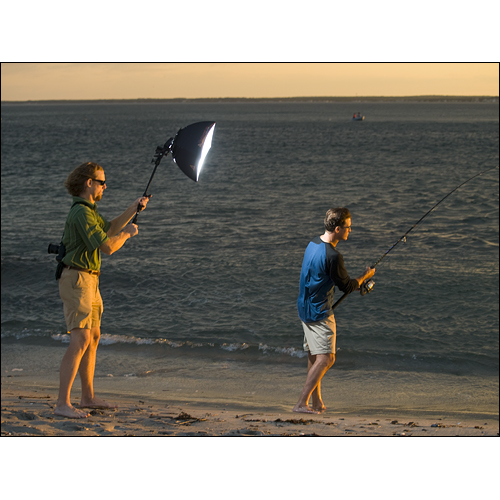
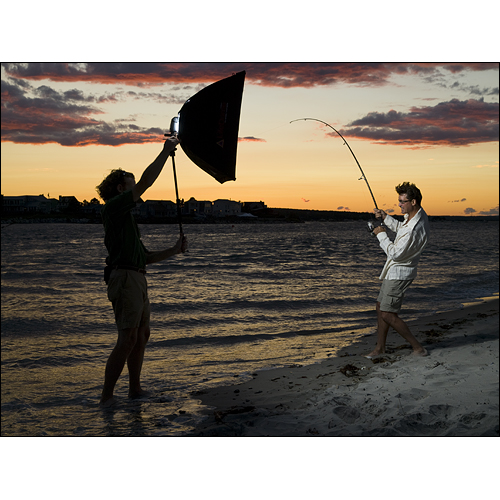
The wind was pretty strong here with no signs of abating, and I realized that positioning the Extra Small LiteDome setup up high on the LiteStand wouldn't work under these conditions, even with sandbags weighting the base of the LiteStand. So I asked Aaron to substitute the LiteStand with just the riser from the LiteReach LiteStand and hold it overhead to serve as a hair/rim light. Once Aaron was where I wanted him to be, I once again tested out the transmission from the camera to the StarFire flash, which worked great. [figure 18]
Figure 18
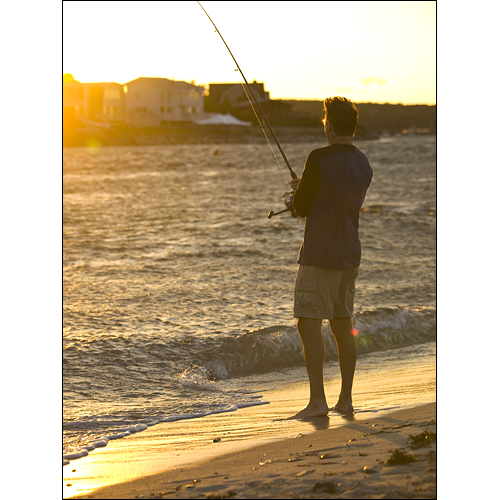
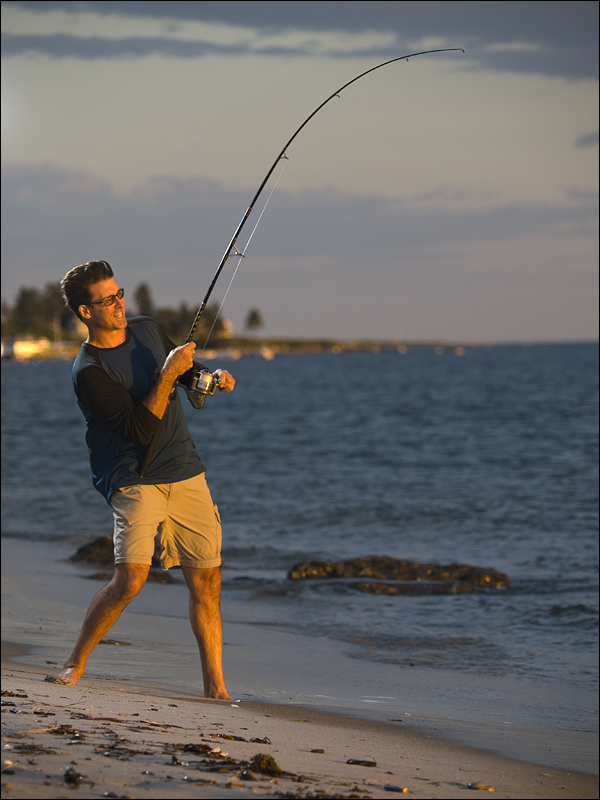
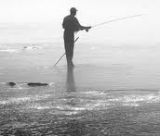
With everything ready to go, I got back about 50 feet or so with my telephoto lens and framed up the shot to include the arc of the rod. I asked Paul, who is also a part-time actor, to give me his best fishing performance while I took a few shots. Here is one from that series. [figure 19]
Figure 19
Figure 20
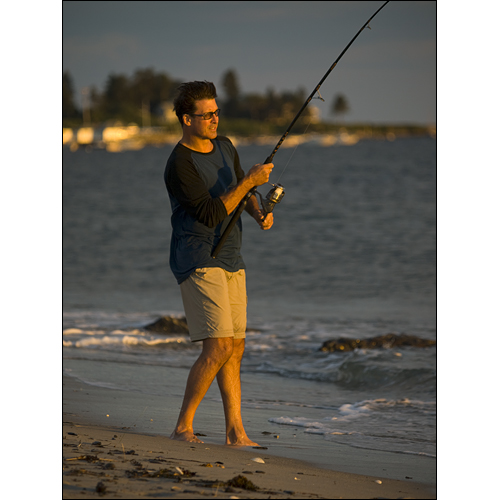
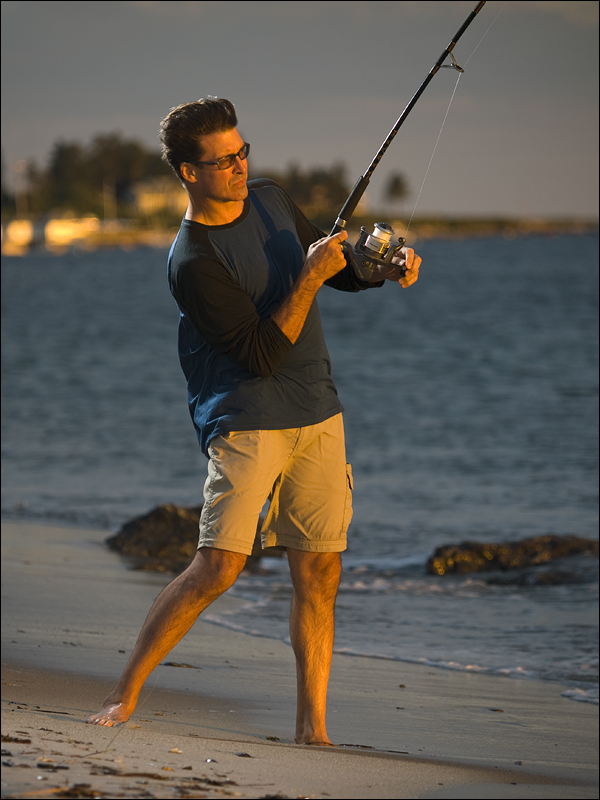
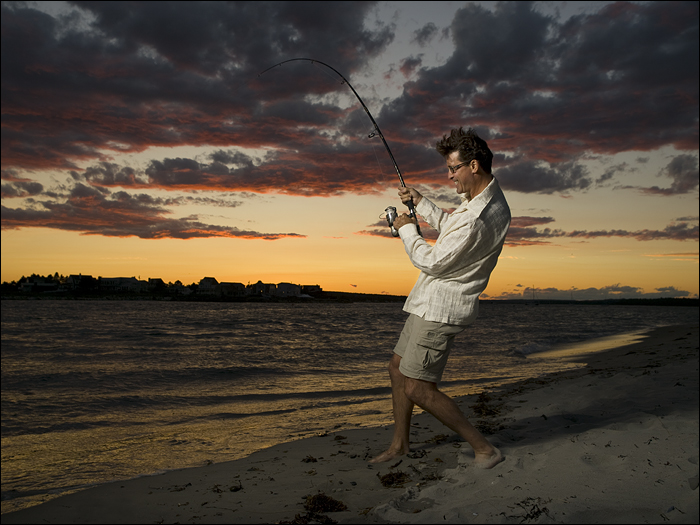
I then decided to come in a little tighter to focus more on Paul and less on the fishing rod. With everything ready to go, I took a few more shots. Here's a favorite from that series. [figures 20 & 21]
Figure 21
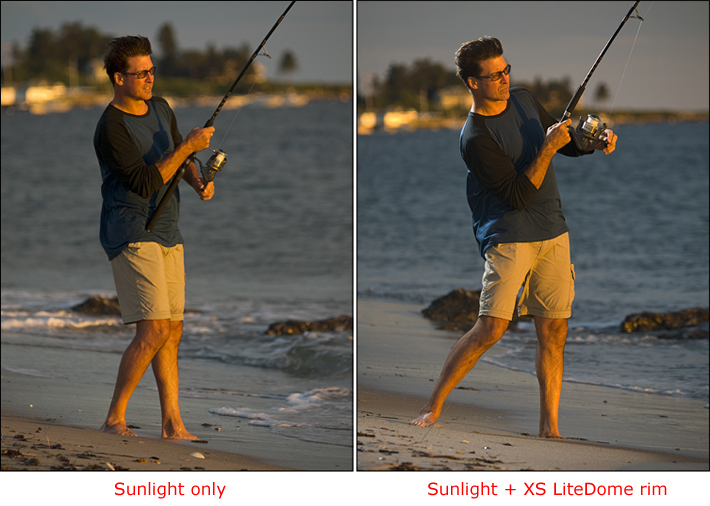
As you can see from the side-by-side comparison below, the added light really helps to articulate Paul's silhouette against the background and makes for a much more dynamic shot. [figure 22]
Figure 22
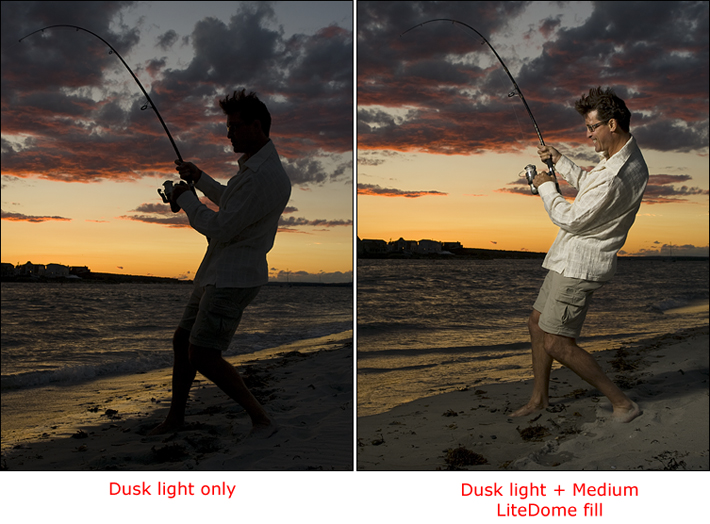
After the Sun Goes Down
We had time for one more shot, as the sun was now dipping below the horizon. I asked Paul to change his shirt, as I wanted fabric that would flow a little more freely in the wind. I also had him reposition to face more south than west so that the camera would be facing directly west and capture the clouds that were still lit up by the sun.
At the same time, I had Aaron replace the XS LiteDome setup with the Medium LiteDome setup (still with the LiteReach riser), because I knew I'd want a little more diffused light to illuminate Paul than the XS LiteDome could provide. Remember, the larger the light source, the softer the light.
While Aaron was making the switch, I found the exposure level I wanted for the background. [figure 23].
Figure 23
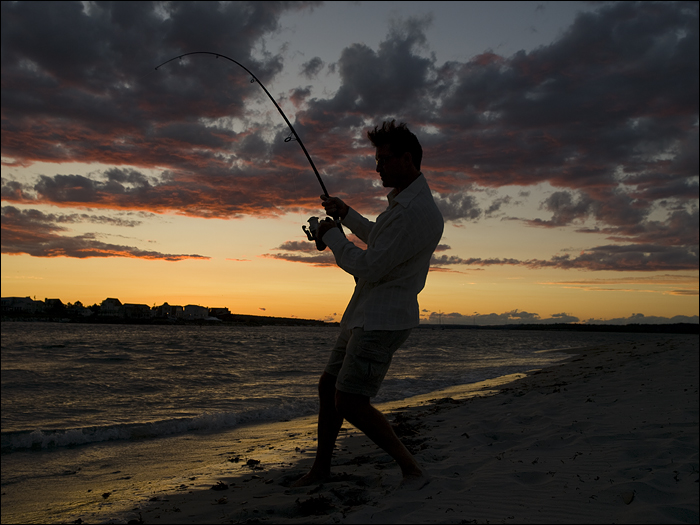
As you can see, Paul was almost entirely in shadow, silhouetted against the sky, so it was a good thing we had some extra light with us. Otherwise, we'd have had to compromise on exposure one way or the other: a good exposure on Paul or a good exposure on the sky, but not both.
Aaron was now back in position and ready to position the light. After testing out the power levels on the flash, we settled at about 3/4 power. I then had Aaron stand in the surf so that the light from the Medium LiteDome would gently rake across Paul. [figure 24]
Figure 24
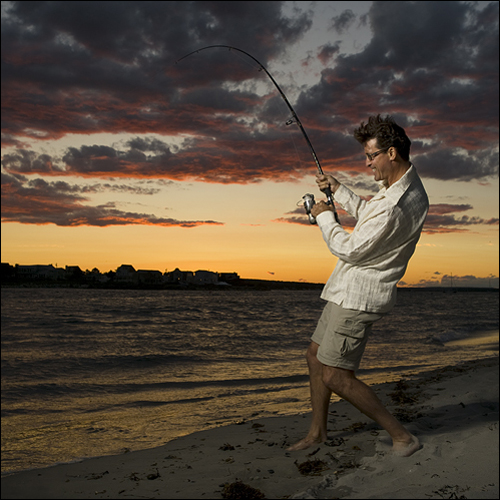
With everyone in position, I asked Paul once again to give me his best fishing performance while I took a final series of shots. We came away with a lot of great shots, but this one ended up being a clear favorite. A great balance of ambient and strobe lighting [figure 25]
Figure 25
Below, you can see just how much the Medium LiteDome setup provided. [figure 26]
Figure 26
As always, remember to experiment with your lighting and have fun in the process!
---
Written and photographed by Ben Clay, contributing lesson writer for WebPhotoSchool.com and Photoflex.com Modeled by Paul Drinan Assisted by Aaron Flacke To learn more about Photoflex® equipment, go to
www.photoflex.com
or
www.photoflexlightingschool.com
I've put in the question to Ben (the photographer). He should give me an answer soon.
Keep in mind though, as I often say it's not really about personal settings used in that situation. Each situation will be different and require a different set of settings to get similar results.
Photoflex Jaron wrote: I've put in the question to Ben (the photographer). He should give me an answer soon.
Keep in mind though, as I often say it's not really about personal settings used in that situation. Each situation will be different and require a different set of settings to get similar results.
They are always good to see regardless, more of a reference. How long of a arm does that softbox extension have? When I shoot I don't have the luxury of helpers so would need to put on a stand.
James L wrote: They are always good to see regardless, more of a reference. How long of a arm does that softbox extension have? When I shoot I don't have the luxury of helpers so would need to put on a stand.
Gotcha. Ben got back to me:
CAMERA + LENS: Olympus E-3 with 12-60mm f/2.8-f/4 lens
FOCAL LENGTH: 16mm
FORMAT: RAW
EXPOSURE MODE: Manual
APERTURE: f/4
SHUTTER SPEED: 1//160th of a second
ISO: 100
WHITE BALANCE: 6300K
FLASH: Photoflex StarFire + Medium LiteDome
approximately 1/2 power (i don't recall precisely and there is no metadata for this, but i remember the power spanned from about 1/3 power to close to almost full.)
As for the LiteReach, it extends 34 inches and comes with a base stand. It also will attach to the top of any LiteStand.
Check out the product page here.
Photoflex Jaron wrote: Yup! And on February 21, we will be unveiling a new product at WPPI, so check out the website that day or come see us at our booth in Las Vegas
The Fujifilm XT5 is a 40MP mirrorless camera capable of 6.2K video at 30p. With those specs, it’s an ideal choice for photographers needing a camera to pull double duty for imaging and video.
The Canon EOS R100 is an entry-level mirrorless camera introduced in 2023. But just because it’s an entry-level camera doesn’t mean it’s a bare-bones camera. Find out why in this review!
Nikon’s retro-looking Nikon Zfc is anything but retro. Under its classic body is a host of features and amenities that make it a worthwhile compact mirrorless camera for 2024.
The Canon EOS R50 is one of the newest R-system cameras from Canon. Is it worth your money? Find out all the details you need to know in this comprehensive review.
Newborn photography requires skill, the right gear, and a lot of patience. This beginner’s guide discusses critical topics that will help you be more prepared for before, during, and after the shoot.
To fill the frame means to expand the footprint of the subject in your shot. Get in close, zoom in, crop the image, or use other techniques to bring the subject to the forefront.
With these simple yet effective beginner photography tips, you can avoid some of the common mistakes beginners make and get improved results with your images.
Urban photography is a genre showcasing features in urban settings. You can photograph people, architecture, mass transit, and many other subjects. Learn how to do so in this guide!
The Nikon D850 might be an older DSLR, but it was ahead of its time when it debuted in 2017. That means it still has plenty of firepower to compete with today’s powerful mirrorless cameras.
The best beginner camera isn’t the same for everyone. That means having choice is of the utmost importance. In this guide, explore five excellent beginner camera options for 2024 and beyond.
Child portrait photography is a unique undertaking requiring special skills and talents to get the best results. Start mastering this photography niche with these essential tips!
The Fujifilm XT5 is a 40MP mirrorless camera capable of 6.2K video at 30p. With those specs, it’s an ideal choice for photographers needing a camera to pull double duty for imaging and video.