One of photographer Patrick Hall's favorite things about living in Charleston, South Carolina is being close to the ocean. He loves being in and around the water, and although he confesses he's not very good at it, he also enjoys wakeboarding. Charleston has become a pretty big hub for sports like kiteboarding and wakeboarding over the last few years, and this city is not short on talented athletes.
Patrick took an interest in wakeboard photography a couple years ago and has always enjoyed shooting images from extreme angles. "Although I’ve gotten some cool images, I never felt like I really had much control over my images with just daylight," he says. "I’ve tried to bring strobes outside to create something 'different', but even those shots have been done a million times. I decided I wanted a way to shoot a rider flying through the air with interesting, studio quality lighting."
In order to do that, Patrick had to bring the wakeboarders and the ocean....into his studio.
(Click on any image below for an enlarged view.)
Topics Covered:
The Video Lesson
Background Story
Challenges on Water
Bringing the Outdoors, Indoors
Final Results
Camera/Media:
Canon 5D
GoPro HD
Nikon D300
Canon 7D
Tokina 11-16mm f/2.8 Wide Angle Lens
Nikkor 70-200 2.8 Telephoto Lens
iPad
Lighting Equipment:
HalfDome[R] nxt: medium
OctoDome[R]: large
StarLite[R] Lamp - 1000watt
StarLite[R] Lamp - 500watt
StarLite[R] QL
The Video Lesson
The Background Story
As a photographer, shooting wakeboarders from an inner tube is an amazing experience. But we have all seen the images that are a result of a shoot like this. [figure 1]
I wanted to take things to the next level and really push my portfolio and decided to put together a shoot that has never been done before.
Figure 1
My whole thing is that I love commercial looking images. I like seeing pictures that really sell something. So for me to bring that to an extreme sport really allows me to showcase the athleticism of these amazing people together with the commercial side of photography and elevate those images up to another level that isn't just sports, but also a product.
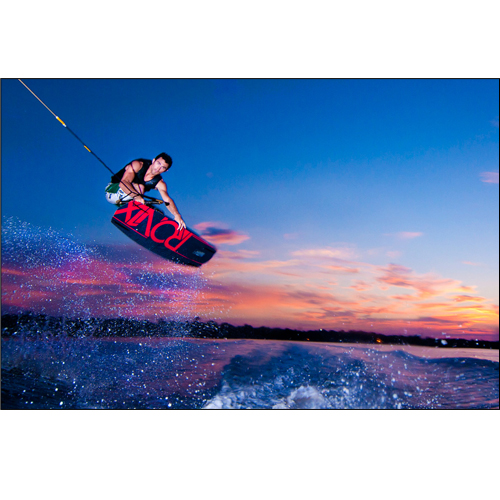
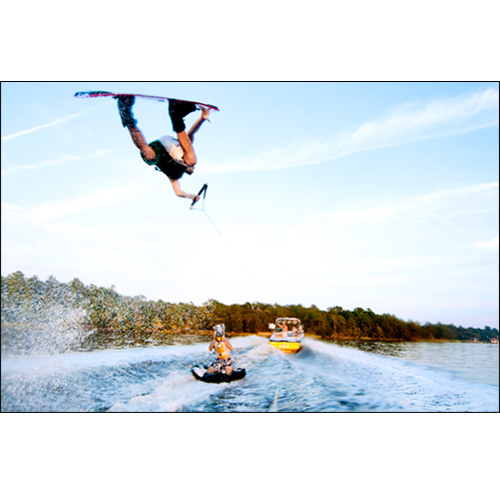
Challenges on the Water
Most wakeboarding images today are shot either from the stern of a chase boat or from an inner tube. Every once in a while you see images taken from land, or possibly even from a stationary spot floating in the water. If you shoot from land or a chase boat you will probably want to shoot telephoto and compress the image, which helps separate the rider by blurring the background. When shooting from an inner tube, you are going to have to shoot wide angle. This allows you to really capture the scenery and help put the rider directly in the viewer's face.
Photographing wakeboarders from a moving inner tube is not exactly easy. There's a lot of challenges that you will face that are not present when shooting telephoto from a boat or from the shore. Here are some tips that I can share that might make it easier for any photographer looking to take similar images.
The first issue you want to tackle is overall exposure. I shoot in JPEG format 80% of the time, but because you can’t easily change your settings on the fly, I would recommend switching over to RAW. This will give you the most flexibility in your editing if something is a little off. I would also recommend setting your camera to shutter priority mode because the most important variable in your exposure is going to be your shutter speed. A shutter speed of around 1/1600th – 1/3200th of a second should be a good starting point.
Now some might disagree with me here, but I would then advise setting your ISO as high as your camera will let you while still maintaining good image quality. The reason I suggest this is because you want your camera to stop down the aperture as much as possible in order to have a lot of depth of field. This gives the rider the most space to perform while still being in focus. If you can shoot at a lower ISO and a wider aperture and still nail your focus then go for it, but I’ve found that the auto focus feature in a camera really struggles with fast action and water drops on the lens.
Because AF is often useless in this situation, I find it best to prefocus the closest distance the rider will be and shoot somewhere around f/5.6 – f/10 to create a nice large depth of field. I have found that my images still look pretty clean, even at ISO 1600-3200, since the light is pretty bright when shooting wakeboarding. Finally, set your camera to the fastest burst rate you can get. Once you get your timing down, you will not need to fire off 8 frames a second, but initially it does help.
Figure 2
The next question you want to address is where will you be located in relation to the boat and the rider. You really have two choices:
1. Between the boat and the rider
2. Behind both the rider and the boat
The first position will allow you to fill the frame with the rider facing you, while the second position lets you capture both the rider and the boat in photo. I’d recommend shooting from both positions if the wakeboarder is comfortable with crossing your tow line.
Just a note about safety here: placing yourself in harm’s way often produces some stunning images but don’t put more responsibility on yourself, the rider, or the boat captain than what you know everyone can handle. If the rider is clearing the wake and crashes, usually they will not hit the photographer. If they don’t clear the wake, there may be trouble.
Here are a few tips that might make your life easier that I have found while on the water:
* Make sure you are close enough to the wakeboarder that you can get dramatic shots with them filling the frame, but not too close that you aren’t also able to capture the horizon and scenery. Most wakeboarders don't like images of themselves in the air with no reference point.
* Don’t place yourself too far from the rider or else your images will start to look like they were taken from the boat, which defeats the whole point of shooting close on a tube.
* Be prepared to have a lot of spray hitting your face and the camera. My approach to keeping the lens clean is to use saliva (I know, gross, but it works!) on the lens which helps repel water. Rain-X and other chemicals will actually create beads of water that will ruin your shots. It also helps to keep little Silica Packages in your housing to prevent moisture build up and fogging.
Figure 3
* You really need to hit the water at the right time of day. Usually the best sunlight is going to be from the side when everything has nice warm tones. I’ve found the best time of day to shoot is the first 3 hours of morning and the last 3 hours before sunset. Anytime outside of that is going to be too bright and too contrasty. Plus the water is usually full of chop around mid day which isn’t good for the riders. If you want to shoot in lower light, you'll have to use flash, which can be very difficult because you need an assistant with you on another tube and you have to deal with syncing around water.
Here are my settings for this shot:
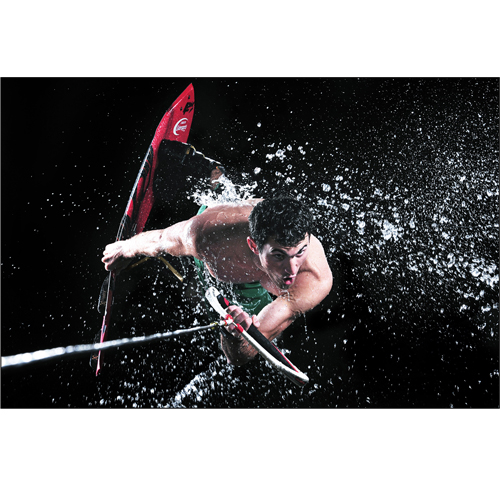
Bringing the Outdoors, Indoors
Shooting wakeboarders behind a boat is a lot of fun, and most of the images you will see in magazines are taken as previously described. However, I wanted to do something that was really different and decided to bring a commercial element that I love to this sport.
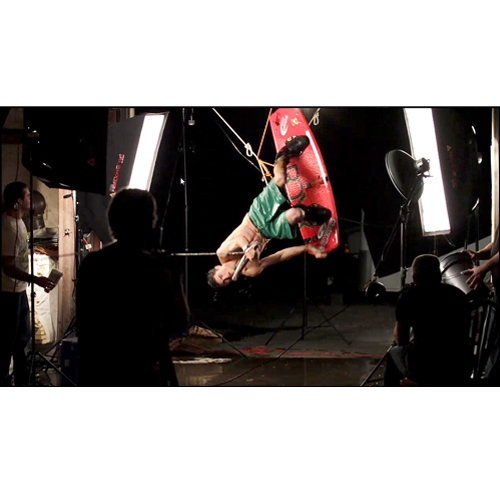
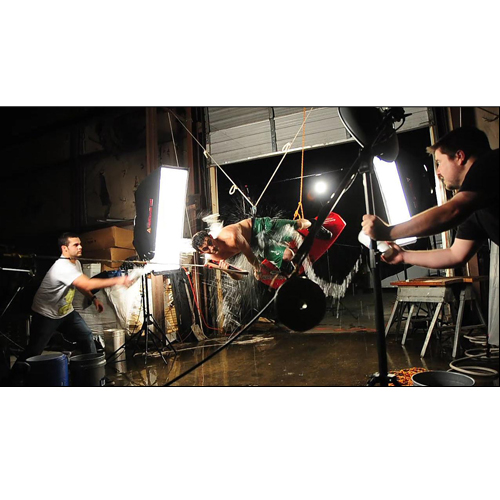
My idea was to suspend the wakeboarders using climbing gear so that I could position them into traditional wakeboard poses while lighting them with studio lights. The final element that would bring these photos to life was intense water splashing against a high contrast background.
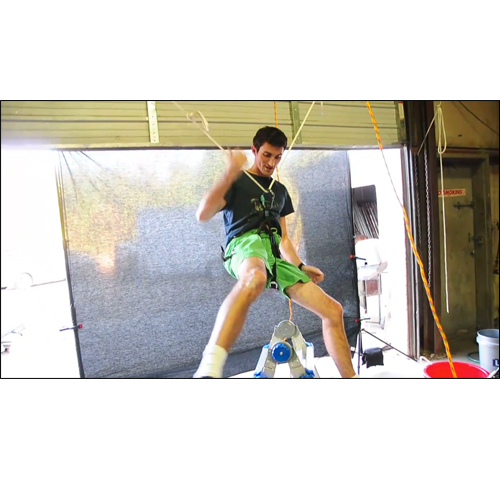
The setup for this shoot was pretty complex. The first thing with which I had to test and experiment was the suspension of the riders. I was able to use a simple climbing harness fitted backwards and a few climbing ropes to hoist each rider up off the ground. [figure 4]
Most of the harness was hidden under the riders’ swim trunks, which greatly minimized the amount of editing I had to do in post. I also had a second rope attached to the wakeboard itself to help keep the riders in balanced horizontal positions. Holding these poses requires a lot of strength and is actually more tiring than doing the jumps in real time behind a boat.
Figure 4
Figure 5
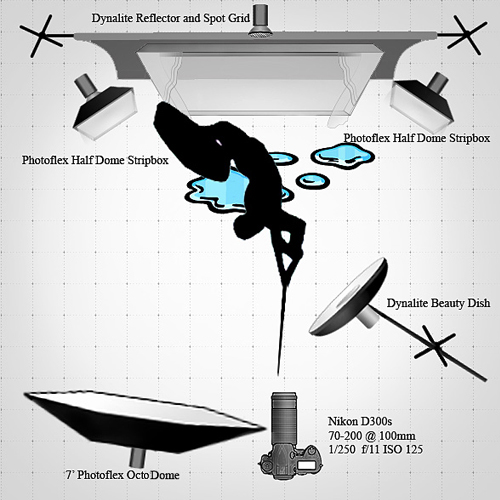
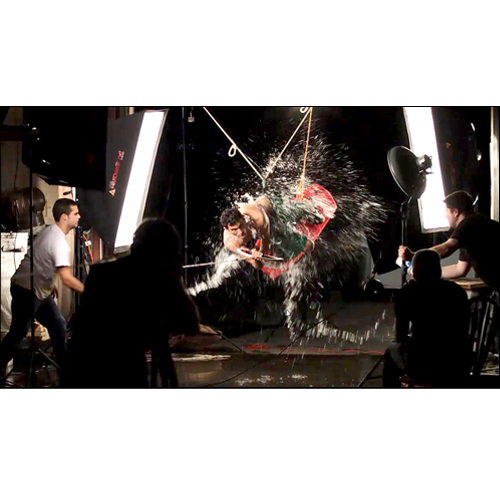
For lighting, I used two Photoflex® HalfDome® SoftBoxes behind the wakeboarders firing back towards the camera. These two lights allowed me to light the water and also the side of each rider. I also used a gridded strobe with a reflector behind and above the black backdrop to add even more back lighting and allow for some separation of the riders’ board and hair.
The main key light was a small beauty dish on a boom stand camera right and I used a large 7 foot Photoflex® OctoDome® almost on camera axis for just the slightest amount of fill. [figure 5]
Figure 6
Figure 7
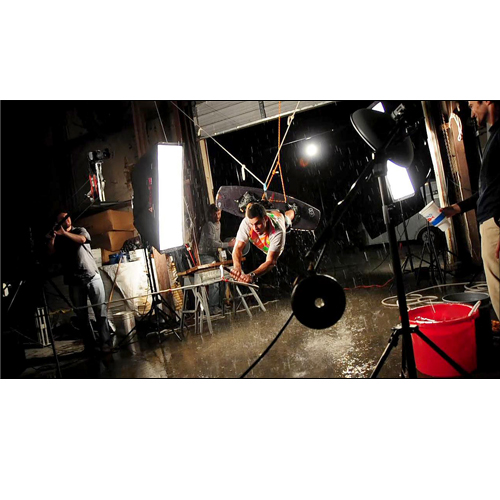
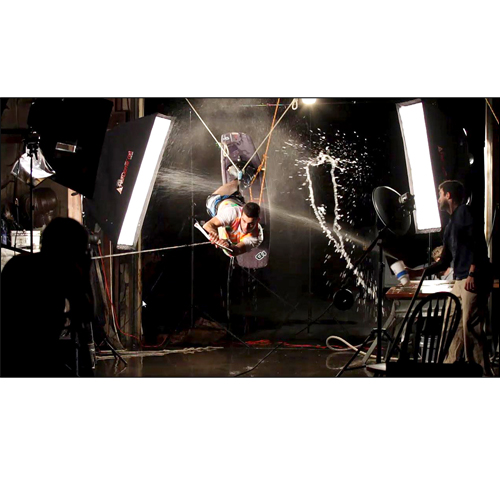
The typical exposure for these shots was around f/11-f/14 @ 1/250th of a second and ISO 125. During Noah’s session, I started to drag the shutter around 1/60th of a second, since the video lamps, Photoflex® StarLite® heads, for the video crew were really strong. This allowed the water to blur just a little. It's an option, but I’m still not sure if I like it one way or the other. If you ever decide to do a shoot like this, that's something you can consider depending upon your own personal tastes.
The only other tricky element to this photoshoot was anticipating how the water would look when thrown at the rider. We used water hoses, small buckets, large buckets, mist, and different types of spray nozzles. Some of them had a more realistic look -- the kind you might see when wakeboarding -- and others were more dramatic. You really have to get your timing down to capture the water at its peak and be careful enough not to have your assistants throwing water directly into the rider’s face.
Figure 8
Figure 9
Figure 10
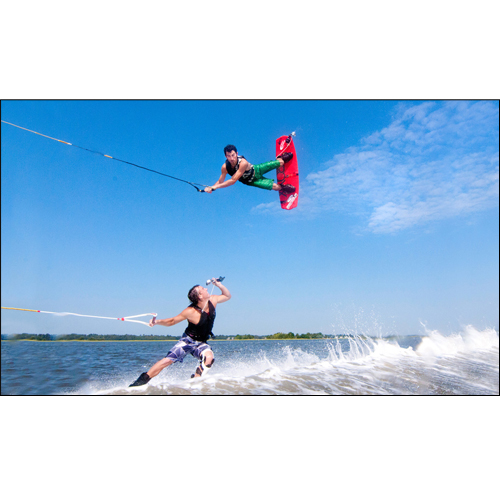
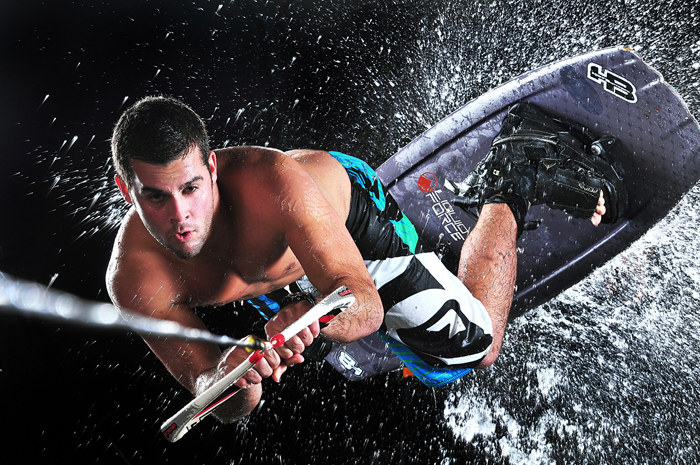
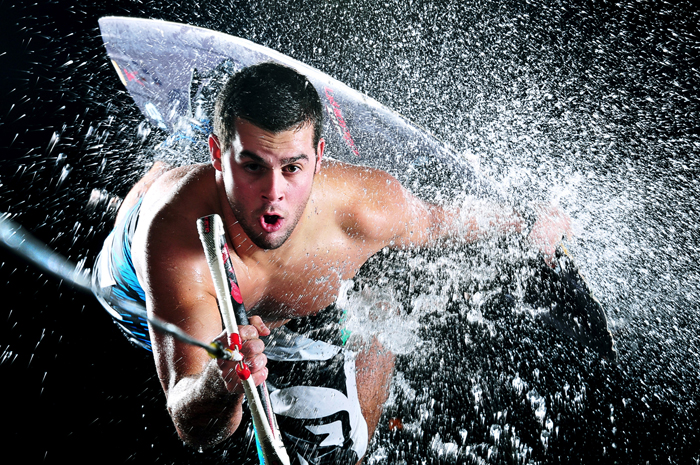
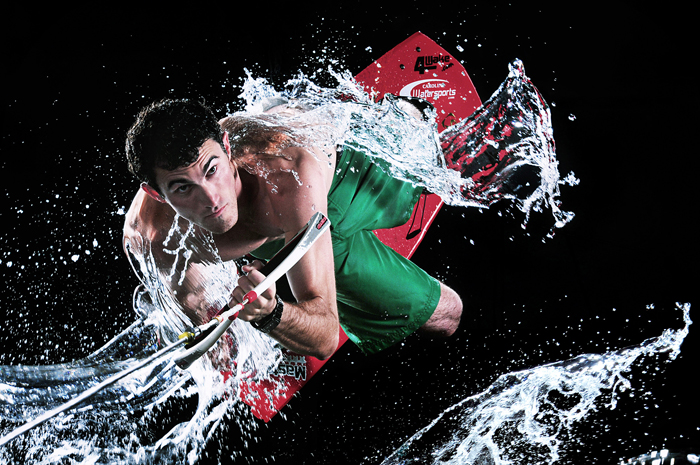
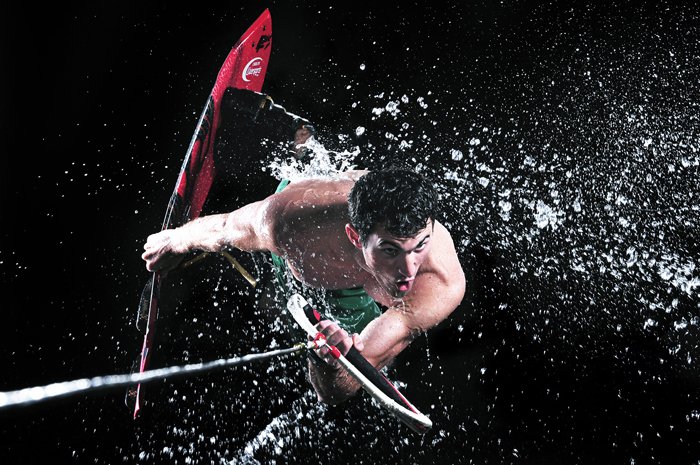
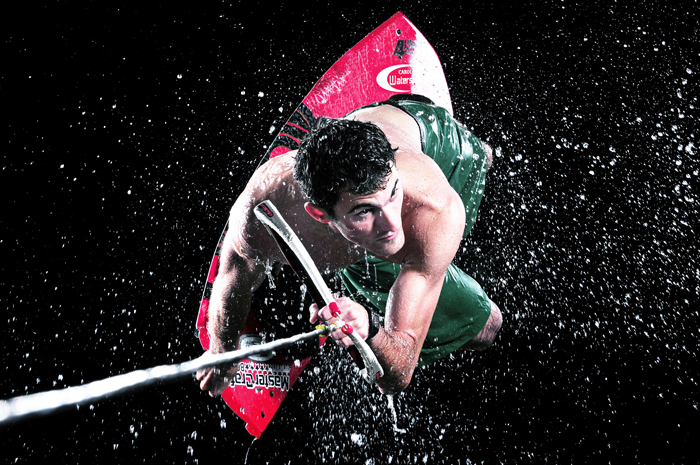
Final Results
Below are some of my favorite results from the studio shoot. I am very happy with these images, and I'm especially excited because I have never seen anything like this done before.
Figure 11
Figure 12
Figure 13
Figure 14
Figure 15
All in all, this photoshoot was a blast and everyone involved really came together to help produce a fun video and some fantastic final images. If you are a photographer living near water, I hope you can take some of these tips to produce your own images. If you are ever around the Charleston area, head over to Trophy Lakes where you can catch some of the best boarders in the Southeast riding the rails. You can also check out more of my work at PatrickHallPhotography.com.
---
Written and photographed by Patrick Hall Wakeboarders (in the studio and on the water): Dale Slear and Noah Simon Wakeboarders (on the water): Fabian Ashley, Mark Rugala, Hunter Drury, Davey Blair, and Steven Pearce Videographers: Lee Morris, Anthony Spenser, Tripp Livingston, Mike Slear, David Keller, Bobby Altman, Mike Ledford, and Keith Bradshaw Assisted by: Cameron Ballinger, Jordan Solomon, Max Schwarz, Mike Allen Boat Captains: Matt Dubon, Hunter Wilson, Fabian Ashley Boats provided by: Cole Gaither at Zero Energy Homes of SC, and Ross Atkins at GreenSpirit Hydrogardens Warehouse Studio provided by: Dean Feltmann Special Thanks: Trophy Lakes Watersports, CarolinaWatersports.com, 4Wake.com To learn more about Photoflex® equipment, go to [url=http:// www.photoflex.com] www.photoflex.com[/url] or [url=http:// www.photoflexlightingschool.com]www.photoflexlightingschool.com[/url]
Very nice production. I was able to take away from this ideas and principles that might apply to any style of photography. The video was first rate too...
“Amateurs worry about equipment, professionals worry about money, masters worry about light, I just make pictures… ” ~ Vernon Trent
The Canon EOS R100 is an entry-level mirrorless camera introduced in 2023. But just because it’s an entry-level camera doesn’t mean it’s a bare-bones camera. Find out why in this review!
Nikon’s retro-looking Nikon Zfc is anything but retro. Under its classic body is a host of features and amenities that make it a worthwhile compact mirrorless camera for 2024.
The Canon EOS R50 is one of the newest R-system cameras from Canon. Is it worth your money? Find out all the details you need to know in this comprehensive review.
The Sony FE 70-200mm f/2.8 GM OSS II is Sony’s flagship mirrorless zoom lens. As such, it’s loaded with features and has a top-shelf build quality that makes it a top pick!
Using leading lines in photography helps improve the composition by drawing viewers in and leading their eye from the foreground to the background. Explore some fine examples of this in this guide!
The Insta360 has one of the best lineups of action cams and 360-degree cameras. With these Insta360 accessories, you can elevate your photography and videography game!
Creating impactful photos of landscapes depends on many factors, not the least of which is your talent behind the lens. This guide explores other elements required for the best product.
The Canon EOS R100 is an entry-level mirrorless camera introduced in 2023. But just because it’s an entry-level camera doesn’t mean it’s a bare-bones camera. Find out why in this review!
The Olympus OM-D E-M10 Mark IV is a micro four thirds camera released in 2020. It’s an entry-level system along with the OM-D E-M5 Mark III. Use this guide to determine which one is best for you!
Blue hour photography might not be as well known as golden hour photography, but it is every bit as good a time to create epic images of landscapes. Learn how in this quick tutorial!
Nikon’s retro-looking Nikon Zfc is anything but retro. Under its classic body is a host of features and amenities that make it a worthwhile compact mirrorless camera for 2024.