Many portrait photographers find
studio lighting
overly challenging and frustrating to contend with. For the most part, studio portrait lighting doesn’t need to be that complicated. If you have a few basic lighting tools and a basic lighting strategy, you can create professional-looking images for your clients.
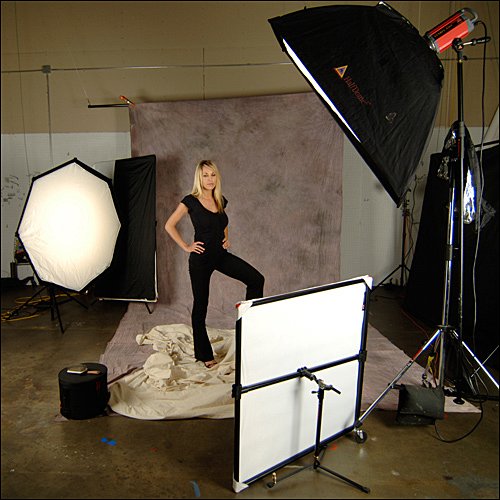
For this shoot, we went for two looks: one where the lighting equipment is visible within the edges of the frame (a technique gaining in popularity), and one with just the model, the foreground and the background.
Before Beginning
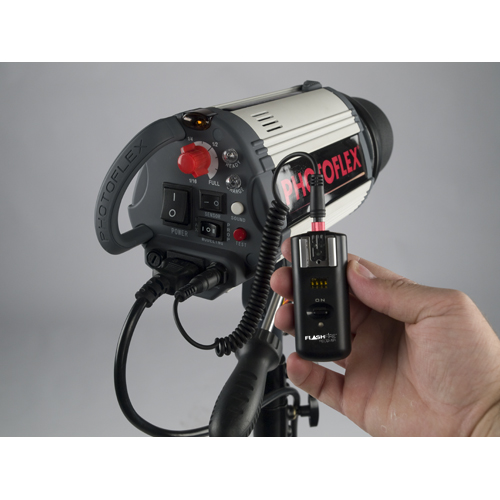
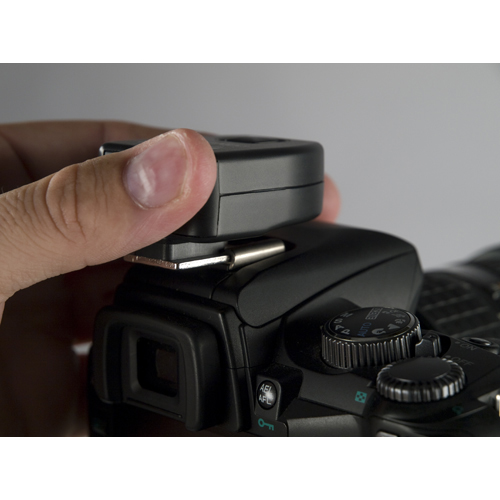
To make your setup more convenient and versatile, we have now included the
Photoflex® FlashFire™ Wireless Trigger & Receiver
. Using this equipment allows you to move more freely with your camera instead of limiting yourself to within a few feet of your lights.
Even adding just one trigger and one receiver you can set your secondary lights to slave so that they fire through the infrared sensor. Either way you choose to use the FlashFire, you cannot ignore its ability to provide your "tool bag" with a great amount flexibility. [figures 1 & 2]
Figure 1
Figure 2
Positioning and Modifying the Main Light
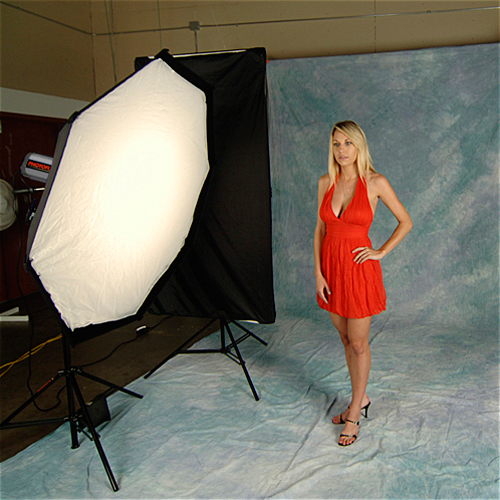
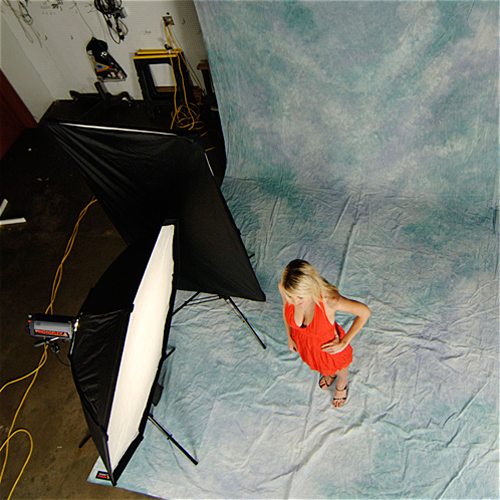
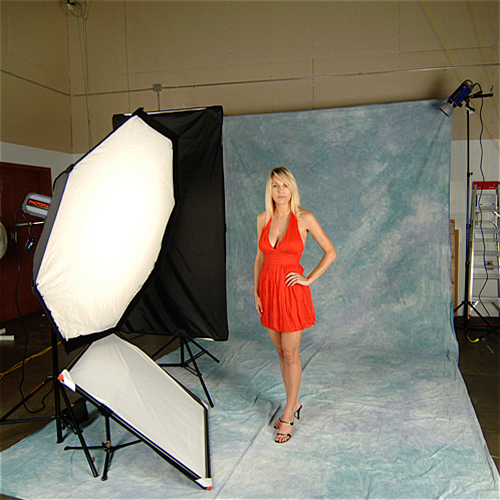
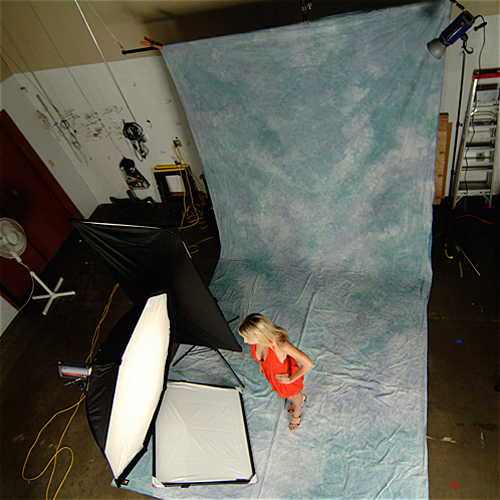
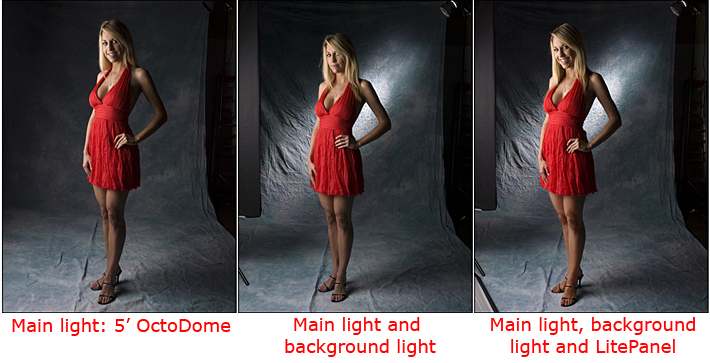
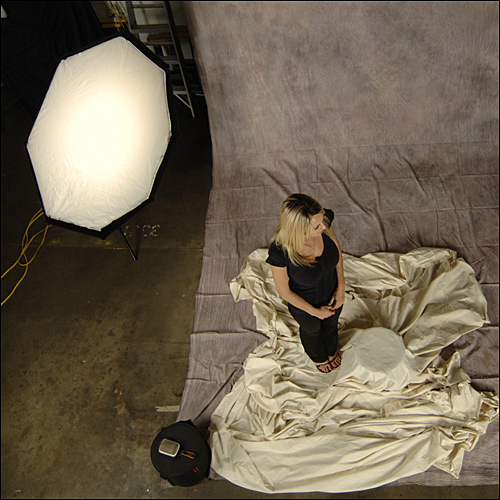
Our first lighting step for this photograph was to set up a 5 OctoDome® with the StarFlash® 150 watt. We positioned the OctoDome at about 90 degrees camera left, raised the LiteStand to about five feet, and angled it down slightly, pointing towards the model's face.
Because we wanted to have the model facing the right-hand side of the set and have the light fall off on her left side, we moved the light as far around as we could without going beyond 90 degrees. We had the model stand a good distance from the
backdrop
in order to prevent too much light spilling on the background.
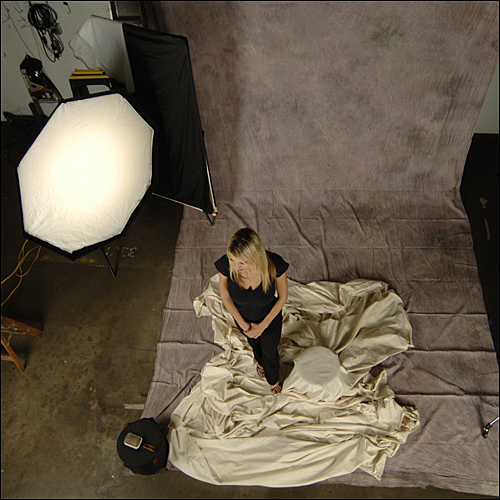
We then set up a 39x72 inch LitePanel with a black/white fabric attached (black side facing the light). We then placed it next to the OctoDome to further keep light from spilling onto the background. [figures 3 & 4]
TIP: The easiest way to ensure that your LitePanel is in the right place is to look through the camera while your assistant positions it.
Figure 3
Figure 4
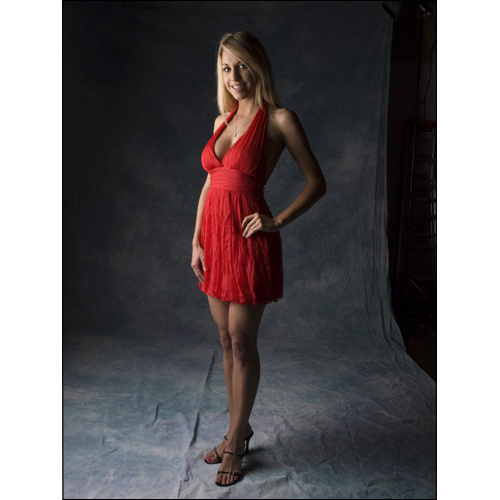
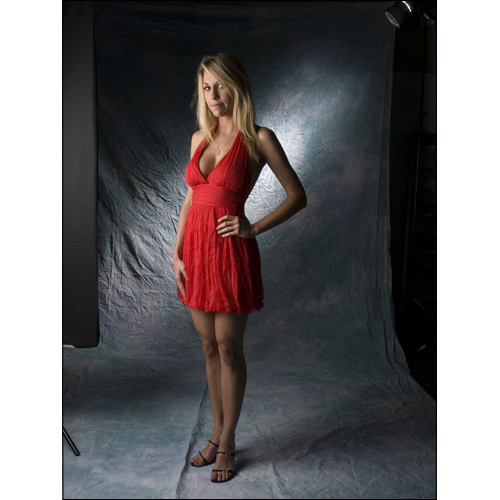
After we had our OctoDome and LitePanel positioned, we took our first shot. [figure 5]
Figure 5
Notice how well the OctoDome lights our subject. The light is soft, yet directional and is very flattering to our model.
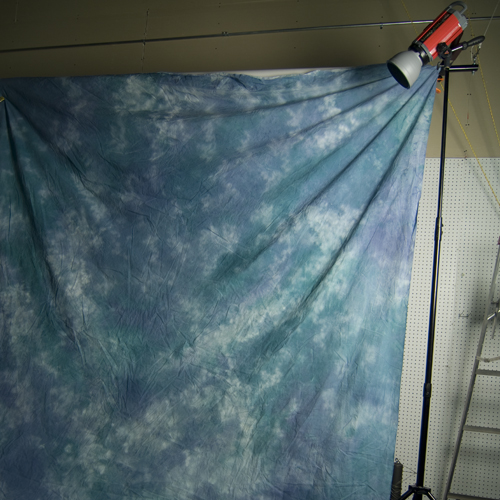
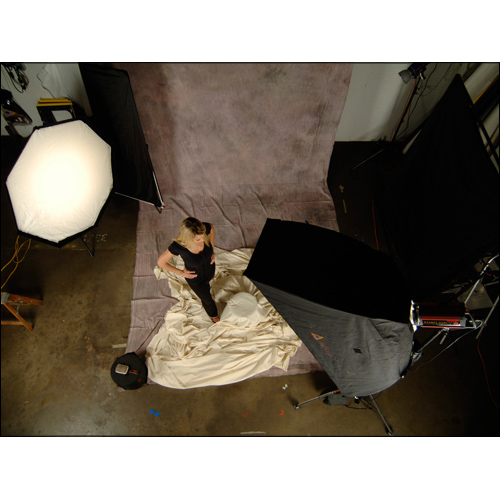
Adding a Grid Spot
Next, we decided to add some drama to the background, so we decided to create a hard streak of light skimming along the muslin diagonally. We set up a StarFlash 300 watt strobe, attached a 6 inch
reflector
and medium (40-degree) grid to it, and placed the light right against the backdrop, about ten feet off the ground. We then pointed it down around 70 degrees and angled it slightly toward the backdrop. [figures 6 & 7]
Figure 6
Figure 7
Once this light was in place, we took another shot. [figure 8]
Figure 8
As you can see, this background light helped to spice up the background somewhat. Since the StarFlash had a reflector on it, we didn’t have to worry about any light spilling onto our model or any other part of our set. We did need to add a grid, however, in order to prevent the light from being too bright where it was closest to the backdrop.
Bouncing the Main Light
In reviewing this image, we felt that the model’s legs were just a bit too dark. We wanted to
add some light
to this area, but we didn’t want to alter the overall lighting scheme. Our solution was to add a 39x39 inch LitePanel with a white fabric attached, and position it under the OctoDome, angled slightly to bounce some light from the OctoDome onto the legs of our model. [figures 9 & 10]
Figure 9
Figure 10
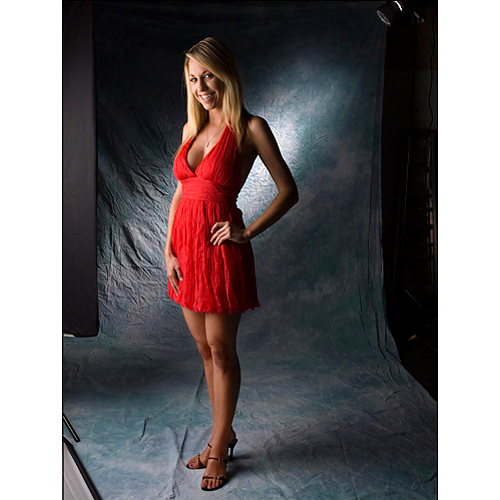
Once the LitePanel was in position, we took another shot. [figure 11]
Figure 11
The change in lighting was subtle yet noticeable, and it was exactly what we were looking for.
As you can see, two lights and a reflector can provide natural-looking results for beautiful home or studio portraits. Next, we decided to move the lights around to create another interesting image using the same StarFlash 150 watt and StarFlash 300 watt.
Below is a comparative look at the results for this shot. [figure 12]
Figure 12
Same Gear, Different Positioning
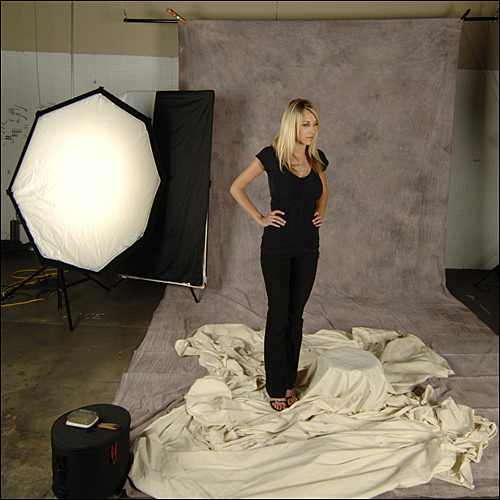
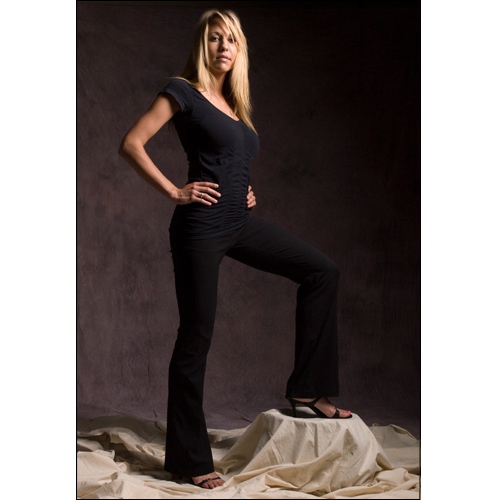
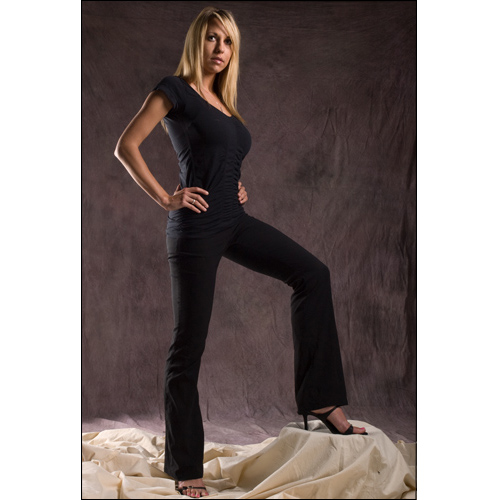
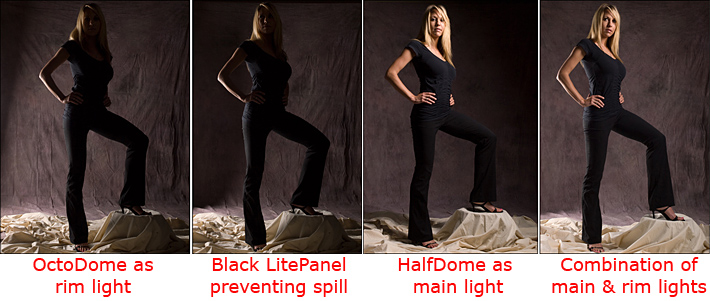
While the model changed outfits, we pulled out the LitePanels and background light and left the 5-foot OctoDome to be repositioned. We ended up placing the OctoDome at about 130 degrees camera left to serve as a full-length rim light. For a final touch, we brought in a foot stool and draped another muslin over it. We also draped it over the majority of the background muslin for added contrast. [figures 13 & 14]
Figure 13
Figure 14
When the
model
was back on the set, we had her put one foot on the stool, put her hands on her hips and look into the camera. When the pose looked good, we took a shot. [figure 15]
Figure 15
As you can see, the OctoDome created a beautiful rim light from head to toe on our model. In reviewing the background, however, we noticed that we had a little too much light spilling onto the muslin, which we wanted to keep relatively dark.
Controlling Spill on a Rim Light
To prevent the light from spilling onto the backdrop, we once again used the 39"x72" LitePanel. [figure 16 & 17]
Figure 16
Figure 17
Once the LitePanel was in place, we took another shot. [figure 18]
Figure 18
In the result, notice how well the LitePanel was able to control the light spill.
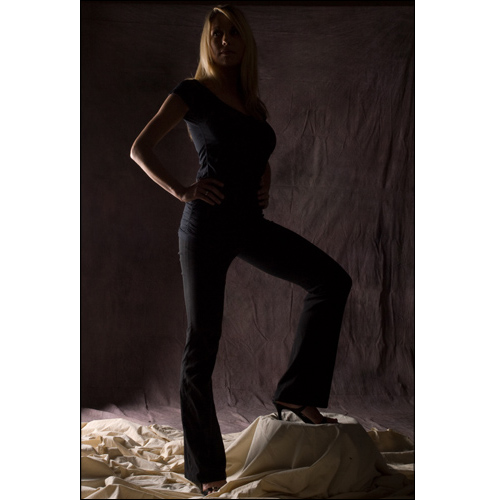
Adding a Main Light After the Rim Light
Next, we wanted to add our main light into the mix. We decided to use a StarFlash 300 watt with a medium HalfDome® for a relatively narrow lighting effect. We positioned the HalfDome at about 80 degrees camera right, close to seven feet high, and pointed it down at about a 45 degree angle. [figures 19 and 20].
Figure 19
Figure 20
We then turned off our OctoDome in order to concentrate solely on the light coming from the HalfDome. We had the HalfDome positioned around camera right because we wanted to get a “loop lighting pattern” on our subject, which can be very flattering. A “loop lighting pattern” is created when the lighting creates a downward diagonal shadow from the nose, angling toward the corner of the mouth. Ideally, the shadow will be halfway between the nose and the corner of the mouth.
When we had the HalfDome where we wanted it, we took another shot. [figure 21]
Figure 21
As you can see, the HalfDome alone provided a very beautiful, soft light for our model.
Bouncing from the Rim Light
To balance out the lighting tonally, we decided to add a little more light onto the front of the model's pants. So again, we placed the 39x39 inch LitePanel down low and angled it to bounce light from the OctoDome. [figures 22 & 23]
Figure 22
Figure 23
With this second LitePanel in place, and the rim light turned back on, we took our final shot. [figure 24]
Figure 24
Notice how well the lighting from the HalfDome ties in with the lighting from the OctoDome. Below is a side-by-side look at each of the results for this setup. [figure 25]
Figure 25
As you can see, the 5 foot OctoDome is an incredibly versatile lighting tool when used with any of the StarFlash strobes. It creates a very soft, beautiful light that is perfect for portraiture.
Remember to experiment with your lighting, and above all, have fun!
--- To learn more about Photoflex® equipment, go to [url=http:// www.photoflex.com] www.photoflex.com[/url] or [url=http:// www.photoflexlightingschool.com]www.photoflexlightingschool.com[/url]
Was that backdrop purposely wrinkled as much as it was, good advise on lighting but please get the iron out next time.
www.dcimages.org.uk
"A good photograph is one that communicate a fact, touches the heart, leaves the viewer a changed person for having seen it. It is, in a word, effective." - Irving Penn
I like the way the author described the lighting was set up. I've done some full length portraits, and it's good to learn some additional ideas to use next time.
The Fujifilm XT5 is a 40MP mirrorless camera capable of 6.2K video at 30p. With those specs, it’s an ideal choice for photographers needing a camera to pull double duty for imaging and video.
The Canon EOS R100 is an entry-level mirrorless camera introduced in 2023. But just because it’s an entry-level camera doesn’t mean it’s a bare-bones camera. Find out why in this review!
Nikon’s retro-looking Nikon Zfc is anything but retro. Under its classic body is a host of features and amenities that make it a worthwhile compact mirrorless camera for 2024.
The Canon EOS R50 is one of the newest R-system cameras from Canon. Is it worth your money? Find out all the details you need to know in this comprehensive review.
Cinematic photography is an interesting genre that combines photographic and videographic skills along with effective storytelling techniques. The result? Highly impactful images!
Newborn photography requires skill, the right gear, and a lot of patience. This beginner’s guide discusses critical topics that will help you be more prepared for before, during, and after the shoot.
To fill the frame means to expand the footprint of the subject in your shot. Get in close, zoom in, crop the image, or use other techniques to bring the subject to the forefront.
With these simple yet effective beginner photography tips, you can avoid some of the common mistakes beginners make and get improved results with your images.
Urban photography is a genre showcasing features in urban settings. You can photograph people, architecture, mass transit, and many other subjects. Learn how to do so in this guide!
The Nikon D850 might be an older DSLR, but it was ahead of its time when it debuted in 2017. That means it still has plenty of firepower to compete with today’s powerful mirrorless cameras.
The best beginner camera isn’t the same for everyone. That means having choice is of the utmost importance. In this guide, explore five excellent beginner camera options for 2024 and beyond.
Child portrait photography is a unique undertaking requiring special skills and talents to get the best results. Start mastering this photography niche with these essential tips!