My parents just gave me 2 large boxes of old photos and negatives and asked if there was a way to get these all digitalized. I told them yes before knowing the answer, so now I'm seeking help from you all. Can you help with the answer to this please?
Ideally something that won't take long and I can do.
Any All-in-one printer/copier/scanner/coffee-maker should be able to handle the photos. If you don't have one of those, a simple, inexpensive, USB powered flat bed scanner will work as well.
Negatives and slides are a different matter. Some scanners have adapters for them, and there are simple, inexpensive scanners for them also.
You should also know that there are companies that will do all that for you, too.
A scanner with a high enough resolution should be capable of it. Pro scanners of up to 25 years old can scan prints and even some models that have back lighting in the lid can scan negatives. I have an old Epson 2450 Pro scanner with the back light in the lid, and it even has plastic frames for holding different common size negatives for scanning. The software with it will let you cover the glass with prints and it will create separate files for each scanned photo. Cropping is usually required of each scanned photo to slightly rotate and trim the edges. My scanner is ancient in today's World, but I still rely on it for this kind of use. I haven't found anything since that will do all of this. I haven't been looking for one either.
There are other ways -
A stand to hold your camera much like an old enlarger, but with a camera mount on it for your camera, and a couple of photo lights at 35-50 degrees right and left of the bed can be used, but you will likely need to do one photo at a time, placing it in the correct position on the bed and using metal strips or similar as weights to hold the photo flat while you adjust the camera zoom for the photo size and then trigger the camera. I use a wireless trigger, so as not to shake the camera. These are available for purchase, but very expensive for what they are. I've had mine for years, but it was a gift. I would not have paid what they want for one. I would have modified an old enlarger to mount a camera and then added lights on flexible arms to it's base, but that's me. I'm a "Maker", and make what I need, if what I want is too expensive, not made to suit me, or not available.
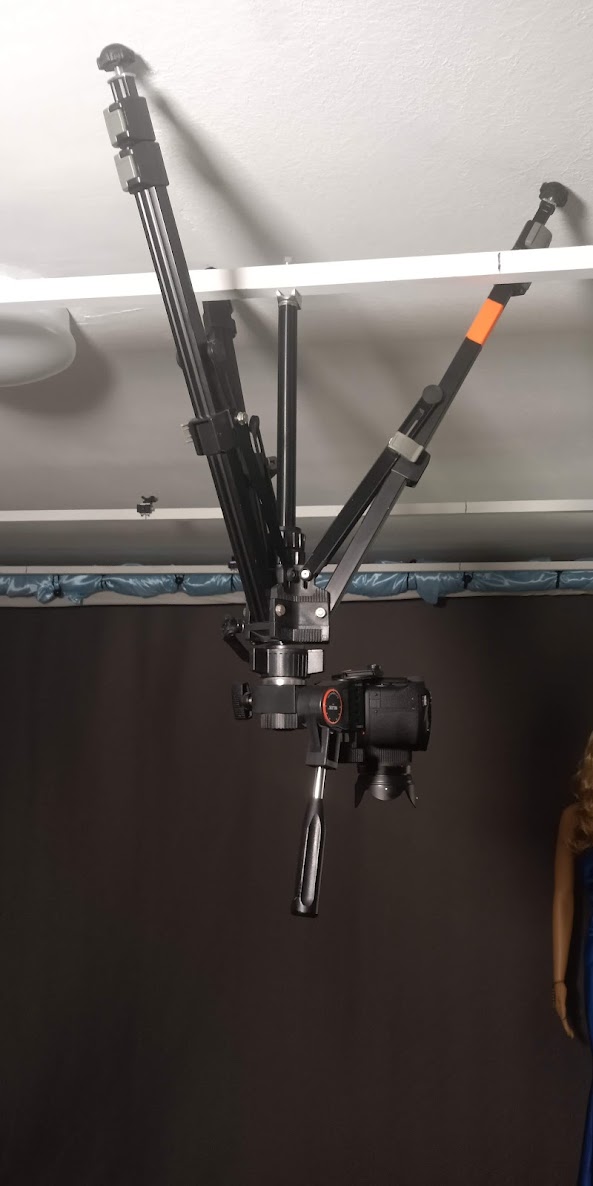
For digitizing a collection of very large antique movie theater coming attraction posters that a friend owned and wanted digitized, I needed a much larger way. I mounted one of my tripods (SLIK 212 Pro) that has a 1/4-20 threaded stud on the bottom of the center column and I attached the tripod upside down to my studio ceiling lighting support grid using this stud with the camera attached to the tripod and pointed straight down. Extending the tripod legs up to hit the ceiling stabilized the camera very well. I used several LED Light panels, also attached to the ceiling lighting support grid and positioned them to evenly light the poster that was placed on the floor. With a little experimenting, I marked the corner position of the first properly positioned poster using blue painters tape for two diagonal corners on the floor. It was then easy to weight down the edges of the posters with steel strips, aligning them with the blue painters tape corner markings, and then trigger the camera. Then change posters and repeat.
Sometimes you need to think a bit outside the box when hit with problems like this. What I did worked very well for the poster project and I had the whole project done quickly, once I had assembled and adjusted the equipment to do it. A photo of my upside down camera and tripod attached to my ceiling lighting grid is attached to this post. A photo of part of the ceiling lighting support grid is also attached.
Most any way that you can hang the lights and camera upside down above the floor or a table, high enough to let you easily fill the camera display with what you are digitizing, should work fine for this. I had the ceiling grid so I used it. A tall C-Stand with a boom arm could be used, but you will likely need several other stands to support the lights too, and the tripod leg spacing of these in close proximity to what you are digitizing might pose a space problem for your work area, but there are other ways to support things too. Your way will likely be different than mine. If it works for you, great.
The center column of my SLIK U-212 tripods have a 1/4-20 threaded stud, so the tripod head can be attached there for close-to-the-ground photos (of course upside down-but that doesn't matter since it can be rotated in POST. I normally keep an eye-nut on these, which is a metal ring with a 1/4-20 female threaded hole in the edge of the ring. This lets me hang weights under the tripod or tie the tripod down with parachute cord if I should be working outside on a very windy day.
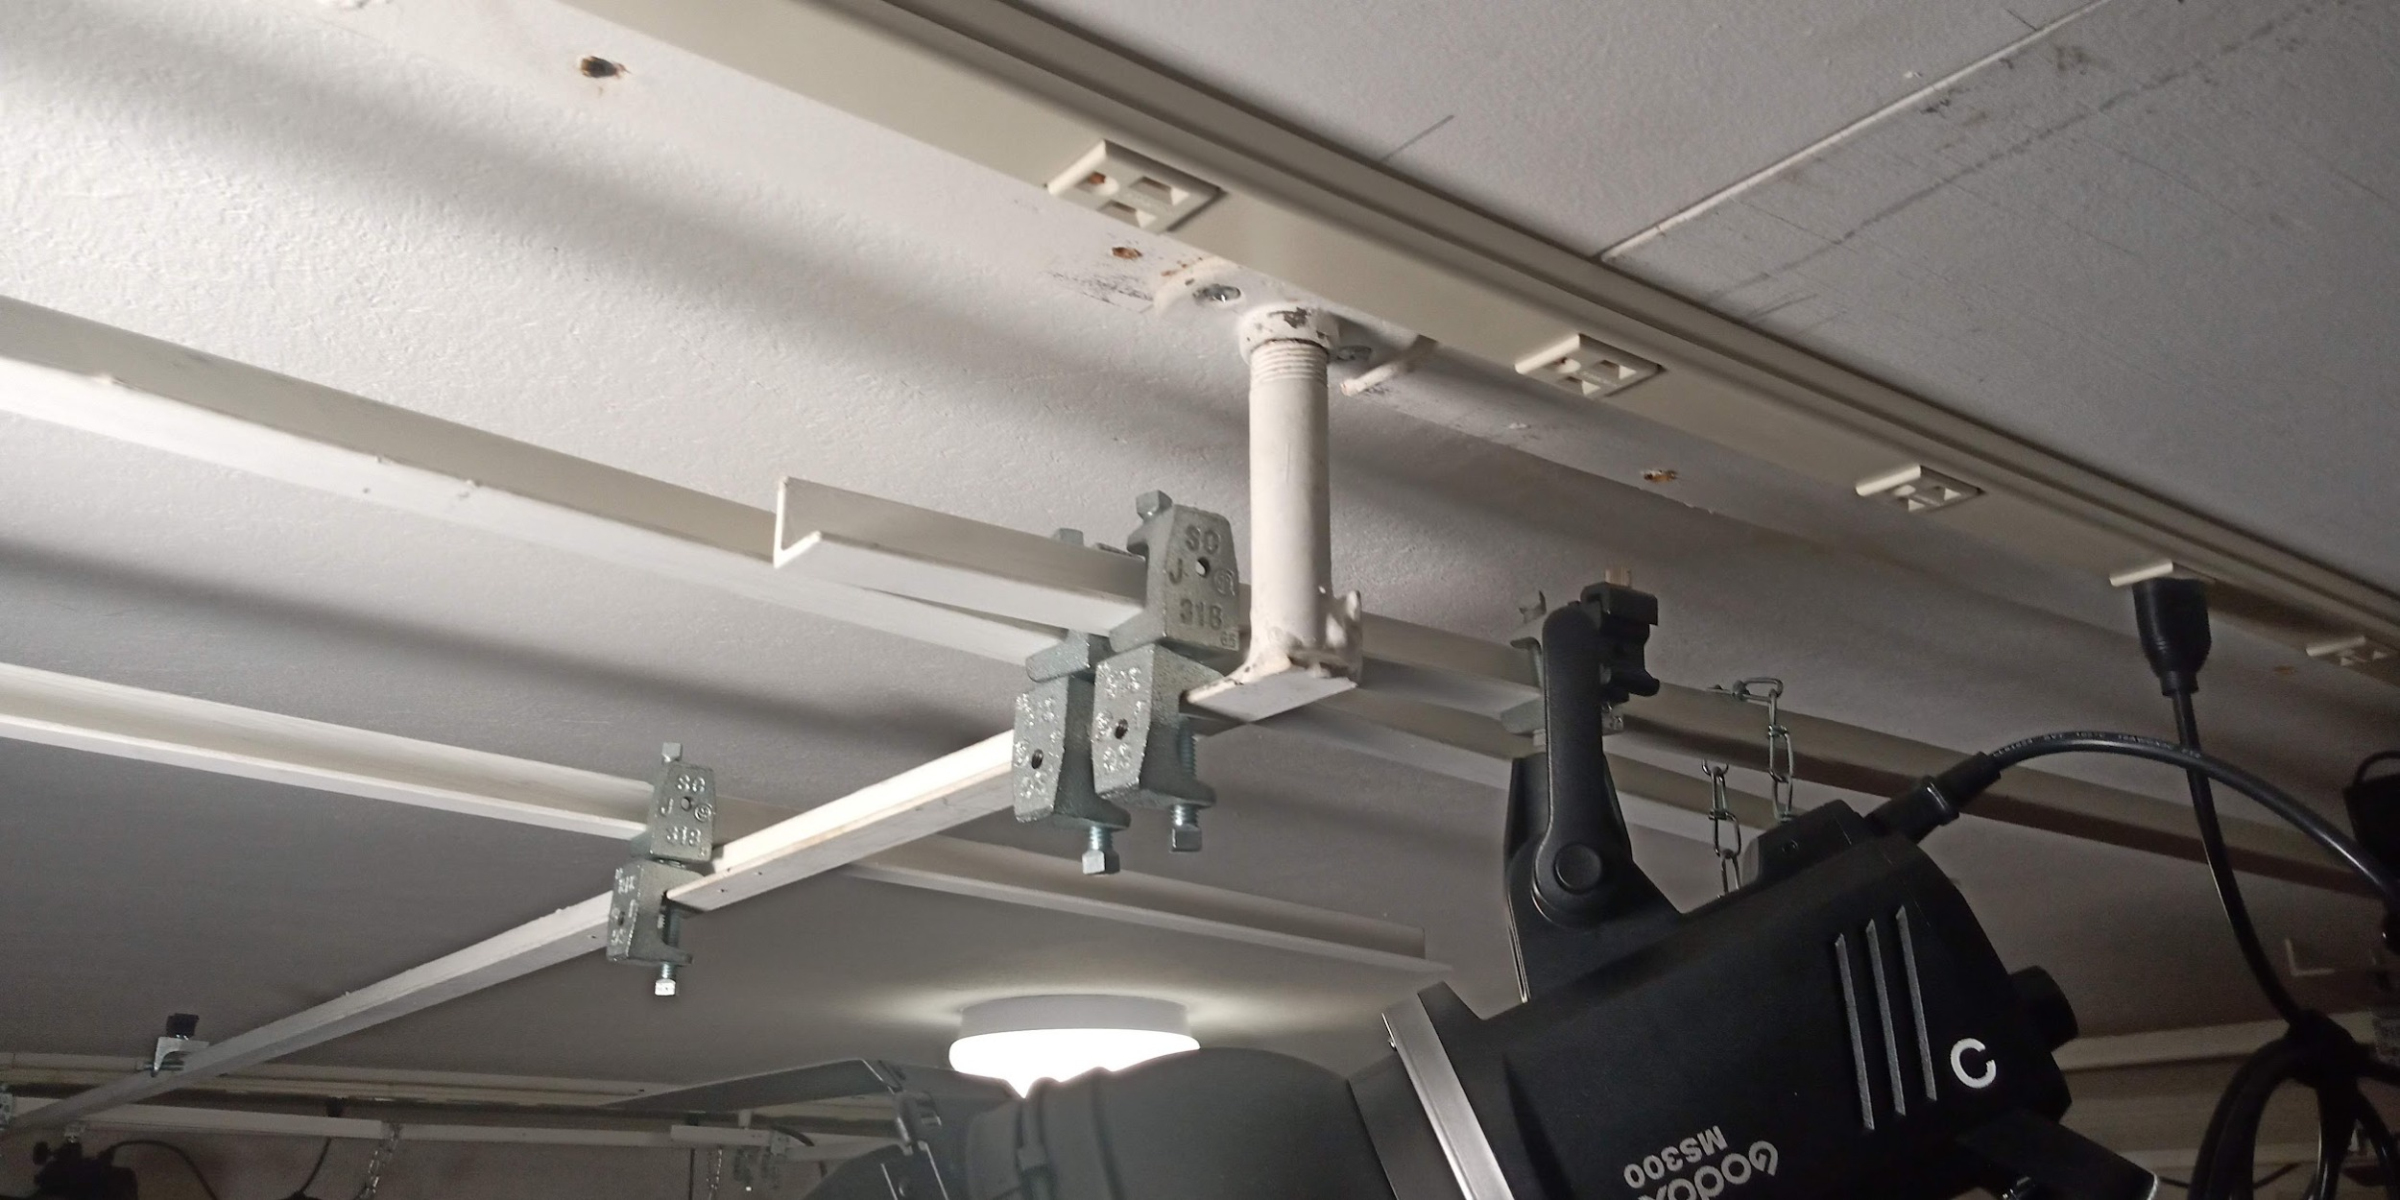
When attaching my tripod upside down to my ceiling lighting grid I use an Electricians Beam Clamp. These are small C-Clamps that electricians commonly use to attach lighting, electrical conduits and other things to structural steel members of buildings. The ones that I buy come with a 5/16 square head bolt into one side for tightening the clamp onto the building steel structural member (in my case, to my ceiling lighting support grid). Opposite and also at 90 degrees to this clamping bolt are 1/4-20 threaded holes in the body of the clamp to allow attaching things to this clamp. I have attached a photo of this clamp and the several ways that I have added photography hardware to them for use with my ceiling lighting support grid.
In the case of the upside down tripod, one of these beam clamps with no other hardware is just screwed onto the threaded stud on the bottom of the SLIK U-212 tripod center column and then the tripod is held upside down and the beam clamp then attached to the ceiling lighting support grid wherever I wish to locate it. I then extend the tripod legs up until they hit the ceiling firmly and lock them at that length, providing stability to the tripod. The entire ceiling grid is made from 1 X 1 X 1/4" steel angle and in this case the clamp is attached to the horizontal part of one of these steel angles.
I use these beam clamps to hang my lighting in a similar fashion. A beam clamp with a photography spigot (like the top of a light stand) bolted to it can be installed on the ceiling grid and then a light attached (upside down) to it. Whenever I hang lights I always use a safety chain loop and hook looped around a structural part of the light and the ceiling grid, since the attachment of the light to the spigot is just one loose wing bolt. If it becomes more loose, the light could fall without this safety chain loop and snap hook (D-Ring, etc.) as secondary protection.
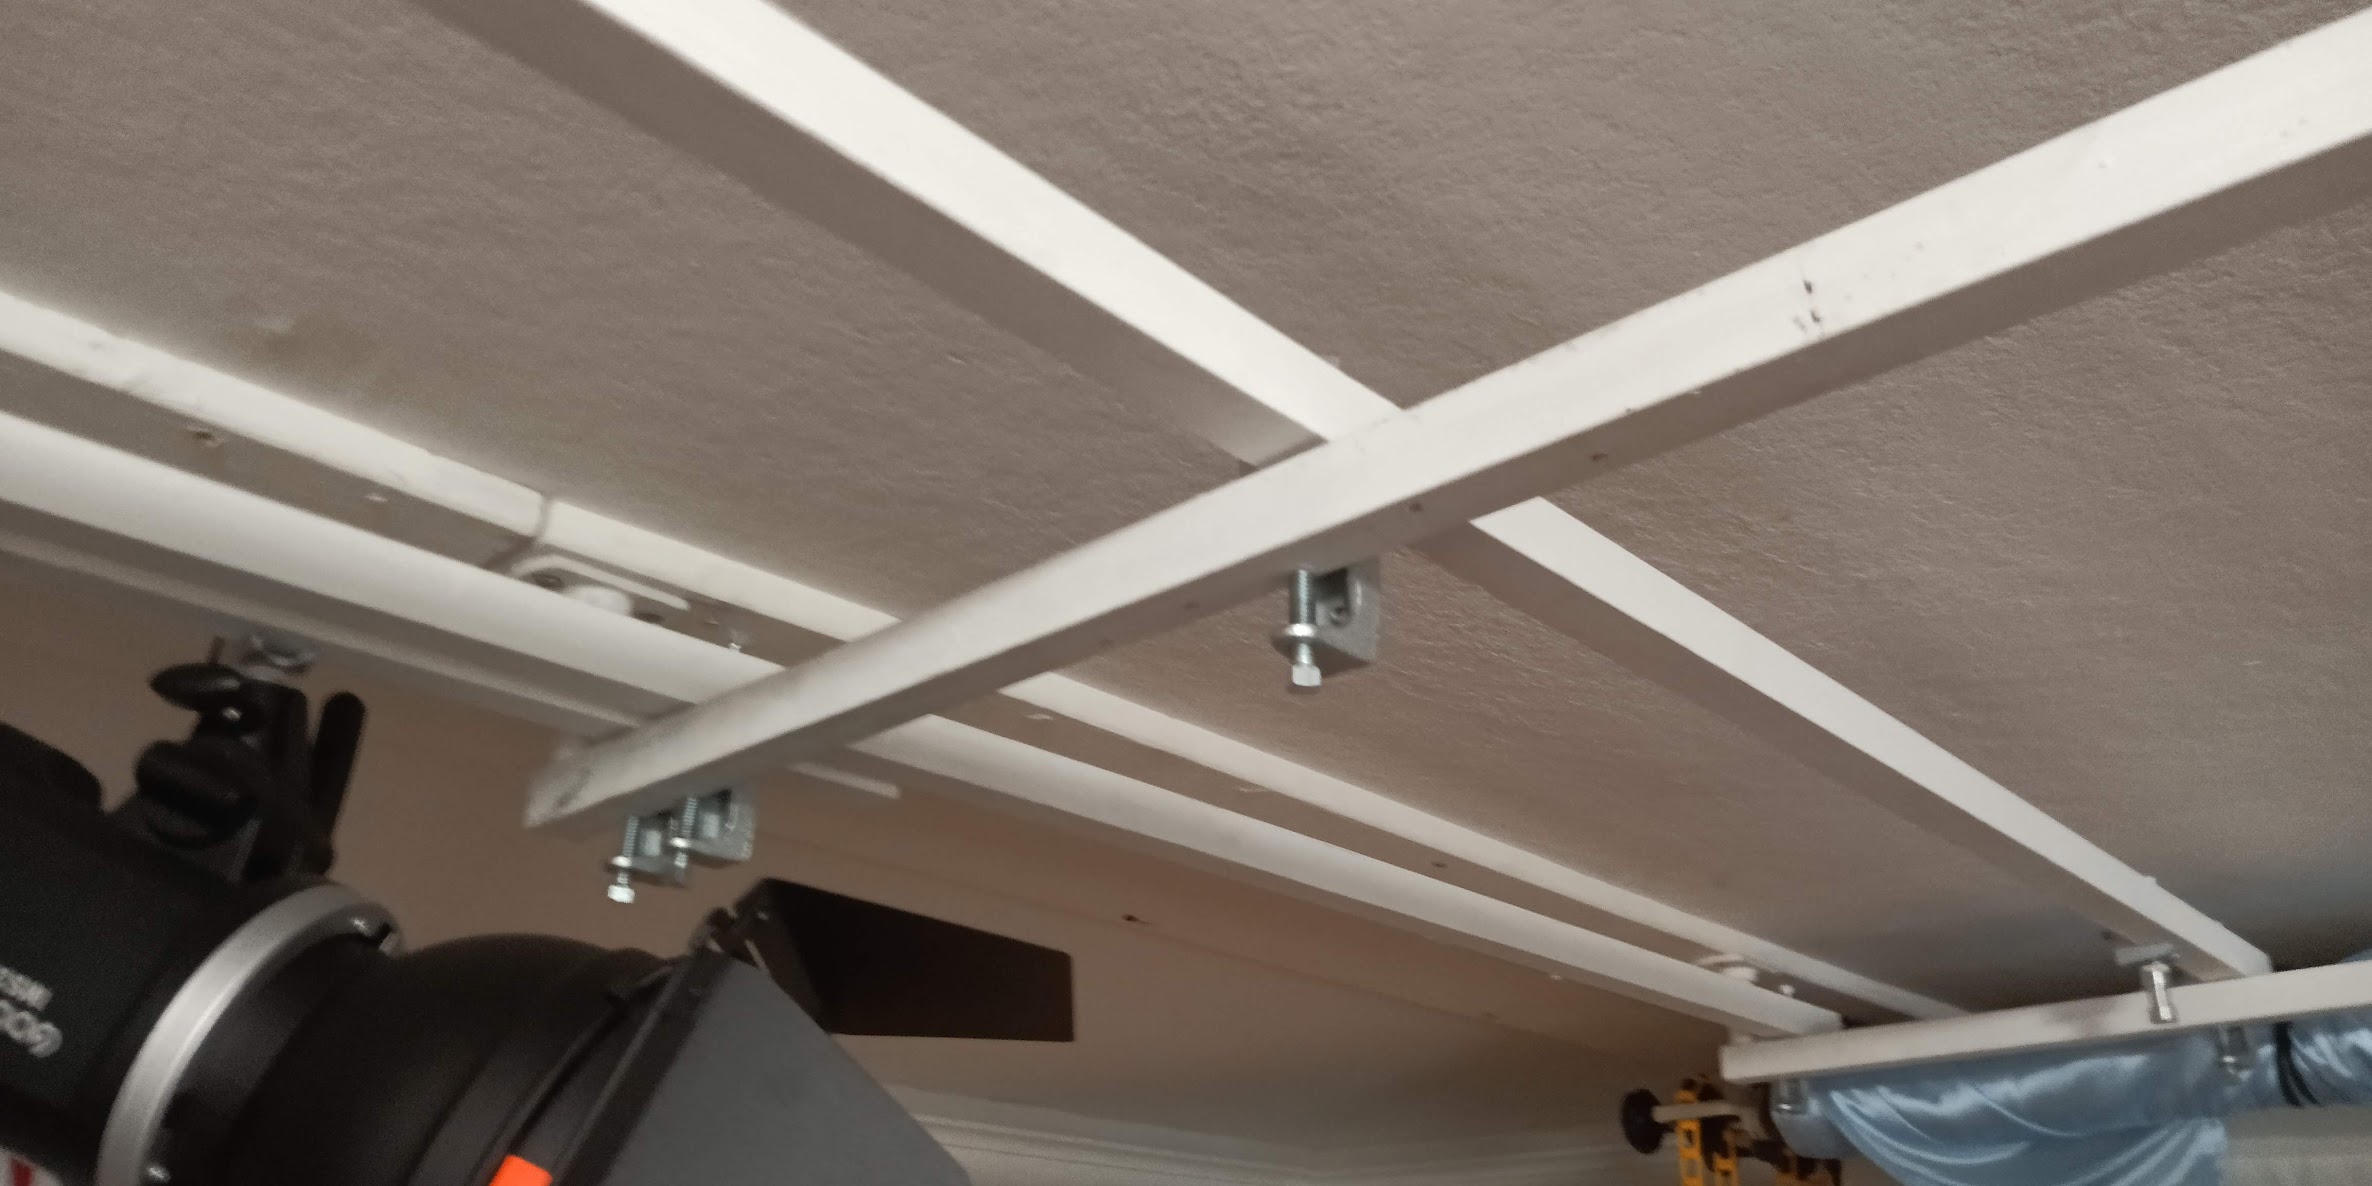
There are five 10' long steel angles spaced about 4' apart and parallel with my backdrops, each one connected to the ceiling at each end by 4" long 1/2" pipe nipples that are welded to the ends of the steel angles at 90 deg. to the angle. The first is about 4" from my backdrop system, then every 4' from there. A 1/2" floor flange is then screwed onto the other end (top) of these pipe nipples and provides 4 holes for screw attaching to the ceiling at each end of the steel angle.
Whenever I wish to place a light somewhere between any two of these steel angles, I have a bunch of the same size angles but they are 5' long. I use these to bridge between the 10 ft angles, locating them above the 10' angles, but connecting the crossing points together using a pair of the Electricians Beam clamps that are bolted together. One of these connects to the 10' angle and the other connects to the 5' angle. A pair of beam clamps is used at each crossing point. If one of these should ever come loose, the 5' long angle will fall down against the 10 ' angle and not to the floor, because they are always used above the 10' angles.
You will see the Wiremold electric outlet strip in these photos. One strip is running past each end of the 10' long angles and attached to the ceiling. This gives me an electric outlet every 6" of the outlet strip all the way to the backdrops on both sides of my shooting area. So there is power within 5' of everywhere that I wish to hang a light. All of my studio lights are powered this way.
No power cables and almost no tripods are ever on my studio floor. If a tripod or C-Stand does get used, the power for the light comes from above or an outlet on the side walls. This is a significant safety feature, especially in a small studio.
I have modified my small light stands. Why? So I could mount them upside down too. I added a wooden plug in the bottom of the center column with a 1/4" hole through it. Through the hole I inserted a 1/4-20 round head bolt. These bolts and plugs then get inserted and epoxied into the bottom of the center column of the tripods so they then have the 1/4-20 male stud just like the camera tripod. Using a beam clamp then allows me to install a light stand upside down on the ceiling lighting grid too. So using one of these modified light stands then gives me vertical adjustment of the light that's hanging from it.
Because I wish to use my small studio for both still and video purposes, I like to change as few things as possible when switching back and forth, so I have managed to install 8 LED light panels in a wide U pattern on the ceiling lighting grid up as close as possible to the ceiling. This made it possible to leave all of them up there when doing still shoots below them. So now when I want to do still shooting, I just hang my studio strobes and soft boxes below and leave the LED panels up there and ready to go.
With only one power circuit for the ceiling lighting grid, I wanted a way to be able to control the different kinds of lights separately. I did this using BN-Link Wireless power controls ES1513-5-2. A 5 pack of these, with two wireless remote transmitters, sells for about $30 on Amazon. Each transmitter has five pairs of On-Off buttons on them and the power control modules come numbered 1 - 5. The power control modules get plugged into an outlet and then the device that you wish to control then gets plugged into the module. So then you have separate buttons on each transmitter to control the power for each light that has it's own power module.
The great feature of these is that they can be easily re-programmed to make groups work together on the button pair of choice. So now I have two wireless transmitters (one near the still camera on it's light stand and one with the video camera on it's light stand). All of my lights each have one of these power modules. Button pair #1 on the transmitter now turns On and Off every one of my studio strobe flash units. Button pair #2 Turns On and Off every one of my video light LED panels, button pair #3 turns on and off all of my Black Light LED panels (yes black lights (for Halloween photo shoots, etc.), and I recently added two 1,000 watt focusing theater spot lights that found me for such a good price that I couldn't refuse them. Each is controlled by button pairs #4 & #5.
I also have 6 motor driven backdrops to raise and lower them remotely via a wireless control, also located on each camera stand. Switching backdrops can now be done in less than a minute during a photo shoot without the subject/model even realizing that it has happened behind them. At Last !! Full power control of my studio lights and backdrops, as well as "on camera" control of all of the light levels, etc. with the on- camera transmitter and switching from video to still shooting or back in the same small studio usually can be done in 10 minutes or less.
I know that this is a lot more than you asked for, but maybe it will get others thinking about and considering implementing some of these ideas. I did most of it because I am getting too old to be spending much time moving things, packing it up and then unpacking and setting up again in a day or two. Getting the "Trip hazards" eliminated, or at least greatly reduced was also one of my reasons. I'm also a "control freak", since most of my career was spent as an Electrical Engineer, designing control systems mostly for manufacturing automation. I was also the stage manager of an Off Broadway Theater for a year early in my working career - this affected my thinking of putting lights and power on the ceiling instead of stands. My ceiling lighting support grid is kind-of a specialized Erector Set using commonly available parts to make it low cost and as easily re-configurable as possible, with safety in mind, both for the user as well as the visitors.
I hope I've given everyone considering their own photo/video studio something to think about.
The Fujifilm XT5 is a 40MP mirrorless camera capable of 6.2K video at 30p. With those specs, it’s an ideal choice for photographers needing a camera to pull double duty for imaging and video.
The Canon EOS R100 is an entry-level mirrorless camera introduced in 2023. But just because it’s an entry-level camera doesn’t mean it’s a bare-bones camera. Find out why in this review!
Nikon’s retro-looking Nikon Zfc is anything but retro. Under its classic body is a host of features and amenities that make it a worthwhile compact mirrorless camera for 2024.
The Canon EOS R50 is one of the newest R-system cameras from Canon. Is it worth your money? Find out all the details you need to know in this comprehensive review.
The best beginner camera isn’t the same for everyone. That means having choice is of the utmost importance. In this guide, explore five excellent beginner camera options for 2024 and beyond.
Child portrait photography is a unique undertaking requiring special skills and talents to get the best results. Start mastering this photography niche with these essential tips!
The Fujifilm XT5 is a 40MP mirrorless camera capable of 6.2K video at 30p. With those specs, it’s an ideal choice for photographers needing a camera to pull double duty for imaging and video.
Using leading lines in photography helps improve the composition by drawing viewers in and leading their eye from the foreground to the background. Explore some fine examples of this in this guide!
The Insta360 has one of the best lineups of action cams and 360-degree cameras. With these Insta360 accessories, you can elevate your photography and videography game!
Creating impactful photos of landscapes depends on many factors, not the least of which is your talent behind the lens. This guide explores other elements required for the best product.
The Canon EOS R100 is an entry-level mirrorless camera introduced in 2023. But just because it’s an entry-level camera doesn’t mean it’s a bare-bones camera. Find out why in this review!


 TCav 9 posts
 CharleyL 5 posts
 Sawyer 5 posts
 Jason Stevens 3 posts
 db3348 3 posts
 Scotty 3 posts
 Tristan R 3 posts
 Razky 3 posts
 Hassner 3 posts