Magic Lantern: Canon Firmware Upgrade
- Magic Lantern 5D Mark II
- Magic Lantern 5D Mark III
- Magic Lantern 6D
- Magic Lantern 7D
- Magic Lantern EOS M
- Magic Lantern T1i
- Magic Lantern T2i
- Magic Lantern T3i
- Magic Lantern T4i
- Magic Lantern T5i
- Magic Lantern 50D
- Magic Lantern 60D
- Ensure your camera battery is fully charged. You must use an original Canon battery, not a third-party one.
- Remove all accessories from the camera body (i.e., external flash, camera grip).
- Have a card reader handy.
- Double-check the version of the Canon firmware running on your camera.
- Put the camera in Manual Mode.
- Restore your camera to default settings. This restores the original Canon settings and removes any custom settings that you have enabled.
- Format the memory card in the camera.
- Unzip all the files from the Magic Lantern .zip file to the root of the cared.
- Begin the firmware update process, and follow the instructions on the screen.
- When the green confirmation screen appears, restart the camera.
- If you encounter difficulties, visit the Magic Lantern troubleshooting section.
- Open the Canon Menu system and restore your preferences. On the Canon 60D, Rebel T2i, and Rebel T3i, enable manual video exposure. On the Canon 5D Mark II and 50D, enable live view shooting. You will likely have to re-install any custom picture styles you had as well.
- In live view, toggle the Info/Disp button until you see the audio levels and footer bar of Magic Lantern.
- Press Delete to open the Magic Lantern menu. There, read the Help Text that pops up.
- Read the User Guide, and start enjoying Magic Lantern!
- Press and hold Set when starting up the camera. This bypasses Magic Lantern for the current session.
- Format your card in the camera and select "Remove Magic Lantern."
- Disable the bootflag to uninstall Magic Lantern. This is done by running the Firmware Upgrade. Simply follow the on-screen instructions to complete the uninstall process.
 photo by PatriciaEnciso via iStock
If you're a Canon shooter, the chances are good that you've heard of Magic Lantern. That makes sense because it's not a new thing.
In fact, Magic Lantern has been going strong for a decade now, helping Canon camera users increase the functionality of their camera by enhancing its software.
For the uninitiated, this article will answer common questions about Magic Lantern, like "What is Magic Lantern?", "How to install Magic Lantern?", and "How to use Magic Lantern?"
What is Magic Lantern?
As described by the nice folks at Magic Lantern, it is a "software enhancement that offers increased functionality to the excellent Canon DSLR cameras."
No, it's not a hack. Instead, it's an open framework (that's licensed under GPL) for developing extensions that work with Canon's official firmware. The program launches from your memory card and runs alongside Canon's software. The only modification that's made is to enable the software to run from a memory card.
Magic Lantern gives Trammell Hudson credit for creating the program. Get an introduction to Magic Lantern in the video above Alexander Fox (and featuring Trammell too).
Today, photographers and videographers the world over are adding more and more functionalities to it that add HDR controls, timelapse, focus assist, manual audio, motion detection, and a whole host of other features to Canon cameras.
Below is just a smattering of cameras that are currently supported by Magic Lantern (each camera is hyperlinked to a YouTube tutorial for Magic Lantern on that specific camera):
Magic Lantern for the Canon SL1 and Rebel XSi are in development, and it also works with the Canon 5D, though the build it no longer maintained. Get in-depth informatioion about Canon 5D Mark IV camera on our website PhotographyTalk.com.
You might be wondering why Magic Lantern is only available for older models. The answer is simple: since the camera's firmware has to be reverse-engineered, it takes a while to get the software just right.
 photo by nortonrsx via iStock
Something else you might be wondering is, "Is Magic Lantern safe?"
By and large, Canon shooters swear by Magic Lantern and laud it as a must-have that expands your camera's capabilities.
Having said that, as Magic Lantern notes on their website, nothing is guaranteed and Canon does not endorse the use of Magic Lantern. The program changes some of the camera's settings, and if those are changed incorrectly, the camera might not turn on.
What's more, using it will more than likely void the camera's warranty, if, in fact, the camera is still within the warranty period. Even if it isn't under warranty, if something goes awry with Magic Lantern and you seek help from Canon to fix your camera, you likely won't get it.
Features of Magic Lantern
Since Magic Lantern is open source, there are tons of features that have been developed and are currently in development that you otherwise couldn't find on a Canon camera.
In the video above, PhotoRec TV explores a number of awesome Magic Lantern features. Below are screenshots of a few of these features with quick explanations.
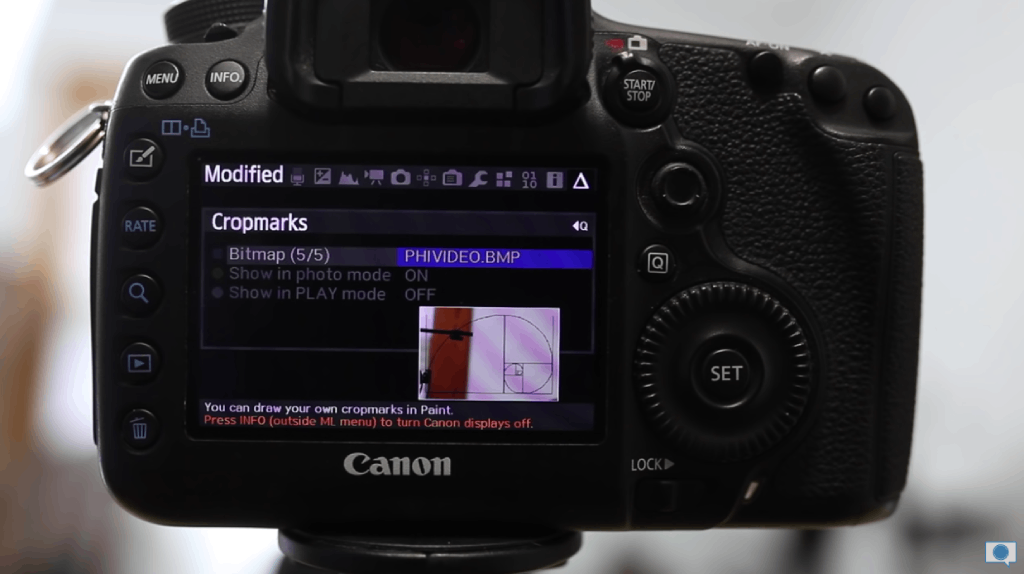
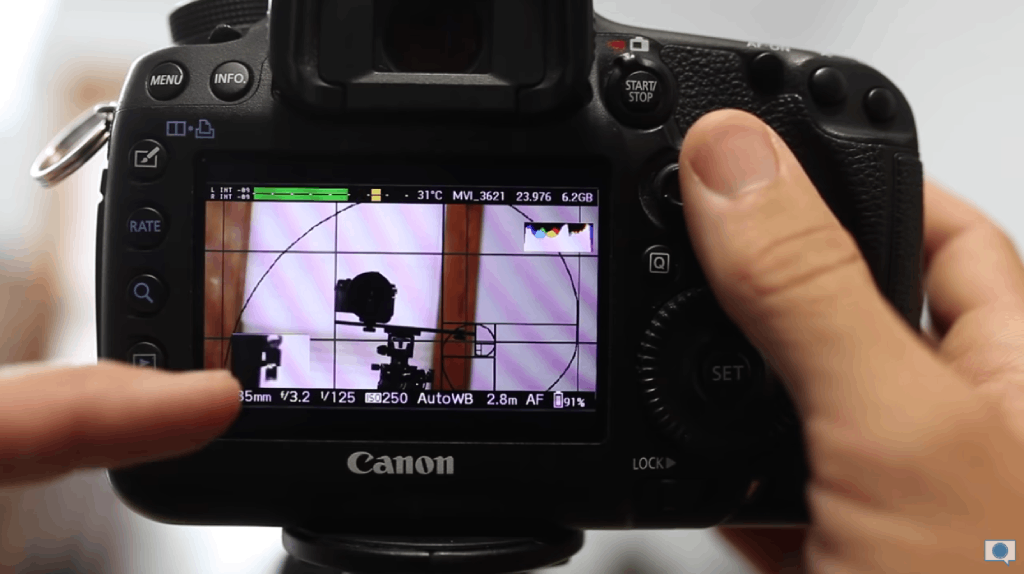
Magic Lantern Features: Cropmarks
 YouTube Screenshot/PhotoRec TV
Sure, you can use the standard 3x3 overlay when shooting in live view, but why not use the Golden Ratio overlay from Magic Lantern?!
Above, you can see how the Golden Ratio overlay looks on the LCD. Though many scenes are well-suited for the more traditional rule of thirds overlay, using the Golden Spiral can help you create much more advanced compositions that have enhanced visual appeal.
Note that this is just one of many different overlays that you can use with Magic Lantern.
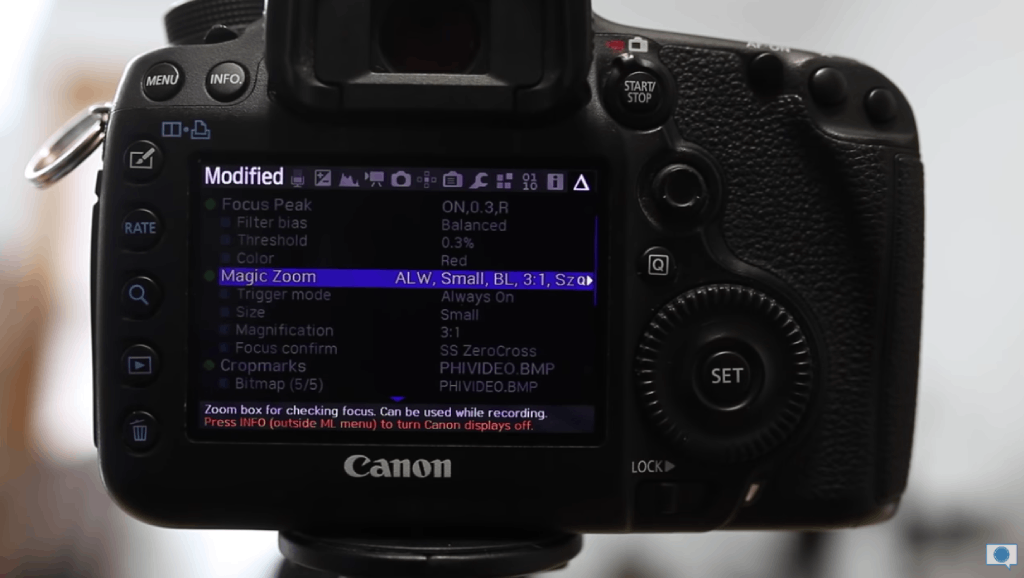
Magic Lantern Features: Magnification for Video
 YouTube Screenshot/PhotoRec TV
Though you can magnify on the camera's LCD to focus for video, as soon as you press record, that magnification goes away.
Unless, that is, you're running Magic Lantern...
Using "Magic Zoom," you can get that focus you need and have a constant view of magnification at the same time.
 YouTube Screenshot/PhotoRec TV
Above, you can see the small display at the bottom-right, which maintains the magnification from earlier while you're recording.
Magic Lantern even displays green bars on the top and bottom of the magnification box to help you achieve maximum sharpness.
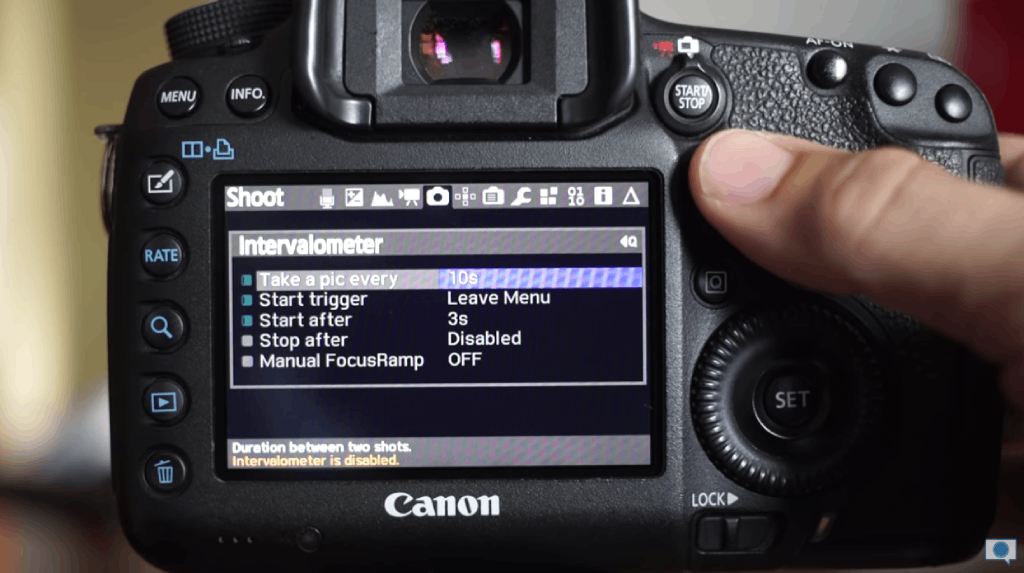
Magic Lantern Features: Intervalometer
 YouTube Screenshot/PhotoRec TV
Yet another great way that Magic Lantern improves the functionality of Canon camera software is by adding an intervalometer.
An intervalometer is a crucial feature to have if you want to take time-lapse photos because it allows you to tell the camera to take a picture at a predetermined interval.
Not only is this convenient from the standpoint that you now get a built-in intervalometer, but it's also a money saver because you don't have to buy an intervalometer that plugs into your camera.
Magic Lantern Features: Focus Peaking
Focus peaking gives you a visual indication of what areas of the scene are in focus.
Though it sounds very simple, it's actually an incredibly helpful tool for getting tack-sharp photos. It also makes much easier work of getting the focus just right when using a manual focus lens.
But focus peaking is just one of many focusing features that Magic Lantern adds to Canon EOS software.
In the video above by Robert Ballou, get a complete run-down of the Magic Lantern focusing menu.
Magic Lantern Features: Other Handy Tools
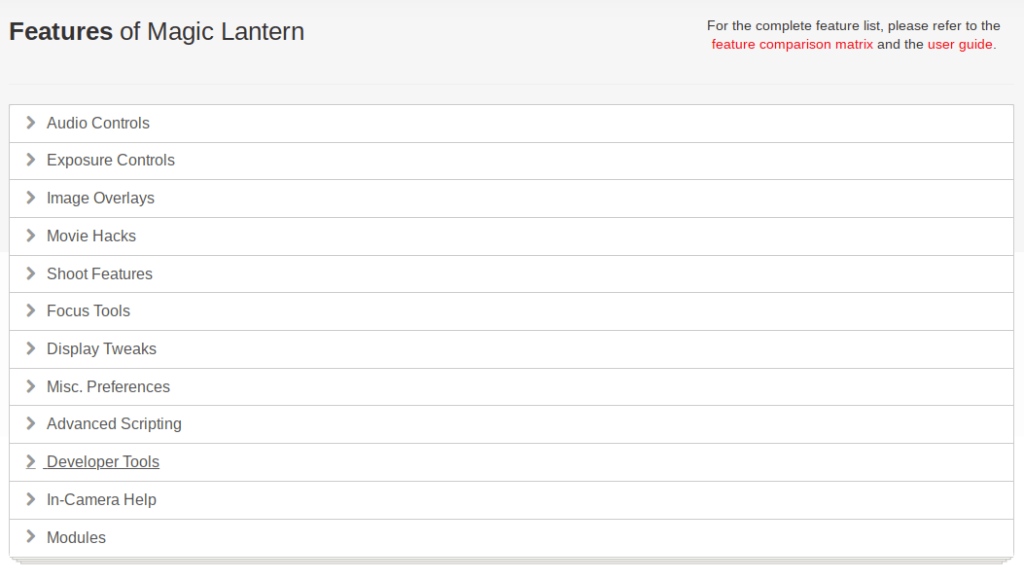
On the Magic Lantern website, you'll find a list of features broken down by topic, as shown above.
As you can see, Magic Lantern isn't just about providing you with more functionalities for photography, but there are also all kinds of features for improving audio and video performance of the Canon firmware.
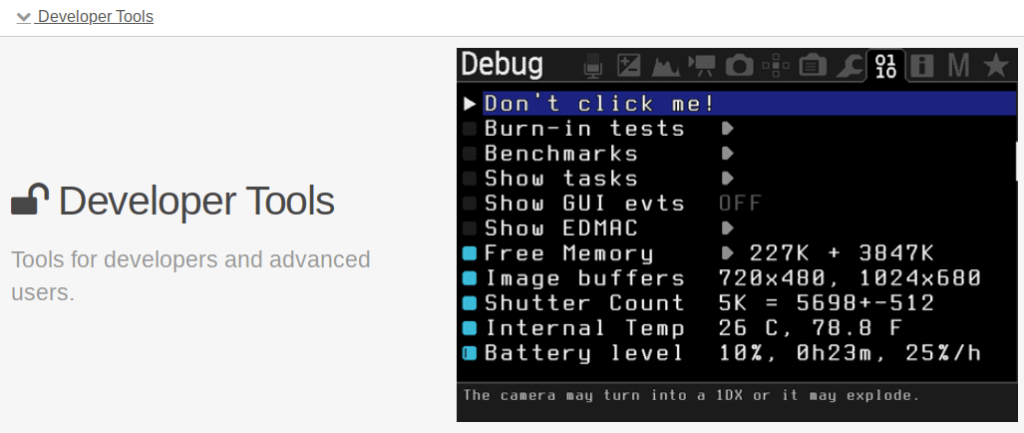
The Developer Tools are also handy because they give you a look under the hood at some important metrics.
You can see how much free memory is remaining, inspect the image buffers, get a readout of the internal temperature of the camera, and much more.
Magic Lantern also has companion software that enhances Nikon cameras, Panasonic cameras, Sony Cameras, and more. Get access to that here.
Magic Lantern Pros and Cons
As with anything, there are some upsides and downsides to Magic Lantern.
Naturally, the features listed above are some of Magic Lantern's best assets. But what are the cons of Magic Lantern?
We've discussed one major disadvantage - Magic Lantern voids the warranty.
For more details on some of the downsides of Magic Lantern, check out the video above by ZY Productions.
How to Install Magic Lantern
The following steps on how to install Magic Lantern are taken from the Magic Lantern Install Guide.
How to Install Magic Lantern: Prepare Your Camera
 photo by DragonImages via iStock
How to Install Magic Lantern: Format the Card and Install the Software
How to Install Magic Lantern: Start It Up
 photo by Ranta Images via iStock
Magic Lantern notes that you must wait for the LED confirmation before removing the memory card from the camera, unless you're using a Canon Rebel T2i.
How to Uninstall Magic Lantern
 photo by Srongkrod via iStock
If you decide you no longer want to run Magic Lantern on your camera, the process for uninstalling it is straightforward:
And there you have it! Now you know what Magic Lantern is, what it does, how to use it, and how to install and uninstall it.
All that's left now is to experiment with Magic Lantern and let it unleash the potential of your Canon camera.