
12 Step Guide to Taking Better Bird Photographs
- Use parks or your backyard: it doesn’t have to literally be your backyard, in fact many areas might have these only a mile or two away. Also any hunting property or areas that you or a close relative may keep stocked for winter makes a good practice spot.
- Plant native plants: native plants attract native animals, such as humming birds, butterflies, and some small animals such as rodents or whatever is local to you. In Michigan there are over 100 types of native plants that humming birds will pollinate daily. That is a lot of photo opportunities, but even the small rodents I mentioned are useful: they attract the really cool stuff like Hawks and owls!
- Water and shelter: also help that is why this works best in a slightly forested backyard or a yard with at least some trees and bushes. If you have a lot of land you might even consider putting in a reflecting pool. However if you don’t have all of this handy don’t feel the need to landscape just look for areas that already contain this.
- Research what you want to attract and where it might be nearby: If you want an eagle you might have to settle for a hawk or heron first. That’s not a bad thing, its great practice.
- Stabilization: stabilization is key, especially if you are shooting at a far distance. You are going to need image stabilization and a fast shutter speed. I also recommend a tripod, something light, but stable. I do not recommend buying a 50-dollar special from the local supermarket for this.
- Fast lens: the shutter speed means that you are likely going to need to open your aperture all the way up. This means your lens will be pricy. If you can get a lens that will open to f/2.8 buy it, I wouldn’t go above an f/4 as my lowest setting. And try to get a primed aperture, or an aperture that will not forcibly increase as you zoom.
- Practice: Practice with your equipment in the last section I mentioned researching where your birds of choice are. Take your camera out and look for the birds, on the way take pictures of other birds and wildlife to get better I’ve heard that photographing sea gulls is a great way to practice white balance and exposure for bald eagles.
- Patience: this is the point where you are going to start having to sit and wait. It might take a while to even see the bird you are looking for, and even then you aren’t guaranteed a good shot.
- Research your birds’ behavior patterns: This will allow you to plan when you need to go out to take those amazing pictures. You will have already gotten the birds’ habitat picked out, now you know the best time to get the picture as well.
- Vantage point: If you are capturing birds in flight its best not to be shooting them from the bottom up. It helps to find a vantage point where you can see them take off and land. A hill or climbable tree near their habitat is always helpful but make sure there is a cleared shot.
- Composition: A good wildlife photo requires good composition just like anything else. If the bird is lightly colored it will show up better on a darker background, you should focus on the eyes, the depth of field also needs to be considered.
- Don’t get frustrated: The keeper rates for bird photos is roughly 1 per 100. In the beginning you may be getting a much worse keeper rate. After a while you might get a much better one. Don’t be too hard on yourself if you have to shoot 3500 photos to get 10 good shots your first time out.
Hello,
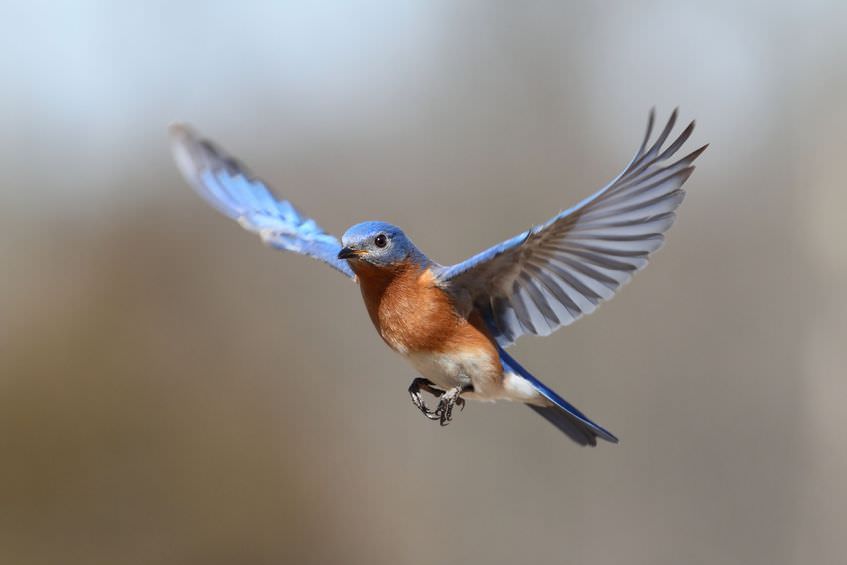
Welcome to the weekly newsletter, and the picture of the week! This week’s lesson was inspired by this great photo from Tracy. To be honest I’m not sure what sort of bird it is but I’m guessing some type of heron. Good shot Tracy. I love all of the natural and wildlife photography I’ve seen uploaded lately and this week’s newsletter is all about inspiring more of you to go out and take more pictures like that.

While normally I divide the newsletter into sections from beginner to advanced that builds on each other it’s a bit harder to write tips that build on each other in list form. But I’ve attempted to do just that. If you are a beginner you can follow all the suggestions here to build your skill up, or if you are intermediate or advanced you can peruse the tips and take what you want.
PRACTICE
The goal I’ve set for beginners is to go out and practice However, I’m from Northern Michigan where patches of forest are like clouds in the sky, It’s not hard to see one if you just look up, so you may have to do research on some of these things. The best thing about practicing in one of these areas is that you can get away with not having the best equipment yet.
EQUIPMENT
On of the huge things about nature photography is the equipment. Over the years I’ve become an expert at buying great equipment at lower prices, sometimes I have skimped on features as long as I got the image quality I wanted. For nature photography you want all the bells and whistles, trust me. The reason that I suggest this as an intermediate step is that it takes a vast investment to get what you are looking for in most cases, so make sure you are ready. In fact I might even recommending stepping up equipment gradually as your needs increase.
RESEARCH & EXECUTION
This is when you go out and prove that you are the great nature photographer you know yourself to be. But even this takes work.
Click here if you missed last weeks newsletter