
Lesson 2: Reducing Ghost Artifacts
- Change the Ghost Reference Image to the exposure you would like the movement to be drawn from. (In this case, the default exposure '0' worked perfectly. In some exposure series, it is best to click on another exposure in the filmstrip to get the results that you are looking for)
- Reduce the Ghost Reduction strength if you have any unwanted image details in your image
One of the major problems that we run into when shooting High Dynamic Range exposure series is that objects in the scene can move between each image in a series. When objects move in a series of images and are later merged together, unwanted details can be created in the merged image. These unwanted details, called ghost artifacts, sometimes appear as transparent or partially formed objects. HDR Efex Pro 2 has some pretty special tools that help remove these artifacts.
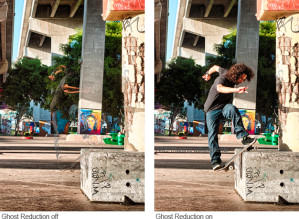
Image © Zach Petschek
Within the HDR Efex Pro 2 merge dialog, a powerful Ghost Reduction algorithm has been implemented to help reduce ghost artifacts. In the example below, we will take a look at how we can make the skater whole again.

Step 1: To turn on ghost reduction, I clicked the check box in the Ghost Reduction section of the Merge Dialog. This will activate the Ghost Reference Image and apply the initial ghost reduction.
 |
Step 2: Next, I changed the strength of the Ghost Reduction by selecting 100% to blend the original image with the image created in HDR Efex Pro 2. The percentage values determine the amount of blending of the different images together. |
If the initial ghost reduction is not what you are looking for at the default settings, try the following:
|
|
 |

 |
Below is an example of a different Ghost Reference Image being selected, ‘1 1/3’. |
 |
The skater is not showing up in the image and the results were very different. |
To view the ghost reduction, I zoomed in by clicking the Magnifier button in the lower right hand corner of the image interface. The Loupe Tool appeared, so that we could view our image and ghost reduction. To move the Loupe Tool, simply click and drag it over the desired area.

Making minor adjustments to this image helped to fix the problem with a moving object in a series of images. Try using Ghost Reduction in your own images with these methods to get the results you are looking for.