Step Up Your Bridge Photography Game With These Quick & Easy Tips
Ask any photographer what man-made objects they most like to photograph, and I’d be willing to bet that bridges will be among the most common answers.
Bridges make excellent photographic subjects thanks to their lines, curves, and shapes, their soaring towers, beautiful lights, and in some cases, interesting colors and textures as well.
But you don’t have to visit the Golden Gate Bridge or Brooklyn Bridge to create a breathtaking image of one of these structures…
Using the tips outlined below, you can make nondescript bridges look their best.
Let’s get started!
Editor’s Note: To illustrate each point, I’ve utilized photos by my buddy Scott Setterberg of ColorTexturePhotoTours.
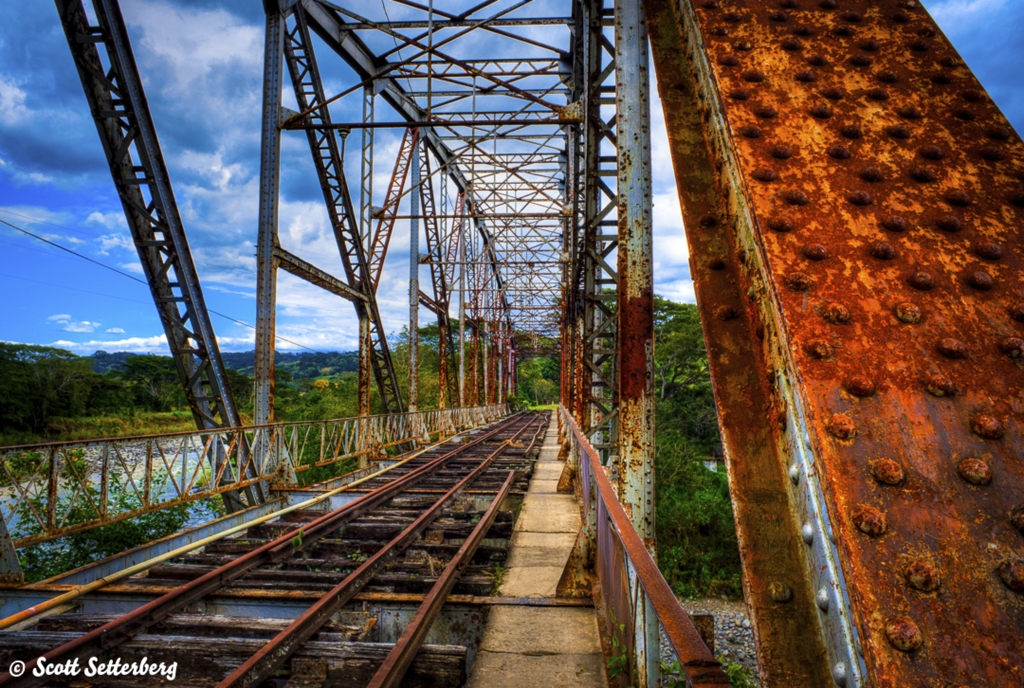
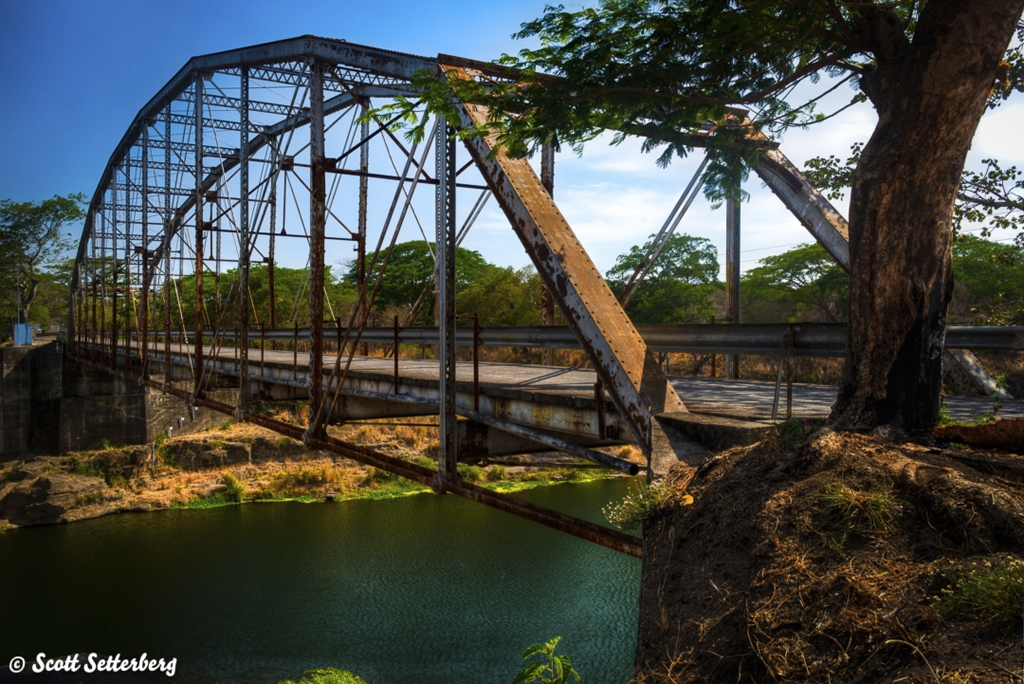
Bridge Photography Tip #1: Find the Details
Everyone strives for the “postcard shot” of a bridge at sunset or set amongst the surrounding landscape. Don’t get me wrong - those photos can be breathtaking and should be on your shot list!
But what fewer photographers do is find the smaller details of a bridge that are nonetheless beautiful.
As you can see above, this old bridge has seen better days, but that rust and decay are certainly beautiful in their own way.
By positioning yourself up close to a beam or girder that’s covered in rust, you can bring that delightful color to the forefront of the shot.
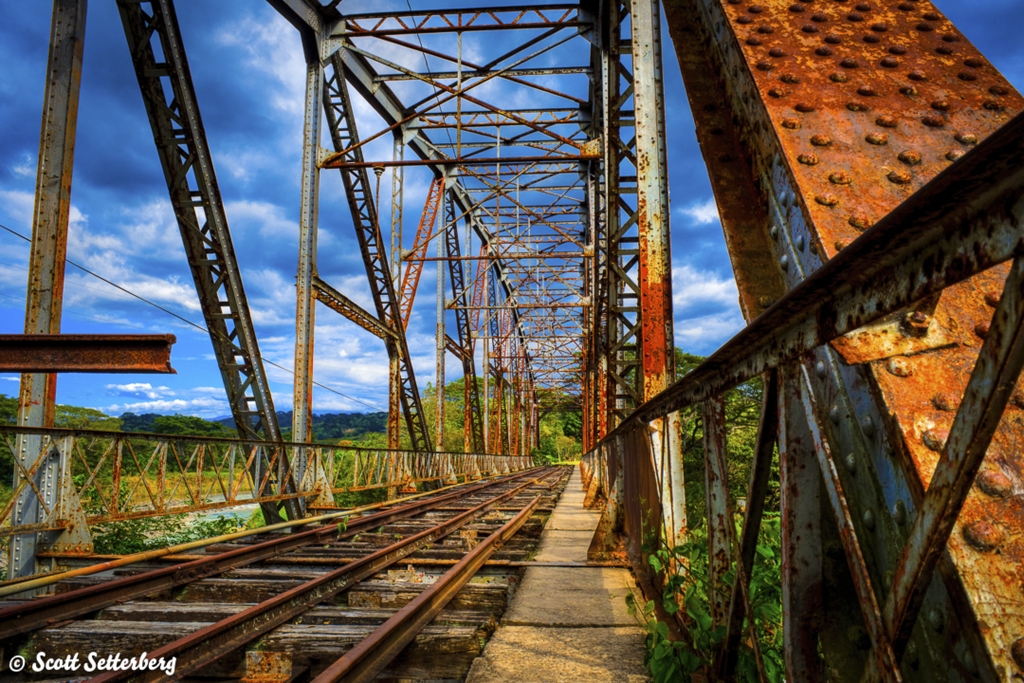
Bridge Photography Quick Tip: Rather than filling the frame with the details you wish to highlight, frame a slightly wider shot, as shown in the two images above. Doing so allows you to highlight those finer details - the rust and rivets, for example - while still allowing the viewer to see the larger context of the bridge. Additionally, play with the perspective to get photos that have a different look and feel. The image above - which was shot from a lower perspective than the image previous - brings the guardrail into our view, which then leads our eyes through the image.
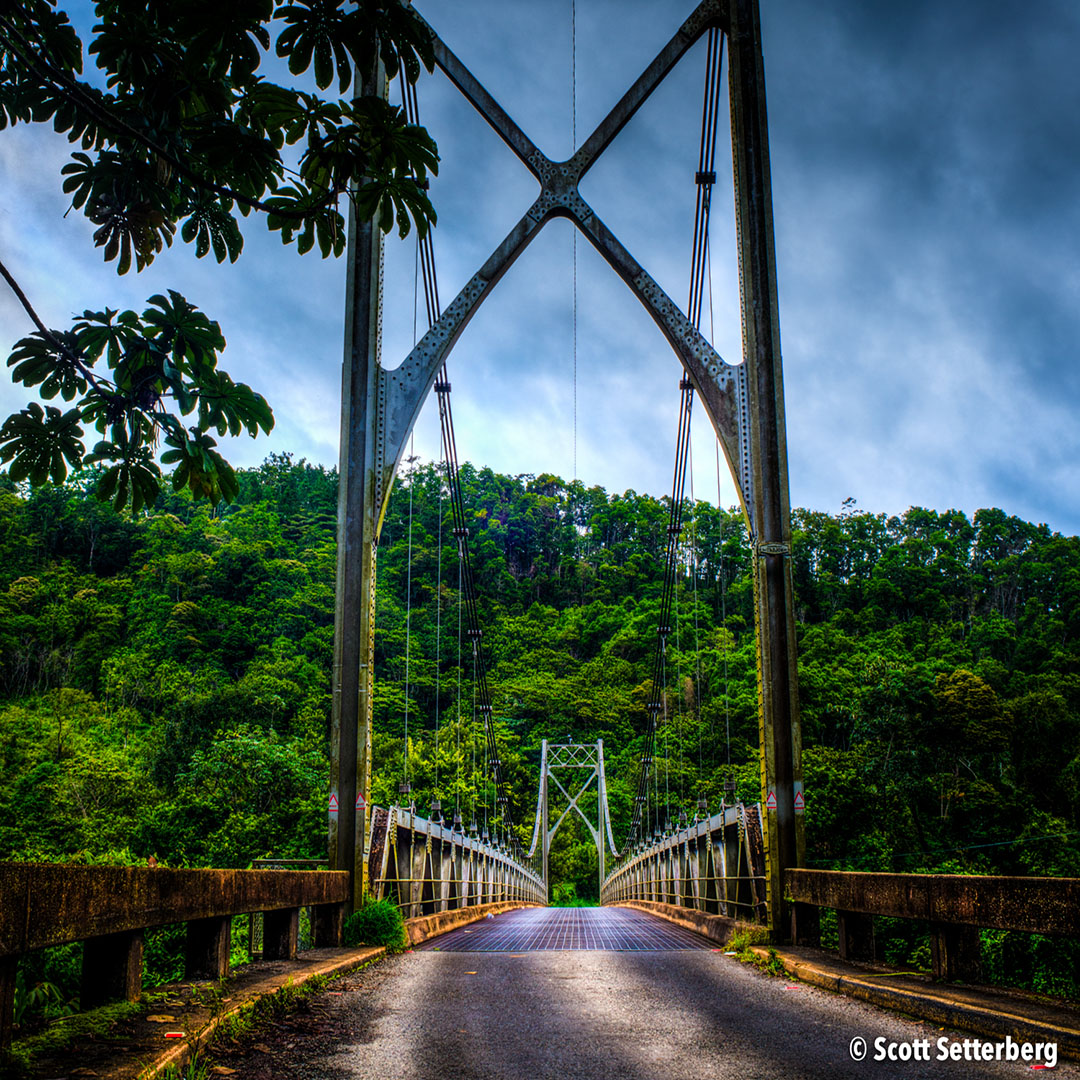
Bridge Photography Tip #2: Symmetrical Shots Must Be Perfect
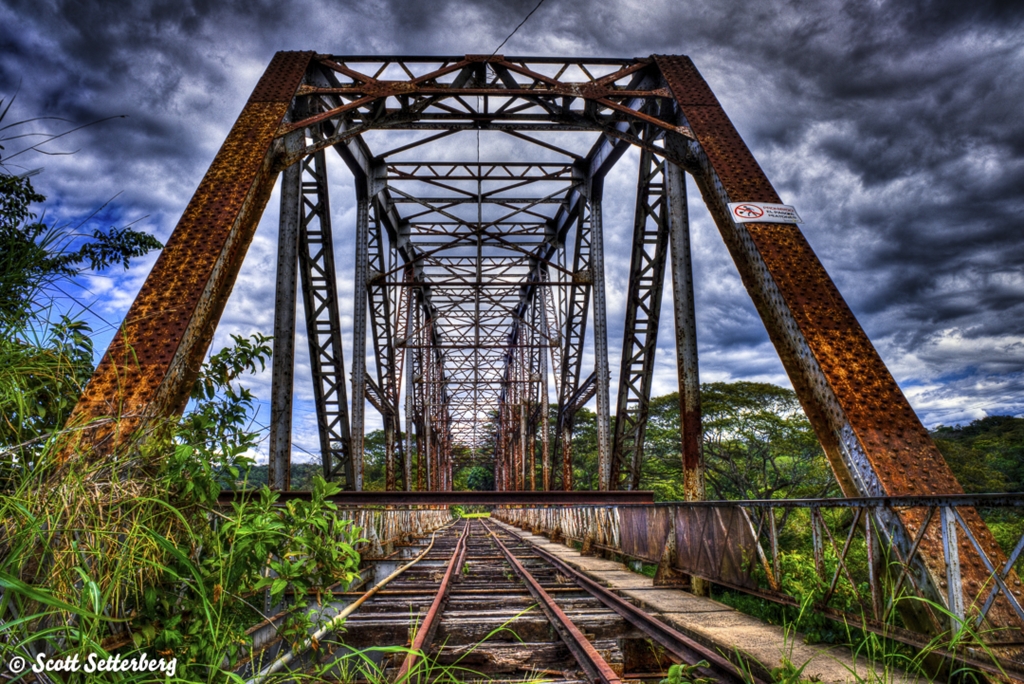
One of my favorite bridge photography compositions is a view right down the bridge. I love the symmetry that results from getting the framing just right.
But for the image to be as successful as possible, it must be perfectly symmetrical, as shown above.
Without that symmetry, the image can feel unbalanced. Likewise, a perfectly symmetrical shot helps make sense of all the lines of a bridge that can compete for your attention.
Getting perfect symmetry is all about patience. You must take time to compose the shot! Use Live View to inspect the composition from top to bottom, left to right, and zoom in if need be to get the placement of the bridge precisely where you need it.
Bridge Photography Quick Tip: When seeking a symmetrical composition, it can often help to move closer to the bridge. Doing so simplifies the composition by omitting some of the foreground and can help you get the framing just right for a perfectly symmetrical result.
Learn More:
Bridge Photography Tip #3: Try Shooting from a Low Perspective
Part of the mystique of bridges is their sheer size - even small bridges can be impressively large when you’re up close to them.
To help emphasize the size of a bridge and make it look more prominent in the frame, shoot from a low perspective.
As you can see above, dropping the eye level of the shot such that we’re looking slightly up towards the bridge gives it a more powerful positioning in the frame. Likewise, moving closer to the bridge also makes it more prominent in the shot.
For example, imagine if this same image had been framed with the nearest tower in full view. The extra distance that would have been required to do so would have resulted in a shot in which the bridge looks far less substantial.
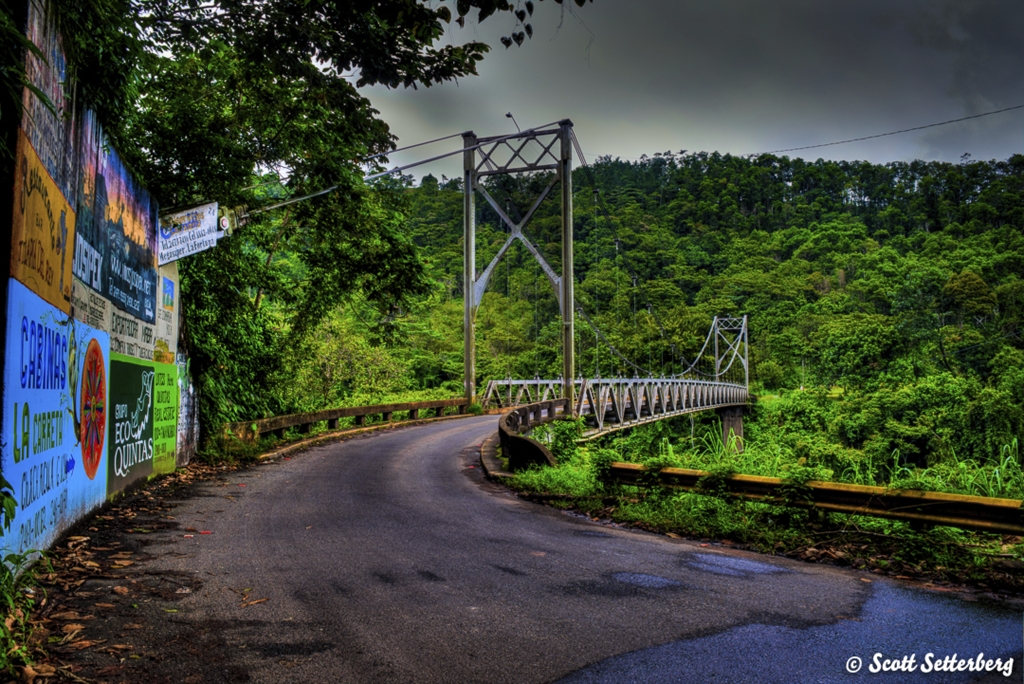
Bridge Photography Quick Tip: When framing up shots of bridges from a greater distance, use foreground elements to help draw the eye to them. As you can see above, the curved roadway is the ideal leading line to help guide our eyes towards the bridge structure. Additionally, the colorful signs on the left side of the frame add a layer of visual interest that makes this a more compelling shot.
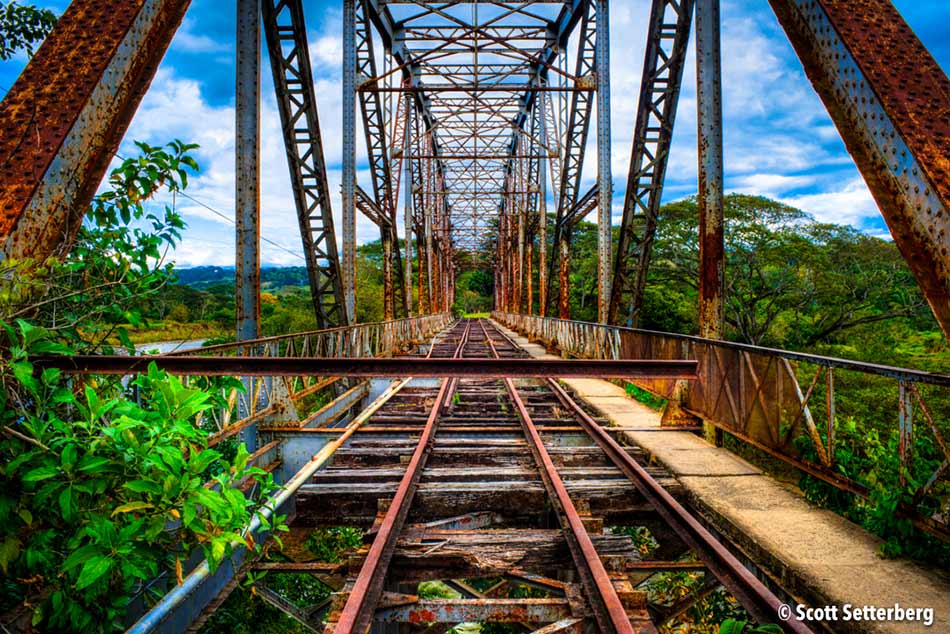
Bridge Photography Tip #4: Put the Bridge in Context
Learning how to photograph bridges requires that you think about how you can put the bridge in the context of its surroundings.
In many cases, the solution is to capture a wide-angle shot from a decent distance so the bridge appears as part of its surrounding landscape.
However, as you can see above, you can still get this context without taking the photo from miles away.
In this case, the inclusion of the tree in the foreground does the trick. Combined with the view of the forest behind the bridge, we understand what this landscape might look like. And by staying close to the bridge, you can also see some of those smaller details we examined earlier. It’s the best of both worlds.
Bridge Photography Quick Tip: Want to explore these beautiful bridges in more detail? Join Scott on a photography tour in Costa Rica, where the images in this article were taken. See rusty, old bridges, incredible sunsets, varying landscapes, and more, all the while getting plenty of one-on-one photography instruction from Scott to improve your skills.