
Most people open a metal print box the same way they open every other package: pull back the cardboard, see something shiny, call it good. After six years of reviewing metal prints from more than a dozen companies, I’d argue a more deliberate approach is worth a few extra minutes.
A metal print looks similar whether it came from a ChromaLuxe-grade lab or a budget operation with undisclosed substrates. The difference between them doesn’t always announce itself on first glance. The problems tend to surface quietly: a saw-tooth edge, a flat color transfer, mounting hardware with loose tolerances, a substrate not ChromaLuxe at all. Knowing what to look for changes what you find.
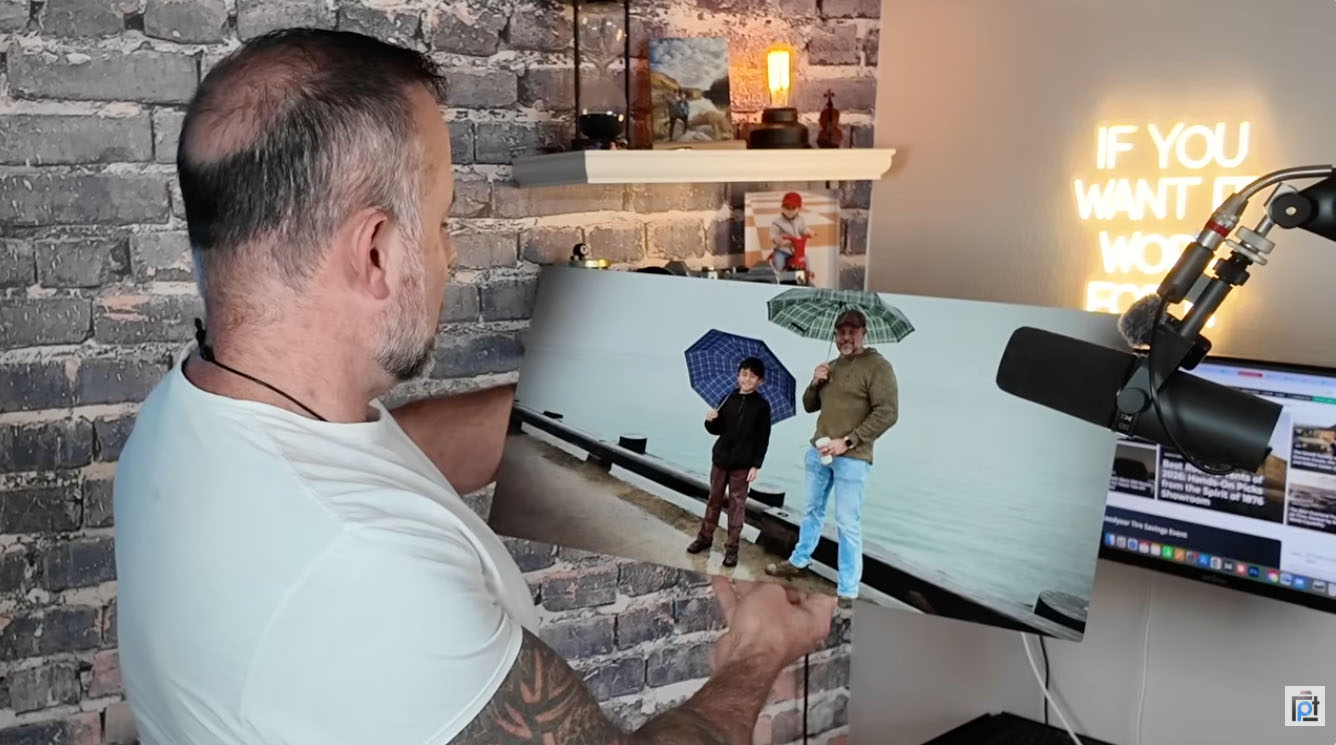
I’ve tested Lumaprints’ metal prints multiple times over the years. The most recent order was a photo of my son and me taken in San Diego at New Year’s. This metal print quality check guide is built from the specific inspection steps I run every single time a metal print lands on my workbench. If you want broader context on how Lumaprints stacks up against other metal print labs, our best metal prints roundup covers five companies tested over six years.
The seven checks below apply to any metal print order, regardless of lab or subject matter. Some are quick visual passes. Others require a hands-on step most buyers skip. Together they give you a complete metal print inspection in under ten minutes. They’ll tell you everything you need to know before the print goes on the wall.
Quick Facts:
- Topic: Metal print quality check, 7-point inspection guide
- Experience basis: Six years of metal print reviews, multiple Lumaprints orders tested
- Time to complete: 5 to 10 minutes
- Substrate covered: ChromaLuxe dye-sublimation aluminum (Lumaprints standard)
- Most common failure points: Edge finishing, color transfer, mounting hardware, packaging damage
- Lab featured: Lumaprints (lumaprints.com)
8 min read
In This Guide
1. Inspect the Packaging Integrity

Before you look at the print, look at the box. Metal print packaging tells you how seriously a lab takes transit safety, and it predicts what you’ll find inside. Budget labs ship in thin corrugated boxes with minimal internal support. Professional labs engineer the box around the print.
On the most recent Lumaprints metal print I inspected, the box used a light-duty outer shell. The print sat inside a cardboard cradle structure built to absorb side impact. Side impact is the primary failure mode during transit, and the cardboard-cradle approach handles it well. The print was also wrapped in a layer of plastic film to prevent surface contact with packaging materials. On the outside of the box, hanging instructions were included. It’s a small detail most labs skip but worth noting for photographers drop-shipping to clients unfamiliar with metal print installation.
One honest note: on the top and bottom, I’d prefer to see at least a layer of bubble wrap. The current approach relies on two layers of corrugated cardboard between the print surface and the box ends. It held up fine on this order, but a bubble wrap layer would add an extra safety margin on rough-handled shipments. This is a minor preference, not a disqualifier. In our full Lumaprints review across seven products, metal print packaging held up consistently across every order we received.
What to look for: no visible dents or compressions in the box, no rattling when you tilt the package, and no shifting when you invert it. Any of those signals suggests the internal cradle failed in transit.
2. Check the Protective Wrap and Surface Film

Additionally, a reputable metal print lab ships the print inside a protective plastic wrap or film layer. On the Lumaprints order, the plastic gave the print a fresh, untouched appearance when pulled back. It signaled the surface hadn’t been in contact with anything during shipping.
This step matters more than it looks. ChromaLuxe aluminum surfaces are sealed and non-porous, which makes them resistant to most handling. Even so, a loose print sliding inside a box without protective film picks up micro-scratches before it even arrives. Those scratches show up most visibly in highlight areas, which are the last places you want them on a metal print.
What to look for: a complete, intact plastic or paper wrap around the full print surface. If the film is torn or missing, inspect the surface carefully under raking light before assuming the print arrived undamaged.
3. Check Color Accuracy and Vibrancy
Color is the first thing anyone notices about a metal print, and for good reason. Specifically, the dye-sublimation process infuses color molecules directly into a polymer coating on the aluminum surface, producing a luminosity paper and canvas don’t replicate. When it works correctly, highlights glow and shadows hold detail simultaneously. When it doesn’t, colors look flat and the metallic base doesn’t contribute anything to the image.
On the San Diego print I reviewed, the colors looked fantastic even under ordinary indoor lighting. Indoor diffused light is the right test environment for a metal print quality check. Diffused indoor light shows you what the print will look like on a wall, which is the only context worth evaluating. The blues in the water, the tones in the sky, the skin tones all landed where I expected them based on the file I uploaded.
One source of confusion worth flagging: the faces in this particular print came out slightly warped. Before ordering, I ran the image through an AI cleanup tool to remove ships from the background. The tool distorted the faces slightly, and I didn’t catch it at upload. The print reproduced exactly what I gave it. Any color or sharpness anomaly you see in a metal print is far more likely to trace back to the source file than to the lab. Metal prints render everything at full fidelity, so compression artifacts, over-sharpened edges, and noise in your file will appear in the finished print.
What to look for: vibrant color with visible depth in the highlights, no dull or flat areas in zones you know should be rich. Color accuracy should be consistent with your monitor calibration. Discrepancies in your source file are your responsibility; discrepancies introduced by the lab are grounds for a reprint.
4. Inspect for Print Anomalies and Surface Defects

Once color is confirmed, slow down and check for anomalies systematically. These are defects introduced during production rather than the source file, and distinguishing between the two is the whole skill set in a metal print inspection.
Lab-introduced anomalies include banding (visible parallel lines from the print head), color bleeding at edges, and uneven dye transfer leaving pale or oversaturated patches. Surface contamination from dust or debris caught under the film during production is another category to check for. None of these are visible in a quick glance. You need to look across the entire surface systematically, moving from corner to corner in natural light.
On the Lumaprints order, I found nothing. No banding, no bleeding, no patches, no contamination. The print looked exactly as a clean dye-sublimation transfer should look, with smooth color gradients and no visible interruption across the surface. After reviewing hundreds of prints over six years, finding a clean surface isn’t surprising from Lumaprints. Still, it’s never guaranteed on any order from any lab, which is why checking matters. See our Lumaprints metal print review for a detailed breakdown of surface quality findings from an earlier order.
What to look for: hold the print at a low angle to a light source and slowly scan across the surface. Anomalies invisible head-on become visible when light rakes across them at an angle.
Order Your Metal Print from Lumaprints
ChromaLuxe Quality. Prices Built for Photographers.
Dye-sublimation on genuine ChromaLuxe aluminum. Drop-ship to clients or order for yourself.
5. Verify the ChromaLuxe Metal Print Substrate
Beyond color and surface condition, verifying the substrate itself is the inspection step most buyers skip, and it’s one of the most important ones. ChromaLuxe is the premium aluminum substrate used by professional metal print labs. It’s also the material behind the 65-plus year indoor display permanence rating from Wilhelm Imaging Research. Not every lab selling metal prints uses ChromaLuxe. Generic aluminum prints look similar on a monitor preview and disappoint significantly in person.
Verifying the ChromaLuxe metal print substrate is straightforward. Hold the back of the print up to a light source and angle it slightly. You’ll see the ChromaLuxe designation etched into the substrate, visible as a faint pattern in the coating. It’s subtle, but unmistakable once you know what to look for. On the Lumaprints order, ChromaLuxe was clearly confirmed using this method.
Beyond the longevity claim, ChromaLuxe’s polymer coating is non-porous, which makes it bacteria-resistant, moisture-resistant, and easier to clean than generic coatings. For photographers drop-shipping to clients, it’s a quality assurance you build into your product description with confidence. For personal prints, it means the image on your wall holds up for decades without protective glass. Read more about the science behind this in our article on how Lumaprints metal prints are built to last.
What to look for: the ChromaLuxe designation on the back panel, visible under angled light. If you cannot find it, contact the lab and ask which aluminum substrate they use before the print goes on a wall.
6. Inspect Edge Finishing and Dimensional Accuracy
Similarly, edge finishing is where budget labs cut corners most visibly. A well-finished metal print has smooth, clean edges with no sharp burrs, no saw-tooth texture from the cutting process, and no coating flaking at the perimeter. Running your finger along the edge of every print you receive is a fast, reliable test. Be cautious with prints from unknown labs; some arrive with edges sharp enough to cause injury. Do it carefully, because the tactile feedback tells you more than looking does.
On the Lumaprints order, the edges were smooth throughout. I also took dimensional measurements. The print came in at 3 and 3/16 inches on both measured sides, with a variance of 1/16 of an inch from the specified dimension. In six years of reviewing prints, I’d call 1/16-inch variance not merely acceptable but essentially perfect. Dimensional tolerances at this level are invisible to the eye and irrelevant to wall placement unless you’re fitting the print into a precision-cut frame.
I also noted one minor scuff in a corner. I’m flagging it because I leave no detail out of these reviews, but to be clear: it was minor enough to require close inspection to find. It would be invisible at any normal viewing distance and irrelevant to a client receiving this print as a finished product.
What to look for: smooth edges throughout with no sharp points or rough texture, and dimensional accuracy within 1/8 inch of the specified size. A slight scuff in a corner is a low-priority note. A rough or burred edge running the length of the print is a return-worthy defect.
7. Inspect the Mounting Hardware

The final step in how to check a metal print is the back panel. A metal print is only as good as its mounting hardware. Hardware quality separates labs building a finished product from those shipping a panel and expecting you to figure out the rest.
On the Lumaprints order, the mounting hardware was heavy-duty. The frame structure on the back looked clean and well-built. Hanging instructions came with the shipment so the end client doesn’t need to guess at installation. For photographers drop-shipping to clients, this matters as much as print quality. A client who struggles with installation, or finds cheap hardware on the back of a product they paid a premium for, will associate the frustration with the photographer who recommended it.
What to look for: hardware rated for the print’s weight with clean attachment points and no surface failures. Hanging instructions should be included either attached to the print or inside the box. A print shouldn’t require a trip to the hardware store before it goes on the wall.
Pros and Cons
Pros
- Lumaprints uses genuine ChromaLuxe substrate, verifiable at home by angling the back panel to a light source
- Color transfer was vibrant and accurate on the San Diego print tested, even under indoor lighting
- Zero print anomalies found: no banding, no bleeding, no surface contamination
- Edge finishing smooth throughout with no burrs or sharp points
- Dimensional accuracy within 1/16 inch of specified size, essentially perfect tolerance
- Heavy-duty mounting hardware included, with hanging instructions shipped in the box
- Cardboard cradle metal print packaging absorbs side impact; plastic film protects the surface in transit
Cons
- Top and bottom relied on corrugated cardboard only; bubble wrap would provide an extra safety margin
- One minor corner scuff noted on this order (visible only under close inspection, invisible at normal viewing distance)
- No paperwork inside the box on this order; the label was minimal, which was initially confusing before the print was identified
- Metal prints render source file issues at full fidelity; AI editing artifacts or compression noise in your upload will appear exactly as submitted
Final Verdict

Running a metal print quality check isn’t about finding reasons to return a print. It’s about building the habit of knowing what you received. Know what to expect on the next order and what to tell a client who asks. A ten-minute inspection also gives you the confidence to hang the print without second-guessing whether anything was missed.
Specifically, on this Lumaprints order, the metal print inspection returned a near-perfect result. ChromaLuxe metal print substrate confirmed, colors vibrant and accurate, surface clean, edges smooth, hardware heavy-duty, and a 1/16-inch dimensional variance I’d call negligible. The metal print packaging absorbed the trip from Kentucky to my workbench without incident. The one honest note, bubble wrap on top and bottom would be an improvement, is a minor packaging preference, not a quality failure.
Lumaprints continues to deliver a lot for the money across multiple orders and formats. If you’re new to printing and wondering where to start, start with something small. A metal print at any size will show you what your image looks like at its best. You’ll understand immediately why so many photographers make printing a regular part of their creative practice.
Verified ChromaLuxe. Ships from Two US Locations.
Lumaprints Metal Prints Pass the Inspection
Clean edges, vivid color, confirmed ChromaLuxe substrate, and heavy-duty mounting hardware on every order.
Frequently Asked Questions
How do I verify my metal print is ChromaLuxe?
Hold the back of the print up to a light source and angle it slightly. The ChromaLuxe designation is etched into the substrate and becomes visible as a faint pattern when light hits the back panel at an angle. It’s subtle but unmistakable once you know what to look for. Lumaprints uses genuine ChromaLuxe aluminum on all their metal prints.
What does a thorough metal print quality check cover?
A thorough metal print quality check covers seven areas: packaging integrity, protective wrap condition, color accuracy and vibrancy, surface anomalies and defects, ChromaLuxe substrate verification, edge finishing and dimensional accuracy, and mounting hardware quality. Each check takes one to two minutes and together they give you a complete picture of what arrived.
Is a slight size variance on a metal print normal?
Yes. A variance of up to 1/8 inch from the specified dimension is considered acceptable tolerance in metal print production. On the Lumaprints order reviewed here, the variance was 1/16 inch, which is essentially perfect. Anything within 1/8 inch is invisible to the eye and irrelevant to wall placement unless you’re fitting the print into a precision-cut custom frame.
How do I inspect metal print edge finishing?
Run your finger carefully along every edge of the print. A well-finished edge feels smooth and consistent throughout. A budget lab’s edge feels rough or has micro-burrs from the cutting process. Be cautious with prints from unknown labs, as some arrive with edges sharp enough to cause a minor cut. Lumaprints’ edge finishing was smooth throughout on this order with no points or rough texture.
What causes print anomalies on a metal print?
Print anomalies come from either the source file or the lab. Lab-introduced anomalies include banding from print head issues, uneven dye transfer, and surface contamination from debris under the protective film. Source file issues include compression artifacts, AI editing distortion, and over-sharpening. Metal prints render everything at full fidelity, so issues present in the uploaded file will appear in the finished print. Always check your source file at 100% zoom before ordering.
What should metal print mounting hardware look like?
Metal print mounting hardware should be heavy-duty and rated for the weight of the print, with clean attachment points and no surface failures. Hanging instructions should be included either on the back of the print or inside the box. Lumaprints includes heavy-duty hardware and ships hanging instructions with every order, so the print is ready to hang straight out of the box.
Our articles might have affiliate links and the occasional sponsored content, but don’t sweat it – if you buy something, we get a little kickback at no extra cost to you, and we only hype products we truly believe in!