
Motion Capture Cheat Sheet
-
Extended exposure: This presents clear subject with a blurred background, so long as the subject is still and the background is moving. Crowds, cars, train busses etc.
This is the easiest of these techniques to achieve. All you need to do is put your camera on a tripod and pick a subject in front of a moving background. The length of your shutter will depend heavily on the speed that your subject is moving. A long enough shutter and you can make it look like a snail is racing. 1/10th of a second - 1/20th will work for most things. If you are shooting a person remember, they have to absolutely still for the time your shutter is open unless you want them blurred. If you look at Evelyn’s picture you can see a tiny bit of motion blur in the hair. -
Panning: Blurred background. This takes a little bit of practice to get right. And you need a tripod, I recommend a fluid head, and you are going to want to spend over 70 dollars, ideally. What you do with this is lengthen your shutter speed a little, for most things anywhere between 1/10th and 1/30th second will work. Then you need to pan the camera at the same speed of the object. This is what takes practice because you have to time it perfectly.
-
Chronophotography: multiple images strung together. This is similar to panning; however, you are shooting multiple exposures. You will take multiple pictures of a moving object, like a horse or a dog, and then you will string them together, much like panoramic pictures. The more seamless you can make combine them the better. Again you will want a tripod so that you can pan on the same level.
-
Extended exposure practice: Find different moving objects, from cars on a street road to walking people, even lights. Set different lengths of exposure for each and see what each one conveys. You can even use this on crowded busy streets. And don’t be afraid to be extreme, you can try ½ a second if you want. Be aware that an open shutter will let in more light; you will have to lower your ISO and close your aperture accordingly or use an ND filter.
-
Panning practice: you will have to start practicing panning and speed matching. It helps to start with things that are moving a bit slower, joggers bikers, slow moving cars and the like. It’s also better to practice on things that move in a strait line. You can also start panning before you take the photo. Be aware that an open shutter will let in more light, you will have to lower your ISO and close your aperture accordingly or use an ND filter.
-
Chronophography practice: For this you should have your settings set too a normal shutter, give or take for the settings and motion you are capturing. Really this is about knowing how many frames you need to shoot per second to capture the movement you want. Again I would experiment. Start with slower movements like walking, and if you have to have the subject stop for your cash to empty then do so.
Hello Photophiles!
Welcome to this week’s photo of the week and newsletter. I still love these summer pictures that everyone is posting so keep shooting away. I didn’t have to look long or hard at all to find this week’s photo of the week. The photo was taken by Evelyn Quinones she apparently took photos of a whole festival called Arab Fest; there was lots of dancing. And that is why this week’s lesson is on photographing movement! Evelyn, you had some really good photos, I had a tough time choosing which one I wanted, but the hair movement in this one is perfect for what we are about to discuss.
Photo of the week by Evelyn Quinones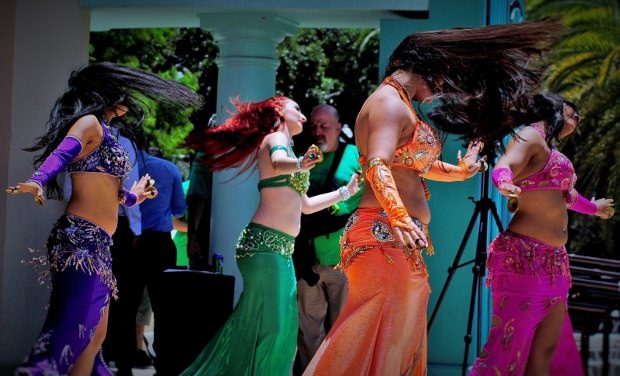
Now this newsletter lesson is intended to be for all levels from beginner to pro, that’s why it’s divided into three sections. The first is where the beginner should start; it will give definitions and basic information. The second is for the intermediate photographers. If you are advanced, then the last section is designed specifically for you. I do encourage everyone to read each section though, I hope that even advanced photographers can learn something from the beginner section, and it never hurts to go over basics. Now that we are all on the same page, lets discuss capturing motion.

HOW TO CAPTURE MOTION
Many times people only capture motion to show the movement, however, motion can be used to show emotions and even paint with light. There are 4 typical ways to do this, and we’re about to discuss all of them. If you still have our shutter speed cheat sheet from about a month ago it will be incredibly beneficial here. Sadly enough I just don’t the room to go over all those shutter speeds again.

PRACTICE EACH TECHNIQUE
So how do we learn to do each of these things? PRACTICE!

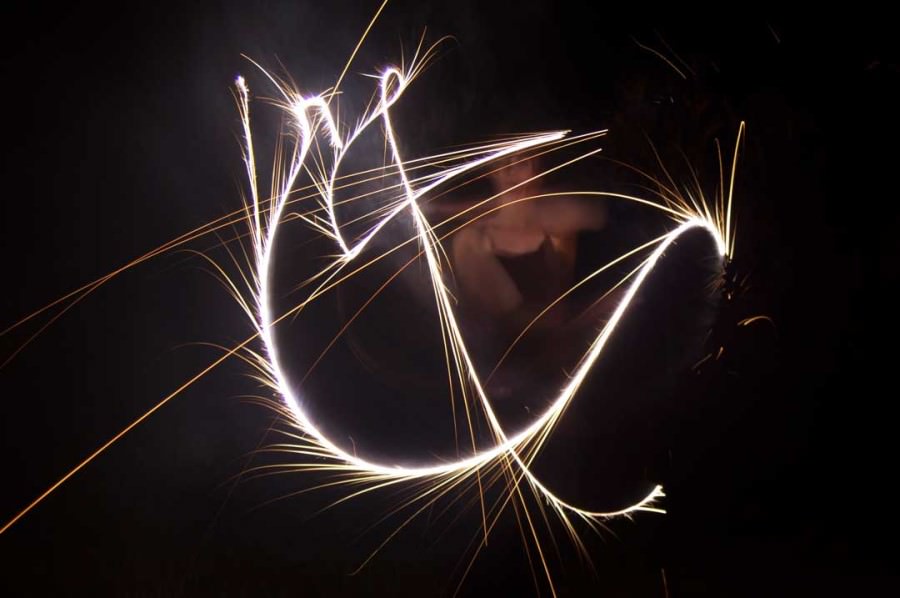
REAR CURTAIN SYNCH
This is a mixture of long exposure, panning and flash photography. See the shutter is made up of two “curtains” usually one will open, exposing the sensor, the flash will fire then the second will open and cover the sensor again. If you could prevent the second curtain from closing off the sensor you would have an interesting image. The flash would freeze your image in time, but the sensor, still open, would continue capturing the movement. Almost like the wormhole effect in Donnie Darko. Many cameras have an option to reverse this effect so that you can get photograph with the flash firing before the second curtain closes so that you get the effect showing a subjects past for lack of a better term.
Click here if you missed last weeks newsletter