
How to Create the Flowing River Effect
- 2013 Photographer's Market: The Most Trusted Guide to Selling Your Photography
- How to Create Stunning Digital Photography
- Best Business Practices for Photographers
- The Fast Track Photographer Business Plan: Build a Successful Photography Venture from the Ground Up
- Group Portrait Photography Handbook
- 500 Poses for Photographing Women
- The Best of Family Portrait Photography: Professional Techniques and Images
- 500 Poses for Photographing Group Portraits
- Selling Your Photography: How to Make Money in New and Traditional Markets
- Starting Your Career as a Freelance Photographer
- Photographer's Survival Manual: A Legal Guide for Artists in the Digital Age
- Legal Handbook for Photographers: The Rights and Liabilities of Making Images
- Taking Stock: Make money in microstock creating photos that sell
- Going Pro: How to Make the Leap from Aspiring to Professional Photographer
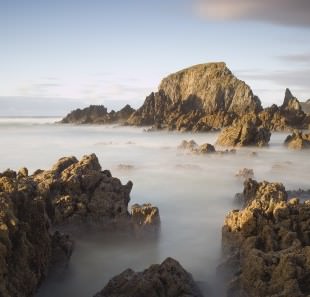 Ever wonder how photographers get those photos of the soft flowing streams and waterfalls? Well wonder no longer. Here are four techniques that will help you create those beautiful nature shots just like you see in the magazines.
Slow Shutter Speed
This is the main key to capturing those beautifully smooth streams. With a high shutter speed, you are essentially freezing the motion of the water. This makes it look clear and sharp, albeit choppy and not particularly pretty. When you lower your shutter speed to less than a second or so, the water will start to blur and cause a nice smooth flowing look. The slower your shutter speed, the more the water willed be blurred and the smoother it will look. This makes the river look like it's actually flowing.
Keeping it Sharp
Although you want the water to be blurred, you'll most likely want the rest of your scene to be sharp. To ensure sharpness, try to use a shutter speed that's not too long, but long enough to blur the water. Leaves blowing in the wind will appear blurry if the exposure is too long, as will anything else that's moving. Other ways to make sure your photos are sharp include using a sturdy tripod, a remote shutter release of some sort, and mirror lock-up.
ND Filters
If you're having problems getting a slow enough shutter speed, you may need a filter. Even with your aperture stopped all the way down, the scene may be too bright for you to use a slow shutter speed. In these occasions, consider using an ND filter. ND stand for neutral density. The filter essentially blocks some of the light that enter the lens without changing the color temperature. ND filters come in various strengths and can block anywhere from one to ten stops of light, though you probably won't need one as strong as the latter. There are also variable ND filters available which you can turn to change how much light is blocked, though, they are a bit pricey.
Polarizing Filters
These filters are similar to ND filters in that they block some light, but they have a different purpose. Polarizers are used to cut down on glare and reflections. You may or may not want a polarizer when shooting flowing water. If you cut through all of the reflections on the water, it will appear clear and there will be no apparent motion visible from the water. However, with a circular polarizer, you can turn it to adjust how much reflection there is, giving you control over the opaqueness or clearness of the water. These polarizers work on anything else that has glare too, not just water. They can cut through reflections that appears on glass, metal, and even vegetation. In fact, removing the glare off of trees and plants makes them appear greener. It can also make the sky look darker. However, unlike an ND filter, polarizing filters may affect the color balance of your photo, so be careful to make the appropriate adjustments.
Also Read: 8 TIPS MOST PROFESSIONALS WISH THEY HAD LEARNED EARLIER
Recommended Reading:
Image credit: ramonespelt / 123RF Stock Photo
Written by Spencer Seastrom