3 Simple Steps for HDR Editing
How many times have you found a gorgeous scene to photograph, only to find that your photos were either too dark or too light?
This often happens when the dynamic range - the range of light values in the scene - is too much for your camera to handle in a single shot.
You can get around this by bracketing the exposures, or taking multiple images at different exposure levels to accommodate the highlights, midtones, and shadows.
In the video above, Jim Nix gives us a quick sample workflow for HDR editing that shows you how to turn those bracketed exposures into a dramatic HDR photo.
Jim uses Aurora HDR 2019 to create his final image. It’s a powerful tool that beginners can use to create gorgeous HDR images, but it’s also loaded with features that seasoned pros will appreciate.
Let’s break down Jim’s HDR workflow.
Sample Workflow for HDR Editing Step 1: Start With Corrections
Though it’s good to strive to get the perfect shot in-camera, that doesn’t often happen. Instead, you’ll likely need to make a few corrections to your images before you get into the heavy lifting of HDR editing.
In Jim’s example, the image needed a little straightening and lens correction - both of which can be done in Aurora HDR in a matter of a couple of clicks. You can see how the distortion correction tool made the lines of the building straighter in the before and after images below:

You can make an array of other adjustments too, including working on the highlights and shadows, white and black tones, saturation and vibrance, color contrast, white balance, and more.
And since Aurora HDR 2019 gives you the power to layer your edits, everything you do is non-destructive.
Sample Workflow for HDR Editing Step 2: Use Filters to Enhance the Photo

As Jim shows in the video, after making needed corrections, the next step in the workflow is to use filters to enhance the photo.
In Jim’s case, he made a number of adjustments to the color, namely, enhancing the red tones in the shot to give the photo a more Golden Hour look, as shown above.

Next, using the HDR Enhance Filter, Jim added HDR Clarity and HDR Structure to bring out the details of the buildings in the shot.
HDR Clarity added localized contrast to the image - only where it was needed - to bring out added detail. HDR Smart Structure (which is “smart” because it’s powered by AI) produced improvements that gave the photo eye-popping depth, but did so without creating noise or halos.
As you can see in the screenshot above, the buildings now have a crisper appearance (on the right) with more dimension than they did before (on the left).
Also note how Jim added these effects - by simply manipulating a slider to perfect the amount of the filter. So, though Aurora HDR 2019 makes editing images a simple process, that doesn’t mean that you lose precise control over how those edits are applied. It’s quite the contrary actually.

Something else that Jim did that had a nice impact on the image is to add a LUT Mapping filter to the shot.
In this case, Jim chose the “Glorious” LUT Map, which added a nice pop of warmth and color. There are 11 integrated LUTs that you can use with the LUT Mapping Filter, all of which offer creative color and tone adjustments that you control by manipulating a single slider.
Sample Workflow for HDR Editing Step 3: Add a Look

One way that Aurora HDR 2019 makes editing photos a simpler and quicker process is through the use of presets, or Looks as they’re called in Aurora HDR.
There are more than 80 Looks to choose from, each of which applies a unique effect to your images with a single click. And like the filters discussed above, you have final say over how the Look is applied by adjusting a single slider.
In this case, Jim selected one of Serge Ramelli’s looks - Sunset - and as you can see above, it enhanced that Golden Hour look that Jim is going for.
Final Thoughts: HDR Editing Workflow

I don’t know about you, but I want to spend more time taking photos and less time editing them, and with Aurora HDR 2019, you can do just that.
As Jim explained so well in the video, this software is easy to use and intuitive, but extremely powerful at the same time.
So while it enables you to spend less time editing, you don’t have to sacrifice quality. That’s evident in the side-by-side comparison of the before and after shown above.
That’s not a bad end-result if you ask me!
Get Aurora HDR 2019 for $99.00
We Recommend
Aurora HDR 2019 Review

Aurora HDR
In Aurora HDR 2019, Skylum has set out to give photographers a powerful, yet easy-to-use program for creating vivid, eye-catching, and dynamic images.
Past versions of Aurora HDR were met with wide acclaim and won many industry awards. In fact, Apple selected Aurora HDR 2018 as the Best Mac App of 2017.
The question is, does this version live up to its predecessors?
In this Aurora HDR 2019 review, take a tour of some of its new tools and best features to see if Skylum has indeed improved upon an already excellent product.
Aurora HDR 2019 is Still a Master With Bracketed Exposures

One thing that past versions of Aurora HDR were known for is that they were a rockstar when it came to merging bracketed exposures.
The latest version of the software only builds on that reputation.
New for Aurora HDR 2019 is tone-mapping technology for both bracketed and single images.
Using a Quantum HDR EngineTM, and AI-powered tone mapping technology, Aurora HDR 2019 meticulously analyzes your photos and merges them intelligently.

 Before and after images by Iurie Belegurschi
The results, as you can see in the before and after comparison above, are breathtaking. The Quantum HDR EngineTM has improved the saturation of the colors in the image, opened up the dark areas of the shot, and controlled for noise.
On the tone-mapping front, detail has been brought out in the shadowed areas of the photo while details have been automatically recovered in the highlighted areas.
That’s a significant change because in the past tone-mapping was done manually, so it was hugely time-consuming.
Now, though, Aurora HDR 2019 makes the process fast, simple, and highly effective.
Aurora HDR 2019 Artificial Intelligence
AI plays a very important role in Aurora HDR. It powers the aforementioned Quantum HDR engine and makes getting gorgeous HDR images a quick and easy process.
But don’t think that because it’s “quick and easy” that the results are somehow less than ideal.

Thanks to the advanced nature of Aurora HDR’s artificial intelligence, the images you create will have no halos, no chromatic aberration, and no artifacts.

In fact, as Trey notes in his video, the results you get with a single RAW file are so similar to those you get with bracketed exposures that it’s hard to tell which is which when all is said and done.
In other words, you get outstanding results in less time - the before and after photos above are proof positive of that!
Aurora HDR 2019 Looks

No one wants to spend hours and hours editing photos. But you don’t need hours and hours if you use Aurora HDR 2019.
There are more than 80 different presets (called Looks) that enhance the original RAW file and take it from so-so to spectacular in a matter of seconds. You can see above how these Looks are organized and easy to access for fast edits.
There’s landscape Looks, architecture Looks, and dramatic Looks, which result in a creative, stylized photo instantaneously with one click of a button.

There are even Signature Pro Looks made just for Aurora HDR 2019 by some of the world’s best photographers, including Trey Ratcliff, Serge Ramelli, and Randy Van Duinen.
As you can see above, each Look has a small preview so you can see how it will affect your image before selecting it. Each one is made up of all the adjustments applied for each filter, including LUTs, Blending Mode, Masks, and Opacity changes.
Again, the point here is that this software takes the guesswork out of crafting gorgeous HDR photos by giving you incredibly powerful tools that are simple to use, but have profound, positive effects on how your HDR photos look.
 Photo by Iurie Belegurschi
Quick Tip: Aurora HDR 2019 offers special Adjustment Layers that allow you to add new Filters or Looks to an existing edit. Build the perfect edit using multiple layers, which you can control precisely by masking certain layers.
To do so, just add an adjustment layer, select the desired Filter or Look, and paint the areas you want to be affected by the Filter or Look.
Aurora HDR 2019 Tools

As noted above, Aurora HDR’s AI is super powerful and helps you create gorgeous HDR photos.
But things aren’t left totally up to AI - you have the final say over how your photo looks thanks to a variety of tools that make fine adjustments a breeze.
That includes a host of filters like HDR Denoise, which automatically recognizes noise in the shot and eliminates it, leaving beautiful details behind.

You can also use the HDR Smart Structure tool to enhance the depth and detail of the image.
HDR Smart Structure does this by giving you precise control over details, structure, and sharpness in your photos, all without creating excess artifacts that can make the image look overprocessed.
Specifically, this filter helps reveal the structure and texture of surfaces in the shot that adds an extra layer of realism to the image. This is especially handy when shooting real estate.
As you can see above, the interior shot by Randy Van Duinen benefits from a moderate level of HDR Smart Structure (the slider is set to 48 out of 100).
Another filter Randy used in the photo above is HDR Clarity, which gives you the power to boost the clarity in the image only where it’s needed. That means that you don’t have to retouch the whole photo, and can simply add localized contrast.

In addition to the HDR Clarity tool, Aurora HDR 2019 has a handy HDR Details Boost adjustment that allows you to increase sharpness without increasing noise or introducing ghosting or halos.
The result is a clearer, sharper photo (or, conversely, you can create a softer photo if you like) by simply adjusting a set of sliders.
As shown above, the HDR Details Boost filter gives you independent control over small, medium and large details. There’s also sliders that enable you to mask certain areas or protect other areas for the cleanest, detail-rich images possible.

I’d be remiss if I didn’t mention the new LUT Mapping filter as well.
This filter is used to add creative color toning to an image, including black and white conversions and digital film looks, in a matter of seconds.
Also new is a LUT mapping integration with instant preview, that way you can have a peek at what the image looks like as you make changes to it. It makes styling your photos a quicker process, especially since you can use any one of eleven LUTs that are pre-loaded in Aurora HDR 2019.
Better still, you can import your own LUTs or download LUTs right from the Skylum website.

Though not a new feature, the Adjustable Gradient tool in Aurora HDR 2019 has been improved to give you fine control in the upper and lower areas of your photos.
Adding a gradient in this manner simulates using a graduated neutral density filter, that way you can control for bright skies and darker landscapes.
As shown above, there are separate adjustments for highlights, shadows, contrast, vibrance, and exposure so you can perfect the look you’re going for and get a more even exposure throughout the image.
Best of all, Aurora HDR 2019 lets you do this without having to create layers or masks - just position the transition point in the image, select how gradual the transition of the gradient is, and align it just so in your photo for a beautiful final result.
Aurora HDR 2019 Gives You Flexibility

Something else that’s impressed me about Aurora HDR 2019 is that it can be used as a standalone program or as a plug-in.
That means that you can purchase the program (currently $99.00) and make it your primary editing tool for HDR photos, or you can add it to Photoshop, Lightroom, or Apple Photos as an integrated component of your existing workflow.
Either way, as Serge Ramelli discusses in his walkthrough of Aurora HDR 2019, you can take advantage of features like batch processing, layers, masking, LUT mapping, and RAW support (among many others) to enhance your photos to your heart’s content.
That makes Aurora HDR 2019 ideal for photographers of all kinds, from those at the start of their photographic journey to those that have been at it for years.
We Recommend
How to Create Natural-Looking HDR Images
The advantage of HDR imagery is that you can create a single, beautifully-exposed image with bracketed exposures.
In the past, though, some HDR programs didn’t create images that were especially natural-looking. Artifacts like ghosting and halos, joined by heavy amounts of noise, were distracting to the eye and diminished the quality of the final HDR shot.
But now there’s a new way to create natural-looking HDR images that have none of these drawbacks.
Start by Using “Looks”
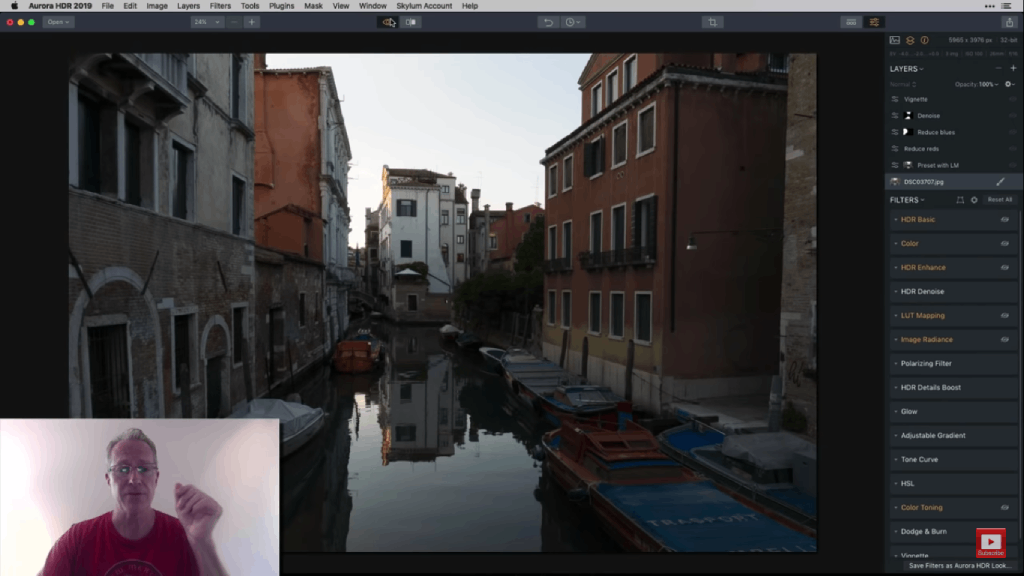
In the video above, Serge Ramelli demonstrates how to create HDR images that have all the advantages of HDR and none of the past detriments.
One of the first things he does is open Aurora HDR 2019 to process his images.
As you see in the video, Serge is able to take three bracketed exposures (one each at -2, 0, and +2 EV) and combine them in Aurora HDR 2019 to create a single well-exposed image, as shown below.
But this is just the tip of the iceberg in terms of what can be done to develop this image into a breathtaking final result.
As Serge points out, you can apply any number of different Looks to the HDR image to enhance its visual appeal.
Below, you can see how the image from above is changed by applying a single Look, in this case Serge’s own “Start Here” Look.

In addition to evening out the exposure to reveal the details of the landscape, this Look has also brightened the sky, improved contrast, and boosted the vibrancy of the trees in the foreground.
All told, there are over 80 different Looks you can use, from specialized Looks for landscapes or architecture to dramatic and artistic Looks to stylize your photos with the click of a button.
In other words, Serge’s approach is both simple and time-efficient. It took just a couple of moments for him to totally transform the original RAW file into a nice-looking HDR image.
Enhance HDR Photos the Easy Way

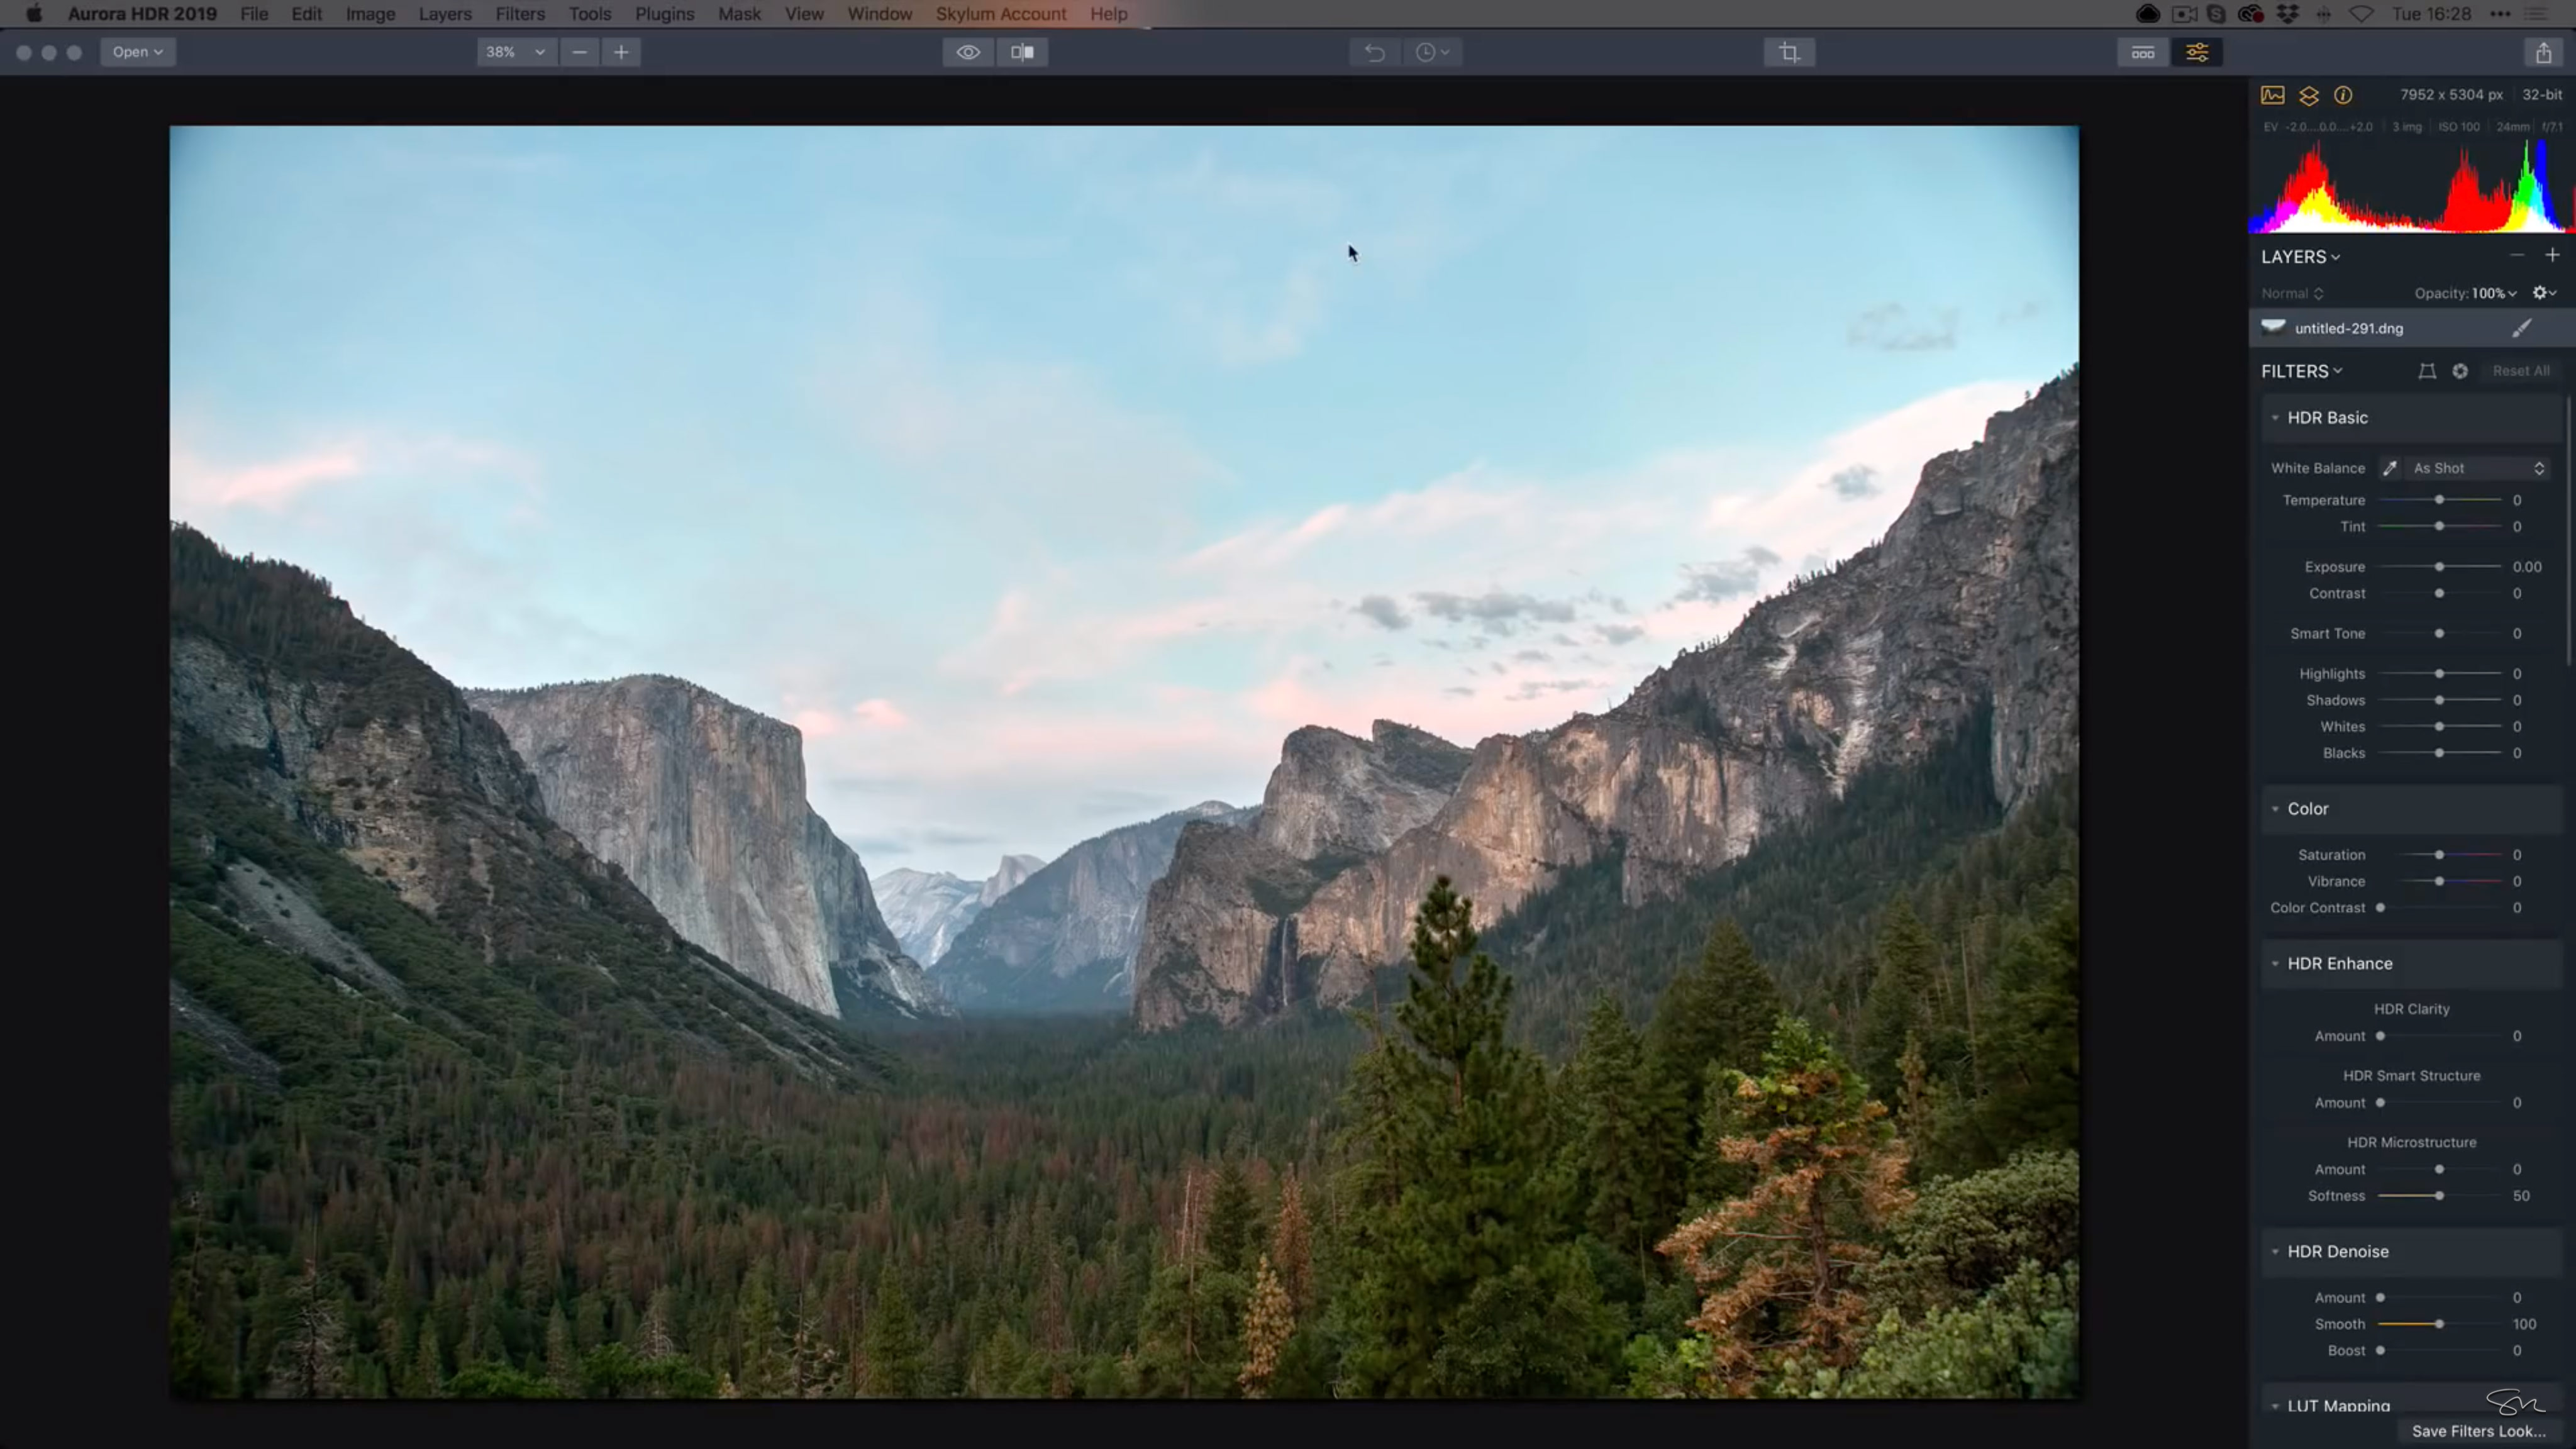
In addition to streamlining the process of editing HDR photos by applying Looks, you can also use Aurora HDR 2019 to fine-tune the details of the shot and enhance it to your liking.
For example, in the image above, notice the array of sliders on the right side of the editing window.
As Serge demonstrates in the video, you can easily manipulate these sliders to adjust anything from highlights and shadows to contrast to the color temperature of the image. And that’s just the start.

Aurora HDR 2019 includes a variety of other tools that are both powerful and easy to use.
One such tool is the new LUT Mapping filter which can be used to add beautiful color toning to your photos.
There are 11 LUTs pre-loaded in the software (including Glorious, which Serge used in the screenshot above), and applying one of them is a simple matter of clicking on it. You get a small preview of what each LUT will do, which makes selecting the one you like a much faster process.
You can also import your own LUTs into Aurora HDR 2019 or download LUTs from the Skylum site as well.
Use Layers to Create Non-Destructive Edits

Thus far, we’ve discussed features in Aurora HDR that can make the editing process much more efficient.
But it should also be pointed out that Aurora HDR has a layers function that allows you to stack edits and do so in a non-destructive manner.
As Serge demonstrates, you can add as many layers as you want, each with a very fine adjustment for a particular part of the image.
In the screenshot above, he’s added a single adjustment layer to bring out some of the color in the trees and the mountains.

You can make simple adjustments like enhancing the saturation or color contrast, add an additional Look on a new layer, or do something more complex and create masks to apply the layer’s edits only to specific portions of the image.
In the image above, you can see how a few layers of adjustments have changed the look and feel of Serge’s image from where it began.
In comparing it even to the image just above it, you can see how the additional layers have improved the color of the trees in the foreground, warmed up the tones on the mountains, and added a pink hue to the clouds as well.
How to Create Natural-Looking HDR Images

As I mentioned in the introduction, HDR got a bad wrap a few years ago as being something that created artificial-looking images that were heavily edited.
But as you can see in the image above, Aurora HDR 2019 resolves that issue thanks to easy-to-use, intuitive, and powerful tools.
Not only does the program’s Quantum HDR EngineTM use AI to analyze the source images and merge them perfectly together, but it also makes previously laborious tasks (i.e., tone-mapping) a process that takes just seconds.

Likewise, the Quantum HDR EngineTM prevents the loss of contrast, manages noise, and eliminates halos, chromatic aberration, and artifacts. You can see in the screenshot above that even when zoomed in, there is no haloing and no noise evident in Serge’s photo.
There are other highly useful tools in Aurora HDR 2019, which I discuss in this in-depth review.
I encourage you to check out the entirety of Serge’s video to see this software at work and consult the complete review linked above to learn more about Aurora HDR 2019.
Get Aurora HDR 2019 for $99.00.
We Recommend
The Power of a Single RAW Image

Typically, HDR requires three or more RAW files to create the final HDR image.
However, Macphun’s Aurora HDR 2018 is so powerful that it only needs a single RAW file to create epic results.
In the video above, photographer Trey Ratcliff offers an in-depth tutorial on Aurora HDR, which I’ll just tell you right now is a mind-blowing piece of software.
In fact, if you’re a Mac user, Apple named it their “Mac App of the Year” for 2017, which should just add to your motivation to try it out.
 YouTube Screenshot/Trey Ratcliff
To begin with, there’s a huge advantage of only needing a single RAW file to create your image. You can’t control things that move, people walking into the shot, and so forth, so sometimes all you have is a single photo with which to work.

Aurora HDR 2018 and their amazing tone-mapping algorithm makes it possible to use that single photo to make an awesome image.
Take the image above as a prime example. In its original form, there’s just not a ton of drama in the shot. But with Aurora HDR, the image takes on a whole new life:
 YouTube Screenshot/Trey Ratcliff
So from just a single RAW file, Trey was able to turn his image into something with greater depth, improved color, and much more emotion with Aurora HDR.
 YouTube Screenshot/Trey Ratcliff
In another of Trey’s original images, you can see a beautifully framed subject with all the makings of a jaw-dropping shot.
It needs some help, and with Aurora HDR, that’s simple to do.
 YouTube Screenshot/Trey Ratcliff
When you open the program, you see a workspace with a layout that is logically organized and feels familiar.
There’s an abundance of tools at your disposal for creating your final image, including easy-to-use presets for making one-click changes to the shot.
 YouTube Screenshot/Trey Ratcliff
In this example, Trey used a landscape preset to give his shot more depth and vibrance.
There’s so much more to Aurora HDR, too...
You can make lens corrections, adjust saturation, exposure, contrast, and of course, use HDR advance tools as well.
You can get a complete walkthrough of Aurora HDR 2018 in Trey’s video. It’s certainly worth a watch!
Be sure to visit the Aurora HDR 2018 website for more details and to order your copy.