10 Lightroom Tips You Should Know
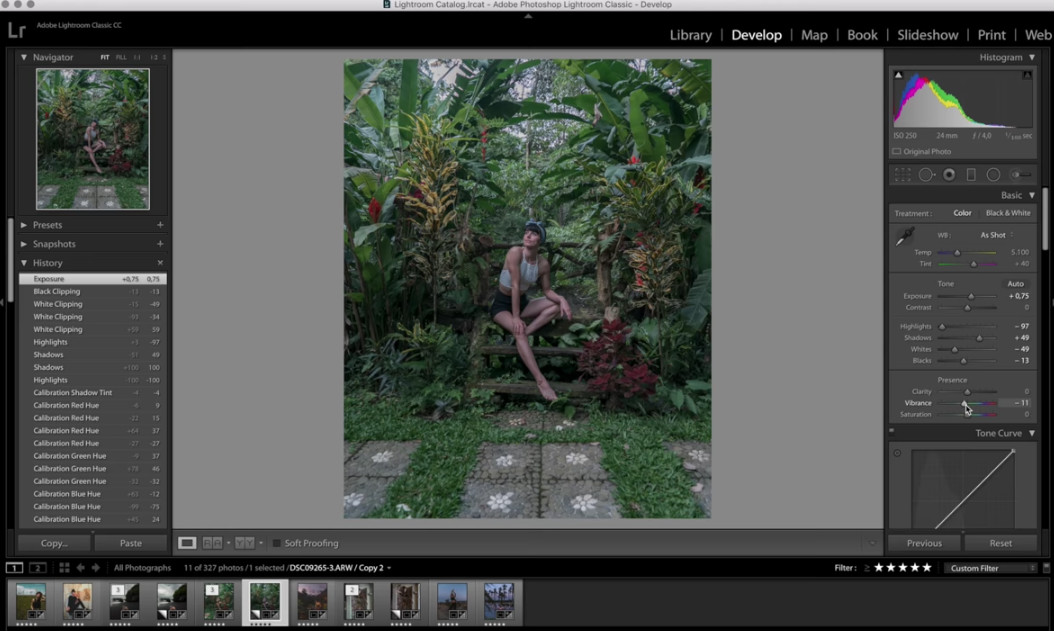
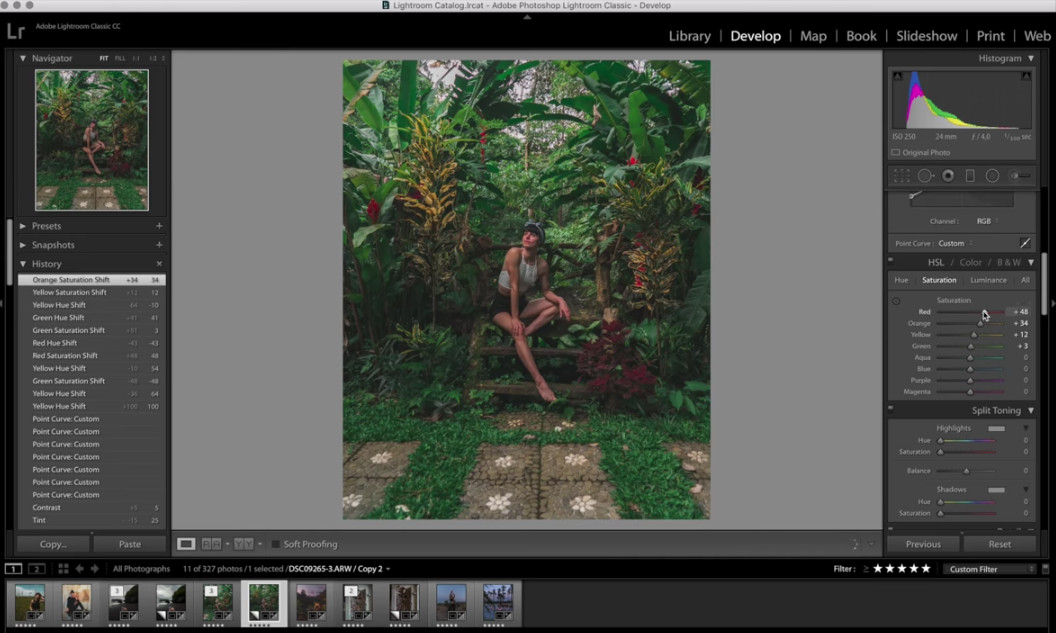
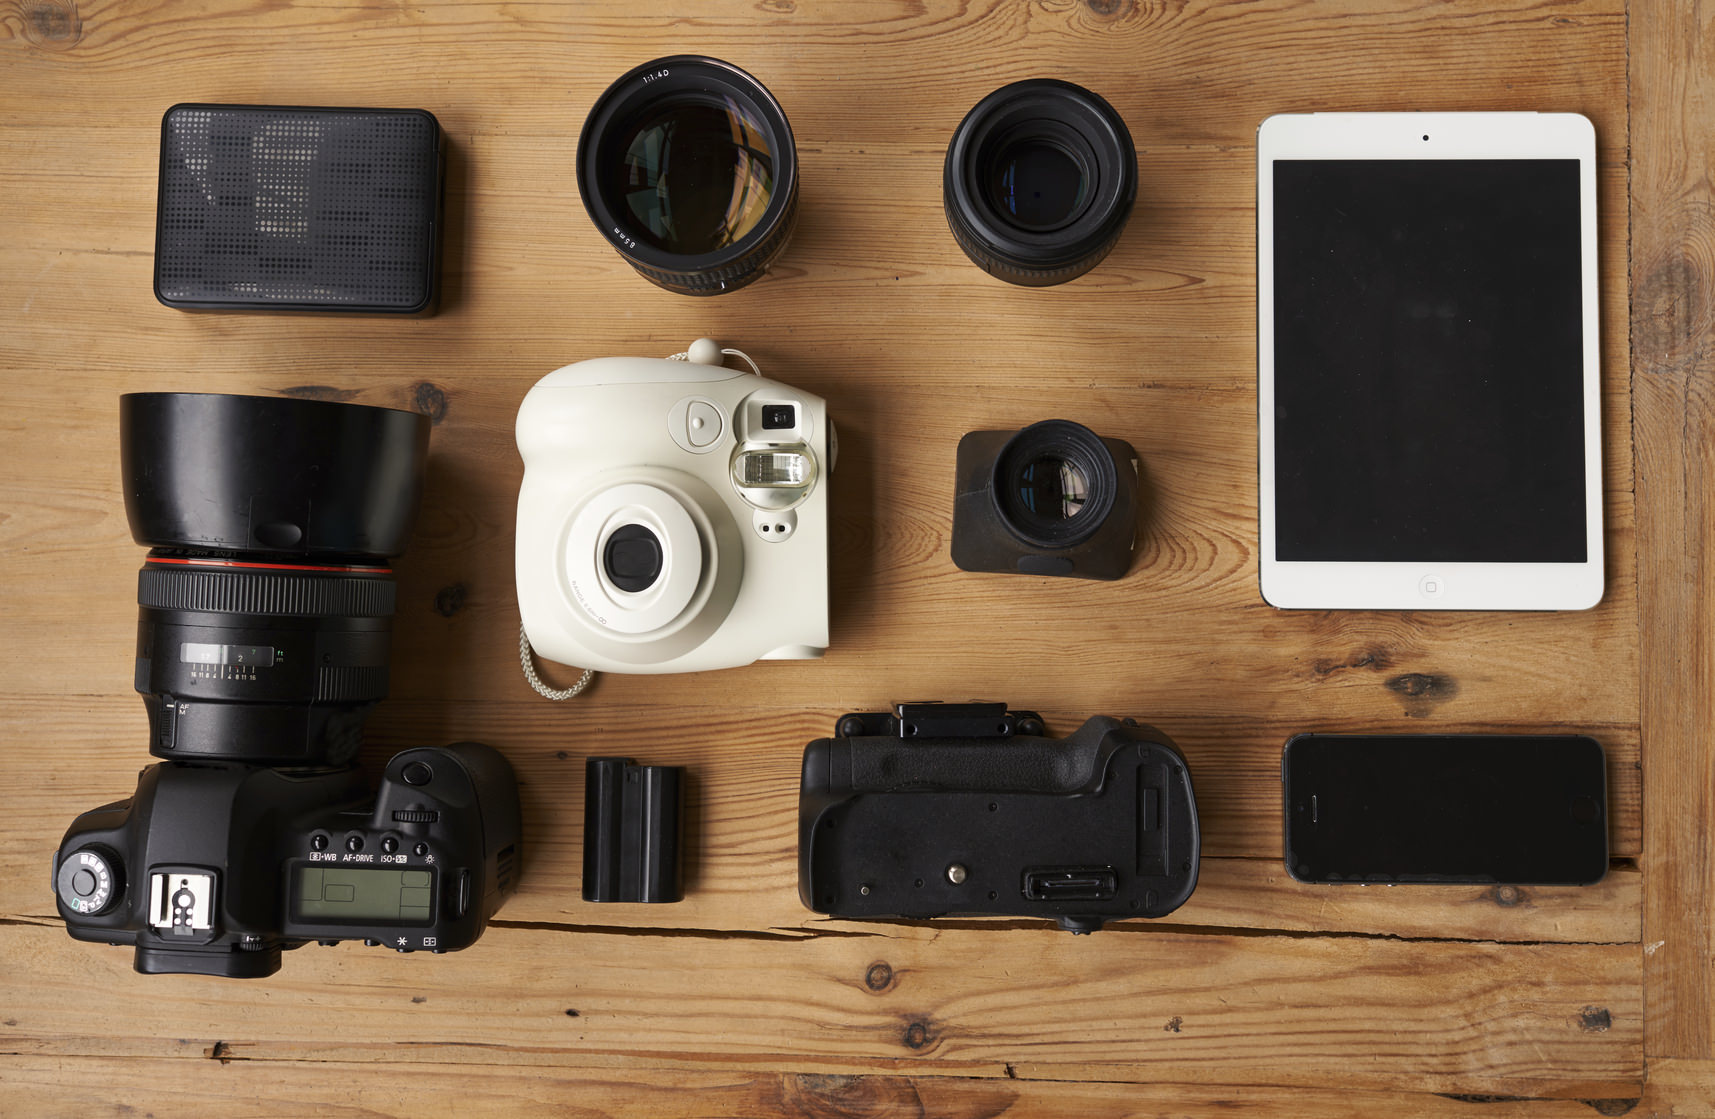
 Image Credit: erikreis via iStock
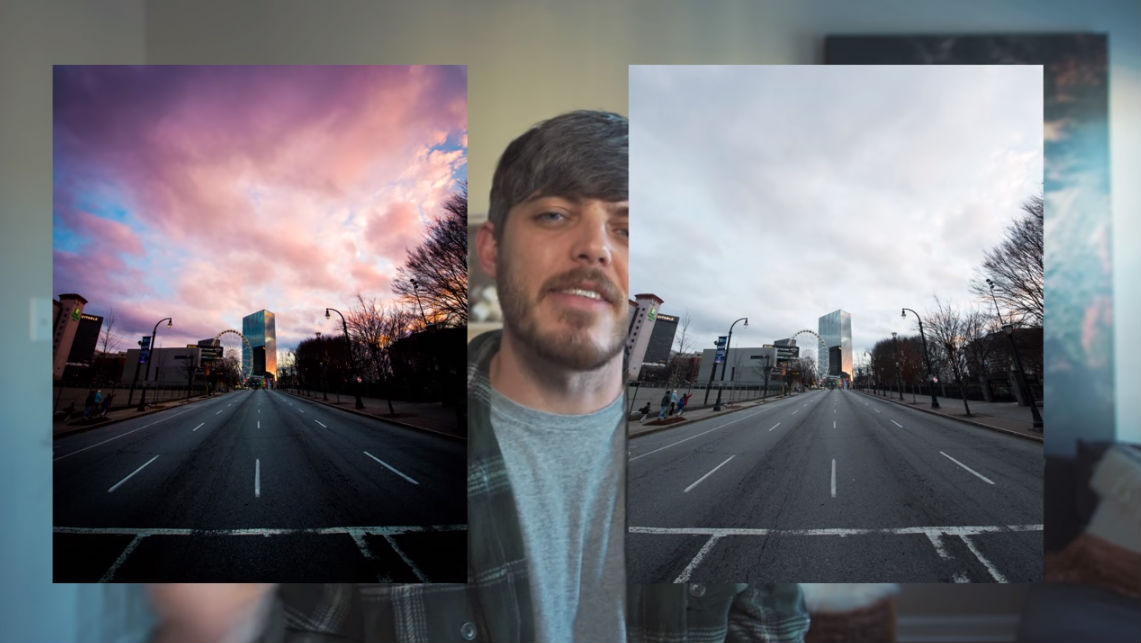
Peter McKinnon is a wildly successful photographer from Canada. To say that he knows his stuff is an understatement.
His YouTube channel is one of my favorites because he's able to mix really good information with a laid back attitude and a little bit of silliness to create videos that are both entertaining and informative.
The video below is no exception...
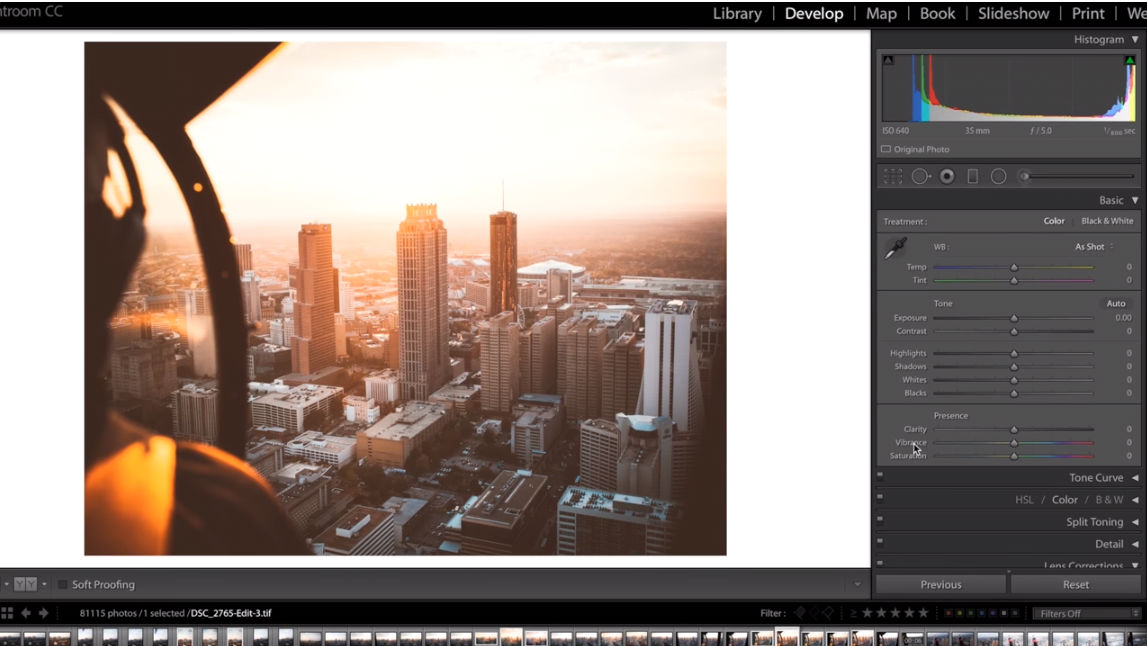
Lightroom is a fantastic editing suite that gives you all kinds of power to bring every bit of life out of your photos.
But if you've used Lightroom before, you understand that it can be a challenge to learn how to use all of its awesome tools.
If you're like many casual photographers, you might only use Lightroom a few times a month, just here and there to tune up a photo or two.
But for enthusiast and professional photographers, Lightroom is something to use every single day.
If you want to use Lightroom like the pros do, check out Peter's video and learn 10 Lightroom tips that you should know.
From auto tone and resetting to radial brush adjustments and organizational tools, Peter will show you little-known Lightroom tips and tricks that will help you take your photos to the next level.
Learn More:
We Recommend
14 Lightroom Tricks You Need to Know

I've always been a Photoshop guy, but in recent years, I've found myself more and more involved with Lightroom.
I'm not the most organized person in the world, so Lightroom's easy importing, organizing, and management tools are a godsend for me.
I like the workflow in Lightroom more and more as well - it's easier and makes more sense to me.
If you're in the same boat as me and want to start using Lightroom more, you don't want to miss the 14 Lightroom tricks that Evan Ranft presents in the video above.
From speeding up your workflow to advanced editing tips and everything in between, this video will give you plenty of Lightroom techniques that will help you create improved images.
Have a look at the video, and for some discussion of a few of my favorite tips, read on below.
Change the Color of the Develop Screen Background
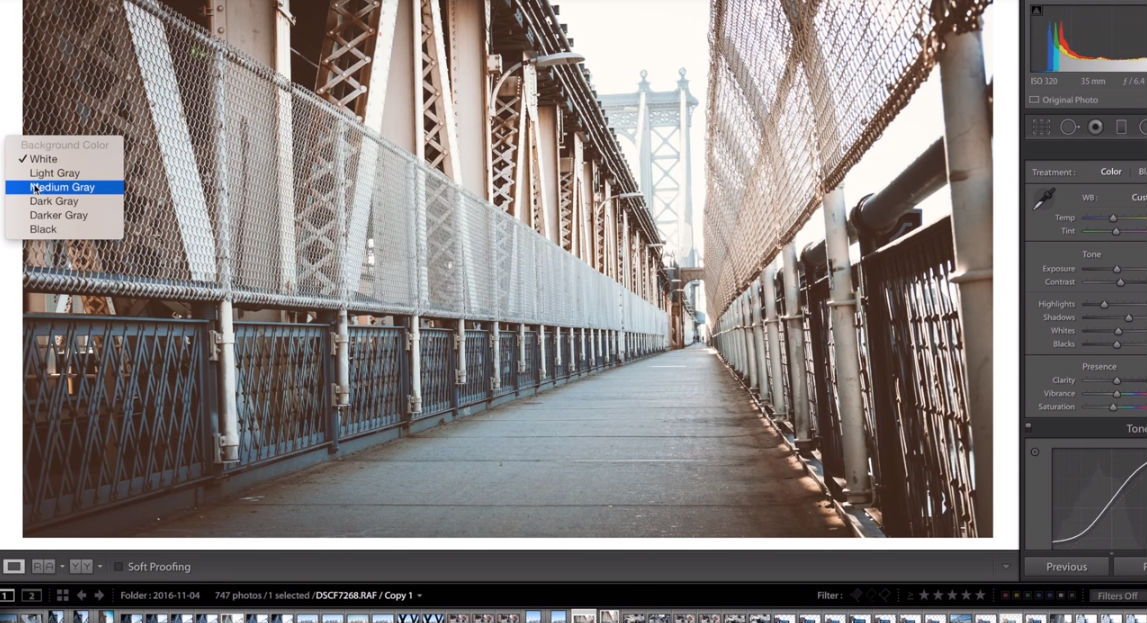 YouTube Screenshot/Evan Ranft
You know how they say that the background of a portrait can make or break the shot?
Well the same principle applies to the background color you see in the Develop Screen in Lightroom.
Some people prefer using a white background, others a black background, and yet others some shade of gray.
It sounds crazy, but changing the background color can change the way you see your image, particularly its colors and contrast.
So, to change things up, just right-click on the background in the Develop Screen, and choose the color of your choice from the corresponding pop-up menu.
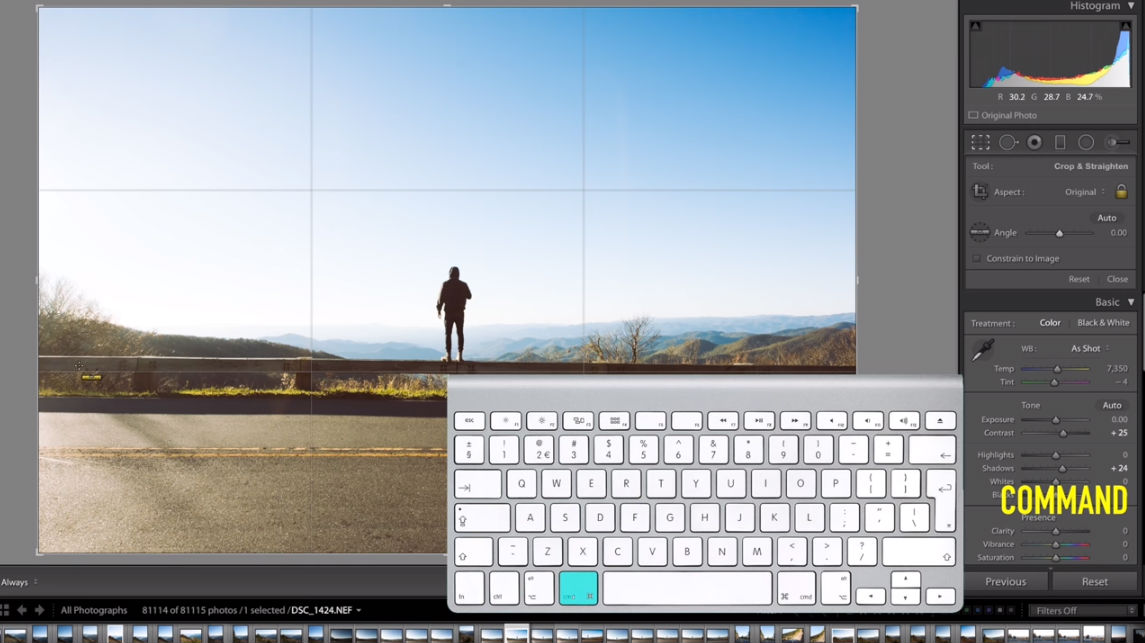
Straighten a Horizon
 YouTube Screenshot/Evan Ranft
Try as you might, sometimes your horizons aren't going to be absolutely straight.
Fortunately, it's an easy fix in Lightroom.
Though you can use the Angle Slider in the Crop and Straighten Panel, there's an even easier way.
Just press Command or Control on your keyboard, and that enables you to draw a straight line.
In this instance, Evan draws a line across the guardrail, and Lightroom automatically adjusts the image to make that line perfectly straight. Easy, right?
Learn More:
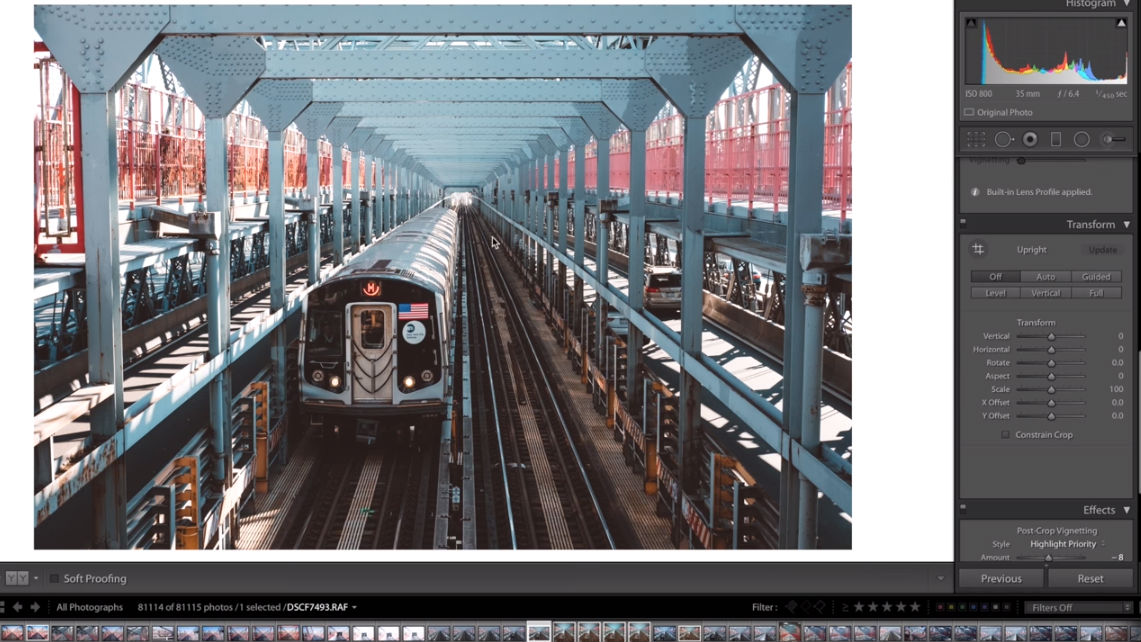
Fix Distortion
 YouTube Screenshot/Evan Ranft
If your photo has a lot of horizontal or vertical lines, you might notice that they appear a bit distorted.
But with Lightroom, this is a simple fix by using the Transform Tools in the Transform Panel.
In looking at the screenshot above, the vertical lines aren't completely vertical and are instead bent ever so slightly.
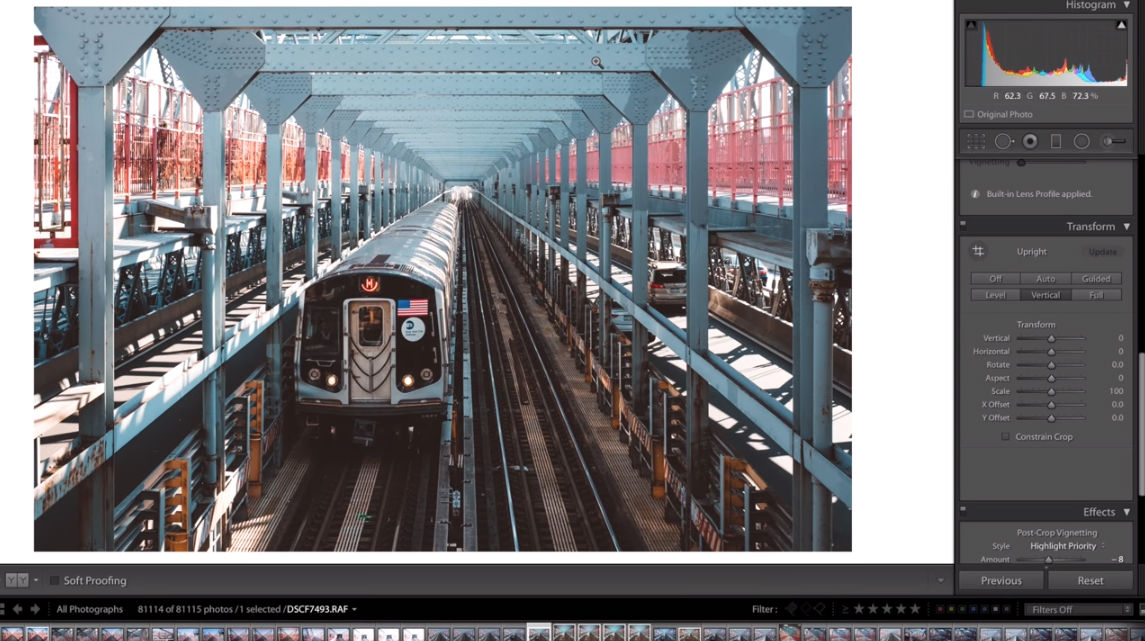 YouTube Screenshot/Evan Ranft
But by pressing the Vertical button in the Transform Panel, Lightroom corrects this distortion, making those vertical lines appear straighter.
This is a great tool to use when you have symmetrical images, like this one.

View Your Image By Itself
 YouTube Screenshot/Evan Ranft
Even though Lightroom has a great workspace, all those panels and buttons and tools can be a little distracting.
When you want to have a look at your image to see how it's coming along, and want to omit all those tools and stuff, you can do so by pressing the L button twice.
The resulting window, shown above, gives you a nice, blank canvas on which to inspect your photo.
Learn More:
Get Finer Control Over Sliders
 YouTube Screenshot/Evan Ranft
For those of us that don't have the finest of hand control, the small sliders in Lightroom can be a bear to use.
Instead of making a small adjustment to something like exposure, it's easy to take it too far and end up with an image that's way brighter or darker than you wanted.
The fix for this is simple: grab the left-hand edge of the panel, and drag it to the left.
As you can see in the screenshot above, doing so extends those sliders and gives you much greater control over how much you move them.

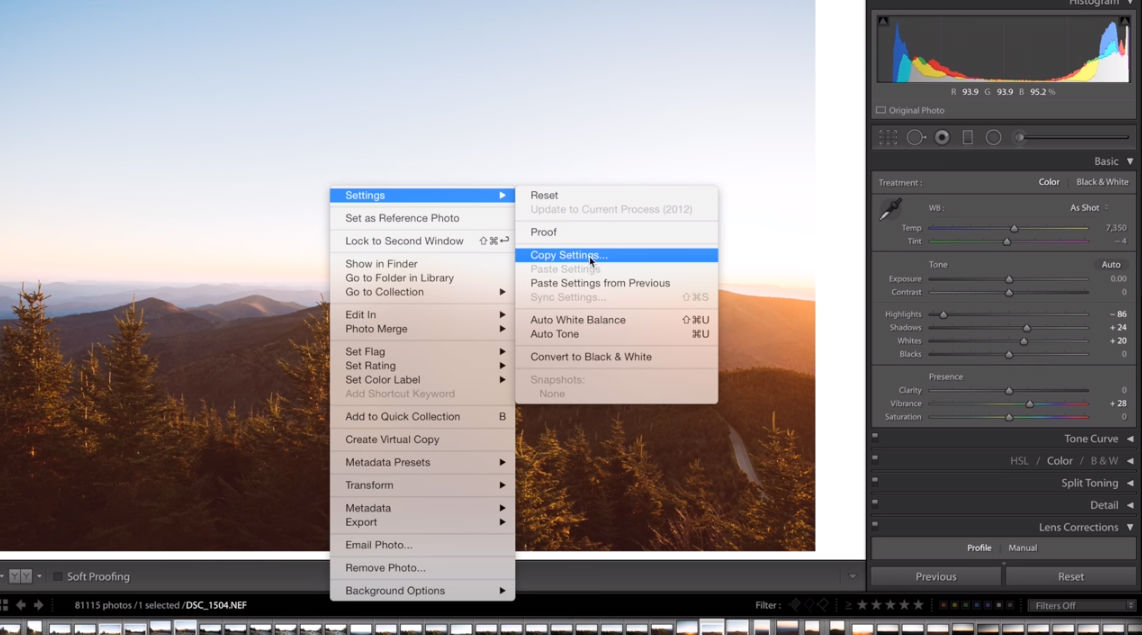
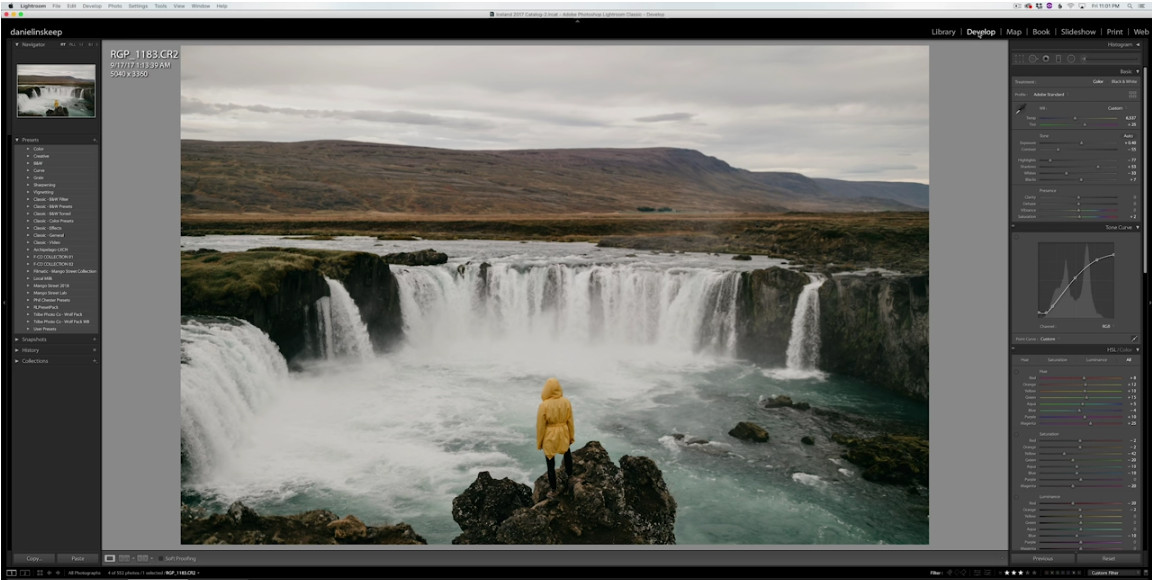
The Best of Lightroom Tricks: Copy Settings From One Image to Another
 YouTube Screenshot/Evan Ranft
Let's say you've fine-tuned an image and you love it.
What if you want to copy some of the settings for that image to another one though?
Just right-click on the image as shown above, and select Copy Settings.
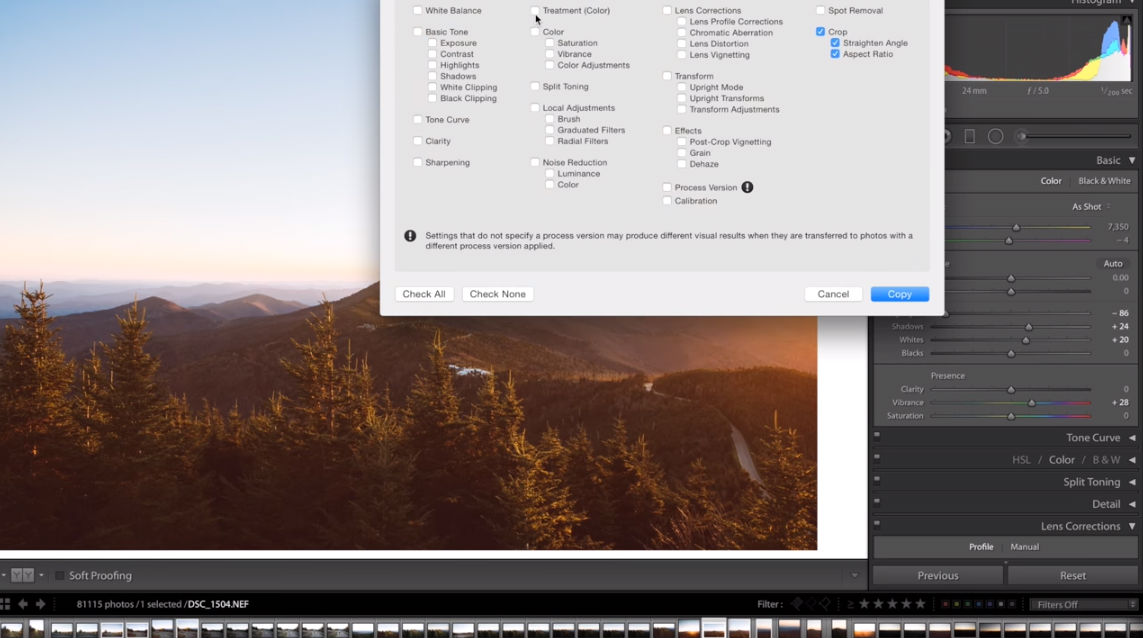 YouTube Screenshot/Evan Ranft
In the following screen you can choose what specific Lightroom settings you'd like to copy, ranging from white balance to color, lens corrections to effects, and a host of other things.
Then, just open another image, right click on it, and select Paste Settings.
It's a fast and easy way to give your photos the same vibe, which is why it's my favorite lightroom trick.
Don't forget, Evan has more great Lightroom tips in his video and on his channel that will help you master Lightroom and get the most out of your photos. You can also check out the best Lightroom tutorials on PhotographyTalk!
Learn More:
- 3 Simple, Yet Helpful Lightroom Tricks
- Make the Most of Editing in Lightroom With These Must-Have Tips
We Recommend
3 Simple, Yet Helpful Lightroom Tricks

Whether you're brand spanking new to Lightroom or you've been using it for some time now, there's always something to learn that makes it a program that's easier to use.
And who doesn't like saving time with tips and tricks that streamline your workflow?!
Travis Transient has a few insights into Lightroom that will help you do just that.
In the video above, Travis identifies three simple Lightroom tricks that have made all the difference in the world.
Check out the video, and for a play-by-play of his tips, read the summaries below.
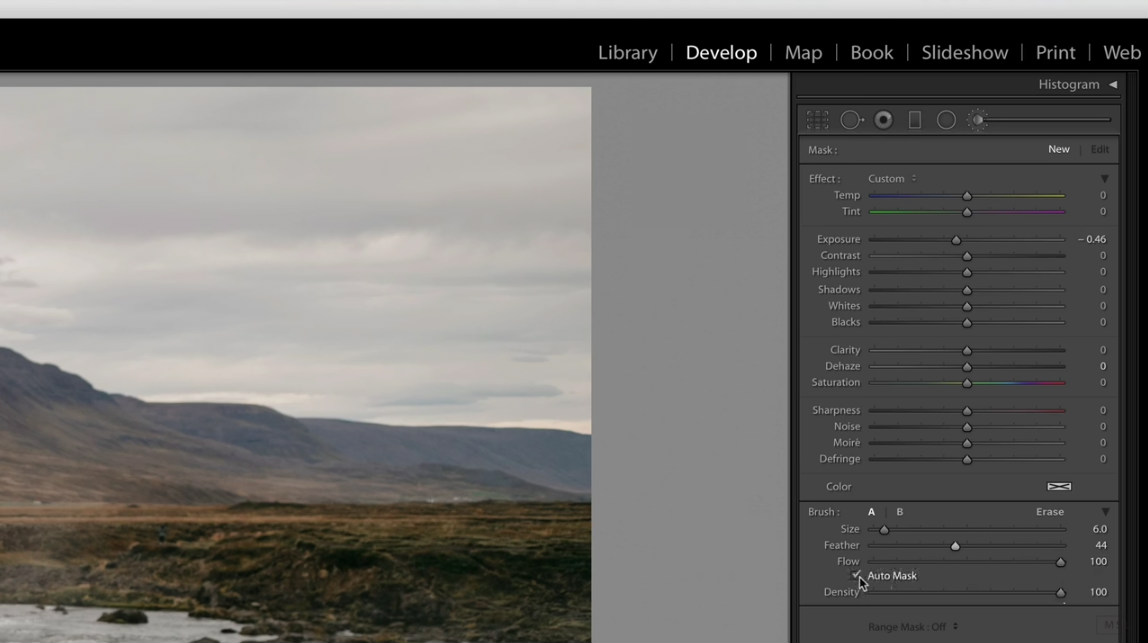
A More Precise Brush Tool
YouTube/Screenshot Travis Transient
You know how when you want to brush over something with the brush tool, but its edges are all wacky, and you have to zoom in to clean them up?
Well, there's a Lightroom secret that helps you avoid that calamity and make much more precise brush strokes.
Rather than brushing away, press and hold CMD/CTRL before you start brushing and the tool will automatically find the edges of the object you wish to paint.
As Travis notes in the video, this essentially makes the brush tool work like the selection tool in Photoshop, finding the edges on its own, so you don't have to do a bunch of cleanup.
Now, this isn't a failproof trick, so if you paint an area you didn't mean to paint, just press Option/Alt and the eraser tool will appear so you can easily get rid of the mistake.
Learn More:
A Better Way to Sharpen
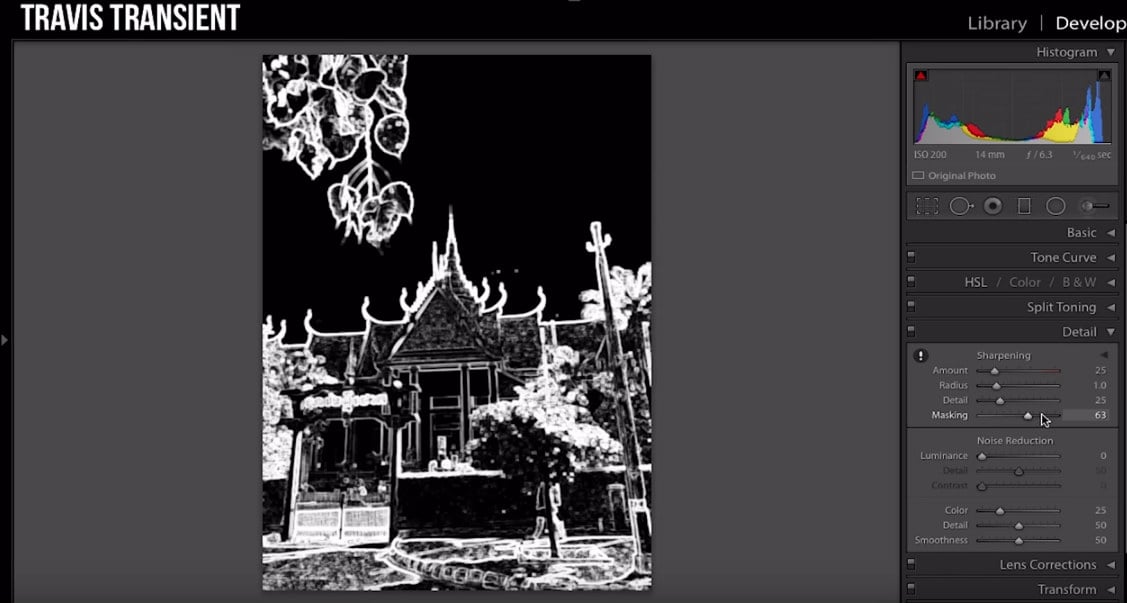
YouTube/Screenshot Travis Transient
Normally, when you want to sharpen something in Lightroom, you probably go to the Details panel and use the Amount, Radius, and Detail sliders to adjust the sharpness of the image.
The problem with this method of sharpening is that it can introduce noise into the image.
That means you need a better way to perfect the sharpness of your photos...
Instead, use the Masking slider in the Details panel to first create a mask of the area that you'd like to sharpen. Just press Option/Alt as you move the slider and the mask will be created, as seen above.
The resulting mask reveals areas of black and white, where white indicates the areas that will be sharpened.
To sharpen those white areas, use the amount slider (again pressing Option/Alt as you do) to make the desired adjustments without introducing noise.
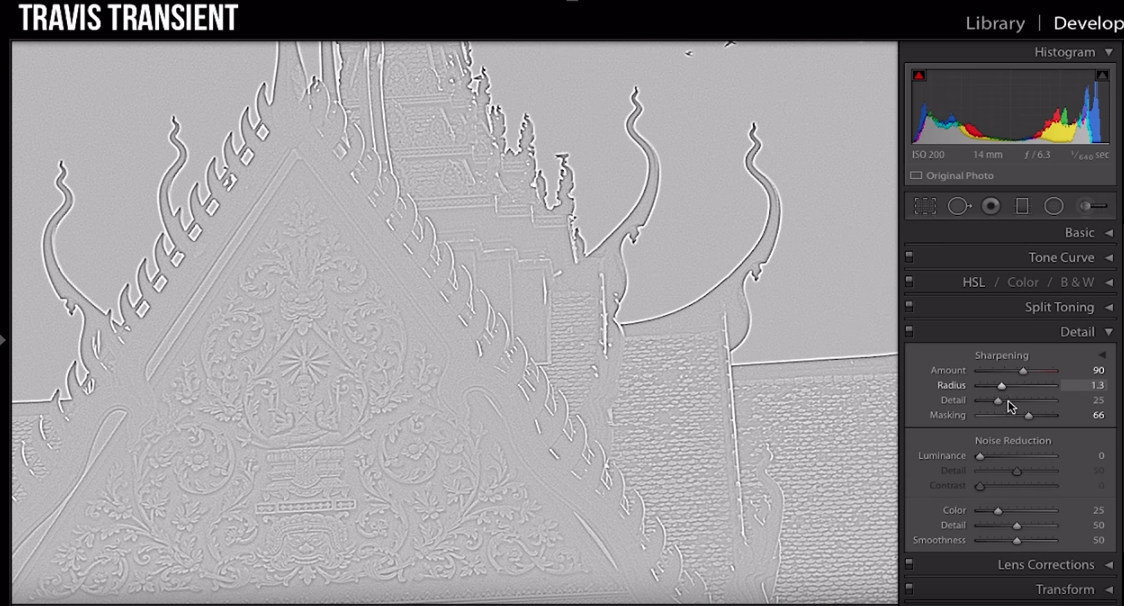
YouTube/Screenshot Travis Transient
This method is especially effective when you want to sharpen intricate details.
To have an even greater effect, you can use the Radius slider to fine-tune the results.
Just press Option/Alt as you move the slider and Lightroom will create what looks like a high-pass filter, as shown above.
That allows you to see the texture of fine details so you can more appropriately adjust the radius of the sharpening effect. This helps minimize noise and haloing around the edges of intricate details in the shot.
Learn More:
A More Effective Way to Use Dehaze
YouTube/Screenshot Travis Transient
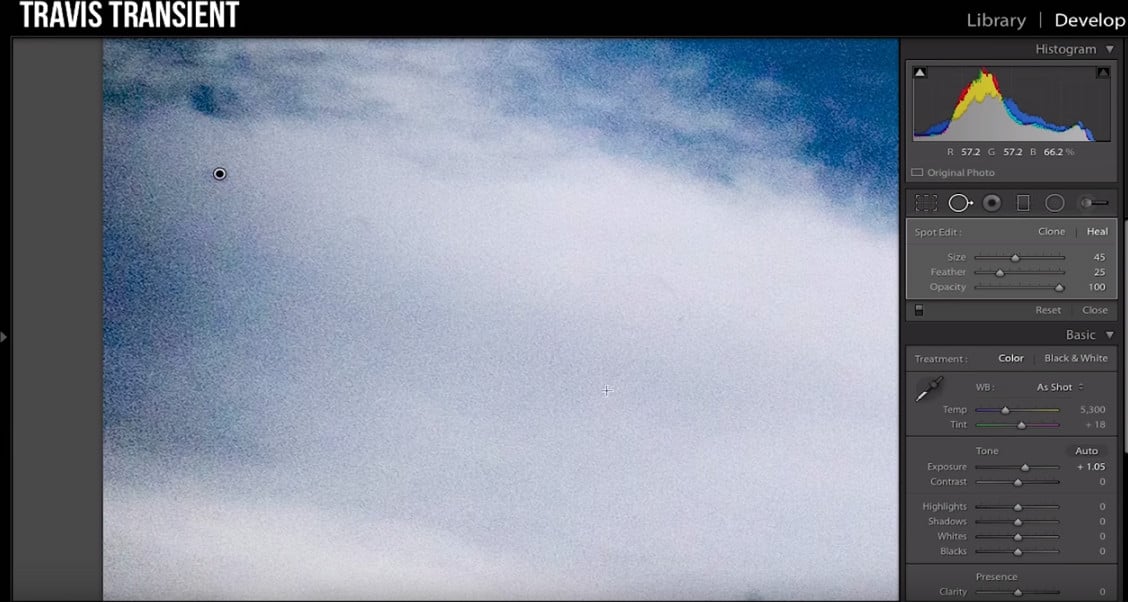
The Dehaze tool is great for clearing up images that might be a little muddy.
But another nice benefit of dehazing is that it can reveal the dust on your sensor or your lens.
All you need to do is zoom in on areas of the image in which you can see dust and use the Spot Remove tool to get rid of the most noticeable dust specks.
By doing this after you've used the Dehaze tool, you'll be able to remove dust specks that may or may not have been noticed initially. Then simply return the exposure and dehaze to their normal levels, and you can go about editing the image without all that dust.
YouTube/Screenshot Travis Transient
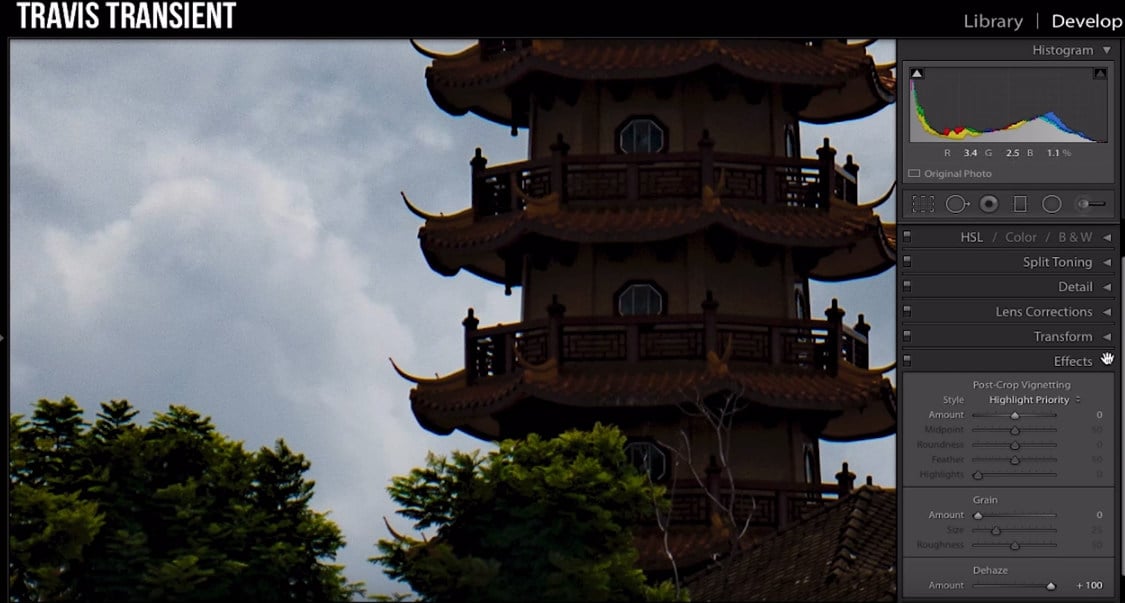
But the Dehaze tool has another trick up its sleeve...
If you crank the Dehaze all the way up, you can use it to look for color fringing as well.
Just zoom in, identify areas where you see color fringing, and use the Defringe tool in the Lens Corrections Panel to take care of it.
Learn more:
Final Thoughts

There's a reason why Lightroom is so popular among photographers.
It's incredibly powerful, does a great job of helping you organize your photos, and there's a ton of tricks you can learn to make it an even more effective tool for post-processing your images.
The three Lightroom tips outlined above are simple and easy to learn but can have a tremendous impact on how your final images look.
Give them all a try and see just how easy they are to use, and just how much they can improve your photos!
Be sure to give Travis Transient a follow on YouTube as well!
We Recommend
3 Tools You Don’t Use Enough in Photoshop

photo byscyther5 via iStock
Do you think you know Photoshop as well as you should?
Photo Manipulation’s Abbey Esparza doesn’t think you do, because she recently made a YouTube video outlining some really important Photoshop tools she thinks are underused.
After watching the video, I tended to agree with her. I’ve been using Photoshop for years, and have grown my own skills alongside its ever-changing platform.
But, I’m also not one to let pride get in the way of knowledge and believe some of the tools in her Photoshop tutorial could be a lot more useful to me if I let them be.
So, which tools are the underused Photoshop tools that she highlighted? Keep reading to find out.
Select Subject
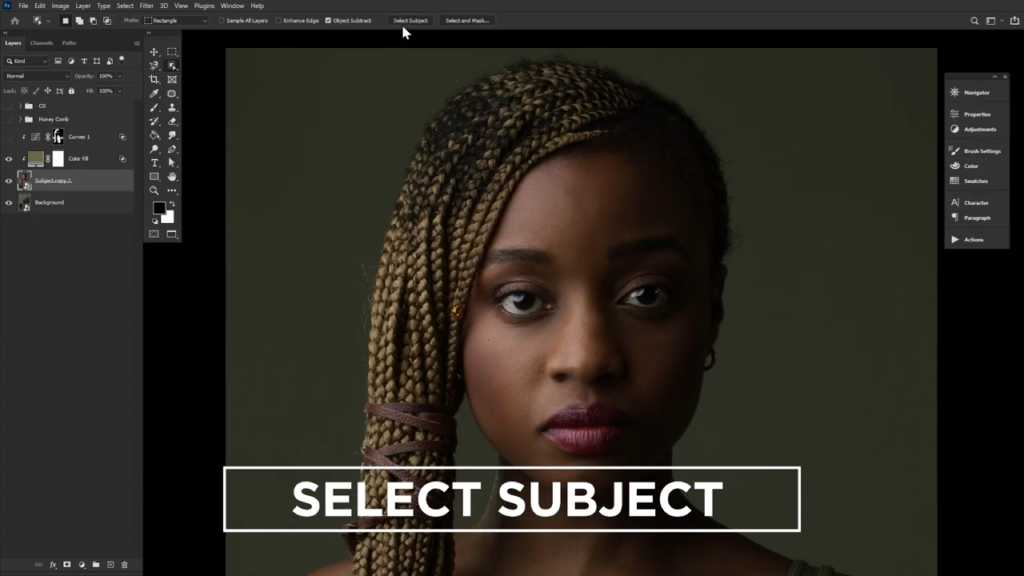
Okay, okay, I know what you’re thinking. The Select Subject tool has been a tool in Photoshop for pretty much as long as Photoshop has been around. And, that’s true, but I tended to ignore it for years and still do.
The reason for this is that the Select Subject tool was really shotty for years. It never correctly highlighted my subject, which left me trying to clean up the border anyways. After years of trying to use this Photoshop tool unsuccessfully, I eventually gave up and just started drawing my subjects myself.
But, Abbey pointed out that this Photoshop tool is really quite impressive now. Photoshop uses an AI to keep improving this tool and while Abbey does admit that it can still mess up every now and again, she argued that it saves her a lot of time.
Color Lookup Layers

You can find the Color Lookup Layers Photoshop tool in the adjustment layers panel. It’s one of the most underloved Photoshop tools, I would argue, because of its odd placement. You have to know exactly what you’re looking for.
You also need to know how to use it. The Color Lookup Layers tool allows you to apply different effects to your entire photo in just the click of a button. For photographers who need to apply the same preset to all of your photos, the Color Lookup Layers tool will quickly become your best friend by allowing you to apply different look up tables to your photos.
One of the tips that Abbey gives in her Photoshop guide is to remember to adjust the opacity for any of the LUTs you use because they are all quite stylized and will look over-the-top unless you adjust the opacity on them and then layer them.
Keep in mind that Abbey is a digital surrealist, so she specializes in creating images in Photoshop that don’t represent reality. If you’re hoping to use the Color Lookup Layers tool to create more natural photos, then don’t be afraid to increase the opacity even more.
Learn More:
Blend If

The Blend If tool comes with two different slider bars, one for “this layer” and one for “underlying layers.” It allows you to adjust your light and color on all of your layers at once. Keep in mind that when you use the Blend If tool to adjust “underlying layers” it will adjust all of your underlying layers.
The Blend If tool is excellent if you want to make your highlights in your photos really stand out, or conversely, it’s really great at making some other elements blend in better to the rest of your image.
New Window For
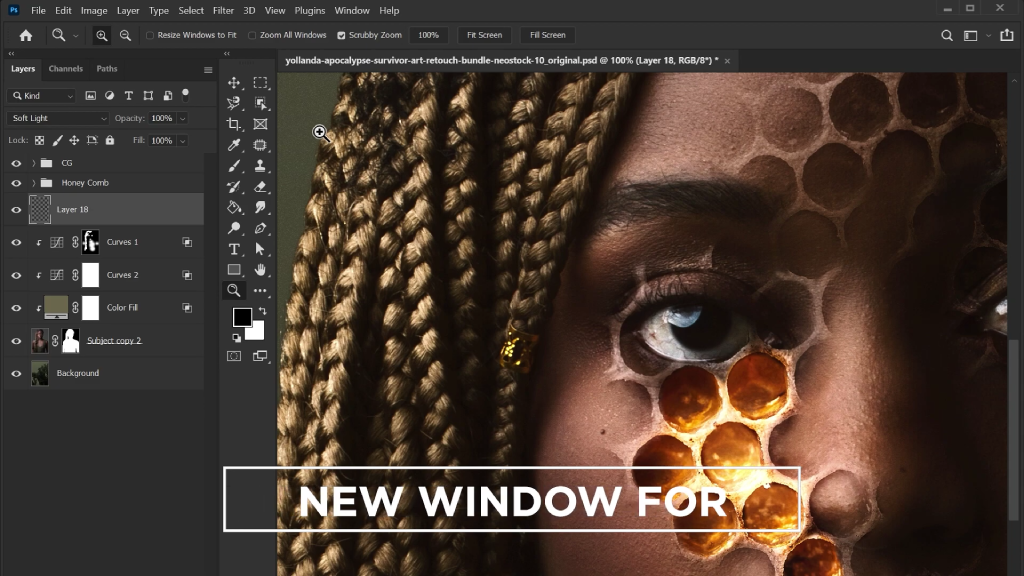
Abbey included a sneaky fourth tool in her Photoshop techniques video… the New Window For tool. This tool creates a new “copy” of the image you’re currently working on, except it isn’t really a copy because it’s a mirror. When you do something to your original image, your mirror copy will also show those changes.
You can use this to zoom in on your image, while simultaneously being able to see the overall effect on the image at large.
What Do You Think?

photo by jacoblund via iStock
So, do you agree with Abbey? Do you think that these Photoshop tools are underused? Which tools do you regularly use now and which tools do you think you’ll start to use more frequently after watching this video?
I personally know I’m going to start using the New Window For tool more often, since I just got a really large new monitor and it’ll be helpful to me to be able to keep track of all of the changes I’m making as I make them.
Learn More:
We Recommend
5 Signs You're Overediting Your Photos
 Photo by GaudiLab via iStock
Editing photos is easier today than ever before, thanks to a wide range of editing programs for our computers and apps for our phones.
Whether you fancy using Photoshop or Lightroom, Luminar or On1, VSCO or Snapseed, you have extremely powerful tools right at your fingertips for correcting mistakes and bringing out the best in each photo you take.
But if you've perused Instagram lately, you have no doubt seen examples of editing gone wrong. More specifically, editing gone too far.
We've all stepped over the editing line at some point - I know I have.
The difficulty with editing photos, especially when you're a beginner photographer, is simply knowing when to say when, according to Mark Denney.
In the video above, he expounds on this issue and offers a few tips for avoiding the cardinal sins of post-processing.
As Denney explains, though the signs that you've overedited a photo might be hard to spot at first, understanding what to avoid as you edit your photos will help you recognize when it's time to hang up your editing hat.
 Photo by GaudiLab via iStock
As you'll see, there are five common signs of overediting of which you need to be aware. These include:
- Unrealistic highlights and shadows
- Adding too much contrast to the image
- Sharpening the image too much (and/or adding too much clarity)
- Too much vignetting
- Oversaturated colors
Clarity was my big issue back in the day. I overamped so many photos by turning the clarity up way too high.
In the end, less is usually more, so heed Denney's advice and know when to say when!
Learn More:
We Recommend
7 Lightroom Secrets

It wasn't that long ago that it seems like our post-processing options were pretty limited both in terms of the programs we could use and the functionalities they offered.
Of course, I'm aging myself because I'm thinking of about 25 years ago...
Times have changed, though, and today we have an incredible array of powerful photo editing tools at our disposal.
One such tool is Adobe Lightroom.
If you ask me, Lightroom is an easier program to use for photo editing than Photoshop.
But there's still a few hidden secrets lurking in there that you should be aware of.
PhotoshopCAFE offers up 7 Lightroom secrets you probably don't know in the video above.
Check it out, and follow along with the text and screenshots below!
Solo Mode
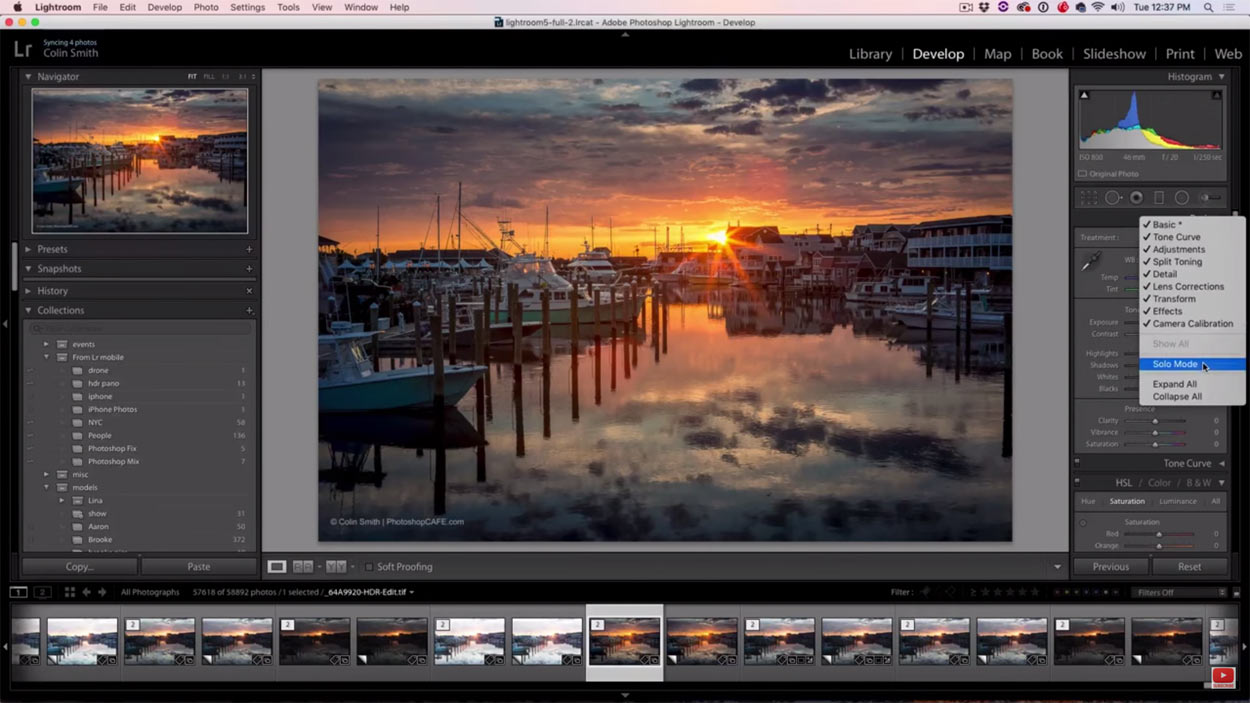
YouTube/Screenshot PhotoshopCAFE
I'm guessing that most of us do our editing on a laptop, which means a smaller screen to fit all of Lightroom's tools and panels.
That can get a little hectic given that you have to scroll a lot, especially on the right side of the screen where the panels are displayed.
If you don't want to scroll through each panel stacked on top of one another, simply click the triangle icon at the top of the panels window, right click on it, and select "Solo Mode."
This automatically closes all panels with the exception of the active one, such that only one panel shows at a time.
That means that instead of having six or seven panels open, thus causing you the need to scroll up and down, you'll only have one active panel that fits nicely on the screen.
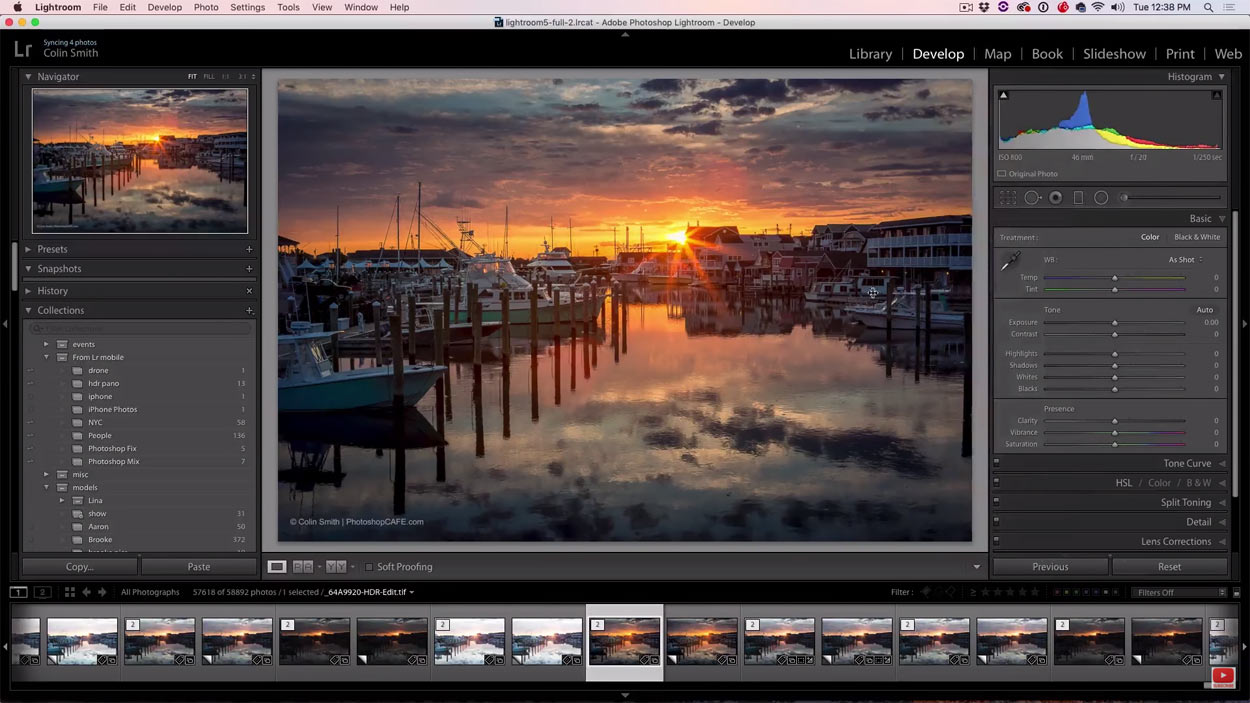
Decrease Slider Sensitivity
YouTube/Screenshot PhotoshopCAFE
In the default view of Lightroom, you might notice that the sliders that control basic elements like temperature, tint, exposure, contrast, and so forth, are a bit on the sensitive side.
In other words, the sliders are compressed, so the movements you make with the sliders have a ton of impact.
The good news is that you can decrease the slider sensitivity by expanding their range.
To do that, all you have to do is grab the left edge of the panels window and drag it to the left. As you can see in the screenshot above, this expands the slider range, giving you a greater ability to have pinpoint control.
Better yet, Lightroom will remember how far you've expanded each panel, so you can customize the size of each one to suit your needs.
Cool huh?
Precise Fit a Radial Filter
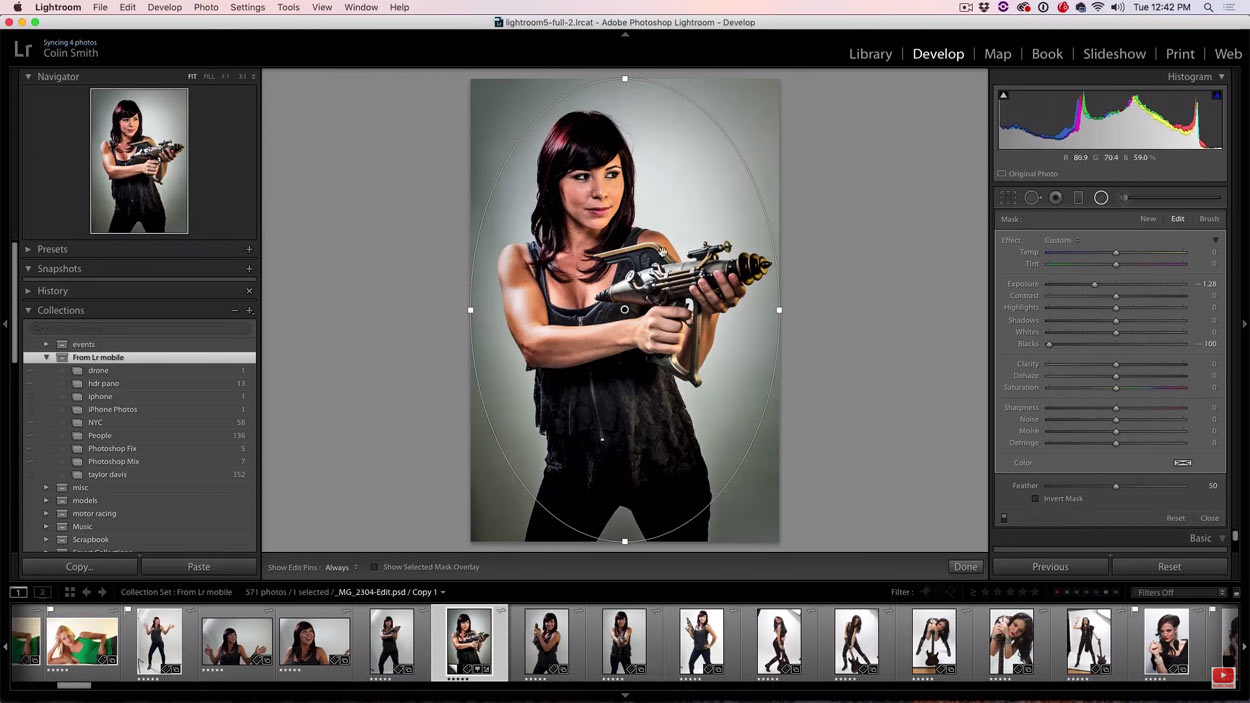
YouTube/Screenshot PhotoshopCAFE
Sometimes, a photo just needs a bit of a vignette to help make the subject stand out a bit from the rest of the shot.
To do that, you can use the Radial Filter found in the Develop Module.
However, doing so means you have to drag the filter around to get it just how you want it.
But what if you could make it fit the image precisely with a lot less work?
With the Radial Filter overlaid onto an image, simply press CMD/CTRL and double-click the pin in the middle of the filter.
As you'll find, it makes the filter fit the precise size of the image, giving you a nice vignette effect like the one seen in the screenshot above.
Learn More:
- Make the Most of Editing in Lightroom With These Must-Have Tips
- 4 Programs You Can Use to Edit Your Photos
Hide Modules
YouTube/Screenshot PhotoshopCAFE
The great thing about Lightroom is that there are all sorts of tools, controls, and modules at our disposal to help us create the best possible photos.
The problem, though, is that all of those tools can clutter your screen - especially a small one on a laptop.
But Lightroom gives you the option to hide modules that you seldom use or simply don't need for the current task.
At the top of the toolbar, right click, and in the corresponding window, simply uncheck the modules that you don't need.
You can do the same to hide unneeded modules in the panels window, too.
It's a quick and easy way to clean up your workspace and improve your workflow in Lightroom!
Add Punch to Videos
YouTube/Screenshot PhotoshopCAFE
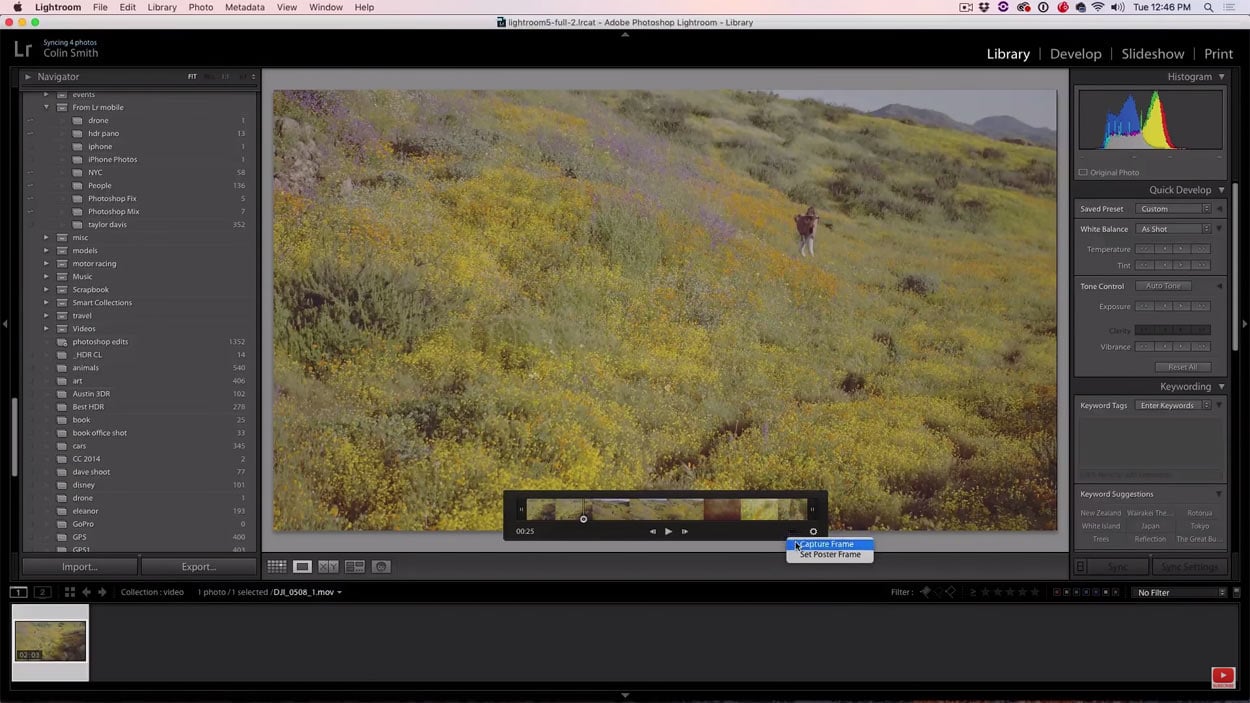
If you've shot some video that's lacking visual punch, you can use the tools in the Develop Module to give it a little more life.
But when you try to open a video in the Develop Module, Lightroom gives you a message that says "Video is not supported in Develop."
You can get around that, though...
Go back to your library and select the video you wish to work on.
Use the slider to scroll to a frame, click on the box in the pop-up window just below the slider and click it, selecting Capture Frame, as seen above.
YouTube/Screenshot PhotoshopCAFE
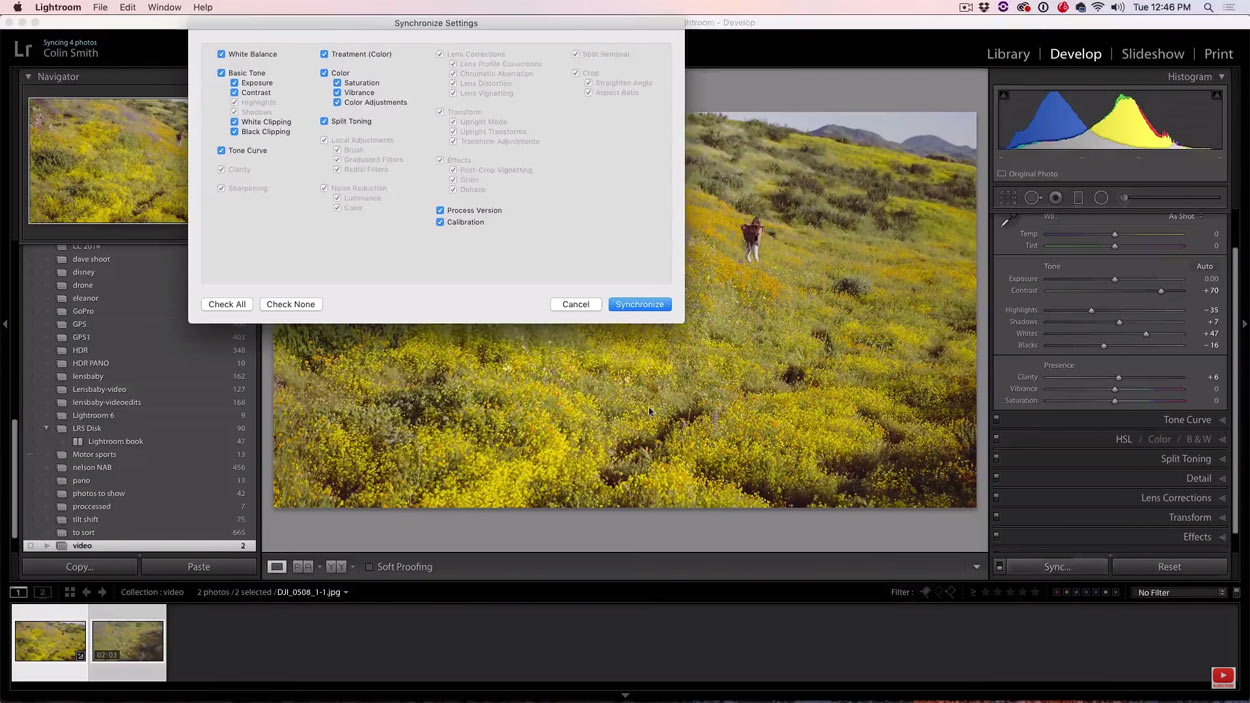
Doing so creates a photo of that frame, which you can then open in the Develop Module.
Use the tools in the Develop Module to punch up the contrast, colors, etc., in the image, and then select Sync to apply the settings from that single frame to the entire video, as seen above.
The result will be a video that has the same new punchy look that you created on just a single frame!
Putting Quick Selections Into a Collection
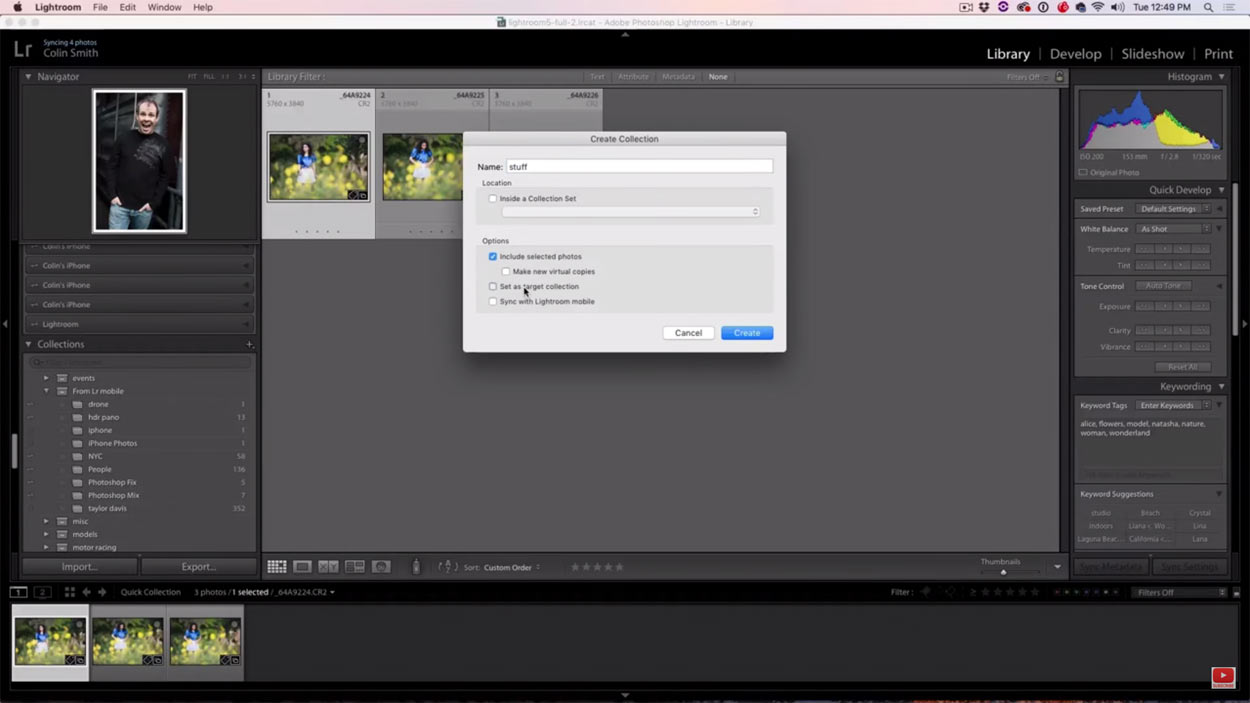
YouTube/Screenshot PhotoshopCAFE
A nice feature about Lightroom is that you can make collections of photos simply by clicking on the dot that appears in the upper right-hand corner of the photos.
Doing so places the selected images into a quick collection that you can use to easily see the images you've selected.
But what if you want the images you've selected to be added to a permanent collection?
It's simple - create a new collection, and when you do, select "Set as Target Collection."
Then, go to your image library, select the desired images by clicking on the dots in the upper right-hand corner of each, and they'll go right into the collection you've created rather than the quick collection folder.
To select a different collection as the target collection, simply right click on its name and select "Set as Target Collection."
Inspecting Metadata
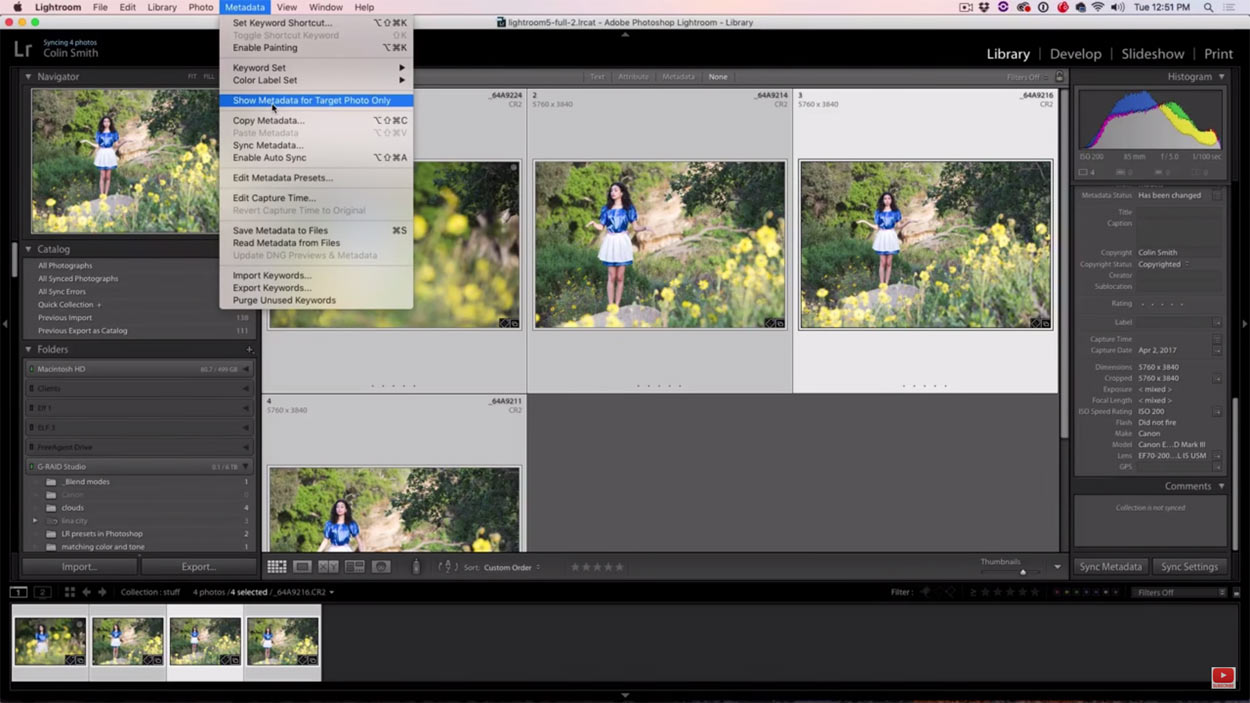
YouTube/Screenshot PhotoshopCAFE
When you have a handful of photos selected and you want to view the metadata of each, you'll probably notice that on the right side of the screen that some of that information isn't displayed, and instead <mixed> is shown.
This is because not each photo you've selected will have the same details, so Lightroom simply displays <mixed> to indicate that there's variability in the images for those particular data points.
To see each photo's metadata, simply select Metadata from the top of the screen and select "Show Metadata for Target Photo Only."
Then, as you select photos in your collection, the metadata from the selected image - and the selected image only - will display on the right side of the screen.
Learn More:
With that, you have seven Lightroom secrets that will help you improve your post-processing workflow!
Give each one a try, practice using them over the next few days, and you'll find that Lightroom becomes a more enjoyable experience!
We Recommend
Editing With Lightroom For Beginners: Tips And Tricks To Supercharge Your Photo Editing Skills

Believe it or not, editing your photos in Lightroom doesn't have to be a long, drawn-out, or overwhelming process.
It might not seem like it if you're just starting out as a beginner photographer, though.
All you need are some basic lightroom editing tricks to help you find your way.
In the video above Sorelle Amore walks us through her Lightroom editing workflow, which, if you ask me, is pretty ideal for beginners.
Have a look at what Sorelle has to say, and for an outline of a few of the tips she offers for editing photos in Lightroom, have a look below.
Editor's Tip: The gear you use can have a significant impact on the quality of the photos you take. Learn why having a prime lens in your bag is hugely beneficial.
Editing With Lightroom Begins When You Shoot
There are a few things to note when you take photos that will help you in the editing process later on.
As Sorelle notes, these include:
- Shooting in RAW, that way you have all the image information captured by the sensor to work with in post-processing.
- Shoot in a flat profile, which dials down the color, saturation, contrast, and so forth, which in turn gives you maximum control over those features in post-processing.
- Shoot under the best lighting conditions possible, such as sunrise and sunset, that way you don't have to deal with editing photos with harsh highlights and shadows.
Of course, you also need to work on things like composition because it's difficult to correct compositional mistakes in post.
Learn More:
The Basics of Editing Photos in Lightroom
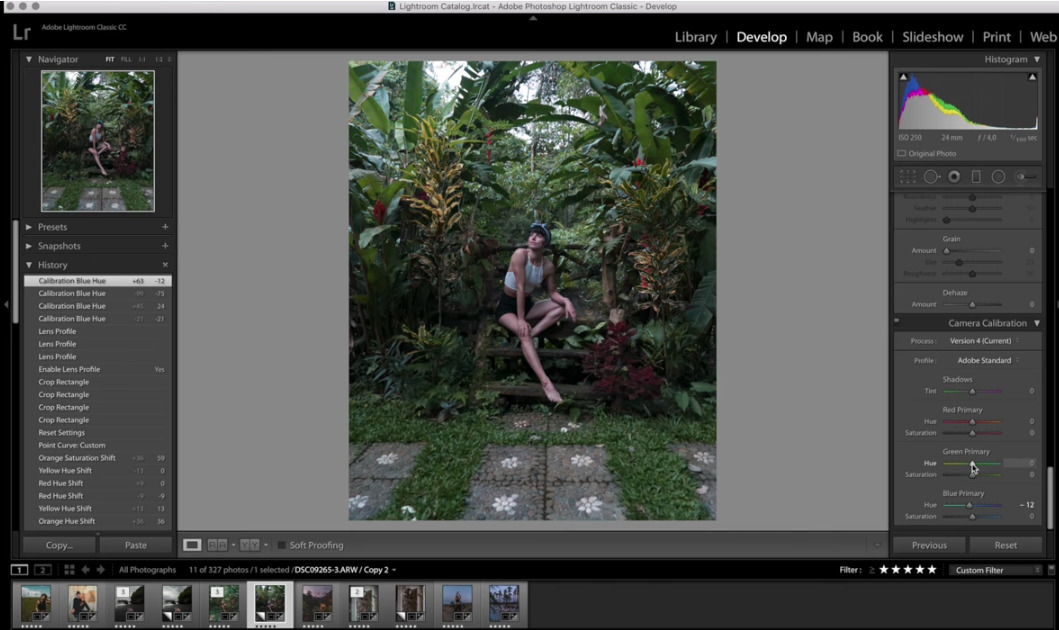 YouTube Screenshot/Sorelle Amore
The first tasks you face when editing photos in Lightroom are basic adjustments like cropping and lens correction.
To crop, simply use the crop tool, which you can find in the Crop and Straighten Panel.
To enable lens corrections, go to Lens Corrections and click Enable Profile Corrections. Then select your lens from the dropdown menu.
Next, use the tools in the Camera Calibration Panel to adjust the shadows and red, green, and blue tones in the shot, as shown above.
 YouTube Screenshot/Sorelle Amore
Lastly, visit the Basics Panel to adjust things like highlights, tint, temperature, exposure, and so forth. It's in this panel that you'll do a lot of fine-tuning to get the image to a place where it begins to reflect your personal tastes and style.
As Sorelle mentions in the video, her personal style is to create images that are on the dark side.
As you can see in the screenshot above, she's brought the highlights way down and the shadows way up. Though this might not be everyone's vibe, it works for her, and she developed that style by playing around with the settings in the Basics Panel.
Editor's Tip: How you accessorize for portrait photography can make all the difference in the world. See how the right accessories can totally change your images.
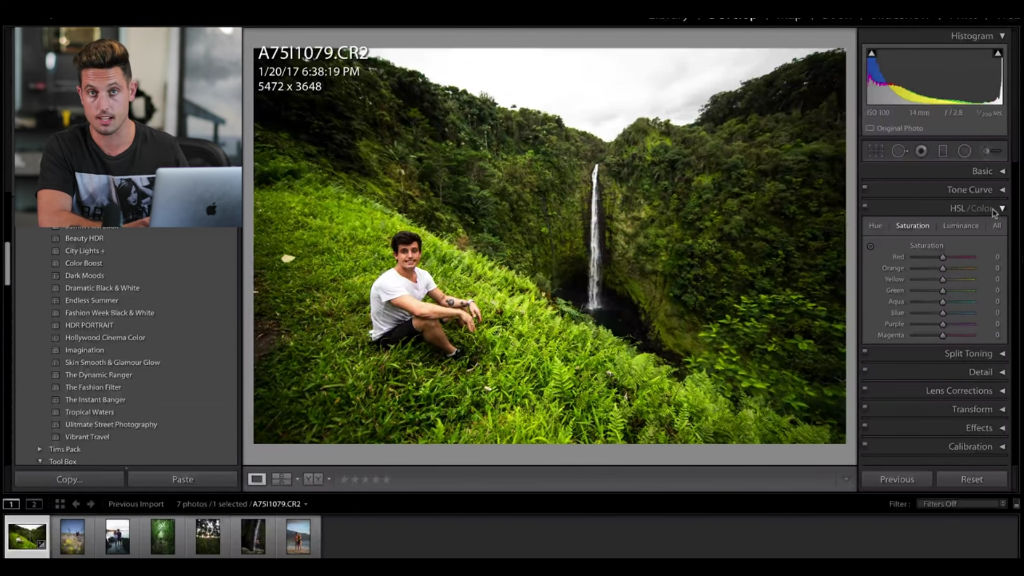
Lightroom Editing - Manipulating the Colors
 YouTube Screenshot/Sorelle Amore
Next in Sorelle's workflow is manipulating the colors of the image using the Hue, Saturation, and Brightness sliders.
Because there are so many changes you can make (especially with regard to saturation levels of individual colors), you can really alter how the image looks and feel to a great degree.
Using the Split Toning controls gives you an additional method by which you can perfect the colors in your image.
Again, experimentation with these color controls is necessary. Get wild and crazy simply to see what each slider does to your image, and then once you're comfortable in understanding how each manipulation changes your photo, you can start to dial things back to perfect how your image looks.
As you can see in the screenshot above, after just a few moments of changing these settings, Sorelle has made a huge impact on how this photo looks.
Learn More:
- Make the Most of Editing in Lightroom With These Must-Have Tips
- 21 Awesome YouTube Channels Photographers Love
We Recommend
Every Beginner Photographer Should Have These 4 Things
 Photo by Stephen Kennedy on Unsplash
Ok, ok...
So there's a lot more than four things that you'll need to get started in photography.
Sure, you need the obvious stuff like a camera and a lens or two, but it would be a mistake to focus all your attention (and money) on just getting a camera and lenses.
That being the case, I'd like to present four things that beginner photographer need, but that might be a little under-the-radar, so to speak.
By that, I mean that the photography gear I list below are things that I wish I would've had back in the day when I got my start in photography.
Make It Easier to Take Photos With a Solid Tripod
 Image Credit: DieterMeyrl via iStock
I know that a tripod might not seem like an "under-the-radar" photography gadget, but it most definitely is.
In fact, I think tripods - good ones, anyway - are the most underrated photography accessories.
That's because they can do so much for the quality of your photos, yet many beginner photographers seem dead set against using them.
Aside from the obvious benefit of having something to provide your camera with stability for a sharply-focused shot, tripods can also help your compositions, too.
Think about it - when you rush through a shot, the chances of making a mistake go up.
But with a tripod, you're forced to take a little bit more time with each shot because you have to fine-tune things like the position of the legs or adjust the level of the tripod head.
Those few seconds can make all the difference in the world when you're after a top-notch shot!
Learn More:
Control the Light With a Reflector Pack
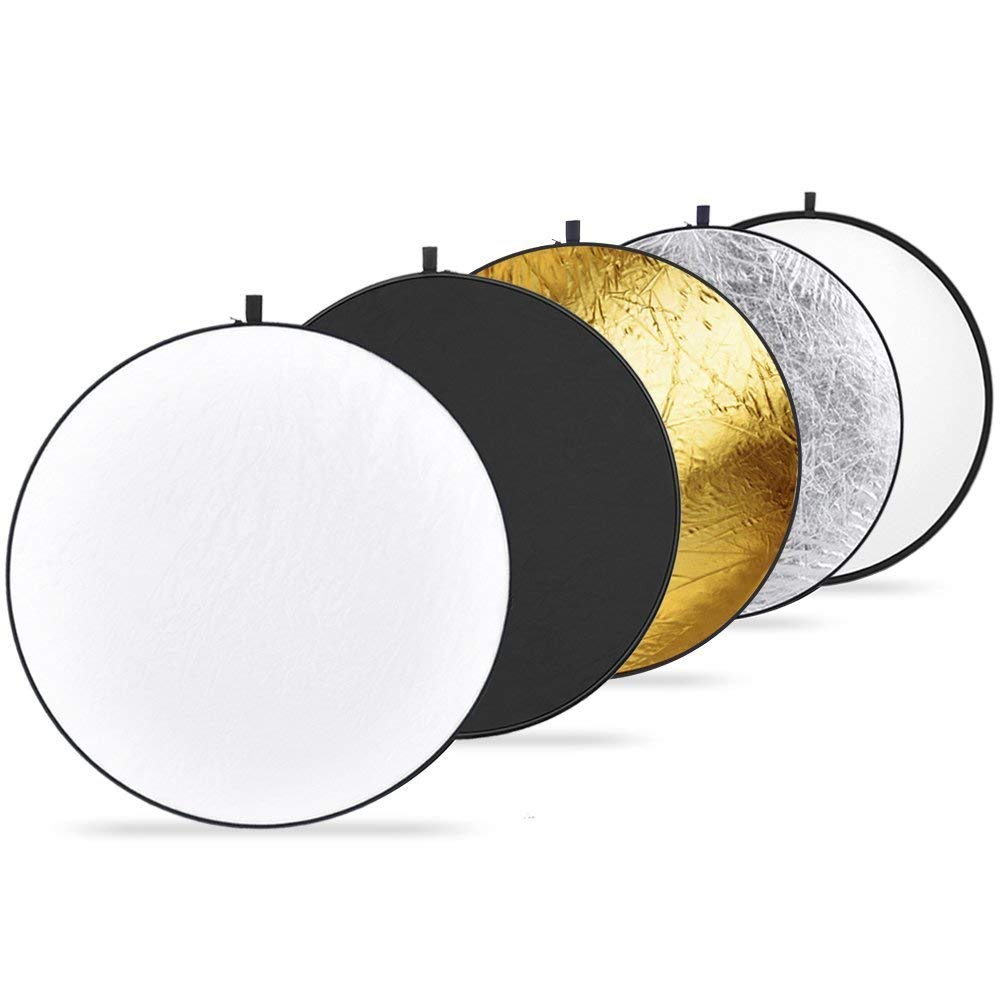
If you want to learn how to take top-notch portraits, one of the best photography accessories you can buy is a reflector pack.
Not only are they inexpensive (like this one from Amazon), but they're also multi-functional.
With one reflector pack you can:
- Soften light with a translucent reflector
- Enhance shadows with a black reflector
- Brighten shadows and highlights with a silver reflector
- Gently soften light with a white reflector
- Warm up light with a gold reflector
The key (well, one of them, anyway) to a great portrait is good lighting, and with a simple reflector pack, you can manipulate the light in a ton of different ways.
Learn how to use a reflector in the video above by Joe Edelman.
Keep Your Images Organized in Lightroom
 Photo by Joseph Pearson on Unsplash
Lightroom wasn't a thing when I started in photography many years ago, let alone incredible plugins that make Lightroom even more functional.
But that's one of the benefits of learning photography these days - the sheer quantity and quality of photography technology is incredible!
If you're keen on keeping all the images you take nicely organized, Lightroom is a must.
It's not as robust a processing program as Photoshop, but in terms of organization, it can't be beat.
Well, that's not completely true because you can add a plugin like Excire to supercharge Lightroom's capabilities.

If you use Lightroom without Excire, you have to manually tag your photos when you upload them.
That can be a laborious task, especially if you're adding tons of images all at once.
But Excire Search and Excire Search Pro get around this inconvenience by using artificial intelligence to determine appropriate tags for your images.
Excire Search has 125 common keywords that are automatically applied while Excire Search Pro has more than 500 common keywords.
That means that your photos of your family dog or cat will automatically be tagged "dog" and "cat."
Better still, Excire Search and Excire Search Pro can take it a step further and identify people based on their gender and their age, as well as features like whether they're smiling or not.
On top of that, Excire will examine your photos and assign tags based on how they look. For example, if the predominant color in the shot is yellow, a "yellow" tag will be applied.
It really is a handy tool to have, and one that will keep all your images organized, help you create meaningful collections of images based on content, and make your library of images much, much easier to search, too.
Besides, starting out with a highly organized and easily searchable collection of photos will only serve you well as your skills advance and your library of images increases in size.
Watch a hands-on review of Excire in the video above by Anthony Morganti.
Learn More:
Protect Your Gear With a Dedicated Camera Bag
 Image Credit: coldsnowstorm via iStock
When you spend hundreds - if not thousands - of dollars on camera gear, it only makes sense to spend a little more money to get a dedicated camera bag to tote it around in.
Bags made specifically for photography have padded interiors with a soft lining that won't scratch your lenses. And some bags also have adjustable interior spaces that you can customize to perfectly fit your gear.
Some photography bags have waterproof zippers and water-resistant exterior materials to keep the elements away from your gear.
There are a host of other features that are beneficial - tamper-proof zippers, big shoulder pads to distribute the weight of your gear, and moisture-wicking materials that you'll love on a hot day, among them.
The point, though, is that a good camera bag can mean the difference between your gear being in pristine condition and it getting damaged. And when there's so much money at stake, why risk it by throwing your camera in your backpack or purse?!
We Recommend
Five Incredible Lightroom Tips You Need to Know

Lightroom is the go-to editing software for plenty of photographers, and with good reason.
It’s fast. It’s powerful. There’s a great selection of editing tools. And it helps you organize your photos. What’s not to like?!
A problem that some photographers have with Lightroom, though, is that there is just so much to learn that it’s hard to become familiar with all of its valuable tools and settings. Often, photographers will overlook some tools or shortcuts, and only focus on learning a few things that are immediately helpful to them.
But Lightroom has so many possibilities!
What if you’re editing your photos on a small screen - how do you make your image larger for easier editing?
Do you know what pressing the Alt button when clicking a slider does?
Benjamin Jaworskyj gives us the answers to these and other questions about Lightroom so that you can maximize it’s value for you as you edit your photos.
Give his video a look and learn five simple, yet impactful tips that will help you take your Lightroom editing to the next level!
Amazon Recommendations
- Adobe Creative Cloud Photography plan (Photoshop CC + Lightroom)
- The Adobe Photoshop Lightroom CC Book for Digital Photographers
- Adobe Lightroom 6 / CC Video Book: Training for Photographers
We Recommend
Four Things About Photography That Beginners Don’t Want to Hear

Photography is a fun and rewarding hobby for many people and is a wonderful occupation for many others. That doesn’t mean it’s all roses and sunshine, however.
That’s not to say that photography has a “dark side,” but there are some unsavory qualities that some new photographers just don’t want to hear about.
Rather than keep your head in the sand, prepare yourself for reality with our list of four things beginner photographers just don’t want to hear.

It’s Expensive
There’s really no getting around this one. Photography is an expensive endeavor, no matter which way you slice it. Camera bodies are expensive. So are lenses. Then you need a bag to carry them. There are also filters, a tripod, a remote shutter release, a pan-tilt head for your tripod, an off-camera flash...you get the picture.
Even if you start out with hand-me-down equipment, at some point, you’ll want or need something new or new-to-you, and when that moment comes, be prepared to open your wallet and fork over a decent amount of cash. But beware! Don’t buy new gear just because it’s new and shiny. Only buy gear because you need it or because your current gear can no longer keep up with your skills.
Photography Takes Commitment
If you’re anything like me, there’s a bit of a romance period at the start with any new hobby. You submerge yourself in it; spend every minute of free time practicing and learning. Then, over time, the love affair begins to fade and your skills and abilities plateau, then plummet.
Photography is a lot like other hobbies, like learning to play an instrument. You won’t get better unless you practice - a lot. The time commitment is very real. The longer your camera sits on your desk collecting dust, the less likely you are to develop the skills needed to take the kind of pictures you want to take. Though mobile phones have made photography uber accessible with decent cameras and editing apps built right in, if you want to make a serious push towards being a good photographer, you’ll need to learn the basics of composition, lighting, and post-processing, and then practice those skills over and over again.
Photography Isn’t Just About Likes

We live in a social media-driven world. There’s nothing wrong with that, but social media is not the best place for a burgeoning photographer to learn and grow. There are two primary reasons for this:
-
Posting images on social media can suck you into the notion that the number of likes equates to the quality of the image. This just isn’t the case. A truly stunning photo might not get many likes at all; that doesn’t change the fact that it’s stunning. Conversely, a technically awful photo might get tons of likes. It’s often just not a worthwhile means of judging the quality of your work.
-
The majority of images you post on social media won’t get constructive criticism, and without that, how do you learn and grow as a photographer? Your family and friends will like your images no matter what because they want you to feel good. Though that’s very thoughtful and nice, it doesn’t do much in terms of helping you grow as a photographer.
This doesn’t mean you shouldn’t upload your images to social media. But you should supplement that with experiences that garner you more constructive criticism. Join a photography club, take a photography class at a local college, or participate in photography forums online to get the feedback you need to improve your skills. Just get your photos in front of other photography folks so you can learn and grow from their expertise.
Post-Processing is More Than Slapping a Filter on a Photo

Not to bash social media too much, but apps like Instagram have made photo filters extremely popular, and perhaps not for the better. While there might be a time and a place for a filter, it’s not the end-all, be-all of post-processing. Post-processing, like photography itself, takes time to master. This isn’t to say you need to rush out and buy Lightroom (though that would be a sound investment), but spending time in post-processing programs, learning how to work with levels, curves, layers, and the like, will help you create more compelling images. Even mobile apps like VSCO, Mextures, and Snapseed have tons of editing controls that offer a surprising level of control over how your final image looks.
Just like you can’t take a solid photo without taking a lot of practice photos beforehand, you can’t expect to create a solid final image every time by spending 30 seconds in this app or that app swiping through filter after filter. As noted above, photography is a commitment, and that includes learning how to make the most of the image you take in post.
We Recommend
Getting Color Under Control – Stage 2: The Edit

After capturing the colors in your images correctly, the second stage of color management begins. The editing stage is the point where you'll make sure that the images you've captured are rendered accurately when they are displayed and printed.
Monitor Calibration
While you might think this step is more closely related to the display stage of color management, the fact is that if you're going to render colors accurately, you need to first see them correctly. Different monitors display colors differently, even if they're identical products. Colors in a display will shift as a monitor ages. The lighting in your room will also affect how you see colors. Without calibration, there's no way to know whether your display is showing you the true colors captured by your camera. The errors will carry over into your final digital images and prints.
Display calibration, therefore, is a critical step before you start editing and on an ongoing basis. Fortunately, it's not a difficult one with the right tool. Our favorite tool is the Spyder5 from Datacolor. It provides easy, reliable calibration for all your monitors, with 5-minute periodic checkups. Watch the webinar below to see exactly how it works.
Creating Color Profiles
Now that your monitor is calibrated, so you know you're seeing the truest possible colors, it's time to use the target, or test shots that you took with SpyderCHECKR in Stage 1. Here's a short video that shows you how:
You'll now have an accurate color correction reference to use in all your editing, to easily maintain the accuracy of the colors in your images.
Adjusting for Lighting Conditions
As you edit your images, you'll use the test shots you took at the beginning of your sessions with SpyderCUBE to adjust the black and white levels, then apply those adjustments to all the photos taken under those same lighting conditions, using batch processing. This is one of the greatest time savers you'll ever add to your workflow. Watch the how-to videos below to learn how to calibrate your RAW files using Adobe Camera RAW and Lightroom:
Finalizing your Edits
With your monitor calibrated and your images adjusted for lighting, you're now free to edit your images according to your needs. Your colors are true-to-life, and you can add whatever tweaks you like to the final product. Cropping, rotation, resizing, etc. can all be performed confidently, knowing that the vivid colors you see are exactly what you'll get. If you're sending them out for printing, you'll need to check with the printer you choose for the color space to use. If you're printing them yourself, you'll want to make sure your printer is reproducing the colors in your images accurately, too. We'll cover that subject in the next article, on Stage 3: the display.
We Recommend
How to Bring Your Boring Photos to Life
Have you ever taken a photo, and then once you viewed it on your computer, thought to yourself, "Man, that didn't turn out like I thought..."?
Dumb question, I know.
Everyone - even the most famous and accomplished photographers - have had those moments in which their photos simply didn't live up to their expectations.
But that doesn't mean that there aren't ways to rescue your photos that don't have a lot of life in them.
In the video above, Evan Ranft uses one of his boring and lifeless photos as an example of what you can do in post-processing to bring some excitement to the image.
It's really quite amazing when you see the difference between the original RAW file and the final product.
So, have a look at the video and see what Evan does to rescue the shot, and for those of you that learn best by reading, check out the summary below!
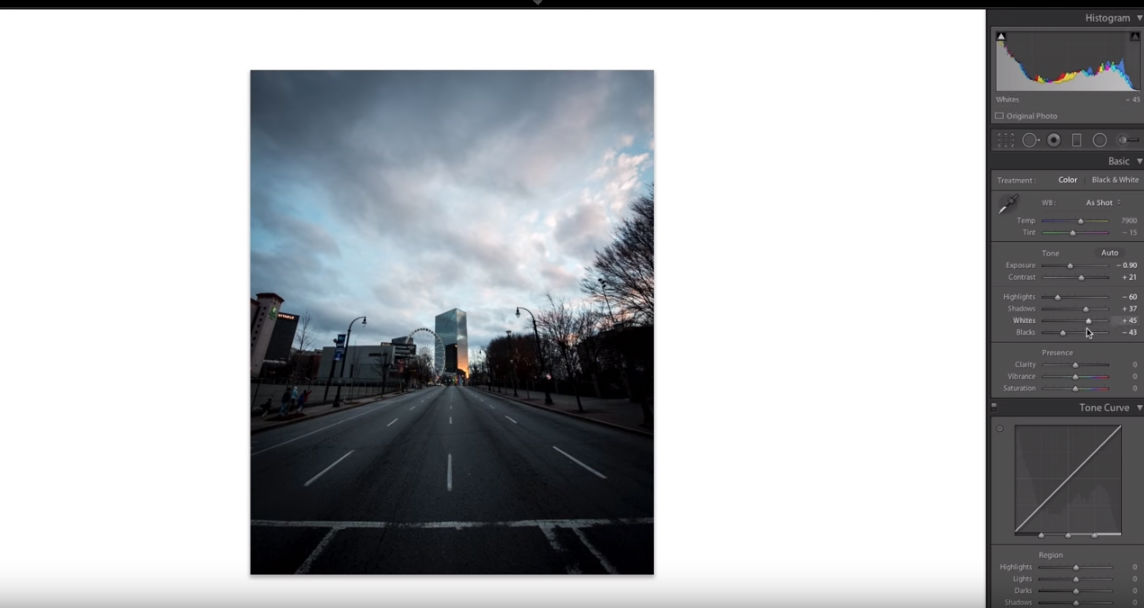
Step 1: Shoot in RAW
I won't get too technical here, but if you aren't shooting in RAW, you aren't doing yourself any favors.
Where JPEGs are compressed and lose some of the data that's originally captured by your camera's sensor, RAW files are uncompressed. That means there's a lot more for programs like Lightroom to work with when you process images.
You can learn more about shooting in RAW, but the short of it is that RAW is the best format to shoot in.
Step 2: Make Basic Adjustments
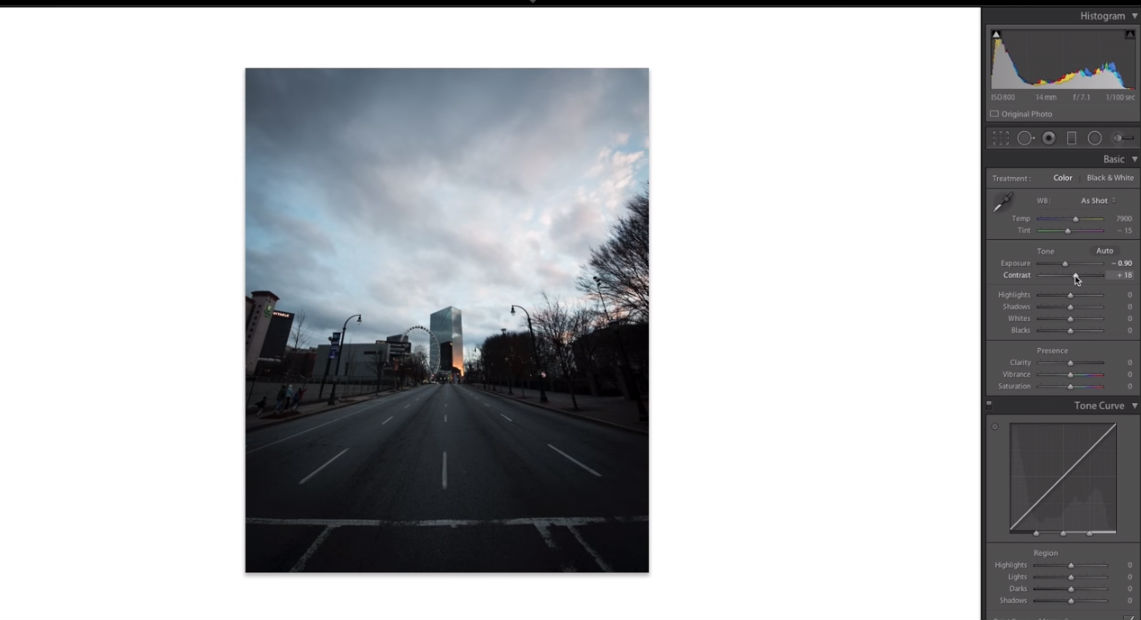
 YouTube Screenshot/Evan Ranft
The first order of business is to make a few basic adjustments to the bare-bones image.
That includes cropping the image as needed, adding vignetting if so desired, and feathering the image as well (all of these things have already been done in the screenshot above).
Then, for this particular shot, Evan brings down the exposure to better show off the details in the sky. This is done simply by moving the Exposure Slider to the left.
 YouTube Screenshot/Evan Ranft
Evan also brings the contrast level up, which brings out the highlights and the shadows in the image. This makes it a little more punchy as opposed to having flat light like the original shot. Again, making adjustments to the contrast level is done easily by moving the Contrast Slider to the right. You can see the progress in the screenshot above.
Learn More:
- How to Pump Life Into Your Landscape Photos in Under 15 Minutes
- Make the Most of Editing in Lightroom With These Must-Have Tips
 YouTube Screenshot/Evan Ranft
The next order of business is to work on the highlights and shadows.
Using the sliders in the Treatment Panel, Evan moves the highlights down and brings the shadows up.
This helps bring out the detail in the clouds a little more while also making the road in the foreground less dark.
Bringing the whites up and blacks down further helps make the shot more punchy and contrasty, as you can see in the screenshot above.
 YouTube Screenshot/Evan Ranft
Lastly, Evan increases the saturation and vibrancy.
As you can see in the screenshot above, this gives the shot just a small injection of color - nothing too over the top, but just enough to start showing off the colors of the sunset.
Editor's Tip: Have an edited photo you're proud of? See what it would look like as a fine art print.
Step 3: Brush in the Sky
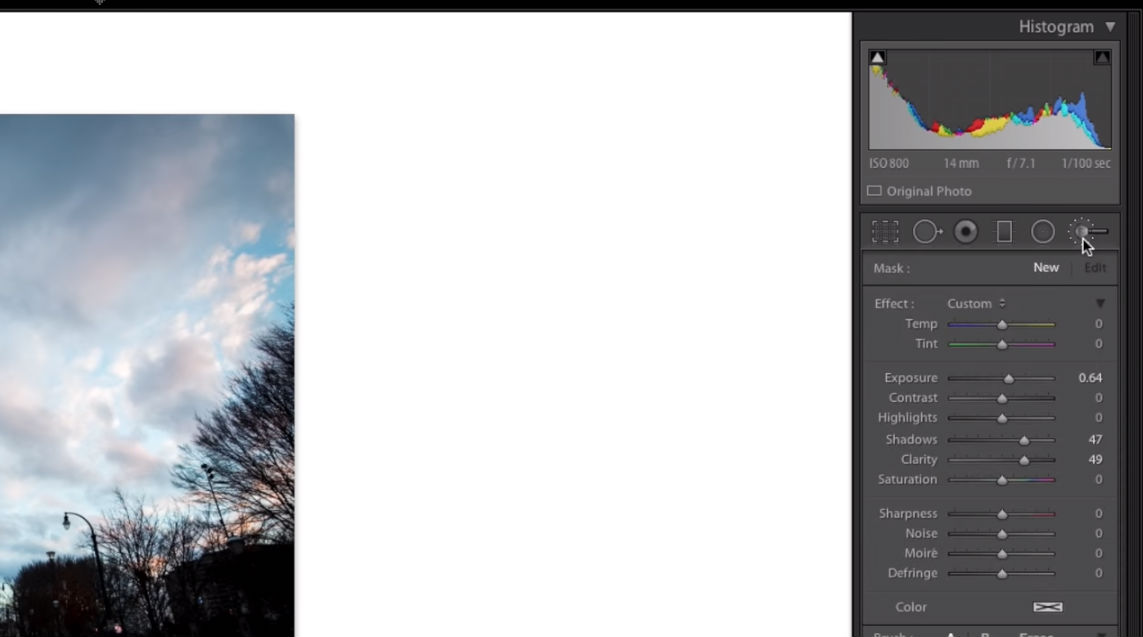 YouTube Screenshot/Evan Ranft
Now that the basic adjustments are out of the way, the next step is to use the brush tool to work on the sky.
The Brush Tool is located in the upper righthand side of the Lightroom workspace, as shown by the cursor in the screenshot above.
Once you have the Brush Tool open, simply brush over the entirety of the sky in the shot.
Once you've masked the sky, reset all the slider values for exposure, contrast, highlights, shadows, and so forth, back to zero.
 YouTube Screenshot/Evan Ranft
In Evan's image, he adds a purple tint to the shot to get some interesting colors going on in the clouds.
He moves the tint toward the yellow side too, for the same purpose.
After adding a lot of saturation to the shot, you can start to see the drama coming into the image, as seen in the screenshot above.
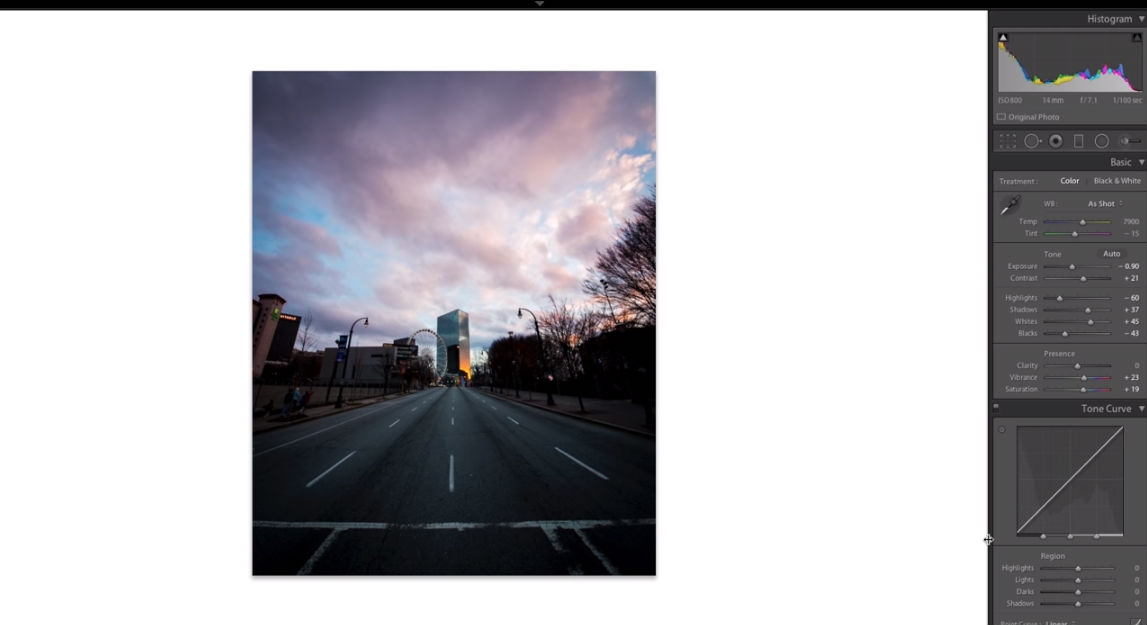
Step 4: Fine-Tune the Colors
 YouTube Screenshot/Evan Ranft
The next step is to fine-tune the colors in the shot.
Using the Temperature Slider, Vibrance Slider, and Saturation Slider, Evan makes the colors in the image really come to life.
As you can see in the screenshot above, the sky is beginning to take shape.
Note, however, that while the sky looks great, the reflection of the sunset on the building looks far too saturated. To fix it, Evan uses the brush to paint a mask on that small area of orange, and then brings down the saturation to make it look more natural.
Step 5: Split Toning
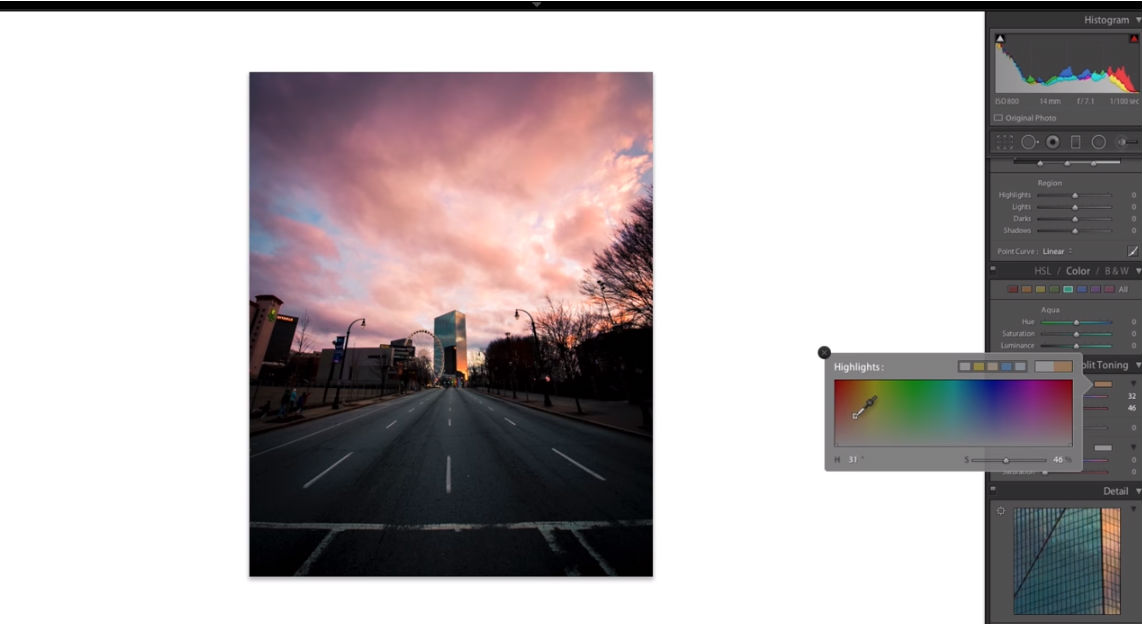 YouTube Screenshot/Evan Ranft
The Split Toning feature in Lightroom allows you to work on the tones of the highlights and shadows separately.
In the screenshot above, Evan is working on the highlights to bring even more color to the sky.
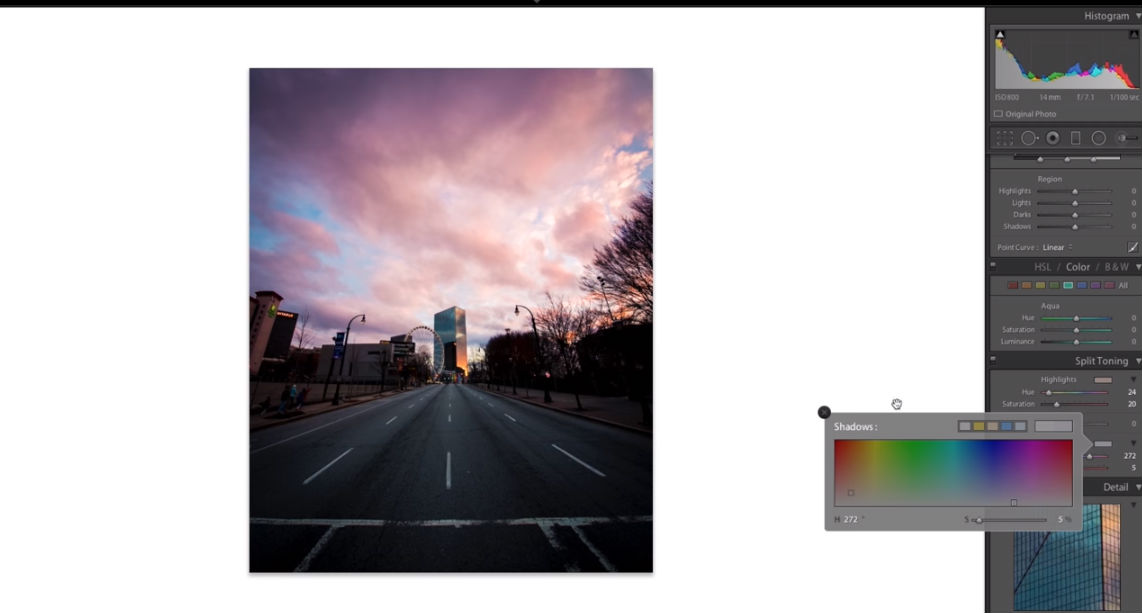 YouTube Screenshot/Evan Ranft
This is where you can get really creative and add whatever color you'd like to the highlights or shadows of your shot.
In Evan's case, he adds punch to the sky but takes it easy with the tones in the shadowed areas to get the beautiful result shown above.
Editor's Tip: Add punch to your portraits with colorful, texture-rich props.
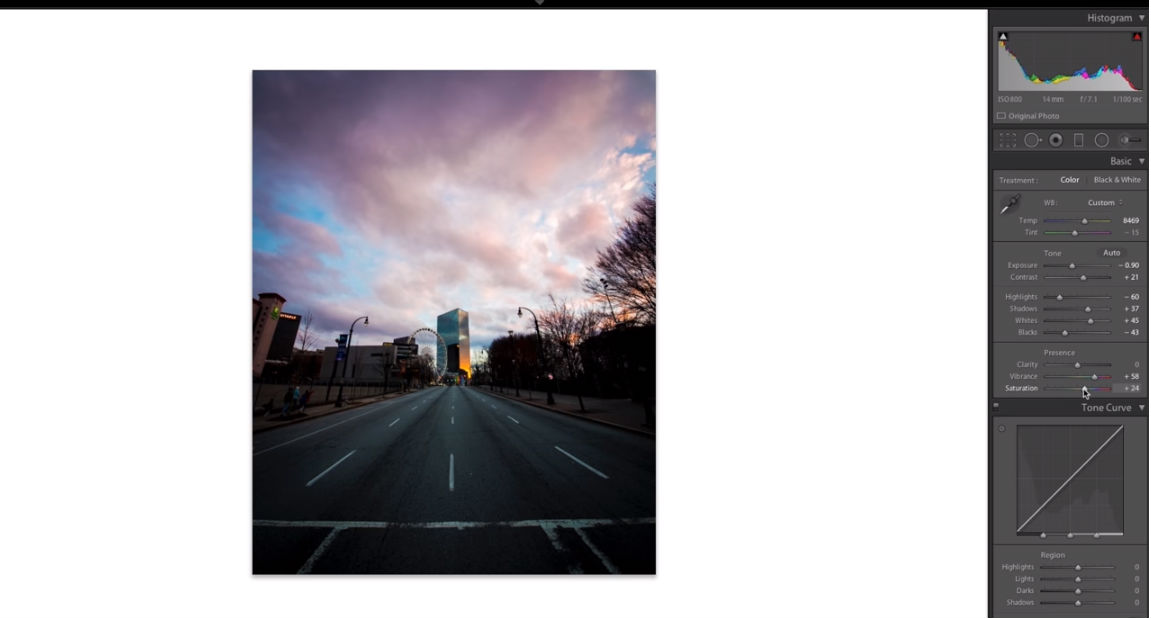
Step 6: Add a Graduated Neutral Density Filter
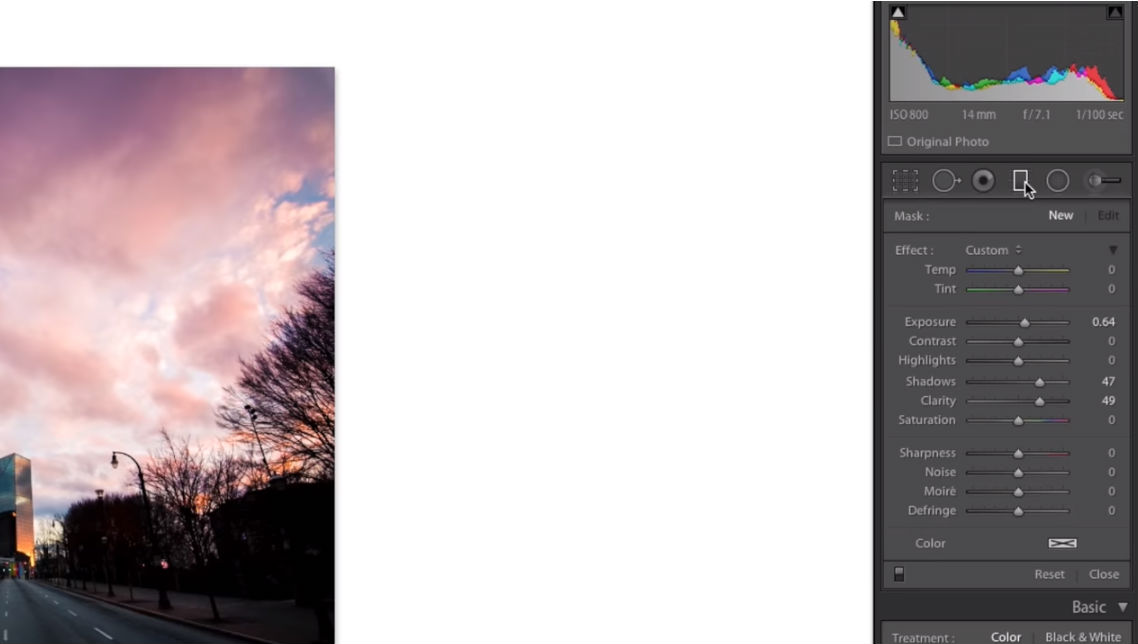 YouTube Screenshot/Evan Ranft
Lightroom gives you the capability of adding a graduated neutral density filter to your images.
You can do so by clicking the rectangular box in the toolbar, as shown by the placement of the cursor above.
In this case, by using this tool, Evan is able to lighten the foreground of the image, which to this point has been quite dark.
 YouTube Screenshot/Evan Ranft
Starting from the bottom of the shot, Evan slides upward to add the filter, and then resets all the slider values back to zero, except for the clarity, which by increasing it, allows him to make the lines on the roadway pop.
Looking at the screenshot above, you can see how the image is getting close to being completed.
Learn More:
- Lightroom Classic CC 7.2 Gets Performance Enhancements, New Features
- 3 Simple, Yet Helpful Lightroom Tricks
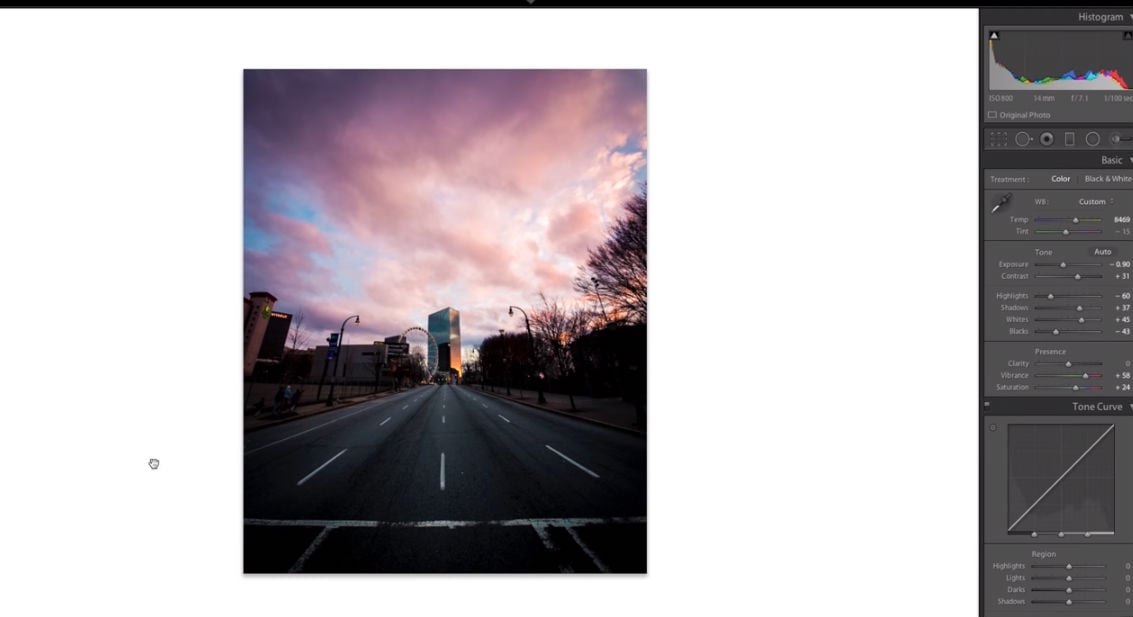
The Final Product
 YouTube Screenshot/Evan Ranft
After a little more fine-tuning to the image, the process is done.
The changes made from the initial shot on the right to the final shot on the left is really quite astounding, especially considering the process only took about 8 minutes or so.
You can use these same Lightroom tools and processes to bring that kind of life to your photos as well!
We Recommend
How to Change Any Color in Lightroom

I love Lightroom. Photoshop too.
In fact, let's all take a moment to be thankful that we live in a world in which we have these programs to help us perfect our images to fulfill our creative vision.
Part of making your dreams a reality is understanding how to wrest all the benefits that you can out of post-processing.
In the video above by Mango Street, we get a great Lightroom editing tutorial that focuses on how to change any color.
And those changes can be made without even touching the HSL sliders...
But how, you ask?
Let's find out!
Editor's Tip: The secret to an incredible photo is in how it's printed. See what your photos look like as fine art.
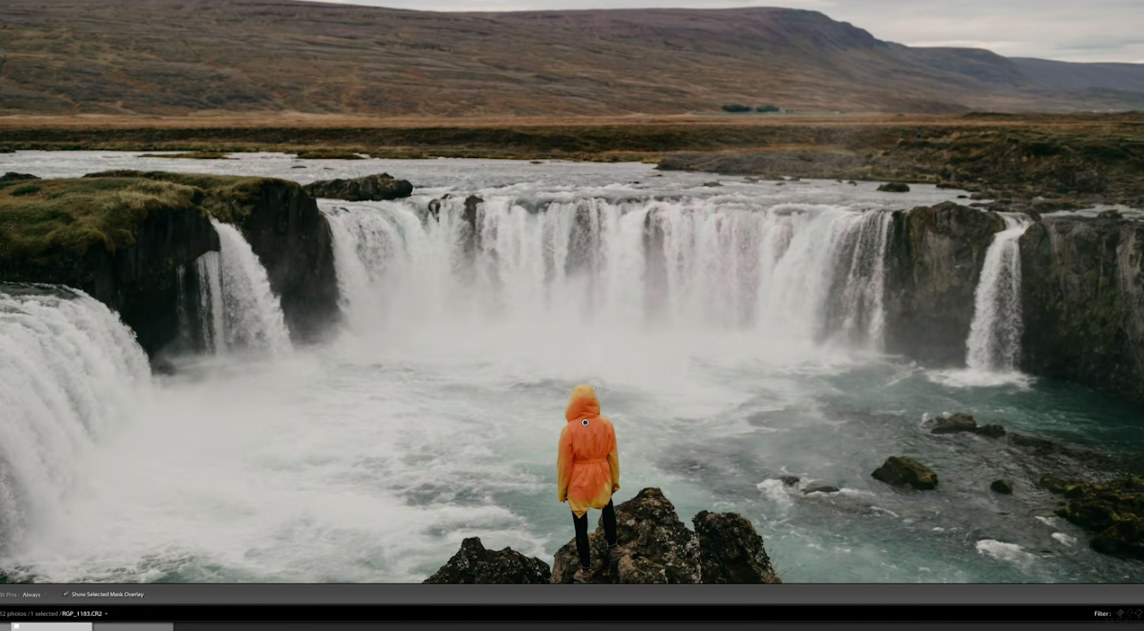
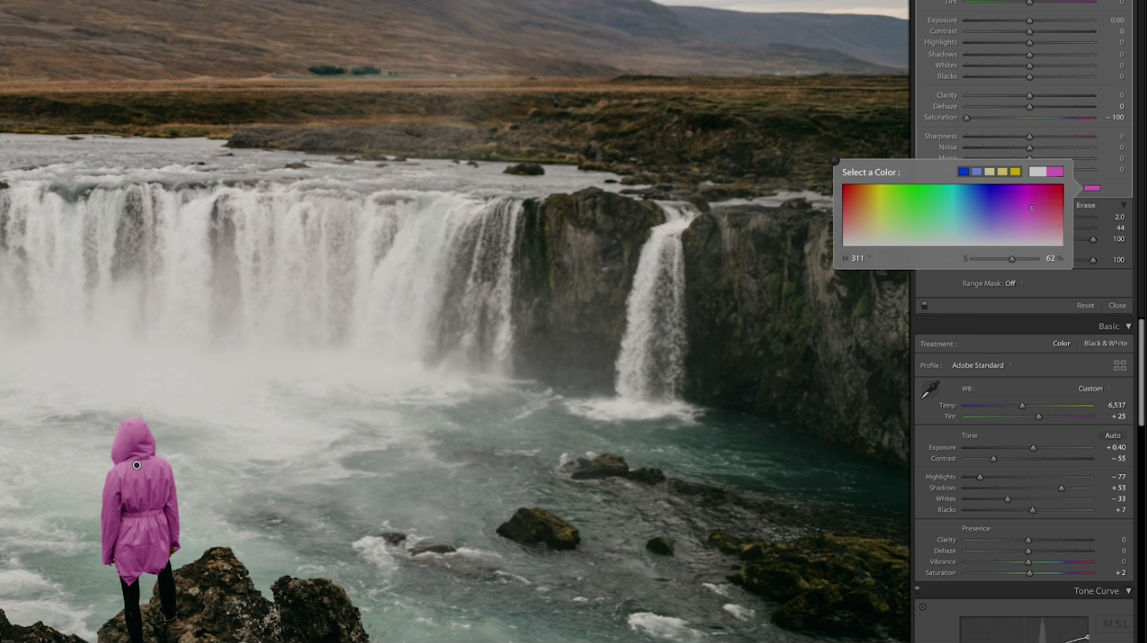
Learn How to Change Any Color in Lightroom by Using Masks
 YouTube Screenshot/Mango Street
Often, I have photos that could stand a little change of pace. Adjusting the color of an individual element is a great way to do that.
In the video, Mango Street uses the image above to demonstrate how to change colors in Lightroom.
 YouTube Screenshot/Mango Street
First, go to the Develop Module and click on the Adjustment Brush Tool at the top of the window.
Keep the size of the brush small with a medium feather. Turn the Density and Flow all the way up to 100.
Also be sure that Auto Mask is selected because that will help you color within the lines and ensure that only the item you want to be colored differently will change. These settings can be seen in the screenshot above.
 YouTube Screenshot/Mango Street
Next, simply use the brush to paint the object you wish to paint. In this case, it's the yellow jacket shown above.
Be sure to press O on your keyboard to reveal the mask as you paint. This will make it MUCH easier!
You might also zoom in as you work so you can see exactly what you're doing. Just press the spacebar while you click and drag on the image to do so.
If you make a mistake, just press Alt/Option to unpaint the errors.
Learn More:
Desaturate and Touch Up the Mask
 YouTube Screenshot/Mango Street
The next step is to inspect your work with the mask.
To do so, bring the saturation level all the way down to -100.
Then, zoom in on the area you've masked. It will be easy to see any areas that need to be cleaned up, as shown by the yellow areas that are still showing in the screenshot above.
Again, use the brush to paint the mask over the remaining areas just as was described above.
Editor's Tip: In the market for a new lens? Before you buy, learn why a 50mm lens is a great addition to your camera bag.
Select a New Color
 YouTube Screenshot/Mango Street
And now, the fun part...
Once the mask is completely touched up, use the color picker to select a new color for the masked area.
When you do so, you might notice that the edges of the masked area are still desaturated.
To fix this, go to the Lens Corrections Panel and select Manual. Then bring the Amount Slider down to zero.
 YouTube Screenshot/Mango Street
And that's it! With just a few clicks of the button, you can completely change the look and feel of your photos with these easy Lightroom tips and tricks.
For more example of how to change colors in Lightroom, be sure to watch the full video by Mango Street. It's worth it!
Learn More:
We Recommend
How to Easily Transform Your Photos in Lightroom

Photo by Radek Grzybowski on Unsplash
Creating beautiful, eye-catching photos is all about the details. If the details are spot-on, your photo will have that visual punch you’re looking for.
However, if you don’t pay attention to the details, distracting elements can rule the shot and take people’s attention away from what you really want them to see.
Fortunately, there are ways to use Lightroom to transform your photos so that mistakes and distractions are minimized.
In the video above, Mango Street offers up some quick tips for making the most of your images in Lightroom. I’ve outlined each tip below for easy reference.
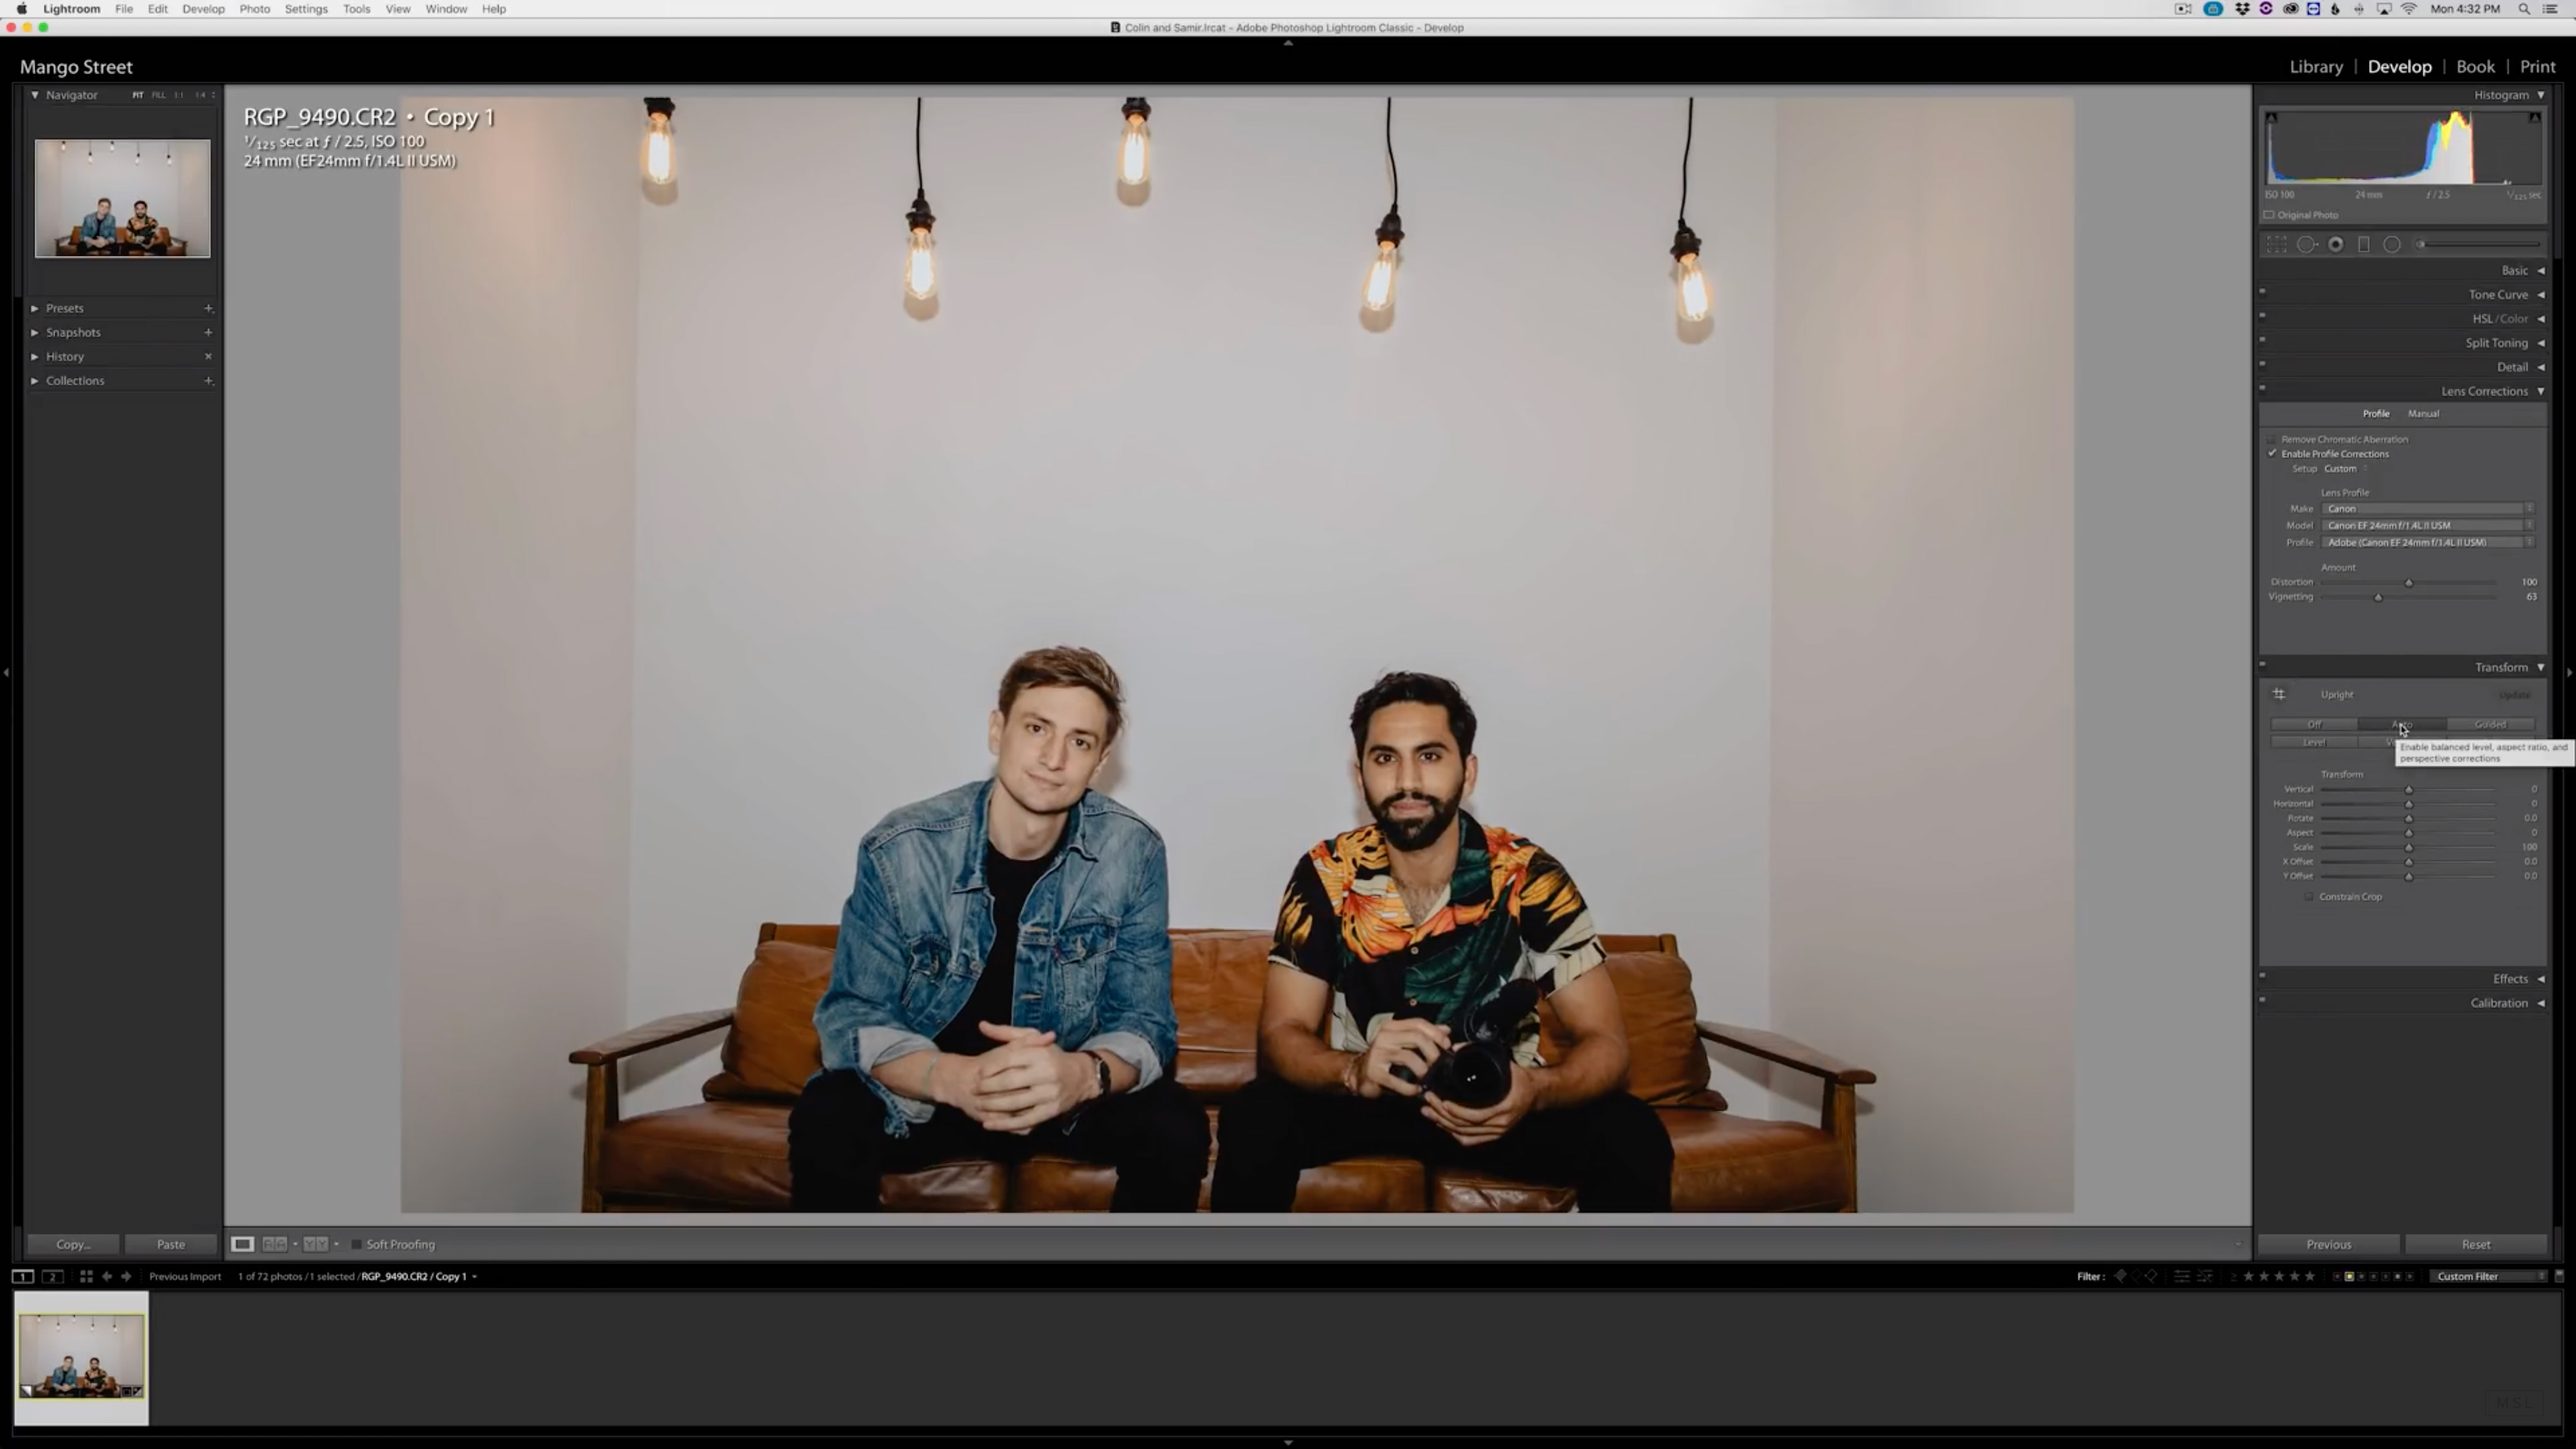
Use Lightroom to Make Auto Perspective Adjustments
YouTube Screenshot/Mango Street
As you can see above, the wall behind the subjects appears like it’s falling back a little. Lightroom can fix that.
The first thing you need to do is apply a lens correction. Lightroom has tons of lens profiles, so just click the “Enable Profile Corrections” box and if your lens is recognized, Lightroom will apply the appropriate corrections.
YouTube Screenshot/Mango Street
This is a critical step because by applying the lens corrections first, any perspective adjustments you make will be more accurate.
The next task is to see if Lightroom can fix the perspective on its own. You can do this by clicking “Auto” in the Transform Tab.
As you can see in the screenshot above, this has made a tremendous difference to the shot. But more can be done…
Learn More:
How to Use Guided Transform in Lightroom

YouTube Screenshot/Mango Street
If the Auto Transform feature doesn’t quite do the job, your next task is to use the Guided Transform tool.
As is demonstrated in the video, you simply add guides to the image so Lightroom understands how much perspective transform is needed.

YouTube Screenshot/Mango Street
In this case, just two guidelines were necessary - one for each corner in the wall behind the subjects - for Lightroom to make the needed changes. If need be, you can add up to four guides.
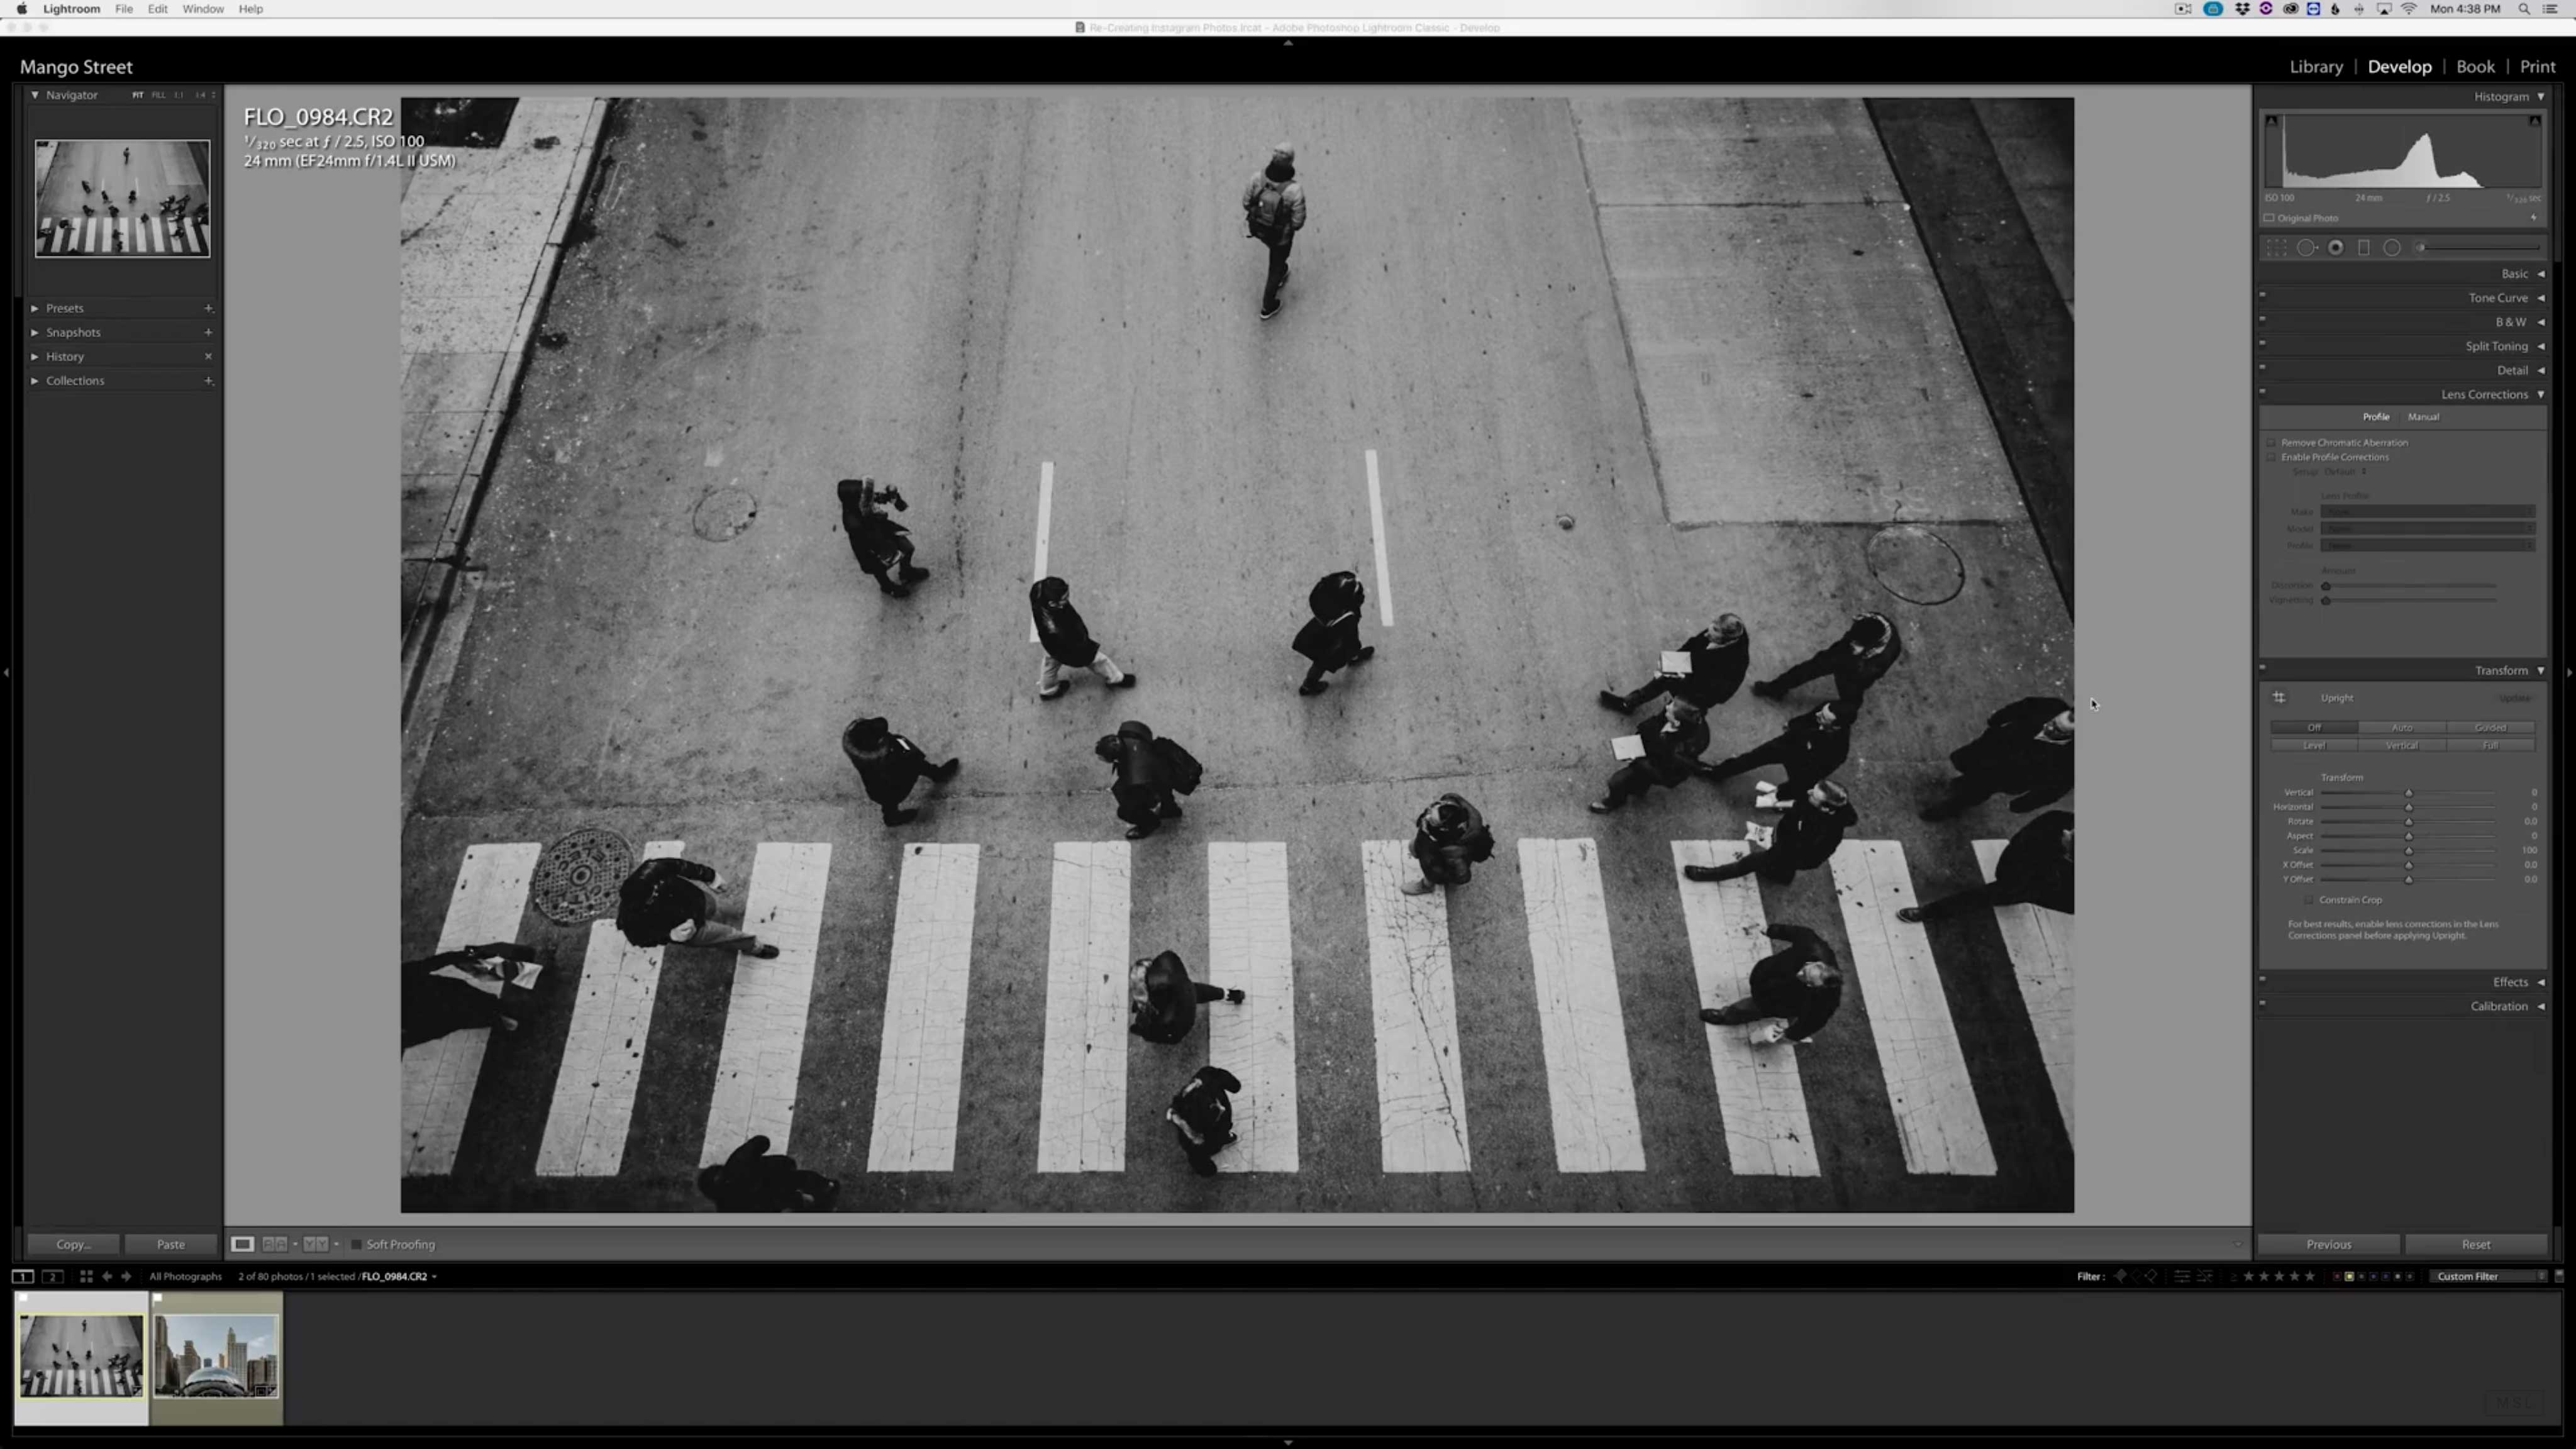
Lightroom Transform Tools for Street & Architecture Photography
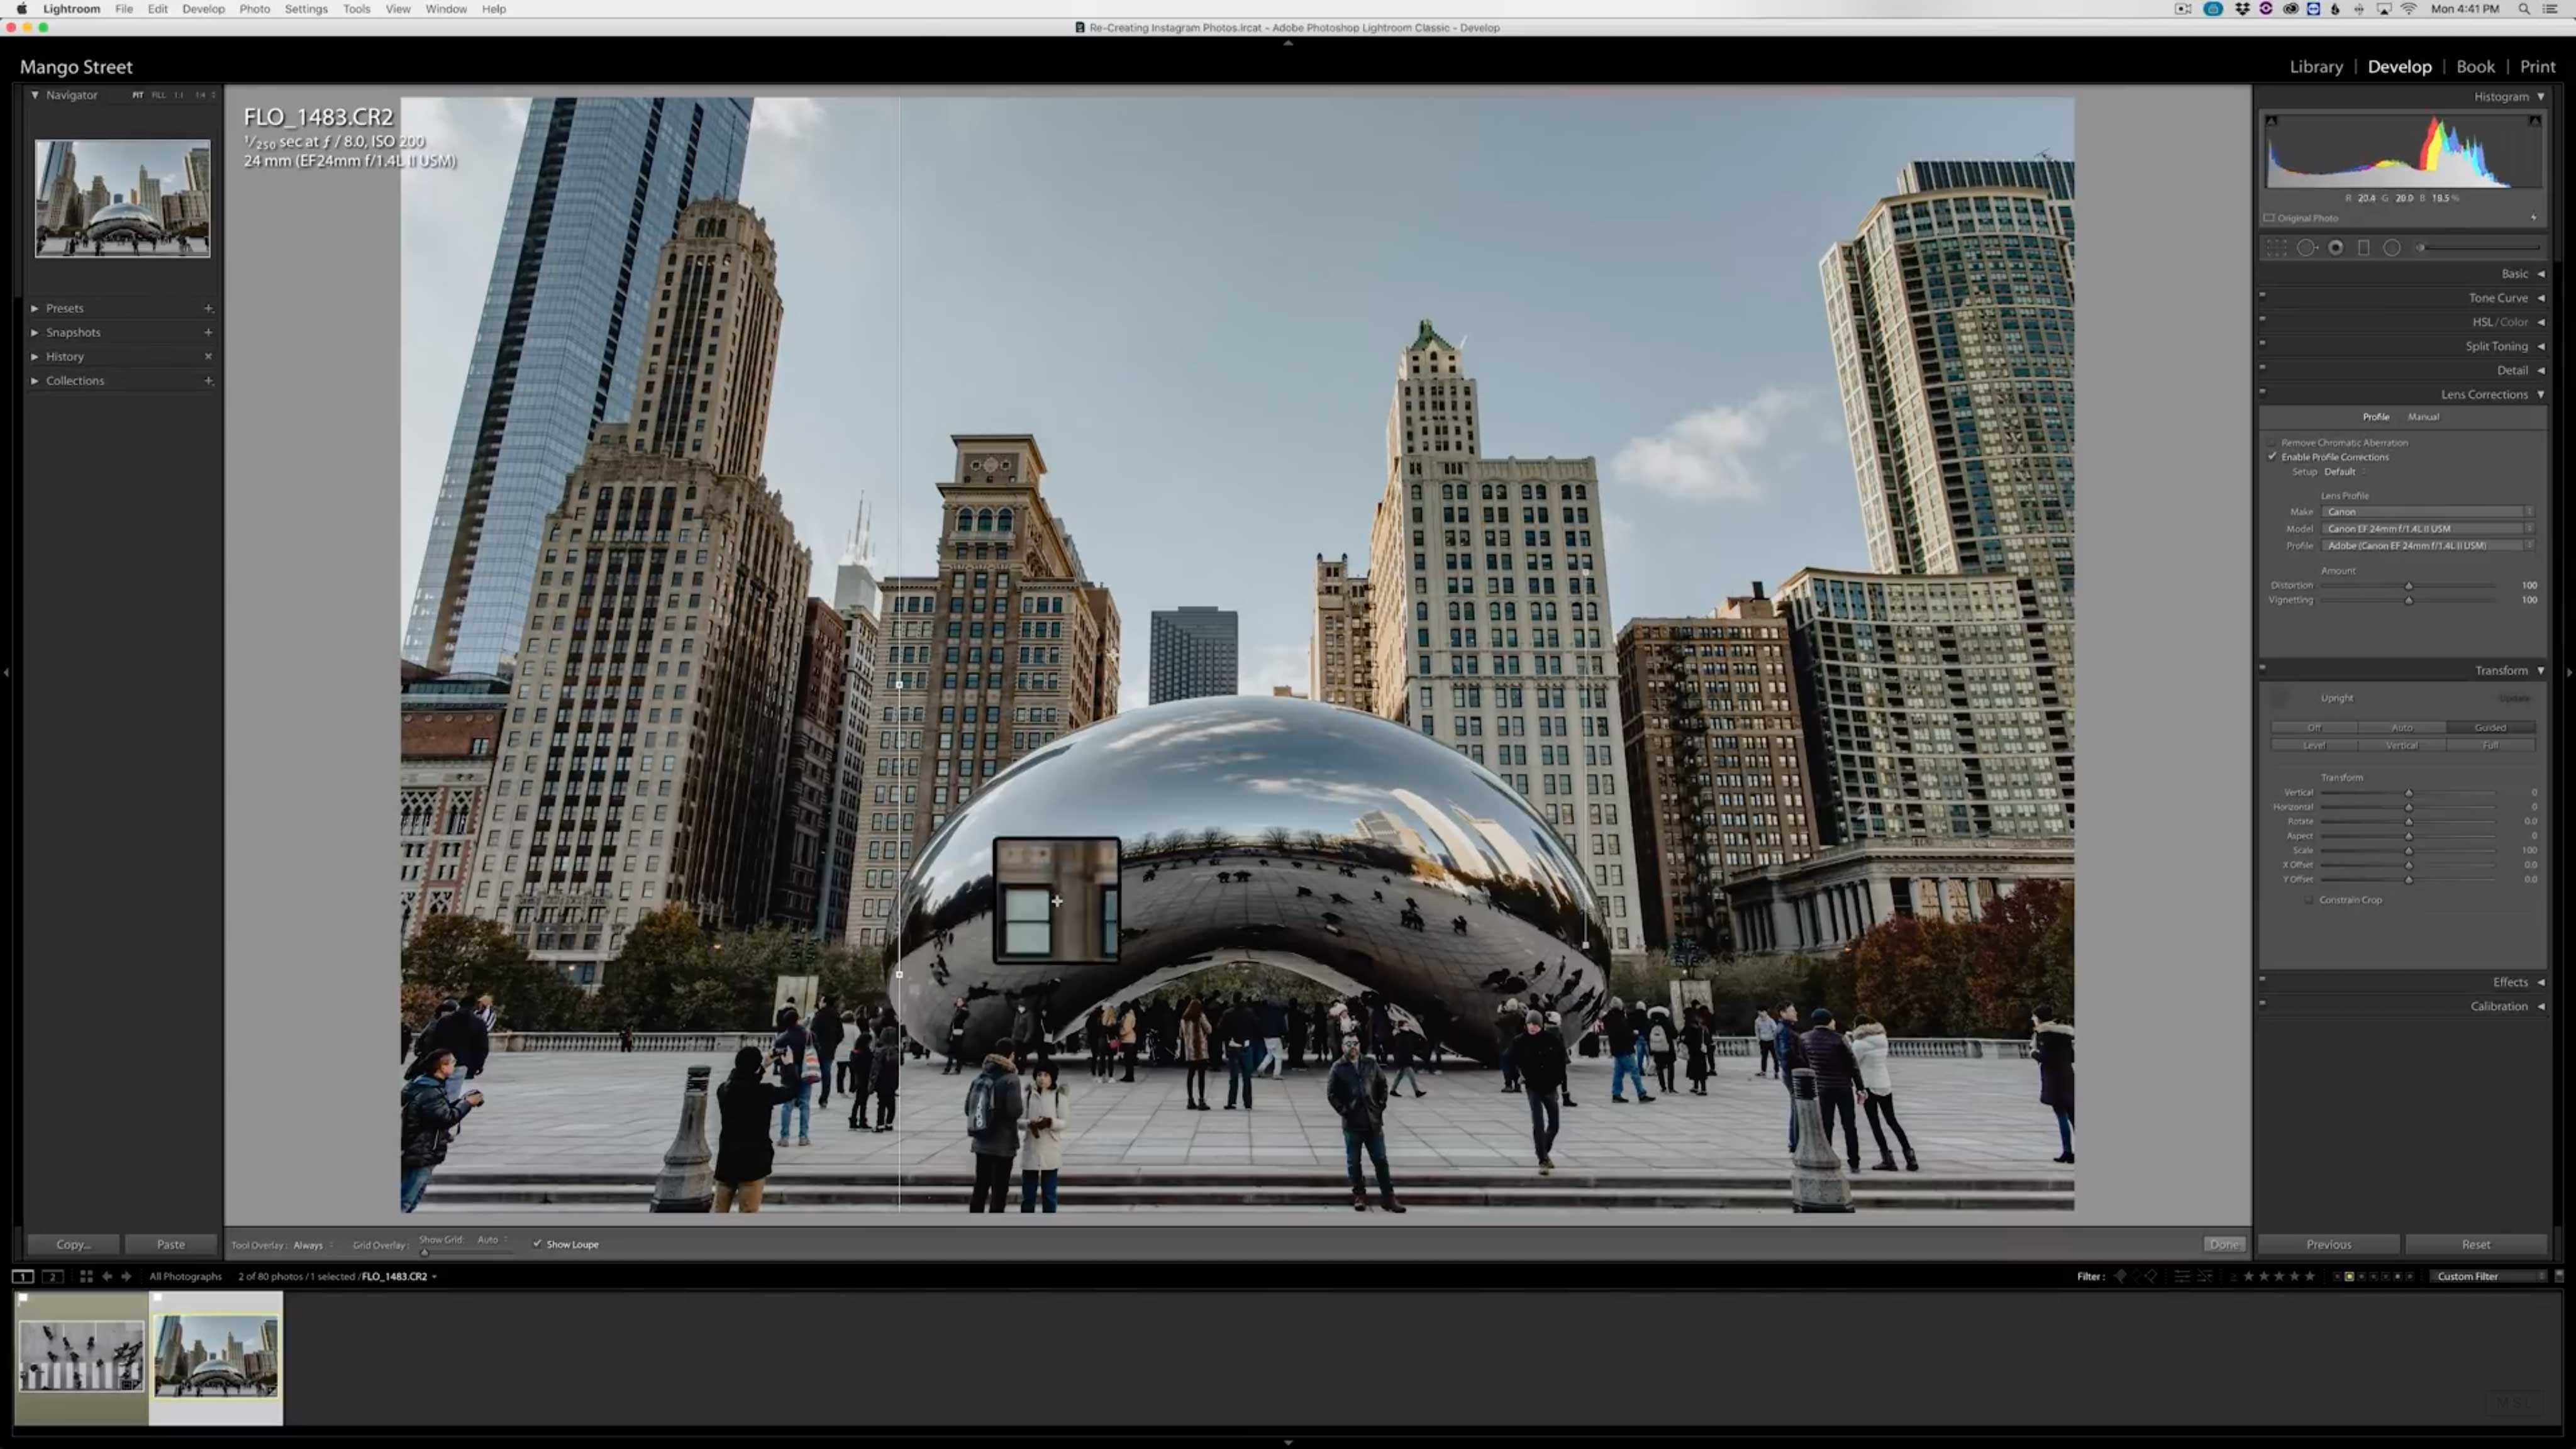
YouTube Screenshot/Mango Street
What’s great about Lightroom’s transform tools is that you can use them to completely change the perceived perspective of the shot.
As you can see above, this image of the crosswalk was taken at an angle, so the crosswalk does not appear to be directly below the camera lens.
However, after using Lightroom’s Transform tools (and a bit of cropping), the photo now looks like it was taken from directly above the crosswalk.
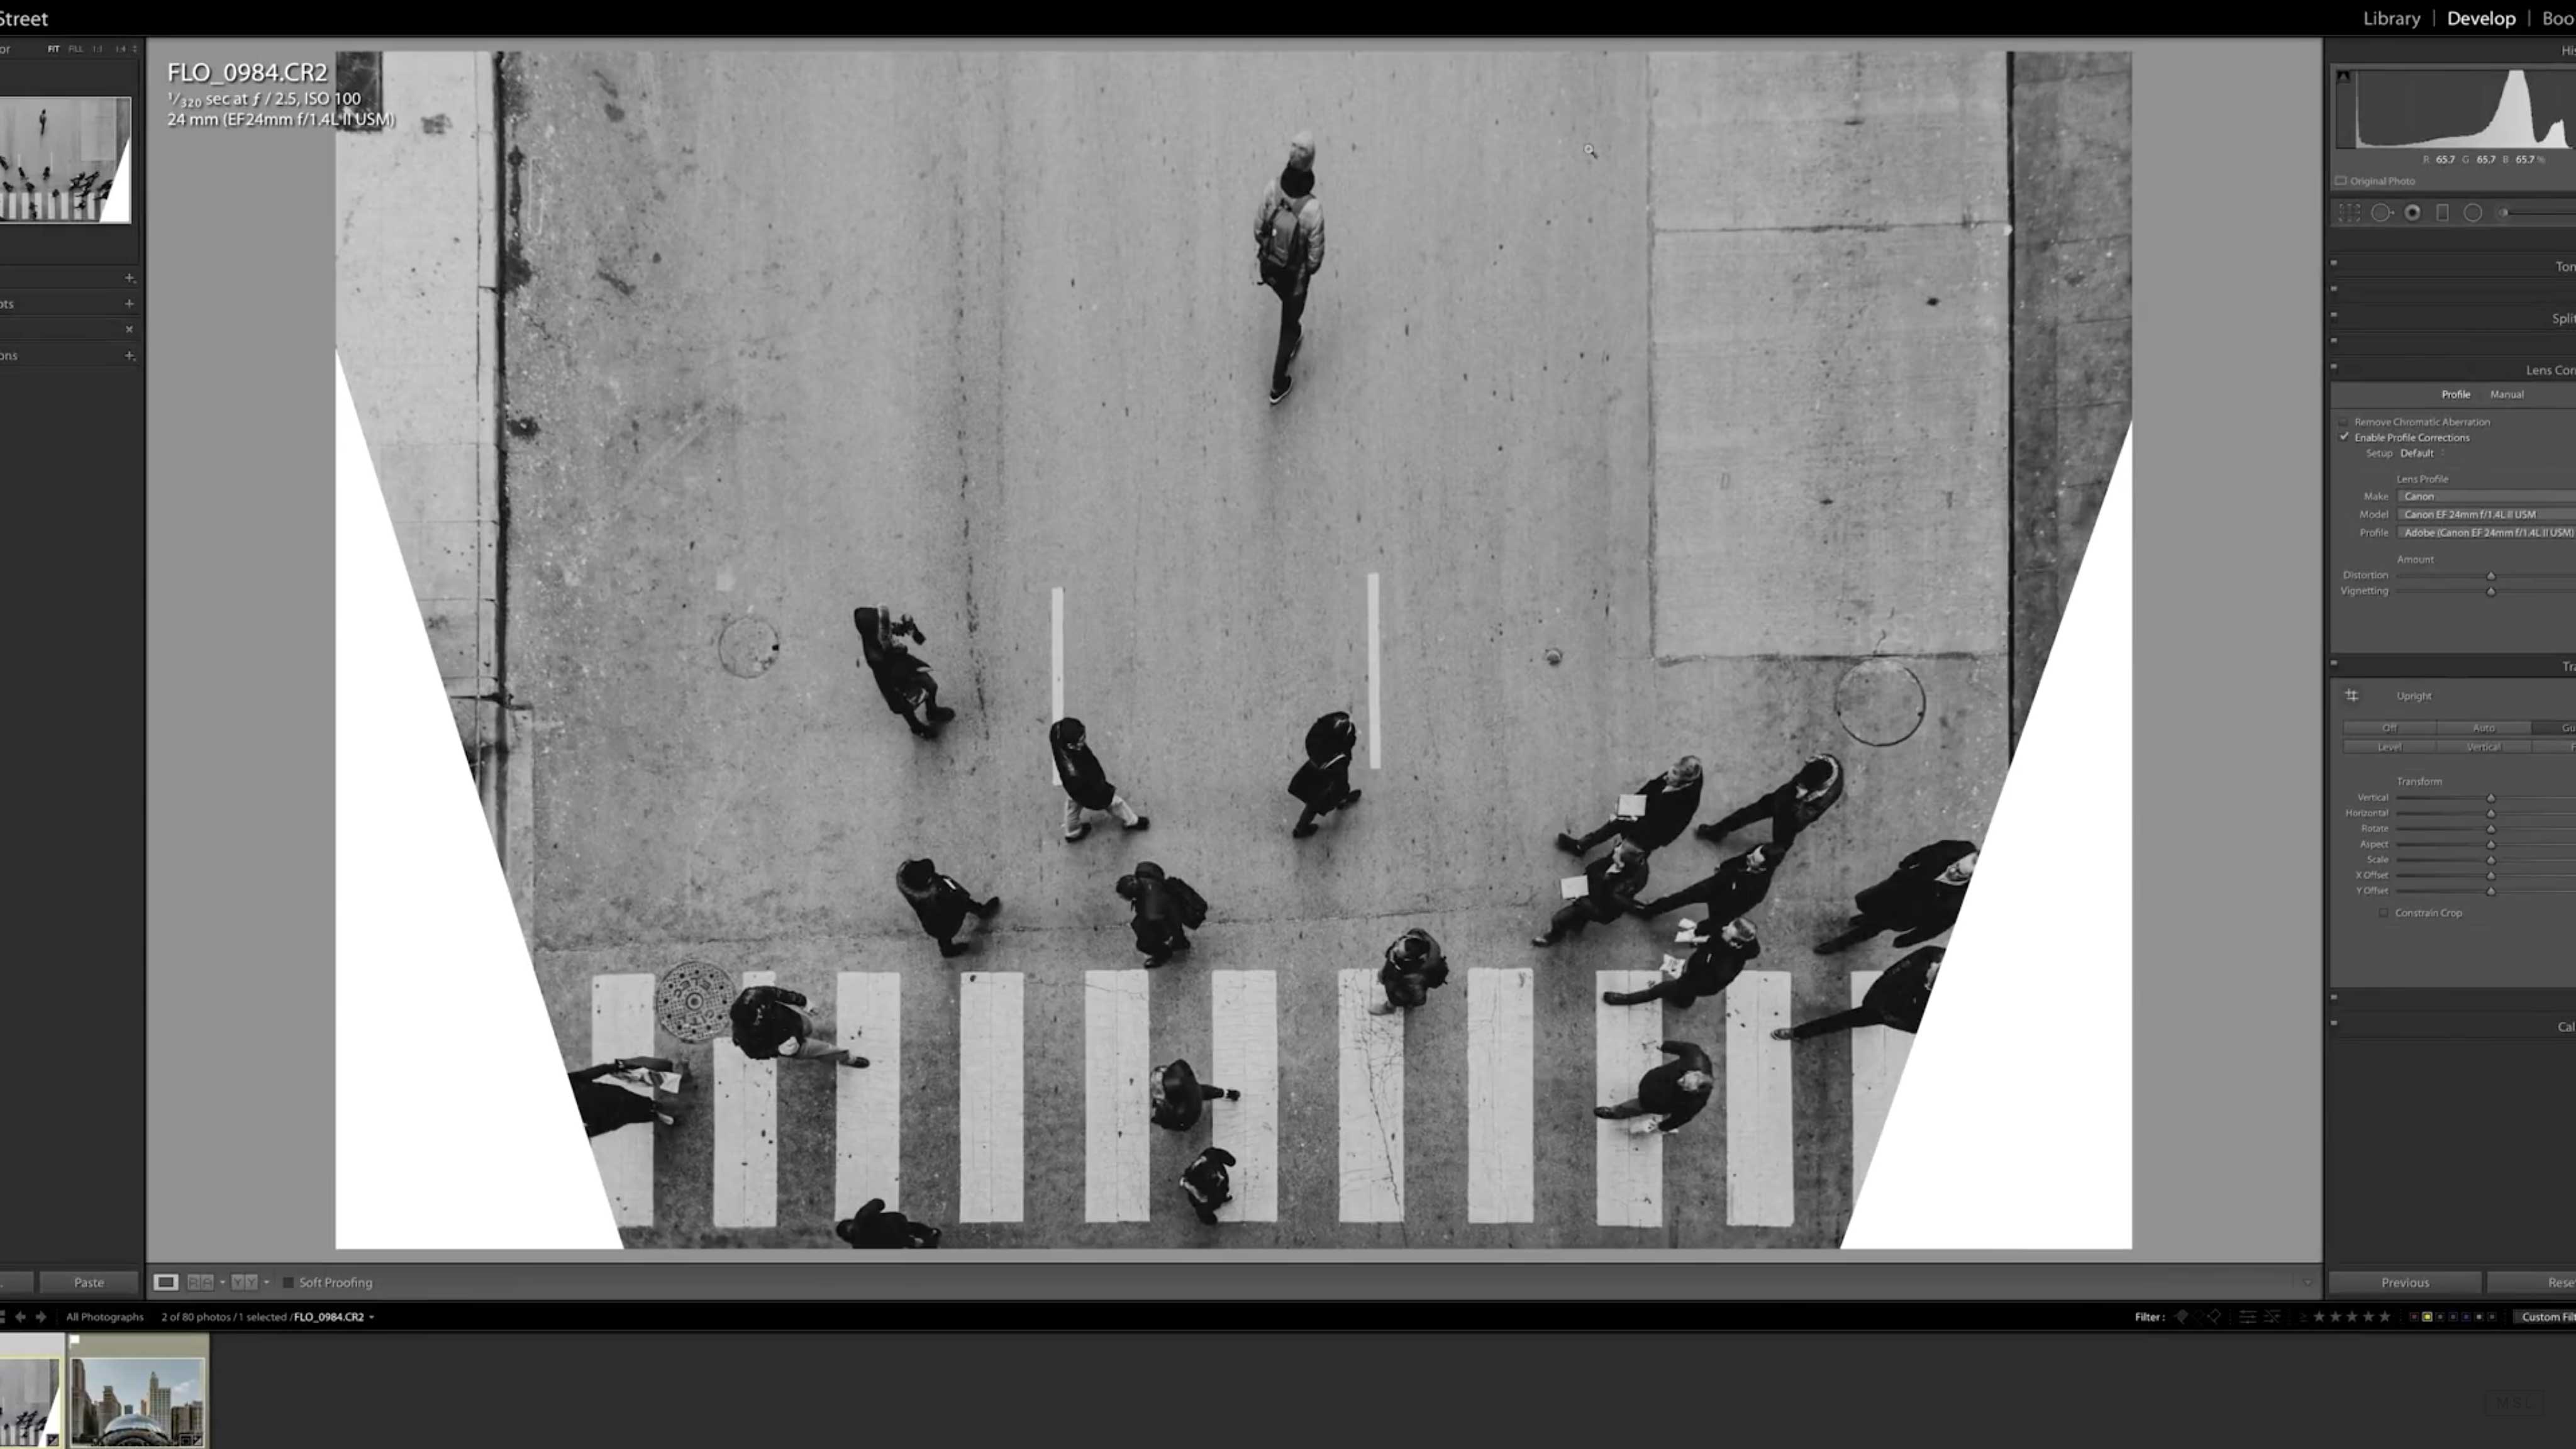
YouTube Screenshot/Mango Street
It only took a few moments to make this change, too.
All that was done was to add guides along the left and right sides of the shot (aligned with the gutters) to remove the warped perspective.
Doing so cut off the bottom corners of the image and stretched out the pedestrian furthest from the crosswalk.
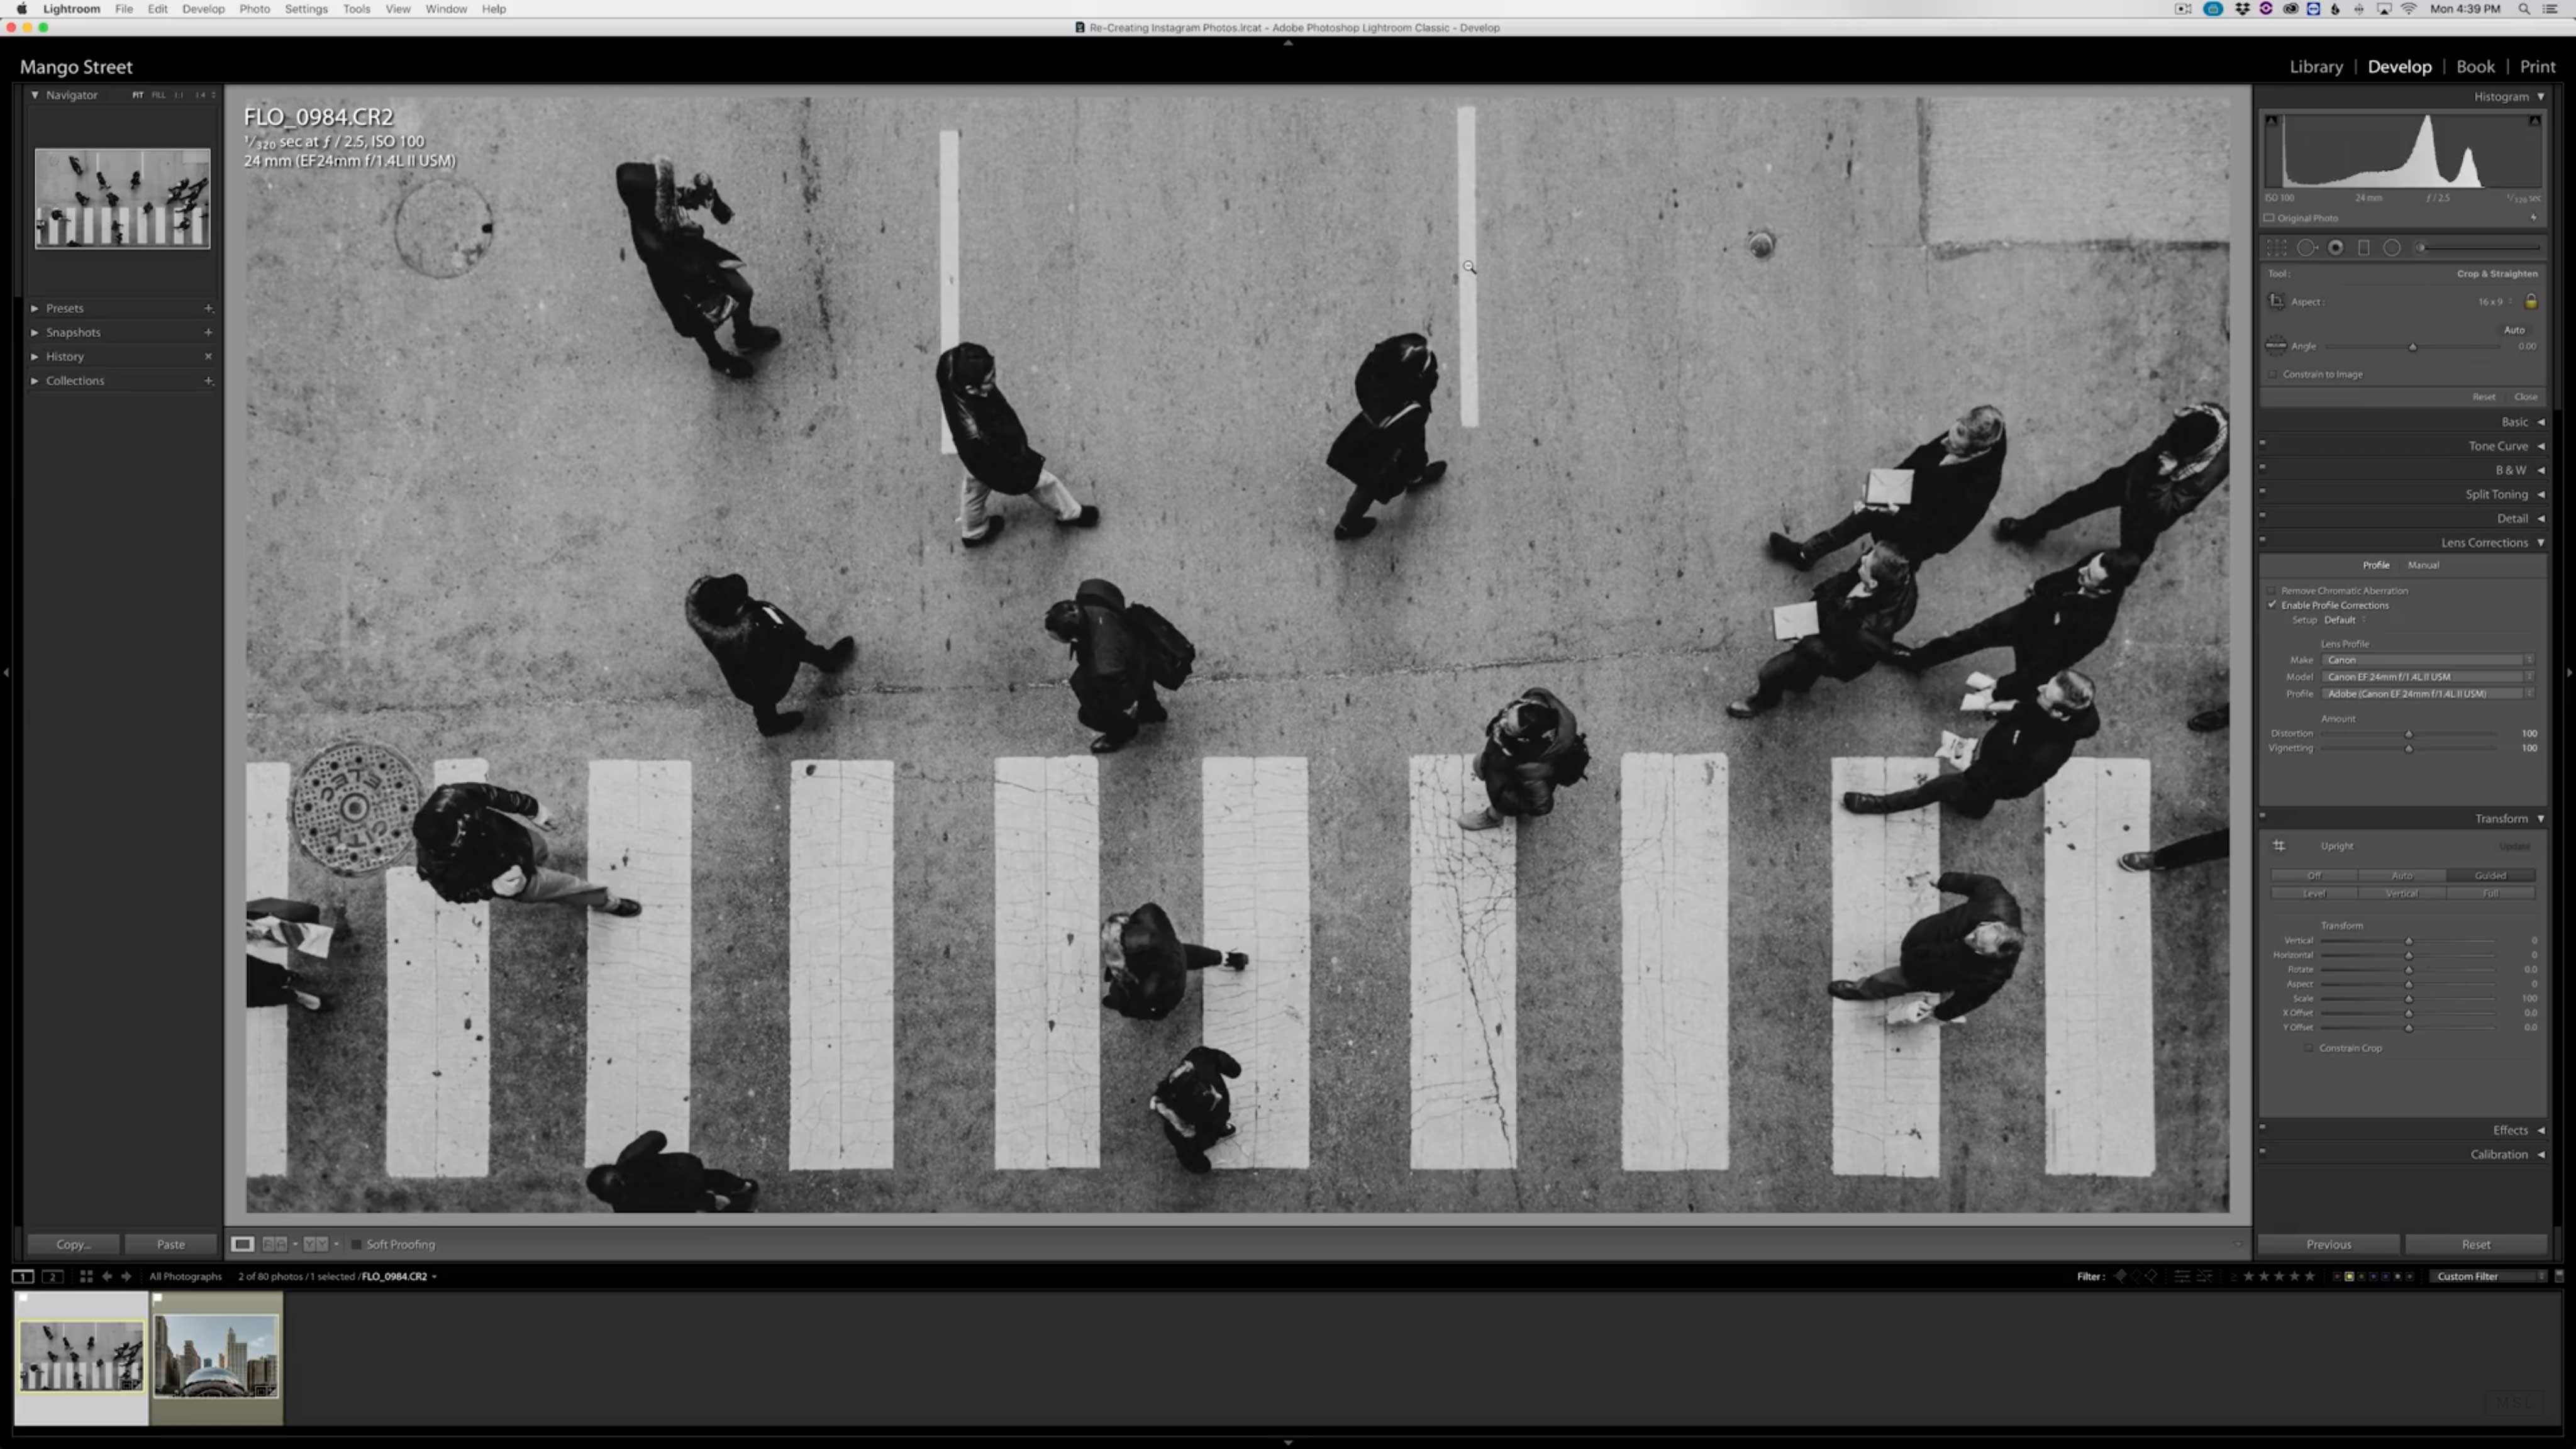
YouTube Screenshot/Mango Street
However, cropping the image is all that was needed to remove those elements from the shot. Not bad, right?
This same trick can be used to easily remove the perspective issues encountered when photographing architecture.
YouTube Screenshot/Mango Street
In the image above, you can see the warped perspective of the skyline of Chicago.
But a quick addition of three guides - two vertical and one horizontal, and you can see how the image totally changes for the better.
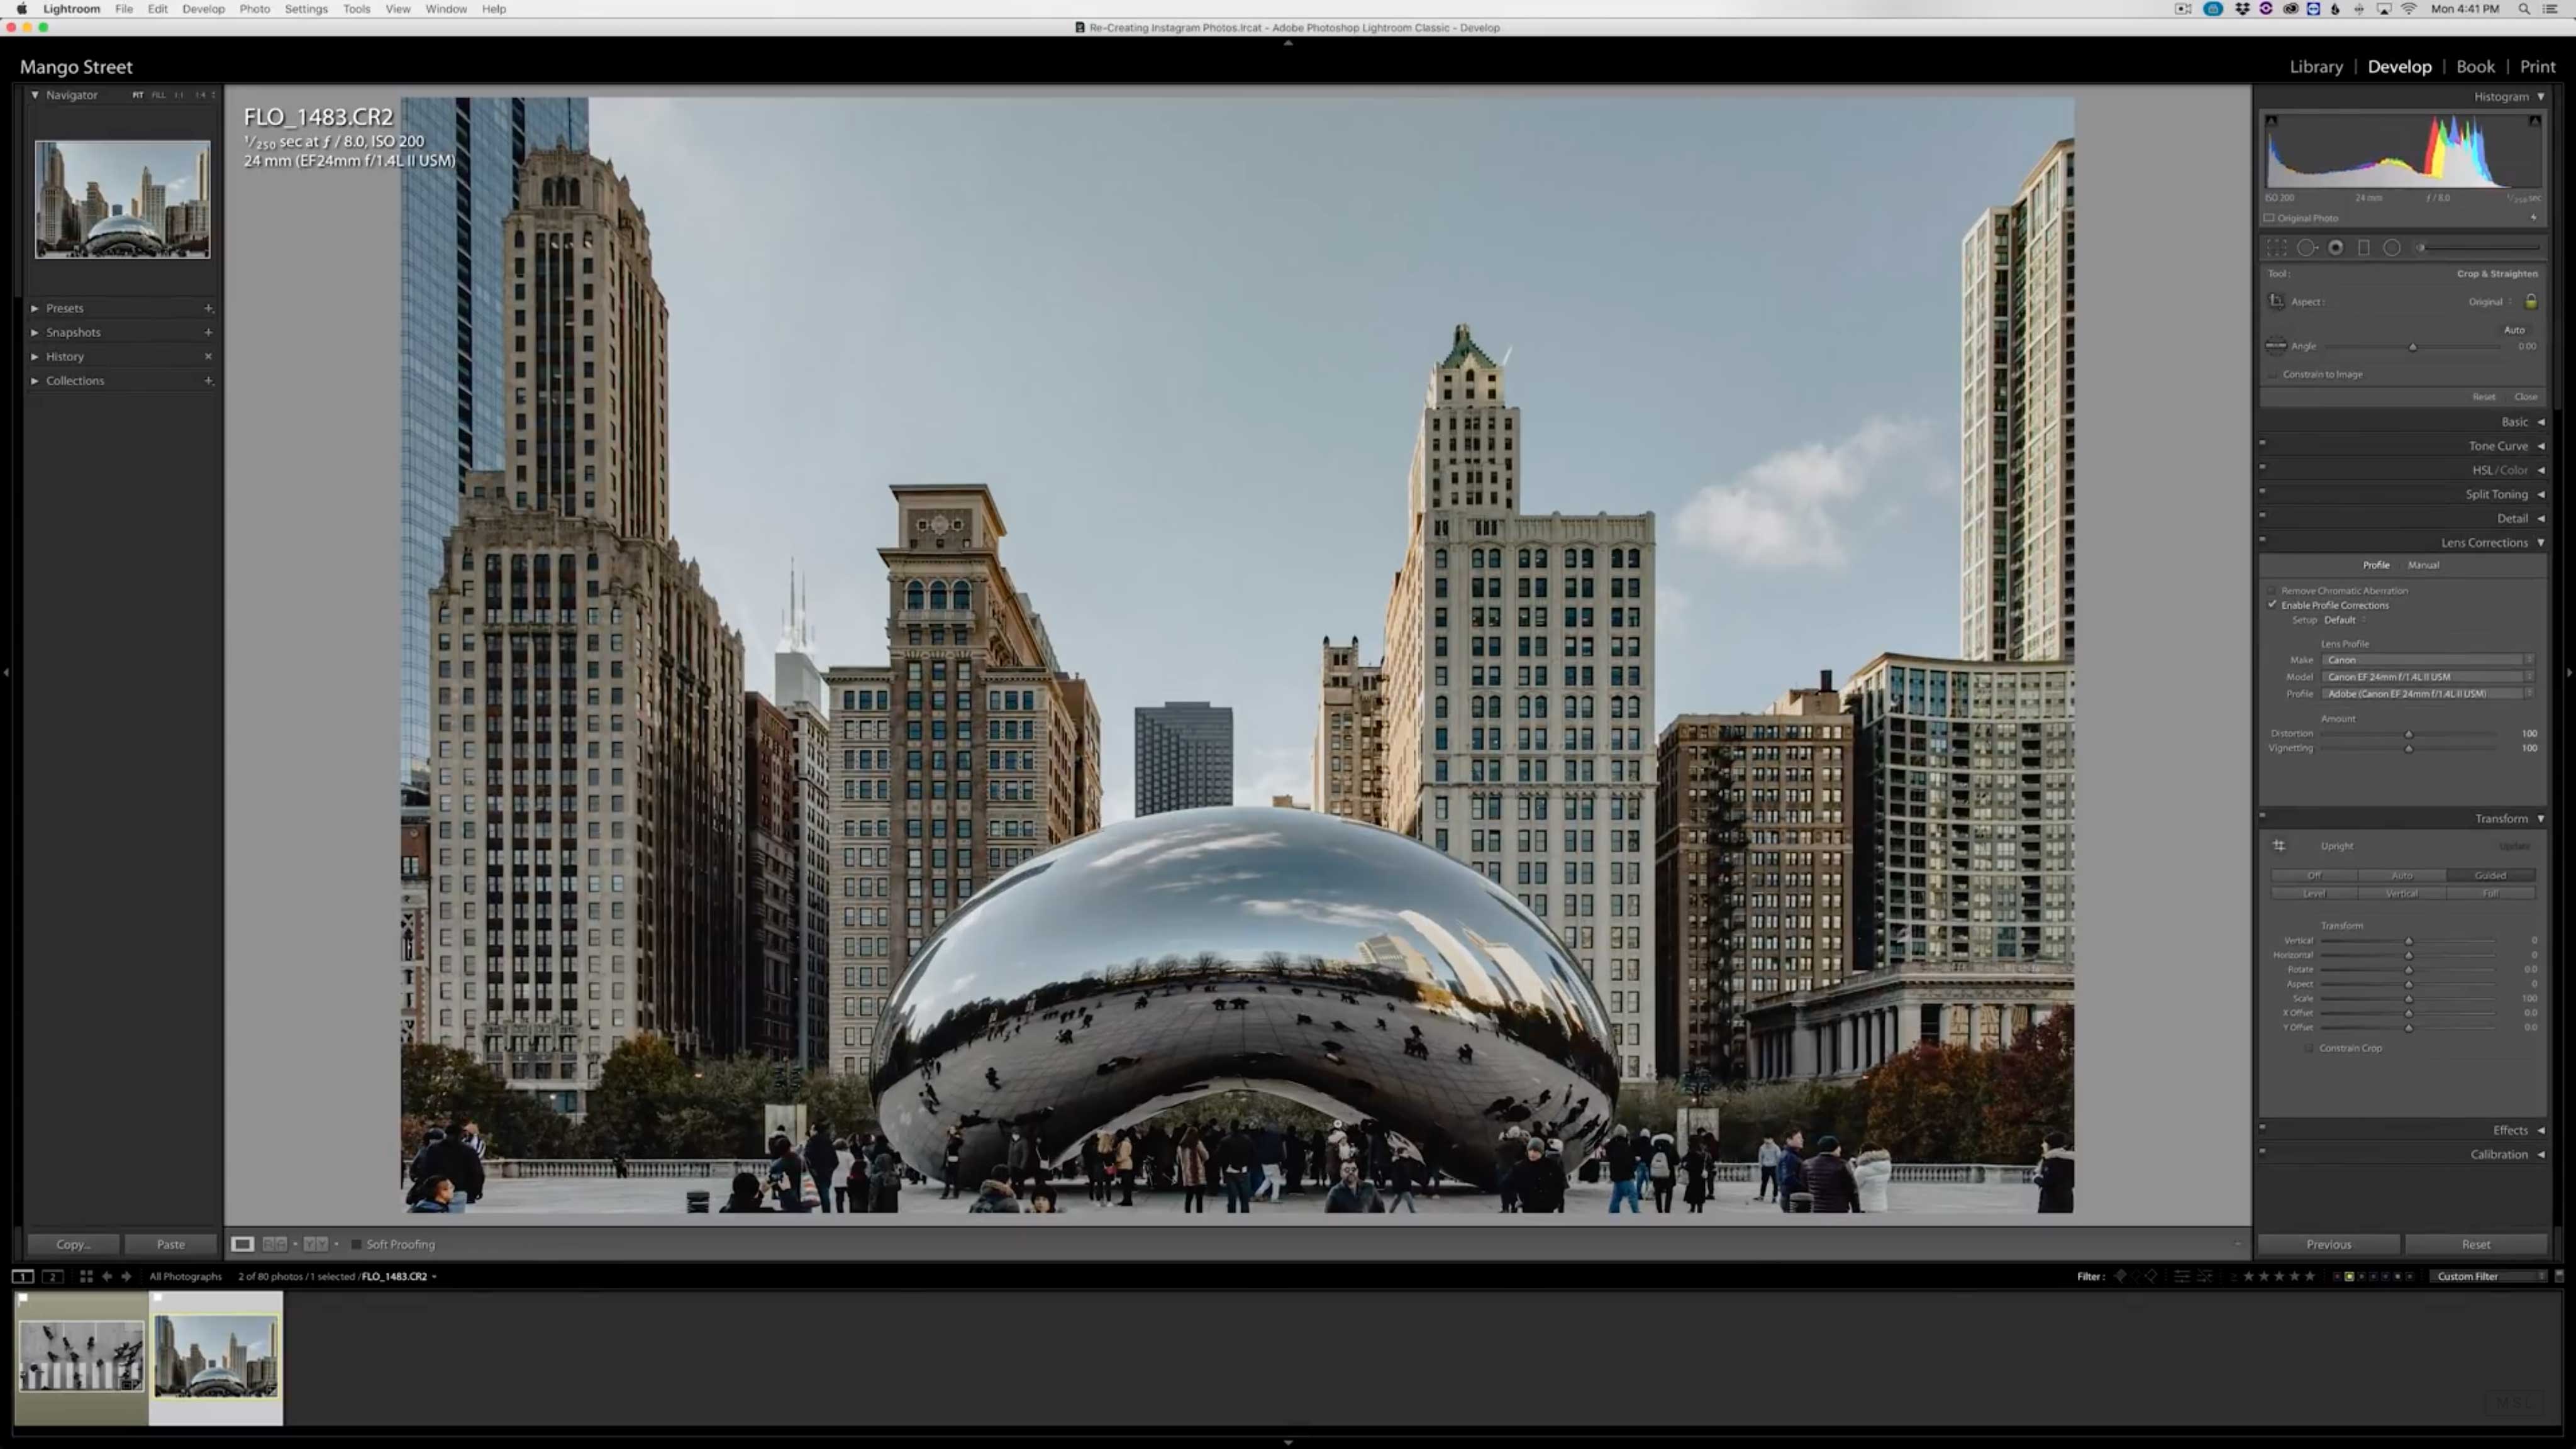
YouTube Screenshot/Mango Street
Again, this was done in a matter of moments in just a few clicks, yet the image takes on a drastically better look.
Using these Transform tools in Lightroom is a quick and easy way to make the most of the photos you take. Be sure to watch the complete video above to see more tips and tricks with this powerful Lightroom tool!
Learn More:
We Recommend
How to Maximize Your Lightroom Experience
 Photo by Radek Grzybowski on Unsplash
Lightroom is a fantastic tool for organizing and editing photos - I don't think anyone would disagree with that.
But that doesn't mean that Lightroom is ideal. Instead, there are plenty of things you can do to maximize your Lightroom experience.
Below, I've outlined a few of my favorite Lightroom tips, tricks, hacks, and shortcuts that have helped me squeeze all of the functionality I can out of Lightroom.
Use Automatic Culling
 Image Credit: Geber86 via iStock
Sorting through your photos in Lightroom is often a multi-step process - at least it is for me.
As you're doing your sort, wouldn't it be nice to quickly mark those that you want to keep and those that can find their way to the trash bin?
All you have to do is press the Caps Lock key, and press ~ to keep an image and to reject an image press x.
Once you determine if an image is a keeper or a reject, pressing the ~ or x key will automatically advance you to the next image.
Though this isn't a ground-breaking Lightroom tip by any means, any and all time you can save while culling your images is a BIG bonus.
Learn More:
Learn Keyboard Shortcuts
Speaking of saving time, keyboard shortcuts in Lightroom can be a huge time-saver as well.
This doesn't mean that you have to learn every single shortcut that Lightroom offers, either.
Even just learning a few shortcuts for the most commonly-used features in Lightroom will help you simplify your workflow and get the job done faster.
In fact, if you just learn one Lightroom keyboard shortcut, make it this one - CTRL +/
Doing so brings up a pop-up that shows you some of the primary shortcuts that are available for active module.
Get more insights on Lightroom shortcuts in the video above by Lucy Martin.
Let AI Help You Organize and Search Your Photos
The worst part of organizing images in Lightroom is the tedious task of tagging all your photos.
But what if I told you that there is a plugin that will organize your photos and make them easily searchable at the same time?
That plugin is called Excire, and it uses artificial intelligence to determine appropriate tags based on each image's subject matter and appearance.
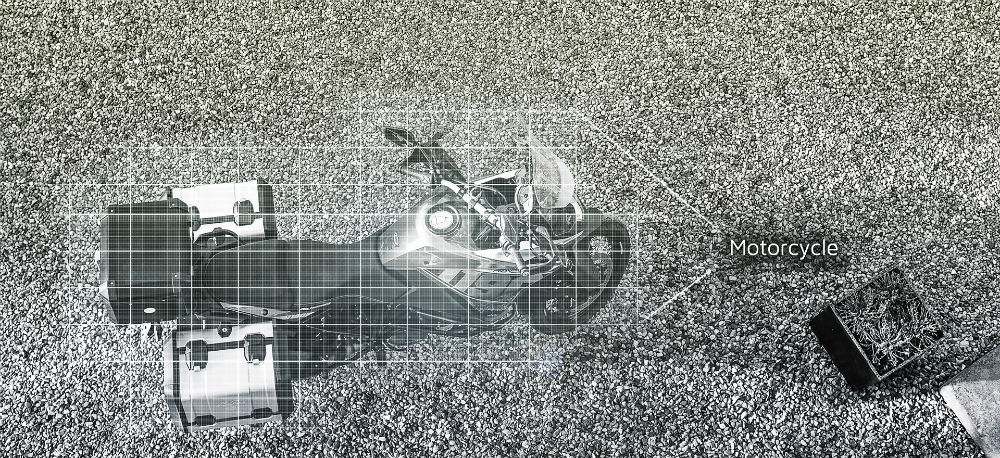
For example, if you upload a photo of a motorcycle parked in front of a fence, Excire will tag it with "motorcycle" and "fence."
What's more, if the predominant color in the shot is blue, Excire will tag is as "blue" as well.
Talk about a time-saver!
There's actually two different versions of Excire.
First, Excire Search offers 125 terms for tagging. Think of it as the ideal solution for amateur and enthusiast photographers that want a streamlined organizational experience.
Second, Excire Search Pro offers over 500 keywords for tagging, which is ideal for any photographer, really, but particularly professionals. It even allows you to transfer keywords to existing photos in your library.
That means that the hundreds of images you've uploaded to Lightroom over the years become easily searchable, too.
When it comes down to it, tagging photos and actually finding the photos you want in Lightroom is the worst part about using that program. But if you add Excire to the fold, those tasks become a breeze! See what I mean in the video above by Suzette Allen.
Learn More:
- These Products and Services are Innovating Photography as We Know It
- Lightroom Tutorial: How to Edit Photos Like a PRO
Compare Edits Side-By-Side
 Image Credit: Joan Vicent Cantó Roig via iStock
If you're like me, you probably make several different edits of the same photo, and then promptly forget what the previous versions looked like.
However, there's a handy Lightroom shortcut that lets you compare two edits side-by-side.
Essentially, what Lightroom does is let you add additional information to the image's .xmp file that permits you to make edits on the "virtual" copy of the image while also keeping the edits you've made to that point.
Just go to Photo > Create Virtual Copy or press CTRL+' to compare your images side-by-side.
Share Images With Others
 Image Credit: RossHelen via iStock
No matter if you've taken photos of your friends and family or you're a pro that's taken photos of your clients, whoever is in the photos will want to see them sooner rather than later.
Lightroom allows you to share your edited images directly with people by using Lightroom Mobile.
Simply select "Sync With Lightroom Mobile," pick the images you want to share, and then click the Collections tab.
Once there, press the + sign, which allows you to create a new collection. In the same dialog box, check "Sync With Lightroom CC" and you're good to go!
This is just the tip of the iceberg when it comes to awesome ways to maximize your Lightroom experience.
If these few simple tips can do this much, just imagine what a few more post-processing tutorials can do for you!
Learn More:
We Recommend
How to Speed Up Lightroom
 Image Credit: jacoblund via iStock
If you've ever lamented a sluggish Lightroom experience, you aren't alone...
As fantastic as Lightroom is, sometimes it feels like it takes longer to do what you need to do in the program than it did to take the series of photos you're trying to edit.
That's where Matt Kloskowski comes in.
Matt is a Lightroom expert and puts his knowledge to good use by sharing some under-the-hood adjustments you can make to Lightroom in his tutorial, shown above.
If you're sick of waiting around on Lightroom to get done what you want it to get done, give his tips for how to speed up Lightroom a try!
I've outlined a few of his tips below for quick reference.
Editor's Note: Are you looking for ways to add to your income? Join our #1 recommended affiliate program and start putting extra cash in your pocket.
How to Speed Up Lightroom: Optimize the Catalog
Located under the File menu, Optimize Catalog instructs Lightroom to streamline the catalog for improved performance.
What this means is that Lightroom will examine the underlying data structure and make changes as necessary to ensure that the catalog is as succinct as possible.
This simple move will often result in faster performance, and as Matt notes, it should be done about once a month to maintain that faster performance.
Learn More:
Use Embedded & Sidecar
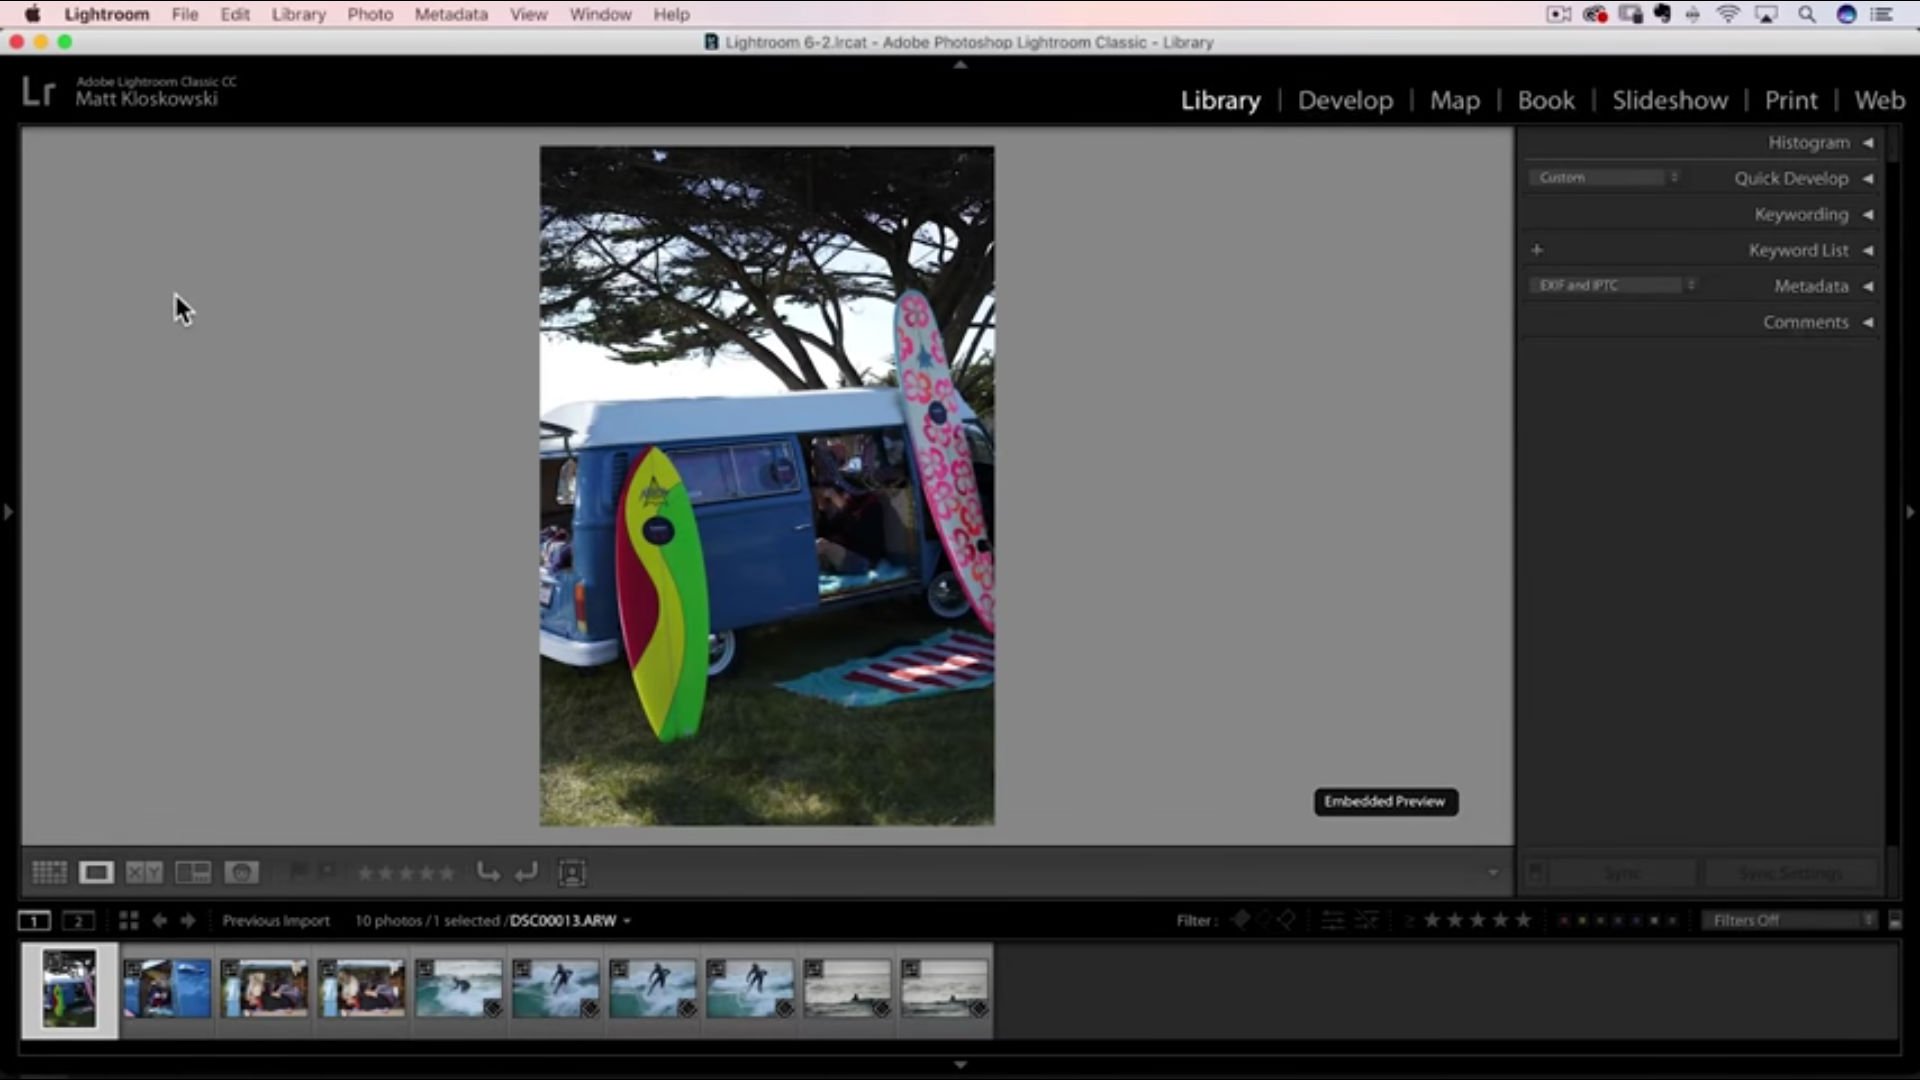 YouTube Screenshot/Matt Kloskowski
If you have a ton of images to go through, using Embedded & Sidecar can significantly speed up the process.
When you import your images into Lightroom, go to the Build Previews drop-down menu in the upper right-hand corner of the window and select Embedded & Sidecar.
After doing that, click Import.
As the images import, you'll see a badge in the top-left corner of each image. If you place the cursor on that badge, it'll say "Embedded Preview," and if you click that, you can see the preview of the image that was embedded with the RAW file.
Editor's Tip: Looking for a new camera? Learn why a new lens is a better investment than a new camera body.
This enables you to view the images you've imported very quickly when in Library mode.
In fact, as Matt demonstrates, you can fly through the images so fast that they look like a movie, though that might not be the most productive way to view your photos.
But the point is that if you want to speed up the process of previewing your images in the Library, use Embedded & Sidecar.
Optimize Your Graphics Card
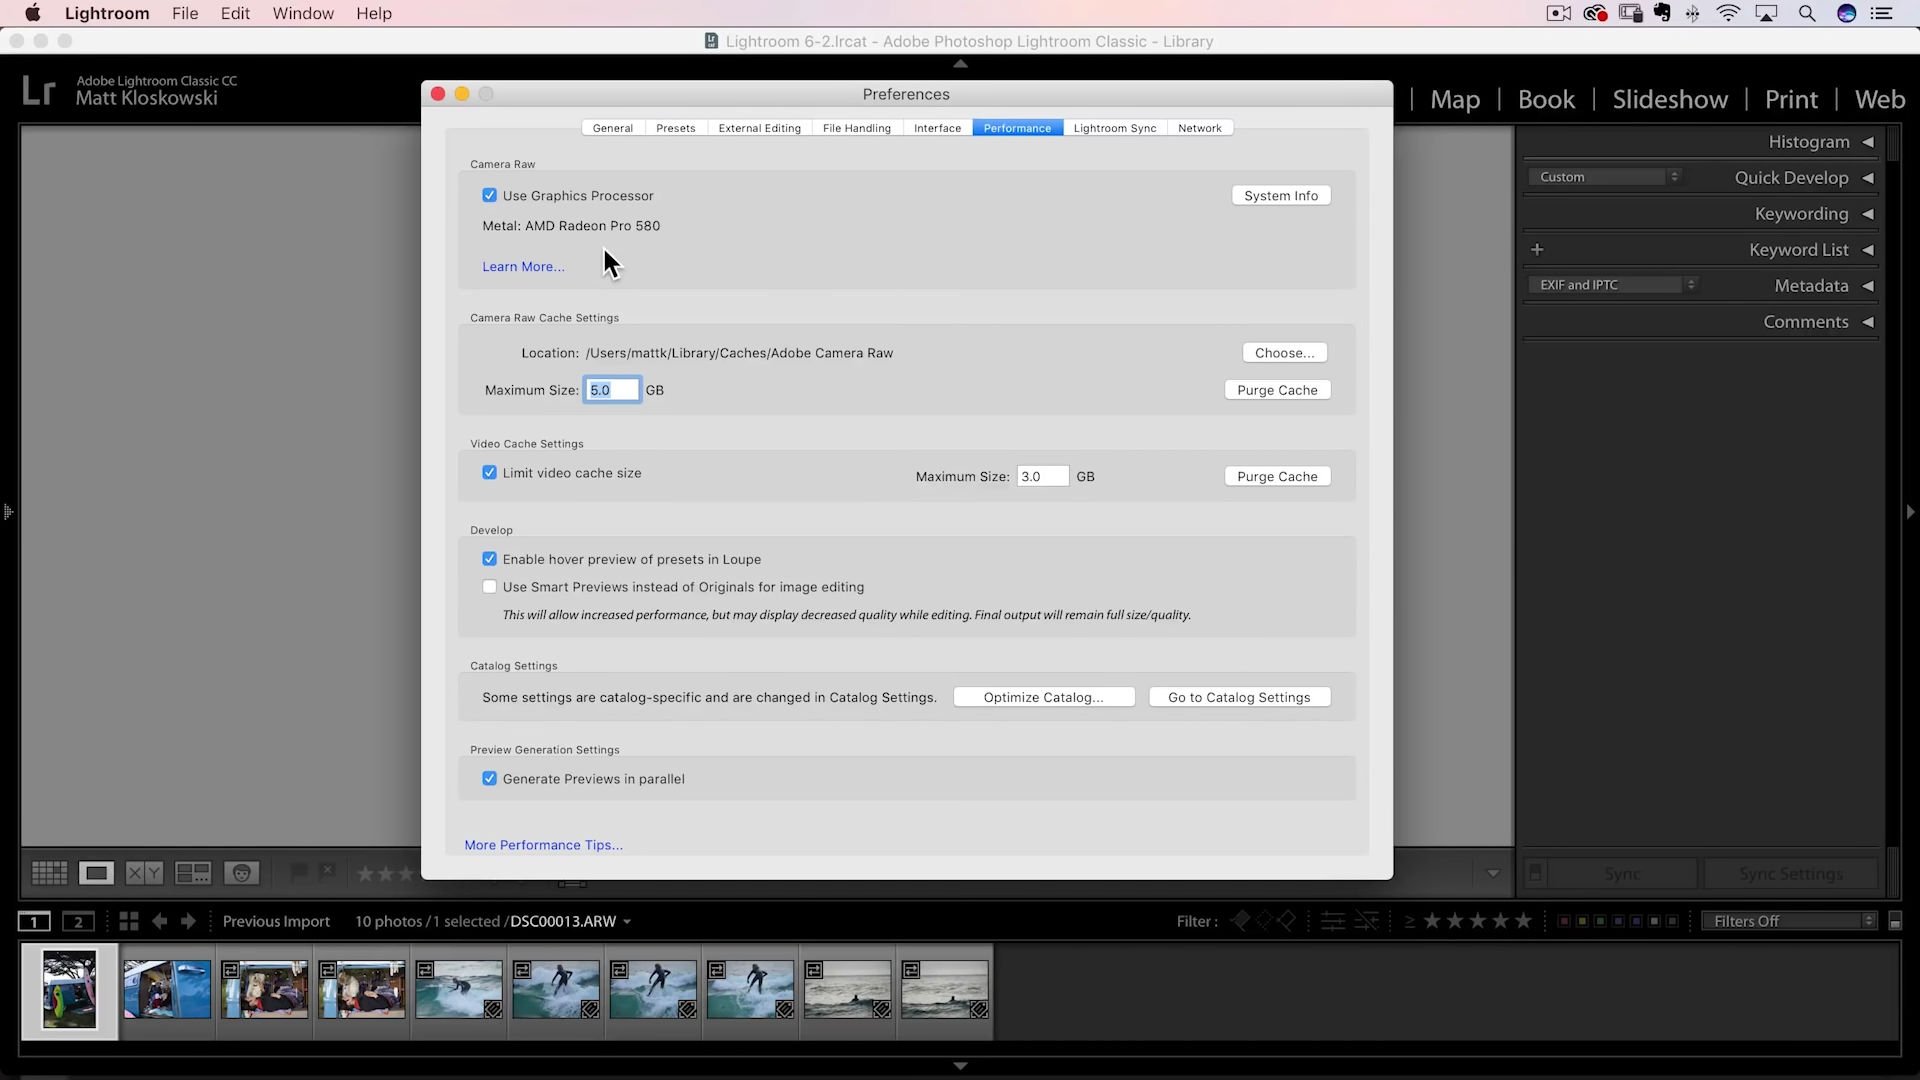 YouTube Screenshot/Matt Kloskowski
Not all things that cause Lightroom to be slow have to do with Lightroom.
In fact, you might need to do some tweaking to how your graphics card works.
To do so, go to the Preferences Menu and select the Performance tab.
At the top of the menu is a checkbox that says Use Graphics Processor.
Lightroom is optimized to work with certain processors, and if your computer doesn't have one of those processors, having this checkbox checked might reduce performance.
As Matt notes in the video, clicking on the "Learn More" link in the Performance window will take you to the details you need to determine if you should or shouldn't have the checkbox marked.
Learn More:
Wrapping It Up
 Image Credit: nicolas_ via iStock
Lightroom is a wonderfully powerful tool for organizing and editing photos.
But as you certainly have discovered, there are times when the process of using Lightroom can be frustratingly slow.
But using these tips for using Lightroom, you can speed up the working experience and make the most of your time editing photos.
Be sure to check out Matt's other tips in the video at the start of the article to learn even more about how to speed up Lightroom.
We Recommend
Lightroom Classic CC 7.2 Gets Performance Enhancements, New Features

Lightroom Classic CC was just updated by Adobe to version 7.2.
That's exciting news for a variety of reasons.
Not only does this new version sport some handy new features (which we'll highlight in a moment), but it also has support for more cameras and lenses and addresses some bug issues.
But best of all, version 7.2 has improved performance so you can get your processing done in shorter order and with fewer spinning wheels of death.
In the video above, Lightroom Blog gives a quick overview of some of the new features in this version of Lightroom and discusses some of the performance enhancements as well.
For a discussion of some of the changes, keep on reading below!
New Features
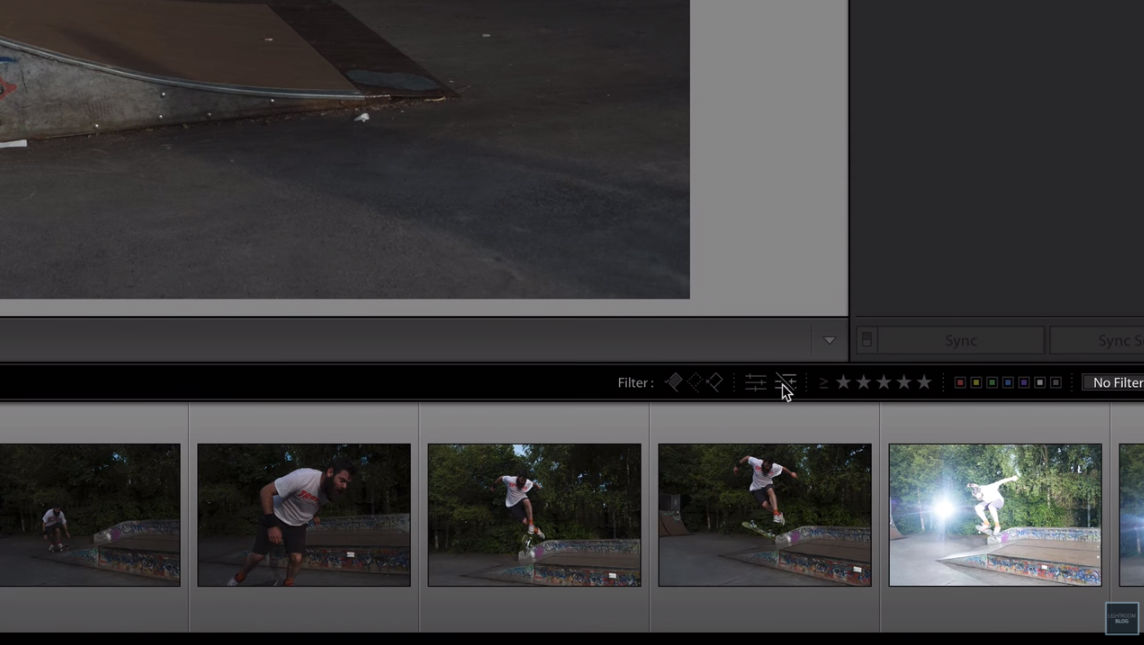 YouTube Screenshot/Lightroom Blog
Lightroom Classic CC 7.2 has some new filters that you can apply in Loupe View - "Has Edit" and "Doesn't Have Edit."
As you might have guessed, clicking "Has Edit" filters all the images in the collection to include just those that you've edited. "Doesn't Have Edit" filters out the edited images so you can see which ones you have left to work on. You can even make Smart Collections of edited and unedited photos using these filters.
When viewing filtered images in Loupe View in version 7.2, you'll notice that as you scroll through, images appear much faster thanks to the new performance enhancements.
Editor's Tip: After you edit your images, complete the process by turning your photos into fine art. Find out how.
 YouTube Screenshot/Lightroom Blog
Another interesting new feature is that Adobe has added a search bar specifically to search in your folders, which enables you to search for things just like you would search for keywords or collections.
 YouTube Screenshot/Lightroom Blog
Speaking of collections, in the Map Module, you can now create a collection based on location.
Just right-click on a pin on the map and select "Create Collection" to instantly add all the photos taken at that spot into one group.
Get a complete rundown of Lightroom Classic CC version 7.2 updates here.
Learn More:

As for Performance Improvements...

The under-the-hood improvement to Lightroom's speed has everything to do with batch processing.
Specifically, if you have a computer with 12GB of RAM or more with a multi-core CPU, you'll find better performance when import grid loading, import and preview generation, and exporting.
Additionally, version 7.2 speeds up the process of viewing images in Loupe View, merging photos for HDR and panoramas, and rendering adjustments made in Develop mode.
Beyond that, this new version of Lightroom also resolves the issue of the program getting slower and slower with time, which should be evident regardless of how much RAM or the kind of CPU your computer has.
As someone that uses Lightroom on a regular basis, the new features are great, but the improved performance is what's really got me excited - and should have you excited as well.
Via Adobe
We Recommend
Lightroom Post Processing Techniques for Bird Photography

If you're like me, you love the thrill of being out with your camera, taking photos, and enjoying the beauty of nature.
But, again, if you're like me, sitting at home processing photos in Lightroom isn't exactly the most exciting experience.
That's why I was so excited when I came upon the quick and efficient Lightroom post processing techniques in the video above.
Follow along in the video as master bird photographer Tim Boyer explains how to make your bird photography shine in just a few minutes.
For a rundown of some of Tim's essential steps, check the outline below.
Editor's Tip: Check out this comprehensive guide on bird photography to get even more tips, tricks, and techniques for perfecting your bird photography.
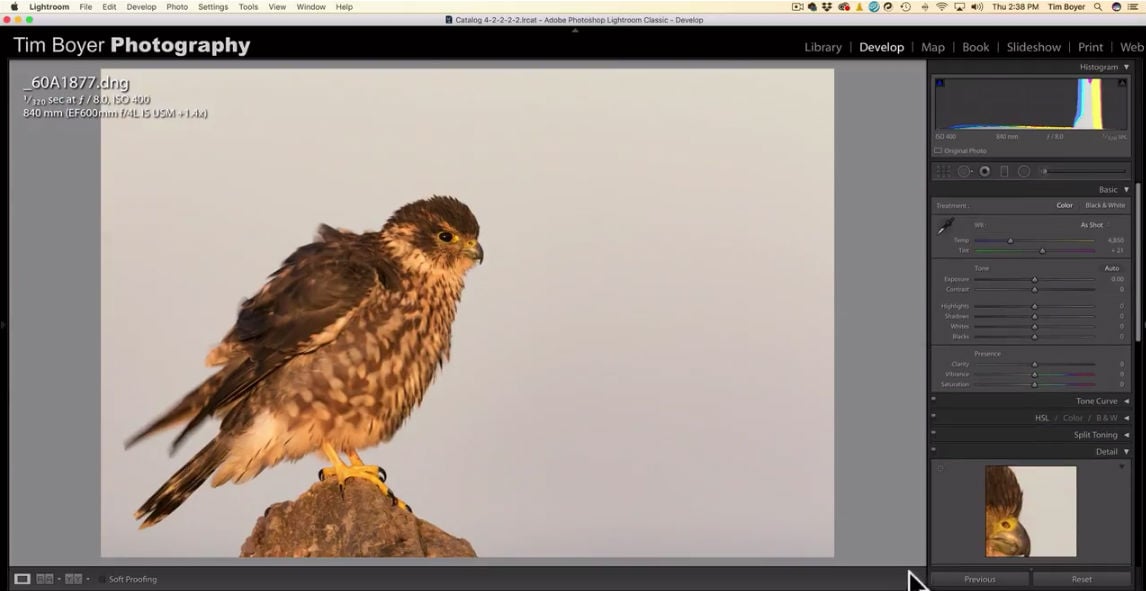
Step 1: Prepare the Workspace
 YouTube Screenshot/Tim Boyer
Particularly if you're processing photos in Lightroom on a laptop or a small screen, you need to prepare the workspace to maximize the real estate on the screen.
That includes hiding the panel on the left side of the screen to give yourself more space to devote to the photo.
Then drag the tools panel on the right side of the screen over to the left to increase its size a little bit.
Not only does this give you a better view of the tools you'll be using, but it also extends the length of the sliders in the panel, which gives you finer control over the adjustments you make.
Learn More:
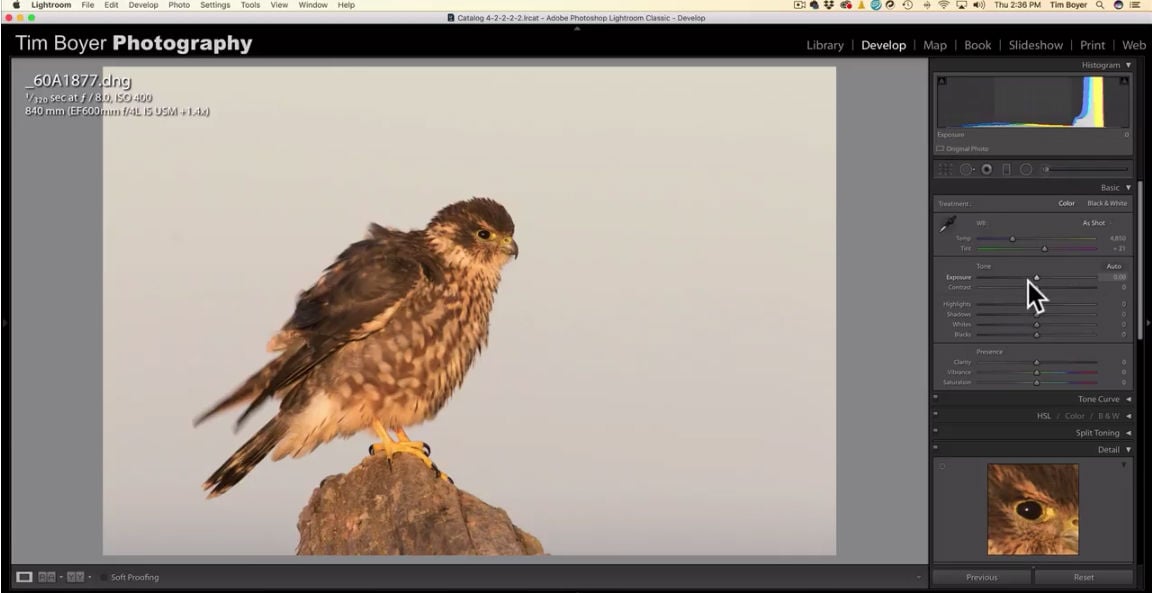
Step 2: Dehaze is a Handy Lightroom Post Processing Technique
 YouTube Screenshot/Tim Boyer
Tim's first step in processing his bird photos is to use Lightroom's Dehaze feature.
Dehaze adds some clarity to the shot while increasing the contrast, too.
It also cleans up the shot a little bit. In Tim's sample image, there was a lot of mist in the air, so dehazing the image helps minimize the softness of that mist for a crisper shot.
In the screenshot above, you can see the Dehaze tool at the bottom of the panel, where the cursor appears.
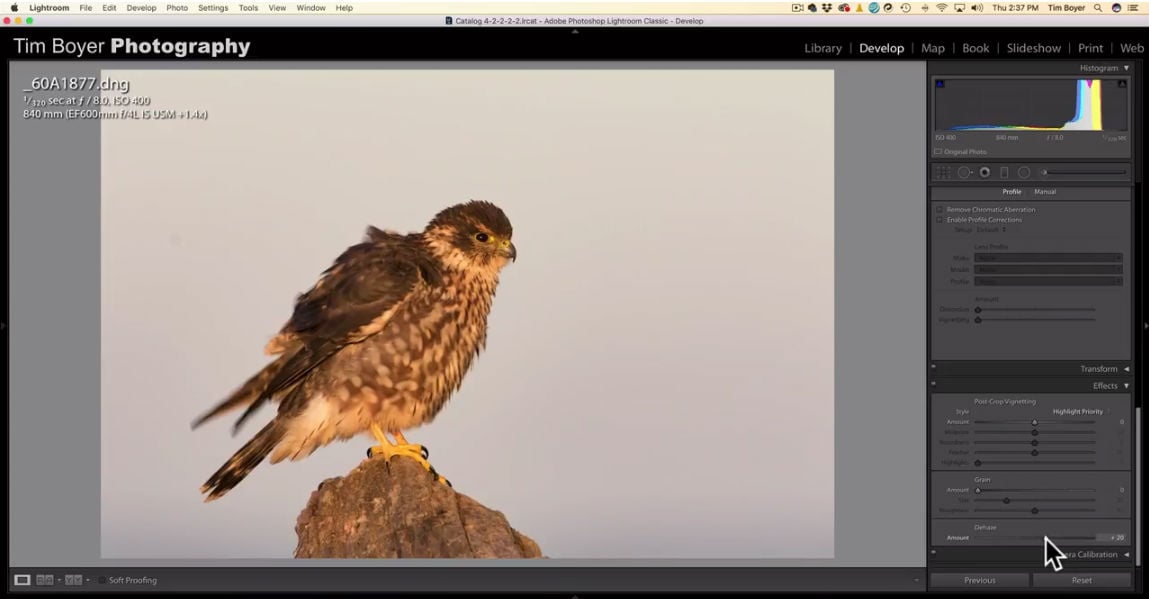
Step 3: Use Lens Correction
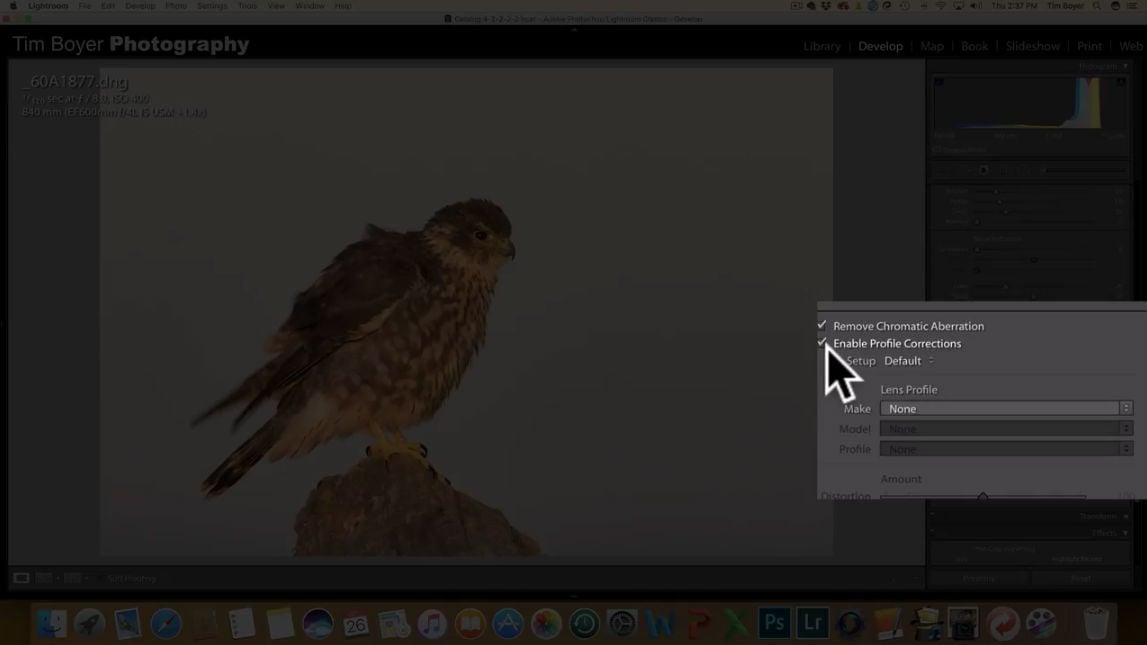 YouTube Screenshot/Tim Boyer
In the Lens Correction Panel, click the boxes for Remove Chromatic Aberration and Enable Profile Corrections.
Doing so improves the image slightly, removing the color fringing that sometimes occurs as a result of chromatic aberration. It also corrects for distortion based on the specific lens you used to take the shot.
Learn More:
Step 4: Sharpen the Image
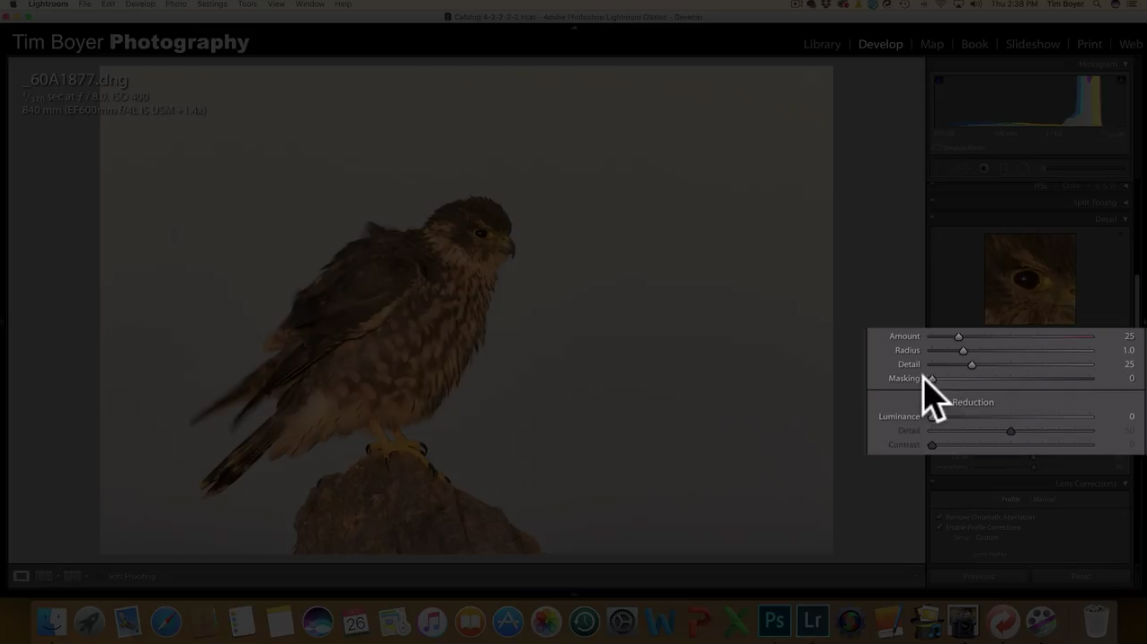 YouTube Screenshot/Tim Boyer
Try as you might, your bird photography might not be optimally sharp each time.
Lightroom's Sharpening tools can help you fine-tune the image's sharpness if need be.
First, create a sharpening mask, which will turn the image into an array of white and black tones.
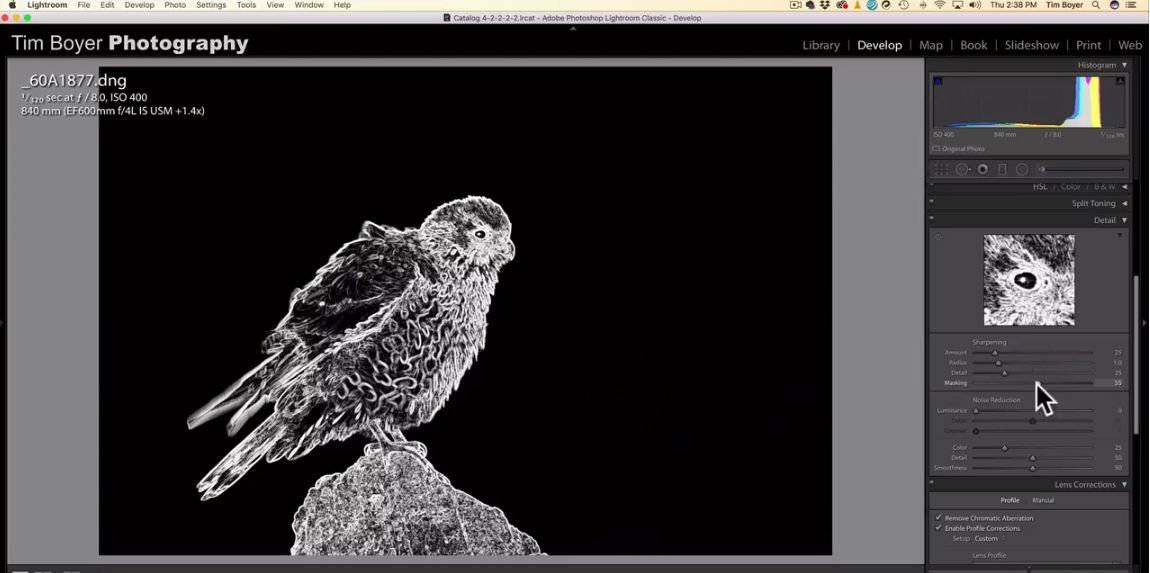 YouTube Screenshot/Tim Boyer
As you can see in the screenshot above, these white and black tones make it easy to see the details of the shot.
By creating the mask, only the white areas will be sharpened, though. That helps ensure that you're sharpening the bird and the bird only, and not the background, which could increase noise in the sky area of the image.
Sharpening the image is easy - just use the sliders in the Sharpening panel to get the results you want. You don't need to go big here, as small adjustments can go a long way.
Step 5: Crop and Remove Dust
 YouTube Screenshot/Tim Boyer
Though your image might not need to be cropped, this is a good point at which to do it.
As you can see in the screenshot above, Tim cropped the image slightly in order to fill more of the frame with the bird.
What's more, he positioned the bird in the frame such that its tail and eye are on a 45-degree angle, which is a pleasing view.
 YouTube Screenshot/Tim Boyer
Tim also uses the Spot Removal Brush to get rid of some artifacts in the shot left by dust on his camera's sensor.
To do so, engage the Spot Removal Brush, and then click the Visualize Spots box at the bottom of the Lightroom window.
Doing so enables you to adjust the slider to bring out any obvious spots in the image.
As you can see, Tim found a dust spot on the far left side of his image that he then removes by using the Spot Removal Brush.
Learn More:
Step 6: Fine-Tune the Exposure
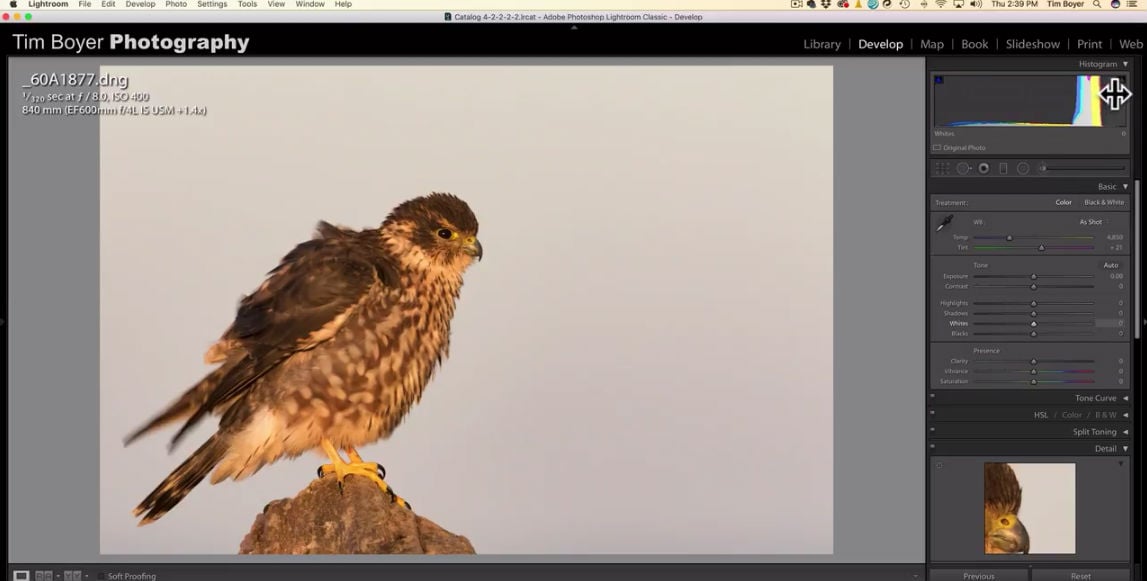 YouTube Screenshot/Tim Boyer
The histogram in Lightroom offers you a look at the tones that are present in the image.
Typically, a nice bell-shaped curve with the highest peak of the graph in the middle is what you want.
But sometimes that's not what you get, and as you can see, Tim's histogram is skewed to the right due to the brightness of the sky behind the bird.
But if you look closely, there's a small triangle in the upper-left portion of the histogram, which indicates that some black areas of the image are being clipped.
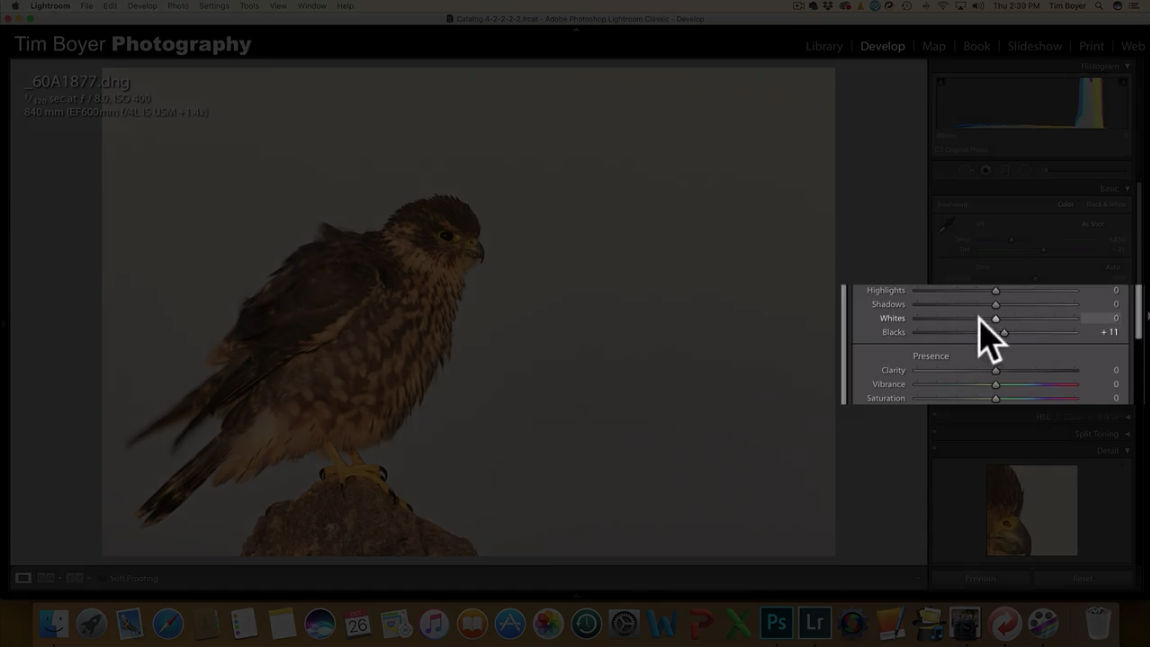 YouTube Screenshot/Tim Boyer
Using the Blacks Slider, Tim increases those values to bring some of those darker areas of the shot back into the image.
Again, it doesn't take much, so making adjustments like this should be done with the idea that less is more.
Manipulating the Highlights, Shadows, and Whites can also help you fine-tune the exposure to get the results that you want.
With that, you have a few quick and easy tips for post processing in Lightroom. Though these tips are meant for bird photography, they can work with any kind of photo!
Editor's Tip: Check out Tim's YouTube Channel or his website for more insights into the art of bird photography.
We Recommend
Lightroom Tutorial: How to Edit Photos Like a PRO
 Image Credit: diego_cervo via iStock
If you ask me, what often separates amateur photographers from the pros isn't necessarily the ability to compose an interesting photo.
I wouldn't even say that understanding camera settings is the number one difference, either.
Don't get me wrong - composition and technical knowledge are of course imperative for creating a top-notch photo.
But for me, it's post-processing skills that separates the best photographers from the rest.
Editor's Tip: Check out Excire, the #1 LIGHTROOM PLUGIN that uses AI to help you organize and find your images fast with no tags required.
That being the case, it's necessary for us all to learn how to edit our photos in a way that brings out all the beautiful details.
In the video above, Sawyer Hartman seeks to do just that.
Editor's Tip: Not sure what type of lens to buy? LEARN ABOUT BASIC LENS TYPES AND WHICH ONE IS RIGHT FOR YOU.
As he points out in the video, learning how to process images is important regardless of whether you're a brand new photographer or one that's been around the block a few times.
There's always something new to learn with post-processing, some new skill to master, or a new feature in Lightroom, Photoshop, and other processing tools that you can learn.
 YouTube Screenshot/Sawyer Hartman
In this video, Sawyer uses Lightroom as our learning space for creating more impactful images.
This is not a step-by-step tutorial for how to edit your photos to achieve a specific look.
Instead, Sawyer walks us through his process of editing photos from start to finish, that way we get a complete understanding of his workflow and why he does the things he does to his images.
There are tons of valuable tidbits in the video, so be sure to check it out in its entirety above. For more photography tutorials, head over to Sawyer's YouTube channel.
Learn More:
We Recommend
Lightroom vs Photoshop
What's the difference between Lightroom and Photoshop?
That's about as common a question as you'll find in photography...
After all, both programs are made by Adobe, and both have many similar features.
But for the uninitiated, Lightroom and Photoshop have several very important distinctions that make them better suited to different tasks.
In this Lightroom vs Photoshop comparison, we explore those differences so you have a better understanding of how you should be using these powerful programs in your post-processing workflow.
Without further ado, let's get started!
What is Photoshop?
In the simplest of terms, Photoshop is best suited for the heavy lifting when it comes to editing your photos, as you can see in the video above from Photoshop Tutorials.
It's got all sorts of powerful tools that help you manipulate your photos in just about any way imaginable, from simple tasks like cropping to intermediate tasks like adding adjustment layers to complex tasks like making selections, removing unwanted features, and other pixel-level work.
 Photo by Domenico Loia on Unsplash
And that's really the trademark of Photoshop - it allows you to drill down to the individual pixels in your photos for pinpoint manipulations.
That's due in part to the fact that you work in layers in Photoshop. That means you can add all sorts of effects to an image, then turn them off or on as you see fit. You can even keep different edits of the same photo on different layers within one file, which makes it easy to see the difference from one edit to the next.
Learn More:
- How to Sharpen an Image in Photoshop Using a High Pass Filter
- Photoshop Gradient Tool and How to Use It
What is Lightroom?
Lightroom has a lot of the image editing features that the everyday photographer needs, but it lacks the sheer volume of tools and the power of Photoshop when it comes to making hefty edits to your photos.
That being said, Adobe designed Lightroom specifically with photographers in mind.
It's not just a photo editor. Instead, Lightroom gives you the means to import your images, organize them, and edit them, making it a nice all-in-one management tool to keep track of your photos, as you can see in the video above from the Adobe Photoshop Lightroom Channel.
In that regard, in a Lightroom vs. Photoshop matchup of user-friendliness, Lightroom wins because you can do everything right within the program. That means that Lightroom has a much better workflow for photographers.
 Photo by Radek Grzybowski on Unsplash
For instance, you can easily create collections of photos with keywords to keep track of images based on date, event, subject, and so forth.
What's more, you can create Lightroom presets and save them, so if you have a certain kind of editing style, it's just a simple matter of applying that preset to a newly imported photo. You can even sync your edits to multiple photos in one action. That makes Lightroom a good time-saver, especially if you have tons of photos that need organizing or editing.
Additionally, unlike Photoshop, Lightroom offers non-destructive editing without having to "Save As." Actually, there isn't even a Save button at all in Lightroom - all edits you make are updated automatically in your Lightroom catalog.
Learn More:
- How to Easily Transform Your Photos in Lightroom
- These Lightroom Hacks are a Godsend for Any Photographer
When to Use Photoshop

Photoshop is where you turn to do the heavy lifting of advanced editing.
If you need pixel-level control over your edits, want to make composites or panoramas, remove stray hairs or whiten teeth, or create an HDR photo, Photoshop is the better answer.
Comparing Photoshop vs. Lightroom regarding editing tools, Photoshop has an undeniably better toolbox for photo editing than Lightroom, but, of course, that means that Photoshop is more difficult to learn, too.
However, that's a learning curve you'll have to master if you want to do more than basic photo editing.
When to Use Lightroom
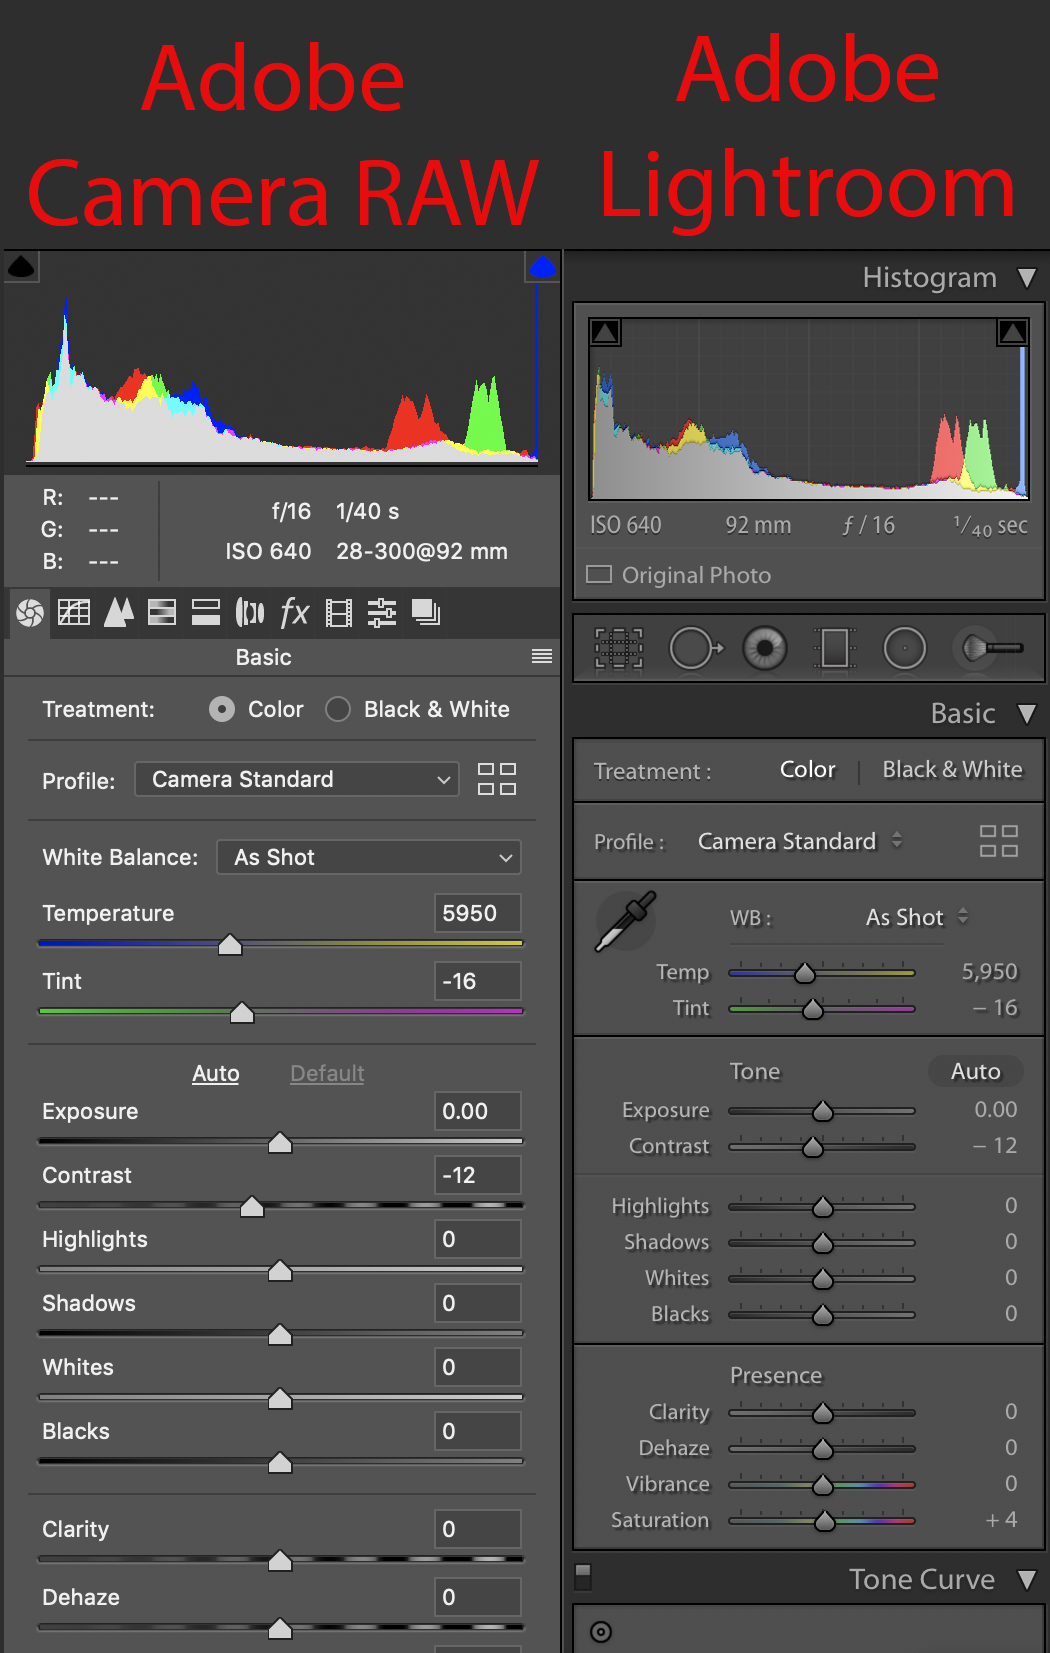
Lightroom is a great first step in the editing process.
Since it's a raw file editor in itself, you can skip using Adobe Camera Raw because you essentially get the same tools in Lightroom. Furthermore, since Lightroom is a stellar organizational tool for your photos, it makes sense to import them into Lightroom from a photo management point of view.
Lightroom is also a good option if you need to tackle basic photo editing.
You can adjust exposure, make histogram adjustments, add gradients and sharpening, reduce noise, work on highlights and saturation, and a host of other essential tasks.
Why Photoshop is Better Than Lightroom
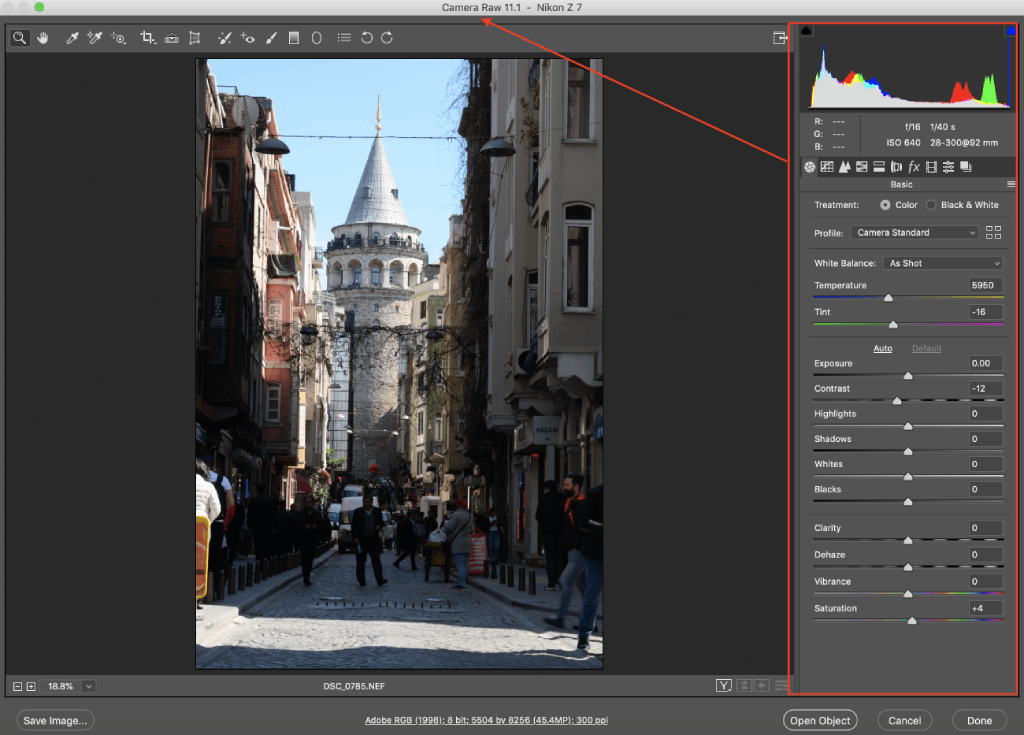
When evaluating Photoshop, there are a few ways that it simply outshines Lightroom:
- Image blending - If you want to blend images, for example, to minimize noise, Photoshop is definitely the way to go.
- Advanced editing - If your portrait model has a blemish on her face, you'll need Photoshop to tackle that task.
- Photo manipulation - If you want to cut grandma out of one photo and put her into another, Photoshop has the tools to do so.
- Panoramic stitching - Splicing images together to create a panoramic photo is one of Photoshop's strong suits.
- Enormous toolbox - Simply put, Photoshop has an incredible collection of editing tools that help you address virtually any editing task you can imagine.
Learn More:
Why Lightroom is Better Than Photoshop

Though Photoshop has its strengths, Lightroom does a few things even better:
- Basic photo editing - If all you need to do is crop an image, reduce the noise, or do some sharpening, Lightroom handles those tasks well.
- RAW editing - Lightroom has a built-in RAW file editor that's more user-friendly than Adobe Camera Raw. Plus, you can make RAW edits as you import your photos.
- Photo organization - As noted above, Lightroom gives you a powerful image management platform to help you organize your photos.
- Ease of use - Lightroom is streamlined for a much simpler user experience.
- Presets - As noted earlier, you can create presets in Lightroom to give a consistent look to your images. Better still, you can import presets that other photographers have made, giving you a virtually endless supply of looks for your photos.
Learn More:
The Downsides of Photoshop and Lightroom
The primary concern with Photoshop is that it has a very steep learning curve. This is simply because of the sheer number of tasks you can do within the program. Some professional photographers don't even know how to use all of Photoshop's bells and whistles, so you can imagine how difficult it can be for some novice and enthusiast photographers to master.
Photoshop doesn't have any image management tools, either, so it isn't nearly as adept at keeping things organized for you like Lightroom is.
On the other hand, being that Lightroom was designed specifically for photographers, you can only edit photos - there's no vector or raster image creation. Additionally, unlike Photoshop, Lightroom doesn't work in layers. Although you can stack effects to get the desired look, they aren't on individual layers that you can manipulate on a layer-by-layer basis.
Get more details on the Lightroom vs. Photoshop debate by watching the video above by Jessica Kobeissi.
Photoshop vs Lightroom: What to Buy

When all is said and done, your better bet will depend on your situation.
If you're a beginner, start with Lightroom as it's easier to learn and more user-friendly. It should also be your choice if you have tons of photos that need organization.
On the other hand, if you're more of an enthusiast photographer that's looking for an editing program to do all sorts of heavy lifting, Photoshop is the way to go.
Fortunately, since they're both Adobe products, they integrate very well together (and are even sold together in one package). Use Lightroom to import, organize, and process your RAW files, then bring them into Photoshop for more serious editing.
Your decision really comes down to which program is best suited for you. Either way, you'll have plenty of power to give your photos the polished look and feel you want.
We Recommend
Master the Art of Drone Photography: Part 1

If you have a drone - and these days, who doesn’t - you understand the trials and tribulations as well as the joys of using an aerial vehicle for photography.
But to think that taking photos from above is the same as it is from your handheld camera is a total misconception. There are the photographic considerations, including subject matter and camera settings. There are also the issues related to the responsible, safe, and legal use of drones.
In the first part of our two-part series on drone photography, we explore legal and privacy issues, as well as topics related to safely flying your drone.
Legal Issues

As drones have become ever more popular, more and more laws have been passed governing their use. Since consumer-based drones are still relatively new, governments worldwide are scrambling to devise rules that pertain to when, where, and how drones can be used, and by whom.
At the center of it all is the common sense use of your drone. Naturally, flying it near buildings, over your neighbor’s backyard, or near airports will do nothing but get you in a heap of trouble. Additionally, flying your drone over something that could be damaged or destroyed should the drone crash is a simple matter of using your head and your wits. In short, if you’re about to fly your drone somewhere and you have doubts about the appropriateness of it, don’t do it!

In the United States, the Federal Aviation Administration has issued a broad spectrum of rules of which you need to be intimately familiar before you take your first flight. The FAA’s Unmanned Aircraft Systems website is the go-to place for the latest in terms of news, regulations, instructions on how to register your drone, and procedures for flying. Other entities, like states, and cities, may have their own set of rules as well. These regulations also vary from country to country, so it’s best practice to check with local authorities before sending your drone up into the sky.
Another excellent resource is the Know Before You Fly Campaign. With guidelines for responsible flying, resources for drone enthusiasts, and much more, it is worth a visit if drone photography is in your future.
Practice Makes Perfect

Once you’ve explored the legalities of flying a drone, it’s time to practice.
It goes without saying that you will need to examine a practice area to ensure that it is safe and legal to fly there. A wide-open area would be an ideal spot, such as an empty field in a rural area. Granted, not everyone that has a drone has the luxury of an open field nearby, so this is another common sense moment. Choose a location that is as open as possible and affords you sweeping views so you can maintain eye contact with your drone at all times. Above all else, ensure that your practice location has nothing that can be damaged and no people that can be hurt. If it crashes, you want to deal with a broken drone at the worst, not a destroyed car windshield or a hurt bystander.
You’ll also want to check the weather to be sure you’re taking to the skies in the best possible conditions. The less wind, the better, for obvious reasons. You will have enough to worry about just trying to master the controls of the drone; you don’t need a breezy day to add more stress to the situation!
Beware of the Battery

Many drones are equipped with a feature that, in case of an emergency, it will return to its launch point automatically. This is great for both you and the drone if something goes awry.
However, if you don’t keep an eye on the battery levels of your drone, it will land wherever it pleases, which can be inconvenient at best and downright destructive at worst. It’s far too easy to get caught up in the process of flying, and once you add taking photos, there is an awful lot to command your attention.
As such, you will need to develop a system for checking your battery life. Set a reminder on your phone. Have a friend time your flight and call out how many minutes of battery life are left. Try to launch the drone as close to the area you want to photograph as possible. These are simple steps, but they could very well save you lots of trouble should your drone run out of juice.
Understanding the factors that reduce battery life is essential as well. The more camera weight it has to carry, the less time your drone will be able to fly. Windy conditions and cold weather have a deleterious impact on battery life as well. Be prepared to cut your flight time in these conditions by as much as half!
Final Thoughts

There is far more to know about flying a drone for photography purposes, so be sure to check the resources provided in this article before you attempt to tackle drone photography. As noted above, it’s mostly about using common sense and being informed about what you can and cannot do with your drone. Be responsible, check local regulations, and take the time to learn how to fly your drone safely before you attempt to add photography to the mix.
We Recommend
Nature and Wildlife Photography Tip: The Lightroom Editing Process From Start to Finish

Lightroom has become one of the go-to tools for photographers for post-processing their images. But like Photoshop, if you haven’t used Lightroom that much (or at all) it can be a bit of an overwhelming experience, leaving you frustrated and wondering, “Where do I even begin?”
YouTuber YuriFineArt has all the answers you need, with his in-depth tutorial of how to edit nature and wildlife images in Lightroom. Watch as Yuri takes a flat, dark wildlife photo and uses Lightroom to change it into a vibrant and colorful masterpiece. You’ll learn each step needed to make the same type of impact on your images, from importing the RAW file to saving the final image, and, of course, all the necessary steps in between. Check out the video below!
Amazon Recommendations
- The Complete Guide to Nature Photography: Professional Techniques for Capturing Digital Images of Nature and Wildlife
- Digital Nature Photography: The Art and the Science
- Lightroom CC Complete Training: Learn the Entire Photographers Workflow in the new Lightroom CC
We Recommend
Photography Tips for Parents: 6 Ways You Can Improve Your Skills Today
 Image Credit: evgenyatamanenko via iStock
You don't have to be a world-class photographer to capture beautiful photos of your children.
In fact, you don't even need to have a high-powered camera!
Often, what makes the difference between a good photo and a spectacular photo is attention to little details - things like composition, understanding when and where to take portraits of your kids, and having the right tools to make your photos shine.
In this guide, I provide a few essential tips on these and other topics that will help you improve your skills for photographing your kids.
Choose Your Battles
 Image Credit: Rawpixel via iStock
If your kid is like mine, there are times when having a picture made is totally fine, and other times when they act like it's torture.
As a result, you need to choose your battles when it comes to photographing your kids.
If they're just not feeling it, wait a few minutes and they'll likely have a completely different mood about the situation!
What's more, you can minimize the number of battles you have to fight by including your kids in the process.
 Image Credit: svetikd via iStock
For example, rather than deciding what they'll wear for them, let them decide what they want to wear.
What's more, rather than dragging them off to some location you've picked, ask for their input.
This doesn't mean you have to make it a free-for-all, either...
Just give them three choices for their outfit and the location, and they'll feel much less like having their picture is something being forced upon them.
Learn More:
Shoot at Sunrise or Sunset
 Image Credit: jeffbergen via iStock
By far, the best light of the day is at sunrise or sunset, when the light from the sun is soft and golden.
Since my little guy is so difficult to get up in the morning, our time to go outside, have fun, and take a few photos is during sunset.
Since the light is so spectacular at sunset, you don't even need to go someplace particularly special to get a great result.
The backyard, the tree house, or the neighborhood park will do just fine!
For the most dramatic shots, shoot toward the sun, that way the scene is backlit. The golden rays of the sunlight will frame your child perfectly in the shot.
Don't Stop Shooting
 Image Credit: Lisa5201 via iStock
A mistake that some parents make is that they try to formally pose their kids for one or two shots.
And while formally-posed portraits are fine, there are many possibilities for heartwarming candid shots between the "look at the camera and say cheese" moments.
To do so, put your camera in continuous shooting or burst mode. This allows you to take multiple shots in rapid succession (the number of shots depends on the camera).
This is ideal for situations in which your child is being active - like playing with the family dog - or when you're photographing multiple children together.
The laughs, smiles, and giggles that are bound to occur as they get lost in what they're doing can truly make for some wonderful, unplanned photos. And all you need to do is keep on shooting between each "say cheese" shot, and you can wind up with some awesome photos!
Give Them Something to Do or Hold
 Image Credit: RyanJLane via iStock
One of the biggest problems with portraits for any age of subject is that they often don't know what to do - especially with their hands.
When you're photographing your kids, you can get around this by having them do something. Ask your five-year-old what their favorite animal is. Tell your teenager a corny joke. Give your kids bubbles to play with as you take their photo. Ask them to use their imaginations to transport themselves someplace else.
The point is that there are a million things you can have your kids do - think about something, act upon something, and so forth - that will help them relax, take their mind off the fact that you're taking a photo, and have a little fun at the same time.
 Image Credit: loops7 via iStock
When using props, just be careful that you don't go overboard with them.
Instead, try to find ways to make the prop a meaningful part of the photo rather than just something for your kid to hold.
A favorite toy or stuffed animal is a great choice, though you can have them hold their big brother or sister's hand, cradle their sibling in their arms, hold the dog's leash, and so forth.
It doesn't have to be fancy to have a great impact on the shot!
Learn More:
- Easy Portrait Photography Tips for the Fall
- How to Learn Portraiture: Why Your Family is the Ideal Subject
Don't Worry About Getting the "Perfect" Portrait
 Image Credit: AleksandarNakic via iStock
Not even professional portrait photographers take perfect portraits, so if you're just a casual photo-taking parent, don't bother stressing about having something that's completely spot-on.
Instead, work to master a few basic technical and artistic skills that will empower you to take improved photos, and let the subject of your photos - your kids - be the meaningful and perfect part of the portrait.
I find that the harder I strive for perfection when I'm taking portraits of my son, the less perfect the photos are.
So, just go with the flow, be okay with making mistakes, and enjoy the process!
Learn How to Edit Your Photos
You can concentrate on the composition of your photos and the gear you use and the camera settings you dial in all you want, but if you don't know how to edit your photos, you're missing out on a very important step in the process.
Now, this doesn't mean that you need to enroll in a Lightroom class at your nearest college or university, but having at least a working knowledge of how to process your images will get you much better results.
Lightroom can be a little intimidating at first, so for a complete introduction to Lightroom CC, check out the video above by LightroomTV.
Image Credit: Geber86 via iStock
Something else you need to do is invest in a plugin that enables you to tag your photos (i.e., identify them based on subject matter) for better organization and to make your images easily searchable.
If you're like me, you have thousands of photos of your kids already, with thousands more to come over the years.
With all those images floating around, it's imperative that you keep them as organized as possible. Excire can help you do that.
Excire has two plugins - Excire Search and Excire Search Pro - which use artificial intelligence to make quick work of tagging and organizing your images.
Excire Search, for example, has 125 keywords for common objects that it automatically applies to images.
So, if you take a photo of your kid at the beach, Excire will automatically tag the photo with "beach."
Not only that, it'll also identify the predominant color of the shot and can recognize faces, too.
If the beach shot is of your little boy on a sunny day with a big blue sky, Excire will tag the shot with "blue," "male," and "child."
Just imagine how much easier it will be to find specific photos using this method rather than scanning through thousands of images on your computer!
Excire Search Pro takes things one step further with over 500 common keywords that adds even greater functionality.
Just like Excire Search, Excire Search Pro gives you the ability to search your images by keyword (i.e., "beach") and by example (i.e., if you select a photo of your kids skiing, Excire will find other photos of your kids skiing).
On top of that, Excire Search Pro has a keyword transfer function that allows you to apply the plugin's keywords to the entire Lightroom catalog, which makes searching and organizing your old photos a much easier process as well. It's the ultimate Lightroom hack! And since there's a 30-day free trial, you have nothing to lose.
Learn more about this exciting software in the video above by Anthony Morganti.
 Image Credit: fizkes via iStock
Capturing great photos of your kids doesn't require tons of training or lots of expensive photography gear.
In fact, concentrating on a few details in the planning stage, while taking photos, and the post-processing stage will help you create images that turn into lasting memories.
Utilize these tips, and you'll see what I mean about improving the quality of the images you take of your kids!
We Recommend
Simple Lightroom Editing Tips for 2021
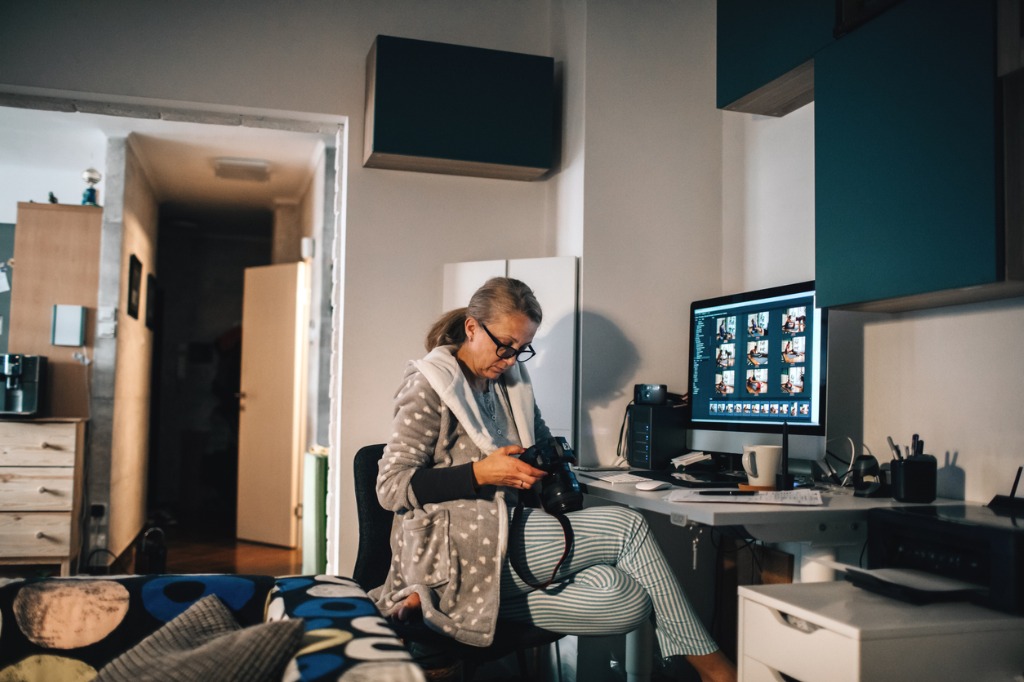
photo byfilmstudio via iStock
If you’re new to Lightroom, or even if you’re just trying to be more honest with the way you edit your images (I’m looking at you, presets), you may be feeling a little overwhelmed.
But, with the help of Nigel Danson’s simple Lightroom editing tips, you’ll be editing like a pro in no time.
While you should obviously watch his entire video, I’ve pulled out a few of my favorite simple Lightroom editing tips for you below.
Closely Examine Your Photo

photo byandresr via iStock
Before you do anything else with an image in Lightroom, take your exposure slider and push it all the way down. This will allow you to see where all of the detail in your photos is located, since it will darken parts of the image without as much detail.
Then, do the exact opposite. Take your exposure slider and push it all the way up. This will, once again, allow you to see a ton of detail in your photo that you otherwise wouldn’t have seen if you hadn’t checked it before you began.
By messing with the exposure slider before you actually start editing your image, you’re figuring out what details you want to get from your finished image.
Mess with Your Contrast

photo byrecep-bg via iStock
One of my favorite simple Lightroom editing tips is to mess with your image before you’ve even begun to edit it.
Just like you changed the exposure in the tip above, you’ll now change your contrast. Adjust your contrast slider all the way to the left, examine the photo, then slide it all the way to the right and examine the photo again.
This will allow you to figure out where you should slightly increase or decrease your contrast before you get too far into the editing process to recognize something this basic.
Importantly, you will have to know how to use local adjustments to change the contrast on specific parts of your images. If you don’t already know how to do this, then you could benefit from this Nigel Danson video.
Learn More:
Focus on Local Adjustments

photo byRossHelen via iStock
I’ve noticed that a lot of beginner Lightroom tips really focus on changing an entire image. Or, worse, they’ll focus on using presets from other photographers in order to edit their images.
While there is a time and place for global adjustments to your photos, not enough photographers are focusing on local adjustments in their images. This means that a lot of the detail in your photos is likely being lost. Doing this may also make your images look to be of a lower quality. It’s something I can automatically pinpoint when I’m scrolling through Instagram and I’m sure you can too.
So, while you’re learning how to edit photos in Lightroom, actually learn how to edit your whole image. Try not to touch the adjustments on the far right of the screen too much before you start changing only certain aspects of your photo.
Never Think an Image is “Too Far Gone”

photo byMorsa Images via iStock
One sort of toxic idea in the beginner photography community is that you can mess up your editing so badly that you need to pull up a copy of your original file again and start over. But, if you’re following all of the simple Lightroom editing tips that you should be, then there’s really no way to ruin an image in Lightroom.
For instance, let’s say that you accidentally overexposed your image, like the one shown above. The detail that you think you’ve lost is still there in the photo to some degree. You just have to get it back.
And you can by using local adjustments to reduce the exposure wherever you need to.
HDR Isn’t Outdated

photo byFilippoBacci via iStock
HDR used to be associated with pretty terrible images that a lot of photographers were obsessed over in the early 2000s.
But, there’s a time and a place for everything when you’re learning how to use Lightroom, even HDR.
In order to use some of these simple Lightroom editing tips, you’ll need to adjust the way that you’re shooting. This is one of those tips.
So, while you’re out shooting, take the same image two or three times. Take it where you normally would, then go down a stop or two and take the image, then go up a stop or two and take the image. This will allow you to have a broader dynamic range when you actually edit your image.
Given the fact that most of these simple Lightroom editing tips don’t take any real time from you, it may be wise to play around with your exposure in this way while you’re shooting to see if you can’t really change how great your images look.
Don’t Be Afraid to Reduce Clarity
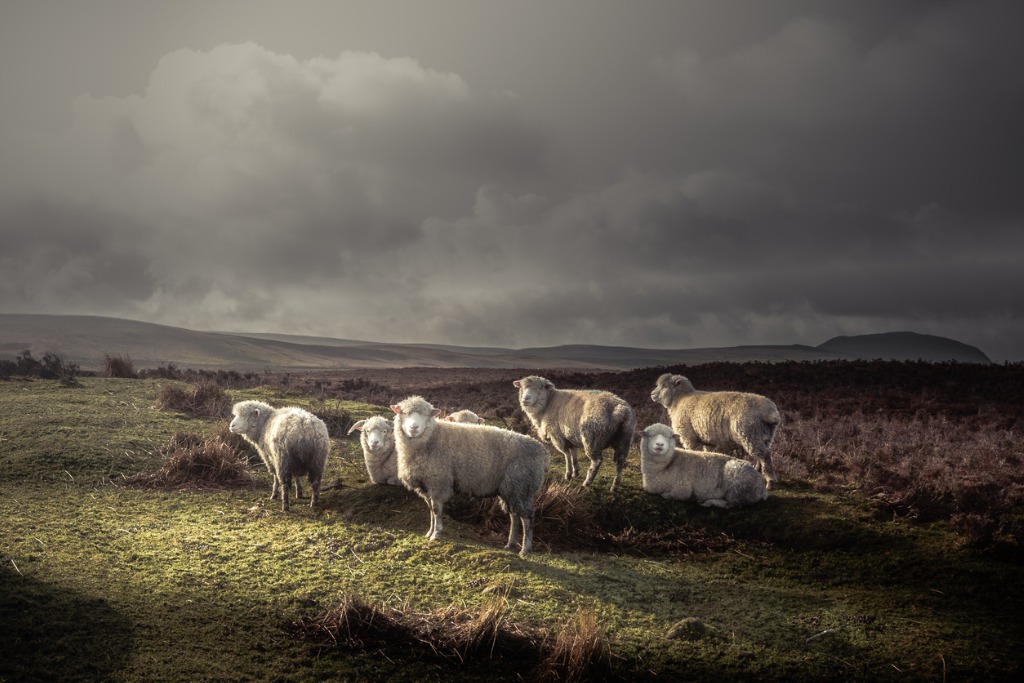
photo byAlan Currie via iStock
A lot of Lightroom tips for 2021 are all about increasing the clarity of your images. People are almost afraid to lose any detail.
While I love a crisp, clean photo, I also understand that there are certain photos which call for a little added moodiness.
It’s why you shouldn’t be afraid to reduce the clarity of your images. Sometimes, by reducing the clarity, you’ll actually add a feeling of ethereal beauty to them.
Alright, guys. I hope you’ve enjoyed this list of simple Lightroom editing tips. Let me know which ones you end up trying!
Learn More:
We Recommend
Step-by-Step Instructions for Creating HDR Panoramas

Creating HDR panoramas used to involve a ton of work, but with recent upgrades to Adobe Lightroom, you can now stitch together HDR RAW files to create stunning images of wide vistas in far less time.
Basically, the process involves creating HDR DNG files using Lightroom’s photomerge option. Then, you compile all the HDR PNG files into one huge RAW file panorama. From there, you simply retouch the large HDR panorama file as you would any other RAW file, then import it into Photoshop for final finishing.
For a more detailed overview of the process, check out Serge Ramelli’s in-depth tutorial below:
Amazon Recommendations
- The HDR Book: Unlocking the Pros' Hottest Post-Processing Techniques (2nd Edition)
- HDR Photography: From Snapshots to Great Shots
- The Adobe Photoshop Lightroom CC / Lightroom 6 Book: The Complete Guide for Photographers
We Recommend
Step-by-Step Post-Processing Tips for Long Exposures

So, you’ve done all the work to get the right gear for long exposures, you’ve learned how to compose and create long exposures, but forgot that after all that work, there’s still some attention that the images need in post-processing.
Though it might seem like a daunting task, Serge Ramelli offers up his tried-and-true workflow for shooting and processing long exposure images. In the video below, he takes us to Quend Plage in the North of France to create the images, then takes us step-by-step through Lightroom to get the post-processing just right. Serge is one of the best in the business, so sit back, relax, and learn a lot about the art of processing your long exposures!
Amazon Recommendations
- Adobe Lightroom 6 / CC Video Book: Training for Photographers
- Adobe Creative Cloud Photography plan (Photoshop CC + Lightroom)
- Photography Night Sky: A Field Guide for Shooting After Dark
We Recommend
The #1 Mistake You’re Making With Lightroom
 Image Credit: jacoblund via iStock
I don't know about you, but when I was learning how to use Lightroom back in the day, I made a ton of mistakes.
There's so many tools in Lightroom that it can be a little overwhelming at first, but like anything else, with some practice, it becomes a much smoother process.
Learning a few Lightroom hacks doesn't hurt, either...
With that in mind, here's a few insider tips to help you avoid mistakes in Lightroom and speed up your workflow all at the same time.
Lightroom Mistake #1: Manually Tagging Your Photos
Photo by Joseph Pearson on Unsplash
One of the distinct advantages that Lightroom has over Photoshop is that it is a far superior program for organizing your images.
The problem is that you have to manually tag your images in order for them to be organized - an incredibly tedious process, especially if you have a lot of images to import.
Yet, most Lightroom users keep manually tagging their images, which is a huge mistake!
That's because now there's a pair of Lightroom plugins called Excire Search and Excire Search Pro that use artificial intelligence to tag your photos for you.
It works like this...
When you import an image, Excire analyzes the content of the image and automatically tags it based on its subject matter and how the images look.
For example, Excire Search is pre-loaded with 125 common keywords for tagging, so if you import a batch of landscape photos, it'll automatically tag every image with a tree with it with that keyword.
Not only that, Excire Search will also tag images based on how they look, so that shot you took of the sunrise that's predominantly pink will be tagged "pink."
Not bad, eh?
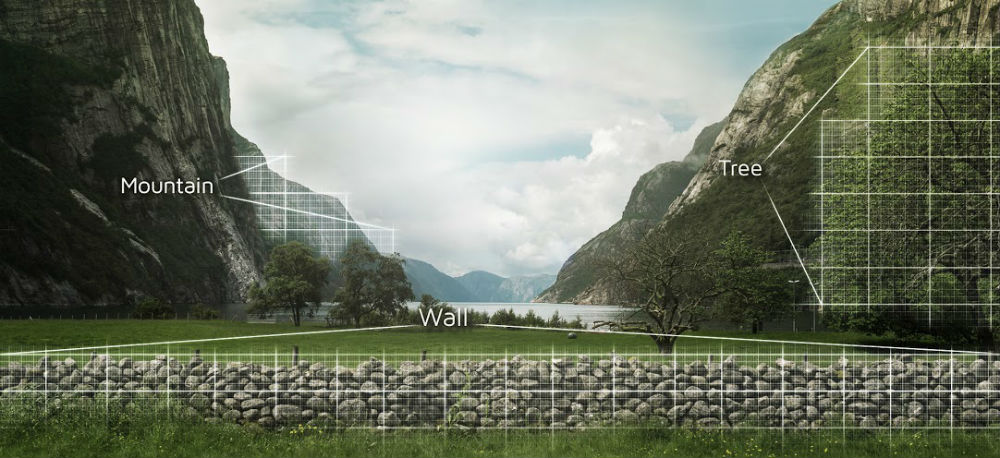
With Excire Search Pro, things get even better.
There's over 500 keywords that can be used for tagging, organizing, and searching your images.
Better still, Excire Search Pro allows you to transfer those keywords to your existing image catalogs in Lightroom.
Whether you have 100 images in your catalog or 80,000 images in your catalog, Excire Search Pro will make it an organized, easily-searchable library of images.
And, let's not forget - Excire Search and Excire Search Pro eliminate the need to manually tag your photos. That fact alone is worth the price of admission if you ask me!
Don't think that this is a plugin just for the pros, either.
Brand new photographers, amateurs, and enthusiast photographers also stand to benefit from the organizational and search-related benefits of Excire. It's simply the best plugin you can get right now for Lightroom. After all, that's why Excire just won the Best Software Plugin Award from the Lucie Technical Awards!
See just how easy it is to use Excire in the video above by Anthony Morganti.
Learn More:
Lightroom Mistake #2: Relying Too Much on Presets
 Photo by
 Don't get me wrong - the ability to use presets in Lightroom is a Godsend and allows you to apply selected edits to each image.
Not only does that speed up your workflow by light-years, but it also helps you create a collection of images that have a cohesive look.
The mistake with presets occurs when you rely on them too much.
That is, you can get a little too comfortable with using your presets, and your photos can start to look way too uniform.
What's more, presets should be used as a tool to speed up editing, not be an end-all, be-all editing process.
So, get your presets setup, use them to get your photos close to how you want them, and then use Lightroom's abundance of tools to fine-tune each image.
The result of doing so will be a collection of photos that still has continuity, but with each image having its own personality.
Lightroom Mistake #3: Getting Wild With Clarity, Dehaze, and Vibrance
 Image Credit: robertiez via iStock
Three of the most popular tools in Lightroom are Clarity, Dehaze, and Vibrance because they can add an extra level of visual punch to an image.
The mistake occurs not in using these tools but in overusing these tools to the point that the photo no longer looks natural.
In the case of clarity and dehaze, both work on the contrast in the image. As such, you should use one or the other, as using both will result in a very obviously overprocessed image, especially if you use them both at a high level.
Vibrance boosts the saturation of mid-tone colors, which is clearly a great tool for adding a little more life to images.
But, just like clarity and dehaze can be overused, so too can vibrance.
To get the most out of these three adjustments, it's best to use them in small doses as a means of fine-tuning your shots.
Learn More:
Final Thoughts
Though this is by no means a comprehensive list of all the things that can go wrong in Lightroom, it's certainly a start.
By far, the most common mistake people make with Lightroom is spending all their time and energy tagging photos when something like Excire can do it for them.
Likewise, you can speed up your workflow and produce better-looking images if you make smart use of presets and other tools like clarity, dehaze, and vibrance.
Ultimately, you obviously want your final images to look their best, and taking a measured approach to editing is often how to get the best look.
For more details on other Lightroom mistakes to avoid, have a look at the detailed Lightroom tutorial above by B&H Photo Video.
We Recommend
The Best Free Software Trials for Photographers
 Image Credit: Rawpixel via iStock
Like cameras, lenses, and other photography gear, the software that photographers need to process images isn't always cheap.
What's more, when you find a cheap suite of tools, it usually performs like a cheap suite of tools.
Every so often, though, you can find free software trials that give you access to extremely powerful photography tools, if even for just a week or month. But in that time, at least you can get a feel for the program and what it can do to help you create better images.
That, in turn, can help you make an informed decision about the software you need to buy.
With that in mind, here's 10 of the best free software trials for photographers for 2018.
Adobe Photoshop
 By Fred the Oyster [Public domain or CC BY-SA 4.0 (https://creativecommons.org/licenses/by-sa/4.0)], from Wikimedia Commons
Yep, the king of photography software offers a seven-day free trial.
And don't think that the free trial is some sort of limited experience, either...
You get access to every tool and every function of the latest version of Photoshop CC.
Even better, Adobe has made the process of converting the free trial into a full-blown Creative Cloud membership a breeze either during or after the trial period.
Get an Adobe Photoshop 7-Day Free Trial
Adobe Lightroom
 By Adobe Systems [Public domain], via Wikimedia Commons
Not to disappoint photographers that want to try Lightroom, Adobe also offers a free seven-day trial of that program as well.
Just like with Photoshop, the Lightroom trial gives you unfettered access to the complete and latest version of the software.
And, again, Adobe has made it easy to convert the free trial into a Creative Cloud membership during or after the trial.
What's more, if you decide to join Creative Cloud, you can get access to hundreds of Adobe videos on how to use Lightroom (and Photoshop, for that matter) for all skill levels of users. Nice!
Get an Adobe Lightroom 7-Day Free Trial
Kizoa

Kizoa is a movie-making software platform that's been around since 2007, and offers photographers a quick and easy way to create professional videos.
Given that video content is king these days, it makes sense to dip your toes into videography if you haven't already.
What's great about Kizoa is that unlike many other software platforms, you pay a one-time fee and you're a member for life.
In fact, not only does Kizoa offer a free-for-life plan to get you started, but they also have a free iOS app as well.
Then, when you decide to upgrade, plans start at just $29.99. Not bad!
HDRsoft Photomatix
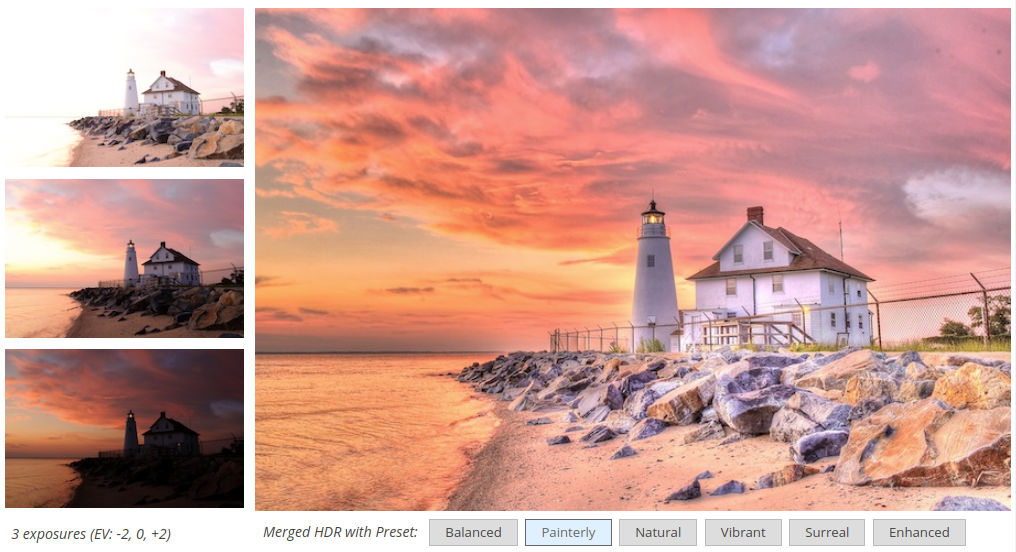
Creating gorgeous, well-exposed images has never been so easy with HDRsoft Photomatix.
Photomatix Pro, for example, gives you both a standalone program and a plugin for Lightroom to maximize its functionality.
The program also offers a wide range of settings, including one-click presets and batch editing to make quick work of your HDR creations.
Better still, the free trial never expires, so if you're good with the Photomatix logo appearing on your final images, you never have to pony up any money.
There are also versions for real estate photography, Linux, a plugin for Aperture, and more!
Get an HDRsoft Lifetime Free Trial
Corel PaintShop Pro 2018

Yep, the photo editing choice of the 1990s is still going strong in 2018 with fresh updates and a 30-day free trial offer.
With tools that are similar to Photoshop, PaintShop Pro offers a good level of functionality for enhancing photos and completing graphic design work.
Perhaps even better, there's no subscriptions attached to the software, so it's a much more affordable option than the Creative Cloud memberships offered by Adobe.
Plus, you can really dive deep into PaintShop Pro 2018 with that massive 30-day free trial!
Get a Corel PaintShop Pro 2018 30-Day Free Trial
Corel Aftershot Pro 3 RAW Photo Editor
If you're looking for an editing suite to tackle RAW photo editing in large quantities, you might give Corel's Aftershot Pro 3 a look.
With all-new tools, image presets, and plugins, Aftershot Pro 3 is a powerful platform for extracting all the color, contrast, and drama that your RAW files hold.
And, like PaintShop Pro, there are no subscriptions to worry about.
Corel also claims that Aftershot Pro 3 is up to four times faster than Lightroom, so that in and of itself might be worth checking out the free 30-day trial!
Get a Corel Aftershot Pro 3 30-Day Free Trial
Luminar 2018

Skylum's Luminar 2018 is an award-winning editing suite for both PC and Mac.
Luminar offers an incredible array of tools, including 45 intelligent filters and 67 smart presets that help make editing photos a more streamlined and successful process.
And like Corel's products, you pay one time for access to Luminar and you're done - no ongoing memberships!
Luminar also works seamlessly with Lightroom and Photoshop, so you can easily switch between Adobe and Luminar for maximum photo-editing capabilities.
Get a Luminar 2018 14-Day Free Trial
Pixlr Pro
What sets Pixlr apart from other editing tools is that it's web-based.
And don't think that because it's web-based that it skimps on the suite of available tools and features...
Instead, Pixlr Pro offers tons of fonts, ready-to-use templates, and over 1 million stock photos, too, which you can browse during a seven-day free trial.
You can use layers, masks, brushes, curves, levels, and most of the other popular tools from the likes of Photoshop and Lightroom as well.
There is a free photo editor called Pixlr Editor, so if all you need is light editing tools, that's a great alternative (if you don't mind seeing ads as you work).
Get a Pixlr Pro 7-Day Free Trial
Affinity Photo

Hailed as a professional photo-editing suite, Affinity Photo might not get all the love that Photoshop and Lightroom enjoy, but it offers plenty of oomph for editing photos nonetheless.
In addition to having RAW editing capabilities and easy HDR tools, Affinity Photo also offers focus stacking, the ability to create panoramas, batch processing, .PSD processing, and even 360-degree photo editing.
You can clone, dodge, burn, liquefy, make lens corrections, and much, much more.
The 10-day free trial will give you plenty of time to explore all these tools, and more!
Get an Affinity Photo 10-Day Free Trial
ON1 Effects 2018

Yet another worthy free photography software trial is the 30-day freebie offered by ON1 for their Effects 2018 software.
ON1 Effects 2018 includes hundreds of tools, including presets and filters, textures, and borders that help you fine-tune your images to create the final product you want.
You can create HDR images, convert color images to black and white, crop, straighten, reduce noise, and more.
If you like Effects 2018 and buy the complete version, you'll get access to training videos, online classes, and top-notch customer service, too.
Get an ON1 Effects 2018 30-Day Free Trial
We Recommend
The Way You’re Cataloging and Organizing Your Photos in Lightroom is All Wrong
 Image Credit: Aramyan via iStock
Here's the thing...
Lightroom is a fantastic program that offers not just excellent photo-editing tools but is also a great way to organize your photos.
Typically, cataloging photos in Lightroom goes something like this:
- Add a new album
- Name the new album
- Select the photos you want to be in the album
Then, if you want your albums to be in folders, you have to add a folder, add the desire albums to the folder, and name the folder.
On top of that, if you want to see the photos in each album, you have to select the Album section from the Info panel, select a photo in the corresponding grid, and click on the "Info" button to see where the photo is located.
 Image Credit: Anchiy via iStock
Organizing photos in Lightroom isn't much easier:
- In the Photo Grid, Square Grid, or Detail view, select the photo(s) you wish to tag
- Click View>Keywords
- Manually enter the desired keyword(s) for each photo
I'm here to tell you that this way of cataloging and organizing your photos is simply all wrong...
Learn More:
How to Organize Photos in Lightroom
If you really want to take control over the power of Lightroom as a tool for organizing, cataloging, and making your photos easily searchable, manually tagging everything and making folders and albums isn't the way to do it.
Instead, you can enhance your Lightroom experience by using an awesome plugin I came across a few months ago: Excire.
Excire offers two plugins, actually.
Excire Search is a high-performance search engine that allows you to create collections and make your photos incredibly easy to search.
For example, after you install the plugin and initialize your Lightroom catalog, you can search your catalog for specific images based on certain criteria.
To search by example, you select one or more images for Excire to reference, and then it will automatically create a Lightroom collection with images similar to the reference images.
That means if you want to create a catalog of images that feature mountains, Excire will do it for you while you sit back and watch. See what I mean in the video below by Suzette Allen:
You can also use Excire Search to create collections and search images based on keywords. If you're looking for that boat photo you took a few months ago, Excire will find it.
As if that's not good enough, Excire Search allows you to search images by faces. Using its intuitive facial-analysis interface, you can search based on one, two, or more faces. You can even select age groups, gender, and search for photos based on whether someone is smiling or not.
Crazy right?!
Learn More:
Expand Lightroom's Functionality With Excire Search Pro
Excire Search Pro steps it up a notch with added features that make it a great option for amateur and professional photographers alike.
Where Excire Search offers 125 keywords, Excire Search Pro has more than 500 to expand your cataloging and search capabilities.
Also, in addition to all of the features of Excire Search noted earlier, Excire Search Pro allows you to transfer keywords. That means that keywords extracted by Excire can be transferred to Lightroom and then used as if you manually entered all the keywords yourself.
Just imagine all the time and energy you can save by having Excire do all the heavy lifting for you!
And I know what you're thinking...
"I don't need a fancy AI-powered plugin to help me in Lightroom." Maybe you'll be convinced after watching the video below:
I'm telling you, though, even if you picked up a camera last week and have only begun to dabble in photography, Excire is a tool that you can use forever, and it will only increase its worth to you as you upload more images to Lightroom.
As someone that has tens of thousands of photos in my Lightroom catalogs, Excire has been a Godsend, and it will be for you as well. So, stop using Lightroom like the old days and step into the future with Excire. It's the best Lightroom plugin out there!
Learn More:
We Recommend
These Lightroom Hacks are a Godsend for Any Photographer
 Photo by Glenn Carstens-Peters on Unsplash
If you're like me, you love the process of taking a photo a lot more than you love sitting at your computer and organizing images, searching for images you need, and editing your photos.
Thankfully, there are a lot of people that are a lot smarter than I am who have made the process of using Lightroom much, much easier.
From keyboard shortcuts that make quick work of tasks to ingenious Lightroom plugins that help you automatically tag photos, there are a ton of awesome Lightroom hacks that you really need to know.
Here are just a few of my favorites...
These Lightroom Keyboard Shortcuts Will Save You Tons of Time
Just like in Photoshop, using keyboard shortcuts in Lightroom can prove to be a game-changer in terms of speeding up your workflow.
For example, pressing E toggles the Library Module and pressing D toggles the Develop Module.
These shortcuts can speed up the process of editing because Lightroom performs faster in the Library Module. That means that when you need to find a photo, toggling back and forth to the Library Module will make quicker work of that task.
Likewise, pressing L dims the lights in Lightroom and another press turns them off. This is helpful on occasions when you want to look at a photo without any distractions.
Another easy, yet profoundly helpful shortcut is SHIFT + F, which eliminates the grey bar at the top of the screen.
Doing so gives you a little more real estate to actually see your photo as you edit, while also getting rid of an element on the screen that can be distracting.
For even more Lightroom shortcuts, check out the video above by Chris Eyre-Walker.
Learn More:
The Best Lightroom Plugin for Organizing and Searching Your Photos

Let's face it - the most time-consuming and laborious aspect of using Lightroom is having to tag all your photos upon upload.
But there's a Lightroom plugin called Excire that makes the process of tagging, organizing, and searching your photos a veritable breeze.
The Excire Search and Excire Search Pro plugins are, in a word, amazing.
Using artificial intelligence, these plugins will automatically tag your photos for you by analyzing the subject matter in the photo as well as how the photo looks.
Let me explain...
If you're using Excire Search, you get access to 125 common keywords (i.e., bike, boat, or mountain) that are used to tag your photos.
What's more, Excire Search understands how the images look as well, so if the predominant color in the shot is blue, it'll be tagged as blue.
With Excire Search Pro, there's even more keywords at your disposal - currently over 500 of them, in fact.
That means that you have an even greater ability to tag and organize your images, and your ability to find specific images within your Lightroom catalog becomes instantly better.
With the power of automatic keywording, any photographer - whether you're a stay-at-home mom with tons of photos of your kids or a seasoned professional that wants to clean up your Lightroom catalog - Excire can be a difference-maker in how you work.
And since both versions of the plugin are priced so well, you don't have to be a world-class photographer with a bank account to match in order to reap the benefits of these incredible plugins.
If there's one thing you do to improve your Lightroom workflow, adding an Excire plugin should be at the top of your list!
Get more details about Excire in the video above by Anthony Morganti.
Learn More:
Apply During Import to Give Each Gallery a Cohesive Look
 Photo by Fernando Hernandez on Unsplash
One of Lightroom's best features is the ability to apply a given preset to an entire gallery of images upon import.
Not only does this save you a mountain of time but you can also develop your personal editing aesthetic and easily apply it to each image you upload.
Using this feature allows you to mass upload images without having to spend hours and hours making the same basic edits to each shot.
Instead, you can fine-tune each image to perfect the look while maintaining the cohesion of your aesthetic throughout the gallery.
Learn More:
Final Thoughts
 Image Credit: scyther5 via iStock
When it comes down to it, getting all of the potential out of Lightroom is a simple matter of knowing shortcuts, making smart decisions about plugins, and relying on built-in features that will help you streamline your workflow.
Heck, even simple things like using the HSL slider to make very fine, granular edits to your images can have a profound impact on how they look.
With the Lightroom hacks I've outlined here, you have a few avenues for achieving beautiful edits that you might not have had before.
Now all that's left to do is to apply these hacks and get to editing!
We Recommend
These Photography Tips Will Help You Streamline Your Post-Processing Workflow
 Image Credit: jacoblund via iStock
If you ask me, the biggest problem with inefficiencies when processing images isn't the tools we use, but poor habits that we've grown accustomed to that stand in our way.
That's a problem, especially for professional photographers because time is money, and every minute spent in the post-processing phase is one less minute available to work directly with clients.
In this tutorial, I share a few key tips for supercharging your post-processing workflow that will help you minimize post-processing time and maximize the time you have to actually take photos.
Editor's Tip: Streamline your post-processing workflow by using Excire to automatically tag your photos in Lightroom. Explore Excire and start your free trial today!
Refine the Culling Process
 Photo by Andrew Neel on Unsplash
Streamlining the way you process your images begins with culling the collection down to the images you wish to work on.
The problem that many people run into at this point is that they treat the process of culling images as though they're somehow permanently getting rid of the images they don't select.
Obviously, that's not the case.
Rather than hand-wringing over this image or that one, try to refine the culling process by going with your gut and your first impression as you look at each image. Rather than waffling between one of three very similar images, just pull the trigger on one of them and move on.
In other words, you were there when you took the photo, so you know what each moment was like. Focus on how you felt at that moment and try to choose the images that best capture that feeling. Doing so can save you tons of time as you begin post-processing.
Learn More:
- The Way You're Cataloging and Organizing Your Photos in Lightroom is All Wrong
- These Products and Services are Innovating Photography as We Know It
Make Keywording in Lightroom Simpler
 Photo by Christin Hume on Unsplash
I don't know any photographers that particularly enjoy manually keywording images when they're imported into Lightroom.
In fact, it's one of my least favorite things to do, so I usually don't do it.
That's a big problem, of course, because I have thousands of images in my Lightroom catalog that have no keywords, so finding the images I'm looking for is difficult.
At least, that used to be an issue...
Now I use Excire Search Pro to keyword my images automatically.
This award-winning Lightroom plugin utilizes artificial intelligence to analyze each image I upload to Lightroom, and based on its analysis, it applies appropriate keywords.
That means that photos that include a beach have "beach" automatically applied. Those with a car have "car" automatically applied, and so on.
But beyond that, Excire Search Pro has a keyword transfer feature that allows me to use its 500 keywords on my existing Lightroom images.
That means that all of those photos I never bothered to keyword are now keyworded by Excire based on content, as described above, how they look (i.e., if the predominant color in the shot is blue, it'll be tagged, "blue"), and features of people in the shot, such as "man" or "woman," "child" or "adult."
If it sounds too good to be true, it isn't! It's an incredibly handy tool that can literally save you hours and hours of work over the course of a year.
Better still, if you don't need the professional-level functionalities of Excire Search Pro, you can opt for Excire Search, which has the same search features but has 125 keywords - a perfect number for casual photographers.
Either way, if streamlining your post-processing workflow is what you're after, this is the way to do it!
See Excire in action in the video above by Anthony Morganti.
Learn More:
Learn How to Batch Edit
Being able to apply your edits to an entire series of photos will save you loads of time because you won't have to make the same minute changes over and over again.
What's more, by batch editing your images, you can create a consistent look across a collection of images that results in a beautifully cohesive look.
There are two primary options when batch editing photos in Lightroom - using a preset or by applying the edits you've made to a new photo to other photos.
While utilizing a preset is much faster - it can be done as images are being imported into Lightroom - you don't have the same level of fine control over the images.
That is, if you're working on a series of 10 images, you can develop a more precise look by editing the first image in the series and applying those edits to the other nine images that what can be accomplished with a preset.
Not sure how to batch edit in Lightroom? Give the video above by Kevin Fremon a quick look.
Learn More:
- The #1 Mistake You're Making With Lightroom
- How to Turn Your Photography Hobby Into a Full-Time Career
Wrapping It Up
 Photo by John Schnobrich on Unsplash
As I noted in the introduction, processing images usually hits a snag when you fall into an old, inefficient habit.
But by implementing the tips I've outlined here, you can break free of those inefficiencies, maximize the usefulness of programs like Lightroom, and make editing your photos a much cleaner and simpler process.
Doing so means that you'll spend less time at home staring at your computer screen and more time actually out taking photos. Who doesn't want that?
We Recommend
This Incredible Technique Allows You to Add Dynamic Skies to Long Exposures

If you’ve mastered the art of taking long exposure photos (or even if you haven’t), the video below is well worth a watch.
Sometimes you find a scene that makes for a great long exposure subject, but perhaps you’re there at a time when the skies are uninteresting. But Serge Ramelli has a detailed method for adding amazing skies to give the scene a visual boost.
In his tutorial you YouTube, Ramelli gives step-by-step instructions that are easy to follow and which help you create a truly stunning image. Have a look at the video below and learn how to take your long exposure photos to the next level using simple tricks in Lightroom!

Amazon Recommendations
- Adobe Photoshop Lightroom 6
- The Adobe Photoshop Lightroom CC Book for Digital Photographers (Voices That Matter)
- Time Lapse Photography, Long Exposure & Other Tricks of Time: From Snapshots to Great Shots
We Recommend
Top 10 Gifts for Photographers Under $150

Believe it or not, the Holdays are almost upon us! Since it's never too early to start shopping for your favorite photographer-type people, we're helping get you off to an early start. As always, we've listend to our members and followed the buying trends to bring you our lists of gifts sure to please any photography or cinematography buffs on your list. Here's the first for this year, with ten great gift ideas under $150.00. Happy shopping!
1. Syrp Variable ND Filter

A Neutral Density (ND) filter is one of the most creative tools you can give a photographer or cinematographer. It enables creative effects by allowing wider apertures and/or slower shutter speeds in bright lighting conditions. The most well-known examples are probably those dreamy, foggy effects created by moving water in stills and elimination of “roll” in videos. This rugged, variable version eliminates the need to carry several ND filters by allowing from 1 to 8.5 stops of exposure reduction with one filter!
2. Datacolor® Spyder®LENSCAL

SpyderLENSCAL provides a fast, reliable method of measuring the focus performance on your camera and lens combinations. It allows photographers to obtain razor-sharp focusing or check to see that their lenses are working at their peak performance.
3. WoodSnap

Imagine your favorite photographer's work printed directly on wood! Give him or her a vibrant, 16” x 20” wood print, complete with mounting slots and ready to grace his, her (or your) wall! Each genuine wood print is completely unique. Upload a photo from Facebook, Instagram or your computer, or email it in to get started.
4. Spider Holster

Conventional camera straps are clumsy, hard on your neck and shoulders and not the fastest way to access your DSLR. The Single Camera System from Spider Pro transfers the weight to your hips and allows an incredibly quick draw of a full-size DSLR with lens when that killer shot comes up. It's revolutionary, rugged and perfect for active photographers.
5. Perfectly Clear

Perfectly Clear Complete for Photoshop and Lightroom offers incredibly effective, one-click enhancement of images. You can use the 40 built-in presets or easily create your own with precise control. With this bundle, you'll get complete control over exposure, contrast, noise reduction, and color. Portrait photographers can also quickly enhance the eyes, skin, face, teeth and much more in one easy-to-use package.
6.Wolverine F2D Mighty

Most photograhers have stacks of negatives and slides just begging to be converted to digital images, and who doesn't have a bunch of old home movies to digitize? The Wolverine Digital Converter makes it easy to create high-resoultion (up to 20MP) digital files from film and positive transparencies. Give the gift of preserved memories.
7. Promaster Multi-Function IR Timer Remote/Intervalometer

Time-lapse sequences are among the most fun and rewarding things you can do with your DSLR. With this intervalometer, you can control your sequences remotely on most brand-name DSLRs and for those that don't have IR sensors, you can add an optional cable to use it wired. Of course, it also works as a standard remote shutter release with a little extra control, like controlling the number of exposures in continuous mode, all from up to 30 feet away.
8. Sirui T-004X Aluminum Tripod with C-10S Ball Head

This aluminum travel tripod from Sirui is compact and weighs in at just 2 pounds. Its legs reverse fold, so its closed size is just 15.7 inches. The adjustable center column can be replaced with the short center column for low angle shooting and three leg angle settings let you keep shooting on uneven terrain. Despite its small size, it can support up to 13.2 pounds and has a maximum height of 58 inches. The tripod even comes with a ball head with safety-lock Arca-type compatible clamp with quick release plate.
Learn more about the Sirui T-004X Aluminum Tripod with C-10S Ball Head.
9. Aquapac SLR Camera Case with Hard Lens

How awesome would it be to shoot underwater with your DSLR? The Aquapac can make that happen! Not only is it guaranteed to let you shoot under up to 15 feet of water, it will float if you drop your camera overboard, and doubles as a protective “rain suit” to keep out moisture, sand and other contaminants. It also comes with an adjustable neck cord and moisture-detecting desiccant packets. Open up a whole world of new possibilities with this gift.
Glide Gear DEV 235 Camera Track Slider 23.5"

One of the coolest things you can do with videos and time-lapse sequences is to add smooth, controlled camera motion. This simple slider enables that without a lot of expense, but without sacrificing quality. It mounts to a tripod or can be set up on almost any surface with the adjustable legs and rubber ball feet. It accepts almost any digital camera, camcorder or video camera, so there's no need to worry about what your favorite photographer shoots with!
We Recommend
Transform Daytime Photos Into Black & White Masterpieces in 5 Easy Steps
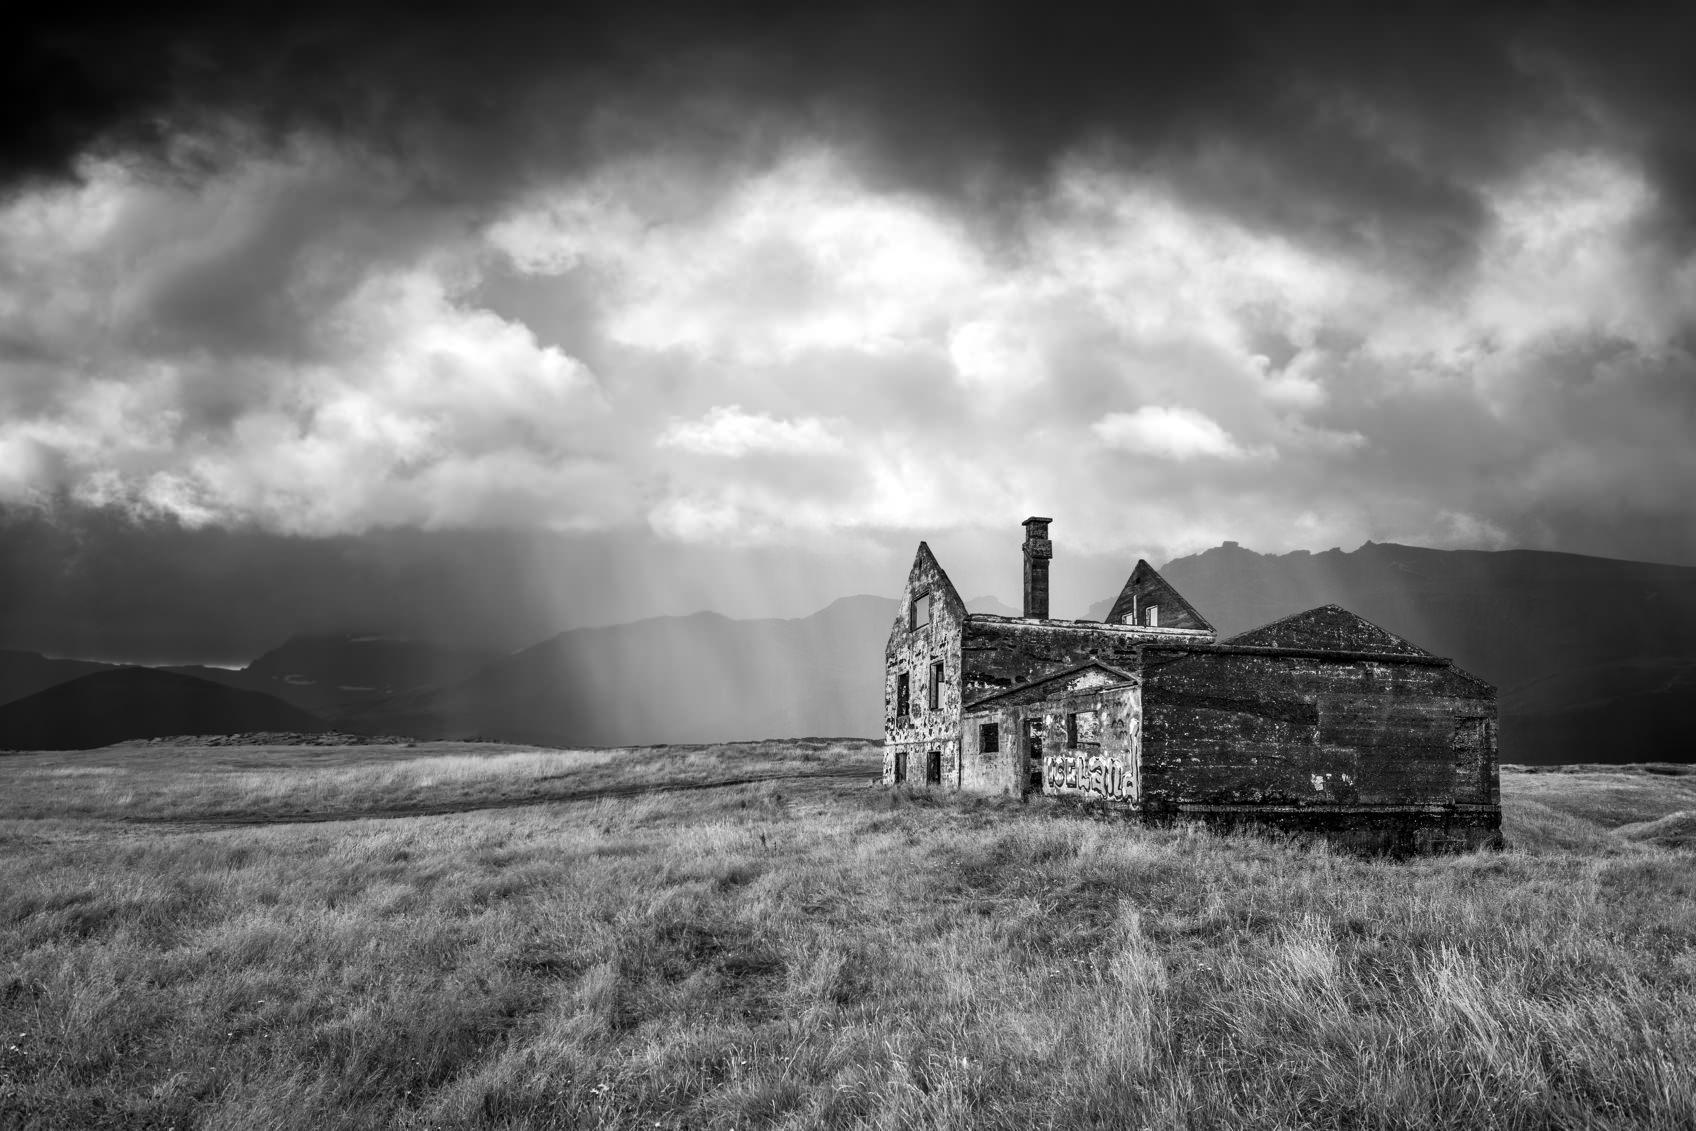
We all know that Golden Hour is the ideal time for outdoor photography, but sometimes shooting in the early morning or late evening hours just isn’t in the cards. That means from time to time we have to grit our teeth and deal with the harsh, mid-day sun that tends to make photos less than appealing.
However, Serge Ramelli has created a short 5-step process for taking drab daytime photos and transforming them into stunning black and white images. All you need is a bit of time and patience, Lightroom CC, and follow along in the tutorial he’s created below. In no time, you’ll have incredible black and white photos that will make friends and family say “WOW!”
Amazon Recommendations
- Art of Black & White with Photoshop: A Comprehensive Course on Professional Black and White Photography
- Mastering Black & White Photography
- Creative Black & White: Digital Photography Tips & Techniques
We Recommend
Use These 5 Lightroom Tips to Instantly Improve Your Portraits

Ok, ok...
So in order for these Lightroom tips to work, you first have to capture a quality photo in the field. If you put a crap picture into Lightroom, no amount of editing will do you any good!
However, if you've done things the right way and you have a solid portrait with which to work, there are tons of tools at your disposal in Lightroom to enhance your photo.
In the video above, Julia Trotti offers up some great advice for improving your portrait editing workflow.
Follow along as she describes each tip, or for a quick rundown of each, check the article below!
Set the White Balance
 YouTube Screenshot/Julia Trotti
First things first...
You want to correct any color-related issues in your photos by adjusting the white balance.
In Lightroom, that's a simple task that's accomplished by using the white balance slider in the Basic Panel to warm up or cool down the image.
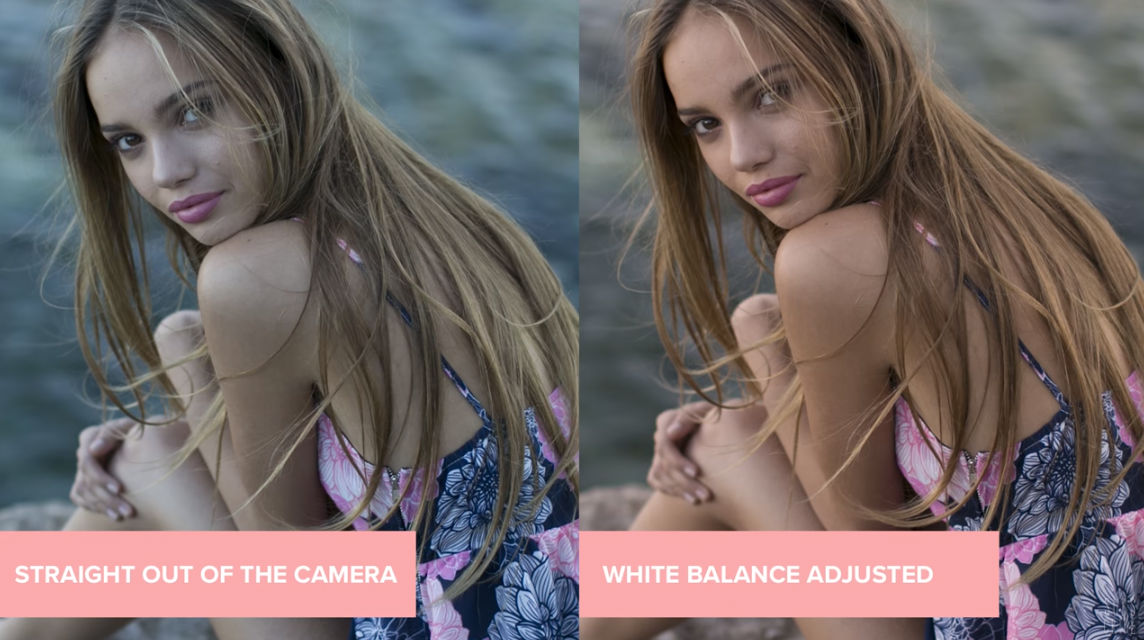 YouTube Screenshot/Julia Trotti
You can also adjust the tint, to correct for skin tones that are too pink or too green.
The final result?
Natural-looking skin tones that form the basis of a high-impact portrait
Learn More:
Even Out the Lighting
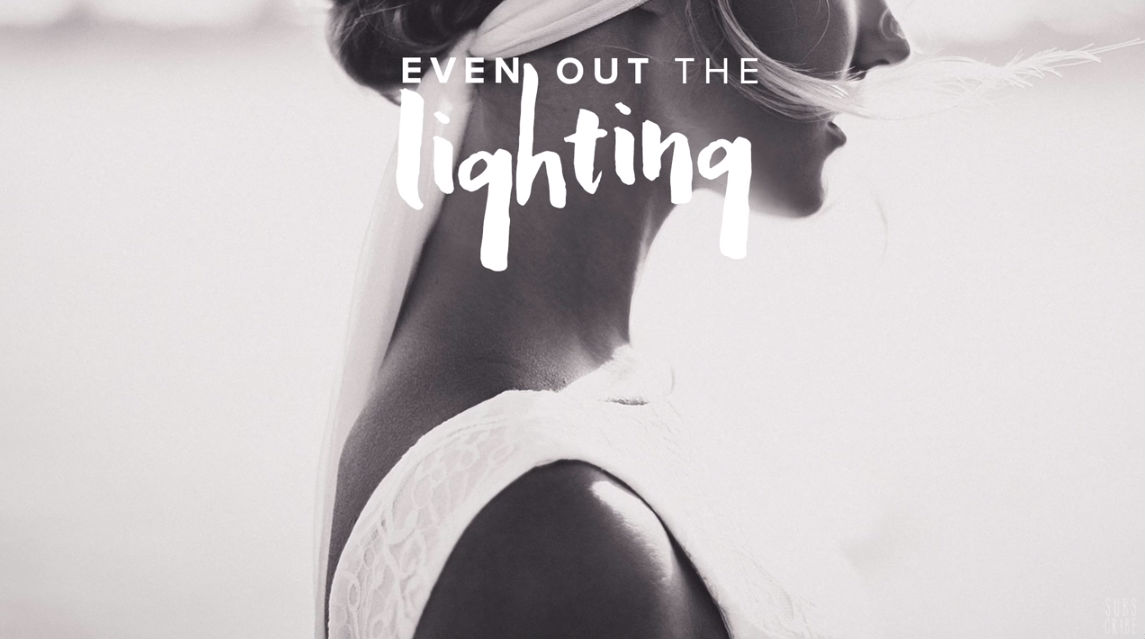 YouTube Screenshot/Julia Trotti
Out of the camera, your image will not have ideal lighting.
But, again, Lightroom offers tons of tools that help you adjust the lighting in the shot for something that's much more dramatic and eye-catching.
In the Basic Panel, simply adjust the sliders for exposure, contrast, highlights, shadows, whites, and blacks.
 YouTube Screenshot/Julia Trotti
Doing so gives you pinpoint control over the lighting in the shot, helping you to create a gorgeous look.
Additionally, by manipulating these settings, you can help draw the viewer's eye to the model's face by brightening their face or eyes.
Though there's tons of sliders involved in lighting, once you get the hang of using them, you can make quick work of correcting the lighting in your portraits.

Use Split Toning to Add Personality to the Shot
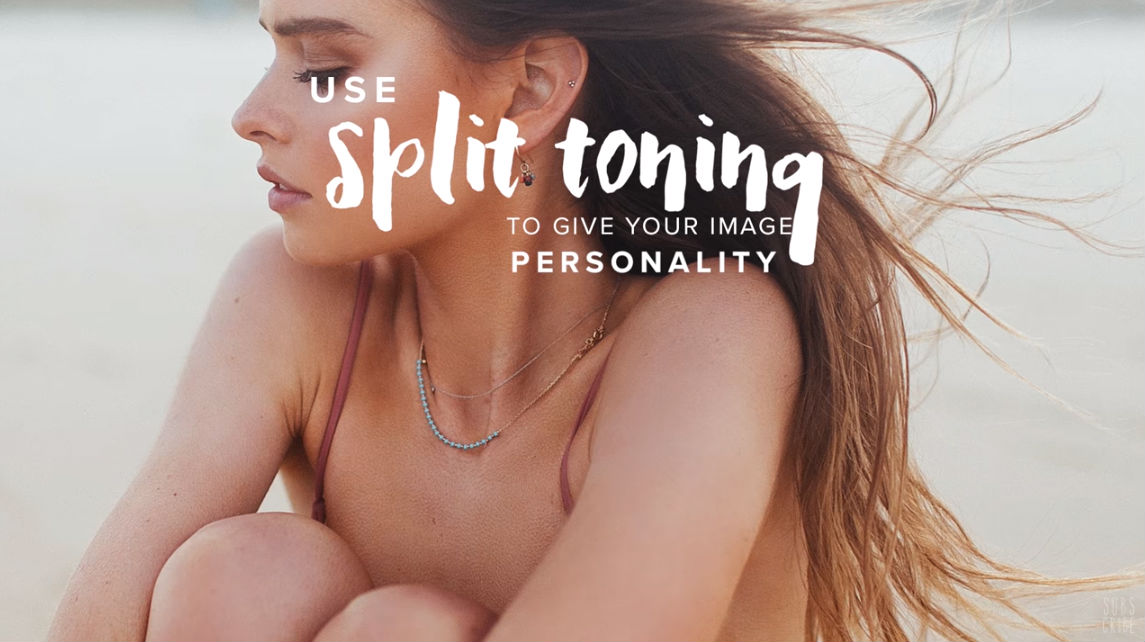 YouTube Screenshot/Julia Trotti
By using Lightroom's split toning feature, you can add color to the highlights of the image while adding a completely different color to the shadows.
For example, if you need to warm up the skin tones of your subject's face, you can add a warm tone, like red, to do so.
At the same time, if you want to cool down the background, you can add a cool tone, like blue, to give it that cool effect.
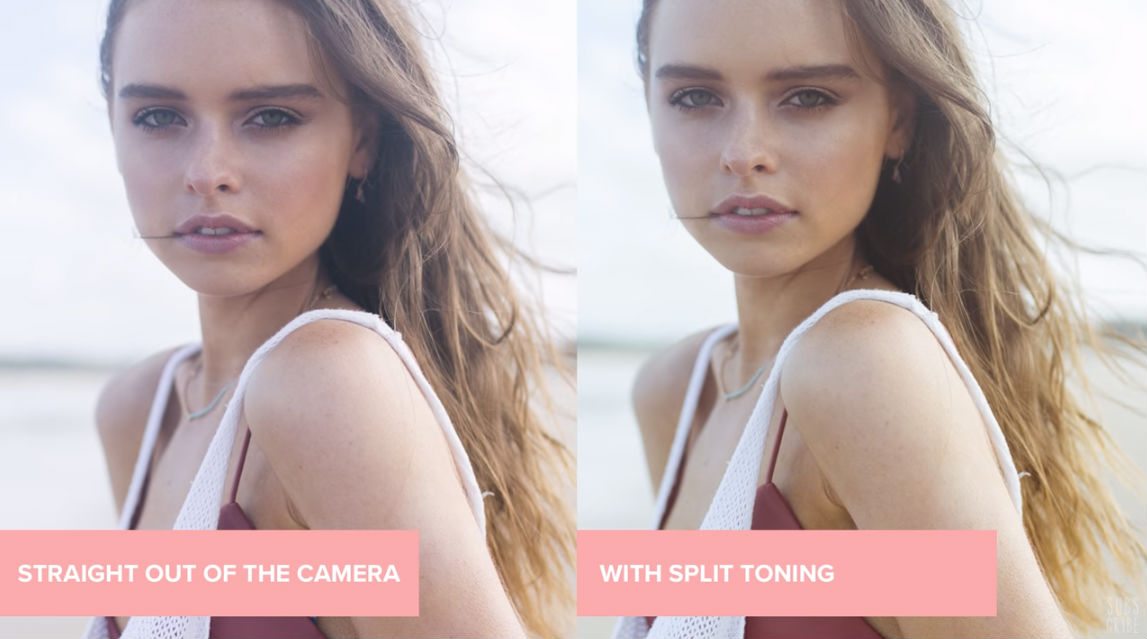 YouTube Screenshot/Julia Trotti
The great thing about split toning is that it gives you yet another level of control over the style of your image.
That is, you can adjust the intensity of both colors, their saturation levels, use preset colors in Lightroom, or select your own colors to use.
In that regard, it's one of the most powerful tools Lightroom offers for creating photos that have your signature style.
Learn More:
Keep an Eye on the Skin Tone
 YouTube Screenshot/Julia Trotti
Despite all the tools and features Lightroom offers you to customize the look and feel of your portraits, one thing should remain the most important - that the model's skin tone looks natural.
As you're adjusting the lighting, using split toning, and other tools to enhance the shot, just make sure that what you're doing doesn't alter what the model's skin tones look like.
To fine-tune how skin tones appear in your shots, use the Hue, Saturation, and Luminance (HSL) tools.
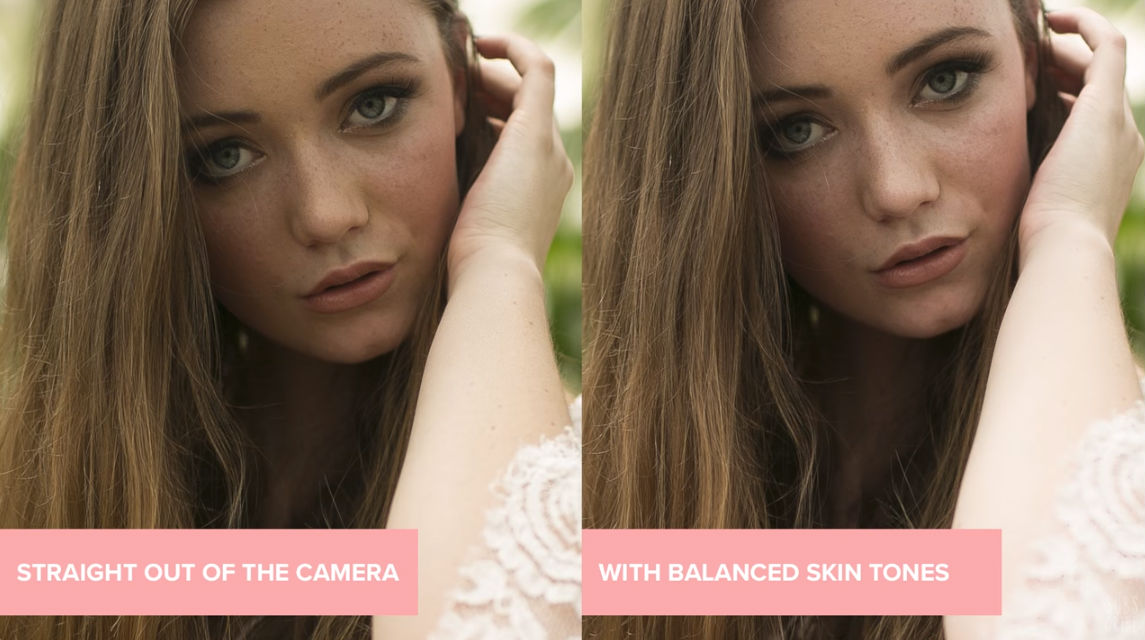 YouTube Screenshot/Julia Trotti
This collection of sliders gives you incredible control over how colors are rendered in the shot.
In fact, you can use the color picker tool to select a specific tone in the image, and then use the HSL sliders to make adjustments only to that color.
It's an easy way to ensure your model looks their best in your portraits!

Make Use of the Adjustment Brush
 YouTube Screenshot/Julia Trotti
To make edits on even more specific areas of your portrait, you can use Lightroom's adjustment brush.
This brush gives you the ability to paint over an area of the photo, then adjust the settings specifically for that area.
You can use this tool to brighten areas of your subject's face, darken the background, and everything in between.
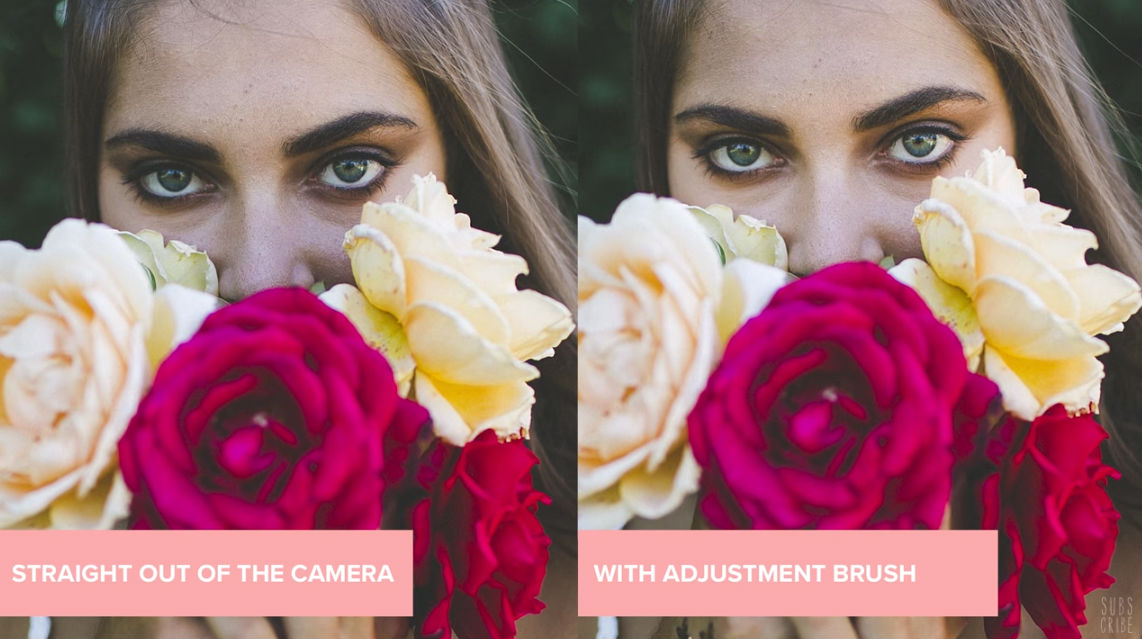 YouTube Screenshot/Julia Trotti
You can also use the adjustment brush to saturate or desaturate certain areas of your portraits.
Naturally, being able to brighten or darken specific areas and manipulate things like saturation only gives you that much more firepower for creating portraits that fulfill your creative vision.
And that's what these tips are all about - empowering you to use Lightroom to create photos that fit your personal taste and style!
Learn More:
We Recommend
What is Chromatic Aberration? (And How to Fix It in Photoshop or Lightroom)
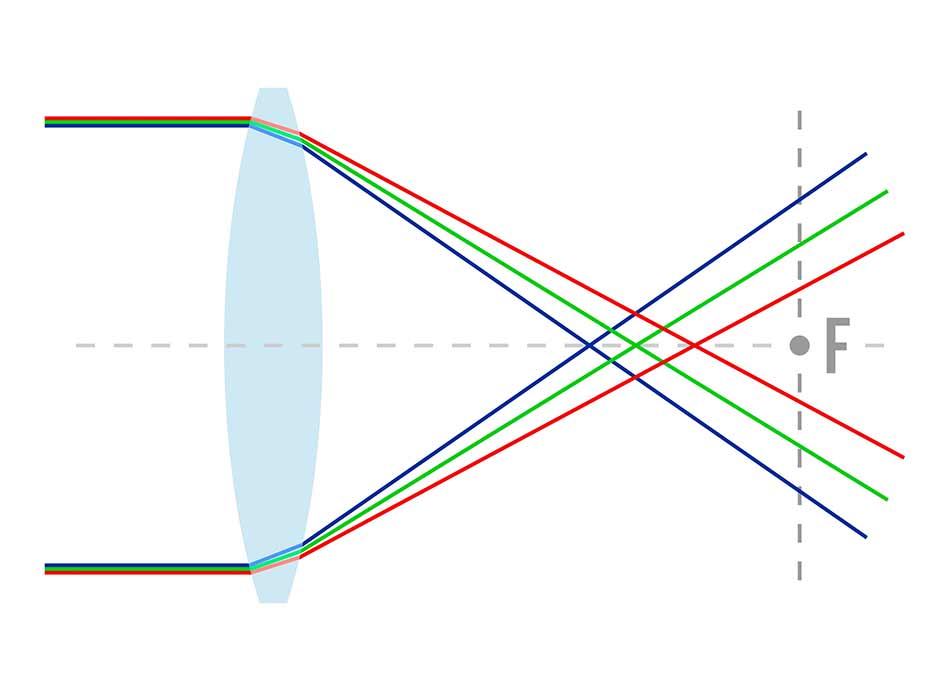 Image Credit: Barbulat via iStock
Chromatic Aberration
Chromatic aberration is a common problem in photography, yet many photographers aren't quite sure what it is, let alone how to fix it.
In this tutorial, you'll not only learn what chromatic aberration is but also the different types, how it impacts how your images look, and how to make corrections in Photoshop or Lightroom such that your final images are clear and crisp without ugly artifacts.
Let's get started!
What IS Chromatic Aberration?
Known as color fringing or purple fringing, chromatic aberration is an optical issue that happens when one of two things happen.
First, it occurs when a lens cannot focus all the wavelengths of color onto the same plane. Second, the problem can also occur when wavelengths of color focus on different areas of the focal plane.
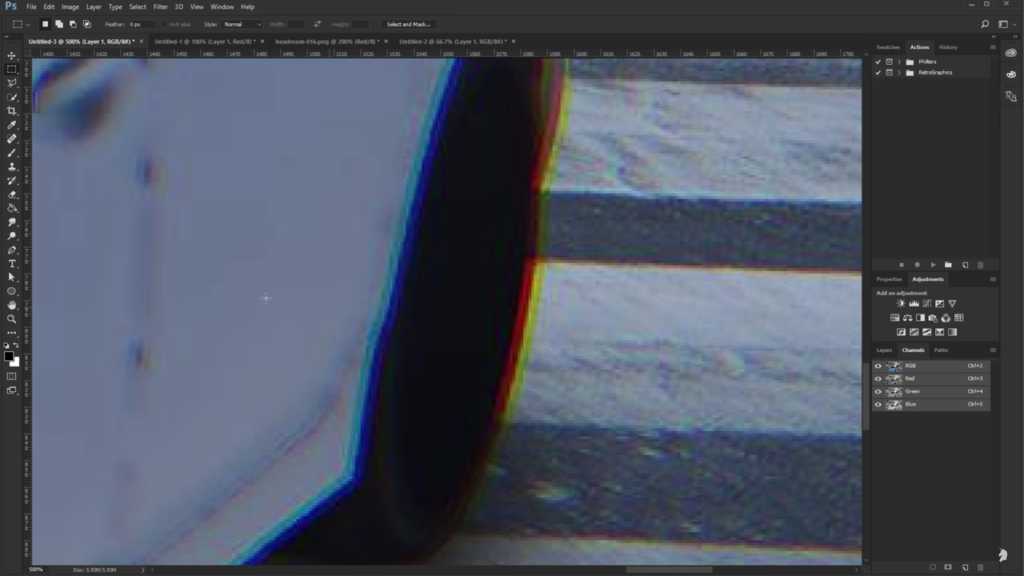 YouTube Screenshot/Pixel Prophecy
In the image above, you can see how pronounced this fringing can be.
Fringing typically occurs most often in high contrast images and appears as green, blue, red, purple, magenta, or yellow artifacts around the edges of objects in the photo.
This phenomenon is caused by lens dispersion, which occurs as different colors travel at varying speeds through your camera's lens.
For a complete introduction to chromatic aberration - including a discussion of why it's important to know what it is and how it impacts your images - have a look at the video above by Pixel Prophecy.
Types of Chromatic Aberration
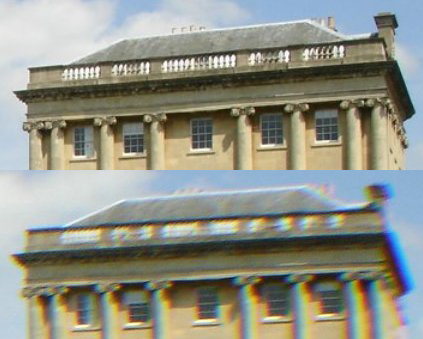 Image Credit: Stan Zurek [GFDL (http://www.gnu.org/copyleft/fdl.html), CC-BY-SA-3.0 (http://creativecommons.org/licenses/by-sa/3.0/) or CC BY-SA 2.5 (https://creativecommons.org/licenses/by-sa/2.5)], from Wikimedia Commons
There are two types of chromatic aberration: axial and transverse.
Axial aberrations, or longitudinal chromatic aberrations, occur when various wavelengths of light are focused at various distances from the lens, a process called focus shift. This type of aberration occurs most often when using longer focal lengths.
The result of axial aberrations is blurred colors both in front of and behind the focus point. It is most noticeable on the edges of very bright areas of an image.
Transverse aberrations, also known as lateral chromatic aberrations, happen when wavelengths of light are focused at varying spots along the focal plane. This is caused by the magnification of the lens as well as the distortion of the lens which both vary with wavelength. This type of aberration is more pronounced when using short focal lengths and appears as color fringing.
The image above shows an image taken with a high-quality lens with no chromatic aberration and a low-quality lens (bottom) that displays significant transverse aberrations.
Learn More:
How Do I Reduce Chromatic Aberration?
Fortunately, even though chromatic aberration is extremely ugly, there are things you can do to correct it in Photoshop.
In the video above, Jimmy McIntyre outlines five different ways to fix chromatic aberrations in Photoshop. These include using:
- Adobe Camera RAW or Lightroom Lens Corrections to reduce chromatic aberration
- Gaussian Blur and Color Blend Mode
- Clone Color
- Lens Corrections Filter
- Desaturation
Each of these techniques is really simple to implement and takes next to no time as well!
Learn More:
How to Remove Chromatic Aberration in Lightroom
If you primarily use Lightroom, fixing chromatic aberration is done easily as well.
In the video above, Phillip Haumesser Photography offers a detailed overview of the process.
As you can see, it only takes a couple of minutes to clean up the image and remove the color fringing.
I think you'll agree that the final result is a vast improvement!
The fact that it's so easy to reduce chromatic aberrations is a good thing, given that most lenses - even high-dollar ones with special extra-low dispersion elements designed to reduce aberrations - still have some fringing.
Luckily, with these tips, you can clean up your images and get rid of fringing in just a matter of minutes!
Learn More:
We Recommend
Why Lightroom Edits Go Wrong

One of the aspects of photography that beginners seem to fail at most is in the post-processing phase.
And believe me, I understand why...
Learning Lightroom and Photoshop was a time-intensive and at times frustrating task for me, and that was back in the day with neither program was as robust as it is now.
But there are common mistakes that people make when learning how to edit photos in Lightroom, and if you can avoid them, you'll have a better shot at a good final result.
James Popsys understands why Lightroom edits go wrong for beginners. He addresses that very topic in the video above.
Have a look and see if you're making these two critical Lightroom mistakes!
For a quick summary of James' points, check the outline below.
Editor's Tip: The process of creating a beautiful photo doesn't end with post-processing. It ends with getting a gorgeous print. See what your photos look like as fine art.
Lightroom Editing Problem #1: Feeling the Need to Manipulate Everything
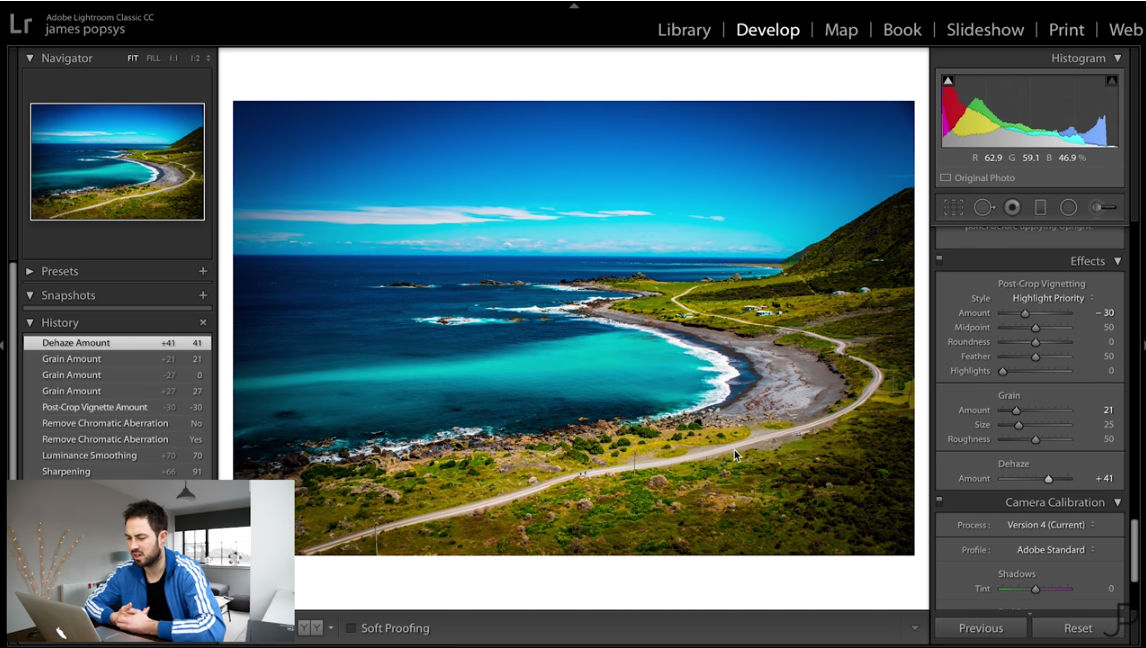 YouTube Screenshot/James Popsys
Lightroom is chock-full of powerful editing tools that you can use to make your photos look better.
But just because a tool is there and its slider looks so inviting to move left and right doesn't mean that you should.
In some photos, you'll need more contrast; in others, you won't.
In some photos you'll need to add a little clarity; in others, you won't.
In some photos you'll need to adjust the Curves or Levels; in others, you won't. You get the picture...
The point is that for the best results, only manipulate the settings that need to be manipulated. Less really is often more!
Learn More:
- Editing With Lightroom For Beginners: Tips and Tricks to Supercharge Your Photo Editing Skills
- How to Change Any Color in Lightroom
Lightroom Editing Problem #2: Adding and Removing the Same Edits
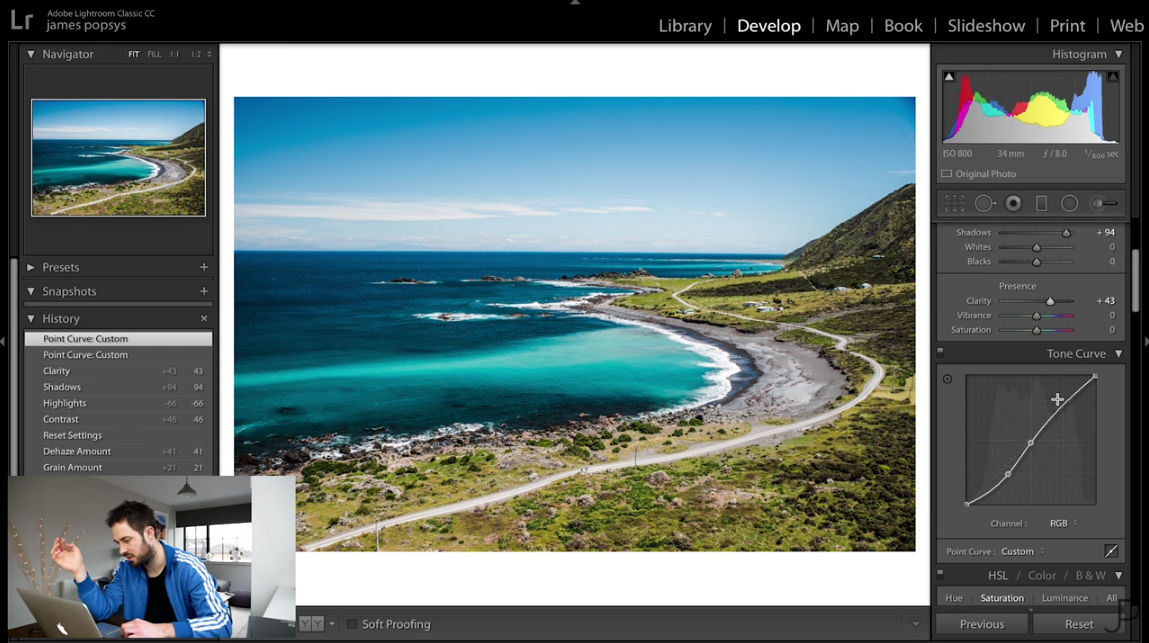 YouTube Screenshot/James Popsys
A common mistake that photographers make in Lightroom is adding an edit only to remove it (or add more of it) later on with another edit.
Here's a prime example...
You add contrast by moving the Contrast Slider to the right, then you remove contrast by reducing the Shadows, increase the local contrast again by moving the Clarity Slider to the right, then increase the overall contrast in the image yet again by manipulating the Curves into the often-recommended S-curve shape (as shown in the screenshot above).
I know it sounds crazy to do that, but in the heat of the moment editing photos, you'd be surprised how many photographers waste their time adding and removing the same effects over and over again.
In fact, as James notes in the video, he doesn't know of any photographer that didn't make this mistake when they were a beginner. I wholeheartedly agree!
Editor's Tip: Not sure what lens you should use to take portraits? Learn why an 85mm lens is ideal for portraiture.
Lightroom Editing Tips: How to Approach Editing the Right Way
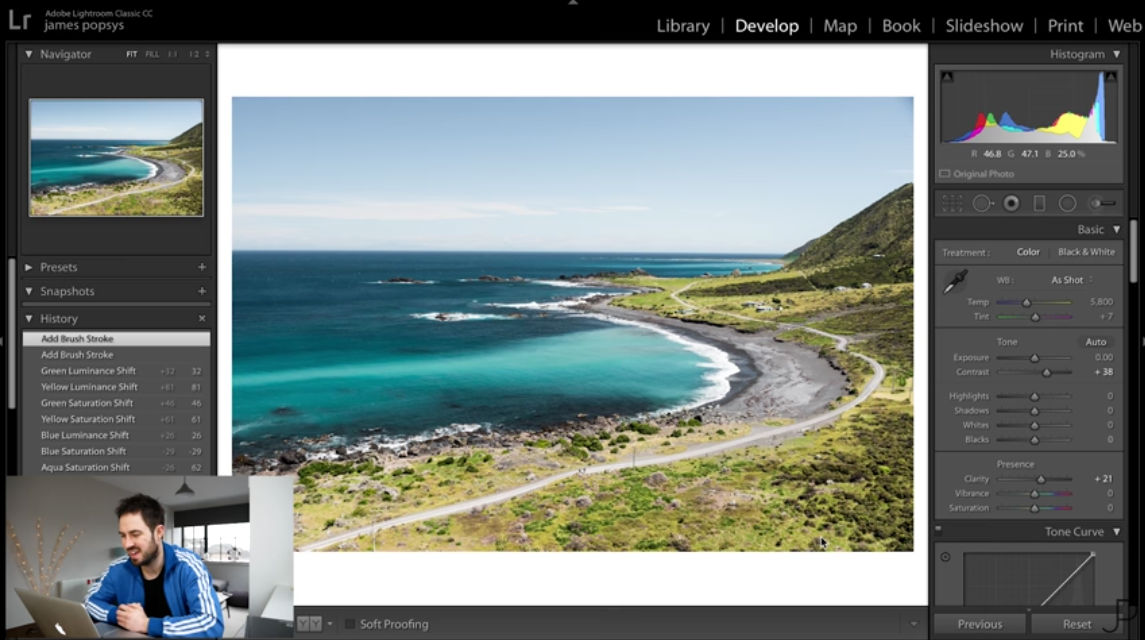 YouTube Screenshot/James Popsys
Let me start by saying that there is no one "right" way to edit an image...
As you develop your creative eye and get more comfortable with how to edit photos in Lightroom, you'll find that your workflow will very likely be different from everyone else's, and that's okay!
But simply pointing out the two biggest mistakes to avoid when editing in Lightroom isn't enough to help you progress. Instead, you need some pointers on what to actually do with your images as well.
James offers a great little tutorial in the latter half of the video above in which he explains how he would edit an image. It's less than three minutes of your time, and it'll be wildly beneficial to your images.
See what James does, check out the "Learn More" links in this article for further Lightroom tips, and get on track with your editing today!