
Critical Tips for Interior Real Estate Photography
- Best Camera Settings for Real Estate Photography Interiors
- What You Need to Do Before Taking a Single Real Estate Photo
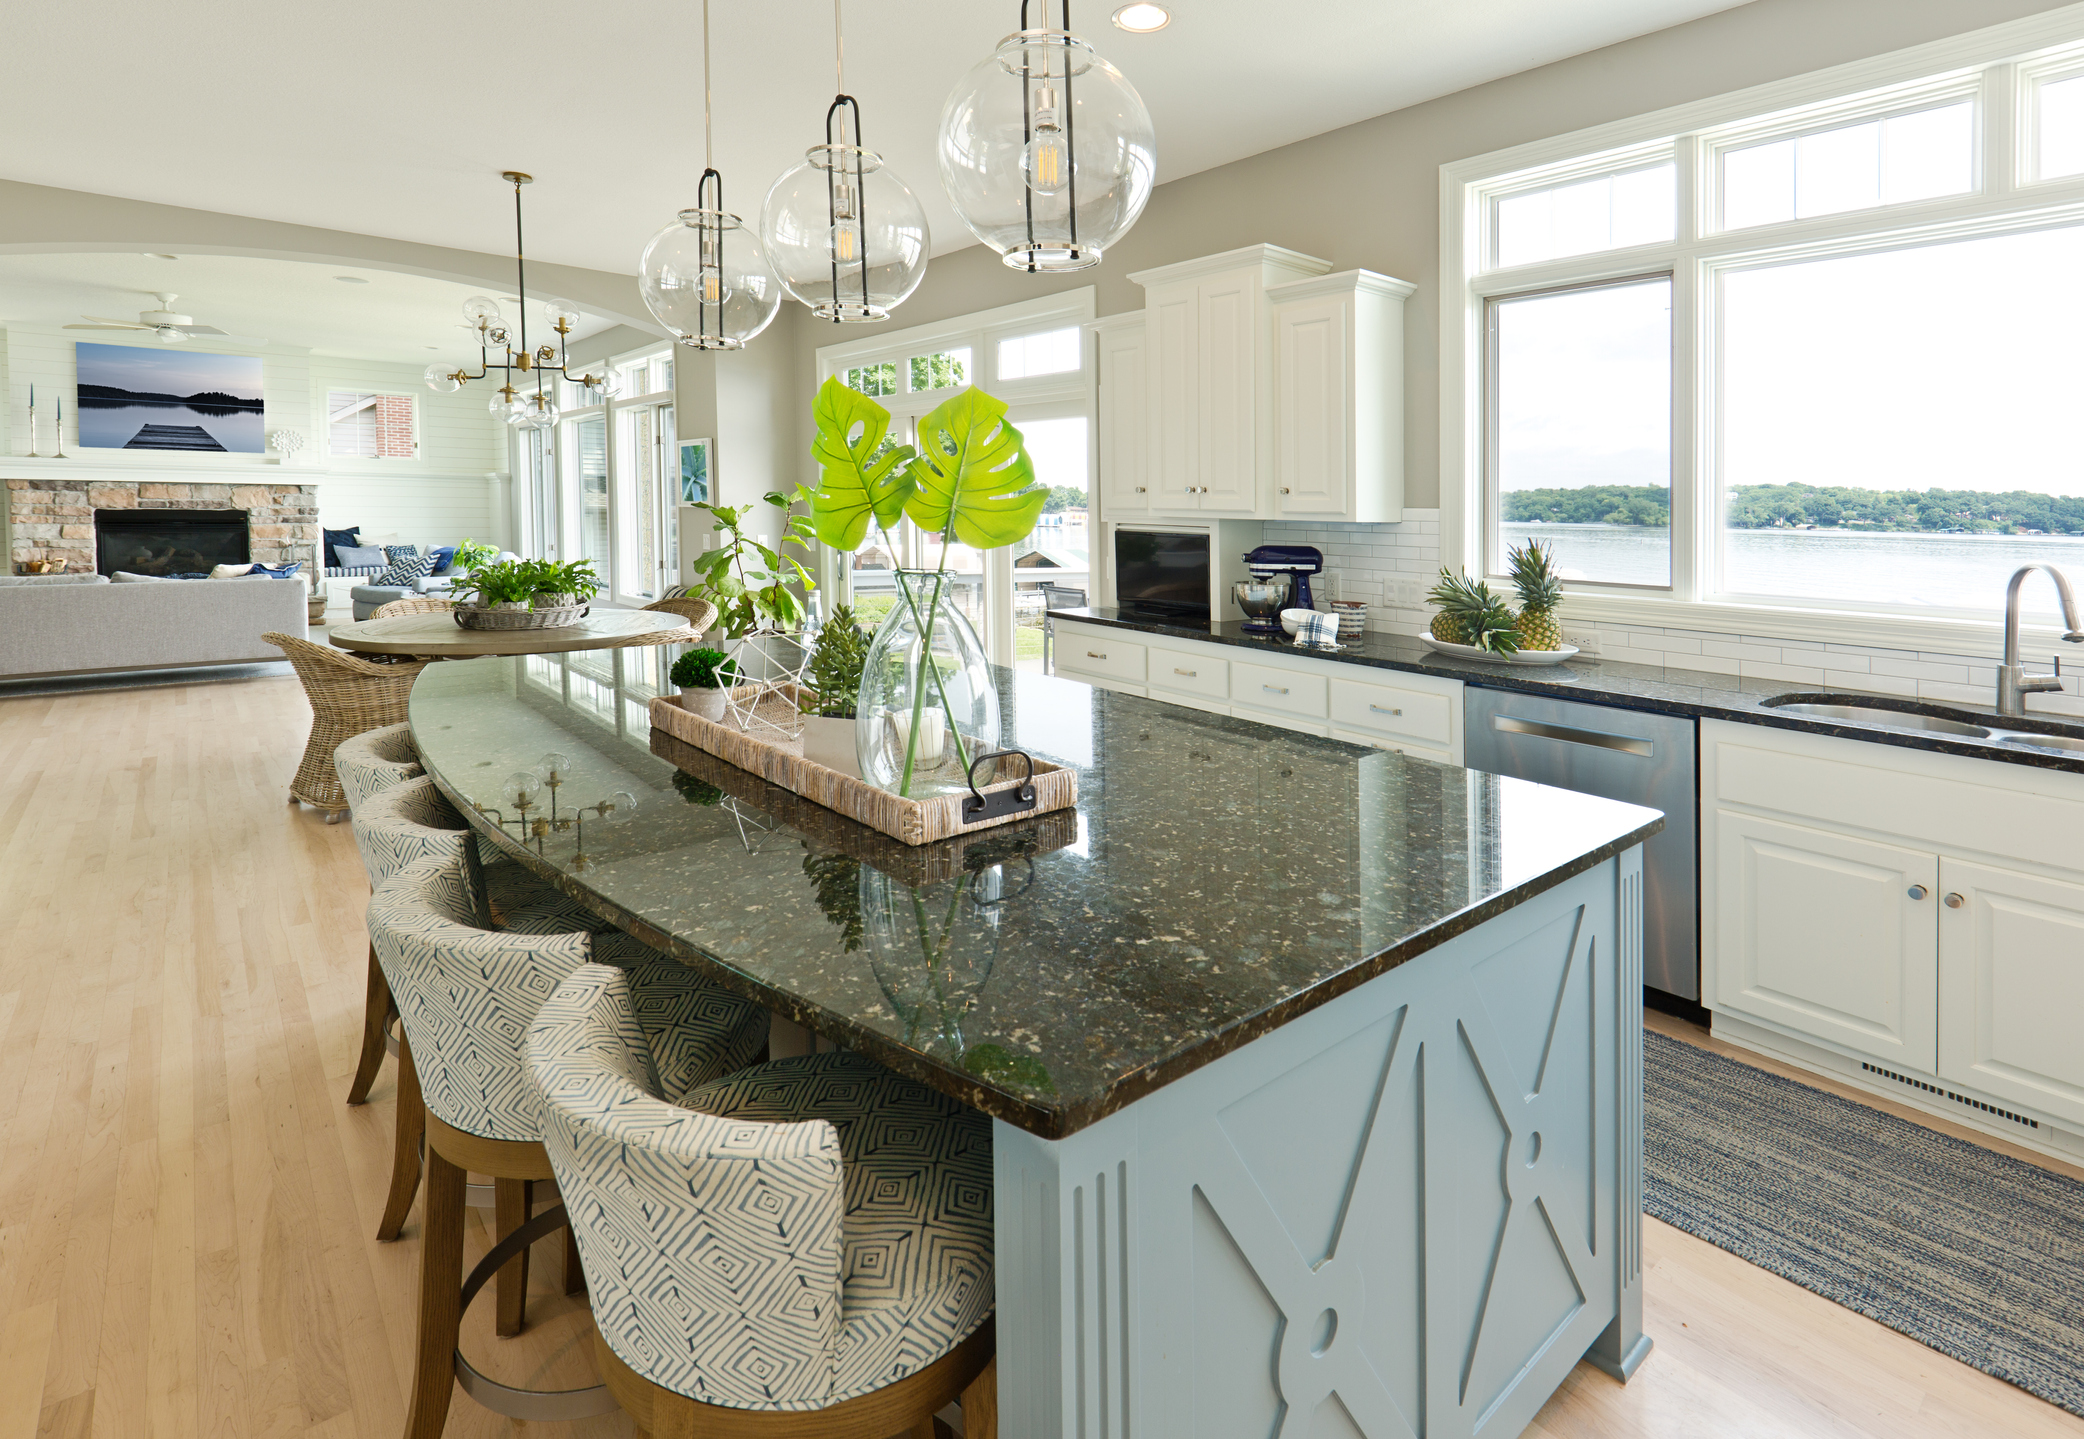
photo by YinYang via iStock
Though the exterior photos of a property will likely be the first ones that prospective buyers see, it’s often the interior shots that compel them to request a showing or put in an offer.
The interior of a home is where the story of the property is told - where they can envision themselves having family dinners, playing with their kids in the family room, and enjoying a soak in the bathtub in the master bath.
But getting high-quality interior photos of properties is much more than just pointing your camera and pressing the shutter button.
Instead, to get the best-quality images, follow these interior real estate photography tips.
Beware of Using Ultra-Wide-Angle Lenses

photo by gerenme via iStock
First and foremost, you want to avoid using wide-angle lenses that are too wide.
Lenses in the 10-12mm range often offer a fisheye look - with distorted and warped lines (the example image above is a panorama, not a single wide-angle shot, but it demonstrates how lines can appear warped). This is not what we want when photographing interior spaces!
Instead, use a wide-angle lens that allows you to capture most of the room in a single shot, but has less distortion - say, in the range of 24mm (or around 14-16mm on a crop sensor camera).
There are some caveats to this, however.
First, distortion is an issue with any wide-angle lens, so some measure of lens correction in post-processing will be needed for barrel distortion and chromatic aberration, even if you shoot at the narrow end of the wide-angle range, like 24mm.
Secondly, there are a variety of rectilinear lenses that go as wide as 10mm. These lenses are specifically designed to minimize or even eliminate the barrel and pincushion distortion that make straight lines appear warped. In that case, you can go much wider than you could with a traditional lens and still get stick-straight lines.
It’s important to have a lens that’s quite wide in your bag so you can get whole-room images in a single photo. That’s difficult to do with a 24mm lens, so shop around for a wider one - particularly a rectilinear lens - to add to your bag.

photo by DenGuy via iStock
Where ultra-wide lenses create images that are distracting with all that distortion, regular wide-angle lenses allow you to highlight the space in the room, include foreground interest, and capture a view that gives the room a feeling of more space and dimension, as shown above.
Learn More:
Interior Photography Composition Tips

photo by Bulgac via iStock
When composing interior photos, it’s helpful to get back to the basics of photography to find tricks that can help you capture the most pleasing shots.
Leading lines, for example, give the image improved depth while also helping guide the viewer’s eye through the shot and around the room.
In the image above, the lines of the wood floors help move your eyes toward the back of the room, which gives the impression of greater depth.

Also rely on the rule of thirds to create photos that are well-balanced and have good proportion.
As shown above, primary features in this photo - the light fixtures and bar among them - adhere closely to the rule of thirds grid.
The resulting image is quite balanced. Notice how the large countertop area doesn’t overwhelm the shot, even though it takes up quite a bit of the frame.

photo by alabn via iStock
When composing photos, think about whether the shot warrants more foreground space or more background space.
For example, if a room has beautiful flooring, you want to highlight that by dedicating more of the composition to the foreground. If, on the other hand, a room has an intricate ceiling, shift the eye level upward to give more space to viewing that detail.
As shown in the image above, this change in eye level needn’t be severe - just a slight increase in the height of the camera allowed the photographer to include more of the coffered ceiling and range hood.
Though these are simple tips, they can have a profound impact on the quality of interior photos!
Quick Tip: When altering the eye level of the camera, strive to maintain the camera at level. Tilting it up or down can cause straight lines like walls to appear as though they’re tilting.
>
Creating Depth in Interior Photos

photo by hikesterson via iStock
Homebuyers love space, and by creating depth in your images, you can give them the impression of space in your photos.
As mentioned before, leading lines are an excellent tool to use to create depth and dimension in your interior photos.
But there are other tricks you can use as well.

photo by YinYang via iStock
For example, by incorporating a foreground element - like the couch in the image above - you create layers of interest for the viewer’s eye to inspect as they look around the image.
In this case, the couch in the foreground, the ottoman behind it, the dining table in the midground, and the kitchen in the background give this shot incredible depth. The fact that the view out the doors and windows is on full display certainly helps as well.
It’s this kind of intention - with staging, furniture placement, and the perspective from which you shoot - that will result in the most pleasing photos of interior spaces.
Learn More:
Maximize the Impact of Interior Spaces With a View Outside

photo by asbe via iStock
As explained earlier, creating images with depth will give buyers a better impression of the size of the rooms they’re looking at in your photos.
One of the best ways to do that is to ensure that the viewer’s eyes can travel beyond the room.
One of the most common difficulties you’ll encounter when photographing interior spaces is that windows tend to be blown out, as shown above. Naturally, this overexposed box does nothing for creating depth in the shot or showcasing what the view from this room might be.

photo by hikestersonvia iStock
Fortunately, the fix for this issue is quite straightforward.
By bracketing the exposures and merging them together, you can create a photograph that’s well-exposed for the shadows, midtones, and highlights in a room.
The result, as you can see above, has far greater visual appeal than the previous image.
In this case, the view out of the window is crystal clear, and allows our eyes to travel further into the photograph.
With that said, this technique, paired with the other interior real estate photography tips outlined earlier, allows you to tell a better story about the property, one that highlights space, depth, and the view!


