

Oregon has a way of rewarding photographers who show up prepared and patient. One hour you might be working a shaded waterfall in a basalt canyon, and the next you’re timing waves on a wide-open beach with a bright sky rolling in behind sea stacks. That variety is exciting, but it also exposes gaps in your process fast. If you want your images to look intentional instead of accidental, you need a reliable set of landscape photography techniques you can apply anywhere.
What makes Oregon such a good training ground is how quickly conditions change. Light shifts from soft to harsh, wind comes and goes, and contrast can swing from gentle overcast to a blazing horizon in minutes. Those shifts force you to make smart choices about shutter speed, filtration, composition, and dynamic range. When you approach each scene with a plan, you stop chasing settings and start shaping the frame.
This is also why a guided experience can be so helpful. ColorTexturePhotoTours’ Oregon Extravaganza photo workshop runs May 31, 2026, to June 5, 2026, and follows a six-day route that includes the Columbia River Gorge, Mt. Hood at Lost Lake, and the Oregon Coast, plus additional waterfall stops near Salem. With a small group, professional instruction, and built-in image reviews and post-processing sessions, you get to practice landscape photography techniques across multiple iconic environments, then refine your results with feedback while the experience is still fresh.
So, let’s dive in and explore how Oregon’s landscapes can be the subject matter that helps you elevate your skills!
Table of Contents
- Mastering Long Exposure for Waterfalls with Landscape Photography Techniques
- Using Filters to Control Light and Motion
- Composing Dynamic Coastal Landscapes
- Capturing Reflections at Alpine Lakes
- Managing Dynamic Range in Forest and Gorge Scenes
- Creative Landscape Photography Techniques to Elevate Your Portfolio
- A Field-Ready Oregon Workflow You Can Repeat
- FAQ
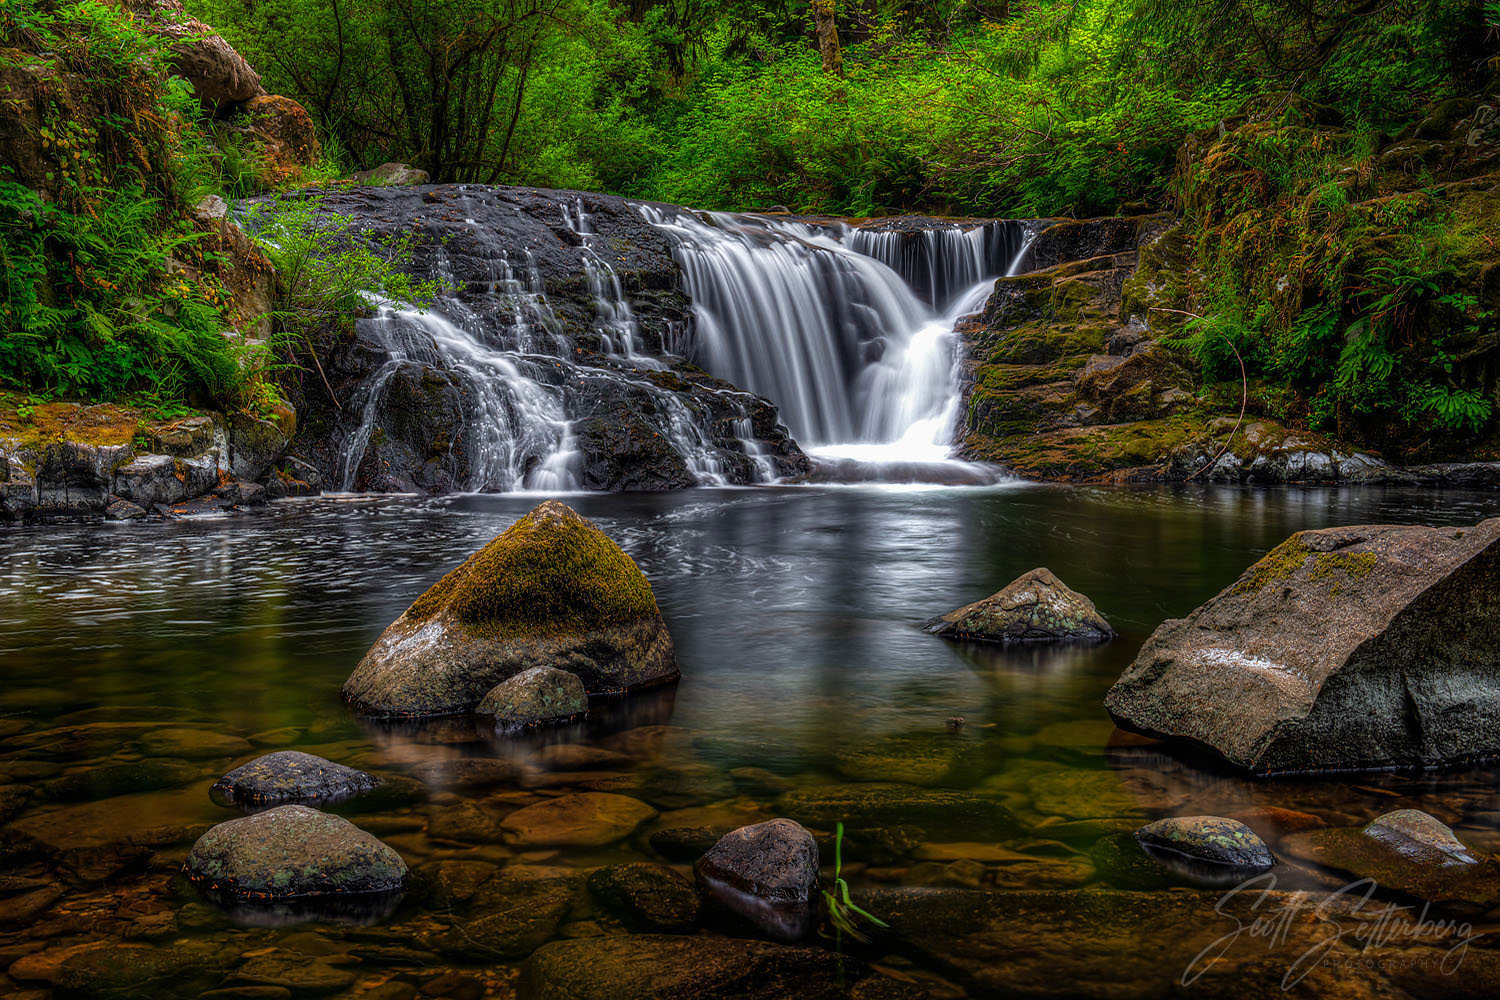
Mastering Long Exposure for Waterfalls with Landscape Photography Techniques
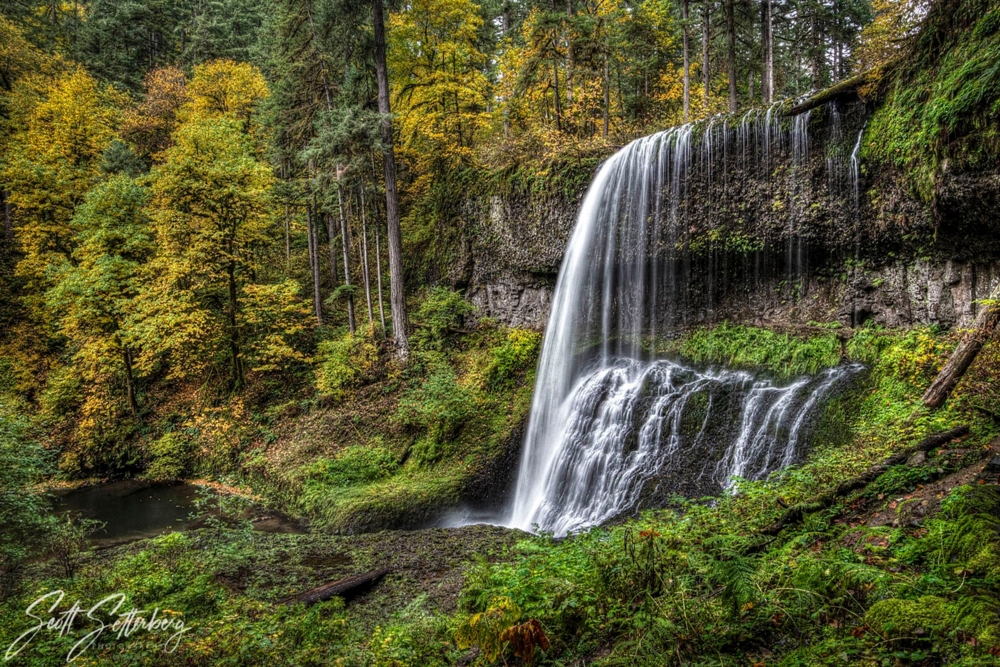
Waterfalls are where many photographers first fall in love with long exposure, and Oregon gives you plenty of chances to practice. Locations such as Wahclella Falls, Starvation Creek, Butte Creek Falls, and multiple stops in Silver Falls State Park create a controlled environment for testing shutter speed choices. Water flows in predictable paths, and your main variables become exposure, stability, and composition. When you treat each stop as a repeatable exercise, you build muscle memory that transfers to rivers, surf, and moving clouds.
Start by choosing the kind of motion you want, then pick a shutter speed that matches the idea. Around 1/10 to 1/2 second can keep some texture in the water while still smoothing the harsh edges. One to four seconds often produces that silky look, but it can also wipe out detail if the flow is fast or foamy. Longer exposures can work in the right light, but they usually need careful filtration and strong foreground structure so the frame does not turn into a blur without purpose.
Tripod discipline matters more at waterfalls than people expect. Extend thicker leg sections first, hang weight only if wind or vibration demands it, and avoid touching the camera during the exposure. A two-second timer or a remote trigger keeps micro-shake out of the frame. If you are on a bridge or a damp viewing platform, step lightly and wait for foot traffic to clear, because a subtle bounce can soften the entire image.
One advantage of a workshop like the Oregon Extravaganza photo tour is that you get to dial this in with guidance while you are standing in front of the scene. The itinerary builds in time for shooting and later image reviews, so you can compare results from different shutter speeds and see how small decisions change the look. That tight feedback loop is one of the fastest ways to improve landscape photography techniques, because it turns trial-and-error into intentional iteration.
Using Filters to Control Light and Motion
Filters are not a requirement for good images, but they expand what is possible in difficult light. A neutral density filter lets you lengthen shutter speed without blowing highlights, which is useful at waterfalls when the scene is brighter than you want, and on the coast when you want motion in the water. A circular polarizer helps reduce glare on wet rocks, deepens foliage tones, and can reveal detail under the surface of shallow water. Once you see the difference a polarizer makes in a forest stream or on tide-slick rock, it becomes one of the most practical tools in your kit.
The key is using filters with a clear purpose rather than leaving them on by default. With a polarizer, rotate slowly while watching the effect on reflective surfaces, then back off slightly if the result looks unnatural. With ND filters, make sure you account for changing light, because a cloud moving over the sun can shift your exposure by multiple stops. If you stack an ND with a polarizer, watch for vignetting on wide lenses and keep your composition slightly looser so you can correct edges later if needed.
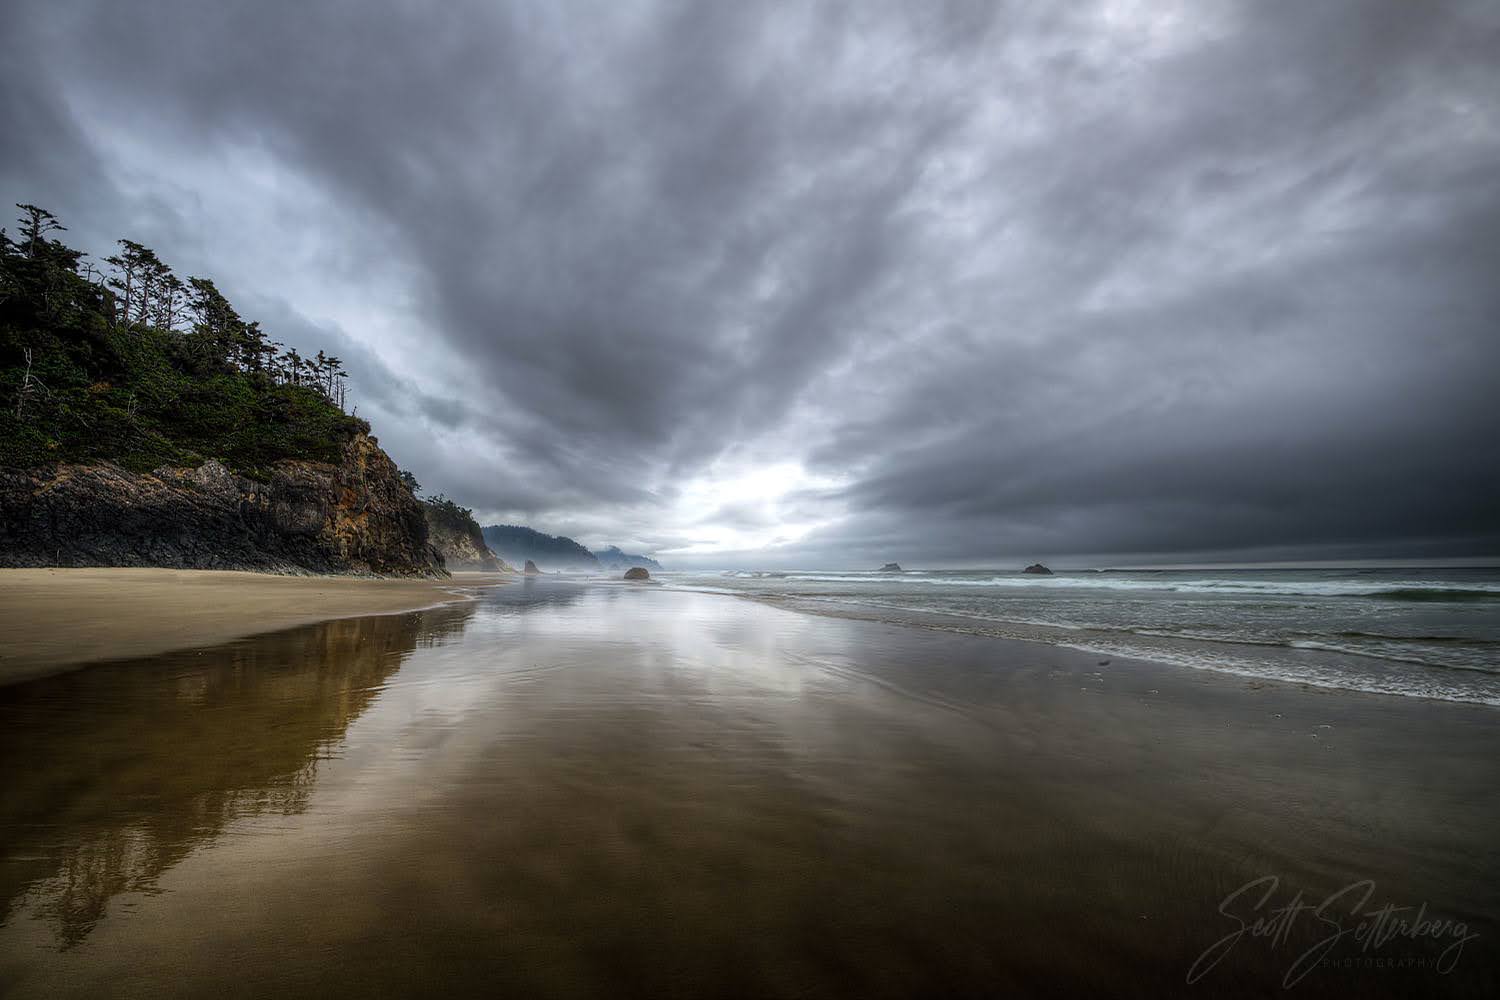
Graduated ND filters can help balance a bright sky against a darker foreground, which often shows up along the Oregon Coast and at elevated views like Ecola State Park. That said, grads are not a magic fix. They work best when the horizon line is relatively clean, and they can look obvious if you force them across tall sea stacks or treelines. In those cases, bracketing exposures and blending later often creates a more natural result.
During a guided workshop, filters become easier to understand because you can see them used in context and get immediate confirmation that your approach makes sense. The Oregon Extravaganza, for example, includes professional instruction and post-processing sessions, which helps connect the field decision to the final file. That connection is where landscape photography techniques stop feeling theoretical and start feeling dependable.
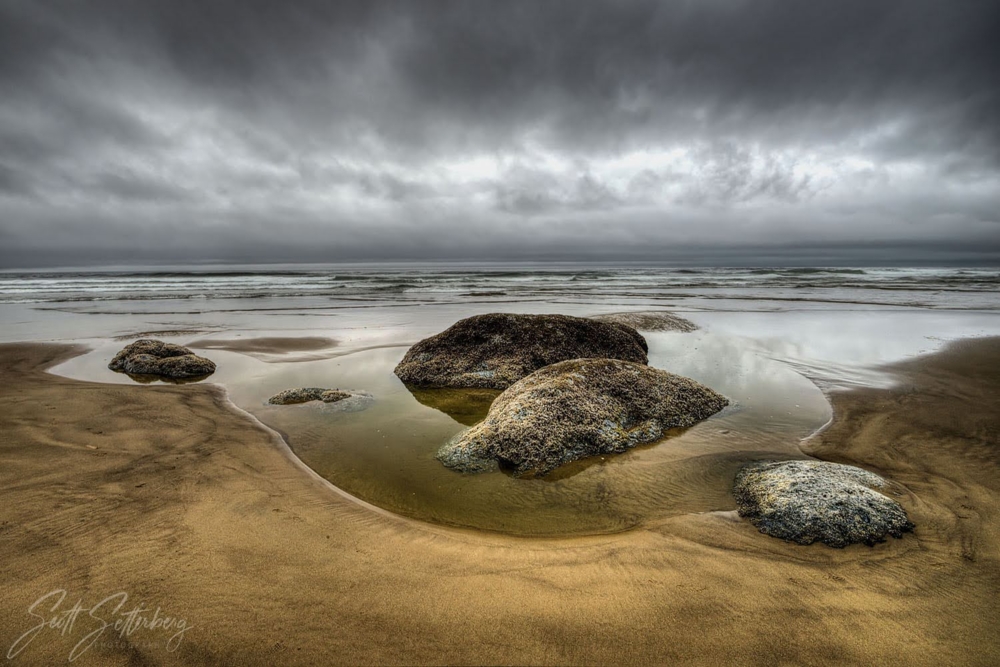
Composing Dynamic Coastal Landscapes

Coastal scenes can feel overwhelming because they contain so much open space and constant motion. The Oregon Extravaganza route includes Ecola State Park, Hug Point, and Cannon Beach, which are excellent places to practice building order in a wide scene. Start by identifying your anchor, then build the rest of the frame around it. At Cannon Beach, Haystack Rock often becomes the anchor, but you can also use a tide pool reflection, a receding foam line, or a pattern in wet sand to lead the eye.
Foreground structure is the difference between a snapshot and a composed coastal image. Look for lines that point toward your subject, like a stream flowing across the sand, a curve of foam, or a ridge of rock that creates a natural pathway through the frame. If the foreground feels weak, move your position first instead of changing lenses. A small shift left or right can align the leading line with your subject and eliminate distracting overlaps.
Timing matters, especially if you want motion blur that looks intentional. For smoother water, try a longer exposure that turns the surf into a soft shape and simplifies the midground. For texture and power, use a faster shutter speed and wait for a wave shape that complements your composition. When the sky is bright, you may need filtration or bracketing to keep detail. When the light is soft, you can often work without filters and focus on timing and structure.
Small-group instruction helps here because composition feedback is hard to self-diagnose in the moment. With a guide and a few peers, you can test a frame, hear what feels off, and fix it while the light is still good. That is one of the most practical ways to improve landscape photography techniques on the coast, because it trains your eye to see problems before you press the shutter.
Capturing Reflections at Alpine Lakes
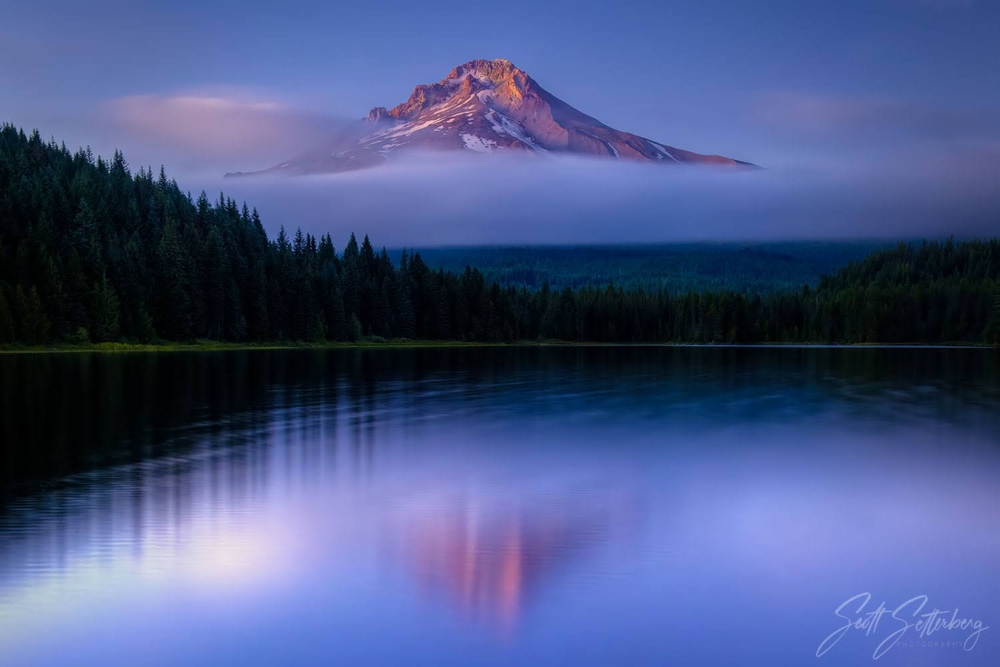
Reflections feel simple until you try to photograph them well. Lost Lake, with Mt. Hood rising above it, offers a classic reflection scene that rewards careful observation. The most important variable is wind, which can turn a perfect mirror into a broken pattern in minutes. If you arrive early, you can watch the surface and recognize the calmer windows, then shoot decisively when the lake settles.
Reflection compositions work best when you choose a clear intent. Symmetry can be powerful, but only if the scene supports it and your edges stay clean. If symmetry feels too formal, break it on purpose by placing the horizon higher or lower and adding a foreground element that creates depth. Rocks, shoreline grasses, or a small log can give scale and add a human sense of viewpoint without turning the image into a cluttered scene.
Exposure at sunrise and sunset can change quickly, especially when color peaks and fades. Keep an eye on your histogram and protect highlights in the sky, because clipped color looks harsh and is difficult to recover. If the dynamic range becomes too wide, bracket exposures. Even if you decide not to blend later, the bracket gives you options and keeps your best moment from being ruined by a small exposure miss.
Working this scene within a workshop structure can help you stay calm and methodical. When you know the plan includes shooting, then reviewing and editing, you are less likely to rush. That pacing supports stronger decisions and reinforces landscape photography techniques that hold up in any reflective scene, from alpine lakes to calm coastal tide pools.
Managing Dynamic Range in Forest and Gorge Scenes
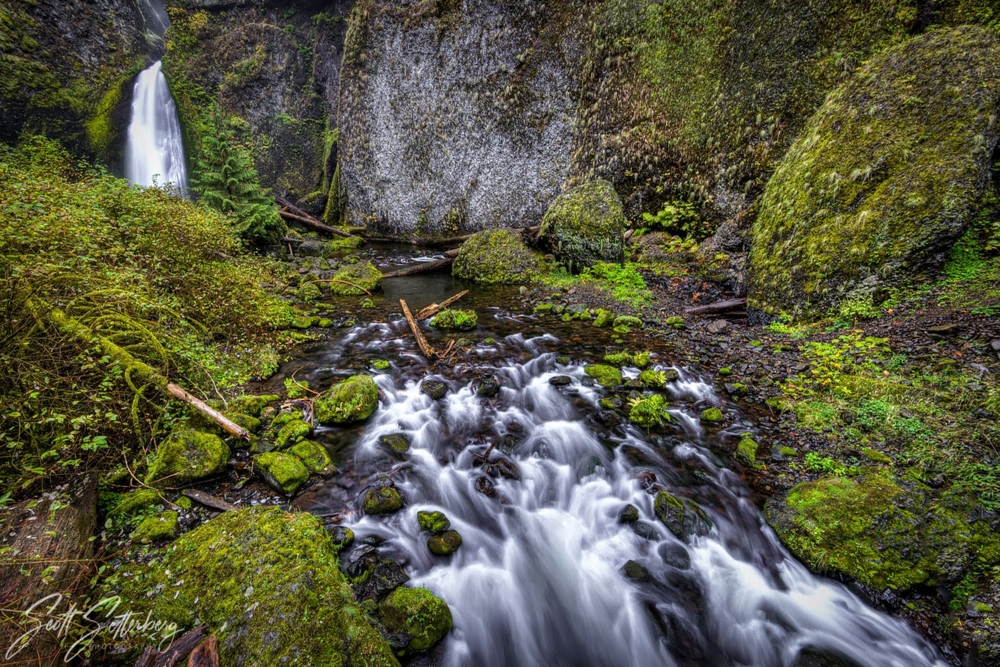
Oregon’s forests and gorges often produce the kind of contrast that cameras struggle with. Deep shade, bright sky openings, and reflective water can appear in the same frame, and if you expose for one area, another can fall apart. This is where dynamic range management becomes one of the most important landscape photography techniques, because it protects both detail and mood. The idea is not to flatten the scene; it’s to preserve what your eye experienced.
Start with a baseline exposure that protects your brightest important highlight, then evaluate what you lose in the shadows. If shadows are too deep, bracket exposures rather than lifting a single file aggressively, because heavy shadow recovery can introduce noise and color shifts. A common approach is a three-frame bracket at two stops apart, then blend later using manual masking or a controlled HDR workflow. The more complex the scene, the more you should lean toward manual blending so you can keep the result natural.
Overcast conditions are a gift in waterfalls and forest interiors because they reduce contrast and create even light. If you can, prioritize shooting shaded waterfalls and forest scenes during softer light windows, then save higher contrast vistas for sunrise or sunset when the light feels directional but not harsh. When the sun does break through, use it intentionally. Backlight can turn leaves into glowing layers, but you need to watch flare and keep highlights under control.
As noted earlier, the Oregon Extravaganza workshop from ColorTexturePhotoTours includes post-processing instruction and image reviews, which is where dynamic range decisions click for many photographers. You can compare a single exposure to a blended result and see exactly what changes, then apply that understanding at the next location. That repetition across multiple days is a practical way to build confidence with landscape photography techniques that often feel intimidating at first.
Creative Landscape Photography Techniques to Elevate Your Portfolio
Once you can consistently capture a clean, well-exposed image, creativity becomes the next growth step. Oregon’s old-growth forests and moving water are excellent places to experiment because they contain repeating shapes, strong lines, and natural motion. Intentional camera movement can work well here, especially when you simplify the scene and commit to a clear motion direction. The goal is not randomness; it is controlled abstraction with a clear subject or rhythm.
Another creative option is to vary your framing and orientation more than you think you should. Waterfalls and tall trees often benefit from vertical compositions, but many photographers default to horizontal because it feels safer. Challenge yourself to shoot the same scene in both orientations, then compare what changes about depth, flow, and emphasis. You can also step back and use a longer focal length to compress layers, which often creates a calmer, more graphic look in busy forest environments.
Black-and-white processing can also suit Oregon scenes when color feels distracting or when contrast and texture carry the story. Coastal rock, mist, and stormy skies can translate well, and shaded forest waterfalls can become more about shape and light than about green tones. If you shoot with black-and-white in mind, pay attention to tonal separation in the field. Look for edges, highlights, and shadows that will still read clearly without color.
A workshop environment is useful for creativity because it gives you permission to experiment while still getting guidance. With a small group and an instructor who can suggest adjustments, you can try new landscape photography techniques without feeling like you are wasting a rare opportunity. Over time, those experiments often become the images that feel most personal.
A Field-Ready Oregon Workflow You Can Repeat
The real payoff comes when you can walk into any Oregon scene and know exactly what to do first. Start by scanning the scene for your main subject and your strongest supporting element, then decide what the photo is about. Once you have that intent, choose your lens and position, then lock in a stable tripod setup. From there, work through exposure, filtration, and focus deliberately rather than bouncing between settings.
Next, run a quick checklist that keeps you honest. Confirm your edges are clean, confirm the horizon is level, confirm you are not clipping important highlights, and confirm your focus choice supports the subject. Then shoot a small series with intentional variations, such as a different focal length, a slightly different crop, or a different shutter speed. This approach produces options without turning the session into spray-and-pray.
Finally, plan for the edit while you are still in the field. If you know you will blend exposures, bracket while the light is stable. If you want motion blur, make sure you have the filtration needed and the shutter speed you intended. If you are experimenting, capture one safe frame first, then push into the creative version. That sequence keeps you covered and encourages growth at the same time.
Oregon’s diversity makes it easy to practice this workflow across waterfalls, coastlines, forests, and alpine lakes in a single trip. With the Oregon Extravaganza itinerary from ColorTexturePhotoTours and built-in instruction from company founder Scott Setterberg, you get repeated chances to apply landscape photography techniques, review what worked, and refine your choices at the next location. If you keep that repeatable workflow, Oregon stops feeling unpredictable and starts feeling like the perfect training ground.
FAQ
What skill level is required for the Oregon Extravaganza workshop?
All skill levels are welcome, and the main requirement is a basic understanding of your DSLR or mirrorless camera. The workshop includes personalized instruction in the field, plus image reviews and post-processing sessions.
What locations does the workshop cover for practicing these techniques?
The itinerary includes Columbia River Gorge locations such as Munra Falls, Wahclella Falls, and Starvation Creek, plus White River Falls. It also includes the Oregon Coast at Ecola State Park, Hug Point, and Cannon Beach, along with Butte Creek Falls and Silver Falls State Park.
Do I need to bring filters to practice these landscape photography techniques?
Filters are helpful for long exposure and glare control, especially ND filters and a circular polarizer. You can still practice core techniques without them, but filters expand your options in bright or reflective conditions.
Are post-processing sessions included?
Yes. The workshop includes post-processing instruction and one-on-one sessions, along with image reviews that connect field choices to final edits.
When is the next Oregon Extravaganza workshop?
The next dates are May 31, 2026, to June 5, 2026. Final payment is due April 1, 2026.
Does the all-inclusive option include transportation and lodging?
Yes. The all-inclusive package includes ground transportation, lodging, meals during the trip, and transfers to and from Portland International Airport, plus snacks, water, and park fees.
Friendly disclaimer: Our articles may contain affiliate links that support us without costing you more, and sometimes we spice things up with sponsored content—but only for products we truly stand behind!