

Quick Facts:
- Subject: Fireworks at night
- Best settings: Manual or bulb, f/11, ISO 100, shutter 1 to 6 seconds
- Lens: A mid-range zoom near 24-70mm covers most displays
- Support: A sturdy tripod plus a remote or cable release
- Focus: Manual, set to the distance of the first burst
- File format: RAW
- Best time: The first few minutes, before smoke builds
- Best for: July 4th, New Year, and festival displays
10 min read
In This Guide
- What You Need to Know
- Fireworks Settings at a Glance
- Gear: Camera, Tripod, Remote
- Camera Settings for Fireworks
- How to Focus on Fireworks
- Bulb Mode and Light Trails
- Composition and Timing
- Location and July 4th Setup
- Shooting Fireworks on a Phone
- Common Mistakes to Avoid
- Editing Your Fireworks Photos
- Printing Fireworks on Each Finish
- Final Verdict
- Frequently Asked Questions
How to Photograph Fireworks: What You Need to Know
Learning how to photograph fireworks looks intimidating, yet the method is simple and repeatable. The trick is a long exposure. You hold the shutter open for a few seconds and let a single burst draw its own trails of light across a black sky. A tripod keeps everything sharp while the color streaks paint the frame.
Most failed fireworks photos share one of two problems. Either the shot is blurry from a handheld camera, or the burst is a tiny dot lost in a sea of dark sky. Both come down to setup, not luck. With a tripod, manual focus, and the right shutter speed, your hit rate climbs fast.
This guide walks through the gear, the exact settings, focus, and the bulb-mode technique step by step. You will also learn composition, a phone method, the mistakes to skip, and how a finished burst looks on a metal print. With July 4th close, now is the time to get ready.

Fireworks Settings at a Glance
Here is the short version to set up tonight. Start from these numbers, then review the back of the camera and adjust. Fireworks photography rewards small tweaks between bursts.
| Setting | Starting Point |
|---|---|
| Mode | Manual, or bulb for longer trails |
| Aperture | f/11 (try f/8 to f/16) |
| ISO | 100 |
| Shutter speed | 1 to 6 seconds, or bulb held by hand |
| Focus | Manual, set near infinity on the first burst |
| White balance | Daylight, around 5500K |
| File format | RAW |
| Support | Tripod plus remote or cable release |
Made for PhotographyTalk readers
Print Your Fireworks on Metal
Vivid Metal Prints offers a $10 sample kit with all five finishes. See how your bursts look on metal before you order a full print.
Gear: Camera, Tripod, and Remote
You need less gear than you might expect. Any camera with a manual mode and a bulb setting works, from an entry DSLR to a mirrorless body. The two essentials are a sturdy tripod and a remote or cable release, since touching the camera during a multi-second exposure adds blur. A remote lets you open the shutter without a single shake.
Lens choice depends on the show. A mid-range zoom near 24-70mm covers most displays and lets you reframe as the bursts rise. A wider lens suits a big finale or a skyline foreground, while a short telephoto isolates single shells. Pack a small flashlight for your dials and a microfiber cloth for the lens. A spare memory card and a charged battery round out the bag, since a long show fills cards fast. For help matching focal length to the scene, see our guide on choosing a lens.
Camera Settings for Fireworks

Start in manual mode with ISO 100, f/11, and a shutter near 2 seconds. Low ISO keeps the sky clean and noise-free, while f/11 holds the bursts sharp and stops the bright trails from blowing out. Set white balance to daylight, around 5500K, so the colors stay true rather than orange.
From there, adjust by result. If the trails look thin, hold the shutter longer to catch more of the burst. If the brightest cores clip to white, close the aperture toward f/16 or shorten the exposure. Shoot RAW so you recover color and highlights later, since a JPEG throws away the data a night scene needs. Bracket a few exposures of the same burst when you have time, so one frame lands between thin and blown-out. For a deeper look at how shutter choices shape the trails, our primer on shutter speed explained helps.
How to Focus on Fireworks
Autofocus fails in the dark, so switch to manual focus. Wait for the first burst, then turn the focus ring until the trails look crisp in live view at high magnification. Fireworks sit far away, so the focus lands near infinity, though not always exactly at the hard stop.
Lock it and leave it. Because every shell explodes at roughly the same distance, one good focus setting holds for the whole show. Tape the focus ring if it drifts, and avoid bumping the zoom, since a change in focal length shifts the focus. If your lens has a focus distance scale, note the spot so you return to it fast after any bump. A quick check on the screen every few minutes keeps you safe.
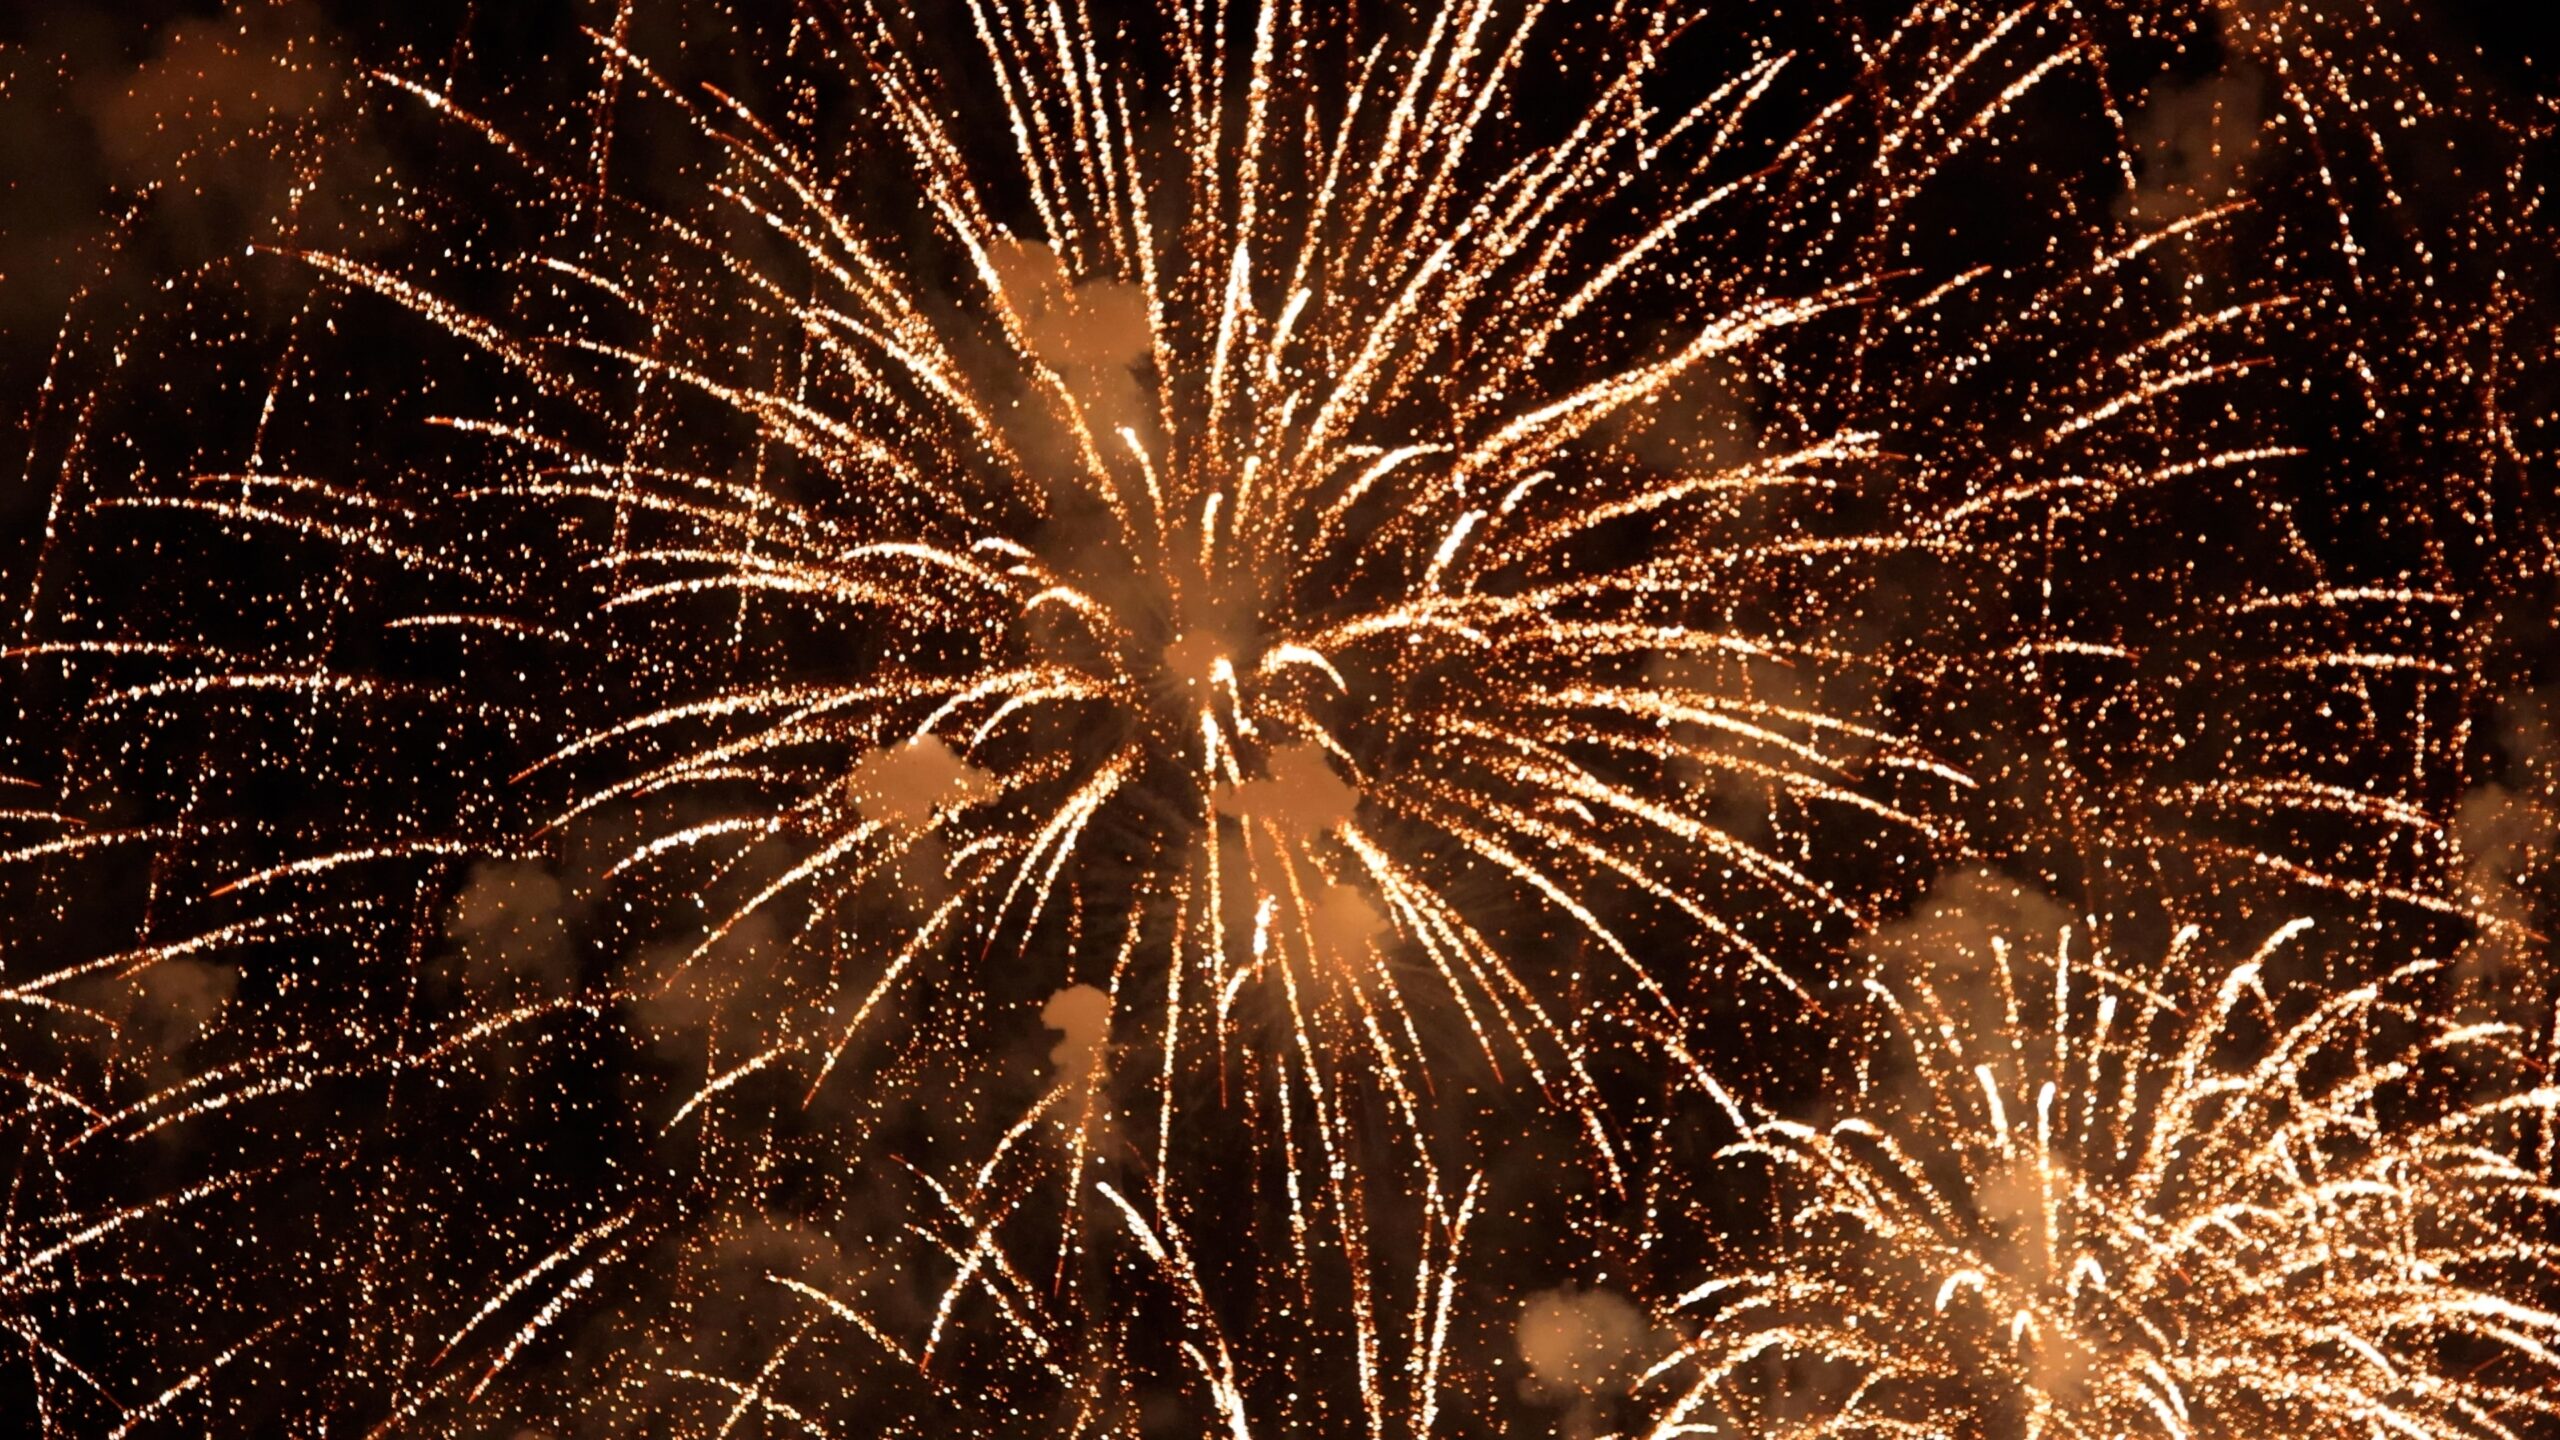
Bulb Mode and Light Trails
Bulb mode is the secret behind the best fireworks photos. In bulb, the shutter stays open for as long as you hold the release, which gives you full control over each burst. You open the shutter as a shell launches, hold through the explosion, and close once the trails fade.
This long exposure approach lets you stack light on your terms. Hold longer to record several bursts in one frame, or release sooner for a single clean shell. A trick many pros use is a piece of black card held in front of the lens between bursts, which lets you combine two or three explosions into one exposure without overexposing the sky. For more on holding the shutter open, these long exposure techniques transfer directly, and the broader idea of long-exposure photography is worth knowing.
Composition and Timing
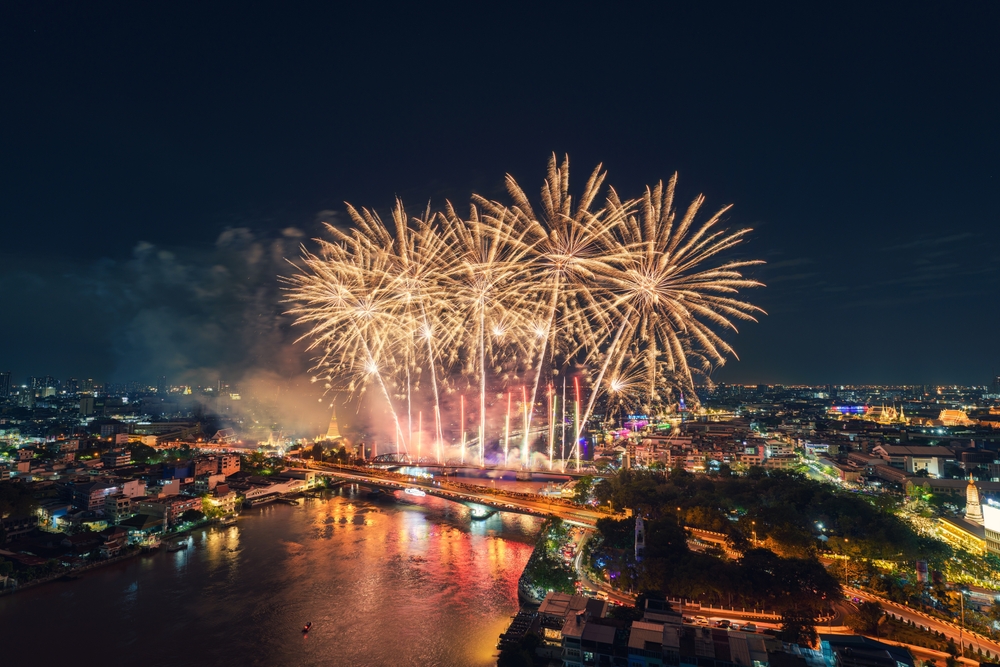
A great fireworks frame needs more than bright trails. Leave room at the top, since shells climb higher than you expect, and frame vertically when the bursts stack tall. A foreground anchors the shot and gives it scale, so include a skyline, a bridge, a lake reflection, or a crowd silhouette.
Timing matters as much as framing. Shoot the first few minutes, before the smoke builds and dulls the colors. Watch the launch arc and open the shutter on the rising trail to catch the full bloom. The grand finale floods the sky with smoke and light, so shorten your exposure there to avoid a washed-out frame. Frame a few horizontal options too, since a wide finale often spills past the edges of a vertical crop.
Location and July 4th Setup
Knowing how to photograph fireworks matters less if you arrive late, so plan the spot first. Good position decides half the shot, so scout before dark. Stand upwind so the breeze carries smoke away from your view, not toward it. Find a clean angle on the launch site with a foreground worth including, and arrive early on July 4th, since the best spots fill quickly.
Set up while you still have light. Level the tripod, frame a test shot of the foreground, and pre-focus on a distant light to get close before the first shell. Silence your phone, dim the camera screen, and keep a spare battery warm in a pocket. A headlamp with a red mode keeps your night vision while you adjust dials. Check the wind direction one last time before the first shell, since a late shift pushes smoke into your frame. A calm, settled setup lets you concentrate on timing once the show starts.
How to Photograph Fireworks With a Phone
A phone handles fireworks better than it used to, with a few steps. Brace it on a small tripod or a ledge, since handheld shots blur during the exposure. Open the camera app, switch on a long-exposure or night mode, and tap the sky to lock focus and exposure on the first burst.
Drag the exposure slider down so the bright trails keep their color instead of clipping to white. A pro or manual mode helps, where you set ISO low and the shutter to a second or two by hand. Several apps add a true long exposure for phones, which records full light trails. For more after-dark phone technique, see our guide on shooting fireworks on a phone and other night scenes.
Common Mistakes to Avoid
A few habits sink otherwise good frames. Shooting handheld is the biggest, since any shake smears the trails into mush. Use the tripod every time. Leaving autofocus on is a close second, because the camera hunts in the dark and misses the burst entirely.
High ISO is another trap. Cranking ISO to brighten the sky only adds noise, when a longer shutter does the job cleanly. Avoid the temptation to chase every shell, too. Pick a frame, hold your composition, and let the show come to you. Finally, watch the finale, when heavy smoke and stacked bursts overexpose a long shutter, so cut your exposure short there. One more trap is forgetting the histogram, since the bright trails fool your eye on a dim screen at night.
Editing Your Fireworks Photos
A little editing lifts a good fireworks frame into a great one. Start in RAW, set the white balance to keep the colors true, and pull the black point down so the sky reads deep and clean. A small boost to contrast and saturation makes the trails glow without looking fake.
Stacking is the next step. Because each frame holds different bursts, you load several shots as layers and blend them with a lighten mode, which combines the best explosions into one full sky. Clean any stray smoke with a soft brush, and dodge the brightest trails to add sparkle. Keep the edit light, since heavy sliders crush the delicate color in the trails.
Knowing how to photograph fireworks gets you the frame, and a careful edit gives it the final polish. Export at full resolution when you plan to print, so the trails stay crisp at a large size.
Printing Fireworks: How They Look on Each Vivid Finish
If you want a frame off the screen and onto a wall, fireworks suit a metal print better than almost any subject. Bright, saturated bursts on a deep black sky give a metal surface the high contrast it loves, and the color gleams in a way a screen never matches. The finish you choose changes the mood, though, so it pays to know the options before you order.
I met the Vivid Metal Prints team in person last month, and we compared fireworks frames across all five of their finishes side by side. The difference was clear at a glance. Vivid is also one of the companies featured in our Best in Class Prints of 2026 roundup, so the quality holds up against the field. Here is how a fireworks shot reads on each finish.
How Each Finish Handles a Burst
| Vivid Finish | Surface Look | How Fireworks Render |
|---|---|---|
| White Base Ultra-Gloss | Highest shine and contrast; Vivid’s best-seller | The brightest, most saturated bursts. White spark cores stay true white. Vivid’s default pick if you are unsure. |
| White Base Semi-Gloss | Same color depth, less reflection | Vivid bursts with reduced glare. A smart pick for a bright room with windows. |
| White Base Satin | No reflectivity, slightly softer | Glare-free, gentler trails. Best where light hits the wall directly. |
| Clear Base Ultra-Gloss | Whites drop to bare aluminum for a metallic glow | Colored bursts gain a shimmering metallic sheen. Bright white cores read silver, so it suits colorful shells over white-heavy ones. |
| Clear Base Satin | Whites drop out, low reflection, antique feel | A muted, vintage look. Bright whites turn metallic, so reserve it for warm, colored bursts. |
For a classic Independence Day burst with bright white cores, a white-base finish keeps those highlights true, and ultra-gloss gives the most punch. For a warm, colored shell where you want an artful, metallic feel, a clear-base finish adds character. Order a custom metal print in the finish matching your image and your wall.
Pick your finish
See Fireworks on All Five Finishes
Compare ultra-gloss, semi-gloss, satin, and the two clear metallic bases on Vivid’s finish guide, then order the look you want.
Final Verdict

Great fireworks photography comes down to a steady setup and patience. Lock the camera on a tripod, focus by hand on the first burst, and use a multi-second exposure in manual or bulb. Do those three things, and sharp, colorful trails follow on almost every frame.
Timing and position separate a good shot from a great one. Scout a clean angle, stand upwind of the smoke, and shoot the first few minutes before the haze rolls in. Add a foreground for scale, and the frame tells a story rather than floating in black.
Once you catch a burst you love, give it a wall. A high-contrast fireworks frame on a metal print holds color and depth a phone screen hides. Plan your spot for July 4th, pack the tripod and remote, and shoot a bracket of exposures so you have a keeper to enlarge.
Ready to print?
Turn Your Best Burst Into Metal Wall Art
Vivid Metal Prints delivers durable, color-rich aluminum prints in five finishes, with free replacement if your order arrives damaged. Order early so your July 4th burst is on the wall this summer.
Frequently Asked Questions
What are the best camera settings for fireworks?
Start in manual mode with ISO 100, f/11, and a shutter near 2 seconds, then adjust. Use bulb mode to hold the shutter through a full burst. Set white balance to daylight near 5500K, shoot RAW, and close toward f/16 if the bright cores clip to white.
What shutter speed should I use for fireworks?
A range of 1 to 6 seconds works for most bursts. Bulb is better still, since you open the shutter as a shell launches and close as the trails fade. Longer holds record several bursts in one frame, while shorter holds capture a single clean shell.
How do you focus on fireworks at night?
Switch to manual focus, since autofocus hunts in the dark. Wait for the first burst, then turn the focus ring until the trails look sharp in magnified live view. The point lands near infinity. Lock it and avoid changing the zoom, which shifts the focus.
How do I photograph fireworks with a phone?
Brace the phone on a tripod or ledge, open a long-exposure or night mode, and tap the sky to lock focus on the first burst. Lower the exposure so the trails hold color. A manual app setting ISO and shutter by hand gives the cleanest result.
Why do my fireworks photos come out blurry or washed out?
Blur comes from a handheld camera, so use a tripod and a remote. A washed-out sky comes from too long an exposure or too high an ISO, especially during the smoky finale. Lower the ISO to 100, close the aperture, and shorten the shutter when the smoke builds.