

There’s something magical about a drizzle of syrup over pancakes or a gentle swirl of steam rising from a fresh bowl of soup. These little moments are what make food feel alive in a photograph. They invite the viewer in and tell a story that goes beyond just what’s on the plate.
Action shots in food photography bring energy, realism, and emotion to your images. They make your audience feel like they’re right there with you—watching, tasting, and smelling every detail. And they aren’t just for professionals. As discussed in the video below by PHOOD, with a little planning, anyone can capture dynamic and engaging food imagery.
In this article, I’ll break down how to photograph movement in food—pours, sprinkles, and steam. You’ll learn the gear you need, how to light each type of shot, and how to use storytelling to make your photos stand out. Whether you’re shooting for a blog, client, or personal project, these tips will help you master the art of action shots in food photography.
Table of Contents
- What Makes Action Shots So Appealing in Food Photography
- Essential Gear and Settings for Capturing Movement
- The Art of the Pour: Tips for Capturing Liquid in Motion
- Sprinkles in the Spotlight: Freezing the Perfect Dusting
- Photographing Steam: Adding Life and Warmth to Your Image
- Lighting Techniques for Action Food Shots
- Using Props, Hands, and Movement to Tell a Story
- FAQ
What Makes Action Shots So Appealing in Food Photography

Photo by Mae Mu on Unsplash (license)
Action shots in food photography transform still scenes into vivid moments. Instead of just showing a plated dish, they reveal the process—what happens just before or just after the food is served. This draws viewers in and keeps their eyes on the image longer.
People love authenticity. A splash of sauce, a sprinkle of sugar, or a swirl of steam creates a sense of freshness and imperfection. These little details humanize the image and help it feel real and approachable.
From a commercial standpoint, action shots also sell. They evoke the senses and highlight texture, temperature, and taste in ways that static shots can’t. Whether you’re photographing for a cookbook, a food brand, or your own social media, including action shots in food photography can elevate your visual storytelling significantly.
Essential Gear and Settings for Capturing Movement
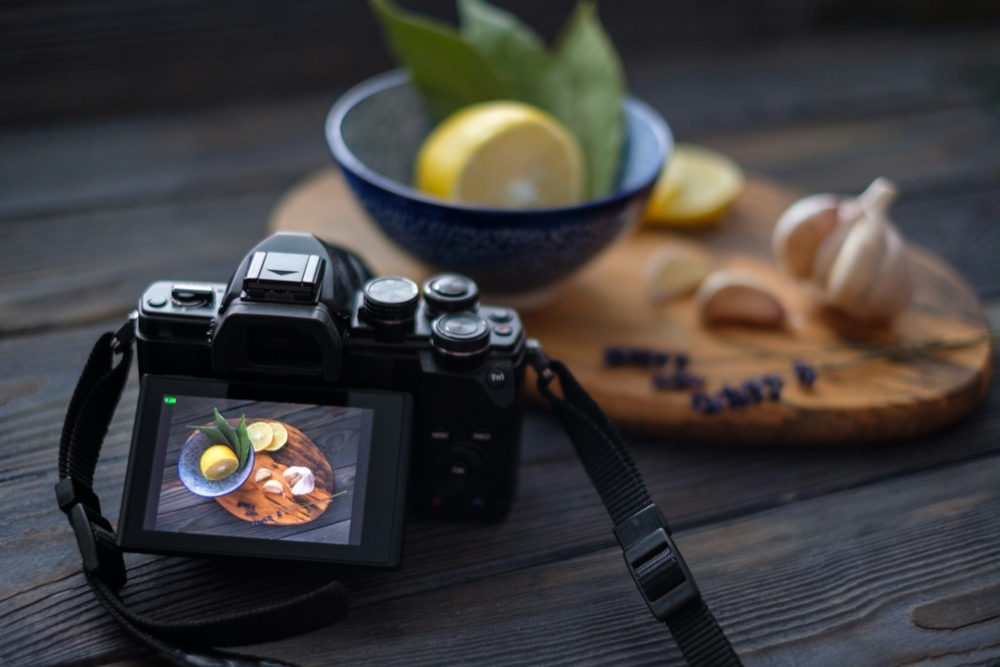
Photo by Alexander Lyubavin on Unsplash (license)
The right gear makes a big difference in capturing action shots in food photography. A DSLR or mirrorless camera that handles high shutter speeds is essential. Pair that with a fast lens (like a 50mm f/1.8 or a 100mm macro) for optimal results.
Shutter speed is your most important setting. If you’re freezing motion—like a sugar sprinkle or honey pour—start at 1/1000s or faster. Use burst mode to take multiple shots in quick succession. This helps ensure you get the perfect frame.
Manual focus or pre-focusing on the area where the action will happen gives you greater control. A tripod is also key for stability, especially if you’re working solo and need one hand free to trigger the action.
If you’re working with artificial light, consider using strobes or flashes with high-speed sync. This can help freeze motion more cleanly than relying on ambient light alone.
The Art of the Pour: Tips for Capturing Liquid in Motion
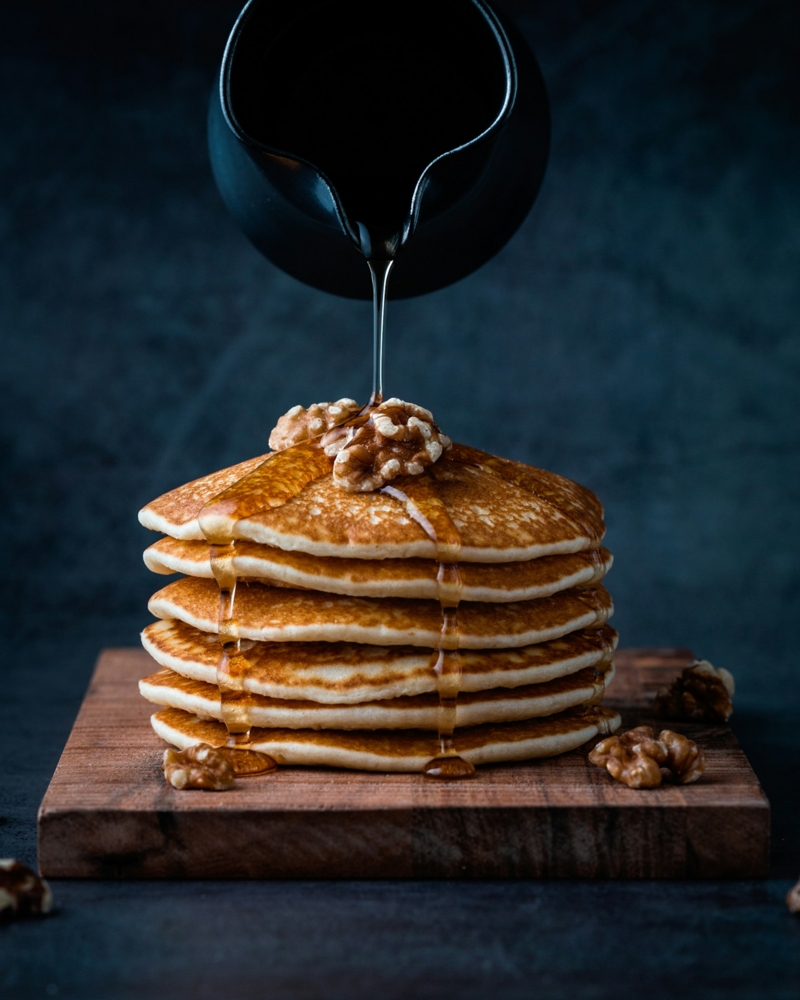
Photo by Mae Mu on Unsplash (license)
Pours are one of the most dynamic and beautiful types of action shots in food photography. Think syrup cascading over waffles or milk swirling into coffee. These shots add flow, texture, and anticipation to your image.
Choose your angle carefully. Side angles work well for tall pours, while overhead or three-quarter angles help when you’re pouring onto a plate. Always consider how gravity affects the flow—it can help you tell a stronger story.
Lighting is crucial. Liquids are often reflective, so using diffused side lighting can help reduce glare. Backlighting can also work beautifully to highlight translucency and detail, especially with honey, oil, or tea.
If you’re working solo, set your camera on a timer or use a remote shutter release. You might also consider pouring from a small spouted container instead of a full bottle—it’s easier to control and repeat.
Keep Reading: Simple Food Photography Composition Techniques
Sprinkles in the Spotlight: Freezing the Perfect Dusting
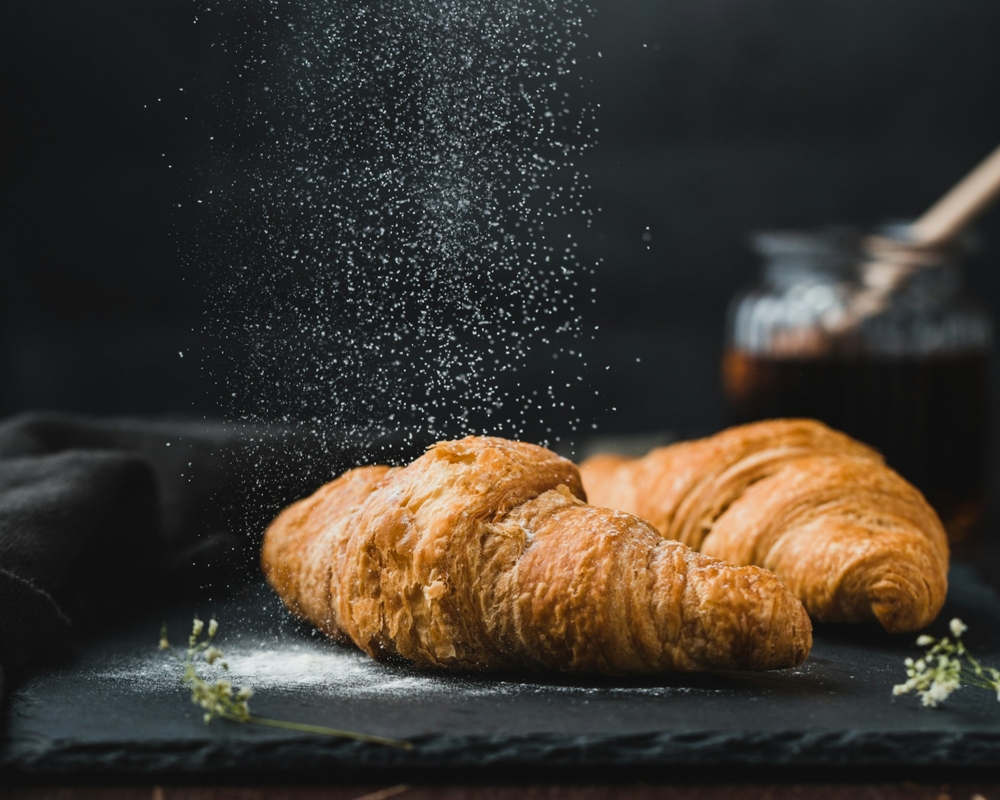
Photo by Mae Mu on Unsplash (license)
Capturing a dusting of powdered sugar or cocoa adds magic and texture to your food photo. These shots can be whimsical, dramatic, or elegant, depending on your styling and lighting choices.
Set your focus point where the sprinkle will land. Use burst mode and a fast shutter speed—1/1600s or higher—to freeze particles mid-air. You’ll need to shoot several frames to get the perfect dust cloud, so patience is key.
Lighting can make or break these shots. Use side or backlighting to highlight the airborne particles. A dark background often works best to make the sprinkle stand out. Consider a simple matte surface to prevent distracting reflections.
Don’t be afraid to do multiple takes. I often test a sprinkle with cornstarch or flour to dial in my settings before using more delicate or expensive ingredients.
Photographing Steam: Adding Life and Warmth to Your Image
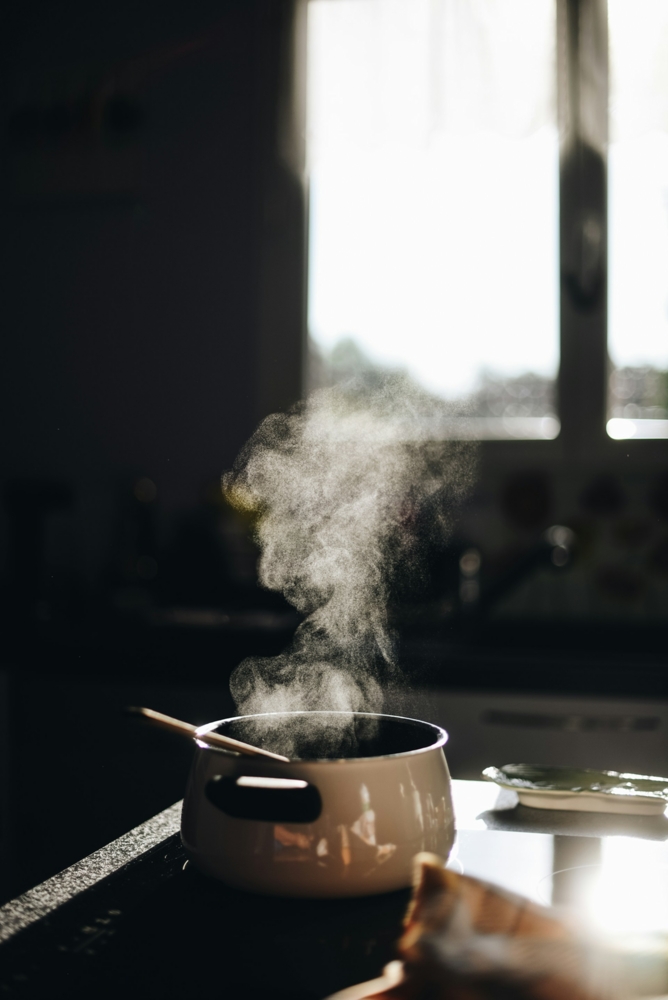
Photo by Gaelle Marcel on Unsplash (license)
Steam is subtle, but powerful. It immediately conveys warmth and freshness. A bowl of soup without steam looks cold. With steam, it looks ready to eat.
Steam is most visible against a dark background with side or backlighting. A cool room can help, too, as steam condenses more visibly in lower temperatures. Avoid strong front lighting—it will flatten the image and kill the atmosphere.
Use a tripod and manual focus to keep your composition steady. I often shoot soups, coffee, or pasta just seconds after plating, while the steam is still rising naturally. If I need more time, I use a microwaved damp cloth or steamer hidden behind the dish to generate a fresh burst.
Steam requires patience. Take a burst of shots and review them. The steam’s movement changes quickly, and capturing that perfect curl or wisp can take a few tries.
Lighting Techniques for Action Food Shots

Photo by Piero Istrice on Unsplash (license)
Lighting plays a starring role in action shots in food photography. It shapes the motion, defines texture, and controls the mood of the image.
For freezing motion, strong directional light is best. Natural window light works well, especially when diffused. For artificial setups, use strobes or flashes with modifiers like softboxes or umbrellas to soften shadows while keeping details crisp.
Side and backlighting are ideal for action because they emphasize texture—whether it’s steam, sugar, or syrup. Avoid flat front lighting, which can make motion look dull and two-dimensional.
Practice is key. If you’re unsure, start with a constant light source to see how shadows fall, then move to flash once you’ve nailed your setup.
Using Props, Hands, and Movement to Tell a Story
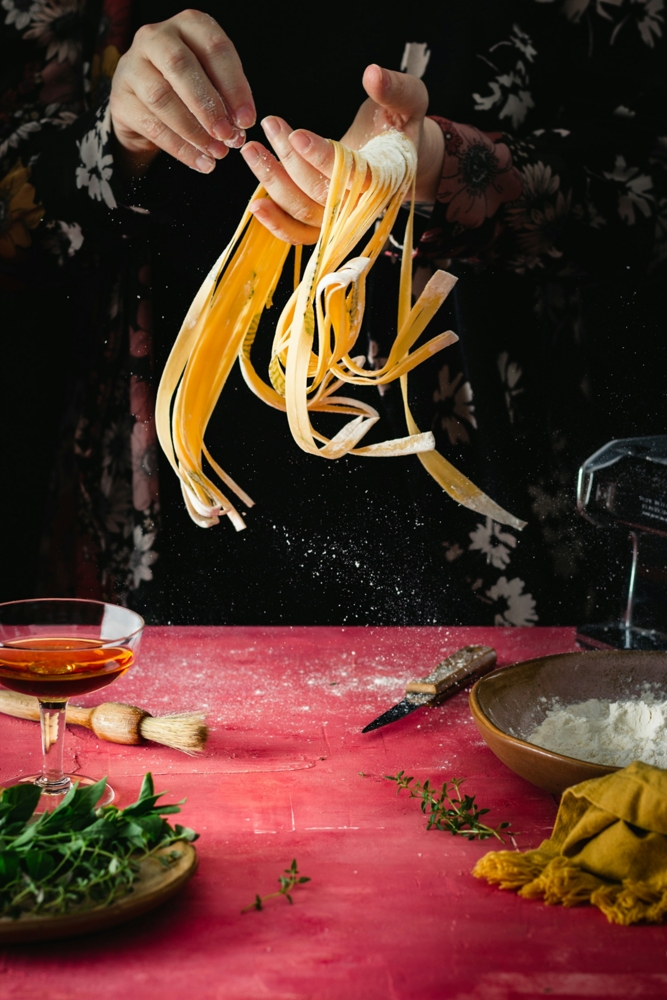
Photo by Bruna Branco on Unsplash (license)
Action shots in food photography are more than technical achievements—they’re storytelling tools. Including a hand pouring milk or sprinkling salt makes the image feel human and relatable.
Props should support the story without distracting from the action. Neutral tones and simple styling keep the focus on what’s happening in the frame. Choose backgrounds that contrast with your main elements to add depth.
Think about the mood. Is your shot rustic and homemade? Elegant and modern? Match your props and movements to that vibe. A ceramic mug and a wool sweater tell a different story than a sleek glass and marble counter.
Don’t be afraid to involve people—even if it’s just your own hand. I often use a tripod and interval timer to capture motion with myself in the frame. It adds warmth, context, and a sense of scale.
FAQ
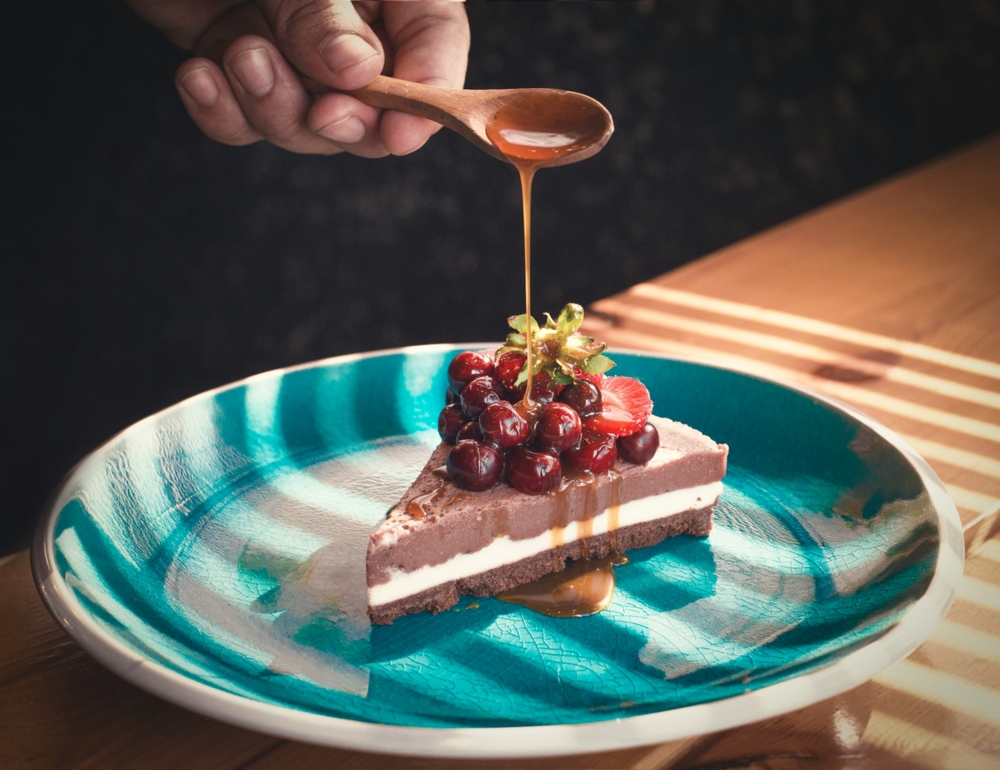
Photo by amin ramezani on Unsplash (license)
What camera settings are best for action shots in food photography?
Use a fast shutter speed (1/1000s or faster), a wide aperture (f/2.8–f/4), and burst mode. Manual focus or pre-focusing is helpful for consistency.
How do I capture steam in food photos?
Use a dark background, side or backlighting, and shoot in a cool room. Act quickly after cooking, or use a steamer or damp cloth for extra steam.
What lens is ideal for action food shots?
A 50mm or 85mm prime lens with a wide aperture works well. For detail shots, a 100mm macro lens offers beautiful close-up control.
Can I shoot action shots in food photography with natural light?
Absolutely. Use diffused window light with a reflector to control shadows. Just make sure your shutter speed is fast enough to freeze motion.
How do I practice action food photography on my own?
Use a tripod and remote shutter. Try pouring water or flour for practice. Experiment with angles, lighting, and props until you find your rhythm.
Our articles might have affiliate links and the occasional sponsored content, but don’t sweat it – if you buy something, we get a little kickback at no extra cost to you, and we only hype products we truly believe in!
Learn More:
Photo by Vitor Monthay on Unsplash (license)