

I’ve been chasing light for more than 30 years. I’ve set up my tripod in hundreds of locations waiting for a single transformative moment when the sky turns gold. Those locations have spanned the red rock canyons of Utah and the fog-draped coastlines of the Pacific Northwest. They’ve also included the wide-open plains of Wyoming and the humid bayous of Louisiana. Golden hour photography isn’t something you fully understand from a tutorial. You understand it by standing in a field at 5:47 a.m., watching the horizon bruise purple before it bleeds into orange. Then you realize your exposure settings are completely wrong for what’s happening in front of you. This guide comes from those moments.
Over three decades behind a lens, I’ve learned which shots consistently reward patience and which ones punish a lack of preparation. The images from golden hour are among the most print-worthy photos you’ll ever take. The warm tones, the long shadows, the emotional weight of sunset and sunrise light make these shots people want on their walls. This guide covers the best subjects to shoot and the settings working consistently in the field. It also addresses what to do with your results once you get them right.
Quick Facts:
- Topic: Golden hour photography: best subjects, techniques, and settings
- Skill level: Beginner to intermediate
- Best time: 30 to 60 minutes after sunrise or before sunset
- Key gear: Tripod, fast lens (f/1.8 to f/2.8), reflector, ND filter
- Camera settings: ISO 100 to 400, RAW format, aperture-priority or manual
- Difficulty: Moderate; timing and preparation are critical
- Best for: Landscape, portrait, silhouette, and architectural photographers
8 min read
In This Article
- Golden Hour Photography Overview
- Key Facts at a Glance
- Landscapes and Wide Scenes
- Silhouettes Against the Sky
- Portraits in Golden Light
- Reflections and Water Shots
- Architecture and Urban Scenes
- Golden Hour Camera Settings
- Sunrise vs. Sunset: Which Golden Hour Wins?
- Pros and Cons
- Final Verdict
- Frequently Asked Questions
Golden Hour Photography Overview: Why This Light Changes Everything
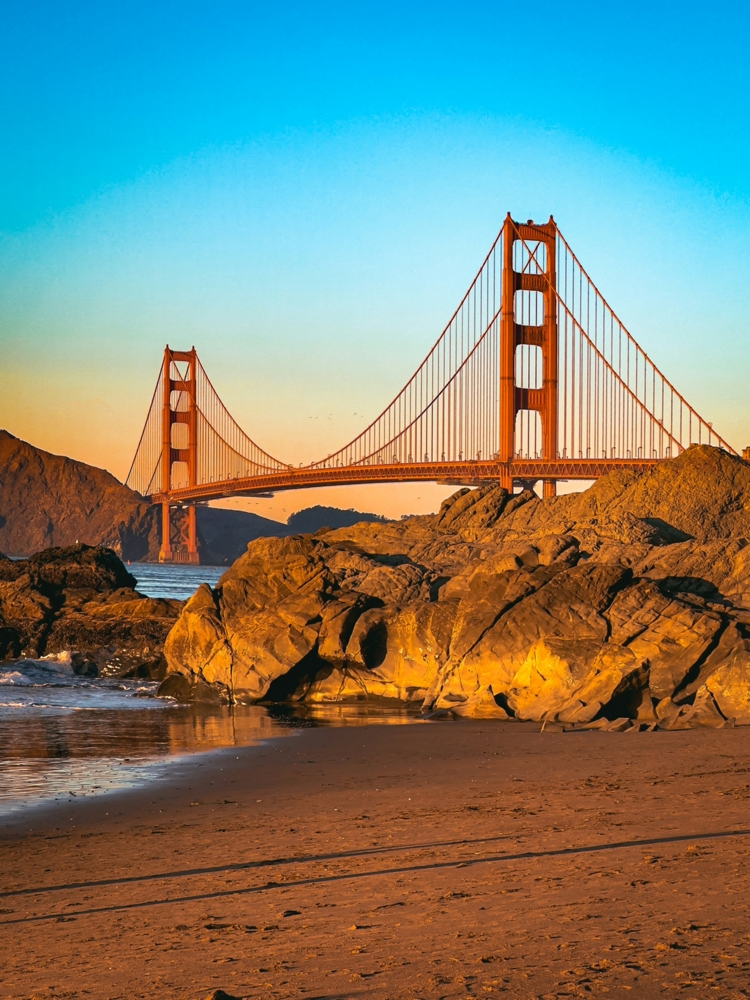
Golden hour photography refers to the roughly 30-to-60-minute window after sunrise and before sunset, when the sun sits low on the horizon and bathes the world in warm, directional light. Unlike the flat, harsh light of midday, golden hour produces longer shadows, richer color, and a visual softness flattering nearly every subject. The color temperature during golden hour typically falls between 3,000K and 4,000K, which is significantly warmer than the 5,500K to 6,500K range of daylight at noon. The shift in warmth is what gives golden hour shots their distinctive emotional tone.
In more than 30 years of photographing landscapes across the country, I’ve found golden hour to be the single most reliable window for shots worth printing. I’ve watched the same Utah canyon look completely flat at 11 a.m. and then transform into something nearly three-dimensional at 6:30 p.m. when the light rakes across the rock face at a low angle. The difference isn’t the location; it’s the light. Our landscape photography guide covers location scouting and composition fundamentals applying directly to golden hour work.
One important clarification: golden hour photography doesn’t always fill a full hour. In high-latitude locations during summer, it extends longer. In tropical regions or during certain seasons, it compresses to as little as 20 minutes. Apps like PhotoPills and Sun Seeker give you precise calculations for any location, which removes the guesswork and lets you set up before the light arrives.
Key Facts at a Glance
| Factor | Details |
|---|---|
| Timing | 30 to 60 min after sunrise, 30 to 60 min before sunset |
| Color temperature | Approximately 3,000K to 4,000K (warm orange and gold) |
| Best aperture (landscapes) | f/8 to f/11 for maximum depth of field |
| Best aperture (portraits) | f/1.8 to f/2.8 for subject separation |
| ISO range | 100 to 400 early; 400 to 800 as light fades |
| File format | RAW required for full dynamic range |
| Essential gear | Tripod, reflector, ND filter (optional) |
| Planning apps | PhotoPills, Sun Seeker, The Photographer’s Ephemeris |
Print Your Best Golden Hour Shots
Turn Golden Hour Photos Into Wall Art
Pictorem offers metal, acrylic, and canvas prints with free shipping across North America and a 30-day satisfaction guarantee.
Landscapes and Wide Scenes

Wide landscape shots are the most natural fit for golden hour photography tips in practice. The low angle of the sun creates raking light pulling out texture in terrain. Rock faces, sand dunes, grassy fields, and mountain ridgelines all gain definition overhead midday light simply cannot match. In my experience shooting across Wyoming, Colorado, and the Southwest, side lighting during golden hour transforms an average landscape into a three-dimensional scene. The key is finding foreground elements: a line of fence posts, a winding creek, or scattered wildflowers. When the raking light hits these elements, it lifts them forward while the warm sky fills the background.
Beyond the light itself, composition is everything for wide landscape scenes. Use the rule of thirds to place the horizon in the lower third when the sky dominates. Move it to the upper third when the foreground texture is the star. Shooting horizontal panoramas during golden hour pays off significantly as well. Overlap your frames by about one-third and stitch them in post. The resulting file holds far more detail than a single frame allows, which matters when you plan to print large.
Silhouettes Against the Sky
Silhouettes are among the best shots at golden hour and also among the most forgiving technically. Because you’re exposing for the bright sky rather than the subject, the exact exposure is less critical. The goal is a clean, recognizable subject shape against a vivid background. Trees, lone figures, mountain ridges, barn structures, and rock formations all work well. Over countless shoots along the Wyoming horizon at dusk, I’ve found the most effective silhouettes share one trait. They hold a clear, uncluttered outline with no busy overlap between subject and background.
To execute a silhouette, meter for the sky by pointing your camera slightly upward, lock the exposure, then reframe your composition. Set your aperture to f/8 or narrower to keep the entire scene sharp. After sunset, the sky continues holding color for another 15 to 20 minutes, so don’t pack up when the sun disappears. Some of the best silhouette light arrives in the minutes after the sun drops below the horizon.
Portraits in Golden Light

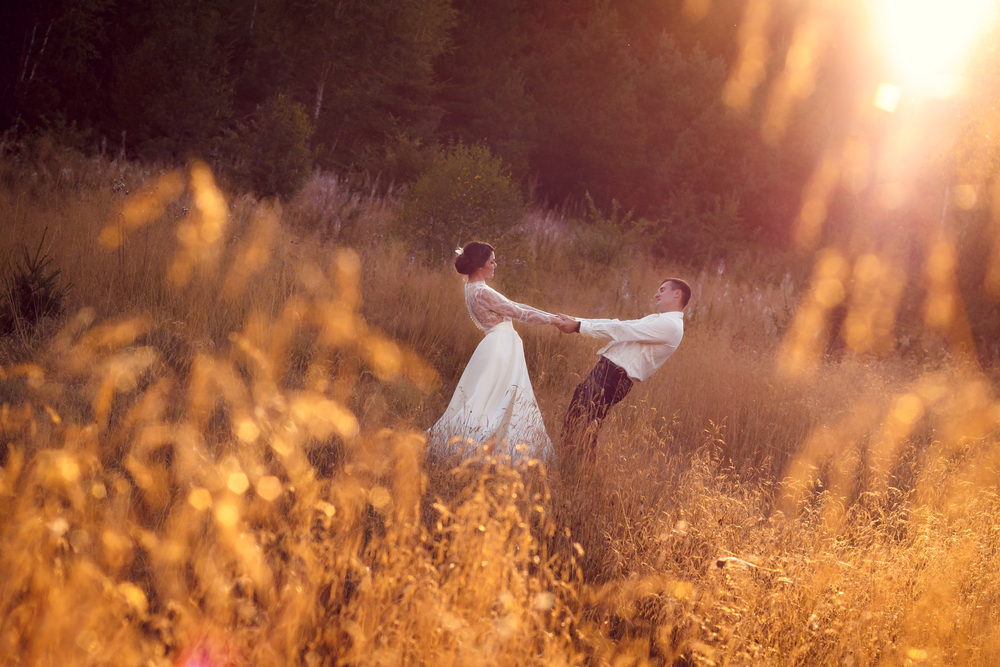
Golden hour is genuinely flattering for portraits. The warm, directional light wraps around a subject’s face in a way studio lighting takes considerable effort to replicate. For the best results, position your subject so the sun hits from the side or slightly behind. The result is a rim of warm light along the hair and shoulders. This backlit look is one of the most requested in portrait photography, and golden hour delivers it for free. For foundational techniques complementing this light, the site’s portrait photography tips are a strong starting point.
One tool dramatically improving golden hour portraits is a simple 5-in-1 reflector. Available for under $20, a reflector bounces the warm ambient light back onto the shadow side of your subject’s face. Without one, the contrast between the lit and shadow sides becomes too strong as the sun drops. Shoot in aperture-priority mode at f/1.8 to f/2.8 to isolate your subject against a soft, golden bokeh background, and adjust ISO upward as the light fades.
Reflections and Water Shots
Water becomes a powerful compositional tool during golden hour. Lakes, rivers, tide pools, and even puddles mirror the warm sky above and double the visual impact of the scene. Specifically, the ideal conditions for reflection shots are calm water, no wind, and a clean horizon. In my experience, sunrise typically delivers calmer water than sunset because wind speeds tend to be lower in the early morning hours. Some of my favorite reflection images have come from small Wyoming reservoirs well before sunrise. Setting the camera low and pulling a wide-angle lens close to the water surface creates a compelling foreground.
For water in motion, golden hour rewards long-exposure techniques. Set your aperture to f/11 or narrower and drop the ISO to 100. Use a tripod with a 1-to-4-second exposure to smooth out river and waterfall movement. The warm light of golden hour combined with the silky motion blur of moving water produces some of the most print-worthy landscape images in photography.
Architecture and Urban Scenes

Urban and architectural photography benefits significantly from golden hour. I’ve shot old brick storefronts in small Wyoming towns and glass towers in Denver, and the light treats both the same way: it gives structural faces depth and warmth they lack at any other time of day. Buildings take on a warm glow, long shadows define structural geometry, and windows reflect the sky in ways adding color and visual interest. For architectural golden hour photography tips, angle matters more than in landscape work. Try to position yourself so the building face receives light from the side rather than straight-on. Facades photographed with side lighting show depth, texture, and shadow patterns obscured by flat frontal lighting.
Notably, the window of time when artificial interior lighting balances with the fading golden exterior light produces an especially atmospheric look. This occurs roughly 15 to 30 minutes after sunset, when the sky transitions toward blue hour. The overlap between golden hour and blue hour offers some of the richest light of the entire day for urban scenes. It’s worth staying well past sunset to capture it.
Golden Hour Camera Settings
The right golden hour camera settings shift as the light fades. Early in golden hour, when substantial light remains, start with ISO 100 to 200. Choose an aperture appropriate to your subject: f/8 to f/11 for landscapes, or f/1.8 to f/2.8 for portraits. Then let the camera set shutter speed in aperture-priority mode. As the sun drops and the light fades, increase ISO incrementally to 400, then 800 if needed, watching for noise creeping into shadow areas.
Above all, shoot in RAW format during golden hour. The dynamic range demands of a scene with a bright sky and a shadowed foreground exceed what JPEG compression handles cleanly. RAW files give you full latitude to recover highlight detail in the sky and lift shadow detail in the foreground during post-processing. White balance set to Shade (approximately 7,500K) enhances the warm tones further. Auto white balance tends to neutralize the color making golden hour images distinctive, so override it manually.
Ready to Print Your Work?
Metal Prints Built for Golden Hour Landscapes
Pictorem’s metal and acrylic prints reproduce the warm tones and vibrant color of golden hour images with outstanding accuracy.
Sunrise vs. Sunset: Which Golden Hour Wins?

Both windows of golden hour photography share the same quality of light, but they differ in conditions and competition. Sunset golden hour is easier to plan for because you’re working with a known end time. However, it attracts more people; popular overlooks and viewpoints fill up at sunset in a way they rarely do at sunrise. Sunrise golden hour, on the other hand, rewards early commitment with solitude, calmer wind, and often more dramatic cloud formations. After decades of shooting both, I lean toward sunrise for landscapes and toward sunset for portraits. The afternoon atmosphere tends to be cleaner before haze builds through the day, which gives landscape images more clarity.
The color palettes also differ subtly. Sunrise light often carries more pink and lavender tones in the sky, while sunset skies tend toward deeper orange and crimson. Neither is objectively better, but they suit different subjects. For reference on which print format showcases the color depth of each best, each surface handles warm tones and high contrast differently, so the choice depends on your specific image and display environment.
Pros and Cons of Golden Hour Photography
Pros
- Warm, directional light flatters every subject type, including landscape, portrait, architecture, and wildlife
- Color temperature of 3,000K to 4,000K produces rich warm tones without heavy post-processing
- Low sun angle creates long shadows adding depth and texture to flat terrain
- Soft light reduces harsh contrast, making exposure easier to control than midday conditions
- Consistently produces print-worthy images due to emotional warmth and tonal richness
- Silhouette opportunities are abundant and technically accessible for all skill levels
Cons
- Window lasts only 20 to 60 minutes, requiring precise planning and fast execution
- Exposure settings change every few minutes, demanding constant adjustment
- Mountain locations often lose golden light earlier due to terrain blocking the horizon
- Overcast or hazy conditions eliminate color entirely; good light is never guaranteed
- Popular locations fill with other photographers, especially at well-known sunset viewpoints
Final Verdict
Golden hour photography rewards preparation more than any other type of shooting. Specifically, the photographers who consistently bring home strong images scout the location beforehand and check the sun angle with an app. They arrive at least 30 minutes early with camera settings already dialed in. After more than 30 years in the field, I know with certainty: the light doesn’t wait for you to figure things out. When it’s right, it’s right for about 45 seconds at peak intensity before shifting into something slightly different. Be ready before it arrives.
For landscape photographers specifically, golden hour is where your best work will come from. The combination of directional light, warm color temperature, and long shadows creates a depth of visual information other times of day rarely produce. Silhouettes, reflections, and wide vistas all shine during this window. Portrait and architectural photographers also benefit enormously, though they often need to manage contrast more actively with reflectors or fill flash.
Once you’ve captured images worth keeping, the next step is getting them off the screen and onto a wall. Golden hour shots, with their warm tones, rich shadows, and high contrast, are among the most compelling subjects for large-format printing. Metal prints in particular handle the color temperature of golden hour beautifully, reproducing the amber and orange tones with depth and luminance. Our Pictorem metal print review goes into detail on print quality, packaging, and color accuracy. For photographers wanting a gallery-quality display format, the Pictorem acrylic print review covers their acrylic option. Acrylic delivers exceptional color depth for images with high visual contrast. For a broader look at top labs in the space, the best metal print companies roundup compares five labs tested over six years.
Ready to Buy?
Print Your Best Shots at Pictorem
Free shipping on all orders within continental North America. 30-day satisfaction guarantee included on every print.
Frequently Asked Questions
What time is golden hour for photography?
Golden hour occurs in the 30-to-60-minute window after sunrise and before sunset. The exact timing varies by season, latitude, and local terrain. Use apps like PhotoPills or Sun Seeker to calculate the precise golden hour start and end times for any location and date. Arriving before the light peaks is non-negotiable.
How long do the best shots at golden hour last?
The peak light of the best shots at golden hour typically lasts between 20 and 60 minutes total, depending on your location and season. In high-latitude regions during summer, the window extends longer. Tropical locations compress the window to as little as 20 minutes. Mountainous terrain blocks the sun early and shortens the available time further still.
What are the best golden hour camera settings for landscapes?
For landscapes, the best golden hour camera settings start at f/8 to f/11 for deep depth of field. Begin with ISO 100 to 200 early in the window, and use aperture-priority mode to handle the shutter speed. Always shoot RAW to preserve full dynamic range. Set white balance to Shade, approximately 7,500K, to enhance the warm tones. Raise ISO gradually to 400 or 800 as the light fades.
Is golden hour better at sunrise or sunset?
Both produce the same quality of light, but conditions differ. Sunrise golden hour photography offers calmer wind, fewer crowds, and pink-to-lavender sky tones. Sunset golden hour is easier to schedule and tends toward deeper orange and crimson tones. Landscape photographers often prefer sunrise for the solitude and conditions; portrait photographers often prefer sunset for scheduling convenience.
What subjects work best for golden hour photography?
Landscapes, silhouettes, portraits, water reflections, and architectural scenes all produce strong results during golden hour photography. Silhouettes are technically the most forgiving to execute. Landscapes benefit most from the directional, raking light bringing out terrain texture. Portraits gain a naturally warm, flattering quality difficult to replicate in a studio.
What print format works best for golden hour images?
Metal prints work particularly well for golden hour photography because the surface enhances luminance and reproduces warm amber and orange tones with strong color accuracy. Acrylic prints also perform well for images with high contrast and vivid color. Canvas softens the tones slightly, which suits portraits well but reduces the visual impact of high-contrast landscape shots.
A quick heads-up: If you snag something through our affiliate links or check out our sponsored content, we might earn a commission at no extra cost to you. But fear not, we’re all about recommending stuff we’re truly stoked about!