

Some of the most technically demanding work I’ve done in more than 30 years behind a lens didn’t happen outdoors. It didn’t happen on a ridgeline at sunrise or in a canyon at golden hour. It happened in a spare bedroom in the middle of the afternoon. The tools were a single north-facing window, a white foam board, and a subject who had never been photographed before. Natural light indoor photography strips away the gear and forces you to think about light itself. You start asking where it comes from and what quality it carries. The answer shapes how you position a window, a reflector, and yourself around the subject. This constraint is exactly what makes it a skill worth developing.
Over three decades of photography, I’ve shot indoor photos in cramped apartments with east-facing windows. I’ve also worked in spacious studios designed around diffused northern light. The principles of how to use natural light indoors don’t change. What changes is your ability to read a room quickly and position your subject before the light moves. This guide covers what I’ve learned about working with window light across different genres. It addresses the tools worth adding to your kit and the camera settings giving you the most flexibility indoors.
Quick Facts:
- Topic: Natural light indoor photography: technique, tools, and settings
- Skill level: Beginner to intermediate
- Best light source: North-facing window (consistent); east or west window (directional)
- Key tools: Reflector (under $20), sheer curtain or white sheet (diffuser)
- Camera settings: ISO 400–1600, f/1.8–f/2.8, aperture-priority mode
- Difficulty: Low to moderate; reading light takes practice
- Best for: Portraits, newborns, maternity, product, still life
8 min read
In This Article
- Natural Light Indoor Photography Overview
- Key Facts at a Glance
- Window Direction and Quality of Light
- Diffusing and Shaping Window Light
- Using Reflectors to Fill Shadows
- Natural Light by Genre: Portraits, Newborns, Product, Still Life
- Camera Settings for Indoor Natural Light
- Natural Light vs. Artificial Light Indoors: Which to Choose?
- Pros and Cons
- Final Verdict
- Frequently Asked Questions
Natural Light Indoor Photography Overview: Why It Works

Natural light indoor photography is the practice of shooting inside a space using only available daylight, specifically window light, rather than studio strobes or flash. Window light is, specifically, directional, controllable, and free. Positioned correctly, it produces the soft, dimensional quality photographers spend thousands of dollars trying to replicate with artificial gear. The key variables are window size, window direction, and subject-to-window distance. Larger windows produce softer, more wrapping light. North-facing windows deliver consistent diffused light all day, while east and west windows deliver directional light at specific times. Closer placement produces softer and brighter results; moving the subject farther from the glass increases contrast and shadow falloff.
After more than 30 years of indoor portrait work, I’ve come to rely on window light. The reason isn’t a lack of studio gear; it produces results I prefer. Soft, directional window light flatters skin tones in ways a softbox often doesn’t. It creates natural catchlights in the eyes and gives images an environmental authenticity studio setups struggle to match. For photographers building skills without studio infrastructure, mastering how to use natural light indoors is one of the highest-value investments you’ll make.
Key Facts at a Glance
| Factor | Details |
|---|---|
| Best window direction | North-facing for consistent soft light; east for morning directional; west for afternoon |
| Subject distance from window | 3 to 6 feet for balanced light; closer for softer, brighter; farther for more contrast |
| Diffusion tools | Sheer curtain, white sheet, frost window film (under $15) |
| Reflector options | 5-in-1 reflector ($15–$20); white foam core board (under $5) |
| Aperture (portraits) | f/1.8 to f/2.8 for subject separation and maximum light |
| ISO range | 400 to 800 in good light; 800 to 1600 in low-light rooms |
| White balance | Cloudy (6,500K) or Custom; avoid Auto WB in mixed-light rooms |
| Shooting mode | Aperture-priority or Manual; always shoot RAW |
Print Your Best Indoor Portraits
Window-Lit Photos Look Stunning as Wall Art
Pictorem’s metal, acrylic, and canvas prints reproduce the soft tones and depth of natural light photography with exceptional accuracy. Free shipping across North America.
Window Direction and Quality of Light

Not all windows produce the same light. The direction a window faces determines both the quality of the light and the time of day it performs best. North-facing windows are the gold standard for window light photography and natural light indoor photography, and they stay consistent throughout the day. They receive no direct sunlight throughout the day, producing soft, consistent, diffused light from morning to late afternoon. In more than 30 years of window light photography and indoor portrait work, I’ve returned to north-facing rooms again and again for this reason alone.
East-facing windows deliver warm, directional morning light. The light enters at a low angle for roughly two hours after sunrise. This creates strong shadows and a directional quality well-suited to dramatic portraits and product work. West-facing windows produce the same effect in the afternoon, particularly in the two-hour window before sunset. South-facing windows receive direct sunlight for most of the day in the Northern Hemisphere, making them the most challenging for portraiture.
However, on overcast days, a south-facing window becomes excellent, because clouds diffuse the harsh direct light into a large, even source. The window’s size matters as much as its direction. A floor-to-ceiling window creates a much softer, more wrapping light than a small bedroom window of the same orientation. A larger light source produces softer illumination relative to subject size.
Diffusing and Shaping Window Light
Direct sunlight streaming through a window creates hard, unflattering shadows on your subject’s face. The fix is diffusion. First, hang a sheer white curtain or a single white bedsheet over the window. This scatters incoming light and consequently converts a harsh direct source into a soft, even wash. This is one of the first techniques I teach in any indoor portrait session, before discussing camera settings or positioning. A sheer curtain costs under $15 and eliminates the most common problem in indoor natural light photography.
Frost window film is a more permanent alternative. Applied directly to the glass, it diffuses incoming light consistently throughout the day without requiring you to hang fabric. For photographers who work out of a dedicated home studio space, frost film is worth the one-time installation. Beyond diffusion, you also shape window light through positioning. Placing your subject perpendicular to the window creates side lighting with defined shadows and strong dimension. Rotating your subject to face the window square-on produces flat, even illumination with minimal shadow. Angling your subject at 45 degrees strikes a balance, providing shape-defining shadow while keeping the face well-lit.
Using Reflectors to Fill Shadows
Above all, a reflector is the most cost-effective of all indoor natural light photography tips to implement. Specifically, position it opposite the window from your subject. It bounces incoming window light back into the shadow side of the face, reducing contrast without adding any artificial light source. A 5-in-1 reflector costs between $15 and $20. It provides five surface options. White delivers subtle fill and silver delivers brighter fill. Gold adds warm fill, black creates negative fill to increase contrast, and the translucent panel works as a diffuser in front of the light source. White and silver are the most useful for indoor window light work.
Photographers without a dedicated reflector have a simple alternative. A large sheet of white foam core board from a craft store costs under $5. It performs nearly as well as a commercial white reflector surface. Prop it against a chair, a wall, or a light stand at roughly 45 degrees opposite the window. The key is placement: too close to the subject and the fill looks artificial; too far and it loses effectiveness. In my experience, positioning the reflector 2 to 3 feet from the subject on the shadow side delivers the most natural-looking results. Natural Light by Genre: Portraits, Newborns, Product, Still Life
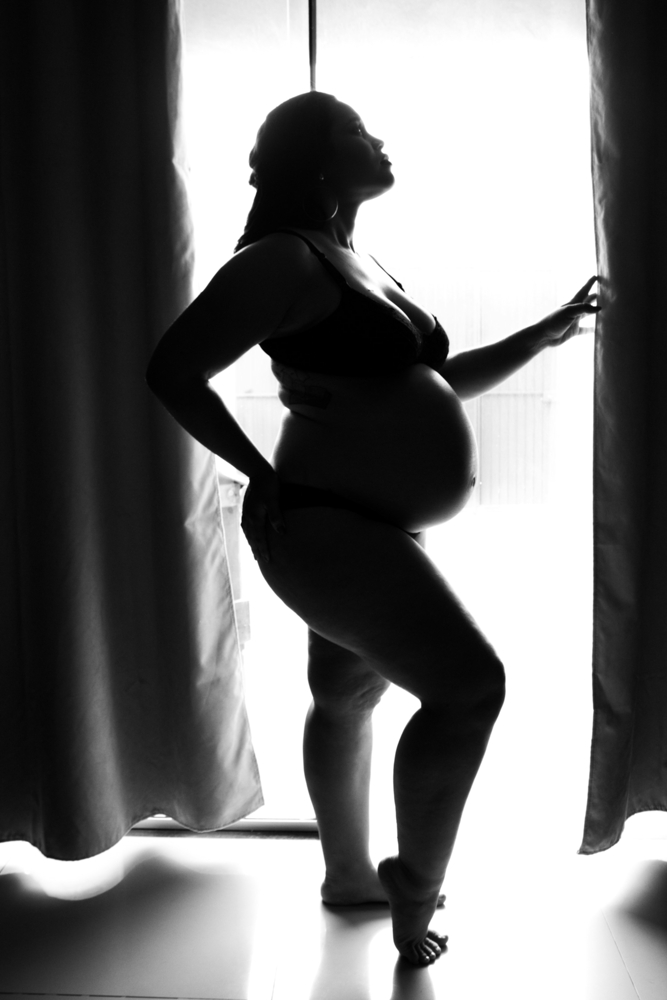
Different subjects demand different approaches to window light. For portrait photography specifically, place your subject 3 to 6 feet from the window with their body angled approximately 45 degrees toward it. This creates a catchlight in the eyes, dimensional shadow on the far cheek, and a natural-looking falloff into the background. A reflector opposite the window balances the shadow side. For maternity sessions at home specifically, the combination of good window light and a meaningful environment produces images with strong emotional resonance.
For newborn photography, softer, flatter light ratios work best. A light ratio of 1.5:1 to 2:1 means the lit side receives only 1.5 to 2 times more light than the shadow side. This ratio keeps the light gentle and non-threatening to the infant while producing images with enough depth to be visually interesting. Also, diffuse the window heavily and position the baby perpendicular to the light source so both sides of their face receive similar illumination. Product photography benefits most from consistent, even light. A north-facing window or a heavily diffused east or west window creates a clean two-source look without any artificial lighting. Add a white reflector card on the opposite side to complete the setup. For still life work, experiment with harder, more directional light from a smaller window. The shadows it creates add texture and drama to objects flat light makes look lifeless.
Camera Settings for Indoor Natural Light
Indoor natural light photography demands a different approach to settings than outdoor shooting. First, start in aperture-priority mode and open your lens to f/1.8 or f/2.8 to pull in maximum available light while creating subject separation from the background. ISO is your primary exposure control in low-light rooms. Begin at ISO 400 and raise it incrementally to 800, then 1600, as the room gets darker or as the day progresses. Most modern sensors handle ISO 1600 cleanly enough for large-format prints. Avoid ISO values above 3200 unless your specific camera body handles high ISO well.
Always shoot RAW indoors. I’ve shot in living rooms where the light shifted from warm afternoon sun to cool overcast within 45 minutes, and only the RAW files gave me enough flexibility to correct the white balance without quality loss. Window light color temperature varies throughout the day, from cooler blue morning light (roughly 6,500K on overcast days) to warmer afternoon light (4,000–5,000K on clear days). RAW files give you the flexibility to correct white balance in post without any quality loss. Set your in-camera white balance to Cloudy or Shade as a starting point. This adds warmth to the image and prevents the camera’s auto white balance from cooling down an already-dim indoor scene. For handheld shots in low light, follow the reciprocal rule: set your shutter speed to at least 1/focal length. A 50mm lens needs at least 1/50 second; an 85mm needs at least 1/85 second. With those settings dialed in, the question becomes whether to rely on natural light at all.
Ready to Print Your Work?
Acrylic and Canvas Prints for Indoor Portraits
Pictorem specializes in large-format fine art prints preserving the subtle tonal gradients natural light portraits produce. 30-day satisfaction guarantee on every order.
Natural Light vs. Artificial Light Indoors: Which to Choose?

Natural light and artificial light each have real advantages indoors. Natural light is free, produces authentic tonal gradients, varies beautifully throughout the day, and creates an environmental quality artificial setups struggle to replicate. Its limitations are equally real. Natural light shifts with the weather, it’s unavailable at night, and it varies by room orientation. A cloudy day produces different results than a clear one. Artificial light, on the other hand, is consistent, controllable, and independent of weather or time of day.
After three decades of using both, my honest view is straightforward. Natural light produces better portraits for most photographers at most skill levels, because the quality of the light is already good before you touch a setting. Artificial light rewards those who understand how to shape it precisely; used poorly, it looks like exactly what it is. The photographers making the fastest progress learn natural light first. They develop an understanding of how light wraps and falls, then apply those principles when they later add artificial sources. Combining both approaches is also valid. For home-based portrait sessions, window light as the key light paired with a simple LED panel as fill gives real flexibility. This mixed approach covers situations when available light isn’t enough.
Pros and Cons of Natural Light Indoor Photography
Pros
- Free and available in virtually every indoor environment without any equipment cost
- Produces soft, natural-looking portraits flattering to most skin tones
- North-facing window light stays consistent for 6 to 8 hours per day without adjustment
- Requires minimal gear; a reflector and diffuser costing under $25 total handle most situations
- Creates authentic environmental context impossible to replicate in a studio
- Teaches fundamental light-reading skills applicable to all lighting setups
Cons
- Dependent on weather and time of day; overcast and sunny conditions produce different results
- Unavailable at night; evening sessions require supplemental or fully artificial lighting
- Window orientation limits where you shoot; not every room delivers usable light
- High contrast between bright window and dark interior demands RAW files and post-processing
- Less controllable than artificial sources; repositioning your subject is the only real adjustment
Final Verdict
Natural light indoor photography is where most portrait photographers develop the foundational understanding of light everything else is built on. A single window, a reflector, and a subject placed at the right distance from the glass produces results rivaling expensive artificial setups. Often those results look more genuine. After 30-plus years of shooting, I still choose window light over studio strobes for most portrait work. The reason isn’t a lack of access to better gear; the light itself is simply better.
These indoor natural light photography tips require almost no equipment investment. A 5-in-1 reflector at under $20, a sheer curtain, and a foam core board from a craft store are the entire kit. What they require is time. Spend time observing how light moves through your space at different hours. Experiment with subject positioning. Study the relationship between window size, subject distance, and shadow quality. Those hours of observation pay dividends in every indoor session you shoot afterward.
Once you’ve produced images worth keeping, the next step is getting them off the screen. Moreover, window-lit portraits, with their soft tonal gradients, natural skin tones, and dimensional light, are among the most print-worthy images you’ll ever take. Acrylic prints in particular preserve the subtle tonal transitions of natural light photography with remarkable fidelity. Our Pictorem acrylic print review covers how their surface handles soft-toned images in detail. For photographers who prefer a more vivid, high-contrast look, our Pictorem metal print review covers the metal surface option. Metal prints deliver luminance and color depth making well-lit portraits genuinely striking on a wall.
Ready to Buy?
Print Your Best Natural Light Photos at Pictorem
Free shipping on all orders within continental North America. 30-day satisfaction guarantee on every print.
Frequently Asked Questions
What is the best window direction for natural light indoor photography?
North-facing windows are the best choice for natural light indoor photography. They receive no direct sunlight, producing soft, consistent, diffused light throughout the day. East-facing windows provide warm directional light in the morning, and west-facing windows deliver similar quality in the afternoon. South-facing windows are the most challenging because they receive direct sunlight for most of the day, though they perform well on overcast days.
How far should my subject be from the window for indoor natural light photography?
Position your subject 3 to 6 feet from the window for the best balance of illumination and light quality. Closer placement produces softer, brighter light with a more wrapping quality. Moving the subject farther from the window increases contrast and shadow falloff. This works well for dramatic portraits but less well for flattering even-toned work like newborn or maternity photography.
What are the best camera settings for indoor natural light photography?
Start with aperture-priority mode, f/1.8 to f/2.8 for portraits, and ISO 400 as your baseline. Raise ISO to 800 or 1600 as the room gets darker, and always shoot RAW to preserve white balance flexibility. Set your shutter speed to at least the reciprocal of your focal length for handheld shots. A Cloudy white balance preset (approximately 6,500K) adds warmth and avoids the camera’s auto white balance cooling down the scene.
How do I soften harsh window light indoors?
Hang a sheer white curtain or a white bedsheet over the window to diffuse direct sunlight into a large, soft source. Frost window film applied directly to the glass is a more permanent solution for dedicated shooting spaces. Both methods scatter incoming light and eliminate the hard shadows direct sunlight creates on a subject’s face.
Do I need a reflector for indoor natural light photography?
A reflector is the single most useful tool for indoor natural light photography and costs under $20. Position the reflector opposite the window on the shadow side of your subject. A white or silver surface bounces ambient light back into the shadows and reduces harsh contrast without adding any artificial light. A white foam core board from a craft store costs under $5 and performs comparably to a commercial white reflector surface.
What print formats work best for natural light portrait photos?
Acrylic prints are particularly well-suited for natural light portraits because the surface preserves subtle tonal gradients and the soft, luminous quality window light produces. Metal prints work well for images with higher contrast and more dramatic lighting. Canvas softens color slightly, which suits the warm, organic aesthetic of natural light work and complements environmental indoor portraits.
A quick heads-up: If you snag something through our affiliate links or check out our sponsored content, we might earn a commission at no extra cost to you. But fear not, we’re all about recommending stuff we’re truly stoked about!