

I’ve spent decades shooting in conditions that most photographers avoid. Over those years, I’ve worked with hundreds of photographers who share the same habit. They put the camera away the moment rain starts. I understand the instinct. Wet gear is expensive to repair, and the street feels uninviting when you’re soaked. Through years of field work and coaching photographers past their wet-weather reluctance, I’ve found one consistent pattern. The photographers who learn to work in rain produce their most interesting urban images there. Rain doesn’t make street photography harder. It makes it different in ways that tend to produce better results.
This isn’t a romantic notion. It’s a pattern I’ve seen repeat across decades of shooting and teaching. Saul Leiter was one of the most influential street photographers in the history of color photography. He built much of his signature body of work in the rain-soaked streets of Manhattan. He once said, “A window covered with raindrops interests me more than a photograph of a famous person.” That philosophy is the foundation of this guide. Ordinary weather transforms ordinary scenes into something worth stopping for. What follows is how to shoot street photography in the rain, stay dry enough to keep shooting, and protect your gear. The goal is to keep the speed and control that street work demands.
Quick Facts:
- Topic: Street photography in the rain, technique, settings, and gear
- Skill level: Beginner to intermediate street photographer
- Best focal lengths: 28mm, 35mm, or 50mm equivalent; commit before going out
- Shutter speed (freeze rain): 1/500s or faster
- Shutter speed (streak rain): 1/30s to 1/60s
- ISO range: 800 to 3200 depending on light and time of day
- Gear protection: Camera Canopy mounts to hot shoe, both hands stay free
- Camera Canopy price: $119 (original); $89 (Mini for mirrorless)
- Best for: Street, urban, travel, and documentary photographers
9 min read
In This Guide
- Why Rain Makes Street Photography Better
- Saul Leiter and the Case for Shooting in the Rain
- Camera Settings for Street Photography in the Rain
- Composition Techniques: Reflections, Umbrellas, and Light
- Protecting Your Gear Without Losing Your Shot
- Shooting From Inside: The Café Window Technique
- Pros and Cons of Rainy Day Street Photography
- Final Verdict
- Frequently Asked Questions
Why Rain Makes Street Photography Better

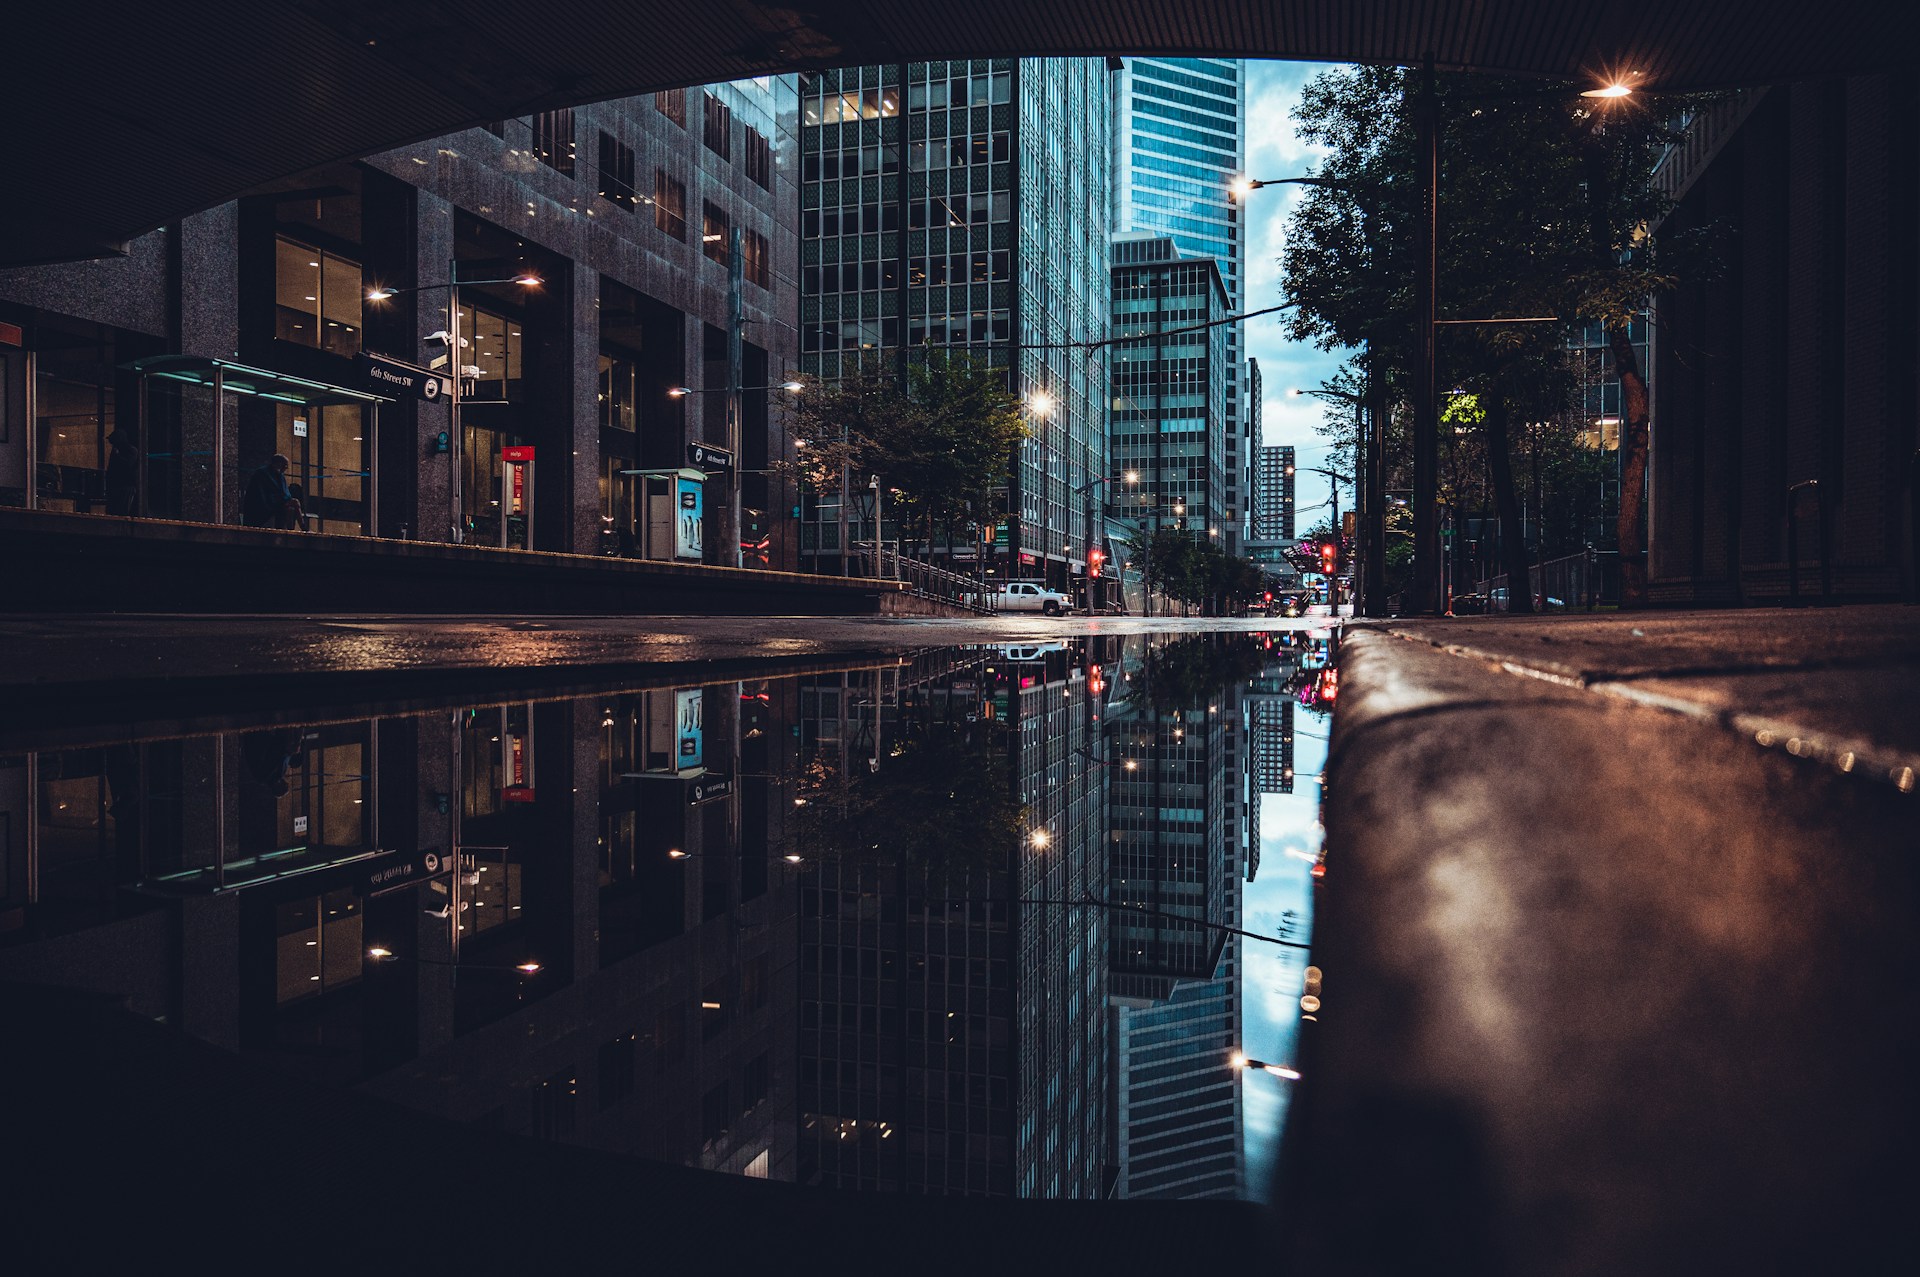
Rain changes the city in ways that benefit street photography specifically. Wet pavement turns every street into a mirror. Neon signs, shop windows, traffic lights, and headlights all reflect beneath every pedestrian’s feet. This secondary layer of reflected light is impossible to replicate in dry conditions. It adds depth to an image without any compositional effort on your part. You walk into it simply by being on the street.
Rain also changes human behavior in ways that create photographic opportunity. People rush, which creates motion and urgency in the frame. They cluster under awnings and doorways, which creates natural groupings and intimate proximity between strangers. They wrestle with umbrellas, look up at the sky, and move with a focused purpose that distracted fair-weather pedestrians don’t. These behavioral shifts create the kind of decisive-moment opportunities that Henri Cartier-Bresson spent his career chasing. Rain puts them in front of you without requiring you to manufacture them.
There is also a practical advantage to working in the rain that street photographers rarely discuss: you often have popular urban spots entirely to yourself. Busy tourist intersections, market streets, and scenic bridges that are crowded on dry days empty out when it rains. The photographs you make from those locations in wet weather often look nothing like the images that typically come from those spots. That alone is worth going out.
Ready to Buy?
Check Today’s Price on Camera Canopy
Made in the USA. Ships with rear tripod shield, lens cleaning cloth, and weather-resistant carry bag. Mount it, go shoot.
Saul Leiter and the Case for Shooting in the Rain
No conversation about street photography in the rain is complete without Saul Leiter. Born in Pittsburgh in 1923, Leiter moved to Manhattan in 1946. He spent the next several decades photographing the East Village. He became one of the earliest serious practitioners of color street photography. At the time, the fine art world largely dismissed color as an artistic medium.
Rain was central to Leiter’s vision, which is why his example remains so relevant to street photography in the rain today. He shot through rain-streaked windows, allowing condensation and droplets to soften and abstract the scenes beyond the glass. He photographed umbrellas as geometric shapes and obscured figures as compositional elements. Reflections in wet pavement became scenes in their own right. His approach was not documentary. It was painterly, influenced by his parallel career as an abstract expressionist painter.
What Leiter Teaches Street Photographers Today
Leiter’s work offers a set of practical permissions for photographers hesitant to shoot in the rain. The first is that rain itself is a subject, not merely a condition. Fogged glass, a rain-streaked window, the blur of drops across a shop front, all of these are images in their own right. The second permission is to embrace ambiguity. Leiter’s subjects are often partially obscured, their faces hidden by umbrellas or frosted glass. He saw this as an asset rather than a limitation. The photographer who waits for a clear, sharp, fully exposed subject in the rain is missing what the rain is offering.
Leiter shot with telephoto lenses, which is unusual for street photography. He used compression to flatten planes and layer reflections and subjects within a single frame. This technique, shooting through foreground elements toward a distant subject, works particularly well in rain. The foreground elements carry additional visual interest: water droplets, condensation, and reflected light. His quote, “I like it when one is not certain what one sees,” is practical instruction for rainy-day street work. Leave room for mystery.
Camera Settings for Street Photography in the Rain

Street photography in the rain requires specific settings adjustments from dry-condition street work. The changes are predictable, so you set them before going out rather than fumbling with dials mid-session when the light changes.
Shutter Speed
Shutter speed is the primary creative decision in rain photography. At 1/500s or faster, raindrops freeze into individual dots of light against a dark background. At 1/30s to 1/60s, drops blur into diagonal streaks that read unmistakably as rain and add motion to the frame. Both approaches work. The choice depends on your intent. If the rain itself is the subject, freeze it. If the scene it creates, the reflections, wet surfaces, and behavioral shifts, is the story, slower speeds serve better.
For most street photography in the rain, a shutter speed of 1/250s to 1/500s is a practical starting point. Fast enough to freeze subject movement, slow enough to capture some sense of atmospheric moisture without committing to full streak motion blur. Adjust from there based on the light and the story you’re after.
ISO and Aperture
Rainy urban environments at daytime typically require ISO 400 to 1600 depending on cloud density and shade. At night or under heavy overcast with limited artificial light, ISO 1600 to 3200 is often necessary. Modern mirrorless cameras from Sony, Fujifilm, and Nikon handle ISO 3200 without meaningful grain. Push the sensor as needed. Grain in street photography is rarely a problem anyway. It adds a quality that suits the genre.
For aperture, f/5.6 to f/8 gives you enough depth of field to capture a fast-moving street scene. You avoid the focus precision demands of f/1.4 or f/2. Street photography in the rain rewards fast response over precise focus control. A slightly stopped-down aperture provides the depth of field buffer that makes grab shots usable. In low light, open to f/2.8 or wider and rely on a higher ISO rather than slowing your shutter below 1/250s.
White Balance and Lens Choice
Set white balance manually to 4000K to 5000K for most rainy daylight conditions. Auto white balance handles mixed artificial-and-natural light poorly on overcast days, often producing color casts that require correction in post. A manual setting removes that variable entirely.
For lens choice, commit before going out. Changing lenses on the street in the rain introduces moisture risk at the sensor. A 28mm, 35mm, or 50mm equivalent prime lens is the right tool for most street photography in the rain. Of the three, 35mm is the most versatile. A 28mm works well for tight urban environments and forces close physical engagement with scenes. The 50mm gives slightly more separation and suits a Leiter-style layered approach. Pick one and leave the rest in the bag.
Composition Techniques: Reflections, Umbrellas, and Light
Rain generates compositional opportunities that don’t exist on dry days. Learning to see them transforms a wet session from an obstacle into an advantage.
Puddle Reflections
Puddles are the most discussed element of rainy street photography, and for good reason. A shallow puddle on a flat city sidewalk reflects the full scene above it with minimal distortion. To use it well, get low. A phone-height perspective or camera held at knee level captures the reflection cleanly. The frame fills with both the reflected scene and the real-world elements above. Look for puddles near strong light sources: neon signs, traffic signals, illuminated shopfronts. The brighter the light source, the stronger and more colorful the reflection.
Shoot into the reflection rather than across it. Position yourself so the puddle fills the foreground and the real-world elements, pedestrians, buildings, vehicles, occupy the background. The visual double, one world above and one below, is what makes the image.
Umbrellas as Compositional Elements
A crowd scene on a rainy day becomes a composition of circles and color when everyone has an umbrella open. Shoot from above, from a bridge or elevated stairway. The umbrellas create a geometric pattern that removes individual faces from the image entirely. This abstract approach produces images that hold up at scale and work well as fine art prints.
From street level, a single brightly colored umbrella against a grey, wet background creates instant visual separation. Follow it. Track the person carrying it through the scene and wait for the background to align. Look for a gap between buildings framing the umbrella, a shopfront reflection echoing it, or a second umbrella entering the frame from the opposite direction. The color contrast between the umbrella and the wet grey environment does compositional work for you.
Back Lighting Rain
Raindrops are invisible in most ambient light. They become visible, and striking, when lit from behind. Street lamps, car headlights, illuminated signs, and shopfront displays all work as backlight sources. Position yourself so the light source is behind your subject and the rain falls between the light and your lens. The drops catch the light as bright points and streaks. Ordinary urban rain becomes a visual effect that looks deliberate and cinematic.
Protecting Your Gear Without Losing Your Shot
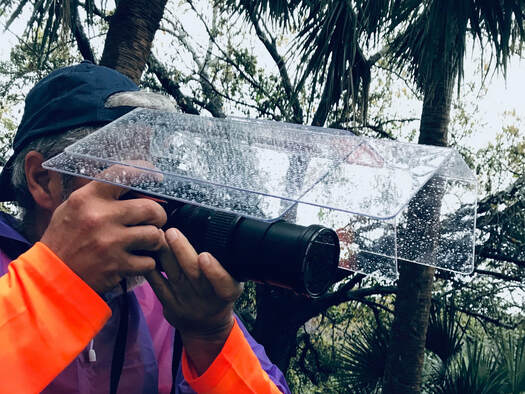
Street photographers face a protection problem that wildlife and landscape photographers don’t. In the field with a tripod, you have time to adjust and manage a fabric rain sleeve. On the street, you’re moving, reacting, and changing settings continuously. Any protection system that slows your hands costs you decisive moments.
The traditional street photography solution is to carry an umbrella. One hand holds the umbrella, one hand holds the camera. This works, and many excellent street photographers shoot this way. The limitation is that you lose one hand entirely. Focusing, zooming, changing settings, and steadying the camera all happen with one hand, which affects image stability and slows everything down. In crowded urban conditions, managing both an umbrella and a camera through a rush of pedestrians is physically demanding.
A rigid hot-shoe mounted rain shield solves this differently. The original Camera Canopy rain shield mounts to the hot shoe and extends a clear acrylic canopy over the body and lens. Both hands stay on the camera. Every dial, button, and focus control remains directly accessible throughout the session. For street photography in the rain, changing ISO, exposure compensation, or AF mode while tracking a moving subject is often necessary. This distinction matters.
The transparent canopy doesn’t block the viewfinder or LCD. It doesn’t interfere with autofocus performance either, since clear acrylic doesn’t impede the AF system. Mirrorless street shooters using compact bodies like the Fujifilm X100VI, Sony ZV-E1, or Ricoh GR IIIx will find the Mini Camera Canopy for mirrorless a better fit. It provides the same hands-free protection at $89 versus $119 for the original, in a lighter format suited to compact street kits. You can also get the Camera Canopy for Mobile if you’re a smartphone shooter!
Buy Direct From Camera Canopy
Both Hands on the Camera. Always.
The Camera Canopy mounts to your hot shoe and gives you hands-free rain protection. No umbrella juggling. No one-handed shooting. Full control, all day.
Shooting From Inside: The Café Window Technique

When the rain is heavy enough to make outdoor shooting impractical, move inside. A café, bar, or covered market near a busy pedestrian area gives you shelter and a warm drink. The window becomes one of the most interesting compositional tools in street photography.
Shooting through glass adds a layer of texture to the image. Rain on the outside of the window creates patterns and streaks across the frame. Condensation from the warm interior fogs the glass, softening whatever lies beyond it. Reflections from lights inside the café overlay the street scene outside. This creates the kind of layered, ambiguous image that Leiter spent his career pursuing. These are not compromised outdoor images. They are a distinct category of street photograph with their own visual logic and appeal.
Technical Setup for Window Shooting
To shoot cleanly through glass, press the lens close to or against the window surface. This eliminates internal reflections from the room behind you. If the glass is too dirty or thick to press against, position yourself at an angle. A slight shift in your position moves the interior reflections out of frame. A lens hood helps. Use a wider aperture to separate the subject from the glass texture. The rain patterns on the window then become an out-of-focus atmospheric element rather than a competing subject.
At night, or when interior light is stronger than the exterior scene, interior reflections dominate the glass. Embrace this rather than fighting it. The person at the window table reflected in the glass against a rainy street backdrop is a Leiter image waiting to happen. Expose for the exterior scene and let the interior reflection fall where it lands.
Pros and Cons of Rainy Day Street Photography
Pros
- Wet pavement creates a natural secondary light source through reflection with no additional equipment
- Rain drives most photographers indoors, leaving popular urban locations available for unobstructed shooting
- Human behavior in rain, rushing, clustering, fighting umbrellas, creates natural decisive-moment opportunities
- Overcast light diffuses harsh shadows and produces flattering, even illumination on faces in the crowd
- Umbrellas add color, shape, and geometric interest to otherwise flat crowd scenes
- Café window shooting provides shelter while producing images unavailable in dry weather
Cons
- Camera gear requires dedicated rain protection to avoid moisture damage at lens mount, battery door, and card slot
- Low light in heavy rain conditions pushes ISO high, which introduces grain even on modern sensors
- Lens changes are impractical in rain; you commit to one focal length for the session
- Carrying an umbrella for personal shelter removes one hand from the camera, slowing response to fast moments
- Very heavy rain or driving wind reduces visibility and makes sustained outdoor shooting physically uncomfortable
Final Verdict
Street photography in the rain rewards photographers who prepare properly and punishes those who don’t. The preparation is straightforward. Set your ISO, shutter speed, and white balance before leaving. Commit to one lens. Sort out how you’ll protect the camera. Then go out and let the city do what it does in the rain.
The images available on a wet city street are genuinely different from those available on a dry one. Saul Leiter understood this from the start of his career and spent decades proving it in the East Village. The reflections, the behavioral energy, the umbrellas, the moody overcast light: these are all gifts the rain delivers. Popular locations that are usually crowded often empty out as well. No additional creative effort is required beyond the decision to show up.
For gear protection, the choice between an umbrella and a hot-shoe rain shield comes down to one question: are you willing to give up a hand? Street photography is a two-handed discipline. Losing one for umbrella management costs you shutter speed, stability, and the ability to adjust settings mid-sequence. Having a Camera Canopy keeps both hands on the camera changes what you’re able to capture, especially in the fast-moving environment of the urban street.
Mirrorless street shooters with compact bodies should start with the Mini Camera Canopy at $89. DSLRs and mirrorless systems with longer standard zoom lenses are well covered by the original Camera Canopy at $119. Both ship with the rear tripod shield and carry bag included. Neither requires tools or a setup process. Mount it to the hot shoe and go.
Mirrorless Street Shooter?
The Mini Camera Canopy Is Built for Your Kit
Lighter, more compact, and purpose-designed for mirrorless cameras. Same hot-shoe mount. Same full control access. At $89 plus shipping.
Frequently Asked Questions
Is rain good for street photography?
Rain is excellent for street photography. Wet pavement creates reflections that act as a secondary light source. Rain changes pedestrian behavior in ways that produce natural decisive-moment opportunities. Umbrellas add color to otherwise flat crowd scenes. Popular urban locations also empty out, leaving spots available that are crowded on dry days. Photographers who consistently produce the most interesting urban images shoot in all weather. Rain sessions frequently yield their standout results.
What camera settings should I use for street photography in the rain?
For most street photography in the rain, start at ISO 800 to 1600, shutter 1/250s to 1/500s, and aperture f/5.6 to f/8. A shutter speed of 1/500s or faster freezes raindrops; 1/30s to 1/60s blurs them into streaks. Set white balance manually to 4000K to 5000K to avoid color casts from mixed overcast and artificial light. At night, push ISO to 1600 to 3200 and open to f/2.8 or wider before slowing the shutter.
How do I protect my camera for street photography in the rain?
The most practical rain protection for street photography is a hot-shoe mounted rigid canopy like the Camera Canopy. It leaves both hands free to operate the camera naturally. An umbrella works but removes one hand from the camera entirely, slowing your response to fast-moving scenes. Plastic rain sleeves block access to controls and obscure the viewfinder. For mirrorless street shooters, the Mini Camera Canopy provides the same hands-free protection in a compact format suited to smaller bodies like the Fujifilm X100VI, Sony ZV-E1, or Ricoh GR IIIx.
What is the best lens for street photography in the rain?
A 35mm equivalent prime is the best all-around lens for street photography in the rain. It’s wide enough to capture environmental context around a subject and long enough to stay out of the personal space of strangers. A 28mm equivalent works well in tight, compact urban environments and forces a more physically engaged, immersive shooting style. A 50mm suits a more layered, Leiter-style compositional approach. Commit to your choice before going out, lens changes on the street in rain introduce moisture risk at the sensor.
How do I photograph puddle reflections in street photography?
Get low. A camera held at knee level or pressed toward the ground captures a puddle reflection cleanly. It fills the frame with both the reflection and the scene above it simultaneously. Look for puddles near strong light sources, neon signs, traffic signals, illuminated storefronts, because brighter sources produce stronger and more colorful reflections. Shoot into the puddle so the reflection fills the foreground, with real-world elements occupying the background. Early morning and evening are the most productive windows for puddle reflection work. Wet surfaces retain their reflective quality for hours after rain stops.
Who was Saul Leiter and why is he associated with rain photography?
Saul Leiter (1923–2013) was an American photographer and early pioneer of color street photography, based in New York City. He is associated with rain photography because rain, snow, fogged glass, and wet surfaces were central to his compositional approach. Leiter frequently shot through rain-streaked windows and photographed umbrellas as geometric shapes. He used reflections and condensation to create abstracted, painterly images of the Manhattan streets. His most quoted line on the subject: “A window covered with raindrops interests me more than a photograph of a famous person.” It summarizes his approach to weather as a creative asset rather than a shooting obstacle.
Can I shoot street photography in the rain without a weather-sealed camera?
Yes, with dedicated rain protection. A non-sealed camera under a Camera Canopy in moderate rain faces less water exposure than a weather-sealed camera shooting unprotected in the same conditions. The canopy keeps overhead rain away from the top of the body, the hot shoe area, and the lens. In heavy or driving rain, a weather-sealed body paired with dedicated protection is the more reliable combination. For most street photography conditions, however, the protection matters more than the sealing rating.
Friendly disclaimer: Our articles may contain affiliate links that support us without costing you more, and sometimes we spice things up with sponsored content—but only for products we truly stand behind!