

A four-pound mirrorless body bouncing off your sternum on a switchback is no fun. Neither is realizing your shoulder bag walked away in a market while you were composing a sunset.
So how do you carry your camera while hiking, scrambling, or traveling without losing it to theft, fatigue, or a bad fall? It takes more than passive hope and a basic neck strap.
This guide on how to carry a camera while hiking walks you through the carry methods working photographers use to prevent theft, eliminate strap slippage, and pull a body up to the eye in under two seconds. Plus, I’ll share what shifted my own carry system after close to a decade on a Peak Design Slide. For the field tests, I used a Canon EOS R6 Mark II and a Canon AE-1 film body.
Table of Contents
- How to Carry a Camera While Hiking: Why Your Strap Matters
- Theft Prevention Tactics
- Anti-Slip Hiking Camera Strap Design
- Quick-Release Mechanics
- Cross-Body Setups
- Why I Switched From Peak Design
- Field Test: Mirrorless and Film
- The Best Way to Carry a Camera While Hiking
- Buyer’s Checklist
- FAQ
How to Carry a Camera While Hiking: Why Your Strap Is Underrated Safety Gear
Most photographers spend hours researching weather sealing, ND filters, and tripod heads. Then they grab whichever strap shipped in the box.
However, your strap is the single piece of equipment connecting you to a four-figure body and lens for 10 to 12 hours per day on a trip. It deserves the same scrutiny.
A great strap has three jobs in the field. First, it keeps the camera tight against your torso while you walk, scramble, or duck under branches. Second, it releases the body in under two seconds when a shot appears. Finally, it makes your kit a harder target for anyone scanning a crowd for an easy grab.
Miss any of the three and you end up with bruised ribs, lost moments, or a missing camera. For environmental hazards on the trail, see our rain and snow protection guide. This article focuses on carry mechanics.
Theft Prevention Tactics Most Travel Photographers Miss
Camera theft concentrates in tourist hubs. According to Photography Life’s gear safety guide, repeat hotspots include cities like Barcelona, Rome, and Paris. Although the risk is real, it is also predictable, and you control most of it.
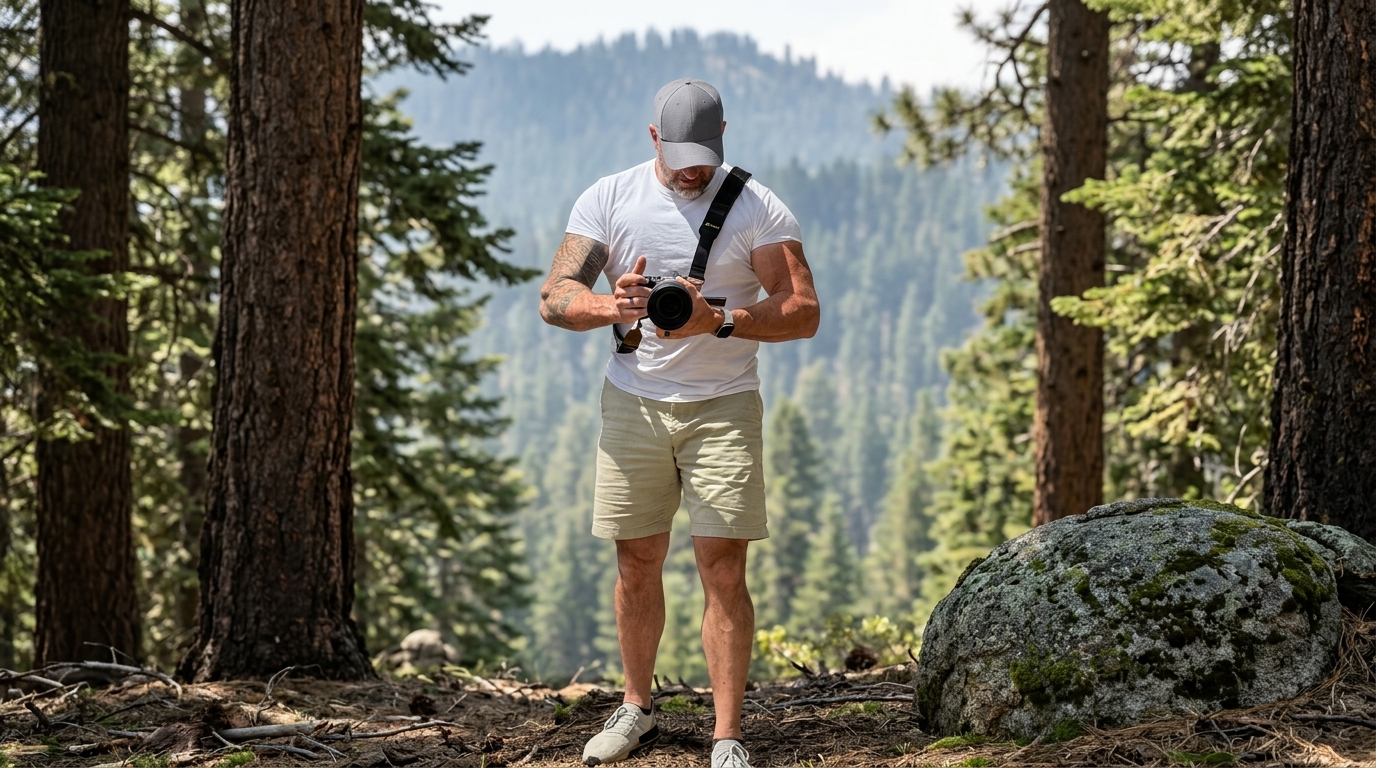
First, wear your strap cross-body, never around the neck or on a single shoulder. A neck strap snaps with one tug. Likewise, a single-shoulder sling slides off when bumped. By contrast, a cross-body strap forces a thief to either lift it over your head or cut the webbing. Neither happens quickly.
Next, cover camera branding when you are not shooting. The white “Canon” logo screams expensive. For example, a small piece of black gaffer tape over the model name reduces visual signal. Similarly, some photographers wrap the lens hood for the same reason.
Also, choose a strap with a one-handed quick-release. Then you pull the camera into a backpack in two seconds when something feels off.
Finally, walk with your shooting hand on the body in dense crowds. Additionally, keep the lens cap on between shots so an opportunist sees a cheap-looking, lens-down profile rather than a long telephoto.
Anti-Slip Design: What to Look for in a Hiking Camera Strap

The biggest failure point of a hiking camera strap is shoulder slip. As you sweat through a t-shirt or layer up a rain shell, smooth nylon webbing slides off your shoulder every five minutes. As a result, you spend the day re-seating it instead of shooting.
Two anti-slip features matter. The first is a textured shoulder pad. Specifically, silicone with raised dots or paw prints grips fabric in both directions.
For instance, the LemurStrap uses raised silicone “lemur paws” on the body-contact side of its 2-inch shoulder pad. As a result, the strap holds in place on a shirt or jacket without constant adjustment.
The second is a contoured pad shape. Flat strips of nylon are the cheapest option and the worst for hiking. By contrast, a wide pad with a slight curve sits flatter against your trapezius and reduces hot spots over a 12-mile day.
In addition, width matters more than padding thickness. For example, a 2-inch pad spreads the load of an R6 Mark II with a 70-200 f/2.8 across enough surface area to stay comfortable for hours. Meanwhile, a 1-inch nylon strap concentrates the same weight onto a single ridge and bruises your trap by lunch.
Quick-Release Mechanics: Two Seconds From Carry to Shot
If pulling your camera up to your eye takes more than two seconds, you miss shots. Every backcountry photographer has a story about a fox, an eagle, or a sudden break in the clouds. In each case, the difference between a keeper and an empty card was a fumbled clasp.
Quick-release systems break into two categories. Friction-based systems let the strap slide through a buckle or pad as you raise the camera. By contrast, pin-locking systems hold the body in place until you press a release.
Both work. However, pin-lock is far better for hiking. On a friction strap, downhill grades or quick lateral moves drift the camera along the webbing. As a result, the body sits at your hip instead of your sternum within an hour.
By contrast, a pin-lock keeps the body fixed at a chosen height until you press to release. For example, the LemurStrap uses a locking cam buckle on the shoulder pad to fix camera height. Additionally, a separate quick-release pin on the baseplate detaches the body for tripod work in seconds.
Cross-Body Setups for Long Days on Foot
Cross-body wear is the standard answer to how to carry a camera while hiking long distances. A diagonal sling distributes weight from one shoulder across your back to the opposite hip. As a result, your spine loads more evenly and the single-shoulder burn fades over hours of walking.
For example, sling strap ergonomic breakdowns use the same biomechanical reasoning hiking-pack manufacturers apply to load distribution.
For a true cross-body fit, three specs matter. First, adjustable length should span roughly 45 to 55 inches for average builds and 45 to 62 inches for taller frames. For instance, the LemurStrap ships in regular and long sizes, fitting people from 5’3″ to 6’7″.
Second, the baseplate should mount to the bottom of your camera through a standard 1/4-20 tripod thread. As a result, the connection point sits at the heaviest part of the body. Additionally, the rear LCD turns away from belt buckles and zipper teeth.
Third, the plate should be Arca-Swiss compatible. Then you drop the camera straight onto a tripod head without removing the strap. Notably, heads from Leofoto, Peak Design, Promaster, Benro, K&F Concept, and 3 Legged Thing accept Arca-Swiss plates as a near-universal standard.
Ready to Upgrade Your Carry System?
The LemurStrap ships free over $150, includes a T-25 wrench in the shoulder pad, and comes with a 30-day money-back guarantee. Worn cross-body, locked tight, ready to shoot in two seconds.
Why I Switched From Peak Design After a Decade
For close to a decade, I shot with a Peak Design Slide and recommended it to every reader who asked. At the time, I had no compelling reason to switch.
Then I tried the LemurStrap on my Canon EOS R6 Mark II with the RF 28-70mm f/2L attached. Three months in, it has not come off the camera. For more on the daily carry experience, see my full one-month Lemur Strap review. Here is the short version.
First, the locking cam buckle keeps the body pinned to my sternum. For example, on a six-hour shoot in Big Bear last month, I walked roughly nine miles across mixed terrain and never re-seated the strap once. By contrast, my old Slide had me repositioning every 20 minutes.
Second, the quick-release pin on the baseplate gets the body onto a tripod in under three seconds. As a result, no anchor clips need detaching and no D-rings need threading.
Third, the screen-up carry orientation has reduced wear on my rear LCD. The camera now flips so the screen faces away from your hip hardware.
Founder Jim, a Boulder-based contractor and inventor, co-developed the strap with conservation photographer Andy Mann over a five-year field-testing period. The small touches show it. For instance, leather end caps, a 50-pound load rating, and a hidden T-25 hex wrench tucked under the shoulder pad.
Field Test: Modern Mirrorless and Vintage Film
Modern mirrorless bodies weigh more than first-time buyers expect. Specifically, a Canon EOS R6 Mark II body is 1.49 pounds. Then the RF 28-70mm f/2L adds 3.06 pounds. Together, 4.55 pounds hangs off your shoulder for the duration of a hike.
Over a 10-mile day with this combo on the LemurStrap, two things stood out. First, the silicone paws on the shoulder pad meant zero mid-hike adjustments. Second, the Arca-Swiss baseplate let me move onto my Leofoto travel tripod for a Big Bear sunset shot in under five seconds. By contrast, my old strap-and-anchor workflow took 30 seconds and a tangled mess.
For travel, the cross-body fit is what sold me. While walking a market in San Diego or a trail in Idyllwild, the camera stays tucked against my hip. As a result, it does not swing into door frames, chairs, or my arms.
Additionally, people notice the camera less because it sits closer to your body. This is what you want when crowd density goes up.
I also run my Canon AE-1 film body on the same baseplate. Notably, the AE-1 weighs 1.30 pounds without film, and its tripod thread is a standard 1/4-20. As a result, the plate fits as cleanly as on the R6 Mark II.
For shooters who use film on weekends and digital on weekdays, a single baseplate swapping between bodies in five seconds saves time. Additionally, it trains your hands to one carry pattern.
The Best Way to Carry a Camera While Hiking: Field Rules
Whether you are shooting waterfalls in the Sierras or wandering a market in Marrakech, four rules cover the best way to carry your camera while hiking.
First, tighten your strap to mid-sternum or higher in technical terrain. Second, tuck the webbing under your backpack hip belt if you use both. Otherwise, it rides over the pack and shifts the camera with every cinch.
Third, keep a microfiber cloth under the shoulder pad for fast lens wipes. Fourth, run leather or paracord through any D-ring as a backup tether. Even with a robust baseplate, redundancy matters for $3,000 of glass over a creek bed.
For longer trips, pair the strap with a proper travel pack like the Peak Design Everyday Backpack V2.
Buyer’s Checklist Before You Spend
Before buying any travel strap, confirm five details on the product page.
First, maximum supported weight should be at least double your kit weight for a margin of safety. Second, strap length range needs to fit your torso. Third, Arca-Swiss baseplate compatibility is non-negotiable for landscape and travel work.
Fourth, an onboard installation tool keeps you self-sufficient in the field. Fifth, a real warranty signals the brand stands behind the build.
For reference, the LemurStrap retails for $119.95 in bronze or black. It also meets all five with a 50-pound load rating, regular and long sizes for 5’3″ to 6’7″, an Arca-Swiss baseplate, a hidden T-25 hex wrench, a 30-day money-back guarantee, and a 90-day defect warranty.
Additionally, Lemur partners with Mikajy Natiora, a Madagascar-based conservation organization. According to the Lemur Conservation Network, 98% of lemur species are at risk of extinction and 31% are critically endangered. As a result, a portion of your purchase supports the species the strap is named after.
Try the LemurStrap Risk-Free
30-day money-back guarantee. 90-day defect warranty. Fits 5’3″ to 6’7″ bodies. Compatible with every modern mirrorless, DSLR, and most film bodies through a 1/4-20 mount.
FAQ
What is the best way to carry a camera while hiking?
The best way to carry a camera while hiking is a cross-body sling strap with an anti-slip shoulder pad and a quick-release baseplate that locks the body to your sternum. This combination prevents swing, eliminates shoulder slip, and lets you pull the camera up in under two seconds when a shot appears.
Is a sling strap safer than a neck strap for travel?
Yes. A cross-body sling distributes the camera’s weight across your torso. Additionally, it forces a thief to either lift the strap over your head or cut the webbing. By contrast, a neck strap also poses a documented safety risk in falls. It puts pressure on your cervical spine if you go down with the camera attached.
Will the LemurStrap fit my older film camera?
If your film body has a 1/4-20 tripod thread on its base, yes. For example, I run my Canon AE-1 on the same baseplate I use with my Canon EOS R6 Mark II. As a result, it swaps between bodies in seconds.
What is the fastest way to detach my camera for a tripod shot?
An Arca-Swiss baseplate paired with a quick-release pin is the fastest setup. First, press the pin. Then slide the camera off the strap webbing. Finally, drop it into the tripod head jaws. Total time is about three seconds.
How heavy a camera will the LemurStrap support?
Lemur load-tests every component to 50 pounds. For example, a heavy pro body with a 70-200 f/2.8 weighs roughly 5 pounds, well within the design margin. As a result, you will run out of shoulder before the strap runs out of capacity.