

Quick Facts: What Truly Improves Landscape Photos
- Gear isn’t the bottleneck. Entry-level cameras handle 12 to 15 stops of dynamic range, more than enough for any landscape scene.
- Foreground is the #1 fix. A strong foreground element adds depth, scale, and a visual entry point in seconds.
- Layered composition wins. Foreground, midground, and background together turn a flat frame into a 3D feel.
- Light direction beats time of day. Side light creates texture, backlight adds drama, and midday overhead light flattens everything.
- Patience separates pros from amateurs. The best moment often lasts seconds, and most people leave before it arrives.
- Print your best work. A physical print reveals flaws no screen will show and speeds up your growth as a photographer.
- Best for: beginner and intermediate shooters who want better landscape photos without buying new gear.
9 min read
In This Article
- Why Your Gear Probably Isn’t the Problem
- Foreground: The Missing Piece in Most Photos
- Layers: Adding Depth to a Flat Medium
- Light: The Real Difference Maker
- Composition: Guiding the Viewer’s Eye
- Patience: The Most Underrated Skill
- Why Beginners Blame Gear
- What Gear Does Matter For
- How to Improve Starting Today
- What Improves Your Photos vs. What Won’t
- Print Your Best Work
- Frequently Asked Questions
- Final Thoughts: The Real Secret
You’ve stood in front of an incredible landscape. Towering mountains. A glowing sunset. Waves crashing along the coast. You raise your camera, press the shutter, and look at the screen.
The shot looks flat. Lifeless. Nothing like the scene in front of you.
If this sounds familiar, you’re not the only one. It’s one of the most common frustrations in photography, and most people blame the wrong thing first. They blame their gear.
They think a better camera will fix it. Or sharper glass. Or a wider lens. Then everything falls into place.
After more than 20 years of shooting landscapes, here’s what I’ve learned: better landscape photos have little to do with your gear. Once you understand what truly matters, your photography improves faster than you expect. Let’s break it down.
Why Your Gear Probably Isn’t the Problem

Modern cameras, even entry-level bodies, are surprisingly capable. Most are built to capture high-resolution images, handle wide dynamic range far better than older models, and produce sharp results with mid-range lenses.
Your camera is almost never the problem. Instead, what holds most photographers back comes down to five things:
- Foreground
- Layers
- Light
- Composition
- Patience
These are the fundamentals. They separate average photos from compelling ones. Better yet, you start improving all five today without spending a dollar.
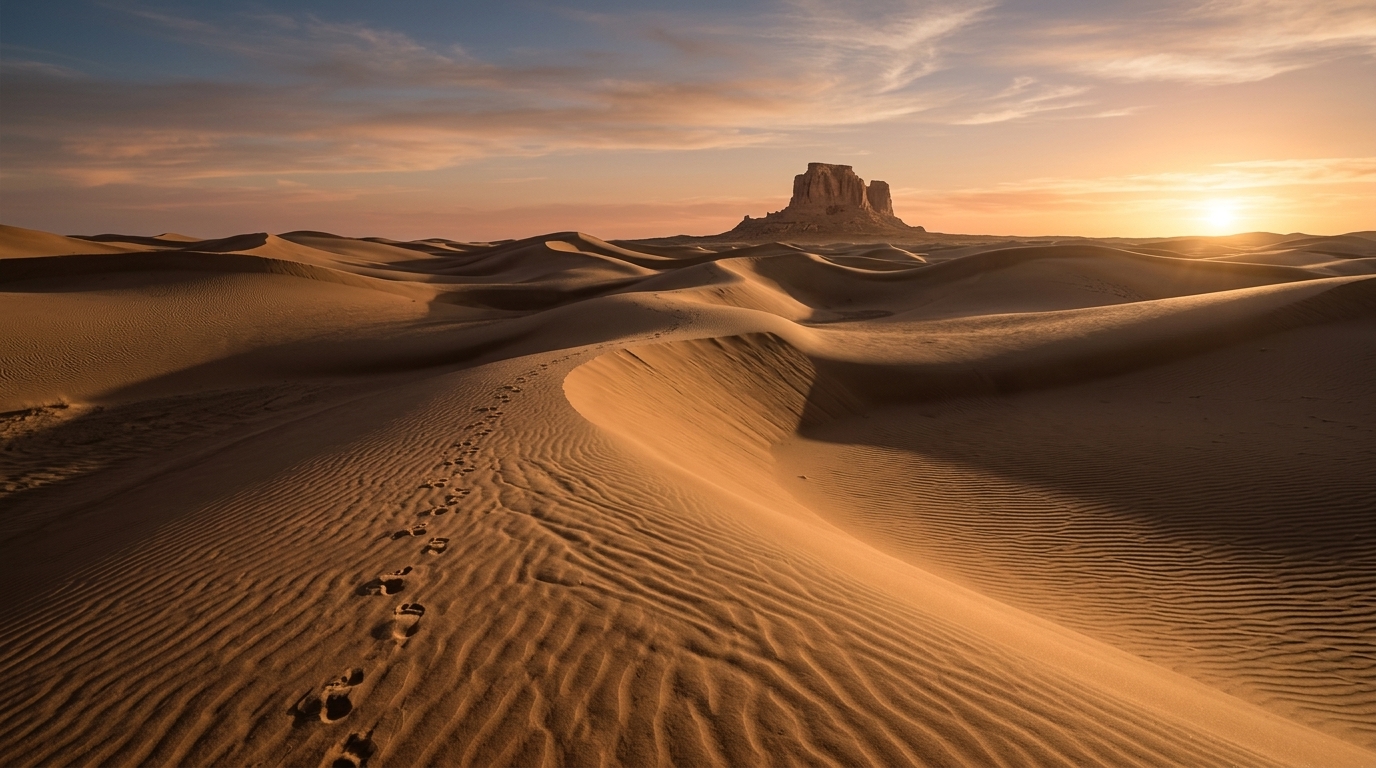
1. Foreground: The Missing Piece in Most Photos
One of the biggest mistakes beginners make is shooting landscapes with no strong foreground. They point at the mountains, sky, or ocean, press the shutter, and end up with a flat, distant image. Nothing pulls the viewer into the frame.
Why Foreground Matters
A foreground element gives your photo depth, scale, and a visual starting point. It hands the viewer something to connect with the moment they look at the image.
What Counts as Foreground?
It doesn’t need to be dramatic. Look for rocks, wildflowers, driftwood, trails, or water reflections. Even something simple like textured ground or leading lines in sand will improve your shot. PhotographyTalk has a full breakdown on how foreground interest transforms your shots if you want to study examples.
Pro Tip
When you arrive at a location, don’t immediately raise your camera. Instead, take a few minutes to walk the area and find your foreground first. Often, your foreground matters more than the distant scene.
2. Layers: Adding Depth to a Flat Medium

A photograph is flat by nature. Your job is to make it feel three-dimensional, and layers do the work.
The Three Essential Layers
Build every shot in three parts. First, the foreground, which is what’s closest to you. Second, the midground, which is the middle area of the frame. Third, the background, which holds the distant elements. When the three combine, your image gains depth and realism.
Why This Works
The human eye processes depth in layers. When your photo presents the same depth your eye sees, it feels more immersive. Instead of looking at a photo, the viewer feels like they’re stepping into one. PhotographyTalk’s guide on how to create depth in landscape photos goes deeper into this technique.
A Quick Example
Picture this composition: a rock or patch of wildflowers in the foreground, a row of trees in the midground, and mountains glowing at sunset in the background. Each element on its own is simple. Together, they build a powerful image.
3. Light: The Real Difference Maker

If one factor shapes your landscape photos more than anything else, it’s light. Not your camera. Not your lens. Light.
Golden Hour Helps, but It’s Not the Whole Story
Sunrise and sunset are excellent shooting windows because the light is softer, warmer, and lower in contrast than midday. PhotographyTalk has a strong walkthrough on golden hour photography if you want the full breakdown. The bigger lesson, however, is how light interacts with your scene, regardless of when you shoot.
Types of Light to Watch For
Side light creates texture and depth, pulling out details in terrain you’d otherwise miss. Backlight adds drama and mood, and it works beautifully with haze, fog, or water. Front light is useful in some cases, yet it often produces flat results. Overhead light at midday is typically harsh, so it flattens your image and produces unflattering shadows.
What to Pay Attention To
Watch the direction of light, the quality (soft or harsh), and the color temperature. Sometimes shifting your position by a few feet will completely change how light shapes your scene.
4. Composition: Guiding the Viewer’s Eye
Strong composition turns a snapshot into a photograph, and it’s not only about the rule of thirds.
Think Beyond the Basics
Good composition answers two questions. First, where does the viewer’s eye go first? Second, where does it go next? PhotographyTalk’s guide on mastering leading lines in photography breaks down how to control eye flow with intention.
Key Techniques to Use
Leading lines guide the viewer into the frame, so roads, rivers, fences, and trails work well. Framing uses natural elements like trees, rock formations, and arches to surround your subject. Balance avoids clutter or uneven weight in the image. Above all, simplicity often wins, because less in the frame means more impact in the shot.
The Goal
Your composition should feel intentional. If the viewer’s eye gets lost or distracted, simplify. Strip the frame down until the photo says one clear thing.
5. Patience: The Most Underrated Skill in Landscape Photography
This is where most photographers fall short. They show up, fire off a few frames, and leave. Landscape photography doesn’t reward that approach.
Why Patience Matters
Light shifts. Clouds move. Shadows change. Often, the best moment lasts only seconds.
What Patience Looks Like
Sometimes you wait for clouds to drift into position. Other times you stay after sunset for richer color, or you watch how light evolves over several minutes. You might wait 10 minutes. You might wait an hour. When the moment hits, you have your shot. PhotographyTalk lays out more on this in their important lessons for landscape photographers.
See Your Work in Print
Turn Your Best Frame Into Fine Art
Pictorem prints on canvas, acrylic, metal, and gallery papers with pigment inks rated to last for decades. Free shipping in the US and Canada.
Why Beginners Blame Gear (and Why It Backfires)
Blaming gear is easy. It feels like a quick fix. Buy the new body, buy the better lens, and the problem goes away. It doesn’t.
Upgrading your gear without improving your fundamentals gives you better-quality average photos, not better photos. Those are two different things. A skilled photographer with basic gear will outperform an inexperienced photographer with expensive gear every time.
What Gear Does Matter For
Gear isn’t irrelevant. It’s simply not the starting point. Where gear helps is low-light performance, extreme dynamic range scenes, and specialized lenses such as ultra-wide or telephoto.
Even then, gear enhances a strong image. It does not create one. The composition, light, and decisions you bring to the shoot are what build the photo. The camera only records it.
How to Improve Your Landscape Photos Starting Today
If you want to improve fast, focus on the following five steps.
1. Slow Down
Don’t rush your shots. Instead, take time to observe the scene before you raise the camera.
2. Scout Your Composition First
Before you touch the camera, find your foreground, build your layers, and visualize your final shot.
3. Watch the Light
Pay attention to how it changes. Move with it. Work with it.
4. Shoot Less, Think More
Instead of taking 50 random frames, take 5 intentional ones.
5. Practice With What You Own
You don’t need new gear to get better. Instead, you need better decisions in front of the scene.
What Improves Your Photos vs. What Won’t
What Improves Your Photos
- A strong foreground element for depth and scale
- Layered composition across foreground, midground, and background
- Directional light such as side light and backlight
- Intentional composition with leading lines and framing
- Patience to wait for the right moment
- Printing your best work to study it closely
What Won’t Fix a Flat Photo
- A newer camera body on its own
- Sharper glass without better composition
- More megapixels than the scene needs
- A wider lens used as a shortcut
- Firing off 50 frames and hoping
Print Your Best Work: The Step Most Photographers Skip
Once you’ve captured your amazing shot, the next step is to get it off your hard drive and onto a wall. Holding a print in your hands changes how you see your own work.
A print is a learning tool. It shows you details your screen hides, and it surfaces flaws in composition, exposure, and color you’d otherwise miss. A print also brings you back to the moment you took the photo and reminds you of who you’re becoming as a photographer.
For high-end fine art prints on canvas, acrylic, metal, and gallery papers, head to Pictorem.com. Pictorem prints with pigment ink on premium fine art canvas built to gallery and museum longevity standards, with color stability rated for decades. Free shipping in the US and Canada comes with a 30-day quality guarantee. If you’re serious about your work, getting your best frame printed at this level changes how you see your own photography.
Ready to Print?
Order Your First Gallery-Grade Print
Pictorem backs every order with a 30-day quality guarantee and decade-rated color stability, so your best landscape looks gallery-ready on the wall.
For more on why prints matter, PhotographyTalk has a useful piece on how printing your photos strengthens your photography skills.
Frequently Asked Questions
Do you need an expensive camera for better landscape photos?
No. Entry-level cameras already handle 12 to 15 stops of dynamic range, which is enough for almost any landscape scene. Better landscape photos come from composition, light, and patience, not from a pricier body.
What is the most important factor in a landscape photo?
Light matters more than any other single factor. Side light builds texture, while backlight adds mood and drama. The direction and quality of light shape your scene far more than the time on the clock.
How do you add depth to a flat landscape photo?
Build the frame in three layers. Place a clear foreground element up close, a midground in the middle, and a background in the distance. This layered composition gives a two-dimensional photo a three-dimensional feel.
What time of day is best for landscape photography?
Sunrise and sunset give you soft, warm, low-contrast light that flatters most scenes. Still, light direction matters more than the hour, so a well-placed side light at other times often beats a flat golden-hour frame.
Why should you print your landscape photos?
A print reveals flaws in composition, exposure, and color that a screen hides. It also pushes your growth as a photographer. Services such as Pictorem turn your best frame into gallery-grade fine art for the wall.
Final Thoughts: The Real Secret
The secret to better landscape photos isn’t hidden behind expensive gear, and it isn’t reserved for professionals. It comes down to thoughtful composition, intentional use of light, strong foreground elements, layered scenes, and patience. Master those, and your photos improve dramatically.
If you want to keep growing, head to PhotographyTalk’s full landscape photography guide. You’ll find in-depth tutorials, gear reviews, and real-world advice to put to work on your next shoot.
One more thing. The next time you’re out shooting, don’t ask yourself whether you need better gear. Instead, ask how to make this scene more interesting. That’s where the real growth happens.